1
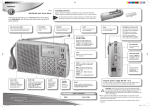
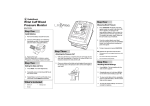
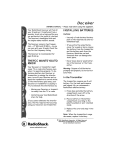
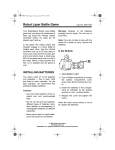
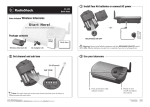
43-124
900Mhz Wireless Intercoms
Thank you for purchasing the 900Mhz Wireless Intercoms
from RadioShack. With a line of site of up to 200 feet,
you can use your new intercoms in large areas. You can
also connect auxillary audio sources and weather radio
(neither included).
VOX
For hands-free communication, press
VOX until the VOX level indicator lights
to communicate through the intercom
hands-free. Repeatedly press VOX
to set the sensitivity level, from low,
medium, to high.
VOX function turns off when VOX level
indicator turns off.
In VOX mode, there is a short
delay between when you
NOTE
start talking and intercom
transmission.
RECEIVE BUSY
Lights when
you receive a
voice message
or when you
monitor a locked
intercom. Flashes
when channel is
in use.
using ac adaptor
Insert the AC adapter into the DC 9V jack and a standard
AC outlet to power your intercom and/or charge
batteries.
• You must use a Class 2 power source that
supplies regulated 9V DC and delivers at
least 350 mA. Its center tip must be set to
NOTES
positive and its plug must fit the intercom’s
DC 9V jack. Using an adapter that does not
meet these specifications could damage the
intercoms or the adapter.
• The correct orientation for this power unit is
in a vertical or floor mount position.
LOCK
To monitor continuously, press until the
TRANSMIT indicator flashes. Press TALK to
unlock.
When an intercom is in the LOCK mode,
it cannot receive voice messages or call
NOTE
tones from the other intercom.
TALK
Hold down and
speak into the
MIC, release to
listen when VOX
mode turns off.
CALL
Press to sound a tone (or call) on another
intercom for about three seconds.
using rechargeable batteries
MIC
ON/OFF VOLUME
(Right Side) Turn VOLUME until it clicks to turn
on, the POWER/BATT LOW indicator lights,
then adjust VOLUME to a comfortable listening
level.
what’s included
Please read this user’s guide before
installing, setting up and using your new product
www.radioshack.com
43-124.indd 1
Battery Notes:
• Use only fresh batteries of the required size and
recommended type.
• Do not mix old and new batteries, different types
of batteries (standard, alkaline, or rechargeable), or
rechargeable batteries of different capacities.
• If you do not plan to use the intercoms with
batteries for a week or more, remove the batteries.
Batteries can leak chemicals that can destroy
electronic parts.
• Dispose of old batteries promptly and properly. Do
not burn or bury them.
• Always connect the AC adapters to the intercoms
before connecting them to AC power.
• Do not attempt to charge alkaline batteries and
never install non-rechargeable batteries when
RECHARGE ON/OFF is set to ON. Nonrechargeable
batteries can get hot or explode if you try to charge
them.
WARNING
You must slide the RECHARGE ON/OFF
switch to ON before charging rechargeable
batteries.
setting the channel and sub tone
Wireless Intercoms (2)
AC Adapters (2)
User’s Guide
©2007 RadioShack Corporation.
All rights reserved. RadioShack and
RadioShack.com are trademarks
used by RadioShack Corporation.
To charge rechargeable batteries (not included), slide
the RECHARGE ON/OFF switch to ON, install batteries,
plug in the AC adapter, then turn on the intercom.
Complete charging takes about 12 to 14 hours. Average
charging time varies with different battery capacity.
• NiMH (1500 mAH) batteries charge in about
12 hours.
• NiCd (700 mAH) batteries charge in about 4
hours.
AC adapter
By default your two intercoms are on the same
channel, but you can change your intercom channels
for your system. Or, if you receive interference on a
channel you selected, set each intercom to one of eight
different sub tones. Complete the following to change
the intercoms channel or sub tone:
1. Open the battery compartment of the intercom and
set the SUB or CH switches.
2. Use a pointed object to set the first three switches
(labeled SUB TONE) inside the battery compartment
you want to use.
SUB TONE
CH
RECHARGE ON/OFF
AO0286AAC1
43-124
07A07
Printed in China
07/25/2007 11:34:13
mounting the intercom
specifications
• Be sure you install the intercoms at least 10 feet away from each other. Or, you may hear a squeal from
the speakers.
NOTES
• The intercoms can transmit up to 200 feet line of sight.
1.Align horizontally
to position and
drill two holes
smaller than the
screws.
3.Align the
intercom’s keyhole
slots with the
mounting screws
and slide the
intercom down
onto it to secure.
315/16”
1/4”
1/8”
2.Thread a anchor
and screw (not
supplied) into
each hole.
4.Lift and rotate the
antenna up so it
stands vertically.
Channel Selectivity ± 500KHz ..................................................................................................................................... .................. 50 dB
Squelch Threshold .................................................................................................................................................... ......... 20 dB SINAD
S/N at 1mV input, ± 38KHz deviation (A-weight) (@ROP) ........................................................................................................ ... 50 dB
10% THD Output Power ...................................................................................................................................................... ....... 500 mW
RX Current Drain at Reference Output ................................................................................................................................. ...... 140 mA
RF Power Output at 50 Ω ..................................................................................................................................................... ...... +3 dBm
MIC Input Sensitivity (@38 kHz Deviation) ............................................................................................................................... ...... 3 mV
AUX Input Sensitivity (@38 kHz Deviation) ............................................................................................................................. ..... 90 mV
Sub Tone Deviation ................................................................................................................................................................ ...... 10 KHz
Call Tone Deviation ................................................................................................................................................................... .... 35 KHz
Alert Tone Deviation ................................................................................................................................................................... .. 35 KHz
TX Current Drain ................................................................................................................................................................ ............ 65 mA
Battery Low Indication ............................................................................................................................................................ ......... 4.2 V
Minimum Operation Voltage (Battery) .................................................................................................................................. .......... 3.8 V
Operation Range (line of sight) ................................................................................................................................................... 200 feet
Overall Frequency Response (–3 dB Bandwidth) ................................................................................................................... 400 - 7kHz
Current Drain at Standby Mode .......................................................................................................................................... .......... 24 mA
Charging Time for 80% ....................................................................................................................................................... ........ 14 hour
AUX VOX Sensitivity ............................................................................................................................................................... ...... 25 mV
Mic VOX Sensitivity........................................................................................................................................................................... 2 mV
Weather Alarm Input Sensitivity (load current) . .............................................................................................................................. 1mA
Specifications are subject to change and improvement without notice. Actual product may vary from the images found in this
document.
connecting an audio source
To transmit audio to each intercom, connect AUX
INPUT of a intercom to an audio source’s output jack
(such as AUX OUT or TAPE OUT) through an audio
cable (not supplied). Follow the instructions in the
owner’s manual for your audio equipment to play
audio.
• If you use the AUX broadcasting feature
and also use the weather radio inputs, you
MUST connect the Weather radio alarm’s
output to the unit that is using the AUX
broadcasting feature. The weather radio
inputs must not be connected to a unit that
is RECEIVING the broadcast.
NOTES
• Always connect the weather radio’s alarm
output to the intercom you frequently use to
broadcast.
• If your audio sources cable does not have
the appropriate connector to attach to the
intercom, use an adapter available at your
RadioShack store or at RadioShack.com.
RF Emissions Information
AUX INPUT
This equipment has been tested and found to comply with the limits for a Class
B digital device, pursuant to Part 15 of the FCC Rules. These limits are designed
to provide reasonable protection against harmful interference in a residential
installation. This equipment generates, uses, and can radiate radio frequency
energy and, if not installed and used in accordance with the instructions, may cause
harmful interference to radio communications. However, there is no guarantee that
interference will not occur in a particular installation. If this equipment does cause
harmful interference to radio or television reception, which can be determined
by turning the equipment off and on, the user is encouraged to try to correct the
interference by one or more of the following measures:
• Reorient or relocate the receiving antenna.
• Increase the separation between the equipment and receiver.
• Connect the equipment into an outlet on a circuit different from that to which
the receiver is connected.
Consult your local RadioShack store or an experienced radio/TV technician for help.
If you cannot eliminate the interference, the FCC requires that you stop using your
intercom. Changes or modifications not expressly approved by RadioShack may
cause interference and void the user’s authority to operate the equipment.
WX INPUT
NOTES
AC Adapter plug
The AUX INPUT for audio source is disabled when VOX mode is activated.
Only use the antenna attached to this product. This device complies with Part 15
of the FCC Rules. Operation is subject to the following two conditions: (1) This
device may not cause harmful interference, and (2) This device must accept any
interference received, including interference that may cause undesired operation.
connecting a weather radio
listening to an audio source
• Each intercom can broadcast from a connected
audio source only when the channel to which it is
set to is not being used to transmit voice from one
intercom to another.
• You can only broadcast from one intercom at a
time.
• Adjusting VOLUME on the intercoms does not
change the intercom’s input sensitivity.
43-124.indd 2
To transmit weather alerts to each intercom, connect the WX INPUT of a intercom to your weather radio’s ALERT
OUT terminals. Follow the instructions in the owner’s manual for your weather radio to create a weather alert.
• If you connect an intercom to both a weather radio and an audio source and both sources are playing at the
same time, the intercom always sounds the weather alert first.
• The intercom’s weather alarm will only shut off after the weather radio alerts expire or after you manually stop
the weather radio alert. To avoid disturbing neighbors/pets if you are away from the weather radio, turn off the
intercom or lower the volume before leaving.
• To stop the alert from a weather radio, it is recommended to manually reset the ALERT OUT terminal of the
weather radio. For example on the RadioShack 12-262 weather radio, you must press the WEATHER/SNOOZE
button twice during an alert to reset ALERT OUT (refer to the User’s Guide for your specific weather radio
model).
• The RadioShack Cat. No.12-262 weather radio (not supplied) has alert output terminals you can use to connect to
the intercoms.
Limited 90-Day Warranty
This product is warranted by RadioShack against manufacturing defects in material
and workmanship under normal use for ninety (90) days from the date of purchase
from authorized RadioShack company-owned stores and authorized RadioShack
franchisees and dealers. For complete warranty details and exclusions, check with
your local RadioShack store.
RadioShack Customer Relations
300 RadioShack Circle Fort Worth, TX 76102
04/04
07/25/2007 11:34:14