1
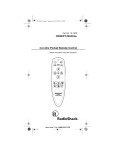
49-421a.fm Page 1 Thursday, August 19, 1999 7:48 AM
Cat. No. 49-421A
OWNER’S MANUAL
Please read before using this equipment.
Door Alarm
49-421a.fm Page 2 Thursday, August 19, 1999 7:48 AM
FEATURES
The RadioShack Door Alarm is your 24hour “electronic sentry.” You can choose
between an instant alarm (for when you
are home) or a delayed alarm (giving you
time to disarm the alarm after you return
home). Disarming is easy using one of the
two keys that come with your alarm. Your
alarm’s other features include:
Magnetic Sensor Alarm System —
sounds a loud (105 dB at 1 foot), piercing
alarm when the magnet moves away from
its alarm unit.
Simple Installation — mounts easily with
either screws or adhesive tape (both supplied) on non-metallic doors and windows.
© 1998 Tandy Corporation.
All Rights Reserved.
RadioShack is a registered trademark
used by Tandy Corporation.
2
49-421a.fm Page 3 Thursday, August 19, 1999 7:48 AM
Low Power Consumption — uses less
than 0.05 mA in standby mode (when the
alarm is not sounding) for long battery life.
Solid-State Circuitry — provides dependable operation.
3
49-421a.fm Page 4 Thursday, August 19, 1999 7:48 AM
PREPARATION
INSTALLING A BATTERY
Your alarm requires one 9-volt battery (not
supplied) for power. For the best performance and longest life, we recommend an
alkaline battery, such as RadioShack Cat.
No. 23-553.
Cautions: Use only a fresh battery of the
required size and type.
Follow these steps to install the battery.
illustration
4
49-421a.fm Page 5 Thursday, August 19, 1999 7:48 AM
1. Use a Phillips screwdriver to remove
the screw from the battery compartment cover, then slide the cover off.
2. Snap the connector over the 9-volt
battery’s terminals and place the battery in the compartment.
3. Replace the cover, then reinsert and
tighten the screw.
When your alarm operates erratically or
the volume decreases, replace the battery.
Cautions:
• Dispose of the old battery promptly
and properly. Do not burn or bury it.
• Always remove an old or weak battery. Batteries can leak chemicals that
can destroy electronic parts.
5
49-421a.fm Page 6 Thursday, August 19, 1999 7:48 AM
MOUNTING THE ALARM
Your alarm is designed for mounting on
non-metallic doors and windows only. It
uses a magnet to trigger the internal alarm.
Mounting on metal surfaces can interfere
with proper operation of the magnetic sensor.
Selecting a Location
For proper alignment, you must mount the
alarm and magnet so the magnet rests
with its arrow pointing toward the alarm’s
engraved line. Choose a location that lets
you install the magnet on a door or window
and the alarm immediately next to it on the
frame, or vice versa. The distance between the alarm and magnet must be no
more than 1/3 inch (8 mm).
6
49-421a.fm Page 7 Thursday, August 19, 1999 7:48 AM
Screw Mounting
illustration
1. Using the supplied drilling template,
mark the screw center points for both
the alarm and magnet. You can drill
starter holes to make it easier to insert
the screws.
2. Thread screws (supplied) into holes A
and B until the screws’ heads extend
about 1/8 inch (3 mm) from the mounting surface.
7
49-421a.fm Page 8 Thursday, August 19, 1999 7:48 AM
3. Line up the keyhole slots on the back
of the alarm with the screws, then
slide the alarm down onto the screws
to secure it.
4. Remove the battery compartment
cover and the battery. Then thread
a screw into hole
C inside the compartment. Reinstall the battery
and replace the
cover.
Illus.
5. Use the two remaining screws to
mount the magnet so its arrow points
toward one of the engraved lines on
either side of the alarm.
8
49-421a.fm Page 9 Thursday, August 19, 1999 7:48 AM
Adhesive Tape Mounting
1. Clean and dry the mounting surfaces
for both the alarm and the magnet.
2. Peel the backing off of one side of
each of the supplied adhesive strips,
then attach them to the back of the
alarm and the magnet.
3. Peel the backing off of the other side
of the alarm’s adhesive strip. Press
the alarm firmly against the window,
door, or frame where you want to
mount it. Hold the alarm in place for
about a minute to secure it.
4. With the magnet’s arrow pointing
toward one of the engraved lines on
either side of the alarm, repeat Step 3
to attach the magnet.
9
49-421a.fm Page 10 Thursday, August 19, 1999 7:48 AM
OPERATION
USING YOUR DOOR
ALARM
Illustration that was on
the front cover of the O/M
with callouts to Key Switch
and Mode Switch.
A pair of keys is provided to operate the
Off/On key switch. When the alarm
10
49-421a.fm Page 11 Thursday, August 19, 1999 7:48 AM
sounds, silence it by inserting a key and
setting the key switch to Off.
Instant Alarm
To arm the alarm while you are at home,
set the mode switch to Instant Alarm and
set the key switch to On.
The alarm sounds if the secured door or
window is opened and the magnet moves
away from the alarm unit. The alarm continues to sound until you set the key switch
to Off.
11
49-421a.fm Page 12 Thursday, August 19, 1999 7:48 AM
Delayed Alarm
To arm the alarm when you leave the
house, set the mode switch to Delayed
Alarm and set the key switch to On.
Once the switch is set to On, there is about
a 15-second delay before the alarm is
armed, giving you time to go out and close
the door.
When you return home and open the secured door, you have about 12–18 seconds to disarm (turn off) the alarm.
Otherwise, the alarm sounds until you set
the key switch to Off.
12
49-421a.fm Page 13 Thursday, August 19, 1999 7:48 AM
CARE
To enjoy your RadioShack Door Alarm for
a long time:
• Keep the alarm dry. If it gets wet, wipe
it dry immediately.
• Use and store the alarm only in normal temperature environments.
• Handle the alarm gently and carefully.
Don’t drop it.
• Keep the alarm away from dust and
dirt.
• Wipe the alarm with a damp cloth
occasionally to keep it looking new.
Modifying or tampering with the alarm’s internal components can cause a malfunction and might invalidate its warranty. If
your alarm is not performing as it should,
take it to your local RadioShack store for
assistance.
13
49-421a.fm Page 14 Thursday, August 19, 1999 7:48 AM
SPECIFICATIONS
Power Source ............ 9V Alkaline Battery
Operation Voltage ................ 7V Minimum
Current Drain at 9V:
Standby Mode ....... 0.03 mA Nominal
(0.05 mA Maximum)
Alarm Sounding ........ 20 mA Nominal
(30 mA Maximum)
Alarm Frequency .............. 2.9 kHz ± 25%
Alarm Cycle Frequency ......... 1 Hz ± 25%
Operating Temperature ............. 32–122°F
(0–50°C)
Dimensions (HWD) ..... 55/32 × 25/16 × 117/32
(131 × 59 × 38 mm)
Weight ........................... 5.17 oz (146.6 g)
Specifications are typical; individual units
might vary. Specifications are subject to
change and improvement without notice.
14
49-421a.fm Page 15 Thursday, August 19, 1999 7:48 AM
Limited Ninety-Day Warranty
This product is warranted by RadioShack against manufacturing
defects in material and workmanship under normal use for ninety
(90) days from the date of purchase from RadioShack companyowned stores and authorized RadioShack franchisees and dealers. EXCEPT AS PROVIDED HEREIN, RadioShack MAKES NO
EXPRESS WARRANTIES AND ANY IMPLIED WARRANTIES,
INCLUDING THOSE OF MERCHANTABILITY AND FITNESS
FOR A PARTICULAR PURPOSE, ARE LIMITED IN DURATION
TO THE DURATION OF THE WRITTEN LIMITED WARRANTIES CONTAINED HEREIN. EXCEPT AS PROVIDED HEREIN,
RadioShack SHALL HAVE NO LIABILITY OR RESPONSIBILITY
TO CUSTOMER OR ANY OTHER PERSON OR ENTITY WITH
RESPECT TO ANY LIABILITY, LOSS OR DAMAGE CAUSED
DIRECTLY OR INDIRECTLY BY USE OR PERFORMANCE OF
THE PRODUCT OR ARISING OUT OF ANY BREACH OF THIS
WARRANTY, INCLUDING, BUT NOT LIMITED TO, ANY DAMAGES RESULTING FROM INCONVENIENCE, LOSS OF TIME,
DATA, PROPERTY, REVENUE, OR PROFIT OR ANY INDIRECT, SPECIAL, INCIDENTAL, OR CONSEQUENTIAL DAMAGES, EVEN IF RadioShack HAS BEEN ADVISED OF THE
POSSIBILITY OF SUCH DAMAGES.
Some states do not allow the limitations on how long an implied
warranty lasts or the exclusion of incidental or consequential
damages, so the above limitations or exclusions may not apply
to you.
In the event of a product defect during the warranty period, take
the product and the RadioShack sales receipt as proof of purchase date to any RadioShack store. RadioShack will, at its option, unless otherwise provided by law: (a) correct the defect by
product repair without charge for parts and labor; (b) replace the
product with one of the same or similar design; or (c) refund the
purchase price. All replaced parts and products, and (Contin-
15
49-421a.fm Page 16 Thursday, August 19, 1999 7:48 AM
(Continued) products on which a refund is made, become the
property of RadioShack. New or reconditioned parts and products may be used in the performance of warranty service. Repaired or replaced parts and products are warranted for the
remainder of the original warranty period. You will be charged
for repair or replacement of the product made after the expiration of the warranty period.
This warranty does not cover: (a) damage or failure caused by
or attributable to acts of God, abuse, accident, misuse, improper
or abnormal usage, failure to follow instructions, improper installation or maintenance, alteration, lightning or other incidence of
excess voltage or current; (b) any repairs other than those provided by a RadioShack Authorized Service Facility; (c) consumables such as fuses or batteries; (d) cosmetic damage; (e)
transportation, shipping or insurance costs; or (f) costs of product removal, installation, set-up service adjustment or reinstallation.
This warranty gives you specific legal rights, and you may also
have other rights which vary from state to state.
RadioShack Customer Relations, Dept. W,
100 Throckmorton St., Suite 600, Fort Worth, TX 76102
We Service What We Sell
3/97
RadioShack
A Division of Tandy Corporation
Fort Worth, Texas 76102
8A8N
DG3-110-18
Printed in Hong Kong