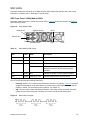
1
Pathlight® VX User’s Guide
ADVANCED DIGITAL INFORMATION CORPORATION
www.adic.com
Copyright © 2005-2006 ADIC
The information contained in this document is subject to change without notice.
This document contains proprietary information which is protected by copyright. All rights are reserved. No part of this
document may be reproduced, modified, distributed, or translated to another language without prior written consent of
ADIC.
ADIC USA
11431 Willows Road NE
Redmond, Washington
98052-4952
Tel.: 1-800-336-1233
Fax: 1-425-881-2296
This document may describe designs for which patents are pending, or have been granted. By publishing this
information, ADIC conveys no license under any patent or any other right.
ADIC shall not be liable for errors contained herein or for incidental or consequential damages (including lost profits) in
connection with the furnishing, performance or use of this material whether based on warranty, contract, or other legal
theory. ADIC makes no representation or warranty with respect to the contents of this document and specifically
disclaims any implied warranties of merchantability or fitness for any particular purpose. Further, ADIC reserves the right
to revise or change this document without obligation on the part of ADIC to notify any person or organization of such
revision or change.
Every effort has been made to acknowledge trademarks and their owners. All trademarks within this document are the
property of their respective owners. Trademarked names are used solely for identification or exemplary purposes, and
any omissions are unintentional. ADIC is a registered trademark of Advanced Digital Information Corporation.
Published: February 2006
Document Number: 6-00020-03 Rev A
Contents
1 About This Guide and Pathlight VX
1
Product Safety Statements . . . . . . . . . . . . . . . . . . . . . . . . . . . . . . . . . . . . . . . . . . . . . . . . . . . . . . . . . . .
Precautions . . . . . . . . . . . . . . . . . . . . . . . . . . . . . . . . . . . . . . . . . . . . . . . . . . . . . . . . . . . . . . . . . . . . . . .
Managing the System . . . . . . . . . . . . . . . . . . . . . . . . . . . . . . . . . . . . . . . . . . . . . . . . . . . . . . . . . . . .
System Placement and Exposure . . . . . . . . . . . . . . . . . . . . . . . . . . . . . . . . . . . . . . . . . . . . . . . . . . .
Grounding . . . . . . . . . . . . . . . . . . . . . . . . . . . . . . . . . . . . . . . . . . . . . . . . . . . . . . . . . . . . . . . . . . . . .
Ventilation . . . . . . . . . . . . . . . . . . . . . . . . . . . . . . . . . . . . . . . . . . . . . . . . . . . . . . . . . . . . . . . . . . . . .
Waste Electrical and Electronic Equipment Directive . . . . . . . . . . . . . . . . . . . . . . . . . . . . . . . . . . . . . . .
Product Model Number . . . . . . . . . . . . . . . . . . . . . . . . . . . . . . . . . . . . . . . . . . . . . . . . . . . . . . . . . . . . . .
Explanation of Symbols and Notes . . . . . . . . . . . . . . . . . . . . . . . . . . . . . . . . . . . . . . . . . . . . . . . . . . . . .
Other Documents you Might Need . . . . . . . . . . . . . . . . . . . . . . . . . . . . . . . . . . . . . . . . . . . . . . . . . . . . .
Getting More Information or Help . . . . . . . . . . . . . . . . . . . . . . . . . . . . . . . . . . . . . . . . . . . . . . . . . . . . . .
2 Description
1
2
2
2
2
2
2
3
3
3
4
5
Pathlight VX Overview. . . . . . . . . . . . . . . . . . . . . . . . . . . . . . . . . . . . . . . . . . . . . . . . . . . . . . . . . . . . . . . 5
Pathlight VX Models . . . . . . . . . . . . . . . . . . . . . . . . . . . . . . . . . . . . . . . . . . . . . . . . . . . . . . . . . . . . . . . . 6
Pathlight VX Components . . . . . . . . . . . . . . . . . . . . . . . . . . . . . . . . . . . . . . . . . . . . . . . . . . . . . . . . . . . . 7
Management Server . . . . . . . . . . . . . . . . . . . . . . . . . . . . . . . . . . . . . . . . . . . . . . . . . . . . . . . . . . . . . 7
SNC . . . . . . . . . . . . . . . . . . . . . . . . . . . . . . . . . . . . . . . . . . . . . . . . . . . . . . . . . . . . . . . . . . . . . . . . . . 8
FC Switch . . . . . . . . . . . . . . . . . . . . . . . . . . . . . . . . . . . . . . . . . . . . . . . . . . . . . . . . . . . . . . . . . . . . . 8
RAID Storage Disk . . . . . . . . . . . . . . . . . . . . . . . . . . . . . . . . . . . . . . . . . . . . . . . . . . . . . . . . . . . . . . 9
Pathlight VX and Attached Physical Libraries . . . . . . . . . . . . . . . . . . . . . . . . . . . . . . . . . . . . . . . . . . . . 11
Pathlight VX and an External Aggregation Switch. . . . . . . . . . . . . . . . . . . . . . . . . . . . . . . . . . . . . . . . . 13
Pathlight VX User’s Guide
iii
3 Getting Started with Pathlight VX
15
Logging On and Logging Off the Pathlight VX. . . . . . . . . . . . . . . . . . . . . . . . . . . . . . . . . . . . . . . . . . . .
Logging On the Pathlight VX . . . . . . . . . . . . . . . . . . . . . . . . . . . . . . . . . . . . . . . . . . . . . . . . . . . . . .
Logging Off the Pathlight VX . . . . . . . . . . . . . . . . . . . . . . . . . . . . . . . . . . . . . . . . . . . . . . . . . . . . . .
Starting Up and Shutting Down the Pathlight VX . . . . . . . . . . . . . . . . . . . . . . . . . . . . . . . . . . . . . . . . .
Starting Up the Pathlight VX . . . . . . . . . . . . . . . . . . . . . . . . . . . . . . . . . . . . . . . . . . . . . . . . . . . . . .
Shutting Down the Pathlight VX . . . . . . . . . . . . . . . . . . . . . . . . . . . . . . . . . . . . . . . . . . . . . . . . . . .
Rebooting the Pathlight VX . . . . . . . . . . . . . . . . . . . . . . . . . . . . . . . . . . . . . . . . . . . . . . . . . . . . . . . . . .
Navigating the Pathlight VX User Interface . . . . . . . . . . . . . . . . . . . . . . . . . . . . . . . . . . . . . . . . . . . . . .
Virtual Library Summary . . . . . . . . . . . . . . . . . . . . . . . . . . . . . . . . . . . . . . . . . . . . . . . . . . . . . . . . .
System Summary . . . . . . . . . . . . . . . . . . . . . . . . . . . . . . . . . . . . . . . . . . . . . . . . . . . . . . . . . . . . . .
Menu Bar . . . . . . . . . . . . . . . . . . . . . . . . . . . . . . . . . . . . . . . . . . . . . . . . . . . . . . . . . . . . . . . . . . . . .
System Information Buttons . . . . . . . . . . . . . . . . . . . . . . . . . . . . . . . . . . . . . . . . . . . . . . . . . . . . . .
Modifying Basic Settings on the Pathlight VX . . . . . . . . . . . . . . . . . . . . . . . . . . . . . . . . . . . . . . . . . . . .
Changing the Admin Password . . . . . . . . . . . . . . . . . . . . . . . . . . . . . . . . . . . . . . . . . . . . . . . . . . . .
Applying the Pathlight VX License. . . . . . . . . . . . . . . . . . . . . . . . . . . . . . . . . . . . . . . . . . . . . . . . . .
Changing Network Settings . . . . . . . . . . . . . . . . . . . . . . . . . . . . . . . . . . . . . . . . . . . . . . . . . . . . . . .
Setting the Date, Time or Time Zone . . . . . . . . . . . . . . . . . . . . . . . . . . . . . . . . . . . . . . . . . . . . . . .
Managing Support and System Notifications. . . . . . . . . . . . . . . . . . . . . . . . . . . . . . . . . . . . . . . . . .
4 Performing Basic Tasks and Operations
43
Performing Basic Pathlight VX Tasks . . . . . . . . . . . . . . . . . . . . . . . . . . . . . . . . . . . . . . . . . . . . . . . . . .
Performing Required Actions. . . . . . . . . . . . . . . . . . . . . . . . . . . . . . . . . . . . . . . . . . . . . . . . . . . . . .
Changing Library Modes (Online and Offline) . . . . . . . . . . . . . . . . . . . . . . . . . . . . . . . . . . . . . . . . .
Renaming a Physical Library . . . . . . . . . . . . . . . . . . . . . . . . . . . . . . . . . . . . . . . . . . . . . . . . . . . . . .
Canceling a Pending Request . . . . . . . . . . . . . . . . . . . . . . . . . . . . . . . . . . . . . . . . . . . . . . . . . . . . .
Working with Virtual Libraries, Drives, and Media . . . . . . . . . . . . . . . . . . . . . . . . . . . . . . . . . . . . . . . . .
Working with Virtual Libraries . . . . . . . . . . . . . . . . . . . . . . . . . . . . . . . . . . . . . . . . . . . . . . . . . . . . .
Working with Virtual Drives . . . . . . . . . . . . . . . . . . . . . . . . . . . . . . . . . . . . . . . . . . . . . . . . . . . . . . .
Working with Virtual Media . . . . . . . . . . . . . . . . . . . . . . . . . . . . . . . . . . . . . . . . . . . . . . . . . . . . . . .
Managing FC Hosts. . . . . . . . . . . . . . . . . . . . . . . . . . . . . . . . . . . . . . . . . . . . . . . . . . . . . . . . . . . . . . . .
Configuring an FC Host . . . . . . . . . . . . . . . . . . . . . . . . . . . . . . . . . . . . . . . . . . . . . . . . . . . . . . . . . .
Modifying an FC Host . . . . . . . . . . . . . . . . . . . . . . . . . . . . . . . . . . . . . . . . . . . . . . . . . . . . . . . . . . .
Removing an FC Host . . . . . . . . . . . . . . . . . . . . . . . . . . . . . . . . . . . . . . . . . . . . . . . . . . . . . . . . . . .
Managing User Accounts . . . . . . . . . . . . . . . . . . . . . . . . . . . . . . . . . . . . . . . . . . . . . . . . . . . . . . . . . . .
Creating User Accounts. . . . . . . . . . . . . . . . . . . . . . . . . . . . . . . . . . . . . . . . . . . . . . . . . . . . . . . . . .
Modifying User Accounts . . . . . . . . . . . . . . . . . . . . . . . . . . . . . . . . . . . . . . . . . . . . . . . . . . . . . . . . .
Deleting User Accounts . . . . . . . . . . . . . . . . . . . . . . . . . . . . . . . . . . . . . . . . . . . . . . . . . . . . . . . . . .
iv
15
15
16
17
17
19
25
27
27
28
29
29
30
30
31
31
32
34
43
43
49
50
51
52
53
58
61
70
70
73
74
76
76
77
79
Contents
5 Performing Advanced Tasks and Operations
81
Managing Media in the Pathlight VX . . . . . . . . . . . . . . . . . . . . . . . . . . . . . . . . . . . . . . . . . . . . . . . . . . . 81
Setting Media Filters . . . . . . . . . . . . . . . . . . . . . . . . . . . . . . . . . . . . . . . . . . . . . . . . . . . . . . . . . . . . 81
Setting the Default Export Rule . . . . . . . . . . . . . . . . . . . . . . . . . . . . . . . . . . . . . . . . . . . . . . . . . . . . 83
Setting Default Media Access . . . . . . . . . . . . . . . . . . . . . . . . . . . . . . . . . . . . . . . . . . . . . . . . . . . . . 84
Setting Media Access Rules . . . . . . . . . . . . . . . . . . . . . . . . . . . . . . . . . . . . . . . . . . . . . . . . . . . . . . 86
Moving Media Within a Virtual Library . . . . . . . . . . . . . . . . . . . . . . . . . . . . . . . . . . . . . . . . . . . . . . . 88
Reassigning Physical Media to the Unknown Media Pool. . . . . . . . . . . . . . . . . . . . . . . . . . . . . . . . 90
Managing Offline Media. . . . . . . . . . . . . . . . . . . . . . . . . . . . . . . . . . . . . . . . . . . . . . . . . . . . . . . . . . 91
Removing Media from the Pathlight VX. . . . . . . . . . . . . . . . . . . . . . . . . . . . . . . . . . . . . . . . . . . . . . . . . 93
Removing Application Media . . . . . . . . . . . . . . . . . . . . . . . . . . . . . . . . . . . . . . . . . . . . . . . . . . . . . . 93
Removing Cleaning Media . . . . . . . . . . . . . . . . . . . . . . . . . . . . . . . . . . . . . . . . . . . . . . . . . . . . . . . 94
Removing Disk Extension Media . . . . . . . . . . . . . . . . . . . . . . . . . . . . . . . . . . . . . . . . . . . . . . . . . . . 95
Removing Internal Backup Media . . . . . . . . . . . . . . . . . . . . . . . . . . . . . . . . . . . . . . . . . . . . . . . . . . 96
Removing Service Media. . . . . . . . . . . . . . . . . . . . . . . . . . . . . . . . . . . . . . . . . . . . . . . . . . . . . . . . . 97
Managing Disk Extension Media . . . . . . . . . . . . . . . . . . . . . . . . . . . . . . . . . . . . . . . . . . . . . . . . . . . . . . 98
Reclaiming Space on Disk Extension Media . . . . . . . . . . . . . . . . . . . . . . . . . . . . . . . . . . . . . . . . . . 98
Changing Disk Extension Media Attributes . . . . . . . . . . . . . . . . . . . . . . . . . . . . . . . . . . . . . . . . . . . 99
Managing Internal Backup Media . . . . . . . . . . . . . . . . . . . . . . . . . . . . . . . . . . . . . . . . . . . . . . . . . . . . 101
Managing Internal Backup Media . . . . . . . . . . . . . . . . . . . . . . . . . . . . . . . . . . . . . . . . . . . . . . . . . 101
Setting the Internal Backup Schedule . . . . . . . . . . . . . . . . . . . . . . . . . . . . . . . . . . . . . . . . . . . . . . 102
Working with Advanced Features . . . . . . . . . . . . . . . . . . . . . . . . . . . . . . . . . . . . . . . . . . . . . . . . . . . . 103
Enabling Advanced Features . . . . . . . . . . . . . . . . . . . . . . . . . . . . . . . . . . . . . . . . . . . . . . . . . . . . 103
Disabling Advanced Features . . . . . . . . . . . . . . . . . . . . . . . . . . . . . . . . . . . . . . . . . . . . . . . . . . . . 106
Managing Storage Policies . . . . . . . . . . . . . . . . . . . . . . . . . . . . . . . . . . . . . . . . . . . . . . . . . . . . . . . . . 108
Configuring Early Tape Creation . . . . . . . . . . . . . . . . . . . . . . . . . . . . . . . . . . . . . . . . . . . . . . . . . . 111
Archiving Media . . . . . . . . . . . . . . . . . . . . . . . . . . . . . . . . . . . . . . . . . . . . . . . . . . . . . . . . . . . . . . . 112
Reverting Archive Media . . . . . . . . . . . . . . . . . . . . . . . . . . . . . . . . . . . . . . . . . . . . . . . . . . . . . . . . 114
6 Pathlight VX Reports
115
Viewing the Virtual Library Summary . . . . . . . . . . . . . . . . . . . . . . . . . . . . . . . . . . . . . . . . . . . . . . . . .
Viewing the Virtual Library Summary Report. . . . . . . . . . . . . . . . . . . . . . . . . . . . . . . . . . . . . . . . .
Viewing the Virtual Drive Summary Report . . . . . . . . . . . . . . . . . . . . . . . . . . . . . . . . . . . . . . . . . .
Viewing the Virtual Media Summary Report . . . . . . . . . . . . . . . . . . . . . . . . . . . . . . . . . . . . . . . . .
Reports About Physical Libraries, Drives and Media . . . . . . . . . . . . . . . . . . . . . . . . . . . . . . . . . . . . .
Viewing the Physical Library Report . . . . . . . . . . . . . . . . . . . . . . . . . . . . . . . . . . . . . . . . . . . . . . .
Viewing the Physical Drive Report . . . . . . . . . . . . . . . . . . . . . . . . . . . . . . . . . . . . . . . . . . . . . . . .
Viewing the Physical Media Report . . . . . . . . . . . . . . . . . . . . . . . . . . . . . . . . . . . . . . . . . . . . . . . .
Reports About System Configuration . . . . . . . . . . . . . . . . . . . . . . . . . . . . . . . . . . . . . . . . . . . . . . . . .
Viewing the System Configuration Report . . . . . . . . . . . . . . . . . . . . . . . . . . . . . . . . . . . . . . . . . . .
Reports About Disk Extension Media . . . . . . . . . . . . . . . . . . . . . . . . . . . . . . . . . . . . . . . . . . . . . . . . .
Viewing the Disk Extension Space Usage Report . . . . . . . . . . . . . . . . . . . . . . . . . . . . . . . . . . . . .
Viewing the Storage Policy Report . . . . . . . . . . . . . . . . . . . . . . . . . . . . . . . . . . . . . . . . . . . . . . . .
Reports About System Activity . . . . . . . . . . . . . . . . . . . . . . . . . . . . . . . . . . . . . . . . . . . . . . . . . . . . . .
Viewing the Library Mailbox Report . . . . . . . . . . . . . . . . . . . . . . . . . . . . . . . . . . . . . . . . . . . . . . . .
Viewing the Media Tracking Report. . . . . . . . . . . . . . . . . . . . . . . . . . . . . . . . . . . . . . . . . . . . . . . .
Viewing the Offline Media Report . . . . . . . . . . . . . . . . . . . . . . . . . . . . . . . . . . . . . . . . . . . . . . . . .
Viewing the Pending Activity Report . . . . . . . . . . . . . . . . . . . . . . . . . . . . . . . . . . . . . . . . . . . . . . .
Viewing the System Backup Report . . . . . . . . . . . . . . . . . . . . . . . . . . . . . . . . . . . . . . . . . . . . . . .
Viewing the User Login Report . . . . . . . . . . . . . . . . . . . . . . . . . . . . . . . . . . . . . . . . . . . . . . . . . . .
Pathlight VX User’s Guide
115
116
119
119
120
120
120
121
123
123
123
123
124
125
125
126
127
128
129
129
v
7 Monitoring the Pathlight VX
131
Viewing Activity Status . . . . . . . . . . . . . . . . . . . . . . . . . . . . . . . . . . . . . . . . . . . . . . . . . . . . . . . . . . . .
Checking System Status . . . . . . . . . . . . . . . . . . . . . . . . . . . . . . . . . . . . . . . . . . . . . . . . . . . . . . . . . . .
Understanding Service Tickets . . . . . . . . . . . . . . . . . . . . . . . . . . . . . . . . . . . . . . . . . . . . . . . . . . . . . .
Viewing Service Tickets. . . . . . . . . . . . . . . . . . . . . . . . . . . . . . . . . . . . . . . . . . . . . . . . . . . . . . . . .
Modifying Service Tickets . . . . . . . . . . . . . . . . . . . . . . . . . . . . . . . . . . . . . . . . . . . . . . . . . . . . . . .
Closing Service Tickets . . . . . . . . . . . . . . . . . . . . . . . . . . . . . . . . . . . . . . . . . . . . . . . . . . . . . . . . .
8 Troubleshooting the Pathlight VX
132
133
134
135
137
138
139
How the Pathlight VX Reports Problems. . . . . . . . . . . . . . . . . . . . . . . . . . . . . . . . . . . . . . . . . . . . . . .
Using Health Checks to Troubleshoot the Pathlight VX . . . . . . . . . . . . . . . . . . . . . . . . . . . . . . . . . . .
General Troubleshooting . . . . . . . . . . . . . . . . . . . . . . . . . . . . . . . . . . . . . . . . . . . . . . . . . . . . . . . . . .
Start Up Problems . . . . . . . . . . . . . . . . . . . . . . . . . . . . . . . . . . . . . . . . . . . . . . . . . . . . . . . . . . . . .
Pathlight VX Backup Problems . . . . . . . . . . . . . . . . . . . . . . . . . . . . . . . . . . . . . . . . . . . . . . . . . . .
User Interface Problems . . . . . . . . . . . . . . . . . . . . . . . . . . . . . . . . . . . . . . . . . . . . . . . . . . . . . . . .
Working with the Pathlight VX System State. . . . . . . . . . . . . . . . . . . . . . . . . . . . . . . . . . . . . . . . . . . .
Capturing a System State . . . . . . . . . . . . . . . . . . . . . . . . . . . . . . . . . . . . . . . . . . . . . . . . . . . . . . .
Downloading a System State . . . . . . . . . . . . . . . . . . . . . . . . . . . . . . . . . . . . . . . . . . . . . . . . . . . .
Deleting a System State . . . . . . . . . . . . . . . . . . . . . . . . . . . . . . . . . . . . . . . . . . . . . . . . . . . . . . . .
Troubleshooting System Problems . . . . . . . . . . . . . . . . . . . . . . . . . . . . . . . . . . . . . . . . . . . . . . . . . . .
Troubleshooting Power Issues . . . . . . . . . . . . . . . . . . . . . . . . . . . . . . . . . . . . . . . . . . . . . . . . . . .
Troubleshooting Cable Connections . . . . . . . . . . . . . . . . . . . . . . . . . . . . . . . . . . . . . . . . . . . . . . .
Troubleshooting Temperature Errors . . . . . . . . . . . . . . . . . . . . . . . . . . . . . . . . . . . . . . . . . . . . . .
Interpreting Status LEDs . . . . . . . . . . . . . . . . . . . . . . . . . . . . . . . . . . . . . . . . . . . . . . . . . . . . . . . . . . .
MS LEDs . . . . . . . . . . . . . . . . . . . . . . . . . . . . . . . . . . . . . . . . . . . . . . . . . . . . . . . . . . . . . . . . . . . .
SNC LEDs . . . . . . . . . . . . . . . . . . . . . . . . . . . . . . . . . . . . . . . . . . . . . . . . . . . . . . . . . . . . . . . . . . .
AX100SC LEDs . . . . . . . . . . . . . . . . . . . . . . . . . . . . . . . . . . . . . . . . . . . . . . . . . . . . . . . . . . . . . . .
DPE/DAE LEDs . . . . . . . . . . . . . . . . . . . . . . . . . . . . . . . . . . . . . . . . . . . . . . . . . . . . . . . . . . . . . . .
SPS LEDs . . . . . . . . . . . . . . . . . . . . . . . . . . . . . . . . . . . . . . . . . . . . . . . . . . . . . . . . . . . . . . . . . . .
FC Switch LEDs . . . . . . . . . . . . . . . . . . . . . . . . . . . . . . . . . . . . . . . . . . . . . . . . . . . . . . . . . . . . . .
Troubleshooting Audible Alarms . . . . . . . . . . . . . . . . . . . . . . . . . . . . . . . . . . . . . . . . . . . . . . . . . . . . .
Troubleshooting Pathlight VX User Interface Issues . . . . . . . . . . . . . . . . . . . . . . . . . . . . . . . . . . . . . .
139
140
142
142
142
142
144
144
146
148
149
149
150
150
151
152
157
161
163
168
169
171
171
Glossary
173
Index
179
vi
Contents
About This Guide and Pathlight VX
This guide contains information and instructions necessary for the normal operation and management of
the Pathlight VX. This guide is intended for anyone interested in learning about or anyone that needs to
know how to operate, administer, and monitor the Pathlight VX.
Note
Be sure to read all operating instructions in this manual and in the System, Safety, and
Regulatory Information Guide before operating this product.
This guide contains information and instructions necessary to operate and manage the Pathlight VX-450
and Pathlight VX-650 models. All references to Pathlight VX apply to both models.
Product Safety Statements
This product is designed for managing data. Any other application is not considered the intended use. ADIC
will not be held liable for damage arising from unauthorized use of the product. The user assumes all risk in
this aspect.
This unit is engineered and manufactured to meet all safety and regulatory requirements. Be aware that
improper use may result in bodily injury, damage to the equipment, or interference with other equipment.
WARNING
BEFORE STARTING UP OR USING THIS EQUIPMENT, READ THE SYSTEM,
SAFETY, AND REGULATORY INFORMATION GUIDE. KEEP THE GUIDE FOR
FUTURE REFERENCE.
Pathlight VX User’s Guide
1
Precautions
To ensure system safeguards are met, observe the rules presented in this section.
Managing the System
•
Read and follow all instructions in the order presented.
•
Follow all warnings that appear on the Pathlight VX and in the supporting documents.
•
Remove rings, watches, or other jewelry and neckties before you begin any procedures.
•
Use caution near any moving part and any part that may start unexpectedly such as fans, motors,
solenoids, and so on.
•
Always use the correct tools for the job.
•
Always use the correct replacement parts.
•
Keep all paperwork, including incident reports, up to date, accurate, and complete.
System Placement and Exposure
•
Do not store the system in temperatures less than 15°C (59°F) or greater than 32°C (90°F).
•
Situate the system away from heat sources such as radiators, heat registers, or furnaces.
•
Do not install hardware components, specifically disk processor enclosures (DPEs) and disk array
enclosures (DAEs), at the top of a rack if the bottom of the rack is empty. Doing so can cause the
rack to become unstable and tip over.
Grounding
Ground circuit continuity is vital for safe operation of the system. Never operate the system with grounding
conductors disconnected. Remember to reconnect any grounding conductors removed for or during any
servicing procedure.
Ventilation
Install product components so that the location or position provides adequate top and bottom ventilation.
WARNING
BEFORE STARTING UP OR USING THIS EQUIPMENT, READ THE SYSTEM,
SAFETY, AND REGULATORY INFORMATION GUIDE. KEEP THE GUIDE FOR
FUTURE REFERENCE.
Waste Electrical and Electronic Equipment Directive
This product contains materials that are recyclable under the Waste Electrical and Electronic Equipment
(WEEE) directive of the European Union. This product should not be disposed of as unsorted municipal
waste. Information about ADIC’s WEEE program may be found at weee.adic.com.
2
About This Guide and Pathlight VX
Product Model Number
The Pathlight VX models are as follows: Pathlight VX-450 and Pathlight VX-650.
Explanation of Symbols and Notes
The following symbols appear throughout this document to highlight important information.
WARNING
INDICATES A POTENTIALLY HAZARDOUS SITUATION WHICH, IF NOT
AVOIDED, COULD RESULT IN DEATH OR BODILY INJURY.
CAUTION
Indicates a situation that may cause possible damage to equipment, loss of
data, or interference with other equipment.
Note
Indicates important information that helps you make better use of your system.
Other Documents you Might Need
The following documents are available for this product. These documents can be found on the Technical
Documentation CD or at www.adic.com/manuals.
•
ADIC System, Safety, and Regulatory Information Guide (6-00618-03)
Note
The Pathlight VX Release Notes (6-01032-XX) are also available. The Release Notes
describe changes to your system or firmware since the last release, provide
compatibility information, and discuss any known issues and workarounds. The
Release Notes can be found in the Pathlight VX Accessory box or at
www.adic.com/manuals.
Pathlight VX User’s Guide
3
Getting More Information or Help
iSuretyTM, ADIC's comprehensive service approach, leverages advanced data access and diagnostics
technologies with cross-environment, multi-vendor expertise to resolve backup issues faster and at lower
cost.
Accelerate service issue resolution with these exclusive ADIC iSurety services:
•
Customer Service Center Website - Register products, license software, browse Educational
Services courses, check backup software and OS support, and locate manuals, FAQs, firmware
downloads, product updates and more in one convenient location. Benefit today at
www.adic.com/csc.
•
Online Service Requests - Submit online service requests, update contact information, add
attachments, and receive status updates via e-mail. Online Service Request accounts are free from
ADIC. That account can also be used to access ADIC's KnowledgeBase, a comprehensive
repository of product support information. Sign up today at www.adic.com/onlinesr.
•
iLink - Securely links ADIC hardware and the diagnostic data from the surrounding storage
ecosystem to ADIC's Global Services Team for faster, more precise root cause diagnosis. iLink is
simple to set up through the internet and provides secure, two-way communications with ADIC's
Secure Service Center. More iLink information can be found at www.adic.com/ilink or e-mail the
iLink team at [email protected]. iLink is currently available with ADIC's Scalar i500, Scalar 1000,
Scalar i2000, Scalar 10K, and Pathlight VX disk-based backup solutions.
•
Product Support Updates - Free e-mail notifications of new information or upgrades that can
improve product function and reduce service activities. You select the products and types of
updates you wish to receive. Sign up today at www.adic.com/ProductUpdates.
For further assistance, contact one of the following:
4
ADIC Technical Assistance Center (ATAC) in the USA:
800-827-3822
ADIC Technical Assistance Center (ATAC) in Europe:
00800 9999 3822
For worldwide support telephone numbers:
www.adic.com/techsup
About This Guide and Pathlight VX
Description
This chapter describes the Pathlight VX system and its individual components.
Pathlight VX Overview
The Pathlight VX backup and restore solution increases capacity and reduces the cost of disk backup by
integrating disk and tape in a single, unified system. The Pathlight VX provides the off-site security, long
term protection, and value of tape—all in a cost-effective, easy-to-manage solution. The Pathlight VX offers
the following features and benefits:
•
Provides an integrated backup and restore solution.
•
Increases the reliability and performance of your most difficult backup jobs.
•
Leverages existing environment, processes and applications by presenting itself as a virtual library
composed of virtual tape drives and virtual tape cartridges.
•
Creates tapes for export outside the backup window, without impacting backup application or server
performance.
•
Provides improved performance, disk speed for faster backup and restore.
•
Ensures backup success by integrating AX100SC (SATA) or CX300 (ATA) RAID to provide fault
tolerance, hot swap-ability as well as scalable capacity and performance.
•
Provides a single point of management for installation, configuration and administration.
•
Leverages hardware building blocks and common software to scale capacity and performance as
well as provide redundancy for higher availability. This strategy protects end users’ investment and
lowers their total cost of ownership.
Pathlight VX User’s Guide
5
Figure 1 shows a front view of the Pathlight VX, consisting of the Pathlight VX Controller (Management
Server (MS), SNC, and in some configurations, an FC switch) and RAID storage disk. In Figure 1, the
Pathlight VX bezel covers the components in the Pathlight VX Controller.
Figure 1
Front View of a Pathlight VX
Pathlight VX Controller
(behind bezel)
Pathlight VX bezel
RAID storage disk
Pathlight VX Models
Two Pathlight VX models are available:
6
•
The Pathlight VX-450 offers midrange disk-based backup and uses AX100SC enclosures as its
RAID component. Currently, one Pathlight VX-450 configuration is available, offering 4.2 TB of disk
capacity.
•
The Pathlight VX-650 offers enterprise disk-based backup and uses CX300s as its RAID
component. Currently, 25 Pathlight VX-650 configurations are available, ranging from 3.8 TB to
71.6 TB of disk capacity. The Pathlight VX-650 series includes Entry-Level, Standard, and HighPerformance Configurations.
Description
Pathlight VX Components
The Pathlight VX contains the following components:
•
MS
•
SNC (either 1 or 2 FC blades)1
•
FC switch (in High-Performance configurations)
•
RAID storage disk
•
Pathlight VX-450 uses 2 AX100SC enclosures as the RAID.
•
Pathlight VX-650 uses CX300 enclosures as the RAID.
Each Pathlight VX contains one MS and one SNC. Together, these components constitute the Pathlight VX
Controller. In High-Performance configurations, the Pathlight VX Controller also includes an FC switch.
Management Server
The Management Server (MS) is the server component of Pathlight VX. The MS manages the configuration
and status of the Pathlight VX components. The MS also regulates data flow to and from the storage disk
and controls the location where data is written on the disk. The MS provides policy-based data
management, with data placement based on access requirements, usage, and age.
The MS is also responsible to control one or more physical libraries attached to the Pathlight VX. The MS
periodically queries the physical libraries for status changes and available media.
The MS is a 2U enclosure that, together with the SNC (and in some configurations, the FC switch),
constitutes the Pathlight VX Controller. In the rack, the Pathlight VX Controller is covered by the ADIC bezel.
Figure 2 shows the front view of the MS, with the SCSI hard drives and power button identified. The MS
front panel is visible when the Pathlight VX bezel is removed.2
CAUTION
Figure 2
Figure 2 identifies the location of the MS power button. To start up or
shut down the MS, refer to Starting Up and Shutting Down the Pathlight
VX on page 17; do not simply press the power button. Failure to follow
this procedure can interfere with the Pathlight VX’s operation.
MS - front view
SCSI hard drives
Power button
1. Depending on the specific Pathlight VX configuration, the SNC houses either 1 or 2 FC blades. The Entry-Level
Configuration has 1 FC blade in the SNC. The Standard and High-Performance Configurations have 2 FC blades in the
SNC.
2. For instructions on removing the Pathlight VX bezel, refer to Starting Up the Pathlight VX on page 17.
Pathlight VX User’s Guide
7
SNC
The SNC houses the FC blades1 and serves as a connectivity point for FC hosts. ADIC’s FC blade
technology enables the blades to instantiate virtual tape drives and changers with which FC hosts can
interact. These virtual devices are created using emulation software which allows them to respond to SCSI
host commands exactly as a tape drive of an ADIC library changer.
The SNC emulates physical libraries and handles all library activity by processing move media requests,
performing read / write operations, and executing import / export operations. Figure 3 shows the front view
of a 2 FC blade SNC, with the utility modules and various ports identified. The front panel of the SNC is
visible when the Pathlight VX bezel is removed.
Figure 3
UM2LAN1
UM2LAN2
SNC - front view
UM2SER1
UM2SER2
AC power
receptacle
utility module 2
UM1LAN1
UM1SER1
UM2LAN2
UM1SER2
AC power
receptacle
power
connection
protector
utility module 1
FC Switch
The FC switch2 is a component in the Pathlight VX High-Performance Configuration, and provides
connectivity between all system components (MS, SNC, and RAID storage disk) and, if attached, one or
more physical libraries. Figure 4 shows the front view of the FC switch, with the power buttons and port
readiness LED identified. For information about this LED, refer to FC Switch LEDs on page 169.
Figure 4
FC switch - front view
port readiness LED
power buttons
1. Depending on the specific Pathlight VX configuration, the SNC houses either 1 or 2 FC blades. The Entry-Level
Configuration has 1 FC blade in the SNC. The Standard and High-Performance Configurations have 2 FC blades in the
SNC.
2. The FC switch is not included in either the Pathlight VX Entry-Level or Standard Configurations.
8
Description
RAID Storage Disk
The Pathlight VX uses high-speed, low-cost AX100SC (SATA) or CX300 (ATA) RAID as its storage disk.
The storage disk is presented as a RAID. When data is processed in the Pathlight VX, it is sent from the
backup application to the SNC, assigned to a virtual library and virtual tape, and then written to the RAID
storage disk.
•
AX100SC - The Pathlight VX-450 uses 2 AX100SC enclosures as the RAID component. Figure 5
shows the front of an AX100SC disk enclosure and identifies its LEDs. For more information about
these LEDs, refer to AX100SC LEDs on page 161.
Figure 5
AX100SC - front view
Fault LED
•
Disk activity LEDs
Fault LED
Disk activity LEDs
DPE - The Pathlight VX-650 uses CX300 enclosures as the RAID component. The CX300 is
referred to as the disk processor enclosure (DPE). Each DPE is tandemed with a standby power
supply (SPS), and cabled to up to 3 disk array enclosures (DAEs). Depending on the configuration,
the Pathlight VX contains up to 4 DPEs, an equivalent number of SPSs, and up to 12 DAEs. Figure
6 shows the front of a DPE and identifies its LEDs. Figure 7 on 10 and Figure 8 on 10 show the front
and rear views of an SPS. Figure 9 on 10 shows the front of a DAE and identifies its LEDs. For more
information about DPE and DAE LEDs, refer to DPE/DAE LEDs on page 163. For more information
about SPS LEDs, refer to SPS LEDs on page 168.
Figure 6
DPE - front view
Enclosure fault LED
Enclosure power LED
Disk activity LED
Disk fault LED
Pathlight VX User’s Guide
9
Figure 7
SPS - front view
M4 x 8mm drill mount
M4 x 8mm drill mount
Phillips screw
Figure 8
Phillips screw
SPS - back view
Active
On battery
Replace battery
Fault
Figure 9
DAE - front view
Enclosure fault LED
Enclosure power LED
Disk activity LED
Disk fault LED
10
Description
Pathlight VX and Attached Physical Libraries
The Pathlight VX may be attached to up to four physical (tape) libraries, which provides the advantage of
long-term data storage. Although a physical library can be attached to the Pathlight VX, it is not a system
component and is considered an external device. When a Pathlight VX user ‘exports’ virtual media from the
system, data is moved to tape in the physical library. The ‘import’ operation retrieves data from physical tape
and makes it available in the Pathlight VX. Table 1 lists physical libraries and drives currently supported by
the Pathlight VX, along with library-specific settings and procedures that must be followed if the library is
used with the Pathlight VX.
Table 1
Physical Libraries Supported by the Pathlight VX
Library and Supported Drives
When Attached to Pathlight VX
Specific Library Settings or Procedures
ADIC Scalar 24
LTO-1
LTO-2
LTO-3
• Verify the library settings (Volser, ASC, Mixed Media, etc.).
ADIC Scalar 100
LTO-1
LTO-2
LTO-3
• Verify the library settings (Volser, ASC, Mixed Media, etc.).
ADIC Scalar 1000
LTO-1
LTO-2
• Verify the library settings (Volser, ASC, Mixed Media, etc.).
• Volser Enabled must always be off.
• If Mixed Media is enabled, then Extended RES must be enabled.
• Change the virtual library to a Scalar i2000 to emulate the i2000
command set.
• CAUTION: This library is capable of configuring the media ID to
the front of the volume serial number. Avoid prepending the
media ID to the volume serial number, because it causes the
Pathlight VX’s configuration of the physical library to fail.
ADIC Scalar i500
LTO-3 (IBM only)
• Verify the library settings (Volser, ASC, Mixed Media, etc.).
ADIC Scalar i2000
LTO-1
LTO-2
LTO-3
• Verify the library settings (Volser, ASC, Mixed Media, etc.).
• If drive spoofing is turned on, you must reboot the Pathlight VX.
Turning on spoofing changes each drive serial number in the i2000.
The reboot causes the Pathlight VX to run through its drive
replacement scripts for each i2000 drive.
• CAUTION: This library is capable of configuring the media ID to
the front of the volume serial number. Avoid prepending the
media ID to the volume serial number, because it causes the
Pathlight VX’s configuration of the physical library to fail.
ADIC Scalar 10K
LTO-1
LTO-2
LTO-3
• Verify the library settings (Volser, ASC, Mixed Media, etc.).
• Volser Enabled must always be off.
• If Mixed Media is enabled, then Extended RES must be enabled.
• CAUTION: This library is capable of configuring the media ID to
the front of the volume serial number. Avoid prepending the
media ID to the volume serial number, because it causes the
Pathlight VX’s configuration of the physical library to fail.
a This library supports LTO-3 drives. However, LTO-3 drives are not supported if the library is used with the
Pathlight VX.
Pathlight VX User’s Guide
11
Table 1
Physical Libraries Supported by the Pathlight VX (continued)
Dell PV 132T a
LTO-1
LTO-2
• Verify the library settings (Volser, ASC, Mixed Media, etc.).
Dell PV 136T
LTO-2
LTO-3
• Verify the library settings (Volser, ASC, Mixed Media, etc.).
Dell PV 160T
LTO-1
LTO-2
LTO-3
• Verify the library settings (Volser, ASC, Mixed Media, etc.).
IBM 3582 a
LTO-1
LTO-2
• Verify the library settings (Volser, ASC, Mixed Media, etc.).
IBM 3583
LTO-1
LTO-2
LTO-3
• Verify the library settings (Volser, ASC, Mixed Media, etc.).
IBM 3584 a
LTO-2
• Verify the library settings (Volser, ASC, Mixed Media, etc.).
• The IBM 3584 has only been certified for use with Pathlight VX if the
Advanced Library Management System (ALMS) is enabled. ALMS
enables partitioning of the library into multiple logical libraries. Do not
configure Pathlight VX to work with a 3584 library that is not
configured to run with ALMS.
• The only way to insert cleaning media is to use a front panel on the
IBM-3584 Library, using the option “Insert Cleaning Media.” This
does not assign cleaning media to any IBM logical partition. Without
this assignment to any IBM logical partition recognition of cleaning
media by any IBM logical partition is not possible by PVX and
StorNext applications.
• If multiple partitions are configured, perform these actions on the
Operator panel:
• Navigate to Settings > Insert Notification and enable the
notification. If the notification is disabled, then there is no prompt
for a partition. The Pathlight VX does not track the media as
exported and continues to display a media ready to export
message.
• When exporting physical media from the library:
1 On the Operator panel, select the partition associated with the
Pathlight VX.
2 Remove the media from the I/E station.
• When importing cleaning media to the library:
1 Insert the media into the I/E station.
2 On the Operator panel, select the Insert Cleaning Media option
and select the partition associated with the Pathlight VX.
a
This library supports LTO-3 drives. However, LTO-3 drives are not supported if the library is used with the
Pathlight VX.
12
Description
Table 1
Physical Libraries Supported by the Pathlight VX (continued)
STK L180 a
LTO-1
LTO-2
• Verify the library settings (Volser, ASC, Mixed Media, etc.).
STK L700 a
LTO-1
LTO-2
• Verify the library settings (Volser, ASC, Mixed Media, etc.).
a
This library supports LTO-3 drives. However, LTO-3 drives are not supported if the library is used with the
Pathlight VX.
Pathlight VX and an External Aggregation Switch
Depending on the type of physical library and number of physical libraries attached to the Pathlight VX, an
external aggregation device (an FC switch) may need to be used with the Pathlight VX so the required
number of port connections are available. ADIC recommends that a Brocade FC switch be used as an
aggregation device. Although you can provide use a different vendor’s FC switch for aggregation, ADIC only
provides technical support for a Brocade FC switch used with the Pathlight VX.
For information about whether an external aggregation switch is needed for the Pathlight VX contact a presales Service Engineer at ADIC (refer to Getting More Information or Help on page 4) and see the external
aggregation device paths in Figure 10 (for Entry-Level Configurations), Figure 11 on 14 (for Standard
Configuration), and Figure 12 on 14 (for High-Performance Configurations).
Figure 10
Aggregation Decision Path: Pathlight VX-450 / Pathlight VX-650 (Entry-Level Configuration)
Can all
data between
the Pathlight VX and
physical library be
communicated on 1
FC port?
yes
Aggregation device
not required
no
Aggregation device
required
Finish
Pathlight VX User’s Guide
13
Figure 11
Aggregation Decision Path: Pathlight VX-650 (Standard Configuration)
Does the
physical library
have 2 FC ports, each
of which communicates
identical and complete
information to Port 6
on each FC
blade?
yes
Aggregation device
not required
no
Aggregation device
required
Finish
Figure 12
Aggregation Decision Path: Pathlight VX-650 (High-Performance Configurations)
Can all
data between
the Pathlight VX and
physical library be
communicated on 3
or fewer
FC ports?
yes
Aggregation device
not required
no
Aggregation device
required
Finish
14
Description
Getting Started with Pathlight VX
The procedures in this chapter describe basic Pathlight VX operations, including logging on and logging off
the Pathlight VX User Interface, and starting up, shutting down and rebooting the system. This chapter also
introduces navigation in the User Interface and describes how to change basic system settings. This chapter
contains the following topics:
•
Logging On and Logging Off the Pathlight VX
•
Starting Up and Shutting Down the Pathlight VX on page 17
•
Navigating the Pathlight VX User Interface on page 27
•
Modifying Basic Settings on the Pathlight VX on page 30
Logging On and Logging Off the Pathlight VX
Use the procedures in this section to log on and log off the Pathlight VX User Interface.
Logging On the Pathlight VX
Use this procedure to log on Pathlight VX.
Note
1
If the Pathlight VX User Interface is idle for more than 30 minutes, the
system logs off the user.
Verify that the Management Server (MS) has rebooted completely.
Note
The MS boot process takes up to 25 minutes to complete; more time if the
Pathlight VX is a High-Performance Configuration.
Pathlight VX User’s Guide
15
2
Open a Web browser, either Internet Explorer or Netscape.
Note
The Pathlight VX User Interface supports these Internet browsers:
• Internet Explorer 5.5 and later versions
• Netscape 7.x
For best results when using an Internet browser to access the Pathlight VX User
Interface, verify these settings:
• JavaScript (active scripting) is enabled in the Security settings of the browser.
• Pop-up blocker is disabled.
• Page caching is disabled.
3
Log on the MS using one of these methods:
•
Connect a laptop computer (or PC) to the MS through a crossover Ethernet cable. Once a
connection is established, open a Web browser and specify this address:
http://192.168.100.3
•
Since you have established an Ethernet connection to the customer LAN, you can open a Web
browser and log on the Pathlight VX User Interface by specifying the IP address of the MS.
The Pathlight VX Login screen appears.
4
In the User Name box, type the user name.
5
In the Password box, type the password.
6
Click OK.
If this is the first time that the Pathlight VX User Interface is being accessed, then the License
Agreement screen appears. The License Agreement includes a checkbox that enables the screen to
be bypassed during subsequent logins.
7
Select this box if you do not want the License Agreement to appear in subsequent logins.
8
Click Accept.
If the Pathlight VX software has not finished initializing, a status screen appears.
If the Pathlight VX software is completely initialized, the Pathlight VX Home page appears.
Related topics:
Logging Off the Pathlight VX
Logging Off the Pathlight VX
Use this procedure to log off Pathlight VX.
Note
1
If the Pathlight VX User Interface is idle for more than 30 minutes, the system logs off the
user.
In the upper-right of any Pathlight VX screen, click Logout.
A dialog window prompts you to confirm the logout.
2
Click OK to confirm the logout.
Related topics:
Logging On the Pathlight VX on page 15
16
Getting Started with Pathlight VX
Starting Up and Shutting Down the Pathlight VX
Use the procedures in this section to start up and shut down the Pathlight VX (system software and
hardware components).
Starting Up the Pathlight VX
•
If the Pathlight VX rack has power distribution units (PDUs) or an equivalent mechanism, you can
switch on all components at the same time. If the Pathlight VX was pre-racked when it was installed,
then its rack contains PDUs.
•
If the Pathlight VX rack does not have PDUs or an equivalent mechanism, go to Step 1.
Note
Before you begin, note:
• The SNC does not have power buttons. Each SNC uses either 1 or 2
power cords. Power to the SNC is controlled by plugging each power cord
in or out of an AC power source.
• On DPEs or DAEs that do not have power buttons, power is controlled by
plugging each power cord in or out of an AC power source.
1
If the Pathlight VX bezel is attached to the system, remove it.
a. Grasp both sides of the bezel near the top.
b. Pull evenly on both sides of the bezel until the mounting clips release on each side.
c. Store the bezel in a secure location.
2
3
Verify the status of the components' power buttons. Do one of the following:
•
If an FC switch is present, turn it on by placing each power button (on the front panel) in the on
position and then go to Step 3.
•
If an FC switch is not present, go to Step 3.
Turn on the SNC by plugging each utility module's power cord to an AC power source.
CAUTION
The SNC does not initialize until the MS is started up and fully booted
(after the Pathlight VX software starts). While the MS is starting up, the
LEDs on the FC blade(s) "racetrack" (blink on and off).
4
Turn on each RAID. If the system is a Pathlight VX-450, go to Step 5. If the system is a Pathlight VX650, go to Step 6.
5
On each AX100SC, verify that the power cable is plugged in the power receptacle and use a pen to
push in the power button for 1 second. Go to Step 10 on page 18.
6
On each DPE and DAE, determine whether the enclosure has power buttons.
7
Turn on each DAE in sequence (DAE A1, DAE A2, DAE A3, etc.).
8
•
If the back panel contains power buttons, place them in the on position.
•
If the back panel does not contain power buttons, plug each power supply/cooling module's power
cord in an AC power source.
Turn on each SPS by placing the power button (on the back panel) in the on position.
Pathlight VX User’s Guide
17
9
Turn on each DPE.
•
If the back panel contains power buttons, place them in the on position.
•
If the back panel does not contain power buttons, plug each power supply/cooling module's power
cord in an AC power source.
10 Turn on the MS by pressing the power button on the front panel.
The MS turns on. The boot process takes approximately 25 minutes to complete; more time if the
Pathlight VX is a High-Performance Configuration.
CAUTION
The MS checks the battery for the DPE (located in the SPS) before it boots
up the software. If the battery needs to be charged, it can add an additional
30 minutes to the startup time for the MS.
CAUTION
Do not interrupt the MS boot process before it completes. If the MS does not
boot up completely, the Pathlight VX may not operate properly.
If you hear an audible alarm, receive a RAS service ticket indicating a failure when logging on the
Pathlight VX User Interface or a Pathlight VX component fails to start, there is a problem with the start
up process. Refer to Modifying Service Tickets on page 137 and Interpreting Status LEDs on page 151.
Related topics:
Shutting Down the Pathlight VX on page 19
Rebooting the Pathlight VX on page 25
MS LEDs on page 152
SNC LEDs on page 157
AX100SC LEDs on page 161
DPE/DAE LEDs on page 163
SPS LEDs on page 168
FC Switch LEDs on page 169
18
Getting Started with Pathlight VX
Shutting Down the Pathlight VX
Shutting down the Pathlight VX consists of two tasks:
•
Shutting Down the System Software and the MS
•
Shutting Down the Hardware on page 21
CAUTION
Rebooting the Pathlight VX causes access to virtual libraries to be
interrupted.
Note
To shut down the Pathlight VX, you must be a user with Administrator
privileges.
Note
Note the following before shutting down the Pathlight VX:
• The SNC does not have power buttons. Each SNC uses either 1 or 2 power cords.
The power is controlled by plugging each power cord either in or out of an AC
power source.
• If the DPEs or DAEs do not have power buttons, the power is controlled by
plugging each power cord either in or out of an AC power source.
Shutting Down the System Software and the MS
Use this procedure to shut down the system software and the MS.
1
Log on the MS.
Refer to Virtual Library Summary on page 27.
2
On the Pathlight VX Home page, select Operations→System Shutdown.
System
Shutdown
Pathlight VX User’s Guide
19
The Shutdown/Reboot screen appears.
Shutdown
3
From the Shutdown/Reboot screen, select Shutdown and click Apply.
The Progress Window appears and displays the status of the selected process.
CAUTION
•
Once the Progress Window appears, you cannot cancel the
Shutdown process. If you close the window by clicking the X in the
upper-right corner, you will not see a confirmation of the success or
failure of the Shutdown process.
If Success displays in the Progress Window: The Pathlight VX software has started to shut down.
Click Close to close the Progress Window.
The Shutdown Monitor appears, showing the progress of the system shutdown.
•
If Failure displays in the Progress Window: Capture the Pathlight VX system state and contact
ATAC. Refer to Capturing a System State on page 144 and Getting More Information or Help on
page 4.
The MS automatically powers itself down when the shutdown process is complete. The MS has shut
down completely if the power LED on the front of the MS goes dark.
20
Getting Started with Pathlight VX
4
If the MS does not shut down in about 5 minutes, press the power button on the MS to power it off.
power button
CAUTION
power LED
The host ports on each FC blade are turned off while the Pathlight VX
software shuts down. While the host ports are off, the FC blade's SFP
lasers do not send a signal and the host port link LEDs are off. The FC
blade's host ports and host port link LEDs do not turn back on until
the Pathlight VX start up process completes with no errors.
Continue with Shutting Down the Hardware on page 21.
Shutting Down the Hardware
Use this procedure to shut down the system hardware.
1
If you have not already done so, shut down the system software and MS.
Refer to Shutting Down the System Software and the MS on page 19.
2
Turn off the SNC by unplugging each utility module’s power cord from its AC power source.
3
Do one of the following:
4
•
If you are shutting down a Pathlight VX-450, go to Step 4.
•
If you are shutting down a Pathlight VX-650, go to Step 5 on page 22.
Turn off each AX100SC power supply by pushing the power button on the back panel.
power button
When the AX100SC(s) turn off, the power off sequence is complete for a Pathlight VX-450.
Pathlight VX User’s Guide
21
5
Turn off the SPS by placing the power button on the back panel in the off position.
When you turn off the SPS, the Activity LED goes dark and the On Battery LED comes on (amber).
These LEDs are visible on the back panel of the SPS.
Note
The SPS LEDs stay lit for up to 90 seconds while the cache is flushed to disk.
CAUTION
Do not unplug the cable connecting the SPS to the DPE. Unplugging
this cable can cause system errors.
cable connecting SPS to DPE - do not unplug
power button
Activity LED
On Battery LED
6
When the SPS’s On Battery LED goes dark, do one of the following to turn off the DPE:
•
If the DPE contains a power button, only turn off the controller opposite the SPS by placing the
power button on the back panel in the off position.
•
If the DPE does not contain a power button, only turn off the controller opposite the SPS by
unplugging the AC power cord from the power receptacle.
Cable connecting SPS to DPE - do not unplug
DPE controller
opposite the SPS
SPS
22
Getting Started with Pathlight VX
As viewed from the rear of the rack, the SPS is installed on the right. In this case,
you would turn off the DPE on the left. Turn off the left controller on the DPE.
Note
CAUTION
Do not unplug the cable connecting the SPS to the DPE. Unplugging
this cable can cause system errors.
left power receptacle
left power button
right power button (do not turn off)
right power
receptacle
(do not unplug)
7
Turn off each DAE.
•
If the DAE contains a power button, turn off the DAE by placing the power buttons on the back panel
in the off position.
•
If the DAE does not contain a power button, turn off the DAE by unplugging the AC power cords
from each power receptacle.
left power receptacle
Pathlight VX User’s Guide
power buttons
right power receptacle
23
8
If the Pathlight VX includes an FC switch, turn off the FC switch by placing the power buttons on the
front panel in the off position.
power button
The shutdown sequence is complete for a Pathlight VX-650.
WARNING
SHUTTING DOWN THE PATHLIGHT VX DOES NOT POWER OFF THE
RACK’S POWER SOURCE. IF MAINTENANCE ACTIVITIES EXPOSE
YOU TO THIS VOLTAGE, SHUT OFF THE RACK’S MAIN BREAKER
AND ATTACH A SIGN WARNING OTHERS NOT TO TURN ON THE
BREAKER WHILE MAINTENANCE IS IN PROGRESS.
Related topics:
Rebooting the Pathlight VX on page 25
Logging Off the Pathlight VX on page 16
24
Getting Started with Pathlight VX
Rebooting the Pathlight VX
Rebooting the Pathlight VX power cycles the MS and SNC and then restarts the system. Rebooting the
Pathlight VX enables changes to the system hardware and software to take effect.
CAUTION
Rebooting the Pathlight VX causes access to virtual libraries to be
interrupted.
Note
To reboot the Pathlight VX, you must be a user with Administrator
privileges.
Use this procedure to reboot the Pathlight VX.
1
Log on as a user with Administrator privileges.
2
On the Pathlight VX Home page, select Operations→System Shutdown.
System
Shutdown
The Shutdown/Reboot screen appears.
Reboot
Pathlight VX User’s Guide
25
3
Select Reboot and click Apply.
A dialog box prompts you to confirm the system reboot.
4
Click OK.
The Progress Window appears and displays the status of the selected process.
Note
•
Once the Progress Window appears, you cannot cancel or stop this
action. However, you can close the window by clicking the X in the upperright of the screen, but confirmation of success or failure is not shown.
If Success displays in the Progress Window: The Pathlight VX successfully started the reboot
process. Click Close to close the Progress Window.
The Shutdown Monitor appears and shows the progress of the system shutdown.
Note
•
26
During the shutdown process, you will lose connectivity to Pathlight VX before
the system reboots. This is an expected result of the reboot process.
If Failure displays in the Progress Window: The Pathlight VX did not start the reboot process.
Capture the Pathlight VX system state and contact ATAC. Refer to Capturing a System State on
page 144. For contact information, refer to Getting More Information or Help on page 4.
Getting Started with Pathlight VX
Navigating the Pathlight VX User Interface
This is the Home page of the Pathlight VX User Interface. The Virtual Library Summary and the System
Summary areas are identified. In the navigation bar, the Policies drop-down menu only appears if the
Storage Policies (Disk Extension) Advanced Feature has been licensed.
Virtual Library
Summary
System Summary
Virtual Library Summary
Virtual Library Summary information is available at the top of the Home page. The Summary provides an
overview of available virtual libraries, drives, and media.
Pathlight VX User’s Guide
27
The Virtual Library Summary provides this information:
•
Libraries - Shows available virtual libraries in the Pathlight VX. To view a virtual library report, click
Libraries. For more information, refer to Viewing the Virtual Library Summary Report on page 116.
•
Drives - For each virtual library, shows the total number of library drives, including active drives. To
view a report, click Drives. Refer to Viewing the Virtual Drive Summary Report on page 119.
•
Media - For each virtual library, shows the total number of media in the library and the number of
used media. To view a virtual media report, click Media. Viewing the Virtual Media Summary Report
on page 119.
•
Slots - For each virtual library, shows the total number of slots in the library and the number of slots
that are full (contain media). Each slot can hold one medium (virtual tape).
•
Mailbox Slots - For each virtual library, shows the number of mailbox slots that are full (contain
media).
•
Media Capacity Used - For each virtual library, shows the percentage of total media capacity that
has data written to it.
System Summary
The System Summary section is divided into two sub-categories:
•
•
28
Components - This section shows the status of the following components: FC blade (also referred
to as the SNC), RAID, MS, FC switch, and, if attached, one or more physical libraries.
•
For each Pathlight VX component, if there are no problems, a green box with a white checkmark
appears to the left of the component link. If there is no problem and you click the component
link, a dialog box reports the status is good. If there is a problem, a red circle with a white X
appears next to the component link.
•
If there is a problem and you click the component link, the Tools - System Status screen
appears and displays open service tickets for the component. For information on checking
service tickets, refer to Checking System Status on page 133.
Capacity Summary - This section shows information about the capacity of the system. It shows
the amount of disk space currently used and available as well as counts of the number of Disk
Extension media currently in use and available.
Getting Started with Pathlight VX
Menu Bar
The menu bar, used to navigate through the Pathlight VX User Interface, is located at the top of every page.
Table 2 describes the system status buttons.
Table 2
Menu Bar System Status Buttons
Button
Description
Home
The Home link returns you to the Home page on the Pathlight VX User Interface.
Help
The Help link launches the Online Help on the Pathlight VX User Interface.
Logout
The Logout link logs you off Pathlight VX.
Operations
The Operations drop-down menu provides options to manage virtual libraries and media
in the Pathlight VX.
Setup
The Setup drop-down menu provides options to set up the Pathlight VX, such as
creating users, network information, libraries, and drives.
Policies
If storage policies are licensed and enabled on the Pathlight VX, the Policies drop-down
menu provides options to create and manage policies.
Tools
The Tools drop-down menu provides additional options to manage media, monitor
system and activity status on Pathlight VX, perform a Health Check and capture the
system state.
Reports
The Reports drop-down menu provides options to view reports on virtual and physical
libraries, drives, and media in Pathlight VX, and reports of other system activity.
Help
The Help drop-down menu provides a link to the Pathlight VX online help, system
configuration information, and identifies the system software and firmware levels.
System Information Buttons
The system information buttons appear at the bottom of the Pathlight VX User Interface. Table 3 describes
the system information buttons.
Table 3
System Information Buttons
Button
Description
The System Status button displays a list of system status tickets. The System
Status button is only shown if there is a problem (open service ticket).
The Action Required button appears when there are actions that require user
intervention. Otherwise, this button does not appear.
The Admin Alert button appears when entries have been added to the admin
log that should be reviewed by a user with Pathlight VX Administrator
privileges.
Pathlight VX User’s Guide
29
Modifying Basic Settings on the Pathlight VX
This section includes procedures to modify basic settings on the Pathlight VX.
•
Changing the Admin Password
•
Applying the Pathlight VX License on page 31
•
Applying the Pathlight VX License on page 31
•
Changing Network Settings on page 31
•
Setting the Date, Time or Time Zone on page 32
•
Managing Support and System Notifications on page 34
Changing the Admin Password
When the Pathlight VX is installed, it is loaded with a default password for the Pathlight VX Administrator
(admin). The Administrator is a user with administrator privileges. During initial configuration, the Pathlight
VX installer is prompted, for security reasons, to change this default admin password. As a security best
practice, ADIC recommends that you periodically change the admin password.
1
Log on as a user with Administrator privileges.
2
From the menu bar, select Setup→Users.
The Setup - Users screen appears.
3
Select Admin and click Modify.
The Modify User Account screen appears.
4
Change the admin password.
•
Enter Password - The new admin password.
Note
•
5
Confirm Password - The new admin password is re-entered (confirmed).
Click Finish.
Note
6
30
The password must be at least 6 characters (alphanumeric and/or any
characters). Spaces are not allowed.
Once the Progress Window appears, you cannot cancel or stop this action.
However, you can close the window by clicking on the X in the upper-right of
the screen, but confirmation of success or failure is NOT shown.
•
If Success appears in the Progress Window: The admin password was successfully changed.
•
If Failure appears in the Progress Window: The admin password was NOT changed. To view the
troubleshooting procedures, click View Recommended Actions. To view the error details, click
Error Log for information on why the password was not changed. To change the admin password,
repeat Step 2 through Step 5.
Click Close to close the Progress Window.
Getting Started with Pathlight VX
Applying the Pathlight VX License
The Pathlight VX license key is entered when the Pathlight VX is installed and initially configured. If
Advanced Features are later purchased, then a new license key must be applied so that the Advanced
Features can be enabled.
1
From the menu bar, select Setup→License.
The Setup - License screen appears.
2
In the Enter New License key field, enter the license key and click Apply.
The license key is applied to the Pathlight VX.
Note
The Setup - License screen updates to show the current licensed
configuration.
Changing Network Settings
Change network settings for the Pathlight VX on the Setup - Network screen.
1
2
Obtain the following Pathlight VX system information from the LAN administrator:
•
Hostname
•
IP Address
•
Default Gateway Address
•
Subnet Mask
•
Domain Name (optional)
•
Primary DNS (optional)
From the menu bar, select Setup→Network.
The Setup - Network screen appears.
3
Complete the following required fields using the information obtained from the LAN administrator:
•
Hostname
•
IP Address
•
Default Gateway Address
•
Subnet Mask
•
Complete the following optional fields:
•
Domain Name (optional)
•
Primary DNS (optional)
Pathlight VX User’s Guide
31
4
Click Apply.
The Progress Window appears, which contains information on the status of setting the internal backup
schedule.
Note
Once the Progress Window appears, you cannot cancel or stop this
action. However, you can close the window by clicking on the X in the
upper-right of the screen, but confirmation of success or failure is NOT
shown.
•
If Success appears in the Progress Window: The updated network settings were successfully
applied to the Pathlight VX. The Pathlight VX User Interface can now be accessed remotely through
a Web browser using either the Hostname or IP address of the Pathlight VX.
•
If Failure appears in the Progress Window: The updated network settings were not applied. To
view the troubleshooting procedures, click View Recommended Actions. To view the error details,
click Error Log for information on why the updated network settings were not applied. To change
network settings, repeat Step 2 through Step 4.
Setting the Date, Time or Time Zone
This feature enables you to set the date, time or time zone on the MS. The time setting can be adjusted
manually or synchronized with Network Time Protocol (NTP).1 The default time zone setting is Greenwich
Mean Time (GMT).
1
Log on as a user with Administrator privileges.
2
From the menu bar, select Setup→Date & Time.
The Setup - Date & Time screen appears and displays the Date & Time and NTP Setting panes.
3
Set the date, time and/or time zone for the Pathlight VX. The date and time can be manually set or
synchronized with NTP. The time zone must be set manually.
•
Setting the Date - The date can be set manually or synchronized with NTP.
•
To manually set the date:
a. In the Select Date field, specify the date.
b. Go to Step 4 on page 33.
•
To synchronize the date with NTP:
a. In the NTP field, select Enable.
b. In the Enter IP Address 1 field, enter the IP address of the NTP server with which to
synchronize the Pathlight VX. Click Test to verify that the Pathlight VX can access the
specified server.
c. Optionally, in the Enter IP Address 2 field, enter the IP address of a second NTP server
with which to synchronize the Pathlight VX. The system only accesses the second NTP
server if, for some reason, the first NTP server cannot be reached. Click Test to verify that
the Pathlight VX can access the specified server.
d. Go to Step 4 on page 33.
1. NTP synchronizes the time of a computer or server to another server or reference time source. On a LAN, NTP is
generally accurate within a millisecond.
32
Getting Started with Pathlight VX
•
Setting the Time - The time can be set manually or synchronized with NTP.
•
To manually set the time:
a. In the Enter Time field, enter the local time and specify AM or PM.
b. Go to Step 4.
•
To synchronize the time with NTP:
a. In the NTP field, select Enable.
b. In the Enter IP Address 1 field, enter the IP address of the NTP server with which to
synchronize the Pathlight VX. Click Test to verify that the Pathlight VX can access the
specified server.
c. Optionally, in the Enter IP Address 2 field, enter the IP address of a second NTP server
with which to synchronize the Pathlight VX. The system only accesses the second NTP
server if, for some reason, the first NTP server cannot be reached. Click Test to verify that
the Pathlight VX can access the specified server.
d. Go to Step 4.
•
Setting the Time Zone - The time zone must be set manually.
a. In the Enter Time Zone field, specify the time zone where the Pathlight VX is located.
b. Go to Step 4.
4
Click Apply.
The Progress Window appears, which contains information on the status of the updated settings.
Note
5
Once the Progress Window appears, you cannot cancel or stop this
action. However, you can close the window by clicking on the X in the
upper-right of the screen, but confirmation of success or failure is NOT
shown.
•
If Success appears in the Progress Window: The updated settings were successfully changed.
•
If Failure appears in the Progress Window: The updated settings were NOT changed. To view the
troubleshooting procedures, click View Recommended Actions. To view the error details, click
Error Log for information on why the updated settings were not changed. To change the date, time
and/or time zone settings, repeat Step 3 on page 32 and Step 4.
Click Close to close the Progress Window.
Pathlight VX User’s Guide
33
Managing Support and System Notifications
Pathlight VX offers several support and system notifications that alert recipients of system changes or
problems that may require attention. The support notification alerts the ADIC Technical Assistance Center
(ATAC) of Pathlight VX problems. System notifications provide email alerts to designated individuals.
Note
Before setting up a support or system notification, configure the e-mail settings for the
Pathlight VX. If these settings are not configured, support and system notifications will not
be sent.
Configuring E-mail Settings for the Pathlight VX
Use this procedure to configure e-mail settings for the Pathlight VX. The system will use these settings when
it sends system notifications and alerts by e-mail through the customer's SMTP (e-mail) server.
CAUTION
To enable Pathlight VX system notifications and alerts to be successfully
sent by e-mail through the customer's SMTP (e-mail) server, certain e-mail
settings must be configured. If these settings are not configured, Pathlight
VX notifications and alerts will not be sent by e-mail. Each failed attempt to
send a notification or alert by e-mail causes a service ticket to be created.
1
Log on as a user with Administrator privileges.
2
From the menu bar, select Setup > E-mail Configuration.
The Setup - E-mail Configuration screen appears and lists the following fields.
•
Enter SMTP Server IP Address: The SMTP server is the e-mail server that the customer wants to
use to transmit Pathlight VX notifications and alerts. Enter the SMTP server's IP address in this field.
•
Select Authentication: Indicates whether the selected SMTP server (specified in the Enter SMTP
Server IP Address field) requires authentication (an account name and a password). If the SMTP
server requires authentication, select Password. If the SMTP server does not require
authentication, select None.
•
Enter Account Name: If the SMTP server requires authentication, the account name to access the
SMTP server. If the SMTP server does not require authentication, this field is greyed out (not
selectable).
•
Enter Account Password: If the SMTP server requires authentication, the password to access the
SMTP server. If the SMTP server does not require authentication, this field is greyed out (not
selectable).
•
Enter Sender Address: This is the e-mail address that appears in e-mail notifications and alerts
sent by the Pathlight VX. The suggested format of the sender address is:
[email protected] where customer.com is the customer's domain. This is a sample
sender address: [email protected].
Note
34
Remember that the sender address is an e-mail address not an IP address.
Getting Started with Pathlight VX
3
Enter valid values in the fields on the Setup - E-mail Configuration screen and click Apply.
The Progress Window appears and displays the status of the selected process.
Note
4
Once the Progress Window appears, you cannot cancel or stop this action.
However, you can close the window by clicking on the X in the upper-right of
the screen, but confirmation of success or failure is NOT shown.
•
If Success is shown in the Progress Window: The e-mail settings for the Pathlight VX were
successfully configured.
•
If Failure is shown in the Progress Window: The e-mail settings for the Pathlight VX were not
configured. To view the troubleshooting procedures, click View Recommended Actions. To view
the error details, click Error Logs for information on why the e-mail settings were not configured.
To re-configure the e-mail settings for the Pathlight VX, repeat Step 1 through Step 3.
Close the Progress Window.
Enabling the Support Notification
When enabled, the Pathlight VX Support Notification feature sends an e-mail to ATAC when problems occur
in the Pathlight VX. The support notification can be enabled or disabled, but ATAC’s notification address
([email protected]) cannot be deleted from the System Email Notifications screen.
1
From the menu bar, select Setup→Notification.
The Setup - System E-mail Notifications screen appears. If e-mail settings have not been configured
for the Pathlight VX, you are prompted to configure them before enabling the support notification. Refer
to Configuring E-mail Settings for the Pathlight VX on page 34.
2
Select [email protected].
3
Verify that the support notification works properly by sending a test notification.
a. Click the Test button to the right of [email protected] to send a test notification to ATAC.
b. Contact ATAC to determine if they received the test notification. If ATAC received the test
notification, go to Step 4 on page 36. If ATAC did not receive the test notification, perform these
steps:
1
If a relay mail server is used and a host name was specified for the relay server, specify an
IP address instead; the Hostname may not be resolved properly.
2
If a relay mail server is used, verify the DNS parameter in the Pathlight VX’s network
settings to be sure the Hostname is resolved properly. Refer to Changing Network Settings
on page 31.
3
Repeat Step 2 and Step 3. Contact ATAC to determine if the test notification was received.
Pathlight VX User’s Guide
35
4
Click Modify.
The Modify System Email Notification screen appears.
5
In the New Settings column, select Enabled and click Apply.
The Progress Window appears, which contains information on the status of the support notification.
Note
6
Once the Progress Window appears, you cannot cancel or stop this action.
However, you can close the window by clicking on the X in the upper-right of
the screen, but confirmation of success or failure is NOT shown.
•
If Success appears in the Progress Window: The support notification was successfully enabled.
•
If Failure appears in the Progress Window: The support notification was NOT enabled. To view
the troubleshooting procedures, click View Recommended Actions. To view the error details, click
Error Log for information on why the support notification was not enabled. To enable the support
notification, repeat Step 1 on page 35 through Step 5.
Click Close to close the Progress Window.
Related topics:
Disabling the Support Notification
Creating a System Notification on page 38
Modifying a System Notification on page 40
Deleting a System Notification on page 41
36
Getting Started with Pathlight VX
Disabling the Support Notification
When disabled, the Pathlight VX Support Notification feature will not send an e-mail to ATAC about system
conditions that require repair and impending system failures. The support notification can be enabled or
disabled, but ATAC’s notification address ([email protected]) cannot be deleted from the System Email
Notifications screen.
1
From the menu bar, select Setup→Notification.
The Setup - Notification screen appears.
2
Select the e-mail address to be modified.
3
Click Modify.
The Modify System Email Notification screen appears.
4
Under New Settings, select Disabled and click Apply.
The Progress Window appears, which contains information on the status of the support notification.
Note
Once the Progress Window appears, you cannot cancel or stop this
action. However, you can close the window by clicking the X in the upperright of the screen, but confirmation of success or failure is NOT shown.
•
If Success appears in the Progress Window: The support notification was successfully disabled.
•
If Failure appears in the Progress Window: The support notification was NOT disabled. To view
the troubleshooting procedures, click View Recommended Actions. To view the error details, click
Error Log for information on why the support notification was not disabled. To disable the support
notification, repeat Step 2 through Step 4.
Related topics:
Enabling the Support Notification on page 35
Disabling the Support Notification on page 37
Creating a System Notification on page 38
Modifying a System Notification on page 40
Deleting a System Notification on page 41
Pathlight VX User’s Guide
37
Creating a System Notification
The Pathlight VX System Notification feature sends e-mail to the designated recipient with information about
system conditions that require repair and impending system failures.
1
From the menu bar, select Setup→Notification.
The Setup - System E-mail Notifications screen appears.
2
Click Create to create an e-mail notification.
The Create System E-mail Notification screen appears.
3
In the Enter Email Address field, enter the e-mail address of an individual who should receive Pathlight
VX notifications.
4
From the Select Alert Level drop-down menu, select the alert level when a designated individual
should receive a notification. System alert levels include one or more events based on severity. Refer
to Table 4 for descriptions of event severity and system alert levels. Available system alert level options
are: High, High and Medium, and All. Available event severity levels are: Low, Medium, and High.
Table 4
Pathlight VX Event Severity and System Alert Levels
Event Severity
Level
Alert Level Containing
This Event Severity Level
Description
Low
An event occurred which needs to be resolved, but it generally
does not affect Pathlight VX operation or performance. Low
severity events are only selectable as part of the All alert level.
All
Medium
A more serious event occurred which needs to be resolved, but
it does not necessarily need to be fixed as soon as possible.
Pathlight VX operation and performance may be degraded.
All
High and Medium
High
A critical event occurred which needs to be resolved as soon as
possible. Pathlight VX operation and performance are degraded
and there is a risk of impending system failure or data loss.
All
High
High and Medium
38
Getting Started with Pathlight VX
5
Click Apply.
The Progress Window appears, which contains information on the status of the system notification.
Note
Once the Progress Window appears, you cannot cancel or stop this
action. However, you can close the window by clicking the X in the upperright of the screen, but confirmation of success or failure is NOT shown.
•
If Success appears in the Progress Window: The system notification was created.
•
If Failure appears in the Progress Window: The system notification was NOT created. To view the
troubleshooting procedures, click View Recommended Actions. To view the error details, click
Error Log for information on why the system notification was not created. To create a system
notification, repeat Step 2 on page 38 through Step 5.
6
Click Close to close the Progress Window.
7
Verify that the new system notification works properly by sending a test notification to the e-mail
address.
a. Click the Test button to the right of the newly-created system notification.
A confirmation dialog box prompts if you want to send the test notification.
b. Click OK.
c. Contact the e-mail recipient to verify if the test notification was received. If the test notification
was not received, verify that the correct e-mail address was entered.
Related topics:
Modifying a System Notification on page 40
Deleting a System Notification on page 41
Pathlight VX User’s Guide
39
Modifying a System Notification
The System Notification feature sends an e-mail to a designated recipient with information about system
conditions that require repair and impending system failures. Use this procedure to modify a system
notification and change the email address of a notification recipient.
1
From the menu bar, select Setup→Notification.
The Setup - Notification screen appears.
2
Select the e-mail address to be modified.
3
Click Modify.
The Modify System Email Notification screen appears.
4
Under New Settings, enter a new e-mail address and click Apply.
The Progress Window appears, which contains information on the status of the system notification
being modified.
Note
Once the Progress Window appears, you cannot cancel or stop this
action. However, you can close the window by clicking the X in the upperright of the screen, but confirmation of success or failure is NOT shown.
•
If Success appears in the Progress Window: The system notification was successfully modified.
•
If Failure appears in the Progress Window: The system notification was NOT modified. To view
the troubleshooting procedures, click View Recommended Actions. To view the error details, click
Error Log for information on why the system notification was not modified. To modify the system
notification, repeat Step 1 through Step 4.
Related topics:
Creating a System Notification on page 38
Deleting a System Notification on page 41
40
Getting Started with Pathlight VX
Deleting a System Notification
The System Notification feature sends a message through e-mail to a designated recipient with information
about system conditions that require repair and impending system failures. Use this procedure to delete a
system notification by removing the email address of a notification recipient.
1
From the menu bar, select Setup→Notification.
The Setup - System Email Notifications screen appears.
2
Select the e-mail address to be deleted.
3
Click Delete.
A confirmation dialog box appears.
4
Click OK.
5
Click Apply.
Note
The Progress Window appears, which contains information on the status
of the system notification being deleted.
Note
Once the Progress Window appears, you cannot cancel or stop this
action. However, you can close the window by clicking on the X in the
upper-right of the screen, but confirmation of success or failure is NOT
shown.
•
If Success appears in the Progress Window: The system notification was successfully deleted.
•
If Failure appears in the Progress Window: The system notification was NOT deleted. To view the
troubleshooting procedures, click View Recommended Actions. To view the error details, click
Error Log for information on why the system notification was not deleted. To delete a system
notification, repeat Step 2 through Step 5.
Related topics:
Creating a System Notification on page 38
Modifying a System Notification on page 40
Pathlight VX User’s Guide
41
42
Getting Started with Pathlight VX
Performing Basic Tasks and Operations
Use this procedures in this chapter to perform basic tasks and operations in the Pathlight VX. This chapter
also contains procedures for managing support and system notifications, FC Hosts, user accounts and
virtual libraries, drives, and media. This chapter contains the following section:
•
Performing Basic Pathlight VX Tasks
•
Working with Virtual Libraries, Drives, and Media on page 52
•
Managing FC Hosts on page 70
•
Managing User Accounts on page 76
Performing Basic Pathlight VX Tasks
This section includes procedures for basic tasks in the Pathlight VX, including performing required actions,
changing virtual and physical library modes, renaming a physical library and canceling a pending request.
Performing Required Actions
The Action Required feature notifies Pathlight VX customers of actions that require user intervention. Each
required action has a link that enables the user to intervene as necessary. For example, the Unknown Media
required action prompts the user to select a media pool (from a pre-defined list) to which to assign new
media in the Pathlight VX.
1
Log on as a user with Administrator privileges.
2
Do one of the following:
•
Click Action Required.
The Tools - User Action Required screen appears.
- OR -
•
Click Tools→Required Actions.
The Tools - User Action Required screen appears.
Pathlight VX User’s Guide
43
Required Action
Procedure
Unknown media in
the system,
indicate media
pool is the
requested action:
This action appears when media is introduced into the Pathlight VX. You can
either import the media into a selected media pool or cancel the import
operation. To import media, refer to the steps below. To cancel the media
import, refer to the steps on page 46.
• To import the media into the Pathlight VX:
1 Click the link to view the media type.
The Define Unknown Media screen appears.
2 Select media for the action. Do one of the following:
a. From the list, select the media.
- OR b. Narrow the media list:
In the text box, to the right of Apply Filter, enter barcodes, barcode
ranges, wild cards(* ) or any combination of these separated by
commas.
EXAMPLE:
00AB01, 00AB20-00AB50, AB* , *AB
NOTE: These values are case-sensitive.
3 Select the appropriate media pool (Application, Internal Backup, Disk
Extension, Cleaning or Service).
• Application - Media that can be used by the backup application.
a. Click Next.
b. In the Select Virtual Library drop-down list, select a library to
associate with the media.
c. In the Select Media Action drop-down list, select an action to apply to
the media. Available options are:
• Scratch — Imports all selected items as new media (scratch). Data
currently on the selected media can be overwritten.
• Preserve Data — Preserves data on the selected media. Virtual
preserves all data from the media to disk. Direct Access restores all
files directly from media without copying the contents to disk.
d. In the Select Entry Method drop-down list, select an entry method to
introduce the media to the Pathlight VX. Available options are:
• I/E Station — Enters media through the library’s I/E station.
• Slot — Enters media through the library’s door.
44
Performing Basic Tasks and Operations
Required Action
Procedure
Unknown media
in the system,
indicate media
pool is the
requested action:
e. In the Select Export Rule drop-down list, select a media export rule.
This parameter specifies a destination for the media when it is exported
from the Pathlight VX. Available options are:
• Export to I/E Station — This rule exports physical media from the
Pathlight VX through a physical library’s I/E station. The physical media
is moved to the I/E station, and the disk where the virtual tape was
stored is released so it can be reused.
• Export to Storage Slot — This rule exports media from a virtual library
to a physical library in offline status. Instead of moving the physical
media out of the library through the I/E station, the media is placed into
a slot in the library’s main storage area and held there in offline status
(creating ‘offline library media’). The disk where the virtual tape was
stored is released so it can be reused.
f. Click the operation.
• If Scratch was selected as the media action, go to Step 4 on page 45.
• If Preserve Data was selected as the media action, click Next, specify
a method to preserve the data, and then go to Step 4 on page 45.
Available options are: Virtual and Direct Access.
• Internal Backup — Media for Pathlight VX internal backups.
• Disk Extension — Media used by Pathlight VX storage policies to make
additional copies of virtual data.
• Cleaning — Media used to clean tape drives in physical libraries.
• Service — Media used for Service.
4 Click Finish.
The Progress Window appears, which contains information on the status of
defining the unknown media.
NOTE: Once the Progress Window appears, you cannot cancel or stop this
action. However, you can close the window by clicking the X in the upperright of the screen, but confirmation of success or failure is NOT shown.
• If Success appears in the Progress Window: The unknown media was
successfully assigned to a media pool.
• If Failure appears in the Progress Window: The unknown media was NOT
assigned to a media pool. To view the troubleshooting procedures, click
View Recommended Actions. To view the error details, click Error Log
for information on why the unknown media was not assigned to a media
pool. To assign unknown media to a media pool, repeat Step 1 on page 44
through Step 4.
5 Click Close to close the Progress Window.
1
The export operation retrieves media from the Pathlight VX when the system is attached to a physical library.
Pathlight VX User’s Guide
45
Required Action
Procedure
Unknown media
in the system,
indicate media
pool is the
requested action:
•
To cancel the media import into the Pathlight VX:
1 Select media for which to cancel the import operation, check the Cancel
Import box, and click Finish.
You are prompted that the import operation will be cancelled and the
selected media will be sent to the I/E Station.
2 Click OK.
The Progress Window appears, which contains information on the status of
the cancelled import operation.
NOTE: Once the Progress Window appears, you cannot cancel or stop this
action. However, you can close the window by clicking the X in the upper-right
of the screen, but confirmation of success or failure is NOT shown.
• If Success appears in the Progress Window: The media import operation
was successfully cancelled for the selected media.
• If Failure appears in the Progress Window: The media import operation was
NOT cancelled for the selected media. To view the troubleshooting
procedures, click View Recommended Actions. To view the error details,
click Error Log for information on why the media import operation was not
cancelled for the selected media. To cancel the media import operation for
selected media, repeat Step 1 and Step 2.
3 Click Close to close the Progress Window.
Physical media
ready for removal
from physical
library I/E station
is the requested
action:
This action appears when media is ready to be removed from a physical library
attached to the Pathlight VX.
NOTE: This required action also causes an Admin Alert to appear on the Pathlight
VX User Interface.
1 Click the link to view the message.
The Physical Media Ready for Removal screen lists the barcodes of media
ready for removal from the I/E station (mailbox) of the physical library.
2 Remove the media from the physical library’s mailbox.
46
Performing Basic Tasks and Operations
Required Action
Procedure
Archived media
returned, indicate
resolution is the
requested action:
This action appears when previously archived physical media is re-inserted into a
physical library attached to the Pathlight VX.
1 Click the link to view the message.
2 Select the media to resolve.
3 Select a method to re-introduce the archived media to the Pathlight VX.
•
Retain Virtual — Data on the physical media is deleted. The data on the
virtual copy is retained.
•
Overwrite Virtual — Data on the physical media is copied (overwritten) to the
virtual copy.
•
Direct Access — Data on the physical media is accessed directly by the
Pathlight VX backup application. The data on the virtual copy is discarded.
•
Scratch — Data on the physical media and the virtual copy is discarded.
Pathlight VX treats the physical media as a blank tape.
4 Click Apply.
The Progress Window appears, which contains information on the status of
defining the unknown media.
NOTE: Once the Progress Window appears, you cannot cancel or stop this
action. However, you can close the window by clicking the X in the upper-right
of the screen, but confirmation of success or failure is NOT shown.
• If Success appears in the Progress Window: The archived media was
successfully re-introduced to the Pathlight VX.
• If Failure appears in the Progress Window: The archived media was NOT
re-introduced to the Pathlight VX. To view the troubleshooting procedures,
click View Recommended Actions. To view the error details, click Error Log
for information on why the archived media was not re-introduced to the
Pathlight VX. To re-introduce archived media to the Pathlight VX, repeat Step
1 on page 46 through Step 4.
5 Click Close to close the Progress Window.
Pathlight VX User’s Guide
47
Required Action
Procedure
An export has
been requested
for an archived
media, indicate
resolution is the
requested action:
This action appears when an export command has been issued for archived
media.
1 Click the link to view the message.
2 Select the media to resolve.
3 Decide whether to rewrite data on the virtual media to the corresponding
physical media or use the existing physical media:
•
Recreate the Physical Volume — Data on the virtual media is rewritten to
the corresponding physical media (volume).
•
Use Existing Physical Volume — Data on the physical media (volume) is
usable. It is not necessary to rewrite the contents of the virtual media to the
physical volume.
4 Click Apply.
The Progress Window appears, which contains information on the status of the
export operation on the archived media.
NOTE: Once the Progress Window appears, you cannot cancel or stop this
action. However, you can close the window by clicking the X in the upper-right
of the screen, but confirmation of success or failure is NOT shown.
• If Success appears in the Progress Window: The archived media was
successfully exported.
• If Failure appears in the Progress Window: The archived media was NOT
exported. To view the troubleshooting procedures, click View
Recommended Actions. To view the error details, click Error Log for
information on why the archived media was not exported. To export archived
media, repeat Step 1 through Step 4.
5 Click Close to close the Progress Window.
Physical Media
Needed for
Pending Export is
the requested
action:
This action appears when media needs to be added to a physical library attached
to the Pathlight VX.
1 Click the link to view the message.
2 Obtain the labeled physical media listed in the message.
3 Place the physical media in the physical library.
Pathlight VX detects the addition of new media in the physical library.
3
48
Click Cancel to close the window.
Performing Basic Tasks and Operations
Changing Library Modes (Online and Offline)
In the Pathlight VX, you can change the operating modes of virtual and physical libraries. There are two
library modes, online and offline.
•
Online - The library is in the normal operating state. In online mode, the library processes Pathlight
VX commands.
•
Offline - The library is in an offline state. In offline mode, the library does not process Pathlight VX
commands.
Changing Virtual Library Modes
You must take a virtual library offline in this situation:
•
Before using the Pathlight VX User Interface to move media (from a drive to a slot, from a slot to a
drive, or from a slot to a slot).
Note
On the Tools - Move Media screen, you can take the virtual library offline
before moving media (if it is not already offline).
Use this procedure to change the library mode for a virtual library.
1
From the menu bar, select Operations→Library Management→Virtual.
The Operations - Virtual Library Mode screen appears and lists the virtual libraries in the Pathlight
VX. For each library, the library type and current mode (online / offline) are listed.
2
Select the virtual library or libraries for which you want to change the library mode and click Apply.
A dialog box prompts you to confirm the library mode change for the selected libraries.
3
Click OK to confirm the library mode change.
The Progress Window appears, which contains information on the status of the library mode change.
Note
4
Once the Progress Window appears, you cannot cancel or stop this
action. However, you can close the window by clicking the X in the upperright of the screen, but confirmation of success or failure is not shown.
•
If Success appears in the Progress Window: The library mode was successfully changed for the
selected virtual library or libraries.
•
If Failure appears in the Progress Window: The library mode was NOT changed. To view the
troubleshooting procedures, click View Recommended Actions. To view the error details, click
Error Log for information on why the library mode was not changed. To change the library mode
of a virtual library, repeat Step 1 through Step 3.
Click Close to close the Progress Window.
Pathlight VX User’s Guide
49
Changing Physical Library Modes
You must take a physical library offline in these situations:
•
Before removing and replacing a drive in the library.
•
Before performing maintenance on the library.
Use this procedure to change the library mode for a physical library.
1
From the menu bar, select Operations→Library Management→Physical→Library Mode.
The Operations - Physical Library Mode screen appears and lists the physical libraries attached to
the Pathlight VX. For each library, the serial number, library type and current mode (online or offline)
are listed.
2
Select the physical library or libraries for which you want to change the mode and click Apply.
A dialog box prompts you to confirm the library mode change for the selected libraries.
3
Click OK to confirm the library mode change.
The Progress Window appears, which contains information on the status of the library mode change.
Note
4
Once the Progress Window appears, you cannot cancel or stop this
action. However, you can close the window by clicking the X in the upperright of the screen, but confirmation of success or failure is not shown.
•
If Success appears in the Progress Window: The library mode was changed for the selected
physical library or libraries.
•
If Failure appears in the Progress Window: The library mode was NOT changed. To view the
troubleshooting procedures, click View Recommended Actions. To view the error details, click
Error Log for information on why the library mode was not changed. To change the library mode
of a physical library, repeat Step 1 through Step 3.
Click Close to close the Progress Window.
Renaming a Physical Library
Pathlight VX applies a default naming convention to physical libraries when they are created, naming them
lib1, lib2, and so on. Use this procedure if you want to rename a physical library.
1
From the menu bar, select Operations→Library Management→Physical→Rename Library.
The Operations - Rename Physical Library screen appears. All physical libraries attached to the
Pathlight VX are listed along with their serial numbers.
2
Select the physical library you want to rename and click Next.
The Rename Physical Library - Physical Library screen appears where Physical Library is the name
of the selected library.
50
Performing Basic Tasks and Operations
3
Enter the new name of the physical library and click Apply.
The Progress Window appears, which contains information on the status of the operation to rename
the selected physical library.
Note
4
Once the Progress Window appears, you cannot cancel or stop this
action. However, you can close the window by clicking the X in the upperright of the screen, but confirmation of success or failure is not shown.
•
If Success appears in the Progress Window: The selected physical library was successfully
renamed.
•
If Failure appears in the Progress Window: The selected physical library was not renamed. To
view the troubleshooting procedures, click View Recommended Actions. To view the error details,
click Error Log for information on why the physical library was not renamed. To rename another
physical library, repeat Step 1 on page 50 through Step 3.
Click Close to close the Progress Window.
Canceling a Pending Request
This operation cancels a pending request for selected media in one of these states: pending import,
pending export or Early Tape Creation.
1
From the menu bar, select Operations→Cancel Request.
The Operations - Cancel Pending Request screen appears and lists all media with requests pending.
For each medium, its barcode, associated library, media type, and state are shown.
2
Select the media for which you want to cancel a pending request by checking the box next to the media.
3
Click Apply.
The Progress Window appears.
Note
4
Once the Progress Window appears, you cannot cancel or stop this
action. However, you can close the window by clicking on the X in the
upper-right of the screen, but confirmation of success or failure is not
shown.
•
If Success appears in the Progress Window: Pending requests on the selected media were
successfully canceled.
•
If Failure appears in the Progress Window: Pending requests on the selected media were NOT
canceled. To view the troubleshooting procedures, click View Recommended Actions. To view
the error details, click Error Log for information on why the selected requests were not canceled.
To cancel additional pending requests, repeat Step 1 through Step 3.
Click Close to close the Progress Window.
Pathlight VX User’s Guide
51
Working with Virtual Libraries, Drives, and Media
The Pathlight VX presents a virtual library, drives, and media to the Pathlight VX backup host and
application. The virtual media presents the RAID disk capacity. The procedures in this section describe how
to create, modify, and delete these virtual elements. This section contains the following topics:
52
•
Working with Virtual Libraries
•
Working with Virtual Drives on page 58
•
Working with Virtual Media on page 61
Note
Any addition or deletion of a virtual element may require a reboot of the host
server in order for the host server to detect the correct number of elements.
Additionally, the Pathlight VX backup application may need to be reconfigured to
power operation of the application. For the proper procedure, refer to the backup
application’s user’s manual.
Note
If virtual media is added or deleted in a virtual library, you may need to perform an
inventory on the Pathlight VX backup application to ensure the application media
database is current.
Performing Basic Tasks and Operations
Working with Virtual Libraries
Pathlight VX supports up to 32 virtual libraries in the Pathlight VX. The maximum number of virtual libraries
that can be created is specified by your Pathlight VX license.Supported library types are: Pathlight VX,
Scalar 100, Scalar 1000, Scalar 10K, Scalar i2000, and Scalar i500.
Creating a Virtual Library
To identify the number of virtual libraries for which the Pathlight VX is licensed, refer to Applying the
Pathlight VX License on page 31.
Use this procedure to create one or more virtual libraries in the Pathlight VX.
1
Log on as a user with Administrator privileges.
2
From the menu bar, select Setup→Virtual Library.
The Setup - Virtual Library screen appears. This screen lists all existing virtual libraries and, for each
library, its library type.
3
Click Create.
The Create Virtual Library screen appears and displays library and drive parameters. Use this screen
to set up the virtual library, assign its name, number of slots, drive type, and number of drives.
Pathlight VX User’s Guide
53
4
•
Select Type – The library type. Supported virtual libraries are: Pathlight VX, Scalar 100, Scalar
1000, Scalar 10K, Scalar i2000, and Scalar i500. Select the library type from the drop-down list.
•
Enter Name – The library name.
•
Enter Number of Slots – The number of library slots to create.
•
Select Type – The drive type. Supported drive types are: LTO-1, LTO-2, and LTO-3. Select the
drive type from the drop-down list.
•
Enter Number of Drives – The number of drives to create. The number of available drives are
listed to the right of the input field.
Specify the library and drive parameters and click Apply.
The Progress Window appears, which contains information on the status of the new virtual library.
Note
54
Once the Progress Window appears, you cannot cancel or stop this
action. However, you can close the window by clicking the X in the upperright of the screen, but confirmation of success or failure is NOT shown.
•
If Success appears in the Progress Window: The virtual library was successfully created with the
specified library and drive parameters.
•
If Failure appears in the Progress Window: The virtual library was NOT created. To view the
troubleshooting procedures, click View Recommended Actions. To view the error details, click
Error Log for information on why the library was not created with the specified library and drive
parameters. To create another virtual library, repeat Step 2 on page 53 through Step 4.
Performing Basic Tasks and Operations
5
Click Close to close the Progress Window.
The Setup - Virtual Library screen appears, which includes the name and type of the newly-created
virtual library.
You are prompted to map the newly-created library to an FC Host.
6
Click OK.
The Setup - Host Access screen appears.
7
Map the new library to an FC Host. For detailed steps, refer to Configuring an FC Host on page 70.
8
Do one of the following:
•
Create virtual media for the virtual library. Refer to Creating Virtual Media on page 61.
- OR •
Create additional virtual libraries. Repeat Step 3 on page 53 through Step 5.
Related topics:
Modifying a Virtual Library on page 56
Deleting a Virtual Library on page 57
Pathlight VX User’s Guide
55
Modifying a Virtual Library
Once a virtual library is created, you can modify these parameters: library name, library type, FC blade, slot
count, and specify whether the library uses extended barcodes. If you need to change other library
parameters, you must delete the library and create a new one with different parameters. For more
information, refer to Deleting a Virtual Library on page 57 and Creating a Virtual Library on page 53.
Use this procedure to modify a virtual library in the Pathlight VX.
1
Log on as a user with Administrator privileges.
2
From the menu bar, select Setup→Virtual Library.
The Setup - Virtual Library screen appears. This screen lists all existing libraries and, for each library,
its library type.
3
Select the virtual library you want to modify and click Modify.
Note
You can only modify one virtual library at a time.
The Modify Virtual Library - Library Name screen appears where Library Name is the name of the
selected library. Use this page to modify these parameters: library name, library type, the FC blade
associated with the library, slot count, and whether the library uses extended barcodes.
Note
4
You can only add to the number of slots. You cannot reduce the number of
slots.
Modify one or more parameters and click Apply.
The Progress Window appears, which contains information on the status of the virtual library being
modified.
Note
5
Once the Progress Window appears, you cannot cancel or stop this action.
However, you can close the window by clicking on the X in the upper-right of
the screen, but confirmation of success or failure is NOT shown.
•
If Success is shown in the Progress Window: The virtual library’s parameters were successfully
modified.
•
If Failure is shown in the Progress Window: The virtual library’s parameters were NOT modified.
To view the troubleshooting procedures, click View Recommended Actions. To view the error
details, click Error Log for information on why the virtual library’s parameters were not modified. To
modify parameters on another virtual library, repeat Step 2 through Step 4.
Click Close to close the Progress Window.
After the Progress Window closes, the Setup - Virtual Library screen appears and you are prompted
to map the modified library to a LUN so it will be visible to the FC Host(s).
6
Click OK.
The Setup - Host Access screen appears.
7
Map the modified library to a LUN. Configuring an FC Host on page 70.
Related topics:
Creating a Virtual Library on page 53
Deleting a Virtual Library on page 57
56
Performing Basic Tasks and Operations
Deleting a Virtual Library
To delete a virtual library, you must first export all media from the library and then delete the library's drives.
For more information, refer to Exporting Virtual Media on page 63 and Deleting a Virtual Drive on page 60.
Use this procedure to delete a virtual library in the Pathlight VX.
1
Log on as a user with Administrator privileges.
2
From the menu bar, select Setup→Virtual Library.
The Setup - Virtual Library screen appears. This screen lists all existing virtual libraries and, for each
library, its library type.
3
From the list, select the virtual library you want to delete.
Note
4
You can delete only one library at a time.
Click Delete.
If the selected library still contains media and/or drives, you are prompted to export the media and delete
the drives before proceeding.
A dialog box prompts if you want to delete the library.
5
Click OK to delete the library.
Related topics:
Creating a Virtual Library on page 53
Modifying a Virtual Library on page 56
Pathlight VX User’s Guide
57
Working with Virtual Drives
In the Pathlight VX, virtual drives are located in virtual libraries. The total number of virtual drives that can
be created across all virtual libraries is determined by your Pathlight VX license. To identify the number of
virtual drives for which the Pathlight VX is licensed, refer to Applying the Pathlight VX License on page 31.
Creating a Virtual Drive
You can create up to 20 virtual drives per FC blade. Depending on the Pathlight VX configuration, the SNC
contains either 1 or 2 FC blades.
Note
When virtual drives are created, they are automatically assigned to the FC
blade(s) in round-robin fashion. For example, the first virtual drive that is
created is assigned to FC blade 1. The second virtual drive is assigned to
FC blade 2. Assignment of virtual drives to the FC blade(s) proceeds in this
manner so the FC blades are load-balanced.
1
Log on as a user with Administrator privileges.
2
From the menu bar, select Setup→Virtual Drive.
The Setup - Virtual Drive(s) screen appears. This screen lists all existing virtual drives and, for each
drive, the drive serial number, drive type, and the virtual library and FC blade associated with the drive.
3
Click Create.
The Create Virtual Drive(s) screen appears. Use this screen to create one or more virtual drives and
specify the number of drives and drive type.
•
Select Library - The virtual library to associate with the new drive(s). Select the library from the
drop-down list.
Note
4
If there is one virtual library, the virtual drive(s) default to be associated
with this library.
•
Enter Number of Drives – The number of new drives to be created. The number of drives available
are listed to the right of the input field.
•
Select Drive Type – The type of virtual drive(s) being created. Available drive types are LTO-1,
LTO-2, and LTO-3.
Define the parameters and click Apply.
The Progress Window appears, which contains information on the status of the virtual drive being
created.
Note
58
Once the Progress Window appears, you cannot cancel or stop this
action. However, you can close the window by clicking on the X in the
upper-right of the screen, but confirmation of success or failure is NOT
shown.
•
If Success is shown in the Progress Window: The virtual drive was successfully created.
•
If Failure is shown in the Progress Window: The virtual drive was NOT created. To view the
troubleshooting procedures, click View Recommended Actions. To view the error details, click
Error Log for information on why the virtual drive was not created. To create another virtual drive,
repeat Step 2 through Step 4.
Performing Basic Tasks and Operations
5
Click Close to close the Progress Window.
After the Progress Window closes, the Setup - Virtual Drive(s) screen appears and you are prompted
to map the newly-created drive to an FC Host.
6
Click OK.
The Setup - Host Access screen appears.
7
Map the new virtual drive to an FC Host. For detailed steps, refer to Configuring an FC Host on page 70.
Related topics:
Modifying a Virtual Drive
Deleting a Virtual Drive on page 60
Modifying a Virtual Drive
Once a virtual drive has been created, you can modify these parameters: drive name and the associated
FC blade. To change other virtual drive parameters, you must delete the drive and create a new virtual drive.
For more information, refer to Deleting a Virtual Drive on page 60 and Creating a Virtual Drive on page 58.
1
Log on as a user with Administrator privileges.
2
From the menu bar, select Setup→Virtual Drive.
The Setup - Virtual Drive(s) screen appears. This screen lists all existing virtual drives and, for each
drive, the drive type and associated virtual library.
3
Select the drive(s) you want to modify.
Note
4
If you select more than one virtual drive, you cannot modify the information in
the Drive Name field.
Click Modify.
The Modify Virtual Drive screen appears. Use this page to modify these parameters: drive name and
the FC blade associated with the drive.
5
Modify the virtual drive's name and FC blade settings and click Apply.
The Progress Window appears, containing information on the status of the virtual drive being modified.
Note
6
Once the Progress Window appears, you cannot cancel or stop this action.
However, you can close the window by clicking on the X in the upper-right of the
screen, but confirmation of success or failure is NOT shown.
•
If Success appears in the Progress Window: The virtual drive was successfully modified.
•
If Failure appears in the Progress Window: The virtual drive was NOT modified. To view the
troubleshooting procedures, click View Recommended Actions. To view the error details, click
Error Log for information on why the virtual drive was not modified. To modify another virtual drive,
repeat Step 3 through Step 5.
Click Close to close the Progress Window.
After the Progress Window closes, the Setup - Virtual Drive screen refreshes and you are prompted
to map the modified drive to a LUN so it will be visible to the FC Host(s).
Pathlight VX User’s Guide
59
7
Click OK.
The Setup - Host Access screen appears.
8
Map the modified virtual drive to a LUN. For detailed steps, refer to Configuring an FC Host on page 70.
Related topics:
Creating a Virtual Drive on page 58
Deleting a Virtual Drive
Deleting a Virtual Drive
A virtual drive can only be deleted if it is empty and does not contain any virtual media.
1
Log on as a user with Administrator privileges.
2
From the menu bar, select Setup→Virtual Drive.
The Setup - Virtual Drive(s) screen appears. This screen lists all existing virtual drives and, for each
drive, the drive serial number, drive type, and virtual library and FC blade associated with the drive.
3
From the list, select one or more drives you want to delete and click Delete.
A dialog window prompts if you want to delete the drive.
4
Click OK to delete the virtual drive.
Related topics:
Creating a Virtual Drive on page 58
Modifying a Virtual Drive on page 59
60
Performing Basic Tasks and Operations
Working with Virtual Media
The total number of virtual media that can be created across all virtual libraries is determined by your
Pathlight VX license and the system’s disk capacity. To identify the number of virtual media for which the
Pathlight VX is licensed, refer to Applying the Pathlight VX License on page 31.
Creating Virtual Media
Virtual media must be created for each virtual library.
Note
When new virtual media is created, you may need to perform an inventory
on the Pathlight VX backup application to ensure the application media
database is current.
1
Log on as a user with Administrator privileges.
2
From the menu bar, select Operations→Media Management→Virtual→Create.
The Operations - Create Virtual Media screen appears. Use this screen to create virtual media in a
virtual library by specifying the media type (LTO-1, LTO-2, or LTO-3), the number of media to create,
the starting barcode of the new media, the applicable storage policy to apply to the new media (if the
Disk Extension [storage policies] feature is licensed and enabled), the method to enter the new media
in the library, and the method to export the new media from the Pathlight VX.
•
Select Library - The virtual library for which new media will be created. Select the library from the
drop-down list.
Note
If only one virtual library has been set up, Pathlight VX defaults to create
media for this library.
•
Select Media Type - The type of media to create. Available types are: LTO-1, LTO-2, and LTO-3.
Select the media type from the drop-down list.
•
Enter Quantity - The quantity of media to create. The number of licensed media available and slots
available are listed to the right of the input field.
•
Enter Starting Barcode - The starting barcode for the new media.
Note
•
For each barcode created, the number entered will be incremented by one (1).
Numbers are incremented by numbers and letters are incremented by letters.
Select Entry Method - The method to enter the media in the library. Available options are: I/E
Station and Slot. Select the entry method from the drop-down list.
Set the entry method to whatever you would normally do on a physical library. For example, if you
have a number of media to enter and you would normally enter the media through a door, select
Slot. If you normally enter media through a tape library's mailbox, select I/E Station.
Note
Selecting Slot indicates to the Pathlight VX backup application that the virtual
library's door is open, which causes the backup application to re-inventory the
library for new media.
Pathlight VX User’s Guide
61
3
Define the parameters and click Apply.
Note
If adding the new media exceeds the amount of space available on the RAID,
the error log reports ‘error creating media’. To make additional space available
for the new virtual media, you must export media to the physical library or
delete existing virtual media from the Pathlight VX, and then repeat this
procedure.
The Progress Window appears, which contains information on the status of the virtual media being
created.
Note
4
Once the Progress Window appears, you cannot cancel or stop this action.
However, you can close the window by clicking on the X in the upper-right of
the screen, but confirmation of success or failure is NOT shown.
•
If Success appears in the Progress Window: The virtual media was successfully created.
•
If Failure appears in the Progress Window: This indicates one of two possible situations: no virtual
media was created or some number of virtual media was created, up to the number of licensed
media and slots available. To view the troubleshooting procedures, click View Recommended
Actions. To view the error details, click Error Log for information on why the virtual media was not
created. To create additional virtual media, repeat Step 2 on page 61 and Step 3.
Click Close to close the Progress Window.
Related topics:
Deleting Virtual Media on page 67
Exporting Virtual Media on page 63
Recycling Virtual Media on page 65
Setting Virtual Media Attributes on page 69
Setting Media Access Rules on page 86
Setting Default Media Access on page 84
62
Performing Basic Tasks and Operations
Exporting Virtual Media
If data is stored on virtual media and the media is exported from the Pathlight VX, then the system writes
the data to physical media (tape). The export operation should only be used if the Pathlight VX's backup
application is not active to perform this function.
CAUTION
If you export virtual media with data written to it and there is no
corresponding physical media to write the data to, then the process remains
pending until media is added and the operation completes. If you do not
want to save the data on the virtual media, then you can either cancel the
operation or recycle the virtual media. Recycling the media causes its data to
be discarded. Refer to Recycling Virtual Media on page 65.
1
Log on as a user with Administrator privileges.
2
From the menu bar, select Operations→Media Management→Virtual→Export.
The Operations - Export Virtual Media screen appears.
This screen lists the virtual media that are available to export. For each media, the barcode, media type,
and associated library are shown.
Pathlight VX User’s Guide
63
3
Select media to export. Do one of the following:
•
Select one or more virtual media to export by checking the box next to the media’s barcode.
- OR •
Narrow the media list:
a. In the text box to the right of Apply Filter, enter barcodes, barcode ranges, wildcards(*) or any
combination of these separated by commas.
EXAMPLE:
00AB01, 00AB20-00AB50, AB*, *AB
Note
These filter values are case-sensitive.
b. Click Apply Filter.
4
Click Apply.
A dialog box appears and prompts if you want to export the selected media from the Pathlight VX.
5
Click OK.
The Pathlight VX displays the Progress Window, which contains information on the status of the virtual
media being exported.
Note
6
Once the Progress Window appears, you cannot cancel or stop this action.
However, you can close the window by clicking the X in the upper-right of the
screen, but confirmation of success or failure is NOT shown.
•
If Success appears in the Progress Window: The export request was successfully submitted.
When the export operation is complete, the status of the request is reported in the Tools→Activity
Status screen and the Action Required button appears, notifying you that the physical media is
ready to remove from the physical library's mailbox.
•
If Failure appears in the Progress Window: The export request was NOT submitted. To view the
troubleshooting procedures, click View Recommended Actions. To view the error details, click
Error Log for information on why the export request was not submitted. To export additional virtual
media, repeat Step 2 on page 63 through Step 5.
Click Close to close the Progress Window.
Related topics:
Creating Virtual Media on page 61
Deleting Virtual Media on page 67
Recycling Virtual Media on page 65
Setting Virtual Media Attributes on page 69
Setting Media Access Rules on page 86
Setting Default Media Access on page 84
64
Performing Basic Tasks and Operations
Recycling Virtual Media
Recycling virtual media resets to the beginning of the selected media, enabling it to be re-used in the
Pathlight VX. Because of the reset, any data on the media will be lost when new data is written to the media.
An export operation performed on blank media results in a de-allocation of the space used by the media.
CAUTION
Note
The Recycle Media function resets to the beginning of the selected
media; it does not purge data on the media.
You cannot recycle blank media or media that is currently mounted in a virtual drive.
1
Log on as a user with Administrator privileges.
2
From the menu bar, select Operations→Media Management→Virtual→Recycle.
The Operations - Recycle Virtual Media screen appears.
This screen lists the virtual media that are available to recycle. For each media, the barcode, media
type, and associated library are shown.
Pathlight VX User’s Guide
65
3
Do one of the following:
•
Select the virtual media you want to recycle by checking the box next to the media’s barcode.
- OR •
Narrow the media list:
a. In the Apply Filter field, enter barcodes, barcode ranges, wildcards(*) or any combination of
these separated by commas.
EXAMPLE:
00AB01, 00AB20-00AB50, AB*, *AB
Note
These filter values are case-sensitive.
b. Click Apply Filter.
4
Click Apply.
A dialog box appears and prompts if you want to recycle the media.
5
Click OK to recycle the media.
The Progress Window appears, which contains information on the status of the media being recycled.
Note
6
Once the Progress Window appears, you cannot cancel or stop this action.
However, you can close the window by clicking the X in the upper-right of the
screen, but confirmation of success or failure is NOT shown.
•
If Success appears in the Progress Window: The virtual media was successfully recycled.
•
If Failure appears in the Progress Window: The virtual media was NOT recycled. To view the
troubleshooting procedures, click View Recommended Actions. To view the error details, click
Error Log for information on why the virtual media was not recycled. To recycle additional virtual
media, repeat Step 2 on page 65 through Step 5.
Click Close to close the Progress Window.
Related topics:
Creating Virtual Media on page 61
Deleting Virtual Media on page 67
Exporting Virtual Media on page 63
Setting Virtual Media Attributes on page 69
Setting Media Access Rules on page 86
Setting Default Media Access on page 84
66
Performing Basic Tasks and Operations
Deleting Virtual Media
To delete virtual media, you must first export it from the Pathlight VX. For more information on this operation,
refer to Exporting Virtual Media on page 63.
1
Log on as a user with Administrator privileges.
2
From the menu bar, select Operations→Media Management→Virtual→Delete.
The Operations - Delete Virtual Media screen appears.
This screen lists all existing virtual media that have been exported from Pathlight VX and are available
for deletion.
3
Do one of the following:
•
Select the virtual media you want to delete by checking the box next to the media’s barcode.
- OR •
Narrow the media list:
a. In the Apply Filter field, enter barcodes, barcode ranges, wildcards(*) or any combination of
these separated by commas.
EXAMPLE:
00AB01, 00AB20-00AB50, AB*, *AB
Note These filter values are case-sensitive.
b. Click Apply Filter.
4
Click Apply.
A dialog box appears and prompts if you want to delete the media.
Pathlight VX User’s Guide
67
5
Click OK to delete the media.
The Progress Window appears, which contains information on the status of the virtual media being
deleted.
Note
6
Once the Progress Window appears, you cannot cancel or stop this action.
However, you can close the window by clicking the X in the upper-right of the
screen, but confirmation of success or failure is NOT shown.
•
If Success appears in the Progress Window: The virtual media was successfully deleted.
•
If Failure appears in the Progress Window: The virtual media was NOT deleted. To view the
troubleshooting procedures, click View Recommended Actions. To view the error details, click
Error Log for information on why the virtual media was not deleted. To delete additional virtual
media, repeat Step 3 on page 67 through Step 5.
Click Close to close the Progress Window.
Related topics:
Creating Virtual Media on page 61
Exporting Virtual Media on page 63
Recycling Virtual Media on page 65
Setting Virtual Media Attributes on page 69
Setting Media Access Rules on page 86
Setting Default Media Access on page 84
68
Performing Basic Tasks and Operations
Setting Virtual Media Attributes
Use this procedure to set (toggle) the Write Protect attribute on virtual media. When Write Protect is on (set
to True), data cannot be written to the selected virtual media. When Write Protect is off (set to False), data
can be written to the selected virtual media.
Note
1
Scratch media cannot be write-protected in the Pathlight VX so they are not
listed on the Operations - Virtual Media Attributes screen.
From the menu bar, select Operations > Media Management > Virtual > Attributes.
The Operations - Virtual Media Attributes screen appears and lists all virtual media in the Pathlight
VX. For each virtual medium, its barcode, media type, write protect setting, and associated virtual library
are shown.
2
Select the virtual media on which to change the Write Protect attribute by checking the box next to the
media.
3
Click Apply.
The Progress Window appears.
Note
4
Once the Progress Window appears, you cannot cancel or stop this action.
However, you can close the window by clicking the X in the upper-right of the
screen, but confirmation of success or failure is NOT shown.
•
If Success appears in the Progress Window: The Write Protect attribute of the selected virtual
media was successfully toggled (changed).
•
If Failure appears in the Progress Window: The Write Protect attribute of the selected virtual
media was NOT toggled (changed). To view the troubleshooting procedures, click View
Recommended Actions. To view the error details, click Error Log for information on why the Write
Protect attribute was not toggled on the selected media. To toggle the Write Protect attribute on
selected virtual media, repeat Step 1 through Step 3.
Click Close to close the Progress Window.
Related topics:
Creating Virtual Media on page 61
Deleting Virtual Media on page 67
Exporting Virtual Media on page 63
Recycling Virtual Media on page 65
Setting Media Access Rules on page 86
Setting Default Media Access on page 84
Pathlight VX User’s Guide
69
Managing FC Hosts
Backup operations on the Pathlight VX are run on a backup application that is accessible through one or
more FC Hosts. An FC Host only sees devices that have been mapped to a specific LUN. Use the
procedures in this section to configure, modify, and remove FC Hosts associated with the Pathlight VX.
Configuring an FC Host
Use this procedure to configure an FC Host by specifying LUN mapping on the device.
1
From the menu bar, select Setup→Host Access.
The Setup - Host Access screen appears and lists the virtual libraries on the Pathlight VX.
2
3
Filter the list of virtual devices that are available to be mapped to the FC Host by selecting one or more
virtual libraries.
•
To select one or more virtual libraries, check the box next to each library's name and click Next.
•
To select all of the virtual libraries, check the Name box and click Next.
Click Next.
The Setup - Host Access - vlib screen appears, where vlib is the name of the selected virtual library.
This screen lists the following information:
•
Host Name – The name of the configured FC Host.
Note
70
The FC host name may display as Unknown. To change the host name,
refer to Modifying an FC Host on page 73.
•
Type – The operating system of the FC Host.
•
WWN – The ADIC-generated address of the FC Host.
Performing Basic Tasks and Operations
4
Select an FC Host to configure and click Configure.
The Configure Host - Host Name screen appears, where Host Name is the name of the FC Host.
Note
5
If you want to view more information about a particular device, click the
device name in the Device column.
Do one of the following:
•
Change LUN mapping for a device; select a LUN from the drop-down list in the LUN column.
•
Map a LUN for each device:
a. Click Map All at the lower-right of the page.
A dialog box prompts you to select the order in which LUNs will be mapped.
•
Sequential (1, 2, 3...): LUNs are mapped in sequential order beginning at 1.
•
Even (2, 4, 6...): LUNs are mapped in sequential order using even numbers beginning at 2.
•
Odd (1, 3, 5...): LUNs are mapped in sequential order using odd numbers beginning at 1.
b. Select a LUN mapping order and click Apply.
The dialog box closes and the Configure Host - Host Name screen appears.
c. Click Apply.
Pathlight VX User’s Guide
71
•
Clear all mapped LUNs:
a. Click UnMap All at the lower-right of the page.
A confirmation message indicates that current LUN mappings are cleared.
b. Click OK.
6
Note
One device must be mapped to LUN 0 (zero). By default, Pathlight VX
automatically maps the Pathlight VX Controller to 0 (zero).
Note
The FC Host can only detect the virtual libraries and virtual drives mapped
to a specific LUN. If you select None for a specific device, the FC Host
does not detect the device. This is useful, for example, if you want to
expose a subset of virtual drives to one FC Host, and a different subset to a
different FC Host.
Click Apply to save the FC Host configuration.
The Progress Window appears, which contains information on the status of the configured FC Host.
Note
7
Once the Progress Window appears, you cannot cancel or stop this
action. However, you can close the window by clicking the X in the upperright of the screen, but confirmation of success or failure is NOT shown.
•
If Success appears in the Progress Window: The FC Host was successfully configured.
•
If Failure appears in the Progress Window: The FC Host was NOT configured. To view the
troubleshooting procedures, click View Recommended Actions. To view the error details, click
Error Log for information on why the FC Host was not configured. To configure another FC Host,
repeat Step 2 on page 70 through Step 6.
Click Close to close the Progress Window.
Related topics:
Modifying an FC Host on page 73
Removing an FC Host on page 74
72
Performing Basic Tasks and Operations
Modifying an FC Host
Use this procedure to modify the name, type or WWN of an FC Host.
If the default name Unknown appears as the name of an FC Host, use this
procedure to modify the FC Host.
Note
1
From the menu bar, select Setup→Host Access.
The Setup - Host Access screen appears.
2
Select one or more virtual libraries.
•
To select one or more virtual libraries, check the box next to each library's name and click Next.
•
To select all of the virtual libraries, check the Name box and click Next.
Note
3
Selecting one or more virtual libraries has no bearing on the operation to
modify an FC Host. The virtual library selection is an artifact, and it does
not matter which library or libraries are selected.
Click Next.
The Setup - Host Access - vlib screen appears, where vlib is the name of the selected virtual library.
4
Select an FC Host and click Modify.
The Modify Host - Host Name screen appears, where Host Name is the name of the selected FC Host.
Pathlight VX User’s Guide
73
5
Modify the name, type and/or the WWN of an FC Host.
6
Click Apply.
The Progress Window appears, which contains information on the status of the modified FC Host.
Note
7
Once the Progress Window appears, you cannot cancel or stop this
action. However, you can close the window by clicking on the X in the
upper-right of the screen, but confirmation of success or failure is NOT
shown.
•
If Success appears in the Progress Window: The FC Host was successfully modified.
•
If Failure appears in the Progress Window: The FC Host was NOT modified. To view the
troubleshooting procedures, click View Recommended Actions. To view the error details, click
Error Log for information on why the FC Host was not modified. To modify another FC Host, repeat
Step 2 on page 73 through Step 6.
Click Close to close the Progress Window.
Related topics:
Configuring an FC Host on page 70
Removing an FC Host
Removing an FC Host
Use this procedure to remove an FC Host that has been disconnected from the Pathlight VX. If the Pathlight
VX has dual FC blades in the SNC and the FC Host is associated with both FC blades, then this procedure
must be performed two times to remove the FC Host from both FC blades.
1
From the menu bar, select Setup→Host Access.
The Setup - Host Access screen appears and lists all virtual libraries in the Pathlight VX.
2
Select one or more virtual libraries in the Pathlight VX.
•
To select one or more virtual libraries, check the box next to each library's name and click Next.
•
To select all of the virtual libraries, check the Name box and click Next.
Note
Selecting one or more virtual libraries has no bearing on the operation to
remove an FC Host. The virtual library selection is an artifact, and it does
not matter which library or libraries are selected.
The Setup - Host Access - vlib screen appears, where vlib is the name of the selected virtual library
or libraries.
74
Performing Basic Tasks and Operations
This screen lists the FC Hosts that are associated with the FC blades (SNC) in the Pathlight VX.
3
Select an FC Host and click Remove.
A dialog box prompts you to confirm the removal of the selected FC Host.
4
Click OK.
The Progress Window appears, which contains information on the status of the FC Host selected for
removal.
Note
Once the Progress Window appears, you cannot cancel or stop this
action. However, you can close the window by clicking on the X in the
upper-right of the screen, but confirmation of success or failure is NOT
shown.
•
If Success appears in the Progress Window: The FC Host was successfully removed from the
selected FC blade.
•
If Failure appears in the Progress Window: The FC Host was NOT removed from the Pathlight
VX. To view the troubleshooting procedures, click View Recommended Actions. To view the error
details, click Error Log for information on why the FC Host was not removed.
5
If the Pathlight VX has dual FC blades in the SNC and the FC Host is associated with both FC blades,
then repeat Step 2 on page 74 through Step 4 to remove the FC Host from the second FC blade.
6
Click Close to close the Progress Window.
Related topics:
Configuring an FC Host on page 70
Modifying an FC Host on page 73
Pathlight VX User’s Guide
75
Managing User Accounts
The procedures in the section describe how to create, modify, and delete Pathlight VX user accounts.
Creating User Accounts
A Pathlight VX user account can be set up when the system is initially configured or at a later time. Users
who do not have Pathlight VX Administrator privileges can only access a restricted number of Pathlight VX
screens and are limited to performing administrative tasks on designated virtual libraries.
Note
Only a user with Pathlight VX Administrator privileges can create a new user
account.
CAUTION
To maintain system security, you are strongly urged to change the
default admin password after the Pathlight VX is installed. For more
information, refer to Modifying User Accounts on page 77 on page 79.
1
Log on as a user with Administrator privileges.
2
From the menu bar, select Setup→Users.
The Setup - Users screen appears and lists the current Pathlight VX users. For each user, the privilege
associated with user account is shown.
3
Click Create.
The Create User Account screen appears. Use this screen to set up the user name, password, and
privilege.
•
Enter User Name - The user name, for example, user1.
Note
•
Enter Password - The user password.
Note
4
The user name must have a minimum of 1 character and a maximum of 20
characters.
The password must be at least 6 characters (alphanumeric and/or any
characters). Spaces are not allowed.
•
Confirm Password - The user password, re-entered for confirmation.
•
Select Privilege - The user privilege. Available options are Administrator and User. Verify that
User is selected.
Define the parameters and click Next.
The Create User Account - User Name screen appears, where User Name is the name entered in
Step 3.
5
76
Select the library or libraries to which you want the user to have access.
Performing Basic Tasks and Operations
6
Click Finish.
The Progress Window appears, which contains information on the status of the user account being
created.
Note
7
Once the Progress Window appears, you cannot cancel or stop this action.
However, you can close the window by clicking on the X in the upper-right of
the screen, but confirmation of success or failure is NOT shown.
•
If Success appears in the Progress Window: The new user account was successfully created.
•
If Failure appears in the Progress Window: The new user account was NOT created. To view the
troubleshooting procedures, click View Recommended Actions. To view the error details, click
Error Log for information on why the new user account was not created. To create additional user
accounts, repeat Step 3 on page 76 through Step 6.
Click Close to close the Progress Window.
Related topics:
Modifying User Accounts
Deleting User Accounts on page 79
Modifying User Accounts
Use this procedure to modify passwords and privileges in Pathlight VX user accounts.
Note
Only the Pathlight VX Administrator can modify a user account.
CAUTION
As a security best practice, ADIC recommends that you periodically change
the default admin password for the Pathlight VX. For more information, refer
to Changing the Admin Password on page 30.
1
Log on as a user with Administrator privileges.
2
From the menu bar, select Setup→Users.
The Setup - Users screen appears.
3
Select the user account you want to modify.
Note
4
If you want to change the name on a user account, you must delete the
existing user account and create a new one. This procedure cannot be used to
change the name of a user account.
Click Modify.
The Modify User Account screen appears.
Pathlight VX User’s Guide
77
5
Modify the user account as necessary.
•
Enter Password - The new user password.
Note
The password must be at least 6 characters (alphanumeric and/or any
characters). Spaces are not allowed.
•
Confirm Password - The new user password is re-entered (confirmed).
•
Select Privilege - The user privilege. Select Administrator or User.
6
Specify the user account settings and click Next.
7
Modify the user’s library access, as necessary. Select the library or libraries to which you want the user
to have access.
8
Click Finish.
The Progress Window appears, which contains information on the status of the user account being
modified.
Note
9
Once the Progress Window appears, you cannot cancel or stop this action.
However, you can close the window by clicking on the X in the upper-right of
the screen, but confirmation of success or failure is NOT shown.
•
If Success appears in the Progress Window: The user account was successfully modified.
•
If Failure appears in the Progress Window: The user account was NOT modified. To view the
troubleshooting procedures, click View Recommended Actions. To view the error details, click
Error Log for information on why the user account was not modified. To modify another user
account, repeat Step 2 on page 77 through Step 8.
Click Close to close the Progress Window.
Related topics:
Creating User Accounts on page 76
Deleting User Accounts on page 79
78
Performing Basic Tasks and Operations
Deleting User Accounts
Use this procedure to delete Pathlight VX user accounts.
Note
Only the Pathlight VX Administrator can delete a user account.
CAUTION
Note
As a security best practice, ADIC recommends that you periodically change
the default admin password for the Pathlight VX. For more information, refer
to Changing the Admin Password on page 30.
The Pathlight VX Administrator account cannot be deleted.
1
Log on as a user with Administrator privileges.
2
From the menu bar, select Setup→Users.
The Setup - Users screen appears.
3
Select the user account you want to delete.
4
Click Delete.
A dialog box prompts if you want to delete the user account.
5
Click OK to delete the user account.
Related topics:
Creating User Accounts on page 76
Modifying User Accounts on page 77
Pathlight VX User’s Guide
79
80
Performing Basic Tasks and Operations
Performing Advanced Tasks and Operations
Use this procedures in this chapter to perform advanced tasks and operations in the Pathlight VX. This
chapter contains procedures for managing different types of media and Advanced Features such as
Archive, Early Tape Creation, and Storage Policies (Disk Extension). This chapter contains the following
sections:
•
Managing Media in the Pathlight VX
•
Removing Media from the Pathlight VX on page 93
•
Managing Disk Extension Media on page 98
•
Managing Internal Backup Media on page 101
•
Working with Advanced Features on page 103
•
Managing Storage Policies on page 108
Managing Media in the Pathlight VX
Use the procedures in this section to manage media in the Pathlight VX, such as setting media filters and
rules, moving virtual media in a library, reassigning physical media, archiving media, and managing offline
media.
Setting Media Filters
Media filters enable Pathlight VX to automatically classify new media (tapes) introduced into the system as
a certain media type and assign the media to the appropriate media pool: Cleaning, Disk Extension,
Internal Backup, and Service. For example, the cleaning media filter matches cleaning media to physical
(tape) media barcodes starting with the letters ‘CLN’. When media is brought into the Pathlight VX, and its
barcode matches this filter, the system automatically classifies the tape as cleaning media. The Disk
Extension, Internal Backup, and Service media filters work in the same manner.
Using media filters avoids having to go through the 'Action Required', 'Define Unknown Media' process of
manually classifying media.
Note
The Disk Extension media filter is only displayed on this page if the Pathlight VX
is licensed for Disk Extension (storage policies) and storage policies have been
enabled on the system.
Pathlight VX User’s Guide
81
1
Log on as a user with Administrator privileges.
2
From the menu bar, select Setup→Media Filters.
The Setup - Media Filters screen appears.
3
•
The internal backup media filter indicates physical (tape) media that are used for the Pathlight VX
backup.
•
The '?' special character matches any individual character.
•
The '*' special character matches any number of characters.
Enter a filter expression in the Enter Internal Backup Media Filter text box.
Example filter expressions include:
4
•
PVX? - matches any single alphanumeric character following PVX (for example, PVX0, PVXA).
•
PVX* - matches any number of characters following PVX (for example, PVX12, PVX12345).
Click Apply.
Note
5
82
Once the Progress Window appears, you cannot cancel or stop this
action. However, you can close the window by clicking the X in the upperright of the screen, but confirmation of success or failure is NOT shown.
•
If Success appears in the Progress Window: The media filter was successfully set.
•
If Failure appears in the Progress Window: The media filter was NOT set. To view the
troubleshooting procedures, click View Recommended Actions. To view the error details, click
Error Log for information. To set additional media filters, repeat Step 2 and Step 3.
Click Close to close the Progress Window.
Performing Advanced Tasks and Operations
Setting the Default Export Rule
The default export rule specifies the destination for virtual media when it is exported from the Pathlight VX.
Use this procedure to set up the default export rule to apply to virtual media upon export. The default export
rule only applies to new media introduced into the Pathlight VX, it does not affect media already in the
system. To change the export rule for media already in the Pathlight VX, navigate to Operations→Media
Management→Virtual→Media Export Rules and refer to Setting Media Access Rules on page 86.
1
From the menu bar, select Setup→Default Export Rule.
The Setup - Default Export Rule screen appears.
2
3
Select a default export rule. Available options are:
•
I/E Station - This rule exports physical media from the Pathlight VX through a physical library's I/E
station. The physical media is moved to the I/E station, and the disk where the virtual tape was
stored is released so it can be reused.
•
Storage Slot (offline media) - This rule exports media from a virtual library to a physical library in
offline status. Instead of moving the physical media out of the library though the I/E station, the
media is placed into a slot in the library's main storage area and held there in offline status (creating
'offline library media').
Click Apply.
The Progress Window appears.
Note
4
Once the Progress Window appears, you cannot cancel or stop this action.
However, you can close the window by clicking the X in the upper-right of the
screen, but confirmation of success or failure is NOT shown.
•
If Success appears in the Progress Window: The selected export rule was successfully set up as
the default.
•
If Failure appears in the Progress Window: The selected export rule was not set up as the default.
To view the troubleshooting procedures, click View Recommended Actions. To view the error
details, click Error Log for information on why the selection was not set up as the default export
rule. To set a default export rule, repeat Step 2 and Step 3.
Click Close to close the Progress Window.
Pathlight VX User’s Guide
83
Setting Default Media Access
Default media access defines how physical media exported from the Pathlight VX will be handled when it is
imported back into the Pathlight VX. Available media access states are Scratch, Direct Access, Virtual,
and Unknown. Depending on the access state selected, data on the media can be discarded, read back
into the system directly from the media, or written to virtual media.
Use this procedure to define media access for media has not yet been exported from the Pathlight VX.
Note
This procedure defines the default access state that will be applied to media
currently in the Pathlight VX at the time the media is exported from the
system. A related procedure is to set the access rules for media that has
already been exported from the Pathlight VX. To navigate to the Set Media
Access Rules operation, select Operations→Media Management→Virtual→
Media Access Rules on the menu bar.
1
Log on as a user with Administrator privileges.
2
From the menu bar, select Setup→Default Media Access.
The Setup - Set Default Media Access screen appears.
3
In the Select Default Access Rule drop-down list, select the default media access to assign to media
when it is exported from the Pathlight VX. Available media access states are:
•
Scratch – Data on the media is not preserved and can be overwritten by new data.
Note
84
If a restore operation is attempted on media marked as Scratch, then the
operation fails. To restore data on Scratch media, change the media access
state to Virtual or Direct Access.
•
Direct Access – The media is automatically placed in a physical drive and its data is read directly
to the backup application. The data is not restored to virtual media in the Pathlight VX.
•
Virtual – Data on the media is restored to virtual media in the Pathlight VX.
•
Unknown - The media is treated as a media that the Pathlight VX has never used. When unknown
media is imported into the Pathlight VX, the system prompts the user that unknown media has been
detected and a media handling method needs to be specified. Refer to Performing Required Actions
on page 43.
Performing Advanced Tasks and Operations
4
Click Apply.
The Progress Window appears, which contains information on the default media access state being
changed.
Note
Once the Progress Window appears, you cannot cancel or stop this action.
However, you can close the window by clicking the X in the upper-right of the
screen, but confirmation of success or failure is NOT shown.
•
If Success appears in the Progress Window: The default media access state was successfully
set.
•
If Failure appears in the Progress Window: The default media access state was NOT set. To view
the troubleshooting procedures, click View Recommended Actions. To view the error details, click
Error Log for information on why the media access rule was not set. To set a media access rule,
repeat Step 2 on page 84 through Step 4.
Related topics:
Creating Virtual Media on page 61
Deleting Virtual Media on page 67
Exporting Virtual Media on page 63
Recycling Virtual Media on page 65
Setting Virtual Media Attributes on page 69
Setting Media Access Rules
Pathlight VX User’s Guide
85
Setting Media Access Rules
Media access rules define how physical media exported from the Pathlight VX will be handled when it is
imported back into the Pathlight VX. Available media access rules are Scratch, Direct Access, and Virtual.
Depending on the access rule selected, data on the media can be discarded, read back into the system
directly from the media, or written to virtual media.
Use this procedure to define media access for media that has already been exported from the Pathlight VX.
Note
This procedure defines how media that has already been exported from the Pathlight
VX will be handled when it is imported back into the system. A related procedure is to
define the default access state that will be applied to media currently in the Pathlight VX
at the time the media is exported from the system. To navigate to the Set Default Media
Access operation, select Setup→Default Media Access on the menu bar.
1
Log on as a user with Administrator privileges.
2
From the menu bar, select Operations→Media Management→Virtual→Media Access Rules.
The Operations - Media Access Rules screen appears and lists all exported media.
For each media, its barcode, media type, associated library, current state, and current media access
rule are shown.
3
Do one of the following:
•
Select the virtual media for which you want to change the media access rule by checking the box
next to the media’s barcode.
- OR -
86
Performing Advanced Tasks and Operations
•
Narrow the media list:
a. In the Apply Filter field, enter barcodes, barcode ranges, wildcards(*) or any combination of
these separated by commas.
EXAMPLE:
00AB01, 00AB20-00AB50, AB*, *AB
Note
These filter values are case-sensitive.
b. Click Apply Filter.
4
In the Select New Access Rule drop-down list, select an access rule to apply when the media is
imported into the Pathlight VX. Available media access rules are:
•
Scratch – Data on the media is not preserved and can be overwritten by new data.
Note
5
If a restore operation is attempted on media marked as Scratch, then the
operation fails. To restore data on Scratch media, change the media access
state to Virtual or Direct Access.
•
Direct Access – The media is automatically placed in a physical drive and its data is read directly
to the backup application. The data is not restored to virtual media in the Pathlight VX.
•
Virtual – Data on the media is restored to virtual media in the Pathlight VX.
Click Apply.
A dialog box prompts if you want to apply the selected media access rule.
6
Click OK to apply the media access rule.
The Progress Window appears, which contains information on the media access rule being changed.
Note
7
Once the Progress Window appears, you cannot cancel or stop this action.
However, you can close the window by clicking the X in the upper-right of the
screen, but confirmation of success or failure is NOT shown.
•
If Success appears in the Progress Window: The media access rule was successfully set.
•
If Failure appears in the Progress Window: The media access rule was NOT set. To view the
troubleshooting procedures, click View Recommended Actions. To view the error details, click
Error Log for information on why the media access rule was not set. To set a media access rule,
repeat Step 2 on page 86 through Step 6.
Click Close to close the Progress Window.
Related topics:
Creating Virtual Media on page 61
Deleting Virtual Media on page 67
Exporting Virtual Media on page 63
Recycling Virtual Media on page 65
Setting Virtual Media Attributes on page 69
Setting Default Media Access on page 84
Pathlight VX User’s Guide
87
Moving Media Within a Virtual Library
Use this procedure to move virtual media to an empty drive or storage slot in a virtual library. The virtual
library containing the media must be taken offline before the move operation can be initiated.
1
Log on as a user with Administrator privileges.
2
From the menu bar, select Tools→Media→Move Media.
The Tools - Move Media screen appears and displays all virtual libraries in the Pathlight VX.
3
Select the virtual library containing the media to be moved.
4
Click Next.
If the selected library is online, you are prompted to take it offline to continue. Media can only be moved
in a library that is offline.
The Move Media - library screen appears where library is the selected virtual library.
5
Select the source media.
a. In the Show Device Type area of the Source Locations table, select Drive, Storage, or I/E
Station to view media available in the selected device type.
The Source Locations table refreshes and displays all locations of the selected device.
•
If a location has source media in it, the radio button is selectable.
•
If a location does not have source media in it, the radio button is not selectable (appears
greyed out).
b. In the Source Locations table, select source media to move.
c. In the Show Device Type area of the Destination Locations table, select Drive or Storage to
view selected device locations where the virtual media can be moved.
The Destination Locations table refreshes and displays all locations of the selected device.
type.
d. Select the destination location for the media.
e. If you want to eject mounted tapes, check the Force Unload box.
88
Performing Advanced Tasks and Operations
6
Click Apply.
You are prompted that after the move operation is complete, use the Pathlight VX backup application
to audit the library. The audit determines the current location of virtual media in the library.
7
Click OK.
The Progress Window appears.
Note
8
Once the Progress Window appears, you cannot cancel or stop this action.
However, you can close the window by clicking on the X in the upper-right of
the screen, but confirmation of success or failure is NOT shown.
•
If Success appears in the Progress Window: The selected virtual media was successfully moved
to the specified location. In the Pathlight VX backup application, run an audit of the library. The audit
ensures that the virtual media and its new location are recognized by the backup application. To
move other virtual media, repeat Step 2 on page 88 through Step 7.
•
If Failure appears in the Progress Window: The selected virtual media was not moved to the
specified location. After a few seconds, retry the move. Another process may have been running
that interfered with the move operation.
Click Close to close the Progress Window.
Pathlight VX User’s Guide
89
Reassigning Physical Media to the Unknown Media Pool
Use this procedure to change (reassign) selected physical media back to the ‘Unknown’ media pool if it was
unintentionally assigned to a different media pool, such as Application, Internal Backup, Disk Extension,
or Cleaning.
After changing to the Unknown media pool, navigate to the Define Unknown Media screen and move
selected media into the correct media pool.
Only blank, unused media can be reassigned to the Unknown media pool if it
was unintentionally assigned to a different media pool.
Note
1
Log on as a user with Administrator privileges.
2
From the menu bar, select Tools→Media→Change Media→Media Pool.
The Tools - Change Media Pool screen appears. This screen lists the blank media that can be
reassigned to the Unknown media pool. For each media, its barcode, associated media pool and
physical library, and media type are listed.
3
Do one of the following:
•
Select the blank physical media to be assigned to the Unknown media pool by checking the box
next to the media’s barcode.
- OR •
Narrow the media list:
a. In the Apply Filter field, enter barcodes, barcode ranges, wildcards(*) or any combination of
these separated by commas.
EXAMPLE:
00AB01, 00AB20-00AB50, AB*, *AB
Note
These filter values are case-sensitive.
b. Click Apply Filter.
4
Click Apply.
The Progress Window appears.
Note
5
Once the Progress Window appears, you cannot cancel or stop this action.
However, you can close the window by clicking the X in the upper-right of the
screen, but confirmation of success or failure is NOT shown.
•
If Success appears in the Progress Window: The blank physical media was successfully changed
(reassigned) to the Unknown media pool.
•
If Failure appears in the Progress Window: The blank physical media was NOT successfully
changed (reassigned) to the Unknown media pool. To view the troubleshooting procedures, click
View Recommended Actions. To view the errors, click Error Log for information on why the blank
physical media was not changed. To change blank physical media, repeat Step 2 through Step 4.
Click Close to close the Progress Window.
Related topics:
Performing Required Actions on page 43
90
Performing Advanced Tasks and Operations
Managing Offline Media
After virtual media is taken offline and exported to a storage slot in the physical library as offline media, it
can be either exported to the I/E station for removal from the physical library or imported to a virtual library
in the Pathlight VX. From the menu bar, select Operations→Media Management→Physical→
Application.
The Operations - Manage Application Media screen appears.
6
Select an offline media operation. Do one of the following:
•
Export the offline media to the I/E station on the physical library. This option causes the offline
media to be moved to the I/E station, where it can be removed from the library.
a. Select Export offline media to I/E station and click Next.
The Application Media - Export Offline Media screen appears. For each media, the screen
lists the following information: the media's barcode, media type, the amount of used space on
the media, and the amount of free space on the media.
b. Select the offline media to export to the I/E station on the library and click Apply.
The Progress Window appears.
•
Import the offline media to a virtual library on the Pathlight VX. This option causes the offline media
to be imported into the virtual library specified by the user.
a. Select Import offline media to virtual library and click Next.
The Application Media - Import Offline Media screen appears.
b. Select the offline media to import to a virtual library on the Pathlight VX.
c. Specify the additional parameters to apply to the offline media when it is imported to the
Pathlight VX
•
Select Virtual Library - This parameter is the virtual library to which the media will be
assigned. Available options are the virtual libraries that have been created in the Pathlight
VX.
•
Select Policy - This parameter is the storage policy to apply to the media. Available options
are: default_policy and any other storage policies that have been created.
•
Select Media Action - This parameter specifies data handling for the media.
•
Scratch - This option imports all selected items as new media (scratch) and deletes all
data on the selected media.
•
Virtual - This option copies all data from the physical media to virtual media.
•
Direct Access - This option restores data directly from the physical media without
copying it to virtual media.
•
Select Entry Method - This parameter specifies how the media should be imported into
the Pathlight VX. Available options are: I/E Station and Slot.
•
Select Export Rule - This parameter specifies how the media should be exported from the
Pathlight VX.
•
Export to I/E Station - The media is exported to the I/E station of the physical library.
•
Export to Storage Slot - The media is exported to a slot in the storage area of the
physical library.
Pathlight VX User’s Guide
91
7
Click Apply.
The Progress Window appears.
Note
•
•
Once the Progress Window appears, you cannot cancel or stop this action.
However, you can close the window by clicking on the X in the upper-right of
the screen, but confirmation of success or failure is NOT shown.
If Success appears in the Progress Window:
•
For the Export option, the offline media was successfully exported to the I/E station.
•
For the Import option, the offline media was successfully imported to the virtual library.
If Failure appears n the Progress Window:
•
For the Export option, the offline media was NOT exported.
•
For the Import option, the offline media was NOT imported.
To view the troubleshooting procedures, click View Recommended Actions. To view the error
details, click Error Log for information on why the offline media operation was not successful.
8
92
Click Close to close the Progress Window.
Performing Advanced Tasks and Operations
Removing Media from the Pathlight VX
Use the procedures in this section to remove different types of media from the Pathlight VX by sending it to
the I/E station of an attached physical library. You can remove Application, Cleaning, Disk Extension,
Internal Backup, and Service media.
Removing Application Media
Use this procedure to remove application media from the Pathlight VX by sending it to the I/E station of an
attached physical library.
1
From the menu bar, select Operations→Media Management→Physical→Application.
The Operations - Manage Application Media screen appears and lists several options for managing
application media.
2
Select the Export offline media to I/E station option and click Next.
The Application Media - Export Offline Media screen appears. For each media, the following
information is provided: the media's barcode, media type, the amount of used space on the media, and
the amount of free space on the media.
3
4
Select one or more application media to remove.
•
To select one or more application media, check the box next to each media's barcode.
•
To select all application media, check the box next to Barcode.
Click Apply.
The Progress Window appears.
Note
Once the Progress Window appears, you cannot cancel or stop this action.
However, you can close the window by clicking on the X in the upper-right of
the screen, but confirmation of success or failure is NOT shown.
•
If Success is shown in the Progress Window: The selected application media was successfully
sent to the I/E station of the attached physical library.
•
If Failure is shown in the Progress Window: The selected application media was not sent to the I/
E station of the attached physical library. To view the troubleshooting procedures, click View
Recommended Actions. To view the error details, click Error Log for information on why the
removal procedure was not successful. To remove additional application media from the Pathlight
VX, repeat Step 1 through Step 4.
5
Click Close to close the Progress Window.
6
Remove the media from the I/E station of the attached physical library.
Related topics:
Removing Cleaning Media on page 94
Removing Disk Extension Media on page 95
Removing Internal Backup Media on page 96
Removing Service Media on page 97
Pathlight VX User’s Guide
93
Removing Cleaning Media
Use this procedure to remove cleaning media from the Pathlight VX by sending it to the I/E station of an
attached physical library.
1
From the menu bar, select Operations→Media Management→Physical→Cleaning.
The Cleaning Media - Remove screen appears and lists the cleaning media in the Pathlight VX. For
each media, the following information is provided: the media's barcode, media type, and library where
the media is located.
2
3
Select one or more cleaning media to remove.
•
To select one or more cleaning media, check the box next to each media's barcode.
•
To select all cleaning media, check the box next to Barcode.
Click Apply.
The Progress Window appears.
Note
Once the Progress Window appears, you cannot cancel or stop this action.
However, you can close the window by clicking on the X in the upper-right of
the screen, but confirmation of success or failure is NOT shown.
•
If Success is shown in the Progress Window: The selected cleaning media was successfully sent
to the I/E station of the attached physical library.
•
If Failure is shown in the Progress Window: The selected cleaning media was not sent to the I/E
station of the attached physical library. To view the troubleshooting procedures, click View
Recommended Actions. To view the error details, click Error Log for information on why the
removal procedure was not successful. To remove additional cleaning media from the Pathlight VX,
repeat Step 1 through Step 3.
4
Click Close to close the Progress Window.
5
Remove the media from the I/E station of the attached physical library.
Related topics:
Removing Application Media on page 93
Removing Disk Extension Media on page 95
Removing Internal Backup Media on page 96
Removing Service Media on page 97
94
Performing Advanced Tasks and Operations
Removing Disk Extension Media
Use this procedure to remove Disk Extension media from the Pathlight VX by sending it to the I/E station of
an attached physical library.
Note
1
Disk Extension (storage policies) is a licensable feature. This operation can
only be performed if storage policies is licensed on the Pathlight VX, and Disk
Extension media have been introduced into the system.
From the menu bar, select Operations→Media Management→Physical→Disk Extension.
The Disk Extension Media - Remove screen appears and lists unused Disk Extension media in the
Pathlight VX. For each media, the following information is provided: the media's barcode, media type,
and library where the media is located.
Note
2
3
Only unused Disk Extension media can be removed from the Pathlight VX.
Disk Extension media being used in the system is not listed on the
Disk Extension Media - Remove screen. To move Disk Extension media to
an unused state (available for removal from the Pathlight VX), you must first
reclaim the media’s wasted space. Refer to Reclaiming Space on Disk
Extension Media on page 98.
Select one or more Disk Extension media to remove.
•
To select one or more Disk Extension media, check the box next to each media's barcode.
•
To select all Disk Extension media, check the box next to Barcode.
Click Apply.
The Progress Window appears.
Note
Once the Progress Window appears, you cannot cancel or stop this action.
However, you can close the window by clicking on the X in the upper-right of
the screen, but confirmation of success or failure is NOT shown.
•
If Success is shown in the Progress Window: The selected Disk Extension media was
successfully sent to the I/E station of the attached physical library.
•
If Failure is shown in the Progress Window: The selected Disk Extension media was not sent to
the I/E station of the attached physical library. To view the troubleshooting procedures, click View
Recommended Actions. To view the error details, click Error Log for information on why the
removal procedure was not successful. To remove additional Disk Extension media from the
Pathlight VX, repeat Step 1 through Step 3.
4
Click Close to close the Progress Window.
5
Remove the media from the I/E station of the attached physical library.
Related topics:
Removing Application Media on page 93
Removing Cleaning Media on page 94
Removing Internal Backup Media on page 96
Removing Service Media on page 97
Pathlight VX User’s Guide
95
Removing Internal Backup Media
Use this procedure to remove internal backup media from the Pathlight VX by sending it to the I/E station
of an attached physical library.
Note
1
If you remove all internal backup media from the Pathlight VX, then you
cannot save system backups to tape.
From the menu bar, select Operations→Media Management→Physical→Internal Backup.
The Operations - Manage Internal Backup Media screen appears and lists the internal backup media
in the Pathlight VX. For each media, the following information is provided: the media's barcode, media
type, and library where the media is located.
2
In the Select Operation area, select Remove.
3
Click Next.
The Internal Backup Media - Remove screen appears and lists internal backup media that can be
removed from the Pathlight VX.
4
5
Select one or more internal backup media to remove from the Pathlight VX.
•
To select one or more internal backup media, check the box next to each media's barcode.
•
To select all internal backup media, check the box next to Barcode.
Click Apply.
The Progress Window appears.
Note
Once the Progress Window appears, you cannot cancel or stop this action.
However, you can close the window by clicking on the X in the upper-right of
the screen, but confirmation of success or failure is NOT shown.
•
If Success is shown in the Progress Window: The selected internal backup media was
successfully sent to the I/E station of the attached physical library.
•
If Failure is shown in the Progress Window: The selected internal backup media was not sent to
the I/E station of the attached physical library. To view the troubleshooting procedures, click View
Recommended Actions. To view the error details, click Error Log for information on why the
removal procedure was not successful. To remove additional internal backup media from the
Pathlight VX, repeat Step 1 through Step 3.
6
Click Close to close the Progress Window.
7
Remove the media from the I/E station of the attached physical library.
Related topics:
Removing Application Media on page 93
Removing Cleaning Media on page 94
Removing Disk Extension Media on page 95
Removing Service Media on page 97
96
Performing Advanced Tasks and Operations
Removing Service Media
Use this procedure to remove service media from the Pathlight VX by sending it to the I/E station of an
attached physical library.
1
From the menu bar, select Operations→Media Management→Physical→Service.
The Service Media - Remove screen appears and lists the service media in the Pathlight VX. For each
media, the following information is provided: the media's barcode, media type, and library where the
media is located.
2
3
Select one or more service media to remove.
•
To select one or more service media, check the box next to each media's barcode.
•
To select all service media, check the box next to Barcode.
Click Apply.
The Progress Window appears.
Note
Once the Progress Window appears, you cannot cancel or stop this action.
However, you can close the window by clicking on the X in the upper-right of
the screen, but confirmation of success or failure is NOT shown.
•
If Success is shown in the Progress Window: The selected service media was successfully sent
to the I/E station of the attached physical library.
•
If Failure is shown in the Progress Window: The selected service media was not sent to the I/E
station of the attached physical library. To view the troubleshooting procedures, click View
Recommended Actions. To view the error details, click Error Log for information on why the
removal procedure was not successful. To remove additional service media from the Pathlight VX,
repeat Step 1 through Step 3.
4
Click Close to close the Progress Window.
5
Remove the media from the I/E station of the attached physical library.
Related topics:
Removing Application Media on page 93
Removing Cleaning Media on page 94
Removing Disk Extension Media on page 95
Removing Internal Backup Media on page 96
Pathlight VX User’s Guide
97
Managing Disk Extension Media
Use the procedures in this section to manage Disk Extension media.
Reclaiming Space on Disk Extension Media
Over time, the media used for storage policies (known as Disk Extension media) develops wasted space as
it is used in the Pathlight VX. Wasted space is a normal by-product of using Disk Extension media in the
system. This space will be automatically reclaimed when virtual media are recycled and as backups expire.
Use this procedure to reclaim wasted space on Disk Extension media.
Note
1
Space reclamation can only be performed on one Disk Extension media at a time, that
this process requires use of two physical drives, and that the process may take
several hours to complete.
From the menu bar, select Operations→Media Management→Physical→Disk Extension.
The Operations - Manage Disk Extension Media screen appears.
2
Select Space Reclamation and click Next.
The Disk Extension Media - Space Reclamation screen appears and lists all formatted Disk
Extension media in the Pathlight VX. For each media, the following information is provided: Barcode,
Media Type, Fill Level (as a percentage), and Wasted Space (as a percentage). This screen also
indicates whether the space reclamation process is in progress for a specific Disk Extension media.
Note
Space reclamation can only be performed on one Disk Extension media at a time. If
the Space Reclamation Currently in Progress field displays a barcode, then space
reclamation is underway on the specified Disk Extension media. You cannot initiate
another space reclamation request until the pending operation is complete. Space
reclamation can take several hours to finish.
Note
If the selected Disk Extension media is scheduled for certain operations, you may
receive a failure message indicating that the system is unable to start the space
reclamation process at this time. If this happens, wait for the scheduled operation to
complete before starting the space reclamation process. Operations that may prevent
space reclamation and cause this failure message to appear include: storing copies of
virtual media files.
3
Select a Disk Extension media on which to reclaim wasted space.
4
Click Apply.
You are prompted that space reclamation can only be performed on one Disk Extension media at a time,
that this process requires use of two physical drives, and that the process may take several hours to
complete.
98
Performing Advanced Tasks and Operations
5
Click OK.
The Progress Window appears, which indicates that the request to reclaim wasted space on the
selected Disk Extension media has been processed.
Note
6
Once the Progress Window appears, you cannot cancel or stop this action.
However, you can close the window by clicking the X in the upper-right of the screen,
but confirmation of success or failure is NOT shown.
•
If Success appears in the Progress Window: The request to reclaim space on the selected Disk
Extension media was successfully submitted and the space reclamation process was successfully
started. When this process is complete, an Admin Alert appears notifying you that the status of the
completed request is reported in the Tools→Activity Status screen.
•
If Failure appears in the Progress Window: The request to reclaim space on the selected Disk
Extension media was NOT processed. To view the troubleshooting procedures, click View
Recommended Actions. To view the error details, click Error Logs for information on the request.
Click Close to close the Progress Window.
Related topics:
Viewing the Disk Extension Space Usage Report on page 123
Removing Disk Extension Media on page 95
Changing Disk Extension Media Attributes
On the Tools - Disk Extension Media Attributes screen, you can change the attributes of Disk Extension
media that are marked Suspect or Unavailable and reset them to a usable state: Unsuspect and
Available.
Note
Disk Extension (storage policies) is a licensable feature. This operation can
only be performed if storage policies is licensed on the Pathlight VX, and Disk
Extension media have been introduced into the system.
1
Log on as a user with Administrator privileges.
2
From the menu bar, select Tools→Media→Change Media→Disk Extension Attributes.
The Tools - Disk Extension Media Attributes screen appears and lists Disk Extension media that are
marked Suspect or Unavailable and available to be reset to a usable state.
3
Do one of the following:
•
Select the Disk Extension media to reset to a usable state.
- OR •
Narrow the media list:
a. In the Apply Filter field, enter barcodes, barcode ranges, wildcards(*) or any combination of
these separated by commas.
EXAMPLE:
00AB01, 00AB20-00AB50, AB*, *AB
Pathlight VX User’s Guide
99
Note
These filter values are case-sensitive.
b. Click Apply Filter.
4
Click Apply.
The Progress Window appears.
Note
5
Once the Progress Window appears, you cannot cancel or stop this action.
However, you can close the window by clicking on the X in the upper-right of
the screen, but confirmation of success or failure is NOT shown.
•
If Success appears in the Progress Window: The selected Disk Extension media was
successfully changed to a usable state (Unsuspect and Available).
•
If Failure appears in the Progress Window: The selected Disk Extension media was NOT changed
to a usable state. To view the troubleshooting procedures, click View Recommended Actions. To
view the error details, click Error Log for information on why the Disk Extension media was not
reset. To reset Disk Extension media to a usable state (Unsuspect and Available), repeat Step 2
through Step 4.
Click Close to close the Progress Window.
Related topics:
Performing Required Actions on page 43
Viewing the Physical Media Report on page 121
100
Performing Advanced Tasks and Operations
Managing Internal Backup Media
Use the procedures in this section to manage Internal Backup media.
Managing Internal Backup Media
If internal backup media have been marked as Unavailable, the system administrator can use this screen
to make the media available again or remove the media from the Pathlight VX.
1
Log on as a user with Administrator privileges.
2
From the menu bar, select Operations→Media Management→Physical→Internal Backup.
The Operations - Manage Internal Backup Media screen appears.
3
4
5
6
In the Select Operation area, select an operation to perform on internal backup media.
•
Make Available - Makes internal backup media available for use in the Pathlight VX.
•
Remove - Removes internal backup media from the Pathlight VX and sends it to the I/E station of
an attached physical library.
Click Next.
•
If the Make Available option was selected, the Internal Backup Media - Make Available screen
appears and lists internal backup media that can be made available to the Pathlight VX.
•
If the Remove option was selected, the Internal Backup Media - Remove screen appears and lists
internal backup media that can be removed from the Pathlight VX.
Select internal backup media for the operation. Do one of the following:
•
For the Make Available operation, select internal backup media to make available to the Pathlight
VX.
•
For the Remove operation, select internal backup media to remove from the Pathlight VX.
Click Apply.
•
If the Make Available operation was selected, a dialog box prompts you to confirm that you want
to reset the availability of the selected media. Click OK. The Progress Window appears.
•
If the Remove operation was selected, the Progress Window appears.
Note
•
Once the Progress Window appears, you cannot cancel or stop this action.
However, you can close the window by clicking on the X in the upper-right of
the screen, but confirmation of success or failure is NOT shown.
If Success appears in the Progress Window:
•
For the Make Available option, the selected internal backup media was successfully made
available for use in the Pathlight VX.
•
For the Remove option, the selected internal backup media was successfully removed from the
Pathlight VX and sent to the I/E station of a physical library attached to the system.
Pathlight VX User’s Guide
101
•
If Failure is shown in the Progress Window:
•
For the Make Available option, the selected internal backup media was not made available for
use in the Pathlight VX.
•
For the Remove option, the selected internal backup media was not removed from the Pathlight
VX and sent to the I/E station of a physical library attached to the system.
To view the troubleshooting procedures, click View Recommended Actions. To view the error
details, click Error Log for information on why the internal backup media operation was not
successful.
7
Click Close to close the Progress Window.
Setting the Internal Backup Schedule
This operation sets the time when daily internal backups are run on the Pathlight VX and specifies whether
internal backups will be copied to internal backup tape (media) in a physical library attached to the Pathlight
VX. The default setting for internal backups to start is 04:02 AM.
1
From the menu bar, select Setup→Internal Backup.
The Setup - Internal Backup screen appears.
2
In the Enter Start Time for Internal Backups field, enter the time when the backups should start and
indicate AM or PM.
3
In the Backup to Tape field, specify whether backups of the Pathlight VX configuration will be copied
to internal backup tape (media) in an attached physical library. System backups are automatically saved
to Pathlight VX disk. Saving system backups to tape is a precaution that enables you to recover the
Pathlight VX configuration in the event the system backup saved to disk is lost because of a disk failure.
4
•
If you select Enable, Pathlight VX system backups are copied to internal backup tape.
•
If you select Disable, Pathlight VX system backups are NOT copied to internal backup tape.
Click Apply.
The Progress Window appears, which contains information on the status of setting the internal backup
schedule.
Note
Once the Progress Window appears, you cannot cancel or stop this
action. However, you can close the window by clicking on the X in the
upper-right of the screen, but confirmation of success or failure is NOT
shown.
•
If Success appears in the Progress Window: The start time for daily internal backups to run and
the backup to tape setting are saved.
•
If Failure appears in the Progress Window: The internal backup schedule start time and backup
to tape setting were not saved. To view the troubleshooting procedures, click View Recommended
Actions. To view the error details, click Error Log for information on why the internal backup
schedule start time and backup to tape setting were not saved. To set the start time for daily internal
backups and specify the backup to tape setting, repeat Step 2 through Step 4.
•
Click Close to close the Progress Window.
The Pathlight VX reboots.
102
Performing Advanced Tasks and Operations
Working with Advanced Features
Use the procedures in this section to enable and disabled Pathlight VX Advanced Features, such as
Archive, Early Tape Creation, and, if licensed, Storage Policies (Disk Extension).
Enabling Advanced Features
Pathlight VX offers Advanced Features such as Archive, Early Tape Creation, and, if licensed, Storage
Policies. By default, Advanced Features are disabled. Use the Enabling Advanced Features screen to
activate these features.
1
Log on as a user with Administrator privileges.
2
From the menu bar, select Setup→Advanced Features.
The Setup - Advanced Features screen appears.
3
Select the Advanced Feature you want to enable. Depending on your Pathlight VX license, certain
Advanced Features may or may not available.
Note
•
For example, if Archive and/or Early Tape Creation is enabled, then
Storage Policies cannot be enabled. To enable Storage Policies, you
must first disable Archive and Early Tape Creation.
Archive - A user-controlled function which enables virtual media to be kept on-site while the
physical counterpart is taken off-site. This features delivers off-site protection while eliminating the
need to perform a second backup (the clone / duplication process) which adds overhead to SAN
and servers. Archive may not be available if Storage Policies are licensed. If Archive is available,
select Archive and click Apply.
The Progress Window appears.
•
Early Tape Creation - An internal function which copies virtual media to physical tape with the
same barcode to enable export operations to complete faster. Early Tape Creation may not be
available if Storage Policies are licensed. If Early Tape Creation is available, select Early Tape
Creation, click Next, and go to Step 4c on 104.
•
Storage Policies - User-definable management functions that automatically create one or more
copies of data on tape and then release the disk copy as it ages. This customizable feature keeps
new data on disk only as long as high-speed restores are required and always keeps a copy on tape
for long term data access. If Storage Policies are licensed, Archive and Early Tape Creation may
not be available. Select Storage Policies, click Next, and go to Step 4c on 104.
CAUTION
CAUTION
Pathlight VX User’s Guide
Once Storage Policies has been enabled, it cannot be disabled.
Before enabling Storage Policies, be sure data is not being actively
read or written in the Pathlight VX. Enabling Storage Policies
interrupts I/O in the system.
103
4
Configure the Advanced Feature. Both Early Tape Creation and Storage Policies require additional
configuration after they are enabled to be fully functional in the Pathlight VX.
•
If Early Tape Creation is selected:
a. Specify the following parameters:
•
Enter Maximum Concurrent Processes - The maximum number of Early Tape Creation
media operations (concurrent processes) that can be active at one time. For example, if 4
physical drives are available to the Pathlight VX, up to 3 drives can be used for Early Tape
Creation operations because at least 1 drive must be available for other activity in the
Pathlight VX. The maximum number of concurrent processes available appears in brackets
next to the field and is 1 less than the number of physical drives on the Pathlight VX
(because of the drive needed for other system activity).
Note
Early Tape Creation functionality is disabled if the Maximum
Concurrent Processes parameter is set to zero (0).
•
Enter Media Percentage Full - Specifies how full virtual media needs to be before it is a
candidate for Early Tape Creation. The default value is 90%. The minimum setting is 75%.
Media will not be a candidate for Early Tape Creation if it is less than 75% full.
•
Early Tape Creation Window: Enter Start Time - Creates a window when Early Tape
Creation will be active.
•
Early Tape Creation Window: Enter End Time - Creates a window when Early Tape
Creation will be active.
All Day is the default setting to allow Early Tape Creation to happen at any time. It is
recommended that this process run in the background while no other processes, such as
backups are running.
b. Click Apply.
The Progress Window appears.
Note
Once the Progress Window appears, you cannot cancel or stop this
action. However, you can close the window by clicking on the X in the
upper-right of the screen, but confirmation of success or failure is NOT
shown.
•
If Success appears in the Progress Window: Early Tape Creation was successfully
enabled.
•
If Failure appears in the Progress Window: Early Tape Creation was NOT enabled. To
view the troubleshooting procedures, click View Recommended Actions. To view the
error details, click Error Log for information.
c. Click Close to close the Progress Window.
104
Performing Advanced Tasks and Operations
•
If Storage Policies is selected:
a. Decide whether you want to create an application window to suspend storage policies on the
Pathlight VX.
•
If you want to create an application window, specify values in the Enter Start Time, Enter
End Time, and Select Days parameters and click Next.
•
If you do not want to create an application window, check the No Application Window box
and click Next.
The Add Unknown Media to Disk Extension Media Pool screen appears and lists unknown
media that are available to add as Disk Extension media and use for storage policies. For each
media, its barcode and media type are listed.
b. Select one or more media to add as Disk Extension media.
•
To select one or more media, check the box next to each media’s barcode.
•
To select all media, check the box next to Barcode.
c. Click Next.
The Modify Default Storage Policy - default policy screen appears and lists the default
storage policy. The following parameters can be modified.
•
Copies to Disk Extension Pool - The number of physical copies of virtual media to be
created. Multiple copies of virtual media protects against physical media failures. If multiple
copies are created, each copy is created on separate physical media so the loss of one
tape does not result in total data loss. This parameter can be set from 1 to 4.
•
Minutes Before Copy - The number of minutes that virtual media must be idle before the
Pathlight VX backup application is done using it. For example, if media is used for multiple
backup jobs, but it might be unloaded between jobs, then this parameter should be set to
30 minutes. If the media is usually filled during a single job or is only used for a single job,
then this parameter should be set to a low value. For virtual media that does not need to be
copied to physical media (tape), check the Never Copy box.
•
Virtual Media on Disk - Specifies whether data should ever be removed from the Pathlight
VX disk. If data should always reside on disk, check the Never Remove box. If data should
be removed from disk when the disk threshold (watermark) is reached, do not check this
box.
Note
Pathlight VX User’s Guide
Data removal from disk only occurs when the disk fills to more than
85% capacity. When this internal threshold is reached, Pathlight VX
clears out virtual media until the disk usage falls to less than 75% of
capacity. To determine if specific virtual media is still on disk, refer to
the On Disk parameter of the Detail Media Report, accessed from
the Virtual Media Summary Report. Refer to Viewing the Virtual
Media Summary Report on page 119.
105
d. Click Apply.
The Progress Window appears.
Note
Once the Progress Window appears, you cannot cancel or stop this
action. However, you can close the window by clicking on the X in the
upper-right of the screen, but confirmation of success or failure is NOT
shown.
•
If Success appears in the Progress Window: Storage Policies were successfully
enabled.
•
If Failure appears in the Progress Window: Storage Policies were NOT enabled. To view
the troubleshooting procedures, click View Recommended Actions. To view the error
details, click Error Log for information.
e. Click Close to close the Progress Window.
Related topics:
Managing Offline Media on page 91
Configuring Early Tape Creation on page 111
Managing Internal Backup Media on page 101
Disabling Advanced Features
Pathlight VX offers Advanced Features such as Archive, Early Tape Creation, and, if licensed, Storage
Policies. Both Archive and Early Tape Creation can be disabled. Once active, Storage Policies cannot
be disabled.
1
Log on as a user with Administrator privileges.
2
From the menu bar, select Setup→Advanced Features.
The Setup - Advanced Features screen appears and lists the Advanced Features. For each feature,
its state is displayed (Enabled or Disabled).
3
Select the Advanced Feature you want to disable.
•
To disable Archive:
1
Select Archive and click Next.
The Advanced Features - Archive screen appears.
•
If the Pathlight VX contains virtual media that have been archived, the Advanced Features
- Archive screen prompts that Archive cannot be disabled until the archived media are
brought back into the Pathlight VX.
a. Bring the archive media back into the Pathlight VX by reverting them. Refer to
Reverting Archive Media on page 114.
b. After the archive media are reverted, return to this step.
•
2
If the Pathlight VX does not contain any virtual media that have been archived, the
Advanced Features - Archive screen indicates that Archive will be disabled.
Click Apply.
A confirmation screen appears and prompts that Archive will be disabled.
106
Performing Advanced Tasks and Operations
3
Click OK.
The Progress Window appears.
Note
4
Once the Progress Window appears, you cannot cancel or stop this
action. However, you can close the window by clicking on the X in
the upper-right of the screen, but confirmation of success or failure is
NOT shown.
•
If Success appears in the Progress Window: Archive was successfully disabled.
•
If Failure appears in the Progress Window: Archive was NOT disabled. To view the
troubleshooting procedures, click View Recommended Actions. To view the error details,
click Error Log for information.
Click Close to close the Progress Window.
The Setup - Advanced Features screen refreshes and indicates that Archive is disabled.
•
To disable Early Tape Creation:
1
Select Early Tape Creation and click Next.
2
Click Apply.
A confirmation screen appears and prompts that Early Tape Creation will be disabled.
3
Click OK.
The Progress Window appears.
Note
4
Once the Progress Window appears, you cannot cancel or stop this
action. However, you can close the window by clicking on the X in the
upper-right of the screen, but confirmation of success or failure is NOT
shown.
•
If Success appears in the Progress Window: Early Tape Creation was successfully
disabled.
•
If Failure appears in the Progress Window: Early Tape Creation was NOT disabled. To
view the troubleshooting procedures, click View Recommended Actions. To view the
error details, click Error Log for information.
Click Close to close the Progress Window.
The Setup - Advanced Features screen refreshes and indicates that Early Tape Creation is
disabled.
Related topics:
Enabling Advanced Features on page 103
Reverting Archive Media on page 114
Pathlight VX User’s Guide
107
Managing Storage Policies
Storage policies is a licensed Advanced Feature of Pathlight VX that defines how to store media. Storage
policies are user-defined management functions that automatically create one or more copies of data on
tape and then release the data on disk as it ages. If you are licensed to use storage polices, you can manage
them from the Setup Policies screen.
Storage policies are a powerful tool that enable you to customize the sizing of the Pathlight VX based on
the amount of disk needed for high-speed backups and restores, and the amount of physical (tape) library
space needed for on-site storage. However, if storage policies are not set up and administered correctly,
policy management can degrade Pathlight VX performance. Review the following implementation
considerations before creating storage policies.
•
How Many Policies to Create: The number of policies needed depends on the user's classification
of data. For example, certain data may need to be immediately copied to physical media (tape), but
stay on disk for a long time, such as CxO data. Other data that may not require high-speed restores
may be quickly copied to tape but only left on disk for one or two days, such as user shares.
Incremental backups, which often have a short lifecycle, may never be copied to tape. As a result,
users may have two, three, or more policies based on how data is classified.
•
Associating Policies with ISV Media Pools: Storage policies are assigned to groups of virtual
media. Determining the specific data that is written to these media is controlled by a backup
application. In order to guarantee that certain data classes (for example, email or user shares) are
moved correctly by storage policies, the local administrator needs to configure the backup
application supporting Pathlight VX to write each class of data to a different ISV media pool. This
way, when storage policies are run against virtual media, the data on the virtual media is moved
correctly.
For example, a policy is created in Veritas Netbackup© to back up three Exchange servers. The
policy is associated with a media pool called Exchange which contains media barcodes 001, 002,
and 003. On the Pathlight VX, a storage policy is created for email called Exchange_PVX and then
is associated with virtual media barcodes 001, 002, and 003. Any backups to virtual media 001 to
003 will now contain Exchange data and be controlled by the Exchange_PVX storage policy.
As a best practice, administrators should create ISV media pools based on how data needs to be
protected. Pools can be created around groups of servers (for example, data on servers A and B
need to be on disk for 2 days; data on servers C and D for 5 days) or around types of data (for
example, all Exchange data goes to media pool X). These media pools will be assigned a specific
policy. When new virtual media is created, it will be assigned a storage policy and then added to
the appropriate ISV media pool.
108
•
Space Reclamation on Storage Policy Media: Over time, the media used for storage policies
(known as Disk Extension media) develops wasted space as it is used in the Pathlight VX. Wasted
space is a normal by-product of using Disk Extension media in the system. This space will be
automatically reclaimed when virtual media are recycled and as backups expire. If you wish to
reclaim wasted space immediately, refer to Reclaiming Space on Disk Extension Media on page
98. To determine which Disk Extension media are candidates for space reclamation, refer to
Viewing the Disk Extension Space Usage Report on page 123. This report lists all formatted Disk
Extension media in the Pathlight VX and, for each media, provides percentages of fill level and
wasted space on the tape.
•
Application Window: To make sure that storage policies do not interfere with backups to the
Pathlight VX, an application window is defined. This application window indicates the timeframe
when storage policies are not allowed to run and all Pathlight VX resources are dedicated to serving
backup application requests.
Performing Advanced Tasks and Operations
•
Defining Policy Parameters: Policy parameters based on user requirements for specific data sets.
•
# of Copies - This parameter is configured based on concerns about physical media. While tape
has a low risk of media errors, a user may want to make multiple copies of virtual media to
protect against physical media failures. If multiple copies are created, they will always be
created on separate physical media so the loss of a single tape does not result in total data loss.
This parameter can be set from 1 to 4.
•
Media Count - This parameter is configured based on the number of barcodes associated with
a selected storage policy.
•
Minutes Before Copy - This parameter is configured based on how long a virtual media (tape)
must be idle before the backup application is done using it. For example, if a tape is used for
multiple backup jobs, but it might be unloaded between jobs, then the Time Until Copy
parameter should be set to 30 or so minutes. If a tape is usually filled during a single job, or only
used for a single job, the idle time could be very low. For virtual media that does not need to be
copied to physical media (tape), check the box to set this parameter to 'Never'.
•
Virtual Media on Disk - This parameter is configured based on whether data should ever be
removed from disk. If data should always reside on disk, check the box to set this parameter to
Never Remove. If data should be removed from disk when the disk threshold (watermark) is
reached, do not check the box.
Note
The Virtual Media on Disk parameter does not actually remove virtual
media from disk once the residency period is met: it makes virtual media
a candidate for removal. Actual removal of data from disk only occurs
when the disk fills to over 85% of capacity. To determine if a virtual media
is still on disk, look at the On Disk parameter of the Viewing the Virtual
Media Summary Report on page 119.
Note
You can only manage storage policies if you are licensed for this
Advanced Feature and it has been enabled on the Pathlight VX. For more
information, refer to Enabling Advanced Features on page 103.
Note
Once a storage policy has been created, it can only be modified. Storage
policies cannot be deleted.
Pathlight VX User’s Guide
109
1
Log on as a user with Administrator privileges.
2
From the menu bar, select Policies→Setup Policies.
The Setup - Storage Policy screen appears.
3
Create or modify a storage policy.
•
If you want to create a storage policy:
a. Click Create.
b. In the Enter Name text box, enter a name for the new policy.
c. In the Protection text boxes, enter protection information.
d. In the Enter Virtual Media on Disk text box, enter capacity management information.
e. Click Apply.
•
You want to modify a storage policy:
a. Select the policy to modify and click Modify.
b. Enter new settings in the following text boxes as appropriate:
•
Copies to Disk Extension Pool
•
Minutes Before Copy
•
Virtual Media on Disk
c. Click Apply.
4
Note
Modifications to the Copies to Disk Extension Pool setting do NOT
apply to existing media currently associated with this policy. Modifications
to all other settings apply immediately to media associated with the
storage policy.
Note
Once the Progress Window appears, you cannot cancel or stop this
action. However, you can close the window by clicking the X in the upperright of the screen, but confirmation of success or failure is NOT shown.
•
If Success appears in the Progress Window: The storage policy was successfully created or
modified.
•
If Failure appears in the Progress Window: The storage policy was NOT created or modified. To
view the troubleshooting procedures, click View Recommended Actions. To view the error details,
click Error Log for information. To manage storage policies, repeat Step 2 and Step 3.
Click Close to close the Progress Window.
Related topics:
Enabling Advanced Features on page 103
110
Performing Advanced Tasks and Operations
Configuring Early Tape Creation
Early Tape Creation is a way to generate a physical copy of virtual data prior to an export (realize) operation
being requested. Using the ETC feature enables export operations to complete faster.
Note
1
Early Tape Creation only applies to virtual media with a physical counterpart
in an attached tape library. If the virtual media does not have a physical
counterpart, Early Tape Creation does not generate a physical copy.
From the menu bar, select Setup→Early Tape Creation.
The Early Tape Creation screen lists the parameters that must be defined when configuring Early Tape
Creation.
•
Enter Maximum Concurrent Processes - The maximum number of physical drives to use for
Early Tape Creation operations. This parameter must be set to a value larger than zero (0). The
number of available drives appears in brackets and is 1 less than the number of physical drives on
the Pathlight VX, thereby making at least 1 drive available for other system activity.
•
Enter Media Percentage Full - Specifies how full virtual media needs to be before it is a candidate
for Early Tape Creation. The default value is 90%. The minimum setting is 75%. Media will not be
a candidate for Early Tape Creation if it is less than 75% full.
Note
Early Tape Creation functionality is deactivated if the Maximum Number
of Physical Drives parameter is set to zero (0).
•
Early Tape Creation Window: Enter Start Time - Creates a window when Early Tape Creation
will be active.
•
Early Tape Creation Window: Enter End Time - Creates a window when Early Tape Creation will
be active.
All Day is the default setting to allow Early Tape Creation to happen at any time. It is recommended
that this process run in the background while no other processes, such as backups, are running.
2
Enter valid values for the parameters and click Apply.
The Progress Window appears, which contains information on the status of the Early Tape Creation
configuration.
Note
3
Once the Progress Window appears, you cannot cancel or stop this
action. However, you can close the window by clicking the X in the upperright of the screen, but confirmation of success or failure is NOT shown.
•
If Success appears in the Progress Window: Early Tape Creation was successfully configured.
•
If Failure appears in the Progress Window: Early Tape Creation was NOT configured. To view the
troubleshooting procedures, click View Recommended Actions. To view the error details, click
Error Log for information on why Early Tape Creation was not configured. To configure Early Tape
Creation, repeat Step 1 and Step 2.
Click Close to close the Progress Window.
Pathlight VX User’s Guide
111
Archiving Media
Use the Archive Media feature to select physical media to remove from a physical (tape) library while the
media's virtual counterparts are retained in the virtual library. This feature enables administrators to move
physical media to a vault outside of Pathlight VX, but to continue using the virtual counterparts (available
from the Pathlight VX backup application). The write-protect feature (if enabled) prevents updates to the
data on the virtual counterparts. The Archive Media screen provides two additional options that prepare
media to be archived. One option synchronizes data on the virtual media and its physical counterpart. The
second option lists the media that are in the process of being synchronized.
1
From the menu bar, select Operations→Media Management→Physical→Application.
The Operations - Manage Application Media screen appears.
2
In the Select Operation area, select Archive media and click Next.
The Operations - Archive Media screen appears with Archive Media selected in the Select Desired
Operation area.
112
Performing Advanced Tasks and Operations
3
In the Select Desired Operation area, select an operation to perform.
•
Create physical tapes - This option synchronizes data on the virtual media and its physical
counterpart. Data on the virtual and physical media must be synchronized before media can be
archived.
When this operation is selected, the Operations - Archive Media screen lists virtual media that are
candidates for data to be synchronized. For each media, the barcode, media type, library containing
the media, and media state are listed.
•
View tape creations in progress - This option lists media that are in the process of being
synchronized. Media cannot be archived until the synchronization process is complete.
The Operations - Archive Media screen lists media that is in the process of being synchronized.
For each media, the barcode, media type, library containing the media, and media state are listed.
•
Archive media - This option sends a physical tape to the I/E station of an attached physical library,
where it can be removed.
The Operations - Archive Media screen lists media that are candidates for archiving. For each
media, the barcode, media type, library containing the media, and media state are listed.
4
Select one or more media for the operation and click Apply.
•
To select one or more media, check the box next to each media's barcode.
•
To select all media, check the box next to Barcode.
5
If you want to write-protect a virtual copy of the media, check the Write Protect Virtual Copy box.
6
Click Apply.
The Progress Window appears.
Note
7
Once the Progress Window appears, you cannot cancel or stop this action.
However, you can close the window by clicking on the X in the upper-right of
the screen, but confirmation of success or failure is NOT shown.
•
If Success appears in the Progress Window: The physical media was successfully archived.
•
If Failure appears in the Progress Window: The physical media was NOT archived. To view the
troubleshooting procedures, click View Recommended Actions. To view the error details, click
Error Log for information on why the physical media was not archived. To close a service ticket,
repeat Step 1 on page 112 through Step 6.
Click Close to close the Progress Window.
Pathlight VX User’s Guide
113
Reverting Archive Media
To disable the Archive feature, all archive media must be reverted or brought back into the Pathlight VX.
Use this procedure to revert archive media. After you have completed this procedure, refer to Disabling
Advanced Features on page 106 to disable Archive.
1
Identify the archive media to revert.
a. On the menu bar, select Setup > Advanced Features.
The Setup - Advanced Features screen appears.
b. Select Archive and click Next.
The Advanced Features - Archive screen appears and lists archive media in the Pathlight VX.
c. Write down the barcode of each archive media and its associated state code.
2
Revert the archive media and bring it back into the Pathlight VX. For archive media, each state code
requires different action to revert the media. Refer to Table 5 and perform the required action (based
on the media's state code) to bring the media back into the Pathlight VX. For some state codes,
performing the required action causes the archive media to change to a state requiring additional action.
Table 5
Archive Media State Codes and Required Actions
State Code
Required Action
1408 - Indicates that the archive media's
physical counterpart is outside of the
attached physical library.
Step 1 Place the physical counterpart in the attached physical library.
When the physical counterpart is detected, the state code
changes to 1920.
1409 - Indicates that the archive media is
mounted in a virtual drive.
Step 1 Dismount the archive media from the virtual drive.
When the media is dismounted from the drive, the state code
changes to 1408.
1412 - Indicates that the archive media is
being exported and there is no physical
counterpart in the attached physical library.
Step 1 Place the physical counterpart in the attached physical library.
When the physical counterpart is detected, the state code
changes to 1924.
1920 - Indicates that the virtual media's
physical counterpart is in the attached
physical library.
Step 1 Click Action Required.
You are prompted that ‘Archived media returned, indicate
resolution.’
Step 2 Select Retain Virtual.
The state code changes to 896.
1921 - Indicates that the archive media is
mounted in a virtual drive.
Step 1 Dismount the archive media from the virtual drive.
When the media is dismounted from the drive, the state code
changes to 1920.
1924 - Indicates that the archive media is
being exported and its physical counterpart
is in the attached physical library.
Step 1 Click Action Required.
You are prompted that ‘An export has been requested for
an archived media, indicate resolution.’
Step 2 Select Recreate the physical volume.
The state code changes to 908, then 932, and finally 0.
3
Verify that the archive media are not in any of these states: 1408, 1409, 1412, 1920, 1921 or 1924.
The archive media has been reverted and brought back into the Pathlight VX.
4
To disable Archive, refer to Disabling Advanced Features on page 106.
See also:
Disabling Advanced Features on page 106
114
Performing Advanced Tasks and Operations
Pathlight VX Reports
The Pathlight VX includes robust reporting functionality that provides information about the system’s status
and operations. Use the procedures in this chapter to run Pathlight VX reports and interpret reported data.
•
Viewing the Virtual Library Summary
•
Reports About Physical Libraries, Drives and Media on page 120
•
Reports About System Configuration on page 123
•
Reports About Disk Extension Media on page 123
•
Reports About System Activity on page 125
Viewing the Virtual Library Summary
Virtual Library Summary information is available at the top of the Home page of the Pathlight VX Interface.
This information provides an overview of the libraries, drives, and media available on the Pathlight VX and
provides access to reports about virtual libraries, drives, and media.
The Virtual Library Summary provides this information:
•
Virtual Libraries - Shows the virtual libraries available on the Pathlight VX. To view a report on the
virtual libraries, click Virtual Libraries. For more information, refer to Viewing the Virtual Drive
Summary Report on page 119.
•
Drives - For each virtual library, shows the total number of drives in the library and the number of
active drives. To view a report on the virtual drives, click Drives. Refer to Viewing the Virtual Drive
Summary Report on page 119.
•
Media - For each virtual library, shows the total number of media in the library and the number of
used media. To view a report on the virtual media, click Media. Refer to Viewing the Virtual Media
Summary Report on page 119.
•
Slots - For each virtual library, shows the total number of slots in the library and the number of slots
that are full (contain media). Each slot can hold one medium (virtual tape).
•
Mailbox Slots - For each virtual library, shows the number of mailbox slots in the library that are
full (contain media).
•
Media Capacity Used - For each library, shows the percentage of media that has data written to it.
Pathlight VX User’s Guide
115
Viewing the Virtual Library Summary Report
The Virtual Library Summary Report lists the virtual libraries configured on the Pathlight VX. The contents
of this report vary depending on whether you are a user with Administrator privileges or not. If the report
spans multiple screens, use the left and right arrows at the bottom right of the window to scroll through the
screens. The report lists up to 100 media entries per screen.
1
From the menu bar, select Reports→Library Summary→Virtual.
The Virtual Library Summary Report appears and contains this information:
2
•
Name – The names of the virtual libraries configured on the Pathlight VX.
•
Serial Number – For each virtual library, its serial number.
•
Type – For each virtual library, its library type.
•
Drives – For each virtual library, the number of configured drives.
•
Media – For each virtual library, the number of configured media.
•
Capacity – For each virtual library, its total storage capacity. Capacity is determined by the number
of configured media in the virtual library. If no media is configured, the capacity is zero (0).
•
Free Space – For each virtual library, the amount of unused storage capacity.
Click the library name to view a report for an individual library.
The Library Summary Report appears for the selected library and lists the virtual library's serial number,
library type, number of drives, media, and slots, total storage capacity, and mailbox fill level. From this
screen, several additional reports are available.
3
Click Drives to view drive information in the Library Drives Report.
Refer to About the Library Drives Report on page 117.
4
Click Media to view media information in the Library Media Report.
Refer to About the Library Media Report on page 117.
5
Click Slots to view slots information in the Library Slots Report.
Refer to About the Library Slots Report on page 118.
6
Click Mailbox Fill Level to view mailbox information in the Library Mailbox Report.
Refer to About the Library Mailbox Report on page 118.
7
116
From the menu bar, select File→Close to close the report.
Pathlight VX Reports
About the Library Drives Report
The Library Drives Report lists drive information for the selected library. The contents of this report vary
depending on whether you are a user with Administrator privileges or not. If the report spans multiple
screens, use the left and right arrows at the bottom right of the window to scroll through the screens. The
report lists up to 100 listings per screen.
For each drive, the report lists the following information:
•
Name – The name of the drive as configured in the Pathlight VX.
•
Serial # – The serial number of the drive.
•
Type – The drive type of the drive.
•
Mode – The mode (availability) of the drive. A drive can be either Online or Offline.
•
Slot – The element address of the slot in the library where the drive is located.
•
Mounted – If media is mounted in the drive, the media's barcode displays in this column. If no
media is mounted in the drive, then empty displays.
•
# Mounts – For each virtual drive, the number of mounts in the library.
Related topics:
Viewing the Virtual Library Summary Report on page 116
About the Library Media Report
About the Library Slots Report on page 118
About the Library Mailbox Report on page 118
About the Library Media Report
The Library Media Report provides media information for the selected library. The contents of this report
vary depending on whether you are a user with Administrator privileges or not. If the report spans multiple
screens, use the left and right arrows at the bottom of the window to scroll through the screens. The report
lists up to 100 listings per screen. The Library Media Report contains the following information:
•
Barcode – The media’s barcode. This barcode number matches the barcode of the corresponding
physical media.
•
Type – The media’s type.
•
Used – The storage capacity that has been used on the media.
•
Free – The storage capacity that is available on the media.
Related topics:
Viewing the Virtual Library Summary Report on page 116
About the Library Drives Report
About the Library Slots Report on page 118
About the Library Mailbox Report on page 118
Pathlight VX User’s Guide
117
About the Library Slots Report
The Library Slots Report provides slot information for the selected library. The contents of this report vary
depending on whether you are a user with Administrator privileges or not. If the report spans multiple
screens, use the left and right arrows at the bottom of the window to scroll through the screens. The report
lists up to 100 listings per screen.
•
Slot – For each slot, its element address.
Note
The element address is used by the FC Host to specify a specific cell
(storage location) in a library.
•
Type – For each slot with media loaded, the media type of the media. If no media is loaded, this
entry is blank.
•
Barcode – For each slot with media loaded, the barcode of the media. If no media is loaded, this
entry appears as empty.
Related topics:
Viewing the Virtual Library Summary Report on page 116
About the Library Drives Report on page 117
About the Library Media Report on page 117
About the Library Mailbox Report
About the Library Mailbox Report
The Library Mailbox Report provides mailbox information for the selected library. Each library contains the
same number of drive slots and mailbox slots. However, the mailbox slot count cannot exceed 250 slots.
For example, if there are 552 drive slots, then the mailbox drive slot count stops at 250.
•
Slot – For each mailbox slot, its element address.
Note
The element address is a number that indicates the physical location of a
slot in the library, not the physical slot number.
•
Type – For each mailbox slot with media loaded, the media type of the media. If no media is loaded,
this entry is blank.
•
Barcode – For each mailbox slot with media loaded, the barcode of the media. If no media is
loaded, this entry appears as empty.
Related topics:
Viewing the Virtual Library Summary Report on page 116
About the Library Drives Report on page 117
About the Library Media Report on page 117
About the Library Slots Report
118
Pathlight VX Reports
Viewing the Virtual Drive Summary Report
The Virtual Drive Summary Report lists the virtual drives configured on the Pathlight VX. The contents of
this report vary depending on whether you are a user with Administrator privileges or not. If the report spans
multiple screens, use the left and right arrows at the bottom of the window to scroll through the screens. The
report lists up to 100 drive entries per screen.
1
From the menu bar, select Reports→Drive Summary→Virtual.
The Virtual Drive Summary Report appears and lists the virtual drives in the Pathlight VX. For each
virtual drive, the report lists the following information.
2
•
Name – The names of the virtual drive as configured in the Pathlight VX.
•
Serial # – The serial number of the virtual drive.
•
Type – The drive type of the virtual drive.
•
Mode – The mode (availability) of the virtual drive. A drive can be either Online or Offline.
•
Slot – The element address of the slot in the library where the drive is located.
•
Library – The virtual library where the virtual drive is located.
•
Mounted – If virtual media is mounted in the virtual drive, the media’s barcode displays in this
column. If no media is mounted in the virtual drive, then empty displays.
•
# Mounts – The number of times media has been mounted in the virtual drive.
From the menu bar, click File→Close to close the report
Viewing the Virtual Media Summary Report
The Virtual Media Summary Report lists the virtual media currently located in the Pathlight VX's virtual
libraries. The contents of this report vary depending on whether you are a user with Administrator privileges
or not. If the report spans multiple screens, use the left and right arrows at the bottom of the window to scroll
through the screens. The report lists up to 100 listings per screen.
1
From the menu bar, select Reports→Media Summary→Virtual.
The Virtual Media Summary Report appears and contains this information:
2
•
Barcode – For each virtual media, its barcode number. This barcode number matches that barcode
of the corresponding physical media.
•
Library – For each virtual media, the virtual library with which it is associated.
•
Type – For each virtual media, its media type.
•
Write Protect – Indicates whether the media is write-protected. If this setting is True, the media can
be written to. If this setting is False, the media cannot be written to.
•
Policy – For each virtual media, the polices enabled for it. policies enabled for the virtual media.
•
Used – For each virtual media, the storage capacity that has been used.
•
Free – For each virtual media, the storage capacity that is available.
On the menu bar, click File→Close to close the report.
Pathlight VX User’s Guide
119
Reports About Physical Libraries, Drives and Media
Use the procedures in this section to view reports about physical libraries, drives, and media.
Viewing the Physical Library Report
The Physical Library Report lists the physical (tape) libraries attached to the Pathlight VX.
1
From the menu bar, select Reports→Library Summary→Physical.
The Physical Library Report appears and lists the following information for each physical library:
2
•
Name – The name of the physical library.
•
Serial Number - The serial number of the physical library.
•
Type – The library type of the physical library.
•
Mode – The physical library's mode. The library can be either Online or Offline.
•
Media – The number of media in the library.
On the menu bar, click File→Close to close the report.
Related topics:
Viewing the Physical Drive Report
Viewing the Physical Drive Report
The Physical Drive Report lists the physical drives in the tape libraries attached to the Pathlight VX.
1
From the menu bar, select Reports→Drive Summary→Physical.
The Physical Drive Report appears and lists the following information for each physical drive:
2
•
Drive ID – The ID number of the physical drive.
•
Type – The drive type of the physical drive.
•
Library – The physical library that contains the physical drive.
•
Mode – The physical drive's mode. The drive can be either Online or Offline.
•
Mounted – The media currently mounted in the physical drive. If no media is mounted, this entry is
empty.
•
# Mounts – The number of mounts of the physical drive.
On the menu bar, click File→Close to close the report.
Related topics:
Viewing the Physical Library Report
120
Pathlight VX Reports
Viewing the Physical Media Report
The Physical Media Report lists the media currently located in the physical (tape) libraries connected to
Pathlight VX. If the report spans multiple screens, use the left and right arrows at the bottom right to scroll
through the screens. The report lists up to 100 listings per screen.
1
From the menu bar, select Reports→Media Summary→Physical.
The Physical Media Report appears.
For each piece of physical media, the report lists the following information:
•
Library – The physical library that contains the physical media.
•
Barcode – The barcode number of the physical media.
•
Type – The media type of the physical media.
•
Media Pool – The media pool type of the physical media.
•
Write Protect – Indicates whether the physical media has been set as write-protected.
•
# Mounts – The number of mounts of the physical media.
•
Suspect Count – The number of times read/write positioning failures have been detected for this
media. The suspect count can be reset to 0 (zero) by selecting Tools→Media→Change Media→
Disk Extension Attributes.
Note
•
This column only applies to Disk Extension media.
Status – The current state of the media for data storage. State options are Available or
Unavailable.
Note
This column only applies to Disk Extension media.
Pathlight VX User’s Guide
121
•
Used – The storage capacity that has been used on the physical media.
Note
2
On Disk Extension media, data may be compressed when it is stored on the
media. This compression can cause the value in the Used column to exceed
the total storage capacity of the media.
•
Free – The storage capacity that is available on the physical media.
•
% Used – The percentage of storage capacity that has been used on the physical media.
Do one of the following:
•
Sort the information by library, barcode, media type, or used and free space, by clicking the
corresponding column heading.
- OR •
Narrow the media list:
a. In the text box, to the right of Apply Filter, enter barcodes, barcode ranges, wild cards(*) or any
combination of these separated by commas.
EXAMPLE:
00AB01, 00AB20-00AB50, AB*, *AB
Note
These values are case-sensitive.
b. Click Apply Filter.
3
122
On the menu bar, click File→Close to close the report.
Pathlight VX Reports
Reports About System Configuration
Use the procedure in this section to view the System Configuration Report.
Viewing the System Configuration Report
The System Configuration Report lists configuration information for Pathlight VX components.
1
From the menu bar, select Help→System Configuration.
The System Configuration Report appears and lists configuration information for the FC blade, RAID,
Management Server, FC HBA on the Management Server, FC switch and Utility Module.
2
Click Locate Serial Number to locate the Pathlight VX's serial number.
A pop-up window appears with instructions on locating the system's serial number.
3
On the menu bar, click File→Close to close the report.
Reports About Disk Extension Media
Use the procedures in this section to view reports about Disk Extension media.
Viewing the Disk Extension Space Usage Report
Over time, Disk Extension media develops wasted space as it is used in the Pathlight VX. This space can
be reclaimed when virtual media are recycled and as the backup expires. Use the Disk Extension Space
Usage Report to determine which Disk Extension media are candidates for space reclamation based on
the amount of wasted space.
1
From the menu bar, select Reports→Disk Extension Space Usage Report.
The Disk Extension Space Usage Report appears and lists all formatted Disk Extension media in the
Pathlight VX. For each media, the following information is provided:
2
•
Barcode – The barcode of the Disk Extension media.
•
Fill Level – The percentage of the Disk Extension media that contains good data.
•
Wasted Space – The percentage of the Disk Extension media that contains wasted space.
Sort the report information. You can sort the Disk Extension space usage by Barcode, Fill Level or
Wasted Space by clicking on the corresponding column heading.
Note
3
To initiate space reclamation on a specific Disk Extension media, refer to
Reclaiming Space on Disk Extension Media on page 98.
On the menu bar, click File→Close to close the report.
Related topics:
Reclaiming Space on Disk Extension Media on page 98
Pathlight VX User’s Guide
123
Viewing the Storage Policy Report
The Storage Policy Report lists the storage policy associated with the Pathlight VX. For each storage
policy, the name of the policy, number of copies of associated data, number of associated virtual media,
minimum time before virtualized data is written to Disk Extension media, and minimum time before data
(written to Disk Extension media) is a candidate for removal are listed. The total number of storage policies
is listed in the upper right of the screen.
1
From the menu bar, select Reports→Storage Policy.
The Storage Policy Report screen appears and lists the following information for each backup of the
Pathlight VX configuration:
2
124
•
Name – The name of the storage policy.
•
# Copies – When data on the virtual media associated with the storage policy is stored to Disk
Extension media, the number of copies that will be created. Each copy is stored on a different Disk
Extension tape.
•
Media Count – The number of virtual media associated with the storage policy.
•
Minutes Before Copy – After new data is written to virtual media, the minimum time that Pathlight
VX waits before storing the data to Disk Extension media.
•
Virtual Media on Disk – Specifies whether virtual media can be a candidate for truncation. If the
Never Remove box is checked, virtual media is never truncated and remains on disk. Otherwise,
the virtual media will be a candidate for removal when data capacity exceeds 85%.
On the menu bar, click File→Close to close the report.
Pathlight VX Reports
Reports About System Activity
Use the procedures in this section to view reports about system activity in the Pathlight VX.
Viewing the Library Mailbox Report
The Library Mailbox Report provides mailbox information for the selected mailbox slots. Each library
contains the same number of drive slots and mailbox slots. However, the mailbox slot count cannot exceed
250 slots. For example, if there are 552 library drive slots, then the mailbox drive slot count can only be 250.
1
From the Home page, in the Virtual Libraries section, select the library for which you want to access a
report.
The Library Summary Report screen appears.
2
Click Mailbox Fill Level.
The Library Mailbox Report screen appears.
3
Click Back to Library Summary Report when you are finished.
The Library Summary Report screen appears.
Related topics:
Viewing the Virtual Library Summary Report on page 116
About the Library Mailbox Report on page 118
About the Library Drives Report on page 117
About the Library Media Report on page 117
About the Library Slots Report on page 118
Pathlight VX User’s Guide
125
Viewing the Media Tracking Report
The Media Tracking Report lists all media in the Pathlight VX. The report provides a state code and
description for each listed media. The state code is an internal number used primarily for serviceability.
1
From the menu bar, select Reports→Media Tracking.
The Media Tracking Report appears.
For each piece of virtual media, the report lists the following information:
2
•
Virtual Location – The virtual library that contains the virtual media.
•
Barcode – The barcode number of the virtual media. The barcode number matches the barcode of
the corresponding physical media.
•
State Code – The current state of the virtual media, expressed as a numeric state code.
•
State Description – The description of the virtual media’s state.
Do one of the following:
•
Sort the location, barcode, state code, and state description by clicking the corresponding column
heading.
- OR •
Narrow the media list:
In the text box to the right of Apply Filter, enter barcodes, barcode ranges, wildcards(*) or any
combination of these separated by commas.
EXAMPLE:
00AB01, 00AB20-00AB50, AB*, *AB
Note
3
These values are case-sensitive.
Click Apply Filter.
The Media Tracking Report appears.
4
126
On the menu bar, click File→Close to close the report.
Pathlight VX Reports
Viewing the Offline Media Report
The Offline Media Report lists all offline media in the Pathlight VX.
1
From the menu bar, select Reports→Offline Media.
The Offline Media Report appears and lists the following information for each offline media:
2
•
Barcode – The barcode number of the offline media. The barcode number matches the barcode of
the corresponding media in the physical library.
•
Library – The library that contains the offline media.
•
Type – The media type of the offline media.
•
Used – The storage capacity that has been used on the offline media.
•
Free – The storage capacity that is available on the offline media.
Sort the report information. Do one of the following:
•
Sort the offline media information by Barcode, Library, Type, Used, and Free by clicking the
corresponding column heading.
- OR •
Narrow the list:
In the text box to the right of Apply Filter, enter barcodes, barcode ranges, wildcards(*) or any
combination of these separated by commas.
EXAMPLE:
00AB01, 00AB20-00AB50, AB*, *AB
Note
These values are case-sensitive.
3
Click Apply Filter.
4
On the menu bar, click File→Close to close the report.
Pathlight VX User’s Guide
127
Viewing the Pending Activity Report
The Pending Activity Report provides information on operations and actions pending in the Pathlight VX.
1
From the menu bar, click Reports→Pending Activity.
The Pending Activity Report appears and lists this information:
2
•
Library – The library associated with the pending action.
•
Barcode – The barcode associated with the pending action.
•
Type – The media type of the media associated with the pending action.
•
State – The status of the pending action. Status can be: Pending Physical Export, Pending
Virtual Export, or Pending Early Tape Creation.
Do one of the following:
•
Sort the information by library, barcode, type, and state by clicking the corresponding column
heading.
- OR •
Narrow the list:
a. In the text box, to the right of Apply Filter, enter barcodes, barcode ranges, wild cards(*) or any
combination of these separated by commas.
EXAMPLE:
00AB01, 00AB20-00AB50, AB*, *AB
Note
These values are case-sensitive.
b. Click Apply Filter.
3
On the menu bar, click File→Close to close the report.
Note
128
Click Operations→Cancel Request to cancel a pending action.
Pathlight VX Reports
Viewing the System Backup Report
The System Backup Report lists backups of the Pathlight VX system, saved to disk or tape. For each
backup, the date and time of the backup (Creation Date), location where the backup is saved (Location),
name of the backup file (File Name), and size of the backup file (Size) are listed. The total number of system
backups are listed in the upper right of the screen.
1
From the menu bar, select Reports→System Backup.
The System Backup Report appears and lists the following information for each backup of the
Pathlight VX configuration:
2
•
Creation Date – The date and time when the system backup was created.
•
Location – The location where the system backup is saved. For system backups to disk, the
location is on the MS and in a reserved partition on the RAID. For system backups to tape, the
location is the barcode of the tape where the backup is stored.
•
File Name – The name of the system backup file.
•
Size – The size of the system backup file.
On the menu bar, click File→Close to close the report.
Viewing the User Login Report
The User Login Report lists users and administrators currently logged on the Pathlight VX.
1
From the menu bar, select Reports→Logged in Users.
The User Login Report appears and lists the following information for each Pathlight VX user:
2
•
User Name – The name of the user.
•
Role Name – The role type of the user. The role name can either be either User or Admin.
•
Login Date/Time – The date and time the when the user logged on the Pathlight VX.
•
Last Activity Date/Time – The date and time of the user's last action on the Pathlight VX.
•
Login Location – The name of the computer used to access the Pathlight VX.
On the menu bar, click File→Close to close the report.
Pathlight VX User’s Guide
129
130
Pathlight VX Reports
Monitoring the Pathlight VX
Use the procedures in this chapter to monitor system activity in the Pathlight VX, such as viewing
administrative alerts and messages. This chapter also contains procedures to view, modify and close
service tickets. This chapter contains the following sections:
•
Viewing Activity Status on page 132
•
Checking System Status on page 133
•
Viewing Service Tickets on page 135
•
Modifying Service Tickets on page 137
•
Closing Service Tickets on page 138
Note
Pathlight VX offers several types of notifications that monitor system activity and alert
recipients of events or problems that may require attention. The support notification
alerts the ADIC Technical Assistance Center (ATAC) of Pathlight VX problems. System
notifications provide e-mail alerts to designated individuals. For more information about
these notifications, refer to Managing Support and System Notifications on page 34.
Pathlight VX User’s Guide
131
Viewing Activity Status
The Activity Status screen displays administrative alerts and informational messages about system activity
in the Pathlight VX.
1
Log on as a user with Administrator privileges.
2
From the menu bar, select Tools→Activity Status.
The Tools→Activity Status screen appears. This page lists the alerts and messages related to system
activity on the Pathlight VX:
3
•
Item - Lists the Pathlight VX item (a media's barcode, Archive, or Audit) about which the message
was generated.
•
Library - Lists the physical or virtual library where the specified item is located.
•
Last Update - Lists the date and time of the last alert or message related to the specified item.
•
Details - Displays the contents of the most current alert or message related to the specified item.
Do one of the following:
•
Narrow the list of items.
a. In the Apply Filter field, enter barcodes, barcode ranges, wildcards(*) or any combination of
these separated by commas.
EXAMPLE:
00AB01, 00AB20-00AB50, AB*, *AB
Note
These values are case-sensitive.
b. Click Apply Filter.
•
View additional alerts and messages for a specific item, check the box next to the item and click
History.
The Activity Status - History screen appears and lists alerts and messages for the selected item. The
alerts and message appear in reverse chronological order, with the most recent alert (message) at the
top of the screen.
132
Monitoring the Pathlight VX
Checking System Status
Use this procedure to check the status of the Pathlight VX.
1
Log on as a user with Administrator privileges.
2
Do one of the following:
•
In the lower-right of the Pathlight VX User Interface, click System Status.
•
From the menu bar, click Tools→System Status.
•
In the Subsystem Status section, select the component.
Note
When selecting this option, all open service tickets for the selected component
are listed.
The Tools - System Status screen appears.
3
In the Show Tickets option, select one of the following:
•
Open - Open service tickets for all components.
•
Closed - Closed service tickets for all components.
•
All - Open and closed service tickets for all components.
Note
4
Selecting either option results in service tickets for ALL Pathlight VX
components being listed.
Select a service ticket to be reviewed and click Details.
A service ticket window appears.
5
Scroll through the service ticket details to find the View Recommended Actions link.
6
Click the link to view the recommended actions or troubleshooting steps.
•
If the problem is resolved, close the service ticket. Refer to Closing Service Tickets on page 138.
•
If the problem is not resolved:
a. Modify the service ticket according to the troubleshooting steps taken.
b. Refer to Modifying Service Tickets on page 137.
c. Contact the ADIC Technical Assistance Center. Refer to Getting More Information or Help on
page 4.
Related topics:
Viewing Service Tickets on page 135
Modifying Service Tickets on page 137
Closing Service Tickets on page 138
Pathlight VX User’s Guide
133
Understanding Service Tickets
Administrative users use the Pathlight VX User Interface to view service ticket information. When an event
in the Pathlight VX is detected and localized isolation and recovery is attempted, the event is reported to
one of the monitoring daemons. The monitoring daemon reports the event to the service daemon. The
service daemon then logs the event and applies additional logic to determine whether the event warrants a
service ticket. If the event is not critical, the process for the event is completed. If the event is critical, the
service daemon creates and logs a service ticket and notifies the user interface that a new service event
needs attention. If Pathlight VX detects that the problem is resolved, the ticket is closed. If the user indicates
that the problem has been resolved, the ticket can be closed manually. At this point, the service daemon
updates the ticket database and notifies the Pathlight VX User Interface.
To help users determine the criticality of events occurring in the Pathlight VX, service tickets grade events
as Low, Medium, or High severity.
•
Low - A serious event has occurred which needs to be resolved, but it generally does not affect the
operation or performance of the Pathlight VX.
•
Medium - A more serious event has occurred which needs to be resolved, but it does not
necessarily need to be fixed as soon as possible. The operation and performance of the Pathlight
VX may be degraded.
•
High - A critical event has occurred which needs to be resolved as soon as possible. The operation
and performance of the Pathlight VX is degraded and there is a risk of impending system failure or
data loss.
Service tickets provide guidance to users on how to resolve certain events in the Pathlight VX. Some service
tickets (and/or associated recommended actions files) guide users through a series of steps that may
resolve the problem prior to contacting ATAC. The procedures described in service tickets or recommended
actions files are intended to be performed by users who are familiar with the Pathlight VX. At any time, a
user may contact ATAC for assistance or if the user is concerned about what specific actions to take.
134
Monitoring the Pathlight VX
Viewing Service Tickets
View Pathlight VX service tickets to view details of the System Status notification and a suggested resolution
of the reported problem.
1
Do one of the following:
•
Click System Status.
- OR -
•
Select Tools→System Status.
The Tools - System Status screen appears.
The System Status screen lists the following information.
•
Ticket – Service ticket numbers, which can be listed in ascending or descending order by clicking
the top of the column.
•
State – The current state of the service ticket. State can be either Open or Closed.
•
Last Updated – Date when the service ticket was last accessed, either opened or closed
depending on the selected sort order.
•
Summary – A summary of the problem reported by the Pathlight VX.
Pathlight VX User’s Guide
135
2
Scroll through the list of service tickets, select the ticket to be viewed, and click Details.
The Ticket Details screen appears.
The Ticket Details screen lists the service ticket number, date and time when the ticket was last
accessed (either opened or closed), ticket status (open or closed), a summary of the problem, and a
detailed information about the problem.
Note
The time indicated in the service ticket may not match the Pathlight VX system time.
Most service tickets also include a View Recommended Actions link. Clicking the link opens a
separate screen with recommended steps to resolve the problem. This is a sample Recommended
Action screen.
3
Click Cancel to close the screen.
Note
For information on analyzing service tickets and obtaining additional information
about a reported problem, refer to Modifying Service Tickets on page 137.
Related topics:
Checking System Status on page 133
Modifying Service Tickets on page 137
Closing Service Tickets on page 138
136
Monitoring the Pathlight VX
Modifying Service Tickets
Use this procedure to add information to a service ticket related to system troubleshooting and to view the
current status of a problem reported by the Pathlight VX. All modified entries are kept with the ticket number
and ticket summary when the service ticket is closed.
1
Open and view a service ticket.
Refer to Viewing Service Tickets on page 135.
2
Click Analysis.
The Ticket Analysis screen appears.
3
Enter all relevant information regarding actions taken to resolve the issue and click Apply.
The Progress Window appears, which contains information on the status of the service ticket being
modified.
Note
4
Once the Progress Window appears, you cannot cancel or stop this action.
However, you can close the window by clicking the X in the upper-right of the
screen, but confirmation of success or failure is NOT shown.
•
If Success appears in the Progress Window: The service ticket was successfully modified.
•
If Failure appears in the Progress Window: The ticket was NOT modified. To view the
troubleshooting procedures, click View Recommended Actions. To view the error details, click
Error Log for information on why the ticket was not modified. To modify a service ticket, repeat Step
1 through Step 3.
Click Close to close the Progress Window.
Related topics:
Checking System Status on page 133
Viewing Service Tickets on page 135
Closing Service Tickets on page 138
Pathlight VX User’s Guide
137
Closing Service Tickets
Use this procedure to close a service ticket.
Note
1
You can analyze a service ticket after it has been closed. For more
information, refer to Modifying Service Tickets on page 137.
Modify the service ticket.
Refer to Modifying Service Tickets on page 137.
2
Check the Close Ticket box.
3
Click Apply to close the service ticket.
The Progress Window appears, which contains information on the status of the service ticket being
closed.
Note
4
Once the Progress Window appears, you cannot cancel or stop this action.
However, you can close the window by clicking on the X in the upper-right of
the screen, but confirmation of success or failure is NOT shown.
•
If Success appears in the Progress Window: The service ticket was successfully closed.
•
If Failure appears in the Progress Window: The service ticket was NOT closed. To view the
troubleshooting procedures, click View Recommended Actions. To view the error details, click
Error Log for information on why the ticket was not closed. To close a service ticket, repeat Step 1
through Step 3.
Click Close to close the Progress Window.
Related topics:
Checking System Status on page 133
Viewing Service Tickets on page 135
Modifying Service Tickets on page 137
138
Monitoring the Pathlight VX
Troubleshooting the Pathlight VX
This chapter explains how to perform general troubleshooting on the Pathlight VX using service tickets
generated by the system’s diagnostic software.
How the Pathlight VX Reports Problems
The Pathlight VX reports status through Pathlight VX diagnostic software. The Pathlight VX diagnostic
software performs these functions:
•
Monitors the health of both software and hardware components.
•
Detects problems in the system.
•
Attempts to isolate each problem to a specific Field Replaceable Unit (FRU).
•
Attempts to recover from the problem.
•
Logs the problem.
•
If the problem requires service, reports the problem in a service ticket associated with the suspect
FRU.
Service tickets include time and date information, status (open or closed), information about each error, and
links to recommended troubleshooting procedures. The Pathlight VX generates service tickets according to
the following scheme:
•
If the FRU associated with the problem does not have an open service ticket, the Pathlight VX
opens a service ticket for the FRU and reports the problem in the service ticket.
•
If the problem reoccurs, the Pathlight VX logs the number of times that it detects the problem in the
existing report.
•
If a different problem occurs with the same FRU, the Pathlight VX adds a new report to the same
service ticket.
•
If a problem occurs with a different FRU, the Pathlight VX uses the above scheme to open a new
service ticket for the FRU or report the problem in an existing service ticket associated with the FRU.
Pathlight VX User’s Guide
139
Using Health Checks to Troubleshoot the Pathlight VX
The Pathlight VX’s Health Check feature can be used to verify several aspects of Pathlight VX connectivity
and function. A failed Health Check can help troubleshoot a problem in the Pathlight VX. Health Checks are
available to test:
•
Visibility to drives in attached physical libraries.
•
Connectivity to the RAID component.
•
Basic RAID configuration parameters.
•
Functionality of individual drives in an attached physical library.
1
Log on as a user with Administrator privileges.
2
From the menu bar, select Tools→Health Check.
The Tools - Health Check screen appears. This page lists the Health Check options and, for each
option, the date and time when the last Health Check was performed.
Note
140
The Status section provides information on the dates of the last Health
Check operations and Pass/Fail status. Additionally, the Operational Drive
Functionality Test status identifies the physical drive and library on which
the test was performed.
Troubleshooting the Pathlight VX
3
Do one of the following:
•
Perform a Health Check. Select a Health Check option from the list and click Apply.
•
Physical Drives Visibility Verification - Verifies that the Management Server and FC blade(s)
have visibility to the same physical drives.
•
Access to RAID - Verifies basic connectivity to the RAID component.
•
RAID Parameter Check - Verifies that the RAID parameters are set to Pathlight VX-specific
parameters rather than to the default parameters.
•
Physical Tape Drive Functionality Test - Verifies the operational function of a physical drive.
Note To run this Health Check, Service media must be available in the Pathlight VX.
Note To run this Health Check, the selected drive must not be in use. If the drive is
being used when the Health Check run, the Health Check will fail.
•
For a selected Health Check, view the most recent log file. In the Status section, next to the Health
Check options, click the link to the Health Check log file you want to view.
•
For a selected Health Check, view a log file from the Health Check history. Select a Health Check
option and click Logs.
The Health Check History screen appears, and lists up to 5 log files for the Health Check, including
the date and time when it was performed. To view a specific log, select the log file and click Apply.
The Pathlight VX displays the Progress Window, which contains information on the status of the
selected Health Check.
4
•
If Success appears in the Progress Window: The Health Check request was successfully
submitted. When the Health Check is complete, the Status section updates to list the date of
the Health Check operation and Pass/Fail status.
•
If Failure appears in the Progress Window: The Health Check request was NOT submitted.
To view the troubleshooting procedures, click View Recommended Actions. To view the error
details, click Error Log for information on why the Health Check request was not submitted.
Make sure the attached physical library is online and ready. Repeat the Health Check when the
library is online and ready. To perform additional Health Checks, repeat Step 3.
Click Close to close the Progress Window
If the Health Check was successfully submitted, the Status section shows the In Progress link for the
selected Health Check.
5
Do one of the following:
•
•
Click In Progress to view additional details about the Health Check.
•
To navigate through the log file, use the Top and Bottom links and the left and right arrows at
the bottom right.
•
To auto-refresh the log file viewer, check the AutoRefresh box and select an auto-refresh
interval (1 to 30 seconds).
•
To close the log file viewer, click Cancel.
Click Refresh periodically to update the Status links to see if the Health Check in progress has
passed or failed.
When the Health Check operation is complete, the Status section contains a link to the Health Check's
log file.
Pathlight VX User’s Guide
141
General Troubleshooting
For many Pathlight VX problems, service tickets associate problems with specific FRUs. It is necessary to
contact ATAC for assistance replacing FRUs. For contact information, refer to Getting More Information or
Help on page 4.
For Pathlight VX problems that are not specific to a FRU, follow these general troubleshooting procedures.
Start Up Problems
If the Pathlight VX fails to start up correctly, make sure that it was started up according to the specific
procedure described in Starting Up the Pathlight VX on page 17. If the Pathlight VX still fails to operate
correctly, contact ATAC. Refer to Getting More Information or Help on page 4.
Pathlight VX Backup Problems
There was a problem backing up the Pathlight VX if you receive a service ticket with this Details field:
Created disk copy of the backup. However, could not write to the filesystem.
The software may have been down.
In this situation, the Pathlight VX attempted to run a system backup while the software was not running, and
the backup failed. Contact ATAC for assistance. Refer to Getting More Information or Help on page 4.
User Interface Problems
If you cannot access the Pathlight VX User Interface, there may be a problem with the LAN configuration or
the Internet browser. Make sure that you are using the supported browser version and have specified the
correct settings, refer to Supported Browser Versions on page 143.
LAN Connection
If you cannot connect to the Pathlight VX through a local area network (LAN) connection, verify that the LAN
administrator correctly configured the following network settings for the Pathlight VX.
142
•
Hostname
•
IP address for the Management Server (MS)
•
IP addresses for the DPEs or AX100SC enclosures
•
Default gateway address
•
Subnet mask
•
Domain name (optional)
•
Primary DNS (optional)
Troubleshooting the Pathlight VX
HTTP Proxy Settings
When using a VPN or HTTP proxy connection to access the Pathlight VX User Interface, Internet Explorer
only works properly if the HTTP proxy settings are correctly enabled.
Use this procedure to enable the HTTP1.x proxy settings.
1
On the Windows Start menu, select Settings→Control Panel→Internet Options.
The Internet Options window appears.
2
Click the Advanced Tab.
3
Scroll down the list to HTTP 1.x Settings.
4
Verify that Use HTTP 1.x is selected.
5
Verify that Use HTTP 1.x through proxy connections is selected.
Supported Browser Versions
The Pathlight VX User Interface supports these Internet browsers:
•
Internet Explorer 5.5 and later versions
•
Netscape 7.x
Note
For best results when using an Internet browser to access the Pathlight VX
Service and User Interfaces, verify these settings:
• JavaScript (active scripting) is enabled in the Security settings of the browser.
• Pop-up blocker is disabled.
• Page caching is disabled.
Note
If you are logged on the Pathlight VX User Interface using multiple Netscape 7.1
windows on the same laptop or PC and you log off any one of them, Netscape
7.1 may terminate the other sessions. It does not make any difference if you are
logged on the same Pathlight VX or different Pathlight VX systems.
Internet Explorer
Use this procedure to determine the Internet Explorer version.
1
Launch Internet Explorer.
2
On the menu bar, select Help→About Internet Explorer.
The About window appears.
3
Under the Internet Explorer logo, locate the version number.
4
If the version number is lower than 5.5, upgrade to version 5.5 or 6.0.
Netscape Navigator
Use this procedure to determine the Netscape Navigator version.
1
Launch Netscape Navigator.
2
On the menu bar, select Help→About Netscape.
The About information appears.
3
Locate the version number at the top of the page.
4
If the version number is lower than 7.0, upgrade to Version 7.0 or higher.
Pathlight VX User’s Guide
143
Working with the Pathlight VX System State
The Capture State feature enables you to capture various sizes of log files for the Pathlight VX’s hardware
and software components. Use the procedures in this section to capture a Pathlight VX system state and
download it, as well as delete a system state capture.
Capturing a System State
Use the Capture System State feature to obtain and preserve detailed information about the current
Pathlight VX state. The Capture State feature enables you to capture three types of log files, Standard,
Extended, or Comprehensive. Refer to Downloading a System State on page 146 to save the captured
system state to a local or network drive for troubleshooting purposes.
CAUTION
1
Before capturing a system state, verify that all I/O has stopped in the
Pathlight VX.
Click Tools→Capture State.
The Tools - Capture System State screen appears and lists previous system state captures. For each
system state capture, the following information is listed:
2
•
Number - The number of the system state capture as assigned by Pathlight VX. The number is
serially assigned.
•
Captured State - The name of the system state capture as assigned by Pathlight VX.
•
Type - The type of system state capture, Standard, Extended or Comprehensive.
•
Size - The size of the system state capture.
Click Capture.
The Tools - Capture System State screen refreshes and lists the following options for the size of the
system state capture:
144
•
Standard - The Standard system state capture does not include FC blade log files. A Standard
system state capture produces the smallest file size.
•
Extended - The Extended system state capture includes a limited number set of FC blade log files.
An Extended system state capture produces an intermediate file size.
•
Comprehensive - The Comprehensive system state capture includes all log files and interrupts
current I/O activity to and from the Pathlight VX. A Comprehensive system state capture produces
the largest file size.
Troubleshooting the Pathlight VX
3
Select the type of the system state capture and click Apply.
The Progress Window appears.
Note
4
Once the Progress Window appears, you cannot cancel or stop this
action. However, you can close the window by clicking the X in the upperright of the screen, but confirmation of success or failure is NOT shown.
•
If Success appears in the Progress Window: The system state was successfully captured.
•
If Failure appears in the Progress Window: The system state was NOT captured. To view the
troubleshooting procedures, click View Recommended Actions. To view the error details, click
Error Log for information on why the system state was not captured. To capture an additional
system state, repeat Step 1 on page 144 through Step 3.
Click Close to close the Progress Window.
The Tools - Capture System State screen appears.
5
Download the captured state.
Refer to Downloading a System State on page 146.
Related topics:
Downloading a System State on page 146
Deleting a System State on page 148
Pathlight VX User’s Guide
145
Downloading a System State
Use the Capturing a System State feature to obtain and preserve detailed information about Pathlight VX
hardware and software in logs that can be reviewed and analyzed. Use the Downloading a System State
Capture feature to save the capture state to a local or network drive for system troubleshooting.
1
Click Tools→Capture State.
The Tools - Capture System State screen appears and lists previous system state captures. For each
system state capture, the following information is listed:
•
Number - The number of the system state capture as assigned by Pathlight VX. The number is
serially assigned.
•
Captured State - The name of the system state capture as assigned by Pathlight VX.
•
Type - The type of system state capture, Standard, Extended or Comprehensive.
•
Size - The size of the system state capture.
2
Select a system state capture to download.
3
Click Download.
The File Download screen appears.
146
Troubleshooting the Pathlight VX
4
Click Save to save the zipped file to a local or network drive.
The Save As screen appears.
5
Click Save.
Related topics:
Capturing a System State on page 144
Deleting a System State on page 148
Pathlight VX User’s Guide
147
Deleting a System State
Use this procedure to delete a system state capture.
Note
1
ADIC recommends that you delete system state captures for Pathlight VX
problems that have been resolved. Failure to manage system state
captures can cause the system to run out of disk space on the MS.
Click Tools→Capture State.
The Tools - Capture System State screen appears and lists previous system state captures. For each
system state capture, the following information is listed:
2
•
Number - The number of the system state capture as assigned by Pathlight VX. The number is
serially assigned.
•
Captured State - The name of the system state capture as assigned by Pathlight VX.
•
Type - The type of system state capture, Standard, Extended or Comprehensive.
•
Size - The size of the system state capture.
Select the system state capture you want to delete and click Delete.
The Progress Window appears.
Note
3
Once the Progress Window appears, you cannot cancel or stop this
action. However, you can close the window by clicking the X in the upperright of the screen, but confirmation of success or failure is NOT shown.
•
If Success appears in the Progress Window: The selected system state capture was successfully
deleted.
•
If Failure appears in the Progress Window: The selected system state capture was not deleted.
To view the troubleshooting procedures, click View Recommended Actions. To view the error
details, click Error Log for information on why the selected capture state was not deleted. To delete
a system state capture, repeat Step 1 and Step 2.
Click Close to close the Progress Window.
The Tools - Capture System State screen appears.
Related topics:
Capturing a System State on page 144
Downloading a System State on page 146
148
Troubleshooting the Pathlight VX
Troubleshooting System Problems
In most situations, a service ticket associates a Pathlight VX problem with a specific field replaceable unit
(FRU). Once a specific FRU has been identified, either the problem with the FRU can be corrected or the
FRU can be replaced.
To isolate Pathlight VX problems that may not be specific to a FRU, use these troubleshooting procedures:
•
Troubleshooting Power Issues
•
Troubleshooting Cable Connections on page 150
•
Troubleshooting Temperature Errors on page 150
•
Interpreting Status LEDs on page 151
•
Troubleshooting Audible Alarms on page 171
•
Troubleshooting Pathlight VX User Interface Issues on page 171
Troubleshooting Power Issues
A power problem can cause any of these conditions:
•
The Pathlight VX cannot be accessed.
•
System LEDs go dark.
•
A service ticket reports a power problem.
•
A service ticket reports a component, software, or communication failure.
Use this procedure if a power problem is either reported or suspected.
1
Verify that all power buttons are in the on position.
2
Verify that each Pathlight VX component is correctly connected to the appropriate AC source.
3
Verify that both ends of each power cord are connected.
4
Verify that the main power breaker of the rack has not tripped and AC power is available to the Pathlight
VX.
5
Measure the AC power supplied to the rack to verify that it is within specifications. For information on
power requirements, refer to the ‘Power Requirements’ topic in the Pathlight VX Site Preparation Guide.
•
If the problem is resolved, close the service ticket. Refer to Closing Service Tickets on page 138.
•
The problem is not resolved, perform these steps:
a. Modify the ticket according to the troubleshooting steps taken. Refer to Modifying Service
Tickets on page 137.
b. Contact the ADIC Technical Assistance Center. Refer to Getting More Information or Help on
page 4.
Pathlight VX User’s Guide
149
Troubleshooting Cable Connections
Cable problems on the Pathlight VX can be difficult to diagnose, because of the number and different types
of cables used in the system. Typically, the Pathlight VX determines that communication errors are
occurring on components connected by the suspect cable, not the cable itself.
CAUTION
When replacing cables on the Pathlight VX, use new cables instead of
swapping FC cables from other components. Swapping cables can
interfere with Pathlight VX host connectivity and device mapping.
If the Pathlight VX reports that a cable has failed, perform these steps:
1
Verify that the connectors on the cable are seated tightly.
If the cables are seated tightly and the problem still exists, replace the cable.
2
After replacing the cable or correcting a connection problem, power off and start up the Pathlight VX.
Refer to Shutting Down the Pathlight VX on page 19 and Starting Up the Pathlight VX on page 17.
3
Verify that the cable problem is resolved.
4
Verify that all components associated with the identified cable are operating normally.
•
If the problem is resolved, close the service ticket. Refer to Closing Service Tickets on page 138.
•
The problem is not resolved, perform these steps:
a. Capture the Pathlight VX system state. Refer to Capturing a System State on page 144.
b. Modify the ticket according to the troubleshooting steps taken. Refer to Modifying Service
Tickets on page 137.
c. Contact the ADIC Technical Assistance Center. Refer to Getting More Information or Help on
page 4.
Troubleshooting Temperature Errors
Typically, temperature problems are caused by incorrect room temperature, poor air circulation inside the
Pathlight VX rack or components, or a malfunctioning fan. For information on temperature requirements,
refer to ‘Environmental Requirements’ in the Pathlight VX Site Preparation Guide.
Use this procedure if a temperature problem is reported or suspected.
1
Check the ambient temperature of the room containing the Pathlight VX to verify that the temperature
falls within the specified range.
2
Verify that all unoccupied disk slots contain a filler module, that all cover plates are in place on the
Pathlight VX components, and that filler plates/bezels are installed over unused space in the rack. All
filler plates must be in place to enable adequate air circulation.
3
Inspect for adequate air circulation inside the rack. Some racks may provide additional fans to improve
air circulation. Check the fan for proper operation. Clean or replace any air filter as necessary.
4
When a FRU reports a temperature problem, verify that its fan (if installed) spins freely and does not
have excessive dust buildup. If it is necessary to replace the FRU, contact ATAC for assistance. Refer
to Getting More Information or Help on page 4.
150
Troubleshooting the Pathlight VX
Interpreting Status LEDs
Activity on the Pathlight VX and system status can be determined by observing LED activity on Pathlight VX
components.
An LED can be in one of the following states:
•
OFF (dark)
•
ON (lit steadily)
•
Flashing
Note
LEDs may flash while a component is booting. This is normal and does not
indicate a problem unless they continue to flash after the boot process
completes.
For detailed LED information on each Pathlight VX component, refer to:
MS LEDs on page 152
SNC LEDs on page 157
AX100SC LEDs on page 161
DPE/DAE LEDs on page 163
SPS LEDs on page 168
FC Switch LEDs on page 169
Pathlight VX User’s Guide
151
MS LEDs
The MS has LEDs on both the front and back panels. The following section describes general status and
activity information provided by these LEDs.
MS Front Panel—Control Panel LEDs
Activity and status on the MS can be determined through the activity of the control panel LEDs. Figure 13
shows their location and Table 6 describes their function.
Figure 13
MS Control Panel LEDs
power
fail
overheat
NIC 2
NIC 1
HDD
power
power button
reset
Table 6
MS Control Panel LED Activity
LED
State
Description
Power fail
OFF
The power supplies are operating normally.
ON
Indicates a power supply unit has failed and needs to be replaced.
OFF
The enclosure temperature is normal.
ON
Indicates an overheat condition. This condition may be caused by cables
obstructing the airflow in the system or the ambient room temperature is too
high. Refer to Troubleshooting Temperature Errors on page 150.
NIC 2
Flashing
Indicates network activity on LAN 2.
NIC 1
Flashing
Indicates network activity on LAN 1.
HDD
ON
Indicates IDE channel activity.
Power
ON
Indicates power is being supplied to the MS power supplies. This LED is
illuminated when the MS is operating normally. Refer to Troubleshooting
Temperature Errors on page 150.
OFF
The MS is shut down.
Overheat
Reset
Used to reboot the MS.
Power button
Used to start up or shut down the MS.
152
Troubleshooting the Pathlight VX
MS Front Panel—SCSI Drive Carriers LEDs
Each SCSI drive carrier on the MS provides two LEDs. Figure 14 shows their location and Table 7 describes
their function.
Figure 14
MS SCSI Drive Carrier LEDs
green LED
red LED
filler module
with no drive
Table 7
MS SCSI Drive Carrier LED Activity
LED Color
State
Description
Green
ON
Indicates disk access.
Red
ON
Indicates that the internal RAID drive has failed.
Pathlight VX User’s Guide
153
MS Back Panel—Power Supply LEDs
Each MS power supply provides one status LED. Figure 15 shows its location and Table 8 describes its
function.
Figure 15
MS Back Panel—Power Supply LED
power supply LED
Table 8
MS Back Panel—Power Supply LED Activity
LED Color
State
Description
Green
OFF
Indicates that no power is supplied to the enclosure. Verify that the power
cables are connected.
ON
Indicates that power is on.
ON
Indicates that the MS has shut down, but power is still supplied to the enclosure.
Amber
154
Troubleshooting the Pathlight VX
MS Back Panel—FC HBA LEDs
The FC HBA provides two status LEDs. Figure 16 shows their location and Table 9 describes their function.
Note
Figure 16
The location of LEDs on the FC HBA card may differ depending upon the card
manufacturer.
MS FC HBA LEDs
green LED
amber LED
Table 9
MS FC HBA LED Activity
LED Color
State
Description
Green
Amber
OFF
OFF
Indicates that there is no power. Verify that the power cables
are connected and the MS is turned on.
Green
Amber
ON
ON
Indicates that power is on.
Green
Amber
ON
OFF
Indicates that the FC HBA is online.
Green
Amber
OFF
ON
Indicates that a link has been established.
Green
Amber
OFF
Flashing 2x / sec
Indicates a loss of synchronization.
Green
Amber
Alternate green and
amber flashing 2x / sec
Indicates a firmware error.
Pathlight VX User’s Guide
155
MS Back Panel—Ethernet LEDs
The MS provides four Ethernet ports: two on the motherboard and two on a plug-in network card. Each port
provides two LEDs. Figure 17 shows their location and Table 10 and Table 11 describe their function.
Figure 17
MS Ethernet LEDs
MS-LAN3
100TX
MS-LAN1
Table 10
MS-LAN1
MS-LAN2
MS-LAN4
100TX
MS-LAN4
ACT/LNK
MS-LAN2
LED Activity for Ethernet Ports LAN 1 and LAN 2
LED
Color
State
Description
Left
None
OFF
Port not active
Green
ON
Port active
None
OFF
No cable connection
Green
ON
100 MHz activity
Amber
ON
1 GHz activity
Right
MS-LAN3
ACT/LNK
Table 11
LED Activity for Dual Port Ethernet Card Ports LAN 3 and LAN 4
LED
State
Description
ACT/LNK
OFF
The Ethernet adapter is not receiving power or there is a driver configuration
problem.
ON
The adapter and switch are receiving power and the cable connection between
the switch and the adapter are good.
Flashing
The adapter is sending or receiving network data. The frequency of the flashes
varies with the amount of network traffic.
OFF
Operating at 10 Mbps.
ON
Operating at 100 Mbps.
100TX
156
Troubleshooting the Pathlight VX
SNC LEDs
Each utility module and FC blade on the SNC has three LEDs that provide general status and activity
information. In addition, the FC blade has FC activity LEDs.
SNC Front Panel—Utility Module LEDs
Each utility module provides a vertical strip of three LEDs. Figure 18 shows their location and Table 12
describes their function.
Figure 18
Utility Module LEDs
Ethernet link
Ethernet activity
ATTN
Ethernet link
Ethernet activity
Table 12
RDY
STS
Utility Module LED Activity
LED
Color
State
Description
Ethernet link
Green
ON
Indicates that the Ethernet connection is active.
Ethernet activity
Amber
Flashing
Indicates data activity.
ATTN
Blue
OFF
Indicates no attention conditions.
Flashing or ON
Utility module requires attention. Refer to the
description of the ATTN LED activity beneath
this table.
STS
Amber
OFF
Indicates no health or environmental problems.
RDY
Green
Flashing 1x / sec
Indicates that processor status is normal.
The ATTN LED provides the following information:
•
Flashing—Blinks occur in patterns that indicate the problem. For example, Figure 19 provides a
graphical representation of the blink pattern for problem code 3. Blink patterns repeat until the
problem is solved. For information on blink patterns, see TABLE 10.
•
ON—The other utility module has detected a failure of this utility module, has taken this utility
module off the internal serial bus, has taken over control of both internal serial buses.
Figure 19
Blink Pattern Example
Pathlight VX User’s Guide
157
Note
Table 13
Note the blink pattern for the problem code so you can report it to ATAC, if
necessary. For contact information, refer to Getting More Information or Help
on page 4.
Utility Module LED Observations
Blue Blink Count
158
Green
Amber
Error
2
OFF
OFF
3
OFF
OFF
Internally detected utility
module failures
4
ON
OFF
2
ON
OFF
3
ON
OFF
4
ON
OFF
6
ON
OFF
7
ON
OFF
Initialization Failure 1
Initialization Failure 2
Other
External communication
failures
VUP Failure
VIP Failure
Other
Intervention required
Invalid Functional Firmware
Firmware CRC Check
Troubleshooting the Pathlight VX
SNC Back Panel—FC Blade LEDs
The front panel of each FC blade provides three status LEDs and six FC activity LEDs. Figure 20 shows
their location and Table 14 describes their function.
Figure 20
FC Blade LEDs
FC1
FC3
FC5
PWR
STS
FC2
Table 14
FC4
FC6
RDY
FC Blade LED Activity
LED
Color
State
Description
FC1, FC3, FC5
Green
Flickering
I/O is occurring on the FC connection to the left of
the LED.
FC1, FC3, FC5
Green
ON
A connection exists, but there is no I/O.
FC2, FC4, FC6
Green
Flickering
I/O is occurring on the FC connection to the right of
the LED.
FC2, FC4, FC6
Green
ON
A connection exists, but there is no I/O.
PWR
Blue
Flashing 1x / 10 sec
Indicates that power is on.
STS
Amber
OFF
Indicates no health or environmental problems.
See Note beneath table.
RDY
Green
Flashing 1x / sec
Indicates normal processor activity.
Note
Normal behavior for the FC blade PWR, STS, and RDY LEDs is not the same as normal
behavior for the utility module PWR, STS, and RDY LEDs.
• During initialization, the FC blade’s amber STS LED remains ON until the firmware
enters its main scheduling loop.
• If initialization fails, the FC blade’s amber STS LED remains lit and the blue PWR LED
blinks, a numeric fault code displays. Table 15 lists the numeric fault codes. If
initialization succeeds, the amber STS LED goes OFF, the green RDY LED blinks
once per second, and the blue PWR LED blinks once every 10 seconds.
Pathlight VX User’s Guide
159
Table 15
FC Blade PWR LED Numeric Fault Codes
Fault Code
Description
Duration
1
Random access memory (RAM) test failure
Constant
2
Vital product data (VPD) cyclic redundancy code (CRC) comparison failure
Constant
3
Program flash CRC comparison failure
Constant
4
Geographic address incorrect for blade type, using alternate
Once
5
Invalid blade type
Constant
6
Controller area network (CAN) controller initialization failure
Constant
7
Timer interrupt test failure
Constant
Note
160
Note the blink pattern for the problem code so you can report it to ATAC, if
necessary. If a fault condition occurs, contact ATAC. For contact information,
refer to Getting More Information or Help on page 4.
Troubleshooting the Pathlight VX
AX100SC LEDs
AX100SC activity and status can be determined by observing the LEDs on the front and back panels.
AX100SC—Front Panel LEDs
The AX100SC front panel provides two status LEDs. Table 21 shows their location and Table 16 describes
their function.
Figure 21
AX100SC Front Panel—Power Supply/Cooling Module LEDs
Power
Fault
Table 16
AX100SC Front Panel—Power Supply/Cooling Module LED Activity
LED
Color
Status
Meaning
Power
None
OFF
The power supply is off.
Blue
ON
The power supply is on.
None
OFF
The start up process is complete.
Amber
ON
The power supply is booting up, has a fault, or is not
receiving power.
Fault
Note
Each disk in the AX100SC contains two LEDs, a Disk activity LED (blue when
on) and a Fault LED (amber when on). For more information about these LEDs,
refer to Figure 5 on page 9.
Pathlight VX User’s Guide
161
AX100SC—Back Panel LEDs
The AX100SC’s power supply / cooling module provides five status LEDs. Figure 22 shows their location
and Figure 17 describes their function.
Figure 22
AX100SC Back Panel—Power Supply / Cooling Module LEDs
Cache I/O
LED
cache charge LED
Table 17
power
SPA boot / fault
power supply A fault
AX100SC Back Panel—Power Supply / Cooling Module LED Activity
LED
Color
Status
Meaning
Power
None
OFF
The power supply is off.
Green
ON
The power supply is on.
None
OFF
The start up process is complete.
Amber
Flashing
The power is booting up.
ON
The power supply has a fault or is not receiving power.
SPA boot /
fault
Power supply
A fault
None
OFF
The power supply does not have a fault.
Amber
ON
The power supply has a fault or is not receiving power.
cache I/O
LED
None
OFF
No data is being written to the disk enclosure
Blue
ON
Data is being written to the disk enclosure
Cache
charge LED
Green
Flashing
The cache on the storage processor is charging.
ON
The cache on the storage processor is fully charged.
162
Troubleshooting the Pathlight VX
DPE/DAE LEDs
Disk processor enclosure (DPE) and disk array enclosure (DAE) activity and status can be determined by
observing the LEDs on the front and back panels.
Note
The graphic in Figure 23 shows the front panel of a DAE, not a DPE. The front
panel of a DPE is similar, but it contains 6 disks instead of 15 disks as shown.
The disks in both DPEs and DAEs provide two status LEDs.
DPE/DAE—Front Panel LEDs
The DPE/DAE front panel provides two status LEDs and each disk module provides two status LEDs. Figure
23 shows their location and Table 18 on page 164 describes their function.
Figure 23
Front Panel—DPE/DAE LEDs
enclosure fault
enclosure power
disk activity disk fault
Pathlight VX User’s Guide
163
Table 18
Front Panel—DPE/DAE LED Activity
LED
Color
State
Description
Enclosure
fault
None
OFF
The enclosure is not experiencing a fault.
Amber
ON
The enclosure is experiencing a fault.
Enclosure
power
None
OFF
The enclosure is shut down.
Green
ON
The enclosure is powered on.
Disk activity
None
OFF
The drive slot is empty, contains a filler module, or has
been powered off by command because of a fault.
Green
Flashing
(mostly off)
(DPE) The disk drive is powered on but not spinning; this
is a normal part of the spin-up sequence, occurring during
the spin-up delay of a slot.
Flashing
(at a constant rate)
(DPE) The disk drive is spinning up or down normally.
(DAE) The disk drive is powered on but not spinning.
ON
(DPE and DAE) The disk drive is spinning, but not
handling any I/O activity (the ready state).
(DAE) The disk drive is spinning up or down normally.
Flashing
(mostly on)
The disk drive is spinning and handling I/O activity.
Flashing
(constant fast rate)
(DAE) The LCC has forced ownership of the drive.
None
OFF
The disk drive is not experiencing any faults.
Amber
ON
The disk drive has a fault or needs to be removed.
Disk fault
Note
164
If all LEDs are flashing, identify the specific DPE or DAE in the Pathlight VX
and contact ATAC. Refer to Getting More Information or Help on page 4.
Troubleshooting the Pathlight VX
DPE—Back Panel Storage Processor LEDs
Each DPE storage processor (SP) provides seven status LEDs on the back panel, five of which provide
information. Figure 24 shows their location and Figure 19 describes their function.
Figure 24
Back Panel—DPE SP LEDs
BE 1
FE 0
reserved
Table 19
Fault
FE 1
power
factory use only
Back Panel—DPE SP Module LED Activity
LED
Color
State
Description
BE 0
None
OFF
The designated connection is not active.
Green
ON
The designated connection is active.
None
OFF
The designated connection is not active.
Green
ON
The designated connection is active.
None
OFF
The designated connection is not active.
Green
ON
The designated connection is active.
None
OFF
The SP is not experiencing any faults.
Amber
Flashing 1x/4 sec
BIOS activity
Flashing 1x/sec
POST activity
Flashing 4x/sec
Booting
Six fast flashes, long pause
Rewriting BIOS/POST.
DO NOT REMOVE THE SP IN THIS
STATE.
Steady
The SP is experiencing a fault.
None
OFF
The power is off.
Green
ON
The power is on.
Reserved
None
OFF
Not applicable
Factory use only
None
OFF
Not applicable
FE 0
FE 1
Fault
Power
Note
If all LEDs are flashing, identify the specific DPE or DAE in the Pathlight VX
and contact ATAC. Refer to Getting More Information or Help on page 4.
Pathlight VX User’s Guide
165
DAE—Back Panel LCC LEDs
Each DAE LCC provides four status LEDs on the back panel. Figure 25 shows their location and Figure 20
describes their function.
Figure 25
DAE Back Panel—LCC LEDs
LCC fault
LCC power
Table 20
expansion link
primary link
DAE Back Panel—LCC LED Activity
LED
Color
State
Description
LCC fault
None
OFF
The LCC is not experiencing any faults.
Amber
ON
The LCC or an FC connection is experiencing a fault.
Also on during POST.
None
OFF
The LCC is powered off.
Green
ON
The LCC is powered on.
Expansion
link
None
OFF
The expansion connection is inactive.
Green
ON
The expansion connection is active.
Primary link
None
OFF
The primary connection is inactive.
Green
ON
The primary connection is active.
LCC power
166
Troubleshooting the Pathlight VX
DPE/DAE—Back Panel Power Supply/Cooling Module LEDs
Each DPE/DAE’s power supply/cooling module provides three status LEDs. Figure 26 shows their location
and Figure 21 describes their function.
Figure 26
DPE/DAE Back Panel—Power Supply/Cooling Module LEDs
blower fault
Table 21
power fault
power
DPE/DAE Back Panel—Power Supply/Cooling Module LED Activity
LED
Color
Status
Meaning
Blower fault
None
OFF
None of the blowers has a fault.
Amber
ON
One of the blowers has a fault.
None
OFF
The power supply does not have a fault.
Amber
ON
The power supply has a fault or is not receiving power.
None
OFF
The power supply is off.
Amber
ON
The power supply is on.
Power fault
Power
Pathlight VX User’s Guide
167
SPS LEDs
The standby power supply (SPS) provides four status LEDs. Figure 27 shows their location and Figure 22
describes their function.
Figure 27
SPS Back Panel LEDs
Active
On battery
Replace battery
Fault
Table 22
SPS Back Panel—LED Activity
LED
Color
Status
Meaning
Active
None
OFF
AC line input is turned off or not available.
Green
Blinking
The battery is charging.
AC line input is supplying the output from the SPS.
Green
ON
The SPS is ready and operating normally.
AC line input is supplying the output from the SPS.
None
OFF
The SPS is not using the battery.
Amber
ON
The AC line power is no longer available.
The battery is supplying the output from the SPS.
Replace
battery
None
OFF
The SPS does not need to have the battery replaced.
Amber
ON
The SPS battery pack can no longer support loads.
This LED stays active until the SPS completes a
successful power test. Contact ATAC to have the
battery replaced. For contact information, refer to
Getting More Information or Help on page 4.
Fault
None
OFF
The SPS is not experiencing a fault.
Amber
ON
The SPS has an internal fault. The SPS may still be
able to run online, but write-caching cannot occur.
Contact ATAC to have the battery replaced. For
contact information, refer to Getting More Information
or Help on page 4.
On battery
168
Troubleshooting the Pathlight VX
FC Switch LEDs
Status LEDs appear on both the front and back panels of the FC switch.
FC Switch—Front Panel LEDs
The FC switch front panel provides three status LEDs. Figure 28 shows their location and Figure 23
describes their function.
Figure 28
FC Switch Front Panel LEDs
port readiness LED
power supply LEDs
Table 23
FC Switch Front Panel LED Activity
LED
Color
State
Description
Power
Supply
None
OFF
Power supply is not providing power. Verify that the power
supply is on and that the power cord is connected to a
functioning power source.
Green
ON
Power supply is providing power.
None
OFF
The switch is off or its boot is not complete or has failed. Verify
that the switch is on and that it has completed its boot.
Green
ON
The switch is on and all ports are ready for use.
Yellow
ON
One or more ports are offline. Verify that the switch has
completed its boot and that it is not disabled. If the LED
remains yellow, check the port status LEDs.
Flashing 1x/sec
Error log contains one or more port diagnostic error
messages. Check the system status for reported errors, port
status LEDs, port media and cables.
Port
Readiness
Pathlight VX User’s Guide
169
FC Switch—Back Panel LEDs
The FC switch back panel provides three status LEDs. Figure 29 shows their location and Table 24
describes their function.
Figure 29
FC Switch Back Panel LEDs
port status LED
power/status LED
Table 24
port speed LED
FC Switch Back Panel LED Activity
LED
Color
State
Description
Power/
Status
None
OFF
The FC switch is off or its boot process is not complete or
has failed. Verify that the FC switch is on and that it has
completed its boot process.
Green
ON
The FC switch is on.
Flashing
1x / sec
Diagnostic error messages have occurred. Check the port
status LEDs, port media, and cables.
None
OFF
No light or signal carrier (media or cable) is detected. Check
the media and cable.
Green
ON
Port is online (connected to external device), but it is
segmented,
Flashing
1x / sec
Port is online but segmented, indicating a loopback cable or
incompatible FC switch. Verify that the correct device is
connected to the port.
Flashing
1x / .25 sec
Port is in internal loopback (diagnostic).
Flickering
Port is online, with traffic flowing through the port.
ON
Port is receiving light or signal carrier, but is not yet online.
Flashing
1x / sec
Port is disabled. Enable the port. Check the port
configuration.
Flashing
1x / .25 sec
Port is faulty. Check the port status LEDs, system status,
media and cable.
Green
Amber
Alternating green
and amber
Port is bypassed. Check configuration of the FC loop.
Green
OFF
Port is transmitting / receiving at 1 Gbps.
ON
Port is transmitting / receiving at 2 Gbps.
Port
Status
Amber
Port
Speed
170
Troubleshooting the Pathlight VX
Troubleshooting Audible Alarms
Audible alarms can provide extra assistance when monitoring or troubleshooting the Pathlight VX.
Note
The utility module, FC blade, and FC switch do not have audible alarms.
•
If the MS sounds an alarm, then a sub-component has failed. To identify the failed component, refer
to MS LEDs on page 152.
•
If the failing component cannot be determined:
a. Check the Pathlight VX system status for a RAS event. Refer to Checking System Status on
page 133.
b. View the service ticket(s) that could possibly identify the problem.
c. Follow the recommended actions of the service ticket(s).
•
If the Pathlight VX has not generated a RAS event and the failing component cannot be determined,
contact ATAC to close the service ticket(s).
•
If the problem has not been resolved:
a. Modify the service ticket according to the troubleshooting steps taken.
b. Contact ATAC. Refer to Getting More Information or Help on page 4.
Troubleshooting Pathlight VX User Interface Issues
The Pathlight VX User Interface supports the following browsers:
•
Internet Explorer 5.5
•
Internet Explorer 6.0
•
Netscape 7.x
Note
Netscape 7.1 does not allow multiple user accounts to log onto the same
machine. Any user that logs off will log off all other logged in sessions on the
same machine.
•
If the Operation Completed message does not display, refer to HTTP Proxy Settings on page 143.
•
If the Internet Explorer version is NOT 5.5 or higher, then upgrade Internet Explorer.
•
If the Netscape version is NOT 7.0 or higher, then upgrade Netscape.
•
If the problem is resolved, close the service ticket. Refer to Closing Service Tickets on page 138.
•
If the problem is not resolved, then modify the ticket according to the troubleshooting steps taken.
Refer to Modifying Service Tickets on page 137. Contact ATAC. Refer to Getting More Information
or Help on page 4.
Pathlight VX User’s Guide
171
172
Troubleshooting the Pathlight VX
Glossary
AMC (ADIC Management Console)
Contains client-server software. The AMC server is used to manage the storage area network (SAN) and
the library. AMC version 4.0 is the first version of the software to provide access to two clients, the AMC
client (which manages the SAN) and the LMC client (which manages the Scalar i2000 library). Pathlight VX
is supported by AMC.
ATAC (ADIC Technical Assistance Center)
The ADIC customer help desk.
Availability
A RAS attribute that is designed to maintain the usability of a storage solution.
AX100SC (AX100 single controller enclosure)
A highly available, cost-effective alternative to direct-attached storage that uses Fibre Channel as an
interconnect interface.
Blade
A PCB, especially a board-level component of the SNC
Category
A logical grouping of the SAN components belonging to a specific view. For example, subnet, department,
location, etc.
CE (Customer Engineer)
An ADIC team member providing on-site installation, configuration, preventative maintenance, and remedial
maintenance of an ADIC solution.
Channel zoning
A method of subdividing a SAN into disjoint zones on a per-channel basis in order to enhance security and
qualify access.
COD (Capacity on Demand)
An ADIC library feature that allows users to have a larger tape library (i.e., more slot capacity than the user
currently needs) but only be licensed to use a subset of the total capacity of the tape library. A license
upgrade enabling more capacity to the user is allowed without causing a system interruption.
Pathlight VX User’s Guide
173
Community strings
Statements describing administrative relationships between SNMP agents and community members.
DAE (disk array enclosure)
An intelligent, highly available, high-performance, high-capacity disk-array storage system that uses Fibre
Channel Arbitrated as its interconnect interface. A DAE connect to another DAE or a DPE, and is managed
by storage-system software in the DPE.
Data path
One of the many possible paths over which data can move in the SAN environment, potentially involving
many components or connections between initiators and targets.
DNS (Domain Name Service)
A service that translates domain names into IP addresses.
DPE (disk processor enclosure)
A highly available, high-performance, high-capacity system that uses Fibre Channel as an interconnect
interface.
Drive carrier
The metal and plastic assembly of the disk modules on either a DPE or a DAE that provides smooth, reliable
contact with the enclosure slot guides and the midplane connectors.
Enclosure ID switch
A switch located between the power supplies at the back of the disk enclosure.
eVPS (extended Virtual Private SAN)
A virtual LUN mapping scheme for Fibre Channel hosts that runs on the SNC. It allows each host to see the
LUN map as if the LUN map began at “1”, subject to an overall device total of 2048, and a per-host device
total of 256.
Export operation
The export operation retrieves media from the Pathlight VX when the system is attached to a physical
library.
FC (Fibre Channel)
A high speed data transfer architecture. Using optical fibre to connect devices, Fibre Channel
communications are serial communications that occur at full duplex and achieve data transfer rates of 200
MBps.
FC (Fibre Channel) Blade
A hardware component responsible for the data interface between hosts and storage devices.
Fibre Channel Arbitrated Loop (FC-AL)
An arrangement of Fibre Channel stations such that messages pass from one to the next in a ring.
Fibre Channel (FC) Switch
A high speed data transfer component of the architecture in Pathlight VX that provides interconnect
capabilities between devices.
FRU (Field Replaceable Unit)
The smallest component that can be replaced at a customer installation.
174
Glossary
Host initiator
A host bus adapter that provides the host with a Fibre Channel port capable of initiating SCSI commands
at the host’s request.
HBA (Host Bus Adapter)
An I/O adapter that connects a host I/O bus to a computer’s memory system.
HRS (Host Registration Service)
A service that presents host information that the AMC server uses to manage host access and data retrieval.
This information includes host name, host type, host connection and the online or offline status.
I/E station (Insert/Eject Station)
A door on the front of the library into which cartridges to be imported are placed manually or cartridges to
be exported are placed by the picker.
IP (Internet Protocol)
A protocol that specifies the formats of packets and addresses. Addresses are formulated as dotted quads:
for example, 123.456.789.123.
Library
An ADIC tape library product including the Scalar 24, Scalar 100, Scalar 1000, Scalar 10K, and iScalar
2000.
Link Control Card (LCC)
The component of the DAE that controls access between the disk modules and the rest of the system.
Logical Unit
An object in a target device that processes SCSI commands.
LTO (Linear Tape Open)
A type of media or drive.
LUN (Logical Unit Number)
A unique identifier for a logical unit.
LVD (Low Voltage Differential)
A type of parallel SCSI interface.
MAC address
An IEEE defined globally unique address for Ethernet controllers: “Medium Access Control.”
Management Server
In Pathlight VX, the computer that hosts the application and serves as the management point.
Media
The tapes in cartridges used for storing data or cleaning drives.
Media filter
A filter used to refine the list of drives, slots, etc. It is displayed in a dialog box.
Media ID
A barcode number associated with a particular piece of media.
Pathlight VX User’s Guide
175
Media type
A format/size of media, for example, LTO or LTO2.
Midplane
The DPE component that distributes power and signals to all the enclosure components. All FRUs plug
directly into midplane connectors.
NDMP (Network Data Management Protocol)
An open standard protocol for enterprise-wide backup of heterogeneous network-attached storage.
NEMA (National Electrical Manufacturer’s Association)
An association that sets the standards for the cabinets (racks) where the left and right mounting channels
are 19 inches apart.
NVRAM (Non-Volatile Random Access memory)
A type of memory that retains its contents when power is turned off.
Partition
An abstraction of an underlying tape library that may present a different personality, capacity, or both to a
host. It is a representation of real physical elements, combined to create a grouping that is different from the
tape library. Assumptions made about partitions in a disk environment, where this term originated, are not
identical to assumptions about partitions of tape library storage.
PCB (Printed Circuit Board)
A thin plate on which chips and other electronic components are placed. A board. A blade.
Point to Point
A Fibre Channel topology.
POST (Power On Self Test)
A diagnostic testing sequence run when power is initially turned on.
RAS (Reliability, Availability, and Serviceability)
Three key attributes of computing system design.
Reliability
A RAS attribute that is designed to prevent failure of a storage solution.
SAN (Storage Area Network)
A SAN is a dedicated, high-performance network whose primary purpose is the transfer of data along FC
or high-speed Ethernet connections between servers, interconnect devices, and storage peripherals.
SCSI (Small Computer System Interface)
A parallel interface standard.
SE (Systems Engineer)
An ADIC team member providing service and ongoing maintenance of an ADIC solution.
Serviceability
A RAS attribute that is designed to accurately diagnose and report failures, as well as minimize downtime
in a storage solution.
176
Glossary
SFP (small form-factor-pluggable)
A hot-swappable input/output device that plugs into an Ethernet port or slot, linking that port with the
network.
SNC (storage networking controller)
ADIC term for a storage networking appliance. The SNC enables high-performance, networked
communications that support intelligence functionality within the Pathlight VX storage system.
SNMP (Simple Network Management Protocol)
The protocol governing network management and the monitoring of network devices and their functions.
SPS (Standby Power Supply)
The component of the Pathlight VX that provides backup power to one of the DPE’s storage processors,
allowing graceful shutdown in case of a power failure.
Storage Processor (SP)
The DPE or AX100SC component that controls access between the disk modules and the rest of the
system.
Switch fabric
A set of point-to-point connections between nodes. One or more Fibre Channel Switches makes each
connection. In Pathlight VX, the Fibre Channel switch supports this particular physical topology.
Target ID
SCSI bus address. See also LUN.
Trap
An SNMP alert sent when predefined conditions are met.
Ultrium
A high capacity implementation of LTO, a type of media.
Virtual library
A system that virtualizes tape drives and libraries. The system makes disk storage appear as if it were a
tape drive or tape library. The system also allows the virtual tape to become actual tape by integration with
physical tape systems.
WWN (World Wide Name)
A unique number assigned by a recognized naming authority. The WWN is integral to Fibre Channel
operations.
Pathlight VX User’s Guide
177
178
Glossary
Index
A
C
AC power, troubleshooting . . . . . . . . . . . . . . . .149
activity status, viewing . . . . . . . . . . . . . . . . . . .132
ADIC Technical Assistance Center, contacting . .4
ADIC, contacting . . . . . . . . . . . . . . . . . . . . . . . . . .4
admin password, changing . . . . . . . . . . . . . . . . .30
advanced features, disabling . . . . . . . . . . . . . .106
advanced features, enabling . . . . . . . . . . . . . .103
advanced features, working with . . . . . . . . . . .103
advanced tasks and operations, performing . . . .81
aggregation switch, external . . . . . . . . . . . . . . . .13
application media, removing . . . . . . . . . . . . . . . .93
archive media, reverting . . . . . . . . . . . . . . . . . .114
archiving media . . . . . . . . . . . . . . . . . . . . . . . .112
ATA . . . . . . . . . . . . . . . . . . . . . . . . . . . . . . . . . . . .5
ATAC
see ADIC Technical Assistance Center
audible alarm . . . . . . . . . . . . . . . . . . . . . . . . . .171
audience . . . . . . . . . . . . . . . . . . . . . . . . . . . . . . . .1
AX100SC
front view . . . . . . . . . . . . . . . . . . . . . . . . . . . . 9
LEDs - back panel . . . . . . . . . . . . . . . . . . . 162
LEDs - front panel . . . . . . . . . . . . . . . . . . . 161
canceling a pending request . . . . . . . . . . . . . . . 51
capturing system state . . . . . . . . . . . . . . . . . . . 144
changing
disk extension attributes . . . . . . . . . . . . . . . . 99
library modes . . . . . . . . . . . . . . . . . . . . . . . . 49
checking, system status . . . . . . . . . . . . . . . . . . 133
cleaning media, removing . . . . . . . . . . . . . . . . . 94
closing, service ticket . . . . . . . . . . . . . . . . . . . . 138
components, system . . . . . . . . . . . . . . . . . . . . . . 7
configuration
Entry-Level . . . . . . . . . . . . . . . . . . . . . . . . . . . 6
High-Performance . . . . . . . . . . . . . . . . . . . . . . 6
Standard . . . . . . . . . . . . . . . . . . . . . . . . . . . . . 6
configuring
Early Tape Creation . . . . . . . . . . . . . . . . . . 111
FC Host . . . . . . . . . . . . . . . . . . . . . . . . . . . . . 70
Pathlight VX e-mail settings . . . . . . . . . . . . . 34
contacting ADIC . . . . . . . . . . . . . . . . . . . . . . . . . . 4
creating
system notfication . . . . . . . . . . . . . . . . . . . . . 38
user account . . . . . . . . . . . . . . . . . . . . . . . . . 76
virtual drive . . . . . . . . . . . . . . . . . . . . . . . . . .58
virtual library . . . . . . . . . . . . . . . . . . . . . . . . . 53
virtual media . . . . . . . . . . . . . . . . . . . . . . . . . 61
Customer Service Center website . . . . . . . . . . . . 4
B
backup problem . . . . . . . . . . . . . . . . . . . . . . . .142
backup schedule, setting . . . . . . . . . . . . . . . . .102
basic settings . . . . . . . . . . . . . . . . . . . . . . . . . . .30
applying Pathlight VX license . . . . . . . . . . . 31
changing admin password . . . . . . . . . . . . . . 30
changing network settings . . . . . . . . . . . . . . 31
internal backup schedule . . . . . . . . . . . . . . 102
managing support and system notifications 34
setting date . . . . . . . . . . . . . . . . . . . . . . . . . 32
setting time . . . . . . . . . . . . . . . . . . . . . . . . . 32
setting time zone . . . . . . . . . . . . . . . . . . . . . 32
basic tasks and operations, performing . . . . . . .43
browser version problem . . . . . . . . . . . . . . . . .143
Pathlight VX User’s Guide
D
DAE
front view . . . . . . . . . . . . . . . . . . . . . . . . . . . 10
LEDs - LCC . . . . . . . . . . . . . . . . . . . . . . . . .166
date, setting . . . . . . . . . . . . . . . . . . . . . . . . . . . . 32
default export rule, setting . . . . . . . . . . . . . . . . . 83
default media access, setting . . . . . . . . . . . . . . . 84
deleting
system notfication . . . . . . . . . . . . . . . . . . . . . 41
user account . . . . . . . . . . . . . . . . . . . . . . . . . 79
virtual drive . . . . . . . . . . . . . . . . . . . . . . . . . .60
179
virtual library . . . . . . . . . . . . . . . . . . . . . . . . 57
virtual media . . . . . . . . . . . . . . . . . . . . . . . . 67
deleting system state . . . . . . . . . . . . . . . . . . . .148
disabling
advanced features . . . . . . . . . . . . . . . . . . . 106
disabling support notfication . . . . . . . . . . . . . . . .37
disk extension media
changing attributes . . . . . . . . . . . . . . . . . . . 99
managing . . . . . . . . . . . . . . . . . . . . . . . . . . . 98
reclaiming space . . . . . . . . . . . . . . . . . . . . . 98
removing . . . . . . . . . . . . . . . . . . . . . . . . . . . 95
Disk Extension Space Usage Report . . . . . . . .123
documents
additional . . . . . . . . . . . . . . . . . . . . . . . . . . . . 3
latest versions . . . . . . . . . . . . . . . . . . . . . . . . 3
downloading system state . . . . . . . . . . . . . . . .146
DPE
front view . . . . . . . . . . . . . . . . . . . . . . . . . . . . 9
LEDs - storage processor . . . . . . . . . . . . . 165
DPE/DAE
LEDs - front panel . . . . . . . . . . . . . . . . . . . 163
LEDs - power supply/cooling module . . . . 167
drives, supported . . . . . . . . . . . . . . . . . . . . . . . .11
H
hardware
shutting down . . . . . . . . . . . . . . . . . . . . . . . . 21
health check . . . . . . . . . . . . . . . . . . . . . . . . . . 140
help
contacting ATAC . . . . . . . . . . . . . . . . . . . . . . 4
Customer Service Center website . . . . . . . . . 4
High-Performance configuration . . . . . . . . . . . . . 6
HTTP proxy settings problem . . . . . . . . . . . . . 143
I
intended audience . . . . . . . . . . . . . . . . . . . . . . . . 1
internal backup media, managing . . . . . . . . . . 101
internal backup media, removing . . . . . . . . . . . 96
interpreting status LEDs . . . . . . . . . . . . . . . . . 151
L
FC Host
configuring . . . . . . . . . . . . . . . . . . . . . . . . . . 70
managing . . . . . . . . . . . . . . . . . . . . . . . . . . . 70
modifying . . . . . . . . . . . . . . . . . . . . . . . . . . . 73
removing . . . . . . . . . . . . . . . . . . . . . . . . . . . 74
FC switch
front view . . . . . . . . . . . . . . . . . . . . . . . . . . . . 8
LEDs - back panel . . . . . . . . . . . . . . . . . . . 170
LEDs - front panel . . . . . . . . . . . . . . . . . . . 169
overview . . . . . . . . . . . . . . . . . . . . . . . . . . . . 8
front view, Pathlight VX . . . . . . . . . . . . . . . . . . . .6
LAN connection problem . . . . . . . . . . . . . . . . . 142
LEDs
AX100SC - back panel . . . . . . . . . . . . . . . 162
AX100SC - front panel . . . . . . . . . . . . . . . . 161
DAE - LCC . . . . . . . . . . . . . . . . . . . . . . . . . 166
DPE - storage processor . . . . . . . . . . . . . . 165
DPE/DAE - front panel . . . . . . . . . . . . . . . . 163
DPE/DAE - power supply/cooling module . 167
FC switch - back panel . . . . . . . . . . . . . . . 170
FC switch - front panel . . . . . . . . . . . . . . . . 169
MS - control panel . . . . . . . . . . . . . . . . . . . 152
MS - Ethernet . . . . . . . . . . . . . . . . . . . . . . . 156
MS - HBA . . . . . . . . . . . . . . . . . . . . . . . . . . 155
MS - power supply . . . . . . . . . . . . . . . . . . . 154
MS - SCSI drive carriers . . . . . . . . . . . . . . 153
SNC - FC blade . . . . . . . . . . . . . . . . . . . . . 159
SNC - utility module . . . . . . . . . . . . . . . . . . 157
SPS . . . . . . . . . . . . . . . . . . . . . . . . . . . . . . 168
Library Drives Report . . . . . . . . . . . . . . . . . . . 117
Library Mailbox Report . . . . . . . . . . . . . . 118, 125
Library Media Report . . . . . . . . . . . . . . . . . . . 117
library mode, physical, changing . . . . . . . . . . . . 50
library mode, virtual, changing . . . . . . . . . . . . . 49
library modes, changing . . . . . . . . . . . . . . . . . . 49
Library Slots Report . . . . . . . . . . . . . . . . . . . . 118
library, physical, renaming . . . . . . . . . . . . . . . . 50
logging off . . . . . . . . . . . . . . . . . . . . . . . . . . . . . 16
logging on . . . . . . . . . . . . . . . . . . . . . . . . . . . . . 15
LTO-1 . . . . . . . . . . . . . . . . . . . . . . . . . . . . . . . . 11
LTO-2 . . . . . . . . . . . . . . . . . . . . . . . . . . . . . . . . 11
LTO-3 . . . . . . . . . . . . . . . . . . . . . . . . . . . . . . . . 11
G
M
glossary . . . . . . . . . . . . . . . . . . . . . . . . . . . . . .173
grounding . . . . . . . . . . . . . . . . . . . . . . . . . . . . . . .2
GUI . . . . . . . . . . . . . . . . . . . . . . . . . . . . . . . . . . .27
Management Server . . . . . . . . . . . . . . . . . . . . . . 7
managing
disk extension media . . . . . . . . . . . . . . . . . . 98
E
Early Tape Creation, configuring . . . . . . . . . . .111
enabling
advanced features . . . . . . . . . . . . . . . . . . . 103
support notfication . . . . . . . . . . . . . . . . . . . . 35
Entry-Level configuration . . . . . . . . . . . . . . . . . . .6
export rule, default . . . . . . . . . . . . . . . . . . . . . . .83
exporting virtual media . . . . . . . . . . . . . . . . . . . .63
external aggregation switch . . . . . . . . . . . . . . . .13
use for Entry-Level Configuration . . . . . . . . 13
use for High-Performance Configuration . . . 14
use for Standard Configuration . . . . . . . . . . 14
F
180
Index
FC Hosts . . . . . . . . . . . . . . . . . . . . . . . . . . . 70
internal backup media . . . . . . . . . . . . . . . . 101
media . . . . . . . . . . . . . . . . . . . . . . . . . . . . . . 81
offline media . . . . . . . . . . . . . . . . . . . . . . . . 91
storage policies . . . . . . . . . . . . . . . . . . . . . 108
user accounts . . . . . . . . . . . . . . . . . . . . . . . 76
manuals
see documents
media
application, removing . . . . . . . . . . . . . . . . . 93
archiving . . . . . . . . . . . . . . . . . . . . . . . . . . 112
cleaning, removing . . . . . . . . . . . . . . . . . . . 94
disk extension, removing . . . . . . . . . . . . . . . 95
internal backup, removing . . . . . . . . . . . . . . 96
managing . . . . . . . . . . . . . . . . . . . . . . . . . . . 81
service, removing . . . . . . . . . . . . . . . . . . . . 97
media access
default . . . . . . . . . . . . . . . . . . . . . . . . . . . . . 84
setting rules . . . . . . . . . . . . . . . . . . . . . . . . . 86
media filters, setting . . . . . . . . . . . . . . . . . . . . . .81
Media Tracking Report . . . . . . . . . . . . . . . . . . .126
media, physical, reassigning . . . . . . . . . . . . . . .90
Menu Bar . . . . . . . . . . . . . . . . . . . . . . . . . . . . . .29
message
an export has been requested . . . . . . . . . . . 48
archived media returned . . . . . . . . . . . . . . . 47
physical media needed for pending export . 48
physical media ready for removal . . . . . . . . 46
unknown media in the system . . . . . . . . . . . 44
model
Pathlight VX-450 . . . . . . . . . . . . . . . . . . . . 3, 6
Pathlight VX-650 . . . . . . . . . . . . . . . . . . . . 3, 6
modifying
FC Host . . . . . . . . . . . . . . . . . . . . . . . . . . . . 73
service ticket . . . . . . . . . . . . . . . . . . . . . . . 137
system notfication . . . . . . . . . . . . . . . . . . . . 40
user account . . . . . . . . . . . . . . . . . . . . . . . . 77
virtual drive . . . . . . . . . . . . . . . . . . . . . . . . . 59
virtual library . . . . . . . . . . . . . . . . . . . . . . . . 56
modifying basic settings . . . . . . . . . . . . . . . . . . .30
admin password . . . . . . . . . . . . . . . . . . . . . 30
date . . . . . . . . . . . . . . . . . . . . . . . . . . . . . . . 32
internal backup schedule . . . . . . . . . . . . . . 102
network settings . . . . . . . . . . . . . . . . . . . . . 31
Pathlight VX license . . . . . . . . . . . . . . . . . . 31
support and system notifications . . . . . . . . . 34
time . . . . . . . . . . . . . . . . . . . . . . . . . . . . . . . 32
time zone . . . . . . . . . . . . . . . . . . . . . . . . . . . 32
moving media in a virtual library
virtual library
moving media 88
MS
front view . . . . . . . . . . . . . . . . . . . . . . . . . . . . 7
LEDs - control panel . . . . . . . . . . . . . . . . . 152
LEDs - Ethernet . . . . . . . . . . . . . . . . . . . . . 156
LEDs - HBA . . . . . . . . . . . . . . . . . . . . . . . . 155
LEDs - power supply . . . . . . . . . . . . . . . . . 154
Pathlight VX User’s Guide
LEDs - SCSI drive carriers . . . . . . . . . . . . .153
overview . . . . . . . . . . . . . . . . . . . . . . . . . . . . .7
shutting down . . . . . . . . . . . . . . . . . . . . . . . .19
N
network settings, changing . . . . . . . . . . . . . . . . . 31
O
Offline Media Report . . . . . . . . . . . . . . . . . . . . 127
offline media, managing . . . . . . . . . . . . . . . . . . . 91
overview . . . . . . . . . . . . . . . . . . . . . . . . . . . . . . . . 5
P
Pathlight VX
advanced tasks and operations . . . . . . . . . .81
basic settings . . . . . . . . . . . . . . . . . . . . . . . .30
basic tasks and operations . . . . . . . . . . . . . .43
components . . . . . . . . . . . . . . . . . . . . . . . . . .7
front view . . . . . . . . . . . . . . . . . . . . . . . . . . . . .6
GUI . . . . . . . . . . . . . . . . . . . . . . . . . . . . . . . .27
logging off . . . . . . . . . . . . . . . . . . . . . . . . . . .16
logging on . . . . . . . . . . . . . . . . . . . . . . . . . . .15
overview . . . . . . . . . . . . . . . . . . . . . . . . . . . . .5
problem reporting . . . . . . . . . . . . . . . . . . . .139
rebooting . . . . . . . . . . . . . . . . . . . . . . . . . . . .25
shutting down . . . . . . . . . . . . . . . . . . . . . . . .19
starting up . . . . . . . . . . . . . . . . . . . . . . . . . . .17
Pathlight VX Controller . . . . . . . . . . . . . . . . . . . . . 6
Pathlight VX e-mail settings
configuring . . . . . . . . . . . . . . . . . . . . . . . . . .34
Pathlight VX license, applying . . . . . . . . . . . . . . 31
Pathlight VX Uer Interface, troubleshooting . . . 171
Pathlight VX User Interface . . . . . . . . . . . . . . . . 27
Menu Bar . . . . . . . . . . . . . . . . . . . . . . . . . . .29
System Information Buttons . . . . . . . . . . . . .29
System Summary . . . . . . . . . . . . . . . . . . . . .28
Virtual Library Summary . . . . . . . . . . . . . . . .27
Pathlight VX-450 . . . . . . . . . . . . . . . . . . . . . . . . . 3
Pathlight VX-650 . . . . . . . . . . . . . . . . . . . . . . . . . 3
Pending Activity Report . . . . . . . . . . . . . . . . . . 128
pending request, canceling . . . . . . . . . . . . . . . . 51
performing advanced tasks and operations . . . . 81
performing basic tasks and operations . . . . . . . 43
performing required actions . . . . . . . . . . . . . . . . 43
Physical Drive Report . . . . . . . . . . . . . . . . . . . . 120
physical library mode, changing . . . . . . . . . . . . . 50
Physical Library Report . . . . . . . . . . . . . . . . . . 120
physical library, renaming . . . . . . . . . . . . . . . . . 50
physical library, supported . . . . . . . . . . . . . . . . . 11
Physical Media Report . . . . . . . . . . . . . . . . . . . 121
physical media, reassigning . . . . . . . . . . . . . . . . 90
precautions . . . . . . . . . . . . . . . . . . . . . . . . . . . . . . 2
problem
AC power . . . . . . . . . . . . . . . . . . . . . .149, 150
181
media filters . . . . . . . . . . . . . . . . . . . . . . . . . 81
setting default media access . . . . . . . . . . . . . . . 84
setting virtual media attributes . . . . . . . . . . . . . 69
shutting down
hardware . . . . . . . . . . . . . . . . . . . . . . . . . . . 21
MS . . . . . . . . . . . . . . . . . . . . . . . . . . . . . . . . 19
system hardware . . . . . . . . . . . . . . . . . . . . . 21
system software . . . . . . . . . . . . . . . . . . . . . . 19
shutting down Pathlight VX . . . . . . . . . . . . . . . . 19
SNC
R
front view . . . . . . . . . . . . . . . . . . . . . . . . . . . . 8
LEDs - FC blade . . . . . . . . . . . . . . . . . . . . 159
RAID
LEDs - utility module . . . . . . . . . . . . . . . . . 157
overview . . . . . . . . . . . . . . . . . . . . . . . . . . . . 9
overview . . . . . . . . . . . . . . . . . . . . . . . . . . . . . 8
reassigning physical media . . . . . . . . . . . . . . . .90 SPS
rebooting Pathlight VX . . . . . . . . . . . . . . . . . . . .25
back view . . . . . . . . . . . . . . . . . . . . . . . . . . . 10
reclaiming space, disk extension media . . . . . . .98
front view . . . . . . . . . . . . . . . . . . . . . . . . . . . 10
recycling virtual media . . . . . . . . . . . . . . . . . . . .65
LEDs . . . . . . . . . . . . . . . . . . . . . . . . . . . . . 168
removing application media . . . . . . . . . . . . . . . .93 Standard configuration . . . . . . . . . . . . . . . . . . . . 6
removing cleaning media . . . . . . . . . . . . . . . . . .94 start up problem . . . . . . . . . . . . . . . . . . . . . . . 142
removing disk extension media . . . . . . . . . . . . .95 starting up Pathlight VX . . . . . . . . . . . . . . . . . . 17
removing FC Host . . . . . . . . . . . . . . . . . . . . . . . .74 statements, product safety . . . . . . . . . . . . . . . . . 1
removing internal backup media . . . . . . . . . . . . .96 status LEDs, interpreting . . . . . . . . . . . . . . . . . 151
removing service media . . . . . . . . . . . . . . . . . . .97 storage policies, managing . . . . . . . . . . . . . . . 108
renaming a physical library . . . . . . . . . . . . . . . . .50 Storage Policy Report . . . . . . . . . . . . . . . . . . . 124
reporting problems . . . . . . . . . . . . . . . . . . . . . .139 support and system notifications, managing . . . 34
required action
support notification
an export has been requested . . . . . . . . . . . 48
disabling . . . . . . . . . . . . . . . . . . . . . . . . . . . . 37
archived media returned . . . . . . . . . . . . . . . 47
enabling . . . . . . . . . . . . . . . . . . . . . . . . . . . . 35
physical media for pending export . . . . . . . . 48 supported browsers . . . . . . . . . . . . . . . . . . . . 143
physical media ready for removal . . . . . . . . 46 supported drives . . . . . . . . . . . . . . . . . . . . . . . . 11
unknown media in the system . . . . . . . . . . . 44 supported library
required actions, performing . . . . . . . . . . . . . . . .43
Dell PV 132T . . . . . . . . . . . . . . . . . . . . . . . . 12
reverting archive media . . . . . . . . . . . . . . . . . .114
Dell PV 136T . . . . . . . . . . . . . . . . . . . . . . . . 12
Dell PV 160T . . . . . . . . . . . . . . . . . . . . . . . . 12
S
IBM 3582 . . . . . . . . . . . . . . . . . . . . . . . . . . . 12
IBM 3583 . . . . . . . . . . . . . . . . . . . . . . . . . . . 12
safety
IBM 3584 . . . . . . . . . . . . . . . . . . . . . . . . . . . 12
intended use . . . . . . . . . . . . . . . . . . . . . . . 1, 2
Scalar 100 . . . . . . . . . . . . . . . . . . . . . . . . . . 11
precautions . . . . . . . . . . . . . . . . . . . . . . . . . . 2
Scalar 1000 . . . . . . . . . . . . . . . . . . . . . . . . . 11
statements . . . . . . . . . . . . . . . . . . . . . . . . . . . 2
Scalar 10K . . . . . . . . . . . . . . . . . . . . . . . . . . 11
symbols and notes . . . . . . . . . . . . . . . . . . . . 3
Scalar 24 . . . . . . . . . . . . . . . . . . . . . . . . . . . 11
System, Safety, and Regulatory Information
Scalar i2000 . . . . . . . . . . . . . . . . . . . . . . . . . 11
Guide . . . . . . . . . . . . . . . . . . . . . . . . . . 1, 2
Scalar i500 . . . . . . . . . . . . . . . . . . . . . . . . . . 11
safety statements . . . . . . . . . . . . . . . . . . . . . . . . .1
STK L180 . . . . . . . . . . . . . . . . . . . . . . . . . . . 13
SATA . . . . . . . . . . . . . . . . . . . . . . . . . . . . . . . . . .5
STK L700 . . . . . . . . . . . . . . . . . . . . . . . . . . . 13
schedule, backup . . . . . . . . . . . . . . . . . . . . . . .102 symbols and notes
service media, removing . . . . . . . . . . . . . . . . . . .97
explained . . . . . . . . . . . . . . . . . . . . . . . . . . . . 3
service ticket
system
closing . . . . . . . . . . . . . . . . . . . . . . . . . . . . 138
placement, exposure . . . . . . . . . . . . . . . . . . . 2
criticality . . . . . . . . . . . . . . . . . . . . . . . . . . . 134 System Backup Report . . . . . . . . . . . . . . . . . . 129
modifying . . . . . . . . . . . . . . . . . . . . . . . . . . 137 System Configuration Report . . . . . . . . . . . . . 123
understanding . . . . . . . . . . . . . . . . . . . . . . 134 system hardware
viewing . . . . . . . . . . . . . . . . . . . . . . . . . . . 135
shutting down . . . . . . . . . . . . . . . . . . . . . . . . 21
setting
System Information Buttons . . . . . . . . . . . . . . . 29
default export rule . . . . . . . . . . . . . . . . . . . . 83 system notification
media access rules . . . . . . . . . . . . . . . . . . . 86
creating . . . . . . . . . . . . . . . . . . . . . . . . . . . . 38
backup . . . . . . . . . . . . . . . . . . . . . . . . . . . . 142
browser version . . . . . . . . . . . . . . . . . . . . . 143
cable . . . . . . . . . . . . . . . . . . . . . . . . . . . . . 150
HTTP proxy settings . . . . . . . . . . . . . . . . . 143
LAN connection . . . . . . . . . . . . . . . . . . . . . 142
start up . . . . . . . . . . . . . . . . . . . . . . . . . . . 142
user interface . . . . . . . . . . . . . . . . . . . . . . . 142
problem reporting . . . . . . . . . . . . . . . . . . . . . . .139
product safety statements . . . . . . . . . . . . . . . . . .1
182
Index
deleting . . . . . . . . . . . . . . . . . . . . . . . . . . . . 41
modifying . . . . . . . . . . . . . . . . . . . . . . . . . . . 40
system overview . . . . . . . . . . . . . . . . . . . . . . . . . .5
system software
shutting down . . . . . . . . . . . . . . . . . . . . . . . 19
system state
capturing . . . . . . . . . . . . . . . . . . . . . . . . . . 144
deleting . . . . . . . . . . . . . . . . . . . . . . . . . . . 148
downloading . . . . . . . . . . . . . . . . . . . . . . . 146
system status, checking . . . . . . . . . . . . . . . . . .133
System Summary . . . . . . . . . . . . . . . . . . . . . . . .28
T
temperature . . . . . . . . . . . . . . . . . . . . . . . . . . .150
temperature, troubleshooting . . . . . . . . . . . . . .150
time zone, setting . . . . . . . . . . . . . . . . . . . . . . . .32
time, setting . . . . . . . . . . . . . . . . . . . . . . . . . . . .32
troubleshooting . . . . . . . . . . . . . . . . . . . . . . . . .150
AC power . . . . . . . . . . . . . . . . . . . . . . . . . . 149
audible alarm . . . . . . . . . . . . . . . . . . . . . . . 171
user interface . . . . . . . . . . . . . . . . . . . . . . . 171
troubleshooting Pathlight VX . . . . . . . . . . . . . .139
troubleshooting, general . . . . . . . . . . . . . . . . . .142
U
understanding service tickets . . . . . . . . . . . . . .134
urls
www.adic.com/crc . . . . . . . . . . . . . . . . . . . . . 4
user account
creating . . . . . . . . . . . . . . . . . . . . . . . . . . . . 76
deleting . . . . . . . . . . . . . . . . . . . . . . . . . . . . 79
managing . . . . . . . . . . . . . . . . . . . . . . . . . . . 76
modifying . . . . . . . . . . . . . . . . . . . . . . . . . . . 77
User Interface . . . . . . . . . . . . . . . . . . . . . . . . . . .27
user interface problem . . . . . . . . . . . . . . . . . . .142
User Login Report . . . . . . . . . . . . . . . . . . . . . .129
using external aggregation switch . . . . . . . . . . .13
using health checks . . . . . . . . . . . . . . . . . . . . .140
V
ventilation . . . . . . . . . . . . . . . . . . . . . . . . . . . . . . .2
viewing
activity status . . . . . . . . . . . . . . . . . . . . . . . 132
Disk Extension Space Usage Report . . . . 123
Library Drives Report . . . . . . . . . . . . . . . . 117
Library Mailbox Report . . . . . . . . . . . 118, 125
Library Media Report . . . . . . . . . . . . . . . . . 117
Library Slots Report . . . . . . . . . . . . . . . . . . 118
Media Tracking Report . . . . . . . . . . . . . . . 126
Offline Media Report . . . . . . . . . . . . . . . . . 127
Pending Activity Report . . . . . . . . . . . . . . . 128
Physical Drive Report . . . . . . . . . . . . . . . . 120
Physical Library Report . . . . . . . . . . . . . . . 120
Physical Media Report . . . . . . . . . . . . . . . 121
Pathlight VX User’s Guide
service ticket . . . . . . . . . . . . . . . . . . . . . . . .135
Storage Policy Report . . . . . . . . . . . . . . . . .124
System Backup Report . . . . . . . . . . . . . . . .129
System Configuration Report . . . . . . . . . . .123
User Login Report . . . . . . . . . . . . . . . . . . . .129
Virtual Drive Summary Report . . . . . . . . . .119
Virtual Library Summary . . . . . . . . . . . . . . .115
Virtual Library Summary Report . . . . . . . . .116
Virtual Media Summary Report . . . . . . . . . .119
virtual drive
creating . . . . . . . . . . . . . . . . . . . . . . . . . . . . .58
deleting . . . . . . . . . . . . . . . . . . . . . . . . . . . . .60
modifying . . . . . . . . . . . . . . . . . . . . . . . . . . . .59
working with . . . . . . . . . . . . . . . . . . . . . . . . .58
Virtual Drive Summary Report . . . . . . . . . . . . . 119
virtual library
creating . . . . . . . . . . . . . . . . . . . . . . . . . . . . .53
deleting . . . . . . . . . . . . . . . . . . . . . . . . . . . . .57
modifying . . . . . . . . . . . . . . . . . . . . . . . . . . . .56
working with . . . . . . . . . . . . . . . . . . . . . . . . .53
virtual library mode, changing . . . . . . . . . . . . . . 49
Virtual Library Summary . . . . . . . . . . . . . . . . . . . 27
Virtual Library Summary Report . . . . . . . . . . . . 116
Virtual Library Summary, viewing . . . . . . . . . . . 115
virtual media
creating . . . . . . . . . . . . . . . . . . . . . . . . . . . . .61
deleting . . . . . . . . . . . . . . . . . . . . . . . . . . . . .67
exporting . . . . . . . . . . . . . . . . . . . . . . . . . . . .63
recycling . . . . . . . . . . . . . . . . . . . . . . . . . . . .65
setting attributes . . . . . . . . . . . . . . . . . . . . . .69
working with . . . . . . . . . . . . . . . . . . . . . . . . .61
Virtual Media Summary Report . . . . . . . . . . . . 119
W
website, Customer Service Center . . . . . . . . . . . . 4
WEEE directive . . . . . . . . . . . . . . . . . . . . . . . . . . 2
working with
advanced features . . . . . . . . . . . . . . . . . . .103
virtual drive . . . . . . . . . . . . . . . . . . . . . . . . . .58
virtual library . . . . . . . . . . . . . . . . . . . . . . . . .53
virtual media . . . . . . . . . . . . . . . . . . . . . . . . .61
www.adic.com/crc . . . . . . . . . . . . . . . . . . . . . . . . 4
183
184
Index