1
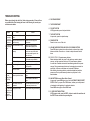
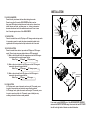
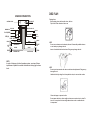
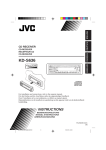
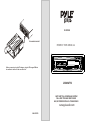
PLCDCS90
CD CHANGER DIN SOCKET
INSTRUCTION MANUAL
CD
FULL LOGIC CASSETTE/RECEIVER/CD-R/W PLAYBACK
FF
TA
+
+
TUNE
BD SEEK
TRACK
--
When you want to play the CD changer, plug the CD changer DIN into
the socket of the back of the car audio unit.
REW
LOC WF
CLASS
FLAT
ROCK
POP
LUD DISC RDM RPT INT MUT MTL
PAUSE
1RDM
CH
MTL
2 RPT
SEL
-
CD - CH
3 SCN
CD
TA
LUD
WOOFER
DISC
4
+
5
--
6AMS
200WATTS
ANTI-THEFT FULL DETACHABLE SYSTEM
FULL LOGIC TAPE AND DISC PLAYER
AM/FM STEREO DIGITAL PLL TUNING RADIO
www.pyleaudio.com
IMO-4527B
PWR
AUDIO
CONTROL
HIGH POWER 35WX4
LOCATION AND FUNCTION OF CONTROLS
SPECIFICATION
1
2
3
5
4
6
CD
FULL LOGIC CASSETTE/RECEIVER/CD-R/W PLAYBACK
+
7
TA
HIGH POWER 35WX4
8
9
PWR
AUDIO
CONTROL
FF
+
TUNE
SEEK
BD
TRACK
--
REW
LOC WF
CLASS
FLAT
ROCK
POP
CH
MTL
PAUSE
1RDM
19
LUD DISC RDM RPT INT MUT MTL
2 RPT
18 17
SEL
-
CD - CH
3 SCN
16
CD
TA
15 14
LUD
13
WOOFER
DISC
4
+
5
12 11
--
6AMS
10
20
1. BAND BUTTON
Press it to switch from tape, CD player or CD changer mode to radio, and
the LCD screen will be shown as below:
FM 1
FM 2
FM 3
MW(AM) 1
MW(AM) 2
2.19. TUNE/SEEK/TRACK UP OR DOWN, FF/RW BUTTONS
In radio mode, press the + or - button, it will start automatic tuning and
stop at the next receivable station; press the + or - button for more than
2 seconds to research for the higher or lower frequency station.
In tape mode, press the + or - button to fast forward or rewind the tape,
and press TAPE button to resume normal tape playing.
In CD player or CD changer mode, press the + or - button to skip to the
beginning of the next track or one of the track currently playing. Press the
- button twice to skip to the beginning of the previous track. Press and
hold the + or - button for more than 2 seconds to search quickly (with
sound) in the forward or reverse direction, and press it again to resume
normal playing.
3. LCD (LIQUID CRYSTAL DISPLAY)
GENERAL
Power Supply The Main Unit..................DC 13.8 Volts.Negative Ground
Maximum Output Power........................................................4 x 50W
Unit Dimension.............................................178(W) x 167(D) x 50(H)
FM TUNER SECTION
Frequency Range.......................................87.5MHz - 108.0MHz(USA)
Usable Sensitivity......................................................................10dB
Frequency Response(+/- 3dB)......................................50Hz - 12.5KHz
I.F. Rejection...........................................................................100dB
Image Rejection.........................................................................65dB
Signal-to-Noise Ratio..................................................................60dB
Selectivity.................................................................................65dB
Stereo Separation.....................................................................30dB
Capture Ratio.............................................................................2dB
Antenna Impedance....................................................................75
AM TUNER SECTION
Frequency Range..........................................530KHz - 1720KHz(USA)
Usable Sensitivity(S/N 20dB).....................................................20uV
I.F. Rejection.............................................................................80dB
Image Rejection........................................................................75dB
Antenna Impedance...................................................................75
TAPE SECTION
Wow&Flutter............................................................................0.1%
S/N Ratio(Normal)....................................................................52dB
Separation................................................................................50dB
Frequency response.......................................................50Hz - 15KHz
CD SECTION
Disc size.......................................................................................5"
Channels...................................................................2-channel stereo
Sampling frequency...............................................................44.1KHz
D/A converter...................................................................Twin. 1- bit
Pickup...........................................Optical 3-beam semiconductor laser
Output filter.............................................................................Active
Frequency response........................................................5Hz - 20KHz
Dynamic range..........................................................................85dB
Signal-to-noise ratio...................................................................90dB
Wow and flutter..............................................Below measurable limits
Channel separation(1 KHz).........................................................85dB
TROUBLE SHOOTING
Before going through the check list, finish wiring connection. If there still are
any question after finish testing the items in the following list, consult your
nearest service dealer.
4. DISC COMPARTMENT
5. TAPE COMPARTMENT
6. CD EJECT BUTTON
In CD player mode, press it to eject the disc.
Symptom
Cause
Solution
The compact
disc or tape
does not play
when inserted
into the unit.
The volume control is turned
down.
Turn up the volume control.
7. TAPE EJECT BUTTON
In tape mode, press it to eject the tape.
The power connections are not
wired correctly.
Check the +12V and ground
connections.
8. POWER BUTTON
Press it to turn on or off the unit.
The sound from
the CD player
skips.
The road surface is rough.
Wait for the road surface to
improve before playing a disc.
The unit is not mounted
securely.
Install the unit securely. Be sure to
use the rear strap if the vehicle
does not provide support for the
rear of the unit.
The disc is defective.
The disc is dirty.
Try another disc. If it plays properly,
the first disc may be defective.
Clean the disc.
The vehicle ignition is switched
off.
Switch the ignition to the "ON" or
"ACC" position.
The fuse is blown.
Replace the fuse with another 15A
fuse.
The unit does
not work
properly (Eject,
Load, Play).
The microcomputer has been
affected by electrical noise.
Eject the disc or tape, then insert it
again.
No radio
reception.
The antenna cable is not
connected.
No power.
Turn the power off and then on
again.
The radio does The signals are weak.
not stop on any
stations when
automatic
tuning is used.
Insert the antenna cable firmly into
the antenna jack on the unit.
Select a station using manual tuning.
9. VOLUME MODE SELECTING AND LEVEL UP OR DOWN BUTTONS
Press SEL button to select the audio mode such as volume, bass, treble,
balance and fader. Press the + or - button to adjust the sound level of
them.
10-11-12-16-17-18. 1-6 preset memory buttons
Select the desired band, then tune for the station you want to store in
memory, and then press and hold one of 1-6 preset memory buttons
for more than 2 seconds to store the broadcasting station to the preset
memory. Every preset memory button can be stored only one station for
each band, so the car audio system can be stored 30 stations.
After finishing the storing operation, select the desired band and then
press one or the six preset memory buttons to quickly tune for the
desired station.
10. AMS BUTTON(Automatic Music Select System)
In tape mode, press AMS button to turn on the AUTOMATIC MUSIC SELECT
SYSTEM. Then if you press FF or REW button, it allows you to skip forward
or backward to the beginning of a particular selection.
Press AMS button again to cancel AMS mode.
11-12. DISC SELECTING BUTTONS
In CD changer mode, press the DISC + button to select the next disc and
the DISC - button to select the preceding disc.
INSTALLATION
13.LOUD/SUB WOOFER
Press it shortly to enhance the bass effect during bass mode.
Press it more than 2 seconds, SUB WOOFER will be turned on.
then press SEL button to select the sound mode such as volume, bass,
treble, balance and fader, and then press + or - button to increase or
decrease the volume level of the selected sound mode. Press it more
than 2 seconds again to turn off the SUB WOOFER.
DASH BOARD
METAL MOUNTING STRAP
HEX NUT
SPRING WASHER
PLAIN WASHER
PLAIN WASHER
14.TAPE BUTTON
Press it to switch from radio, CD player or CD changer mode to tape mode.
In tape mode, press it to make the player automatically switch to the
opposite side of the tape when the tape reaches the end of one side.
CONSOLE
TAPPING SCREW
SLIDE BRACKET HOUSING
HEX BOLT
15.CD/CD-CH BUTTON
Press it to switch from radio or tape mode to CD player or CD changer
mode. (Press it again to pause playback when no CDC connection)
1). When a disc is loaded in the disc compartment and the CD changer
is not connected, the mode changes like this:
Radio/Tape
CD player
CD player pause
2). When a disc is not loaded in the CD player and the CD changer is
connected, the mode changes like this:
Radio/Tape
CD changer
CD changer pause
3). When a disc is loaded in the CD player and the CD changer is
connected, the mode changes like this:
Radio/Tape
CD player
CD changer
KEY PLATE
PLASTIC TRIM OUT
KEY PLATE
16. SCAN BUTTON
In CD player mode, press it to search each song for 10 seconds, press
it again to stop scanning and retain the song currently selected.
In CD changer mode, press it to search each song for 10 seconds, press
it again to search each disc for 10 seconds, press it thirdly to stop
scanning and retain the disc currently selected.
If you want to take CHASSIS out of the SLIDE BRACKET HOUSING,
remove the PLASTIC OUTLINE away, then insert the two KEY PLATE
into left and right side of chassis as above illustration.
PRECAUTIONS AND MAINTENANCE
.1.This unit is designed for negative ground operation only. The equipment can
be used safely, if the negative terminal of the battery is connected to the
vehicle metal work.
2.Do not use speakers of impedance less than 4 ohms; and allow the speaker
wires to be shorted together when the unit is switched on.
Otherwise it may overload or burn out the power amplifier stage.
3.If the car interior is extremely hot, as after being parked in the sun, do not use
the player until the car has been driven for a while to cool off the interior.
4.Take care of your tape cassette to preserve the quality of the recordings. Do
not allow them to be exposed to direct sunlight. Store them in a place
protected from dirt and dust and avoid handing with greasy or oily hands.
Also, keep the away from magnets, and motors of the permanent magnet type.
5.It is not advisable to use cassette tapes longer than C-60(30 minutes per side)
in automobile players, since the tape is too thin and tends to become easily
entangled. Always remove cartridge from your tape player as soon as play is
finished.
6.The capstan and tape head should be cleaned about once every six months
with a soft cloth or cotton-wool swab, moistened with alcohol.
This will serve to maintain the richness and clarity of sound, and prevent loss
of volume. Do not use a screwdriver, or ferrous metal rod , in carrying out the
above cleaning. See illustration.
7.A loosely wound cassette tape will get damaged. Prior to using such tape,
tighten it in a manner as guided by Fig. 2.A carelessly would cassette tape will
cause unnecessary pressure on the tape resulting in the cassette springing out
while the tape is running .For prevention, rewind the tape through fast for
warding or rewinding.
17.RPT/METAL BUTTON
In tape play mode, If a metal tape is used, press METAL button
to make the player in metal play mode, and MTL is indicated on LCD.
In CD player mode, press it to play the current track repeatedly. Press
it again or eject the disc to cancel this mode.
In CD changer mode, press it to play the current track repeatedly. Press
it again to play the current disc repeatedly. Press it thirdly to cancel this
mode.
18.RDM/PAUSE BUTTON
In CD player mode, press it to play the track in random order. Press the
TRACK + or - button to select another random track. Press it again or
eject the disc to cancel this mode.
In CD changer mode, press it to play tracks on the current disc in
random order. Press it again to play tracks on the full disc in random
order. Press it thirdly to cancel this mode.
In tape mode, press it to pause tape playing, press it again to resume
tape playing.
20.RELEASE BUTTON
Press it to detatch the front panel when you want to take it away.
DISC PLAY:
SPEAKER CONNECTION
MEMORY B+
YELLOW
FUSED
FILTER
BOX
0.5A &10A
FUSES
BLACK(GND)
RED (B+)
FRONT
LEFT
SP
REAR
BLUE AUTO ANT 1 A
FUSE
+
WHITE
WHITE/BLACK
+
Cleaning discs:
Before playing, clean the disc with a clean, lint-free.
Flip the disc in the direction of the arrow.
CDC SOCKET
ANTENNA PLUG
GREEN
GREEN/BLACK
WOOFER LINE OUT
YELLOW
RCA LINE OUT
RED R
WHITE L
GRAY
+
RIGHT
GRAY/BLACK
VIOLET
VIOLET/BLACK
FRONT
+
SP
REAR
NOTE:
. Do not use so solvents such as benzine, thinners. Commercially available cleaners
or anti static spray damage the unit.
. Insert a disc with the label surface down. Doing so may damage the unit.
Label
surface up
NOTE:
In spite of having any kinds of speaker system, must use 4 ohms
impedance of speaker to reduce the distortion during high volume
level.
NOTE:
. Do not try to insert another disc when one has been already inserted. Doing so may
damage the unit.
. Handle the disc by its edge. And to keep the disc clean, do not touch the surface.
.Do not stick paper or tape on the disc.
.Do not expose the disc to direct sunlight or heat sources such as hot air ducts. Or
leave it in a car parked in direct sunlight where there can be a considerable rise
in temperature.