1
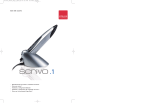
scrivo1_manual_eng_rz_kb2.qxd 06.12.2004 17:39 Uhr Seite 1
User’s Guide
_
Product Specification and System Requirements
_
How to use scrivo.1
_
Bluetooth Installation and Configuration
_
scrivo.1 Driver Installation and Configuration
_
How to use following utilities Finger NoteTM
scrivo1_manual_eng_rz_kb2.qxd 06.12.2004 17:39 Uhr Seite 2
Thank You
Contents
Thank you for purchasing the scrivo.1. You have made an excellent choice for your next digital
input device. scrivo.1 is designed to be used for many functions with ease.
Trademarks
The following are registered trademarks of plawa-feinwerktechnik GmbH & Co. KG: scrivo.1, the
scrivo.1 logo, and plawa mobilities logo is a trademark of plawa. Other product names mentioned in this guide may also be trademarks or registered trademarks of their respective owners.
Manual Notice
plawa reserves the right to make changes to this manual and to the equipment described herein
without notice. Considerable effort has been made to ensure that this manual is free of inaccuracies and omissions. However, plawa makes no warranty of any kind including, but not limited to,
any implied warranties of merchantability and fitness for a particular purpose with regard to this
manual. plawa assumes no responsibility for, or liability for, errors contained in this manual or for
incidental, special, or consequential damages arising out of the furnishing of this manual, or the
use of this manual in operating the equipment, or in connection with the performance of the
equipment when so operated.
1. Description
page
4
_
page
4
Features & Shipment Contents
_
Specifications
page
4
_
Bundle Software
page
5
page
6
2. System Requirements
3. Using scrivo.1
page
6
_
Correct way to hold scrivo.1
page
7
_
OCR (OCR: Optical character recognition)
page
8
_
Example of using scrivo.1
page
9
page
11
4. Installing & Configuring Bluetooth
_
Installation for Windows 2000/XP
page
11
_
Update Bluetooth setting in Windows XP service pack2
page
21
_
Installation for Windows 98SE/ME
page
25
page
28
5. scrivo.1 Driver and Software
_
Installing scrivo.1 driver and utilities
page
28
_
scrivo.1 Driver Setting
page
29
_
Changing mode and usage
page
32
page
34
6. Using Finger NoteTM
2
_
What is Finger Finger Note ?
page
34
_
Finger NoteTM Basic Menu
page
34
7. Troubleshooting
page
38
8. Contact and Support
page
39
TM
3
scrivo1_manual_eng_rz_kb2.qxd 06.12.2004 17:39 Uhr Seite 4
1. Description
Software package
Make hand written notes, design and contol your desktop. Create MMS messages on a smart
phone and manage memos on a PDA.
Finger NoteTM (Only for PC users)
Features
_
_
_
_
_
Optical navigation & mouse-hover technology
Portable and convenient: light and durable (perfect for notebook users)
Ergonomic design: Fits comfortably in your hand. No wrist pains after long hours of use.
USB connection: plug and play.
Includes application software which maximizes usage of scrivo.1 “Finger NoteTM”
(Only for PC users).
Create memos and highlight text in any program. This program allows users to open Microsoft
PowerPoint, Word, Excel by slides. User can also save slides with created memos. (Image file format). This program is very especially useful in presentations. (Refer to “Using Finger NoteTM“).
Practical use in other Software programs*
_
_
_
Paint: It allows the user to draw or write in Microsoft Paint in Accessories, something which
users cannot do using a typical mouse.
Windows XP or Office XP installed on PC: Practical uses XP´s handwriting recognition (OCR).
Practical use in graphic programs in with other tablet systems.
Shipment Contents.
_
_
_
_
_
_
Scrivo.1
Charger (receiver)
Manual
Pad
Software Finger NoteTM
Driver CD
Specifications
4
_
_
_
_
_
_
_
_
Communication: Bluetooth
Frequency: 2.4 GHz
Range: Within 10 Meter radius
Resolution: 800 dpi
Connection: USB
Battery 3.7 V DC, 400 mA Li Polymer
Continuous usage time: 5 hours
Stand by usage time: 26 hours (80 hours in power saving mode)
_
_
_
scrivo.1
Size: 157 (L) x18 (B) x30 (H) mm
Weight: 40 g
Power: 3.7 V rechargeable Battery
_
_
_
_
Charger:
Size: 108 (L) x 49 (B) x 42 (H) mm
Weight: 100 g (including wire)
Cable length: 1.7 m
Power: USB power (DC5V)
2. System Requirements
scrivo.1 requires the following minimum system configuration:
_
_
_
_
_
Pentium II 400MHz or equivalent
Operating System: Windows 98SE/ME/2000/XP, Mac O 9.2-X
System Memory: At least 32MB or above
Hard Drive: At least 11.5MB available memory
HID Support with USB port
* PC without USB ports cannot be used.
* Requires 3rd party software when you use it on a PDA or mobile phone. (Not included)
5
scrivo1_manual_eng_rz_kb2.qxd 06.12.2004 17:39 Uhr Seite 6
3. Using scrivo.1
Correct way to hold scrivo.1
When using a typical ballpoint pen, you can
write on a paper regardlessof how you hold the
pen. On the other hand, if you hold a fountain
pen and rotate its pen tip to an upright position, you cannot write at all since the tip of a
fountain pen has a different structure to that of
a typical ballpoint pen. Similarly, the performance of scrivo.1 greatly depends on how you hold
it. As a result, when you try to write a memo
or draw a simple graph with scrivo.1, holding it
incorrectly may result in unexpected output
such as rotated letters, tilted axis and so on.
Therefore, you should be careful when you hold
scrivo.1
scrivo.1 has a power switch, two function buttons, and two indicators.
Power switch
Status-LED
Battery indicator
Pairing Button
.
Second button
First Button
The Ccorrect way to hold scrivo.1 is shown in the pictures below. The forepart, where the push
button is attached, should face the front
Power switch
Turn the power ON/OFF using this switch located on the bottom of the pen. Power switch must
be in the ON position before use. Switch to the OFF position if it’s not in use for a long period of
time.
Pairing Button
Reset the pen to initial stage. After successful initiation, Status LED light will blink green
continuously.
First button (pen-tip button)
Located on the end of scrivo.1 and has same function as the left button on a typical mouse.
Front View
Side View
If the angle of scrivo.1 and the surface is too low as shown in the figure (a), or if its forepart
does not face to the front as shown in the figure (b), (c), and (d), it will not perform correctly.
Second button (Jog button)
Located on the front top of the pen and has same function as the right button on typical mouse.
When you scroll the Jog switch, it will work like the mouse wheel scroll feature.
Status-LED
1) Green LED -> indicates status between Pen and Charger is ok.
- Blinking continuously: Initiating stage for pairing. (Blinking for the first 3 mins remain lit after
3 mins)
- No LED light: Complete Pairing Status.
- Continues to blink in 1-2 sec. interval: Power to receiver has been interrupted
2) Red LED – Check battery status
- Need to recharge scrivo.1 when red LED blinks (continues to be usable for 30 mins)
(a) Angle of pen and surface
is too low.
(b) scrivo.1 is turned to right.
(c) scrivo.1 is reversed.
(d) scrivo.1 is turned to left.
Battery indicator
Red LED during charging and green LED when fully charged. Total charging time: 3.5 hours.
6
7
scrivo1_manual_eng_rz_kb2.qxd 06.12.2004 17:39 Uhr Seite 8
OCR (Optical Character Recognition)
Changing Pen Tip
If users´ PC has Windows XP or Office XP installed, they will be able to use their OCR programs
to convert their users own handwriting to text or save it as a picture file. (Handwritten to text
conversion will not be supported if OCR isn’t Windows XP and Office XP or above isn’t installed.)
scrivo.1´s pen tip is designed to withstand abrasion. However for best results, the pen tip needs
to be replaced after it has been used for a long period of time.
_ First, prepare one of the tips included with
scrivo.1.
For those environments that support OCR programs, IME pad is located on the task bar and can
be launched by clicking the icon (IME Pad). Users can write or draw using this function.
_ Hold the tip and pull towards arrow shown in
the figure on left (Use pincer or pliers for your
convenience).
If the task bar isn´t visible, click the Windows
key – located on the bottom left of your keyboard, to enable the task bar.
_ Insert the new tip into the now empty space.
_ Place the pen on a hard surface and gently
press the tip.
Example of using scrivo.1 (Only for PC users)
To use the OCR function in Windows XP, open “Regional and Language Options” in the “Control
Panel” and click Details in the “Languages” tab to open the “Text services and input languages”
dialog box where you can add OCR function.
_
OCR function (MS Office XP or above)
Converting handwriting into text using Office XP.
_
Finger NoteTM
If Windows XP is not installed but has Office XP or above, open “Text service” in the “Control
Panel” to add OCR function.
Mouse Pad
scrivo.1 is designed to work on most surfaces except surfaces made out of materials that don’t
reflect lasers such as glass or white paper. Use the pad included for optimum results for writing,
drawing and other mouse function uses.
8
Taking memos directly on the desktop using Finger NoteTM.
9
scrivo1_manual_eng_rz_kb2.qxd 06.12.2004 17:39 Uhr Seite 10
_
Using in Microsoft Paint or as a graphic tool
_
Using in Microsoft OneNote
scrivo.1 can be used in graphic software programs such as Corel Painter, PhotoShop,
PaintShop, Microsoft Paint: www.corel.com / www.adobe.com / www.jasc.com
_
Correction function in Word documents
Using correction function in Microsoft Word. Practical use in document-creating applications
such as Microsoft Excel, Power Point, etc.
_
Input signatures
Microsoft OneNote is a program with wich you can input not only with the keyboard, but also
with a pen.
4. Installing and Configuring Bluetooth
4.1 Windows 2000/XP Environment
Please install/configure in the following order
_ Bluetooth Software (BTW) Installation
_ Connect charger to your computer
_ Bluetooth Configuration
Software Installation
Input signatures in MS Word, PDF files, and other documents.
10
1) Windows Installer will automatically run when you insert the CD into CD/DVD ROM drive. If
Windows Installer does not run automatically, use Windows Explorer to find the Setup.exe file on
the CD to launch the setup program. Click (Next) to continue software installation.
11
scrivo1_manual_eng_rz_kb2.qxd 06.12.2004 17:39 Uhr Seite 12
2) Please read the License Agreement carefully and choose “I accept the terms in the license
agreement”. Then click [Next] to continue setup.
3) Assign a Destination folder for Bluetooth software. We recommend you leave the default.
Click [Next] to continue with the next step.
4) The following window appears when ready to install. Click (Install).
12
5) The following picture shows the installation process.
6) During the process, you might get a message as shown below. This tells you that you currently
do not have the Bluetooth signature program, but you can continue with installation without any
problems.
During the process, you might receive warnings as shown below. However, these will not harm
your computer in any way. You may continue with installation.
13
scrivo1_manual_eng_rz_kb2.qxd 06.12.2004 17:39 Uhr Seite 14
7) Checks whether hardware installation is completed or not. If you want to install hardware later,
simply click [Cancel]. Always, install software first and then hardware.
Connect charger to your computer
Bluetooth software installation is complete. Lastly, you need to connect pen and cradle with configuration.
1) Connect your charger to an available USB port.
2) “Found New Hardware Wizard” window will open once hardware setup is completed and will
search for “CSR USB Bluetooth Device”.
8) Click (Finish) to complete the software installation.
Windows 2000
Windows XP
3) When the new device is detected, the [Add Hardware Wizard] starts automatically. Select
[Automatic Installation (recommended)] and click [Next] to proceed.
(This process may take place automatically depending on your OS or user setting, and you may
not have to do it manually. If so, simply proceed to the next step)
9) Restart your computer after completion.
4) “Setup Wizard” will automatically set the selection list of installation program and copy the
necessary files to the system. Click [Finish], and run “New Device Wizard”. The Bluetooth icon
will be created in the System Tray after the installation has successfully finished.
Depending on your system specification, you may or may not get a ‘restart’ message. If you don´t,
you have to restart your system.
14
15
scrivo1_manual_eng_rz_kb2.qxd 06.12.2004 17:39 Uhr Seite 16
Bluetooth Configuration
4) The following is the list of Bluetooth services. In this case, scrivo.1 does not require any of the
services so you can uncheck everything and click [Next] to continue with the next installation.
After hardware installation is complete, you need to configure the Bluetooth connection. This process is required in Bluetooth technology different from previous version such as IR or RF technology.
1) The following is a basic Bluetooth setup process. If the “Initial Bluetooth Configuration
Wizard” does not appear, double click the “My Bluetooth Places” icon to run the basic Bluetooth
software setup process. Click [Next] to continue the process when the Wizard asks to add the
icon on the system.
5) Click [Skip] to continue when you see the following message.
2) Click [Next] after entering the computer name and type.
6) When configuration is complete, you will see the following message. Simply click [Finish].
3) Click [Next] to start the wizard.
16
17
scrivo1_manual_eng_rz_kb2.qxd 06.12.2004 17:40 Uhr Seite 18
7) When you are done with configuration, double click [My Bluetooth Places] on the desktop. Or
right click the Bluetooth Icon in the taskbar to run [Explore My Bluetooth Places].
You can select [Bluetooth] -> [Search For Devices] from the menu instead of [Find Bluetooth
Devices].
8) Turn on the scrivo.1 switch after you have completed previous steps.
Power switch
Pairing-Button
If you run [My Bluetooth Places] and get the following picture, simply select [Bluetooth] ->
[Search for Devices] from menu the in order to find it.
Status-LED
If you turn on the switch, the Green LED will blink rapidly.
This means that the pen is connected. If the LED light
blinks slowly or is not blinking at all, push the pairing button so that the LED light blinks faster. You can use a ballpoint to push the paring button.
10) After you search for devices, you see the scrivo.1 icon as shown in the following picture.
Double click this logo icon7. If you still don’t see the icon, go back to step 3, try pairing correctly
and search again.
9) When your pen is connected, run [Find Bluetooth Devices] in [My Bluetooth Places].
18
19
scrivo1_manual_eng_rz_kb2.qxd 06.12.2004 17:40 Uhr Seite 20
11) After you double click the icon, a window will pop up and ask for your confirmation. Click (Yes).
4.2 Update Bluetooth setting in Windows XP service pack2
1. Please check the Bluetooth Device is already in the “Device Manager”, as shown on the
following image.To open the “Device Manager”, please follow the following steps: Press the right
mouse button on the Desktop, press “My
Computer“ and then “Properties“. Open the
option “Hardware“. You will see the button to
open the “Device Manager“.
12) After device installation is complete, you will see a green arrow next to the icon. This is the
final step and you will be able to move scrivo.1.
2. If you installed Windows XP service pack2 and the device is installed correctly, the Bluetooth
icon will be displayed as shown in the next image.
3. After installing the Bluetooth device correctly, click the Bluetooth icon and select “Open
Bluetooth Settings”.
You can check your connection status by looking at the Bluetooth icon in the system tray
on the bottom right.
Enable (started)
White
Disabled (stopped)
Red
Connected
Green
Once you complete these steps, you do not need to go through them again unless you switch
your computer. These settings will remain even after you restart your computer.
20
21
scrivo1_manual_eng_rz_kb2.qxd 06.12.2004 17:40 Uhr Seite 22
4. After step number 3, you will see a new window as shown below. Select “COM Ports” and
then click the “Add” button for adding COM
Ports.
6. Select “Options” in the Bluetooth Devices Window and then check the correspondent boxes as
shown below.
7. Select “Devices” in the Bluetooth Devices Window and then click the “Add” button for adding
the device.
5. In the Add COM Port window, select the “Incoming” button and click “OK”, as shown above.
The window with the added COM ports will
appear, as follows. You can check your connection status by looking at the Bluetooth icon in
the system tray on the bottom right.
22
8. When the window “Add Bluetooth Device Wizard“ is displayed, turn on scrivo.1´s power
switch and pair it with scrivo.1´s cradle (receiver). Then, click “Next”.
23
scrivo1_manual_eng_rz_kb2.qxd 06.12.2004 17:40 Uhr Seite 24
9. The system will search for the device. If the system can not find the device, push the pairing
button, and then click “search again“.
4.3 Windows 98SE/ME Environment
Please install/configure in following order
_ Bluetooth Software (BTW) Installation
_ Connect charger to your computer
_ Bluetooth Configuration
Software Installation
1) Windows Installer will automatically run when you insert the CD into your CD/DVD ROM drive.
If Windows Installer does not run automatically, go to Windows Explorer to find the Setup.exe file
on the CD to launch the setup program. Click [Next] button to continue software installation.
10. After completing the search, select the option “Don't use a passkey“. Then click “Next”.
2) Please read the License Agreement carefully and choose “I accept the terms in the license
agreement”. Then click [Next] to continue the setup.
11. Finish adding the Bluetooth device by clicking “Finish”.
3) Assign a Destination folder for Bluetooth software. We recommend you leave the default. Click
[Next] to continue with the next step.
24
25
scrivo1_manual_eng_rz_kb2.qxd 06.12.2004 17:40 Uhr Seite 26
4) When the software is ready to be installed, the following window appears. Click (Install).
8) Click (Finish) to complete software installation.
5) The following picture shows the installation process.
9) Restart your computer after installation is complete.
6) During the installation process, you might be asked to put the Windows 98SE/ME CD into
your CD-ROM drive as shown in the following picture. If you have already put your Bluetooth software CD into the CD-ROM drive, simply take it out and replace it with the Windows 98SE/ME
CD. Your PC will then automatically start to copy files from the CD.
Connect charger to your computer
Bluetooth software installation is complete. In the final step, you need to connect the pen and
charger and configure.
1) Connect your charger to an available USB port.
2) When you connect the device into your USB port, a window should pop up, telling you “New
Hardware detected’. [Add New Hardware Wizard] will run and install the correct driver on your
system. (Although it is plug and play, you might need the CD).
7) This asks if you want to install hardware now or not. If you want to install hardware later, simply click [Cancel]. Always install software first and then hardware.
Warning: If the installed hardware cannot be found, select [Start] > [Control Panel] > [New
Hardware] and detect the new hardware. Then, install the driver manually.
Bluetooth Configuration
Bluetooth configurations in a Windows 98/ME environment are the same as Windows 2000/XP.
Please refer to the Bluetooth connection configurations on page 16 (You might need the
Windows CD in a Windows 98/ME environment).
26
27
scrivo1_manual_eng_rz_kb2.qxd 06.12.2004 17:40 Uhr Seite 28
5. scrivo.1 Driver and Software
5.2 scrivo.1 driver setting
5.1 Installing scrivo.1 driver and utilities
After installation, an icon will be created in the System Tray as shown in the figure below .
Caution: Please exit other programs before connecting scrivo.1 or installing scrivo.1 driver
and utilities.
Setup Bluetooth communication pen and receiver before installing scrivo.1 driver. (Use Bluetooth
Dongle CD). Insert the scrivo.1 driver CD into your CD-ROM drive and install the driver after setting up Bluetooth communication.
1) Select your language.
Installation files will be automatically loaded when the CD included is inserted into the CD-ROM
drive. Select your language to install driver and utilities.
.
2) Choosing setup type.
Select installation details and click [Next] to continue.
_
_
Install scrivo.1 USB driver – USB driver will be installed if selected.
Install Utilities – Finger NoteTM will be installed if selected.
scrivo.1 System Tray logo figure. Open the scrivo.1 Control Center by
clicking scrivo.1 Setting.
Another way to open the scrivo.1 Control Center is to press the hot key (Defalt: F12). Simple
settings can be done here. Choose “Advanced Configuration” for detailed settings.
Speed
_
_
28
24
Mouse Mode – This setting configures acceleration in mouse mode. Acceleration can be
adjusted by moving the slider (Default: Middle)
Pen Mode – This setting configures acceleration in pen mode. Acceleration can be adjusted by
moving the slider (Default: 45)
29
25
scrivo1_manual_eng_rz_kb2.qxd 06.12.2004 17:40 Uhr Seite 30
Double Click
Wheel setting
This setting allows users to adjust the double clicking action using scrivo.1. Move your cursor to
the target diagram and double click. The values in the small dialog box will change. By clicking
“Apply” you can set the value according to the double click action you just made. It will be helpful
to click several times. The corresponding range
values appear. If you want to change it to the
default setting, simply click on “Default’.
(Default: Speed 600ms, Range 32x32 pixels).
If speed is set too fast or too centred in the
circle, users might experience discomfort with
scrivo.1.
This setting allows users to configure the wheel function. The default value is 3 lines when operating the window with the mouse pointer. Users can change the number of lines, reverse scroll,
select window.
Coordination
scrivo.1 info
This setting allows users to choose between right-handed and left-handed use. This is convenient
for left-handed users. Select “coordinates” and then click and drag the red coloured area to draw
out the most comfortable position. This setting applies the best hand position for users. When
you want to apply the default setting, simply click (Set default).
An overview of scrivo.1 driver version information and manufacturer information is shown here.
Hot Key
For user’s convenience, a hot key feature has been added to open the scrivo.1 control center
and to switch between pen/mouse mode. The
“Finger NoteTM” utilitiy can also be used with a
hot key. Users can open the scrivo.1 control
center or switch mode by pressing the key that
has been set for the hotkey on any screen. The
hot key’s key can be customized by users.
(Default: Open scrivo.1 control center -> F12,
Mouse/Pen Mode Change -> F4 Finger NoteTM
->F6).
30
31
scrivo1_manual_eng_rz_kb2.qxd 06.12.2004 17:40 Uhr Seite 32
5.3 Changing mode and usage
Restarting Driver
Changing mode
If scrivo.1 is connected to the PC after the PC has been started, scrivo.1 may not operate correctly. If so, end the scrivo.1 driver in the System Tray and restart the driver. (Refer to the figure below)
_ Changing mode using the hot key
Change mode using the hot key (Standard: F4). It will appear on the screen at the same time
when mode has been changed as shown in the figure below.
_ Changing mode by using System Tray
Click the scrivo.1 icon and choose between Pen or Mouse mode as shown in the figure below.
The check mark (√) indicates current mode.
Right Mouse Button
scrivo.1´s push button, located on the front of scrivo.1, functions the same way as the right
mouse button. The keyboard can be used as the right button function for those who are having
difficulties using the push button. Place the cursor to where you want to click, click the tip once,
and then press the keyboard key which located on the bottom right hand side of your keyboard
for the right button function.
Changing Mouse mode to Pen mode
Changing Pen mode to Mouse mode
_ Changing mode by opening the scrivo.1 Control Center
Open the scrivo.1 Control Center by pressing the Hotkey (Default: F12). Choose between
Pen mode/Mouse mode and click [OK].
32
33
scrivo1_manual_eng_rz_kb2.qxd 06.12.2004 17:40 Uhr Seite 34
6. Using Finger NoteTM
b. Windows Mode button
This button allows you to go back to the Windows mode from captured screen mode. Here, you
can work on your computer in normal setting.
6.1 What is Finger NoteTM? (Only for PC users)
Finger NoteTM is a tool which can be used to capture anything on your computer screen. You can
also write and draw on the captured image, and save it to file.
c. List button
6.2 Finger NoteTM Basic Menu
This button enables you to browse through all
previous captured screens and re-open them.
The followings are Finger NoteTM’s running images
This menu appears when you first run the program.
Arrow buttons can also be used to select an
image from the list.
If you click on the red arrow that is on the very right side.
d. Save button
This button enables you to save captured images under a different file name. (Image file)
e. Board image button
You can have more options and buttons like the image above. Once you click the red arrow button
again, you get to see only basic menu like before.
6.3 Each button’s use
a. Screen capture button
You can load a saved template board image
and work on it.
This button is to capture the whole computer
screen in order to work on the captured
image.
34
35
scrivo1_manual_eng_rz_kb2.qxd 06.12.2004 17:40 Uhr Seite 36
f. Import documents button
m. Eraser button
This button enebles you to erase writing or drawing in case you make mistakes. The left button is
for erasing only the parts you want to erase. The right button is used to clear everything.
n. Line button
This button enables you to draw a straight line. Left click your mouse and hold it down, then drag
it to the point you want to draw a line.
o. Circle button
This button imports other documents
(*ppt,*doc,*xls, etc…) into the slide list.
g. Pen button
Left click your mouse and hold it down, then drag it until you make the circle the size you want.
p. Rectangle button
This button enables you to write or draw lines after you capture a screen. Your cursor changes
into a regular pencil shape.
Left click your mouse and hold it down, the drag it until you make the right size of rectangle.
q. Arrow button
h. Highlight Pen button
Click this button and hold the mouse left button, then drag it to the point where you want to draw
the arrow.
This button has a highlight feature and is different from the pencil button. It can be used to highlight something in a particular spot.
r. Wave line button
i. Pen diameter button
This button is to underline or highlight your notes. Drag it as much as you want to draw wave
line.
This button enables you to decide pencil/highlighter line thickness when you draw.
s. property setting button
j. Pen colour button
This is the colour preference button. You can choose your favourite colour and change your pen
colour accordingly. (In System Properties, you can use all colours supported by Windows).
k. Help button
This Button opens a program guide “Using Finger NoteTM”
You can change the pen default colour, pen
diameter, or 3 basic colours to your favourite
choice. You can also adjust the eraser tool
and colour size. If you click ‘Load Default’,
everything changes to the original setting.
l. Mouse right click menu button
This button works like the right mouse click button such as opening Webster board menu. Once
you click this and click mouse, it works like clicking the right button of your mouse for 5 secs.
After 5 secs, it goes back to normal setting.
36
37
scrivo1_manual_eng_rz_kb2.qxd 06.12.2004 17:40 Uhr Seite 38
7. Troubleshooting
8. Contact & Support
Although scrivo.1 is designed to be highly reliable, you may occasionally experience a problem.
The following will help you to identify the cause of possible problems and suggest solutions for
related problems
The plawa technical support team is eager to help you enjoy your new plawa product. If you are
experiencing difficulties, please contact us at the following address:
Symptom
Cause
Solution
PC does not recognize
scrivo.1.
Is your pen cradle’s USB cable
connected to the USB port?
Connect scrivo.1 cradle’s USB
cable to the USB port.
Is there a problem with your
USB port?
Try a different USB port.
Does the Bluetooth icon in the
system tray not turn from red
to white?
Reinstall Bluetooth software
(refer to page 11).
Is the Bluetooth icon in the
system tray green?
If not, setup communication
process between scrivo.1
and the receiver again (Refer
to page 16).
Press pen tip (first button).
Does it function like a right
button?
If not, setup scrivo.1 pen
again (refer to page 24).
Do you see a dark red light in
front of the pen?
If not, setup scrivo.1 again.
Cursor moves, but the clicking
function is not working.
Is pen tip damaged?
Replace the pen tip
(Refer to page 9).
Cursor is too sensitive.
Have you installed scrivo.1
driver?
Install the driver again (Refer
to page 24).
Cursor does not move the way
I want it.
Are you using the pad provided
with scrivo.1 package?
(It may malfunction if used in a
different environment.)
Use scrivo.1 on the pad provided with the scrivo.1 package
for the best results.
Cursor does not move.
38
plawa-feinwerktechnik GmbH & Co. KG
Bleichereistr. 18
73066 Uhingen, Germany
Telephone:
Fax:
Website:
Online-service:
+49(0)7161-93872-20
+49(0)7161-93872-60
http://www.plawa.com
[email protected]
Do you have any comments or suggestions? If so, we would love to hear from you! Please visit
our website and fill out the contact form or you can send us a mail to the address above. Your
comments and suggestions help make our products better and enhanced to fit your needs.
Thank you for purchasing this plawa-product.
39