1
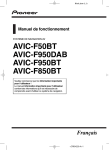
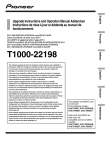
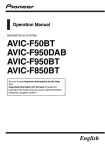
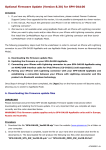
Switching screens using the touch panel keys
Phone screen
Destination screen
Quick Start Guide
NAVIGATION AV SYSTEM
AV operation screen
Destination menu
1 2
3
4
5
AVIC-F50BT
2 Touch Address.
3 Select the country.
4 Input the destination infor-
Top Menu
Basic hardware buttons
Editing route screen
Shortcut menu
mation.
6
2 3 4
1VOL (+/–) button
Press to adjust the AV source
volume.
2MODE button
Press to display the AV operation screen or AppRadio
Mode screen.
3HOME button
Press to display the “Top
Menu” screen.
© 2013 PIONEER CORPORATION.
All rights reserved. <KMZZ13D>
5
AppRadio Mode screen
(Application menu screen)
6
4MAP button
Press to display the map
screen.
5TRK button
6h button
Press to display the
“Monitor Setup” screen.
<CRD4733-A> EU
English
FIX_NX132_EU_QSG_CRD4733A_EF.ind1-8
Basic items on the map
1-8
Information screen
Edit/Settings screen
Switching screens using the hardware buttons
Top Menu
Map screen
7
1 Returns to the previous
screen
2 Searches for a location by
address
3 Searches for a facility by
name
4 Searches for a location from
the history or your registered
locations
Scrolling the map
1 Touch and hold a point on
the map in the direction
that you want to scroll.
The map moves in the touched
direction.
AppRadio Mode screen
(Application menu screen)
AV operation screen
8
5 Touch Go here.
You can control applications for iPhone and smartphone directly on
the navigation screen (AppRadio Mode). To use the AppRadio
Mode, install the AppRadio app on the iPhone or smartphone
beforehand to enable launching of the application on the navigation
system. For details about the AppRadio app, visit the following site:
http://www.pioneer.eu/AppRadioMode
7
1 Touch the keys in the following order on the “Top
Menu” screen.
1 Current time
2 Distance to the destination
(or distance to waypoint)
3 Estimated time of arrival
4 Next street name
(or next guidance point)
5 Next direction of travel
6 Current route
7Current position
l Source Settings l
iPod Settings
8
9 Current street name (or AV
information)
Switches between the current street name and current
AV information.
a Map control
Sets the view mode and the
map orientation.
2 Touch iPod Connection
Settings to “30-pin
Connector”.
3 Display the AV operation
screen.
4 Connect your iPod.
The source changes and
then playback will start.
5 Use the touch panel keys
on the screen to control
your iPod.
You can operate some navigation functions by
using a swipe action. To use the swipe action,
touch and hold the next direction of travel on
the map screen to display the operation guide.
Then, slide your finger toward the function
that you want to use on the operation guide.
7 Select whether to transfer
2 Touch the keys in the fol-
8 Select whether to use the
function on your device.
lowing order on the “Top
Menu” screen.
l System Settings l
Bluetooth Settings
Video
Music
1
2
3 4
1
2
3 4 8
3 Touch Registration.
bMap scale
Changes the map scale.
The system searches for and
lists nearby devices.
4 Touch your device name in
the list.
Swipe action on the map
When the route calculation is
completed, the Route confirmation screen appears.
1 Activate the Bluetooth
Using the touch panel keys (iPod)
8 Phone menu key
Displays the “Phone” screen.
2 To slightly adjust the posi-
tion, touch Adju. first, then
touch the desired direction
arrow (eight directions).
You can use various additional functions (hands-free phoning,
Bluetooth audio and AppRadio Mode) by connecting your Bluetooth
devices to this navigation system. To use the functions, pair the
devices with the navigation system in advance.
a
5
The navigation system provides route guidance both
visually and by voice.
If you want to cancel the
route guidance, touch
on
the “Top Menu” screen.
Using AppRadio Mode
6
4
9
Touch one of the options.
After narrowing down your
destination, the Location
confirmation screen will
appear.
Pairing your Bluetooth® devices
b
2 3
9
5 Calculates the route to your
home
6 Searches for a nearby facility
7 Searches for a facility near
the destination
8 Searches for a facility in a
specified city
9 Searches for a location by
coordinates
Playing your iPod
You can operate your iPod by connecting it to the navigation system
using the USB interface cable for iPod (sold separately).
However, iPod source is not available when an iPod with Lightning
connector is connected to this navigation system. To play music
and/or video files on your iPod, install CarMediaPlayer on your iPod,
and then launch it while in AppRadio Mode.
1
screen.
This guide is intended to guide you through the basic functions of this
navigation system. For details, please refer to the Operation Manual.
1
Searching for your destination
by address
1 Display the “Destination” 6 Touch OK.
7
Operation guide
65
1 Switches a source
2 Switches between the music
list screen and video list
screen
3 Displays the list screen
4 Recalls the equaliser curve
5 Sets the repeat playback
range
7
6 95
6 Sets shuffle playback
7 Switches between playback
and pause
8 Shows only the current
image
9 Changes the screen size of
the video
5 Enter the PIN code from
your device if required.
(The default code is 1111.)
6 Touch OK.
your contacts if required.
Bluetooth audio device if
required.
9 Select whether your device
is an Android™ device or
not.
If your device is an Android
device, (1) touch Yes,
(2) select whether to set your
device for the AppRadio Mode.
If your device is other than an
Android device, (1) touch No,
(2) select whether your device
is an iPod with Lightning connector or not, (3) if your device
is an iPod with Lightning connector, select whether to set
the device for AppRadio Mode.
10Touch OK.
When the pairing is complete, you can use the functions.
Starting procedure
Using an application
1 Touch the keys in the fol-
1 Touch Apps on the “Top
lowing order on the “Top
Menu” screen.
l App settings l App
connection settings
2 Select the type of OS in your
device.
3 Connect your device to
this product via the separately sold cable.
If your device is an iPhone
with Lightning connector or
an Android device, proceed
to step 4.
4 Connect your iPhone with
Lightning connector or
Android device to this
product via the Bluetooth
wireless technology.
Menu” screen.
The AppRadio app is
launched, and the AppRadio
Mode screen (Application
menu screen) appears.
2 Touch an application icon.
The application is launched,
and the AppRadio Mode
screen (Application operation
screen) appears.
3 Operate the application.
If the HOME button is
pressed while you are operating the application via the
navigation system, you will
return to the AppRadio Mode
screen (Application menu
screen).
2013/04/10
9:33:05
Changement d’écrans au moyen des touches de l’écran tactile
Écran Navigation
Manuel de démarrage rapide
SYSTÈME DE NAVIGATION AV
Écran Téléphone
Écran de fonction AV
Menu Navigation
1 2
3
4
5
AVIC-F50BT
Boutons physiques de base
2 Touchez Adresse.
3 Sélectionnez le pays.
4 Tapez les informations sur
Menu supérieur
Écran Modification
de l’itinéraire
Menu des raccourcis
la destination.
6
2 3 4
1Bouton VOL (+/–)
Appuyez sur ce bouton pour
ajuster le volume de la
source AV.
2Bouton MODE
Appuyez sur ce bouton pour
afficher l’écran de fonction AV
ou l’écran AppRadio Mode.
3Bouton HOME
Appuyez sur ce bouton pour
afficher l’écran “Menu
supérieur”.
5
Écran AppRadio Mode
Écran Informations
(Écran de menu de l’application)
6
4Bouton MAP
Appuyez sur ce bouton pour
afficher l’écran de la carte.
5Bouton TRK
6Bouton h
Appuyez sur ce bouton pour
afficher l’écran
“Configuration moniteur”.
© ��������������������������
2013 PIONEER CORPORATION.
Tous droits de reproduction et de traduction réservés.
Français
FIX_NX132_EU_QSG_CRD4733A_EF.ind9-16
Éléments de base sur la carte
1
2 3
9-16
Écran Modifier/Paramètres
Changement d’écrans au moyen des boutons physiques
Menu supérieur
Écran de la carte
7
1 Revient à l’affichage
précédent
2 Recherche un emplacement
à partir d’une adresse
3 Recherche un point de
repère à partir d’un nom
4 Recherche un emplacement
dans l’historique ou les
emplacements enregistrés
5 Calcule l’itinéraire jusqu’à
votre domicile
8
5 Touchez Aller !.
Défilement de la carte
1 Touchez de manière
2 Pour ajuster légèrement la
prolongée un point sur la
carte dans le sens dans
lequel vous souhaitez
défiler.
La carte se déplace dans le
sens touché.
Écran AppRadio Mode
(Écran de menu de l’application)
Écran de fonction AV
position, touchez d’abord
Régl., puis touchez la
flèche du sens désiré (huit
directions).
b
6
a
7
1 Touchez les touches dans
l’ordre suivant sur l’écran
“Menu supérieur”.
9
Touchez l’une des options.
Après avoir restreint votre
destination, l’écran de
confirmation du lieu
apparaîtra.
Vous pouvez commander votre iPod en le connectant au système
de navigation au moyen du câble d’interface USB pour iPod (vendu
séparément). Cependant, la source iPod n’est pas disponible
lorsqu’un iPod avec connecteur Lightning est connecté à ce
système de navigation. Pour lire des fichiers audio et/ou vidéo sur
votre iPod, installez CarMediaPlayer sur votre iPod, puis lancez-le
dans AppRadio Mode.
5
9
6 Recherche un point de
repère à proximité
7 Recherche un point de
repère près de la destination
8 Recherche un point de
repère dans une ville
spécifique
9 Recherche un emplacement
à partir des coordonnées
Lecture de l’iPod
4
“Navigation”.
Ce guide est destiné à vous guider à travers les fonctions de base de ce
système de navigation. Pour en savoir plus, veuillez consulter le Manuel de
fonctionnement.
1
Recherche de votre destination par son
adresse
1 Affichez l’écran
6 Touchez OK.
Le système de navigation
fournit le guidage d’itinéraire
à la fois visuellement et
vocalement.
Pour annuler le guidage
d’itinéraire, touchez
sur
l’écran “Menu supérieur”.
1 Heure locale
2 Distance jusqu’à la
destination
(ou distance jusqu’au point
de passage)
3 Heure estimée d’arrivée
4 Prochain nom de rue
(ou prochain point de
guidage)
5 Prochain sens de
déplacement
6 Itinéraire actuel
7Position actuelle
8
8 Touche du menu Téléphone
Affiche l’écran “Téléphone”.
9 Nom de rue actuel (ou
informations AV)
Bascule entre le nom de rue
actuel et les informations AV
actuelles.
a Contrôle de la carte
Règle le mode de
visualisation et l’orientation
de la carte.
bÉchelle de la carte
Change l’échelle de la carte.
Action de glissement sur la carte
Une fois le calcul d’itinéraire
terminé, l’écran de
confirmation de l’itinéraire
apparaît.
Vous pouvez commander certaines fonctions de
navigation grâce à l’action de glissement. Pour
utiliser l’action de glissement, touchez de manière
prolongée le prochain sens de déplacement sur
l’écran de la carte pour afficher le guide de
fonctionnement. Ensuite, faites glisser votre doigt
vers la fonction que vous souhaitez utiliser sur le
guide de fonctionnement.
Guide de
fonctionnement
l Param. source l
Param. iPod
2 Touchez Param. connexion
iPod pour sélectionner
“Connecteur 30 broches”.
3 Affichez l’écran de fonction AV.
4 Connectez votre iPod.
La source change et la
lecture démarre.
5 Utilisez les touches de
l’écran tactile pour commander votre iPod.
Appariement de vos périphériques
Bluetooth®
Vous pouvez utiliser un éventail de fonctions supplémentaires
(Téléphone main libre, audio Bluetooth et AppRadio Mode) en
connectant vos périphériques Bluetooth à ce système de
navigation. Pour utiliser les fonctions, appariez au préalable les
périphériques avec le système de navigation.
1 Activez la fonction
7 Sélectionnez de transférer
2 Touchez les touches dans
8 Sélectionnez d’utiliser ou
Bluetooth sur votre
appareil.
l’ordre suivant sur l’écran
“Menu supérieur”.
l Param. système
l Paramètres Bluetooth
Utilisation des touches de l’écran tactile (iPod)
Musique
Vidéo
1
2
3 4
1
2
3 4 8
3 Touchez Enregistrement.
Le système recherche et
répertorie les appareils à
proximité.
7
65
1 Change de source
2 Bascule entre l’écran de
liste audio et l’écran de liste
vidéo
3 Affiche l’écran de liste
4 Rappelle la courbe
d’égalisation
5 Règle la plage de lecture répétée
7
6 95
6 Règle la lecture aléatoire
7 Bascule entre la lecture et la
pause
8 N’affiche que l’image
actuelle
9 Change de taille d’écran de
la vidéo
4 Touchez le nom de votre
appareil dans la liste.
5 Saisissez le code PIN de
votre appareil si demandé.
(Le code par défaut est
1111.)
6 Touchez OK.
ou non vos contacts si
demandé.
non le périphérique audio
Bluetooth si demandé.
9 Sélectionnez si votre
appareil est un appareil
Android™ ou non.
Si votre appareil est un
appareil Android, (1) touchez
Oui, (2) sélectionnez si vous
souhaitez régler votre
appareil en AppRadio Mode.
Si votre appareil n’est pas un
appareil Android, (1) touchez
Non, (2) sélectionnez si votre
appareil est un iPod avec
connecteur Lightning ou
non, (3) si votre appareil est
un iPod avec connecteur
Lightning, sélectionnez si
vous souhaitez le régler en
AppRadio Mode.
10Touchez OK.
Utilisation de AppRadio Mode
Vous pouvez contrôler les applications pour iPhone et smartphone
directement sur l’écran de navigation (AppRadio Mode). Pour
utiliser le AppRadio Mode, installez au préalable l’application
AppRadio sur l’iPhone ou le smartphone pour permettre le
lancement de l’application sur le système de navigation. Pour en
savoir plus sur l’application AppRadio, visitez le site suivant :
http://www.pioneer.eu/AppRadioMode
Procédure de départ
Utilisation d’une application
1 Touchez les touches dans
1 Touchez Apps sur l’écran
l’ordre suivant sur l’écran
“Menu supérieur”.
l Param. app l Param.
connexion app
2 Sélectionnez le type de
système d’exploitation sur
votre appareil.
3 Connectez votre appareil à
ce produit via le câble
vendu séparément.
Si votre appareil est un
iPhone avec connecteur
Lightning ou un appareil
Android, passez à l’étape 4.
4 Connectez votre iPhone
avec connecteur Lightning
ou votre appareil Android
à ce produit via la
technologie sans fil
Bluetooth.
“Menu supérieur”.
L’application AppRadio est
lancée et l’écran AppRadio
Mode (Écran de menu de
l’application) apparaît.
2 Touchez une icône
d’application.
L’application est lancée et
l’écran AppRadio Mode
(Écran de commande de
l’application) apparaît.
3 Commandez l’application.
Si le bouton HOME est
enfoncé alors que vous
commandez l’application via
le système de navigation,
vous serez ramené sur
l’écran AppRadio Mode
(Écran de menu de
l’application).
Une fois l’appariement
terminé, vous pouvez utiliser
les fonctions.
2013/04/10
9:33:29