1
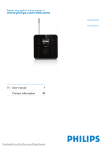
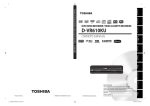
Project8
15-02-08
10:33
Page i
Philips Streamium
Wireless Music Station
WAS6050
Quick start guide
1 Prepare
2 Connect
3 Enjoy
Project8
15-02-08
10:33
Page ii
EN
What’s in the box
Wireless Music Station WAS6050
Philips Streamium
Wireless Music Station
WAS6050
WAS6050
Quick start guide
Congratulations on your purchase
and welcome to Philips!
To fully benefit from the support that
Philips offers, register your product at
www.philips.com/welcome
1 Prepare
2 Connect
For support call 0906 1010 017
Wireless Music Center
3 Enjoy
1-way remote control
2 x AAA batteries
Quick start guide
PC Suite CD
Angled support / wall
mount with screws
User manual
1 x AC power cable
Before using the remote control:
Insert batteries as shown.
ii
Project8
15-02-08
10:33
Page iii
How to use this guide
I want to ...
See page(s):
Connect:
... connect the Station to a home network / PC
... add a Station to the network of the Center
(sold separately)
3A/
B
4C
Play:
... stream music from a PC
... play music from a portable audio device (AUX)
... play HD (Harddisk) music from the Center
(sold separately)
... let the music follow me to another location
... listen to FM radio
... listen to Internet radio*
3A/
5A
5B
B
6C
6D
6E
+7F
Find out more:
... FAQ - Frequently Asked Questions
... check what is compatible with the product
* Internet radio requires broadband Internet access.
8
8
Project8
15-02-08
10:33
Page 1
1 Prepare
A Controls on the Station
The top panel features sensor buttons that are sensitive to touch and moisture.
Top panel
1 MUSIC FOLLOW ME
15
2 Display
3 DBB Dynamic Bass Boost
4 + VOL 5 1 / 2 / 3 / 4 Navigation control
6 9 (Stop)
7 OK / 2; (Confirm, Play/Pause)
14
1
8 )) (Forward skip)
2
13
3
9 (( (Back skip)
12
10 MENU
4
11
11 HOME
10
65
9
12 y
87
13 INCREDIBLE SURROUND (Incredible Surround
Sound)
14 SMART EQ (Smart Equalizer)
15 Wi-Fi antenna
Side panel
1 Ethernet jack
2 AUX jack
12
Rear panel
1
2
3
1
2
3
4
Power supply socket
FM antenna
Holes for support attachment screws
Subwoofer
4
Tip
You can attach the angled support (supplied) for easy access to
the top panel:
For information on how to attach the angled support for wall
mounting, refer to the user manual.
1
Project8
15-02-08
10:33
Page 2
31
30
29
28
27
1
2
3
4
5
6
7
8
26
9
25
11
24
23
22
21
12
10
13
14
15
16
17
18
19
20
EN
B Controls on the remote controls
1
2
3
4
5
6
7
8
9
10
11
12
13
14
15
16
17
18
19
20
21
22
23
24
25
26
27
28
29
30
31
y (On / Standby / Eco Standby)
FM TUNER
HOME
SEARCH
VIEW
MENU
1/2/3/4
OK, 2/;
)K
9
+ VOL MUTE
SHUFFLE (3 def)
REPEAT (2 abc)
INCR.SURR. (6 mno)
DBB (5 jkl)
RDS/NEWS (9 wxyz)
SAME GENRE (8 tuv)
MUSIC FOLLOWS ME
(0 )
MUSIC BROADCAST
SAME ARTIST (7 pqrs)
SMART EQ (4 ghi)
SLEEP (1 .,?!'@-_:;/)
SCROLL 3, 4
CLEAR / J(
REC 0
MARK/UNMARK (0 )
AUX
CD/MP3-CD
HD
2
Project8
15-02-08
10:33
Page 3
2 Connect
A Connect the Station to the power supply
B Connect the Station to a home network / PC
This section describes the simplest way to set up a wireless connection between the Station and
your home network / PC.
When you connect the Station to a network
• You can use the Internet Radio feature
• You can connect to the Internet for firmware updates
• You can transfer music from a PC hard disk to the Station
Connection example:
www
Router
Wireless /
Wired
This is the most commonly used home network setup.Your home network may be
protected, hold ready your network password or the encryption key.
1 Ensure the Station is turned on.
2 Press MENU.
3 Select Settings > Network >
• Wireless (if your router has 802.11b/g wireless feature)
• Wired (if you use an Ethernet cable to connect the PC or network device to your home
network)
> Station shows list of networks in range.
4 Press 3 or 4, then 2 to select your home network.
5 Press alphanumeric buttons to enter encryption key (if you are asked to do so), then 2.
6 Select
• Automatic, if your router is capable of serving IP addresses and network settings (DHCP
enabled).
• Static, if you have to enter IP addresses to introduce new devices in your home network.
> The display shows: Apply Settings?
7 Select Yes.
8 Press 2 to complete the configuration process.
3
Project8
15-02-08
10:33
Page 4
EN
C Add the Station to the network of a Center (sold separately):
On the Center:
1 Ensure the Center is in HD mode.
2 Press MENU to enter the menu display.
3 Press 3 or 4, then 2 to select Station management (Mgnt).
4 Press 3 or 4, then 2 to select Add new Station.
> The Center searches for the new Station.
On the Station:
1 Connect the Station to the power supply:
2 Turn on the Station.
If you turn on the Station for the first time, press 3 or 4, then 2 to select the language.
If you already used the Station with a Center, press MENU, followed by 3 or 4, then 2 to
select Installation Mode.
> The display shows: Center found. Setting up. Please wait...
The display shows: Connecting to Center...
On the Center:
1 When the Station is found, press STOP 9, to stop the search for the new Station.
Tip For better Wi-Fi reception, rotate the Wi-Fi antenna or adjust the location of the Center
and the Station.
4
Project8
15-02-08
10:33
Page 5
3 Enjoy
A Stream music from a PC
You can stream music to the Station directly from a PC, without transferring files.
For Windows XP / Vista:
1 Ensure that your administrator rights are enabled on the PC.
2 Insert the PC suite CD into the PC.
3 Click Install Windows Media Player 11 to start the installation of Windows Media Player.
On the PC:
1 Click Start > Programs > Windows Media Player.
2 In the Windows Media Player interface, click on the Library pull-down menu and select More
Options....
3 In the Library interface, select Configure Sharing.
4 In the Media Sharing pop-up window, check Share my media, then click OK.
> When the WAS6050 is connected to you home network, the window shows a
.
5 Click the WAS6050 icon.
6 Click Allow, then OK.
On the Station:
1 Press HOME.
2 Press 3 or 4, then 2 to enter UPnP mode.
> The display shows: Searching for UPnP servers, then the list of media servers.
3 Press 3 or 4, then 2 to select your PC.
4 Press 2.
Tip To download Microsoft Windows Media Player 11, use the following URL:
http://www.microsoft.com/windows/windowsmedia/download.
B Play music from a portable audio device (AUX)
1 Connect an audio cable (not supplied) from the AUX jack to the portable audio device:
2 Start play on the portable audio device.
> You hear the audio from the device through the Music Station.
5
Project8
15-02-08
10:33
Page 6
EN
C Play HD (Harddisk) music from a Center
1 Ensure that the device is turned on.
2 Press HOME.
3 Press HD on the remote control.
4 Press 3 4 1 2 to select your playback options.
(Demo tracks are stored under All tracks.)
5 Press OK / 2; to start play.
6 Press STOP 9 to stop play.
Change your playback option:
1 During play, press 1 once or more to enter previous option lists.
2 Press 3 4 1 2 to select, then OK / 2;.
D Let the music follow me to another location
As you move around at home you can let the music move with you between the Center and
Station or between Stations.
On the source unit (Center or Station) where music is playing:
1 During play, press MUSIC FOLLOWS ME to activate the function.
> The display shows the icon
.
On the destination unit where you want continue to listen to the music:
2 Ensure that the device is turned on.
3 Press MUSIC FOLLOWS ME.
E Listen to FM radio
1 Ensure that the device is switched on.
2 Press HOME.
3 Press FM TUNER on the remote control.
4 Press MENU.
5 Press 3 or 4, then 2 to select Autostore radio.
> When all available stations are stored, the first auto stored preset station plays.
Tip You can store up to 60 preset radio stations in the memory (including a maximum of 10
RDS stations).
When the radio plays, to directly switch from one preset station to another:
1 Press J( or )K.
When the radio plays, to select a station from the list of preset stations:
1 Press 2.
2 Press 3 or 4, then 2 to select.
6
Project8
15-02-08
10:33
Page 7
F Internet radio*
You have to register your product with a valid email address when using the Internet feature for
the first time:
1 Ensure that the Music Station is turned on.
2 Ensure that the Music Station is connected to the Internet.
3 Ensure you have a valid email address.
4 Ensure that you use the remote control of the Music Station for the registration process.
5 On the Music Station, press HOME.
6 Select Radio > Internet radio.
> The Internet radio registration display is shown.
7 Press ALPHANUMERIC BUTTONS on the 1-way remote control to enter the valid email
address.
8 Press 2.
> The display confirms the automated email dispatch to your mailbox.
9 On the PC, check the email inbox for a message from [email protected] with
the subject Your Streamium Registration....
10Follow the instructions in the email to complete your registration process on the Philips
website.
> The display of the Music Station returns to the Radio menu.
The email address is stored in the memory.
To return to the Home menu, press HOME.
Listen to Internet radio*
1 Ensure that the Music Station is turned on.
2 Ensure that the Music Station is connected to the Internet.
3 Press HOME.
4 Select Radio > Internet radio > User > Services.
> The service list is displayed.
5 Press 3/4 to select from the list. Examples: RadioIO, Live365
6 Press 2.
7 Press 3/4 to select the station, then press 2.
To return to the Home menu, press HOME.
* Internet radio requires broadband Internet access.
7
Project8
15-02-08
10:33
Page 8
EN
FAQ - Frequently Asked Questions
Sound
I cannot hear any sound or • Press + VOL - to increase the volume.
the sound is poor, what do • Press the MUTE button again to reactivate the sound output.
I do?
Radio
The radio reception is
poor, what do I do?
• Adjust the antenna for better reception.
• Increase the distance between the Music Station and TV or VCR devices.
Wi-Fi
Is there a maximum
distance of transmission
between a Center and the
Music Station for effective
streaming?
During the first time setup, the display on the
Music Station shows
SEARCHING FOR
CENTER, what do I do?
How do I avoid Wi-Fi
interferences from other
devices that operate in the
same (2.4GHz) frequency
spectrum, such as Dect
phones or Bluetooth
devices?
The wireless firmware
update failed, what do I
do?
Yes.The maximum distance of Wi-Fi transmission is 250m measured in open
spaces. However, in a home environment, where solid obstacles such as
walls and doors are present, the effective transmission distance is reduced
to 50-100m. Reposition the devices if you experience transmission
problems.
Follow the instructions for the set-up with a Center.
• Move the Music Station (and the Center, if applicable) at least 3m away
from such devices.
• Use a WEP/WPA encryption key when you create the wireless
connection your PC / home network (see Create wireless connection
in the user manual).
• Change the operating channel on the interfering devices.
• Turn the devices in different directions to minimize interference.
1 Ensure that the PC is connected to the Internet.
2 Use an Ethernet cable (sold separately) to connect the Music Station to
the PC.
3 On the PC, launch the WADM on the PC to update the firmware (see
Update in the user manual).
WADM (Wireless Audio Device Manager)
I have problems installing
WADM or launching
WADM after installation,
what do I do?
• Ensure that the operating system of the PC meets the requirements (see
PC connection requirements in user manual).
• Ensure that the Microsoft Windows Media Player is installed on the PC
(see Install Windows Media Player 11 in user manual).
• Ensure that the PC is virus-free.
I cannot use all the WADM Temporarily disable the antivirus software on the PC, as it may affect the
functions, what do I do?
WADM functions.
Compatibility
Philips Streamium Wireless The Philips Wireless Music Centers (WAC700/7000/7500,WAC3500D) are
Music Products
compatible with any Philips Wireless Music Stations (WAS700/7000/7500)
8
Project8
15-02-08
10:33
Page 9
Need help?
User Manual
See the User manual that came with your player.
Online
Go to www.philips.com/welcome
Disposal of your old product
Your product is designed and manufactured with high quality materials and components, which can be recycled and reused.
When this crossed-out wheeled bin symbol is attached to a product it means the product is covered by the European Directive 2002/96/EC
Please inform yourself about the local separate collection system for electrical and electronic products.
Please act according to your local rules and do not dispose of your old products with your normal household waste.
The correct disposal of your old product will help prevent potential negative consequences for the environment and human health.
Batteries contain chemical substances that may pollute the environment, so they should be disposed of at an official collection point.
9
15-02-08
10:33
Page 10
Important
Safety
Know these safety symbols
7KLV¶EROWRIOLJKWQLQJ·LQGLFDWHVXQLQVXODWHG
PDWHULDOZLWKLQ\RXUXQLWPD\FDXVHDQHOHFWULFDO
VKRFN)RUWKHVDIHW\RIHYHU\RQHLQ\RXU
KRXVHKROGSOHDVHGRQRWUHPRYHSURGXFW
FRYHULQJ
7KH¶H[FODPDWLRQSRLQW·FDOOVDWWHQWLRQWR
IHDWXUHVIRUZKLFK\RXVKRXOGUHDGWKHHQFORVHG
OLWHUDWXUHFORVHO\WRSUHYHQWRSHUDWLQJDQG
PDLQWHQDQFHSUREOHPV
:$51,1*7RUHGXFHWKHULVNRIÀUHRUHOHFWULF
VKRFNWKLVDSSDUDWXVVKRXOGQRWEHH[SRVHGWR
UDLQRUPRLVWXUHDQGREMHFWVÀOOHGZLWKOLTXLGV
VXFKDVYDVHVVKRXOGQRWEHSODFHGRQWKLV
DSSDUDWXV
&$87,217RSUHYHQWHOHFWULFVKRFNPDWFK
ZLGHEODGHRISOXJWRZLGHVORWIXOO\LQVHUW
a Read these instructions.
b Keep these instructions.
c Heed all warnings.
EN
Project8
g Do not block any ventilation openings.
Install in accordance with the
manufacturer’s instructions.
h Do not install near any heat sources such
as radiators, heat registers, stoves, or
RWKHUDSSDUDWXVLQFOXGLQJDPSOLÀHUVWKDW
produce heat.
i For countries with a polarized mains,
do not defeat the safety purpose of
the polarized or grounding-type plug.
A polarized plug has two blades with
one wider than the other.A grounding
type plug has two blades and a third
grounding prong.The wide blade or the
third prong are provided for your safety.
,IWKHSURYLGHGSOXJGRHVQRWÀWLQWR
your outlet, consult an electrician for
replacement of the obsolete outlet.
Caution:To prevent electric shock, match
the wide blade of the plug to the wide
slot, fully insert.
j Protect the power cord from being
walked on or pinched, particularly at
plugs, convenience receptacles, and the
point where they exit from the apparatus.
k Only use attachments/accessories
VSHFLÀHGE\WKHPDQXIDFWXUHU
l Use only with the cart, stand, tripod,
EUDFNHWRUWDEOHVSHFLÀHGE\WKH
manufacturer or sold with the apparatus.
When a cart is used, use caution when
moving the cart/apparatus combination to
avoid injury from tip-over.
d Follow all instructions.
e Do not use this apparatus near water.
f Clean only with dry cloth.
10
Project8
15-02-08
10:33
Page 11
m Unplug this apparatus during lightning
storms or when unused for long periods
of time.
n 5HIHUDOOVHUYLFLQJWRTXDOLÀHGVHUYLFH
personnel. Servicing is required when
the apparatus has been damaged in any
way, such as power-supply cord or plug
is damaged, liquid has been spilled or
objects have fallen into the apparatus, the
apparatus has been exposed to rain or
moisture, does not operate normally, or
has been dropped.
o Battery usage CAUTION – To prevent
battery leakage which may result in bodily
injury, property damage, or damage to the
unit:
• ,QVWDOODOOEDWWHULHVFRUUHFWO\DQGDV
PDUNHGRQWKHXQLW
• 'RQRWPL[EDWWHULHVROGDQGQHZRU
FDUERQDQGDONDOLQHHWF
• 5HPRYHEDWWHULHVZKHQWKHXQLWLVQRW
XVHGIRUDORQJWLPH
p Apparatus shall not be exposed to
dripping or splashing.
q Do not place any sources of danger on
WKHDSSDUDWXVHJOLTXLGÀOOHGREMHFWV
OLJKWHGFDQGOHV
r This product may contain lead and
mercury. Disposal of these materials
may be regulated due to environmental
considerations. For disposal or recycling
information, please contact your local
authorities or the Electronic Industries
Alliance: www.eiae.org.
Warning
• 1HYHUUHPRYHWKHFDVLQJRIWKLV0XVLF6WDWLRQ
• 1HYHUOXEULFDWHDQ\SDUWRIWKLV0XVLF6WDWLRQ
• 3ODFHWKLV0XVLF6WDWLRQRQDÁDWKDUGDQGVWDEOH
VXUIDFH
• 1HYHUSODFHWKLV0XVLF6WDWLRQRQRWKHUHOHFWULFDO
HTXLSPHQW
• 2QO\XVHWKLV0XVLF6WDWLRQLQGRRUV.HHSWKLV0XVLF
•
6WDWLRQDZD\IURPZDWHUPRLVWXUHDQGOLTXLGÀOOHG
REMHFWV
.HHSWKLV0XVLF6WDWLRQDZD\IURPGLUHFWVXQOLJKWQDNHG
ÁDPHVRUKHDW
How to connect a plug
7KHZLUHVLQWKHPDLQVOHDGDUHFRORXUHGZLWK
WKHIROORZLQJFRGHEOXH QHXWUDO1EURZQ
OLYH/
$VWKHVHFRORXUVPD\QRWFRUUHVSRQGZLWKWKH
FRORXUPDUNLQJVLGHQWLI\LQJWKHWHUPLQDOVLQ\RXU
SOXJSURFHHGDVIROORZV
• &RQQHFWWKHEOXHZLUHWRWKHWHUPLQDO
PDUNHG1RUFRORXUHGEODFN
• &RQQHFWWKHEURZQZLUHWRWKHWHUPLQDO
PDUNHG/RUFRORXUHGUHG
• 'RQRWFRQQHFWHLWKHUZLUHWRWKHHDUWK
WHUPLQDOLQWKHSOXJPDUNHG(RUHRU
FRORXUHGJUHHQRUJUHHQDQG\HOORZ
%HIRUHUHSODFLQJWKHSOXJFRYHUPDNH
FHUWDLQWKDWWKHFRUGJULSLVFODPSHGRYHU
WKHVKHDWKRIWKHOHDGQRWVLPSO\RYHU
WKHWZRZLUHV
Mains plug
7KLVDSSDUDWXVLVÀWWHGZLWKDQDSSURYHG
$PSSOXJ7RFKDQJHDIXVHLQWKLVW\SHRISOXJ
proceed as follows:
a Remove fuse cover and fuse.
b Fix new fuse which should be a BS13625
Amp,A.S.T.A. or BSI approved type.
c 5HÀWWKHIXVHFRYHU
,IWKHÀWWHGSOXJLVQRWVXLWDEOHIRU\RXUVRFNHW
RXWOHWVLWVKRXOGEHFXWRIIDQGDQDSSURSULDWH
SOXJÀWWHGLQLWVSODFH
,IWKHPDLQVSOXJFRQWDLQVDIXVHWKLVVKRXOG
KDYHDYDOXHRI$PS,IDSOXJZLWKRXWDIXVH
LVXVHGWKHIXVHDWWKHGLVWULEXWLRQERDUGVKRXOG
QRWEHJUHDWHUWKDQ$PS
11
15-02-08
10:33
Page 12
7KHVHYHUHGSOXJPXVWEHGLVSRVHGRIIWRDYRLG
DSRVVLEOHVKRFNKD]DUGVKRXOGLWEHLQVHUWHG
LQWRD$PSVRFNHWHOVHZKHUH
Norge
7\SHVNLOWÀQQHVSnDSSDUDWHQVEDNVLGH
2EVHUYHU1HWWEU\WHUHQHUVHNXQGHUWLQQNRSOHW
'HQLQQHE\JGHQHWGHOHQHUGHUIRULNNH
IUDNWRSOHWQHWWHWVnOHQJHDSSDUDWHWHUWLOVOXWWHW
QHWWNRQWDNWHQ
)RUnUHGXVHUHIDUHQIRUEUDQQHOOHUHOHNWULVN
VW¡WVNDODSSDUDWHWLNNHXWVHWWHVIRUUHJQHOOHU
IXNWLJKHW
Notice
Notice of compliance
For USA:
7KLVHTXLSPHQWKDVEHHQWHVWHGDQGIRXQG
WRFRPSO\ZLWKWKHOLPLWVIRUD&ODVV%GLJLWDO
GHYLFHSXUVXDQWWR3DUWRIWKH)&&5XOHV
7KHVHOLPLWVDUHGHVLJQHGWRSURYLGHUHDVRQDEOH
SURWHFWLRQDJDLQVWKDUPIXOLQWHUIHUHQFHLQD
UHVLGHQWLDOLQVWDOODWLRQ7KLVHTXLSPHQWJHQHUDWHV
XVHVDQGFDQUDGLDWHUDGLRIUHTXHQF\HQHUJ\
DQGLIQRWLQVWDOOHGDQGXVHGLQDFFRUGDQFHZLWK
WKHLQVWUXFWLRQVPD\FDXVHKDUPIXOLQWHUIHUHQFH
WRUDGLRFRPPXQLFDWLRQV+RZHYHUWKHUHLV
QRJXDUDQWHHWKDWLQWHUIHUHQFHZLOOQRWRFFXU
LQDSDUWLFXODULQVWDOODWLRQ,IWKLVHTXLSPHQW
GRHVFDXVHKDUPIXOLQWHUIHUHQFHWRUDGLRRU
WHOHYLVLRQUHFHSWLRQZKLFKFDQEHGHWHUPLQHG
E\WXUQLQJWKHHTXLSPHQWRIIDQGRQWKHXVHULV
HQFRXUDJHGWRWU\WRFRUUHFWWKHLQWHUIHUHQFH
E\RQHRUPRUHRIWKHIROORZLQJPHDVXUHV
• 5HRULHQWRUUHORFDWHWKHUHFHLYLQJDQWHQQD
• ,QFUHDVHWKHVHSDUDWLRQEHWZHHQWKH
HTXLSPHQWDQGUHFHLYHU
• &RQQHFWWKHHTXLSPHQWLQWRDQRXWOHWRQ
DFLUFXLWGLIIHUHQWIURPWKDWWRZKLFKWKH
UHFHLYHULVFRQQHFWHG
• &RQVXOWWKHGHDOHURUDQH[SHULHQFHG
UDGLR79WHFKQLFLDQIRUKHOS
For Canada:
7KLVGLJLWDODSSDUDWXVGRHVQRWH[FHHGWKH&ODVV
%OLPLWVIRUUDGLRQRLVHHPLVVLRQVIURPGLJLWDO
DSSDUDWXVDVVHWRXWLQWKH5DGLR,QWHUIHUHQFH
EN
Project8
5HJXODWLRQVRIWKH&DQDGLDQ'HSDUWPHQWRI
&RPPXQLFDWLRQV7KLV&ODVV%GLJLWDODSSDUDWXV
FRPSOLHVZLWK&DQDGLDQ,&(6
7KLVSURGXFWFRPSOLHVZLWKWKHUDGLR
LQWHUIHUHQFHUHTXLUHPHQWVRIWKH(XURSHDQ
&RPPXQLW\
7KLVSURGXFWFRPSOLHVZLWKWKHUHTXLUHPHQWVRI
WKHIROORZLQJGLUHFWLYHVDQGJXLGHOLQHV
((&((&((&
Class II equipment symbol
7KLVV\PEROLQGLFDWHVWKDWWKHXQLWKDVDGRXEOH
LQVXODWLRQV\VWHP
Disposal of product and packing
material
<RXUSURGXFWLVGHVLJQHGDQGPDQXIDFWXUHG
ZLWKKLJKTXDOLW\PDWHULDOVDQGFRPSRQHQWV
ZKLFKFDQEHUHF\FOHGDQGUHXVHG
:KHQWKLVFURVVHGRXWZKHHOHGELQV\PEROLV
DWWDFKHGWRDSURGXFWLWPHDQVWKHSURGXFWLV
FRYHUHGE\WKH(XURSHDQ'LUHFWLYH(&
3OHDVHEHLQIRUPHGDERXWWKHORFDOVHSDUDWH
collection system for electrical and electronic
SURGXFWV
3OHDVHDFWDFFRUGLQJWR\RXUORFDOUXOHVDQG
GRQRWGLVSRVHRI\RXUROGSURGXFWZLWK\RXU
QRUPDOKRXVHKROGZDVWH7KHFRUUHFWGLVSRVDO
RI\RXUROGSURGXFWZLOOKHOSSUHYHQWSRWHQWLDO
12
Project21
27-02-08
12:35
Page 13
QHJDWLYHFRQVHTXHQFHVWRWKHHQYLURQPHQWDQG
KXPDQKHDOWK
$OOUHGXQGDQWSDFNLQJPDWHULDOKDVEHHQ
RPLWWHG:HKDYHGRQHRXUXWPRVWWRPDNHWKH
SDFNDJLQJHDVLO\VHSDUDEOHLQWRPRQRPDWHULDOV
3OHDVHREVHUYHWKHORFDOUHJXODWLRQVUHJDUGLQJ
WKHGLVSRVDORISDFNLQJPDWHULDOV
Environmental information
$OOXQQHFHVVDU\SDFNDJLQJKDVEHHQRPLWWHG
:HKDYHWULHGWRPDNHWKHSDFNDJLQJHDV\WR
VHSDUDWHLQWRWKUHHPDWHULDOVFDUGERDUGER[
SRO\VW\UHQHIRDPEXIIHUDQGSRO\HWK\OHQH
EDJVSURWHFWLYHIRDPVKHHW
<RXUV\VWHPFRQVLVWVRIPDWHULDOVZKLFKFDQ
be recycled and reused if disassembled by
DVSHFLDOL]HGFRPSDQ\3OHDVHREVHUYHWKH
ORFDOUHJXODWLRQVUHJDUGLQJWKHGLVSRVDORI
SDFNDJLQJPDWHULDOVH[KDXVWHGEDWWHULHVDQGROG
HTXLSPHQW
Battery disposal information
%DWWHULHVLQFOXGLQJEXLOWLQUHFKDUJHDEOH
EDWWHULHVFRQWDLQVXEVWDQFHVWKDWPD\SROOXWH
WKHHQYLURQPHQW $OZD\VKDQGWKHDSSOLDQFH
LQDWDQRIÀFLDOFROOHFWLRQSRLQWWRUHPRYH
DQ\EXLOWLQEDWWHULHVEHIRUH\RXGLVFDUGWKH
DSSOLDQFH $OOEDWWHULHVPXVWEHGLVSRVHGRIDW
DQRIÀFLDOFROOHFWLRQSRLQW
13
Project8
15-02-08
10:33
Page 14
Specifications are subject to change without notice.
Trademarks are the property of Koninklijke Philips
Electronics N.V. or their respective owners
© 2008 Koninklijke Philips Electronics N.V.
All rights reserved.
www.philips.com
Printed in China
wk8042