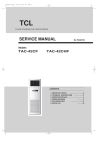
1
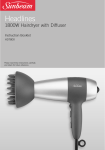
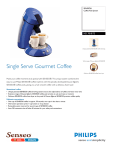
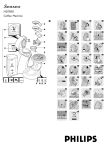
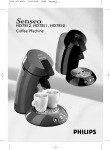
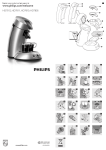
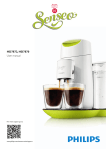
Senseo
HD7800
2
3
4
5
HD7800
ENGLISH 6
6
ENGLISH
The new way of enjoying coffee
With the Senseo you can now enjoy a perfect cup of coffee - topped
with a rich layer of crema - whenever you feel like it. Each cup is freshly
brewed, so you're always sure of that pure, smooth taste.The unique
brewing system of the Senseo from Philips in combination with the
special coffee pads from Douwe Egberts make sure you get only the
very best in flavour and aroma from freshly roasted coffee.
The Douwe Egberts coffee in convenient coffee pads and Philips'
unique new brewing system are perfectly matched to ensure that the
best taste and aroma are extracted from the coffee.
To optimise the taste of the coffee, you should keep the following
aspects in mind:
Fresh water
Use fresh water every day. If you have not used the appliance for some
time, rinse the water reservoir, fill it with fresh water and flush the
appliance before you use it again (see 'Preparing the appliance for
use').
Fresh coffee pads
The Douwe Egberts Senseo coffee pads will stay fresh longer if you
close the package by means of the keep-fresh seal after use or if you
store them in a storage container.
A clean appliance
Clean and descale your Philips Senseo coffee maker regularly (see
'Cleaning' and 'Descaling').
Remove used coffee pads after brewing. If a used pad has been left in
the coffee maker and you have not used the appliance for some time,
flush the appliance before you use it again (see 'Preparing the appliance
for use').
Preparing the appliance for use
◗ Check whether the mains voltage indicated on the appliance
corresponds with the mains voltage in your home before you
connect the appliance.
◗ Do not use the appliance if the plug, the cord or the appliance
itself is damaged.
◗ Put the appliance in a frost-free place, on a flat, stable surface, out
of the reach of children.
◗ Do not use the appliance at altitudes higher than 1000 m above
sea level.
◗ The appliance does not work at temperatures below 10cC/42cF.
ENGLISH
◗ We advise you to clean the water reservoir, the coffee outflow
unit and the pad holder before you use the appliance for the first
time.
◗ Flush the appliance with clean water.
IMPORTANT:YOU CANNOT BREW COFFEE IF YOU HAVE NOT
FLUSHED THE APPLIANCE FIRST!
C
1
Remove the water reservoir.
C
2
Fill the water reservoir with cold water up to the MAX
indication and put it back onto the appliance.
C
3
Release the lid by moving the two levers towards each other.
C
4
Open the lid.
7
8
ENGLISH
C
C
5
Put the 1-cup or 2-cup pad holder in the appliance without
pad(s).
6 Close the lid again.
Make sure the levers return fully to their most outward position by
pushing firmly on the lid.
7
Put the plug in an earthed wall socket.
C
8
Put a bowl (with a capacity of at least 27 fl. ounce)under the
coffee outlet openings to collect the water:
C
9
Press on/off button I and subsequently press buttons ° and
°° briefly at the same time.
The appliance will fill itself with water from the water reservoir.This will
take some time and you probably won't notice that this is happening.
After a while, the appliance will start flushing and it will switch itself off
after the flushing cycle.
B
Brewing coffee
C
1
Fill the water reservoir with water up to the MAX indication.
Never pour milk, coffee, hot water or carbonated water into the water
reservoir.
A full reservoir allows you to make coffee a number of times (up to 5
cups).This makes it unnecessary to fill the water reservoir each time
you want to make a cup of coffee.
ENGLISH
2
B
C
Press on/off button I.
The pilot light blinks while the water is heating up. Heating up takes
approx. 90 seconds.
3
Release the lid by moving the two levers towards each other.
4
Open the lid.
5
Put the coffee pad(s) in the pad holder, with the convex side
pointing downwards. Make sure the coffee in the pad is evenly
distributed and press the pad slightly down in the pad holder.
C
◗ If you want to make one cup of coffee, use the 1-cup pad holder
and insert one pad.
C
◗ If you want to make two cups of coffee at the same time, use the
2-cup pad holder and insert 2 pads.
For optimal brewing results, use Douwe Egberts Senseo coffee pads.
Never use torn pads or normal ground coffee, as this could cause the
appliance to become blocked.
Each coffee pad contains the optimal amount of ground coffee for 1
cup.
C
6
Put the pad holder in the appliance.
C
7
Close the lid.
9
10
ENGLISH
C
C
8
Make sure that the levers return fully to their most outward
position by pushing firmly on the lid.
9 Place one cup or two cups under the outflow openings.
The cups you use should have a capacity of at least 4.5 fl. ounce.
The pilot light of the on/off button I blinks slowly when the water is
heating up.
The appliance is ready for use when the pilot light burns continuously.
If the pilot light blinks rapidly, check whether:
C
◗ The water reservoir has been (properly) placed onto the
appliance.
◗ There is enough water in the water reservoir.The water reservoir
must at least be filled up to the MIN indication.
C
10
Press the button indicating the number of cups you want to
brew.
° for one cup
°° for two cups
B
The appliance starts brewing.
The appliance automatically supplies the optimal amount of water.
You can interrupt the brewing process at any time by pressing the
on/off button I.
When you switch the appliance back on after having interrupted the
brewing process, the appliance will not complete the interrupted
brewing cycle.
If the appliance stops brewing when you are making two cups of
coffee, yet the cups are only half full, there was not enough water left in
the water reservoir. Fill the water reservoir and press button ° for
one cup.The two cups will then be filled completely.
C
11
Remove the coffee pads after use by lifting the pad holder out
of the appliance and emptying it.
ENGLISH
11
◗ Tip: regular rinsing of the pad holder gives the coffee a better
taste.
◗ Tip: the coffee will taste best if you stir it before drinking it.
C
◗ Tip: if you intend to make another cup of coffee later, just leave
the appliance switched on.The appliance will automatically switch
itself off after 1 hour.
Cleaning
Never immerse the appliance in water.
C
C
C
1
Always unplug the appliance before you start cleaning it.
2
Clean the outside of the appliance with a moist cloth.
3
Remove the coffee outflow unit and clean it with a washing-up
brush.
◗ You can disassemble the coffee outflow unit for more thorough
cleaning.
4
Clean the pad holder, the cup tray and the drip tray in hot
water, if necessary with some washing-up liquid, or clean them
in the dishwasher.
Tip: the pad holders, drip tray, cup tray and coffee outflow unit are
dishwasher proof.
C
Tip: the top of the reservoir can be removed to allow thorough
cleaning of the inside.
12
ENGLISH
C
◗ Clean the water reservoir thoroughly in hot water, if necessary
with some washing-up liquid.
5
Rinse the parts with fresh water after cleaning and put them
back onto the appliance.
Descaling
Regular descaling will prolong the life of your appliance and will
guarantee optimal brewing results for a long time.
C
C
C
1
Fill the water reservoir with a descaling agent up to the MAX
indication and put the water reservoir back on the appliance.
Use a descaling agent based on citric acid.
Follow the instructions on the package of the descaling agent.
2
Put a bowl (with a capacity of at least 27 fl. ounce) under the
coffee outlet to collect the descaling agent:
Press on/off button I and subsequently press buttons ° and
°° briefly at the same time to start flushing the appliance.
For the best result, wait at least 30 minutes after flushing the appliance
with the descaling agent.
3
4
Repeat this descaling procedure one more time.
5
Let the appliance complete two more flushing cycles with clean
water to rinse away any descaling agent residues.
Replacing the mains cord
If the mains cord of this appliance is damaged, it must always be
replaced by Philips or a service centre authorised by Philips, as special
tools and/or parts are required.
ENGLISH
13
Solving problems
If you have a problem, you may find the solution in the table below. If
the table does not provide the solution to your problem or if you have
a question, see the chapter 'Information & service'.
Problem
Solution
The coffee is not strong enough.
Make sure that:
- the coffee pad(s) has/have been placed level in the holder.When you are using
two coffee pads on top of each other, make sure that the convex sides of both
pads are pointing downwards and press the pads slightly down in the pad holder.
- you have used the correct number of pads and have pressed the right dosing
button. Use 1 pad in combination with the 1-cup pad holder and the ° button.
Use 2 pads in combination with the 2-cup pad holder and the °° button.
- a fresh pad has been used.
- the coffee is evenly distributed in the coffee pad.
If you prefer a more robust flavour, try the Dark Roast blend.
The coffee is too strong.
Check if you have used the right number of pads and if you have pressed the
right dosing button. Use 1 pad in combination with the ° button and 2 pads in
combination with the °° button.
If you prefer a milder flavour, try the Mild Roast blend.
The machine pours less water into Descale the appliance (see 'Descaling').
the cup(s) than it used to.
Make sure that:
Water is leaking from the
appliance.
- the two levers are in their most outward position.
- the water reservoir has not been filled beyond the MAX indication.
- the pad holder is not blocked. Deblock the small opening in the middle of the
pad holder by rinsing it under the tap. If necessary, you can use a washing-up
brush or a pin to deblock the opening.
- the pad has been placed evenly in the pad holder.
The presence of some drops of water on the worktop is perfectly normal.This is
caused by the filling and placing of the water reservoir.
In all other cases: contact the Philips Customer Care Centre.
The pilot light continues to blink
slowly.
If the pilot light continues to blink slowly for more than 5 minutes, contact the
Philips Customer Care Centre.
The pilot light continues to blink
rapidly.
Make sure that:
- the water reservoir has been properly placed.
- there is enough water in the water reservoir (the water level should always be
above the MIN indication).
- the flushing procedure that must be performed before the appliance is used for
the first time has been carried out properly. (See the chapter 'Preparing the
appliance for use').
- the temperature of the room is above 10cC/42cF. (See the chapter 'Preparing
the appliance for use').
In all other cases: contact the Philips Customer Care Centre.
14
ENGLISH
Solution
Switch the appliance off.Wait for 2 hours and try to open the lid again.
Make sure the pad holder is not blocked. Deblock the small opening in the middle
of the pad holder by rinsing it under the tap. If necessary, you can use a washing-up
brush or a pin to deblock the opening.
If problems continue to occur, contact the Philips Customer Care Centre.
Information & service
If you need service or information or if you have a problem, please
consult the worldwide guarantee leaflet or visit our Web site:
www.philips.com or contact the Philips Customer Care Centre in your
country (you will find its phone number in the worldwide guarantee
leaflet). If there is no Customer Care Centre in your country, turn to
your local Philips dealer or contact the Service Department of Philips
Domestic Appliances and Personal Care BV.
15
16
17
u
www.philips.com
4222 001 95791