1
DVDR615
QUICK USE GUIDE
12nc: 3139 246 14151
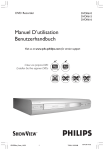
LANGUAGE AND COUNTRY
Select Language and Country
ANTENNA/
CABLE SIGNAL
Menu
English
Spanish
French
Language
Country
4
Done
5
TV FORMAT
1
Select your TV format
2
4
3
TV format
Done
CHANNEL SEARCH
Automatic channel search will find and
store all channels. Make sure to connect
the Antenna.
Channel Search
6
Start
TIME AND DATE
Check time and date and correct if
necessary
5
1
1
2
3
4
5
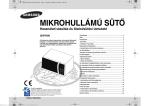
Connect DVD recorder
Remove the antenna cable plug from your TV (or Satellite
Receiver/Cable Box). Connect it to the ANTENNA input
socket at the back of the DVD recorder.
Use the supplied antenna cable to connect the DVD
recorder’s TV output socket to the antenna input socket at
the back of your TV set
Use the supplied AV cables (yellow plug) to connect the
DVD recorder’s VIDEO (CVBS) (OUT 2) socket to the
Video In socket at the back of your TV set.
3
1
2
Time
09:00 PM
Date
30.06.2004
Done
OK
1.3
CH-
7
8
CH+
IS THE TV ON?
1
Skip Search
DVD recorder back panel
2
4:3 Panscan
4:3 Letterbox
16:9
CH+
3
CH-
Start first installation
Press STANDBY-ON 2 on the DVD recorder to switch
it on.
Switch on the TV set and select the correct video in channel,
the First Installation menu appears on the TV.
NO PICTURE! Press the TV/AV button or CHANNEL 3 4
button on the TV to select the correct video in channel, for
example, 'EXT', '0', or 'AV'.
3
Use the supplied AV cables (red/white plugs) to connect the
DVD recorder’s AUDIO L/R (OUT 2) socket to the audio
input socket at the back of your TV set.
Connect the power cable from the DVD recorder’s
~ MAINS to the power supply.
4
Helpful Hint:
If your TV does not have the above-mentioned
connectors, please refer to the user manual for more
information on others possible connection to your
TV set.
5
Press 3 4 to select an item in the menu.
Press 2 to access the selected item’s options.
Press 1 to confirm your selection.
When you complete, select { Done } in the menu and press
OK to continue.
{ Language and Country } menu appears.
{ Language } – select on-screen display language.
{ Country } – select country of your residence.
{ TV Format } menu appears.
{ TV Format } – select TV screen display.
6
{ Channel Search } menu appears.
Press OK to start automatic TV channel search.
Once the TV channel search complete, the total number of
channels found appears.
2
Prepare the remote control
7
If the time and date shown on the TV are not correct,
press 2 to enter the respective time/date field. Press 3 4 to
change the first digit and press 2 to go to the next digit field.
Once complete, press OK to confirm.
3
8
1
{ Time and Date } menu appears.
Press 4 to select { Done } and press OK to save the changes.
➜ The first installation is now complete.
2
The DVD recorder is ready for use!
See next page for basic recording and playback.
... cont.
SUPER VIDEO
1.3
1.3
CH-
CH+
CH-
CH+
{0}
34
1234
OK
CH+
CH+
EDIT
CHCH-
PLAY
2
4
1
2
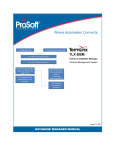
Start manual recording
Insert a recordable DVD+R(W) with the label side facing up.
Press TUNER on the remote control to see the TV
programmes, then press 3 4 to select the programme
number you wish to record.
5
1
2
➜ If you wish to record from additional device (e.g.Video Cassette
Recorder), press button 3 4 on the remote control to select the
correspond external input channel.
For example, select { EXT2 } if you have connected the VCR to
IN-EXT2 socket at the back of the DVD recorder.
3
Press REC MODE to select a desired recording mode. It
defines the picture quality and the maximum recording time
for a disc.
Record
Mode
●
5
6
Maximum Recording
Time per Disc
M1
M2
M2x
High quality (HQ)
DVD quality-Standard Play (SP)
DVD quality-Standard Play Plus (SP+)
1 hour
2 hours
2.5 hours
M3
M4
S-VHS quality-Long Play (LP)
VHS quality-Extended Play (EP)
VHS quality-Super Long Play (SLP)
3 hours
4 hours
6 hours
VHS quality-Super Extended Play (SEP)
8 hours
M6
M8
4
Picture Quality
Press REC 0 to start recording.
If required, you can press REC 0 twice to start a
30-minute recording. Each time you press REC 0 button,
you will add 30 minutes to the recording time.
During recording, you may press PAUSE ; to pause the
recording and press REC 0 to continue.
To stop the recording, press STOP 9.
➜ Wait until the message disappears from the display panel before
you remove the disc.
Start Playback
Insert a disc with the label side facing up.
Playback will start automatically.
➜ If a dialogue appears on the TV showing { Do you want to
access the disc content }, press 3 4 to select { Yes } to show the
disc content or { No } to switch to the last active mode, then press
OK to confirm.
➜ If a disc menu appears, press 1 2 3 4 to navigate within the
menu, highlight a title and press OK or PLAY 2 to start playback.
NO SOUND! Connect the AUDIO L/R (red/white) sockets at
the back of the DVD recorder to the correspond AUDIO input
sockets on a TV set, stereo system or receiver. Turn on the
connected system and select the appropriate channel.
3
To stop playback, press STOP 9.
To watch the TV programmes
1
Press TUNER on the remote control, then press 3 4 to
select the programme number.
To play a DVD+R on other DVD players, you
must finalise it first
1
2
Press EDIT on the remote control.
Press 3 4 to select { Finalise } in the menu, then press
OK.
Once a DVD+R is finalised, no further recording or
editing is possible. Unfinalising a DVD+R is not
possible.
Detailed playback features and additional functions are described in the
accompanying user manual.
Ӥఀպܒݾ
͇ቢƝ
LANGUAGE AND COUNTRY
Select Language and Country
ANTENNA/
ତቢੈཱི
CABLE
Language
Country
Menu
English
Spanish
French
Done
TV FORMAT
Select your TV format
TV format
Done
4:3 Panscan
4:3 Letterbox
16:9
CHANNEL SEARCH
1.3
Automatic channel search will find and
store all channels. Make sure to connect
the Antenna.
Channel Search
CH-
CH+
IS THE TV ON?
Start
Skip Search
TIME AND DATE
EWE ᐂٸᇆ፟۞ࡦڕ
EWE
Ꮓعᆇጠ
EWE
EWEᏃعᆇጠ
1
1
ૃྫගĞؖྫޑගНዢƝФሣྫග˅ğ͎̈ئሣ
BOUFOOB
ሣನᏞĂઠͺϵEWEᏃعᆇጠࠧڟBOUFOOB
Ꭿʣನ̌Ą
2
պᏍጠۣਚ̈ڟሣሣĂઠEWEᏃعᆇጠ!ڟUW!
UW!Ꭿ͎
UW!
ನ̌Ăϵྫගࠧ̈ڟሣᎯʣನ̌Ą
3
պᏍጠۣਚڟBWሣĞกѓನᏞğĂઠEWEᏃعᆇጠ
WJEFP!)DWCT*!)PVU3*
ڟWJEFP!)DWCT*!)PVU3*
WJEFP!)DWCT*!)PVU3*ನ̌Ăϵྫගጠࠧఋڟග
ᏜᎯʣನ̌Ą
4
պᏍጠۣਚڟBWሣĞࠔƝΩನᏞğĂઠEWEᏃعᆇ
BVEJP!M0S!)PVU3*!
ጠڟBVEJP!M0S!)PVU3*!
BVEJP!M0S!)PVU3*!ನ̌Ăϵྫගጠࠧఋࡱڟ
ᏜᎯʣನ̌Ą
5
ઠEWEᏃعᆇጠྫڟປሣ!)NBJOT*!
)NBJOT*!эྫປನࣴĄ
)NBJOT*!
Ꮊάˉಪΰċ
࠷ѱྫڟගԠФʰࡘڟನ̌Ăቜኧ̘̙͋Ă̾ᑕ
ુԁϻჄྫග͂֏ڟཥटĄ
ᄍૡዢྱڟర
2
Check time and date and correct if
necessary
2
1
2
09:00 PM
Date
30.06.2004
Done
OK
CH+
CH+
CH-
CH-
ࡶזЩЊཆ
TUBOECZ.PO
ݸEWEᏃعᆇጠڟTUBOECZ.PO
TUBOECZ.PO!2̾ଂΏ୰ܢĄ
ଂྫගጠծᎵጅΓሂڟගᏜᎯʣᏜཾĂϵྫගഫĂ
͎୪ࡶЩЊཆ͒ےĄ
ԠФᆇ࿋ĕ
ԠФᆇ࿋ĕݸUW0BWؖූݸϵྫගڟDIBOOFM!3 4
ූݸĂᎵጅΓሂڟගᏜᎯʣᏜཾĂЃ(FYU(ă(1((ؖBW(
3
!ݸ3 4 Ꮅጅϵ͒ڟےά
!ݸ2 ʣːᎵڟά
!ݸ1 ሂჯѱڟᎵጅ
Epof
PL
໋ӇЙጇѰݣĂቜϵ͒ےĂᎵጅ|!Epof
Epof!~ծ!ݸPL
PL!ᙷᛉ
ጇѰĄ
4
͎୪!{ Language and Country } ͒ے
{ Language } ůᎵጅϵᎉဍΰڟჭՐ
{ Country } ůᎵጅѱרўࣜڟ
5
͎୪!{ TV Format } ͒ے
{ List } – Ꮅጅྫගഫΰ
6
͎୪!{ Channel Search } ͒ے
PL
ݸPL
PLĂྫזගᏜཾьষ͒Ą
PL
໋ӇЙྫගᏜཾষݣĂݸPL
PLሂჯĄ
7
͎୪{ Time and Date } ͒ے
࠷ϵྫග͎୪ڟढַ̠ೈ˚ސΓሂĂቜ!ݸ2Ăʣߺ
ᐖڟढ0̠ೈЅĂ!ݸ34 ӽᝐʙᆵЅĂծ!ݸ2Ă
PL!
ʣʮʙᆵЅЅĂ໋ጇѰӇ୳ݣĂቜ!ݸPL!
PL!ሂჯĄ
8
3
Time
Epof
PL
!ݸ4 ĂᎵጅ|!Epof
Epof!~ĂծݸPL
PLᏽІӽᝐĄ
➜
ࡶЊཆുӕĂۯҙӇЙĄ
1
2
EWE ᐂٸᇆ፟Ξͽᐌॡฟֹؕϡ
ኛણ࠻˭˘ࢱĂͽᒔՀкᐂᄦᇫٸᇆͯ۞ྤफ़
DVDR6xx_69_QUG chT
1
8/19/04, 3:57 PM
ᙷᛉ
2
ALL
SUPER VIDEO
1.3
1.3
CH-
CH+
CH-
CH+
{0}
34
1234
OK
CH+
CH+
EDIT
CH-
CH-
PLAY
2
4
1
2
זʡ̙Ꮓყᆇ̰
5
عʣʙ͟ᏃყڟEWE,S)X*ώႅĂФᆿථڟʙϩʰĄ
UVOFS
ݸᄍૡዢʰڟUVOFS
UVOFSĂ̾ណྫගάےĂഓݸݣ
34ĂಣᎵѱ๑Ꮓყڟά༴ሆĄ
1
2
➜ Ѓَѱ๑ᖞʹڟዢԅվᏃყᆇ̰)սЃᏃᆇጠ*-!ቜݸᄍૡ
ዢ!ڟ4ĂᎵጅߺᐖʹڟ༊ᎯʣᏜཾĄս˅;!ЃَѱːᄻᏃᆇ
FYU!3!BVY.J0P
ጠ֗EWEᏃعᆇጠࠧఋڟFYU!3!BVY.J0P
FYU!3!BVY.J0Pನ̌ĂቜᎵጅ
|FYU3~Ą
3
SFD!NPEF
ݸSFD!NPEF
SFD!NPEF!ĂᎵጅʙ๒ڟᏃყᇁВĄͺː௩סᆇ
࿋ڟቴশַώႅڟశᏃᆇढĄ
4
●
5
6
ݸREC 0ĂזᏃყᆇ̰Ą
ЃФᄯࡌĂѱ͟ݸREC 0 ֍Щվזʙ41˷ᚘڟᏃყ
྆ുĄ໋ѱԐЩݸREC 0 ූݸĂۯ41˷ᚘڟᏃყ
ढĄ
Ꮓყᆇ̰ढĂѱ̾͟ ݸPAUSE ; uվᆷᏃყάĂϔ
ݸREC 0 ᙷ͟ۯᛉїᏃყĄ
ࡌத̥ᏃყĂቜ ݸSTOP 9.
ቜϵΰݎʰڟЅͯ॑ͶݣĂ̟͟ऌ͎ᆇႅĄ
➜
عʣᆇႅĂ֎ФᆿᝆڟʙϩʰĄ
ΏEWEጠьזᆬعĄ
➜ Ѓྫගഫΰ|!Ep!zpv!xbou!up!bddftt!uif!ejtd!dpoufou@!~Ă
ቜ!ݸ3 4 Ꮅጅ|!Zft!~Ăΰᆇႅ˱࣠ĂؖᎵጅ|!Op!~ĞҏğĂ
˸ಲэశݣպڟᇁВĄ
➜ Ѓ͎୪ᆇႅ͒ےĂ!ݸ1 2!3 4Ă͟ۯϵ͒˱ےዲĂ
PL
QMBZ!
ഓݣ۫֏˛ʙᆿᖠĂൿĂݸPL
PLؖQMBZ!
QMBZ!2Ăזᆬع
ᆇ̰Ą
ԠФᒐࡱ
ԠФᒐࡱ""!ઠEWEᏃعᆇጠࠧఋڟBVEJP!M0S!)ࠔ0Ω*ನ̌Ă
эྫගăγᒐՁؖНዢߺڟဇBVEJPᎯʣನ̌Ąଂ
ːڟՁĂծᎵጅኌ໋ڟᏜཾĄ
ᏃყᇁВ
!!!!!!
ᆇ̰ቴশ
ᏃყᇁВ!!!!!!
!!!!!!ᆇ̰ቴশ
N2
N3
N3y
N4
N5
N7
N9
ʙώႅశ
Ꮓყढ
ቴশ!)IR*
2 ˉढ
EWE ᆿລᆇ࿋ )TQ*
3 ˉढ
EWE ᆿລᆬعŮ)TQ,*
3/6 ˉढ
T.WIT ͑ᆬ)عMQ*
4 ˉढ
WIT ᆬ) عFQ*
5 ˉढ
WIT ቴশ͑ᆬ)عTMQ*
7 ˉढ
WIT ቴশ!ය͑ᆬ)عTFQ*
9 ˉढ
זᆬع
3
ࡌ̥ᆬعĂቜ ݸSTOP 9Ą
៍࠻ෛ༼ϫ
1
ݸᄍૡዢ ڟTUNER!ഓݸݣ3 4!Ꮅጅά༴ሆĄ
ࡌϵ֏͂
EWE
ᆇႅጠᆬع
EWE,S
ढĂѱΆϑӇ
ࡌϵ֏͂EWE
EWEᆇႅጠᆬع
ᆇႅጠᆬعEWE,S
EWE,SढĂѱΆϑӇ
ЙᏃყുӕĄ
1
2
ݸᄍૡዢ!ڟEDITĄ
Gjobmjtf
PL
ݸ3 4 ϵ͒ےᎵጅ|!Gjobmjtf
Gjobmjtf!~ĂഓݸݣPL
PLĂӇЙ
EWE,SڟᏃყുӕĄ
༊ EWE,S ᐂᄦԆјޢĂ̙ܮΞдЍჄГᐂᄦЇң༼ϫٕበ
ᏭЇңྤफ़Ăࢋפঐд EWE,S ۞ᐂᄦёĂߏ̙Ξਕ۞Ą
ྎ۞ᇫܢٸΐΑਕĂኛણዦܢਖ਼۞ϡ͗͘ΊĄ
DVDR6xx_69_QUG chT
2
8/19/04, 3:57 PM