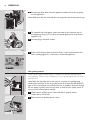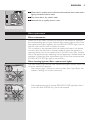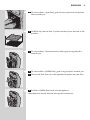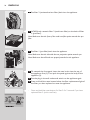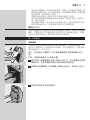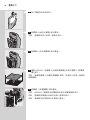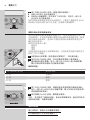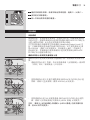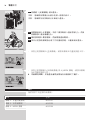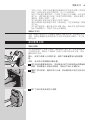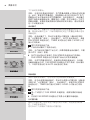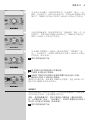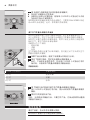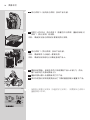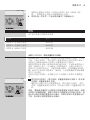
1
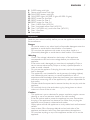
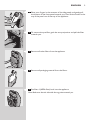
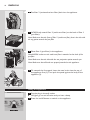
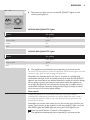
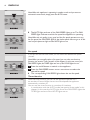
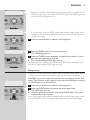
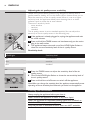
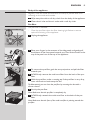
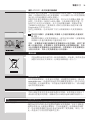
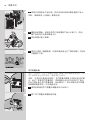
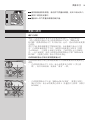
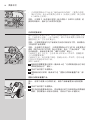
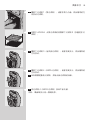
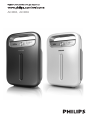
AC4004, AC4002
2
3
1
2 3
H
4
5
6 8 10
7 9 11
12
13
14
I
A
B
C
J
K
L
M
G
F
D
E
1
4
AC4004, AC4002
English 6
繁體中文 25
简体中文 41
6
English
Introduction
Congratulations on your purchase and welcome to Philips! To fully benefit
from the support that Philips offers, register your product at
www.philips.com/welcome.
With this new CleanAir System you breathe cleaner air. For the best results,
place the CleanAir System in a room where you spend most of your time,
e.g. the living room or bedroom.
Wherever there are people, plants or pets, there are airborne particles that
can affect your well-being, especially if you suffer from allergies. Because of
these particles, the air inside a room may be more polluted than the air in
a large city.
Normally, particles are invisible and odourless. Nevertheless, they can affect
your health. The CleanAir System reduces the amount of animal dander
and industrial pollutants in the air, and therefore improves the air quality.
It also filters out ultrafine particles larger than 20 nanometres, including
bacteria and some viruses. According to publications of the World Health
Organization, the avian and human influenza viruses and the Legionella
bacterium are larger than 20 nanometres.
Filtration in several stages
The air cleaner has a unique multi-stage filtration system that guarantees
the best air quality:
-- Stage 1: The pre-filter has been treated with antibacterial substances. It
catches big particles like human hair, pet hair etc.
-- Stage 2 : In combination with the HEPA filter, the multi-care filter filters
out dust, pollen and ultrafine particles larger than 20 nanometres,
including bacteria and some viruses. According to publications of the
World Health Organization, the avian and human influenza viruses and
Legionella bacterium are larger than 20 nanometres.
-- Stage 3: The activated carbon filter removes odours and harmful gases
effectively.
-- Stage 4: The high-performance composite HEPA filter with antibacterial coating effectively removes fine dust and cigarette smoke,
while the antibacterial and anti-mould functions of organic antibacterial
materials eliminate germs and mould.
General description (Fig. 1)
A
B
C
D
E
F
G
H
1
2
3
4
5
6
7
Air quality sensor outlet
Air quality sensor
Air quality sensor inlet
Air inlet
Mains cord
Air outlet
Handle
Control panel
Pre-filter cleaning light
Filter replacement lights
REPLACE FILTER light with ‘appliance locked’ indication
AIR QUALITY lights (AC4004: 4 lights, AC4002: 3 lights)
HOUR lights
TIMER on/off button with light
AUTO button with light
English
7
8 SLEEP button with light
9 Power on/off button with light
10 FAN SPEED button with light
11 FAN SPEED lights (AC4004: 3 lights, AC4002: 2 lights)
12 RESET button for pre-filter
13 RESET button for filter 2
14 RESET button for filter 3/4
I Filter 4: HEPA filter (AC4124)
J Filter 3: activated carbon filter (AC4123)
K Filter 2 (AC4004 only): multi-care filter (AC4121)
L Filter 1: pre-filter
M Front panel
Important
Read this user manual carefully before you use the appliance and save it for
future reference.
Danger
-- Do not let water or any other liquid or flammable detergent enter the
appliance to avoid electric shock and/or a fire hazard.
-- Do not clean the appliance with water or any other liquid or a
(flammable) detergent to avoid electric shock and/or a fire hazard.
Warning
-- Check if the voltage indicated on the bottom of the appliance
corresponds to the local mains voltage before you connect the
appliance.
-- If the mains cord is damaged, you must have it replaced by Philips, a
service centre authorised by Philips or similarly qualified persons in
order to avoid a hazard.
-- Do not use the appliance if the plug, the mains cord or the appliance
itself is damaged.
-- This appliance is not intended for use by persons (including children)
with reduced physical, sensory or mental capabilities, or lack of
experience and knowledge, unless they have been given supervision or
instruction concerning use of the appliance by a person responsible for
their safety.
-- Children should be supervised to ensure that they do not play with the
appliance.
-- Do not block the air inlet and outlet, e.g. by placing items on the air
outlet or in front of the air inlet.
Caution
-- This appliance is not a substitute for proper ventilation, regular vacuum
cleaning or use of an extractor hood or fan while cooking.
-- If the wall socket used to power the appliance has poor connections,
the plug of the appliance may become hot. Make sure you plug the
appliance into a properly connected wall socket.
-- Always place and use the appliance on a dry, stable, level and horizontal
surface.
-- Leave at least 20cm free space behind and on both sides of the
appliance and leave at least 30cm free space above the appliance.
-- Do not place anything on top of the appliance and do not sit on the
appliance.
8
English
-- Do not place the appliance directly below an air conditioner to prevent
condensation from dripping onto the appliance.
-- Make sure all filters are properly installed before you switch on the
appliance.
-- Only use the original Philips filters specially intended for this appliance.
Do not use any other filters.
-- Avoid knocking against the appliance (the air inlet and outlet in
particular) with hard objects.
-- Always lift or move the appliance by the handgrip at the back of the
appliance.
-- Do not insert your fingers or objects into the air outlet.
-- Do not use this appliance when you have used indoor smoke-type
insect repellents or in places with oily residues, burning incense or
chemical fumes.
-- Do not use the appliance near gas appliances, heating devices or
fireplaces.
-- Always unplug the appliance after use and before you clean it.
-- Do not use the appliance in a room with major temperature changes,
as this may cause condensation inside the appliance.
-- To prevent interference, place the appliance at least 2m away from
electrical appliances that use airborne radio waves such as TVs, radios
and radio-controlled clocks.
-- When the air cleaner is not used for a long time, bacteria may grow on
the filters. Check the filters after a long period of disuse. If the filters
are very dirty, replace them (see chapter ‘Filter replacement’).
-- The appliance is only intended for household use under normal
operating conditions.
-- Do not use the appliance in wet surroundings or in surroundings with
high ambient temperatures, such as the bathroom, toilet or kitchen.
-- The appliance does not remove carbon monoxide (CO) or radon
(Rn). It cannot be used as a safety device in case of accidents with
combustion processes and hazardous chemicals.
Electromagnetic fields (EMF)
This Philips appliance complies with all standards regarding electromagnetic
fields (EMF). If handled properly and according to the instructions in this
user manual, the appliance is safe to use based on scientific evidence
available today.
Before first use
Placing the filters
The appliance comes with all filters fitted inside, but you have to remove
the packaging of the filters before you can use the appliance. Remove all
filters, unpack them and place them back into the appliance as described
below.
Tip: Place the appliance against a wall for more stability when you remove or
insert filters.
Note: Make sure you insert the filters in the correct position.
English
2
9
1 Place your fingers in the recesses of the side panels and gently pull
the bottom of the front panel towards you. Then lift the hooks at the
top of the panel out of the top of the appliance.
1
2 To remove the pre-filter, grab the two projections and pull the filter
towards you.
3 Remove all other filters from the appliance.
4 Remove all packaging material from the filters.
5 Put filter 4 (HEPA filter) back into the appliance.
Note: Make sure that the side with the tag points towards you.
10
English
6 Put filter 3 (activated carbon filter) back into the appliance.
7 AC4004 only: attach filter 2 (multi-care filter) to the back of filter 1
(pre-filter).
Note: Make sure that the front of filter 2 (multi-care filter), that is the side with
the tag, points towards the pre-filter.
8 Place filter 1 (pre-filter) in the appliance.
Note: AC4004: make sure the multi-care filter is attached to the back of the
pre-filter.
Note: Make sure that the side with the two projections points towards you.
Note: Make sure that all hooks are properly attached to the appliance.
1
9 To reattach the front panel, insert the two hooks into the top of
the appliance first (1). Then push the panel against the body of the
appliance (2).
2
Using the appliance
1 Put the plug in the wall socket
,, All lights go on and off twice and you hear a beep.
2 Press the on/off button to switch on the appliance.
English
11
,, The power-on light and one of the AIR QUALITY lights on the
control panel goes on.
AC4004: AIR QUALITY lights
Colour
Air quality
Blue
very good
Deep purple
good
Purple
fair
Red
bad
AC4002: AIR QUALITY lights
Colour
Air quality
Blue
very good
Deep purple
good
Red
bad
,, The appliance automatically starts operating in the auto mode.
To switch off the appliance, press and hold the on/off button again until the
power-on light goes out and unplug the appliance.
Note:When the humidity level in the room is very high, it is possible that
condensation develops on the air quality sensor. As a result, the AIR QUALITY
lights on the control panel may indicate that the air quality is bad even though
the air quality is good. In this case, the auto mode causes the appliance to
run at high fan speed.You can solve this by cleaning the air quality sensor. If
condensation develops frequently during periods of high humidity, we advise
you to use one of the manual speed settings.
Auto mode
When the appliance is switched on, the built-in air quality sensor
automatically measures the ambient air quality. When the auto mode is
activated, the appliance selects the most appropriate fan speed for the
measured air quality.
Note:When you use the auto mode, you can also use the timer function (see
section ‘Timer function in this chapter). In this case, the AUTO light, one of the
FAN SPEED lights, the TIMER light and one of the HOUR lights are on.
1 Press the on/off button to switch on the appliance.
,, The appliance automatically starts operating in the auto mode.
12
English
Note:When the appliance is operating in another mode and you want to
activate the auto mode, simply press the AUTO button.
,, The AUTO light and one of the FAN SPEED lights go on. The FAN
SPEED light indicates at which fan speed the appliance is operating.
Note:When the air quality is very good and the fan speed operates at a very
low fan speed, the FAN SPEED light for the lowest speed does not go on. In this
case only the power-on light and the AUTO light are on.
Fan speed
If you do not use the auto mode, you can select the desired fan speed
yourself.
Note:When you manually select a fan speed, you can also use the timer
function (see section ‘Timer function in this chapter). In this case, one of the
FAN SPEED lights, the TIMER light and one of the HOUR lights are on.
1 Press the on/off button to switch on the appliance.
2 Press the FAN SPEED button one or more times to select the
desired fan speed.
,, The corresponding FAN SPEED light shows the set fan speed.
Timer function
With the timer function, you can let the appliance operate for a
set number of hours. When the set time has elapsed, the appliance
automatically switches off.
You can use the timer function in a number of situations:
-- In combination with the AUTO mode (see section ‘Auto mode’ in this
chapter). In this case, the AUTO light, one of the FAN SPEED lights, the
TIMER light and one of the HOUR lights are on.
English
13
-- When you choose a fan speed manually (see section ‘Fan speed’ in this
chapter). In this case, one of the FAN SPEED lights, the TIMER light and
one of the HOUR lights are on.
-- In combination with the SLEEP mode (see section ‘Sleep mode’ in this
chapter). In this case, the SLEEP light and one of the HOUR lights are
on (but dimmed).
1 Press the on/off button to switch on the appliance.
2 Press the TIMER button to activate the timer.
,, The TIMER light goes on.
3 Press the TIMER button repeatedly to choose the number of hours
you want the appliance to operate.
,, The corresponding HOUR light goes on.
To deactivate the timer function, press the TIMER button repeatedly until
the HOUR light and the TIMER light are out.
Sleep mode
When you use the appliance in sleep mode, it operates very quietly and all
the lights that are on are dimmed, to allow you to sleep undisturbed.
Note:When you use the sleep mode, you can also use the timer function (see
section ‘Timer function in this chapter). In this case, the SLEEP light and one of
the HOUR lights are on (but dimmed).
1 Press the on/off button to switch on the appliance.
2 Press the SLEEP button to activate the quiet sleep mode.
,, The SLEEP light goes on.
,, All other lights are off, except one of the HOUR lights if you have
activated the timer function.
If you want to go back to the fan speed mode or auto mode, simply press
the FAN SPEED or AUTO button. The sleep mode is then deactivated.
14
English
Adjusting the air quality sensor sensitivity
People with certain health problems (e.g. allergies or asthma) have a
greater need for healthy air. For this reason, the air cleaner allows you to
adjust the sensitivity of the air quality sensor. When it is set to a higher
sensitivity level, the appliance already starts cleaning the air at lower
pollution levels to make the air even cleaner.
There are 3 sensitivity levels:
-- extra sensitive
-- sensitive
-- standard
The air quality sensor is set to standard sensitivity. You can adjust the
sensitivity of the air quality sensor in the following way:
1 If the appliance is already plugged in, unplug the appliance and wait
for a few minutes.
2 Press and hold the TIMER button and simultaneously put the mains
plug in the wall socket.
,, The appliance beeps twice and one of the HOUR lights flashes to
show the current sensitivity level of the air quality sensor.
Sensitivity level:
HOUR light
Sensitivity level
1hr
extra sensitive
4hrs
sensitive
8hrs
standard
3 Press the TIMER button to adjust the sensitivity level of the air
quality sensor.
,, One of the HOUR lights flashes to show the set sensitivity level of
the air quality sensor.
4 Press and hold the on/off button to switch off the appliance.
Note:When you change the sensitivity level, the appliance automatically starts
operating at the set sensitivity level whenever you switch on the appliance.
Cleaning and maintenance
Always unplug the appliance before you clean it.
Never immerse the appliance in water or any other liquid.
Never use aggressive or flammable cleaning agents such as bleach or
alcohol to clean any part of the appliance.
Only the pre-filter is washable. All other filters are NOT washable.
English
15
Body of the appliance
Regularly clean the inside and outside of the body to prevent dust from
collecting on the inside and outside.
1 Wipe away dust with a soft dry cloth from the body of the appliance.
2 Clean the air inlet and the air outlet with a soft dry cloth.
Pre-filter
The pre-filter is washable.
-- Clean the pre-filter when the filter cleaning light flashes to ensure
optimal functioning of the appliance.
1 Unplug the appliance.
2
2 Place your fingers in the recesses of the side panels and gently pull
the bottom of the front panel towards you. Then lift the hooks at the
top of the panel out of the top of the appliance.
1
3 To remove the pre-filter, grab the two projections and pull the filter
towards you.
4 AC4004 only: remove the multi-care filter from the back of the prefilter.
5 Wash the pre-filter under a running tap. If the pre-filter is very dirty,
use a soft brush to brush away the dirt.
Tip: Alternatively, you can clean the pre-filter by removing the dust with a
vacuum cleaner.
6 Air-dry the pre-filter.
Note: Make sure that the pre-filter is completely dry.
7 AC4004 only: reattach the multi-care filter to the back of the prefilter.
Note: Make sure that the front of the multi-care filter is pointing towards the
pre-filter.
16
English
8 Put the pre-filter back into the appliance. Attach all hooks properly
to the appliance.
Note: Make sure that the side with the two projections is pointing towards you.
1
9 To reattach the front panel, insert the two hooks into the top of
the appliance first (1). Then push the panel against the body of the
appliance (2).
10Put the plug in the wall socket.
2
11Press and hold the reset button for filter 1 (the button below the
filter cleaning light) for 2 seconds to reset the appliance.
Air quality sensor
Clean the air quality sensor every 2 months for optimal functioning of
the appliance. Clean it more frequently if you use the appliance in a dusty
environment.
Note:When the humidity level in the room is very high, it is possible that
condensation develops on the air quality sensor. As a result, the AIR QUALITY
light on the control panel may indicate that the air quality is bad even though
the air quality is good. In this case you have to clean the air quality sensor or
use one of the manual speed settings.
1 Clean the air quality sensor inlet and the air quality sensor
outlet with a soft brush.
2 Remove the air quality sensor cover.
English
17
3 Clean the air quality sensor, the dust inlet and the dust outlet with a
lightly moistened cotton swab.
4 Dry them with a dry cotton swab.
5 Reattach the air quality sensor cover.
Filter replacement
Filter maintenance
When one of the filters is almost full and has to be cleaned or replaced,
the corresponding light or lights (the pre-filter cleaning light or one of the
filter replacement lights together with the ‘REPLACE FILTER’ light) start to
flash. You then have to clean or replace this filter.
This air cleaner is also equipped with the HealthyAirProtect Lock feature
to ensure that the filters are in optimal condition when the appliance is
operating. When you do not replace filter 2 (AC4004 only), filter 3 and/or
filter 4, the appliance stops operating and the appliance is locked. When the
appliance is locked, the filter replacement light of the filter concerned and
the ’REPLACE FILTER’ light light up continuously.
Filter cleaning light and filter replacement lights
The filter cleaning light and the filter replacement lights indicate which filter
has to be cleaned or replaced.
-- Filter cleaning light 1 flashes: you have to clean filter 1 (pre-filter). See
chapter ‘Cleaning’ for further instructions.
-- Filter replacement light 2 and the ‘REPLACE FILTER’ light flash: filter 2
(multi-care filter, AC4004 only) has to be replaced.
English
18
-- Filter replacement light 3/4 and the ‘REPLACE FILTER’ light flash: filter 3
(activated carbon filter) and filter 4 (HEPA filter) have to be replaced.
Note: Filter 3 (activated carbon filter) and filter 4 (HEPA filter) have a similar
lifetime.Therefore they have to be replaced at the same time.
Filter replacement lock
If you do not replace a filter in time, the appliance stops operating approx.
2 weeks after the filter replacement light started flashing. When the
appliance is locked, it does not operate until you have replaced the full filter
and pressed the reset button.
Note:The time between the filter replacement signal and the locking of the
appliance varies, depending on how often you use the appliance.
Note:When the power on/off light, filter replacement light 2 or 3/4 and the
‘REPLACE FILTER’ light are on continuously, the appliance is locked (see section
‘Filter maintenance’ in this chapter for more information).
Approximately 1 day before the appliance locks, it beeps every 30 minutes
to inform you that one of the filters needs to be replaced.
When the appliance is locked, you hear a beep when you press any button.
You can switch off the appliance by pressing and holding the on/off button.
If the appliance is locked:
1 Check which filter needs to be replaced (see section ‘Filter cleaning
light and filter replacement lights’ above).
2 Switch off the appliance and unplug it.
3 Replace the appropriate filter (see section ‘Replacing the filters and
resetting the appliance’ below).
Replacing the filters and resetting the appliance
Tip: Place the appliance against a wall for more stability when you remove or
insert filters.
2
1
1 Switch off the appliance and unplug it.
2 Place your fingers in the recesses of the side panels and gently pull
the bottom part of the front panel towards you. Then lift the hooks
at the top of the panel out of the top of the appliance.
English
19
3 To remove filter 1 (pre-filter), grab the two projections and pull the
filter towards you.
4 AC4004 only: remove filter 2 (multi-care filter) from the back of the
pre-filter.
5 To remove filter 3 (activated carbon filter), grab its tag and pull it
towards you.
6 To remove filter 4 (HEPA filter), grab its tag and pull it towards you.
7 Discard the filter that has to be replaced and unpack the new filter.
8 Put filter 4 (HEPA filter) back into the appliance.
Note: Make sure that the side with the tag points towards you.
20
English
9 Put filter 3 (activated carbon filter) back into the appliance.
10AC4004 only: reattach filter 2 (multi-care filter) to the back of filter
1 (pre-filter).
Note: Make sure that the front of the multi-care filter points towards the prefilter.
11Put filter 1 (pre-filter) back into the appliance.
Note: Make sure that the side with the two projections points towards you.
Note: Make sure that all hooks are properly attached to the appliance.
1
12To reattach the front panel, insert the two hooks into the top of
the appliance first (1). Then push the panel against the body of the
appliance (2).
13Put the plug in the wall socket and switch on the appliance again.
2
14Press and hold the reset button below the filter replacement light of
the filter you have replaced to reset the appliance.
-- Press and hold the reset button for filter 2 for 2 seconds if you have
replaced filter 2 (multi-care filter).
English
21
-- Press and hold the reset button for filter 3/4 for 2 seconds if you have
replaced filter 3 (activated carbon filter) and 4 (HEPA filter).
,, You hear a beep and the appliance starts operating in the auto mode
again.
Accessories
New filters are available under the following type numbers:
Filter
Type number
Filter 2: multi-care filter
AC4121
Filter 3: activated carbon filter
AC4123
Filter 4: HEPA filter
AC4124
AC4002 only: adding the multi-care filter
AC4002 comes with the pre-filter, activated carbon filter and the HEPA
filter. For this appliance, only the filter cleaning light of filter 1 (pre-filter)
and the filter replacement light of filter 3 and 4 (activated carbon filter and
HEPA filter) have been activated.
If you want to enjoy the benefits of the multi-care filter, you can purchase
this filter separately (see the table above). In combination with the HEPA
filter, the multi-care filter filters out dust, pollen and ultrafine particles
larger than 20 nanometres, including bacteria and some viruses. According
to publications of the World Health Organization, the avian and human
influenza viruses and Legionella bacterium are larger than 20 nanometres.
After installing the multi-care filter, you have to activate the filter
replacement indication of filter 2 in the following way:
1 Simultaneously press and hold the reset button for filter 1 (pre-filter)
and the reset button for filter 2 (multi-care filter) for 2 seconds.
-- To deactivate the filter replacement indication of filter 2,
simultaneously press and hold the reset button for filter 1 (pre-filter)
and the reset button for filter 2 (multi-care filter) for 2 seconds.
Note:To check whether the filter replacement indication of the multi-care filter
is active or not, press the reset button for filter 2. If the filter replacement light
of filter 2 goes on for a few seconds, the filter replacement indication of the
multi-care filter is active. If the filter replacement light of filter 2 does not go
on, the filter replacement indication is not active.
22
English
Environment
-- Do not throw away the appliance with the normal household waste
at the end of its life, but hand it in at an official collection point for
recycling. By doing this, you help to preserve the environment.
Guarantee and service
If you need information or if you have a problem, please visit the Philips
website at www.philips.com or contact the Philips Consumer Care Centre
in your country (you find its phone number in the worldwide guarantee
leaflet). If there is no Consumer Care Centre in your country, go to your
local Philips dealer.
English
23
Troubleshooting
This chapter summarises the most common problems you could
encounter with the appliance. If you are unable to solve the problem with
the information below, contact the Consumer Care Centre in your country.
Problem
Possible solution
The appliance doesn’t
work.
You ignored the filter replacement lights. You did not replace a filter when
the corresponding filter replacement light and the REPLACE FILTER light
started flashing and did not respond when the appliance started to beep
every 30 minutes after approx. 2 weeks. As a result, the appliance is now
locked and you have to replace the filter and reset the appliance (see
chapter ‘Filter replacement’) so that the appliance can provide healthy air
again.
The AIR QUALITY
lights keep flashing and
the appliance does not
work.
There is a problem with the air quality sensor of the appliance. Please
contact the Philips Consumer Care Centre in your country (you find its
phone number in the worldwide guarantee leaflet). If there is no Consumer
Care Centre in your country, go to your local Philips dealer.
No air comes out of the
air outlet
The appliance is not switched on. Put the plug in the wall socket and switch
on the appliance.
The air quality is good and the auto mode is activated. In this case, the
appliance stops operating automatically when the air is clean to save
electricity.
The airflow that comes
out of the air outlet is
significantly weaker than
before.
The pre-filter is dirty. Clean the pre-filter (see chapter ‘Cleaning’).
You haven’t removed all packaging material from the filters. Make sure that
you have removed all packaging material.
The air quality does not
improve, even though
the appliance has been
operating for a long time.
One of the filters has not been placed in the appliance. Make sure
that all filters are properly installed in the following order, starting with
the innermost filter: HEPA filter, activated carbon filter, multi-care filter
(AC4004 only), pre-filter. The multi-care filter (AC4004 only) has to be
attached to the back of the pre-filter.
The air quality sensor is wet. The humidity level in your room is high and
causes condensation. Make sure that the air quality sensor is clean and dry
(see chapter ‘Cleaning’).
The room in which you run the appliance is larger than 30m², which is the
maximum size at which this air cleaner can operate effectively.
The air quality sensor is dirty. Clean the air quality sensor (see
The AIR QUALITY light
chapter ‘Cleaning’).
does not change colour
even though the appliance
has been operating for
some time.
I need cleaner air because
I have an allergy.
You can change the air quality sensor sensitivity (see chapter ‘Using the
appliance’) to make the air cleaner clean the air even better.
24
English
Problem
Possible solution
The appliance is extra
loud.
You have not removed all packaging material from the filters. Make sure
that you have removed all packaging material.
The appliance still
indicates that I need
to replace a filter, but I
already did.
Perhaps you did not reset the appliance. Plug in the appliance, press and
hold the reset button corresponding to the filter you have replaced. The
appliance beeps if you have reset it properly.
When I press the SLEEP
When you press the SLEEP button, the appliance enters the SLEEP mode,
button, all lights except for which is designed to allow you to sleep undisturbed. The appliance operates
the SLEEP light go out.
quietly and only the SLEEP light is on. If you have activated the timer, one
of the HOUR lights is also on. All lights that are on in the SLEEP mode are
dimmed to allow you to sleep undisturbed.
繁體中文
25
簡介
恭喜您購買本產品並歡迎加入飛利浦!請於 www.philips.com/
welcome 註冊您的產品,以善用飛利浦提供的支援。
有了空氣清淨系統,您就可以呼吸清淨空氣。為了達到最佳效果,
請將空氣清淨系統放在您最常待的房間內,例如您的起居室或臥
室。
只要是有人、植物或寵物的地方,空氣當中就會有影響您健康的微
粒存在,特別是若您同時受過敏之苦。因為這些微粒之故,您室內
的空氣污染,可能比大都市的污染情況嚴重。
通常微粒本身無味,肉眼亦無法看見。儘管如此,卻會危害您的健
康。空氣清淨系統能降低空氣當中的動物皮屑以及工業污染物,藉
此改善空氣品質。同時也能濾除大於 20 奈米的超微粒,其中包括
病毒與細菌。根據世界衛生組織的出版物指出,禽鳥類與人類的流
感病毒以及退伍軍人菌 (Legionella) 大於 20 奈米。
多階段過濾
本空氣清淨機具有多階段過濾系統,確保最佳空氣品質:
-- 階段 1:前層濾網經抗菌物質處理,可捕捉人類頭髮、寵物毛髮
等較大粒子。
-- 階段 2:相較於 HEPA 濾網,全效濾網可濾除灰塵、花粉與
大於 20 奈米的超微粒,其中包括病毒與細菌。根據世界衛生
組織的出版物指出,禽鳥類與人類的流感病毒以及退伍軍人菌
(Legionella) 大於 20 奈米。
-- 階段 3:活性碳濾網可有效去除異味與有害氣體。
-- 階段 4:高效能複合 HEPA 濾網有抗菌塗層,可有效去除微塵與
香煙味,而有機抗菌材質的抗菌防霉功能可去除細菌與霉菌。
一般說明 (圖 1)
A
B
C
D
E
F
G
H
1
2
3
4
空氣品質感測器出風口
空氣品質感測器
空氣品質感測器進風口
進風口
電源線
出風口
手柄
控制面板
前層濾網清潔指示燈
更換濾網指示燈
具有「產品鎖定」指示的更換濾網 (REPLACE FILTER) 指示燈
空氣品質 (AIR QUALITY) 指示燈 (AC4004:4 個指示燈,
AC4002:3 個指示燈)
5 小時 (HOUR) 指示燈
6 定時開/關 (TIMER On/Off) 按鈕附指示燈
7 自動 (AUTO) 按鈕附指示燈
8 休眠 (SLEEP) 按鈕附指示燈
9 電源開/關 (On/Off) 按鈕附指示燈
10 風扇速度 (FAN SPEED) 按鈕附指示燈
11 風扇速度 (FAN SPEED) 指示燈 (AC4004:3 個指示燈,
AC4002:2 個指示燈)
12 前層濾網重設 (RESET) 按鈕
13 濾網 2 重設 (RESET) 按鈕
14 濾網 3/4 重設 (RESET) 按鈕
26
繁體中文
I
J
K
L
M
濾網 4:HEPA 濾網 (AC4124)
濾網 3:活性碳濾網 (AC4123)
濾網 2 (僅限 AC4004):多重防護濾網 (AC4121)
濾網 1:前層濾網
正面護板
重要事項
在使用本產品前,請先仔細閱讀本使用手冊,並保留說明以供日後
參考。
危險
-- 請勿讓水或其他液體,或是易燃清潔劑進入產品內,以避免電擊
和 / 或火災。
-- 請勿用水或其他液體,或是 (易燃) 清潔劑清潔產品,以避免電
擊和 / 或火災。
警示
-- 在連接本產品的電源之前,請確認本產品機體底部所標示的電壓
與當地的室內電壓是否相同。
-- 如果電線損壞,則必須交由飛利浦、飛利浦授權之服務中心,或
是具備相同資格的技師更換,以免發生危險。
-- 當插頭、電線或產品本身受損時,請勿使用產品。
-- 基於安全考慮,在缺乏監督及適當指示之下,本產品不適用於孩
童及任何身體、知覺、或心理功能障礙者,或缺乏使用經驗及
知識者。
-- 請勿讓孩童使用本產品或當成玩具。
-- 請勿在出風口上方或進風口前面放置物品,擋住進出風口。
警告
-- 本產品不可用來作為維持良好通風的設備、替代吸塵器清潔,或
烹調時用來當作抽油煙機使用。
-- 如果供應產品電力的電源插座接觸不良,產品插頭可能會發熱。
請確定將產品插入接觸良好的插座。
-- 請將本產品放置在乾燥平穩的水平面上使用。
-- 產品的背面及側面須至少保留 20 公分的間隔距離,頂部則至少
保留 30 公分的間隔距離。
-- 產品頂部請勿堆放任何物品,請勿坐在產品上。
-- 請勿將本產品放置在冷氣機正下方,以免冷氣機滴水,造成產品
發生水滴凝結的現象。
-- 請在開啟產品電源前,先確認所有濾網皆已正確安裝。
-- 僅使用本產品專用的飛利浦原廠濾網,請勿使用其他濾網。
-- 切勿使用堅硬的物體敲打本產品 (特別是進風口及出風口)。
-- 請務必使用產品背面的握把提起或搬動產品。
-- 請勿將手指或任何物體放入出風口。
-- 當您使用室內噴霧式驅蟲劑或在充滿油漬、燒香、香煙的火星或
化學煙霧的地方時,請勿使用本產品。
-- 請勿在氣體用品、加熱裝置或壁爐附近使用本產品。
-- 使用完畢後或進行清潔之前,請務必先拔除電源插頭。
-- 請勿在溫差變化極大的室內使用本產品,因為室溫差距太大會造
成本產品內部凝結水珠。
-- 請將本產品遠離使用無線電電波的電子儀器至少 2 公尺以避免
干擾,例如電視、無線電廣播、無線電信號控制的時鐘。
繁體中文
27
-- 當空氣清淨機有一段時間沒有使用,濾網上可能會滋生細菌。長
時間沒有使用的話,請您檢查濾網。如果濾網非常髒,請更換濾
網 (請參閱「更換濾網」單元)。
-- 本產品為家用產品,僅限於在正常操作環境下使用。
-- 請勿在極為潮濕或周遭溫度很高的環境下使用本產品,例如浴
室、廁所或廚房。
-- 本產品無法清除一氧化碳 (CO)或氡氣 (Rn)。發生燃燒意外及危
險化學物品意外時,本產品無法當作安全裝置使用。
電磁波 (EMF)
本飛利浦產品符合電磁波 (Electromagnetic fields,EMF) 所有相關
標準。只要使用方式正確並依照本使用手冊之說明進行操作,根據
現有的科學研究資料,使用本產品並無安全顧慮。
第一次使用前
放置濾網
2
1
本產品所有隨附的濾網皆已妥善安裝在機體內,但是在使用前,必
須先拆下濾網包裝。請先移除所有濾網,拆下濾網包裝,然後把濾
網放回產品中,如下所述。
提示: 取出或裝入濾網時,將本產品靠牆擺放可獲得較穩定的支
撐。
注意: 請確定濾網裝入正確的位置。
1將手指放入兩邊護板的凹處,朝自己的方向,將正面護板的底部
輕輕拉出。然後將護板頂部的扣鉤自產品頂部提起。
2若要取出前層濾網,抓住濾網上兩個凸出部分,朝向自己拉出。
3自產品內取出所有其他濾網。
28
繁體中文
4拆下濾網所有包裝材料。
5將濾網 4 (HEPA 濾網) 裝回產品。
注意: 請確認有拉片的那一側朝向自己。
6將濾網 3 (活性碳濾網) 裝回產品。
7僅限 AC4004:將濾網 2 (多重防護濾網) 安裝於濾網 1 (前層濾
網) 後方。
注意: 請確認濾網 2 (多重防護濾網) 前側,即有拉片的那一側朝向
前層濾網。
8將濾網 1 (前層濾網) 裝回產品。
注意: AC4004:請確認全效濾網是安裝於前層濾網的後方。.
前面
注意: 請確認有兩個凸出部分的那一側朝向自己。
咔
注意: 請確認所有扣鉤皆已正確裝入產品。
繁體中文
1
29
9若要重新裝入正面護板,先將二個扣鉤裝入產品頂部 (1),然後
將護板推入產品機體 (2)。
2
使用此產品
1將插頭插入電源插座
,, 所有指示會燈亮與熄滅起兩次,並發出嗶聲。
2按下開/關 (On/Off) 按鈕,開啟產品電源。
,, 控制面板上的電源指示燈與其中一個空氣品質 (AIR QUALITY)
指示燈會亮起。
AC4004:空氣品質 (AIR QUALITY) 指示燈
顏色
空氣品質
藍色
優良
深紫色
良好
紫色
普通
紅色
不良
AC4002:空氣品質 (AIR QUALITY) 指示燈
顏色
空氣品質
藍色
優良
深紫色
良好
紅色
不良
,, 本產品會在自動模式下自動開始運作。
若要關閉產品電源,請再次按下開關 (On/Off) 按鈕不動,等到電源
30
繁體中文
開啟指示燈熄滅,將產品的插頭拔除。
注意: 室內濕度等級很高的時候,空氣品質感測器上可能會凝結水
滴,如此一來,即使空氣品質良好,控制面板上的空氣品質 (AIR
QUALITY) 指示燈可能會顯示空氣品質不良。此時自動模式會讓產
品風扇高速運轉。您可以清潔空氣品質感測器來解決此問題。如果
高濕度期間經常發生水滴凝結問題,建議您使用手動風速設定。
自動模式
產品電源開啟後,內建的空氣品質感測器會自動檢測周遭環境的空
氣品質。啟動自動模式後,產品會根據所檢測到的空氣品質,選擇
最適當的風扇速度。
注意: 使用自動模式時,您也可以使用定時功能 (請參閱本單元的
「定時功能」章節)。在此情況下,自動 (AUTO) 指示燈、其中一個
風扇速度 (FAN SPEED) 指示燈、定時 (TIMER) 指示燈以及其中一
個小時 (HOUR) 指示燈會亮起。
1按下開/關 (On/Off) 按鈕,開啟產品電源。
,, 本產品會在自動模式下自動開始運作。
注意: 若產品以另一種模式運作,但您想要啟動自動模式時,只要
按下自動 (AUTO) 按鈕即可。
,, 自動 (AUTO) 指示燈與其中一個風扇速度 (FAN SPEED) 指示燈
會亮起。風扇速度 (FAN SPEED) 指示燈會顯示產品是以何種風
扇速度運作。
注意: 當空氣品質非常良好時,風扇速度會以非常低的風扇速度運
作,顯示低速運作的風扇速度 (FAN SPEED) 指示燈不會亮起。在
此情況下,只有電源指示燈與自動 (AUTO) 指示燈會亮起。
風扇速度
如果不使用自動模式,可選擇所需的風扇速度。
注意: 當您手動選取風扇速度時,也可以使用定時功能 (請參閱本
單元的「定時功能」章節)。在此情況下,其中一個風扇速度 (FAN
SPEED) 指示燈、定時 (TIMER) 指示燈以及其中一個小時 (HOUR)
指示燈會亮起。
1按下開/關 (On/Off) 按鈕,開啟產品電源。
2按下風扇速度 (FAN SPEED) 按鈕一次或多次,選擇所需的風扇
速度。
,, 對應的風扇速度 (FAN SPEED) 指示燈會顯示設定的風扇速度。
定時功能
您可以使用定時功能,讓產品在設定的小時數內運作。設定的時間
結束時,本產品會自動關閉電源。
您可以在下列情況下使用定時功能:
繁體中文
31
-- 搭配自動 (AUTO ) 模式使用 (請參閱本單元的「自動模式」章
節)。在此情況下,自動 (AUTO) 指示燈、其中一個風扇速度
(FAN SPEED) 指示燈、定時 (TIMER) 指示燈以及其中一個小時
(HOUR) 指示燈會亮起。
-- 手動選取風扇速度 (請參閱本單元的「風扇速度」章節)。在此情
況下,其中一個風扇速度 (FAN SPEED) 指示燈、定時 (TIMER)
指示燈以及其中一個小時 (HOUR) 指示燈會亮起。
-- 搭配休眠 (SLEEP) 模式使用 (請參閱本單元的「休眠模式」
章節)。在此情況下,休眠 (SLEEP) 指示燈以及其中一個小時
(HOUR) 指示燈會亮起 (低亮度顯示)。
1按下開/關 (On/Off) 按鈕,開啟產品電源。
2按下定時 (TIMER) 按鈕啟動定時功能。
,, 定時 (TIMER) 指示燈會亮起。
3重複按下定時 (TIMER) 按鈕,選擇想要產品運作的小時數。
,, 對應的小時 (HOUR) 指示燈會亮起。
要關閉定時功能,請重複按下定時 (TIMER) 按鈕,直到小時
(HOUR) 指示燈與定時 (TIMER) 指示燈熄滅為止。
休眠模式
當產品處於休眠模式時,會非常安靜地運作,亮起的指示燈會以低
亮度顯示,給您不受干擾的睡眠。
注意: 您也可以在休眠模式時使用定時功能 (請參閱本單元的「定
時功能」章節)。在此情況下,休眠 (SLEEP) 指示燈與其中一個小
時 (HOUR) 指示燈會亮起 (但呈昏暗)。
1按下開/關 (On/Off) 按鈕,開啟產品電源。
32
繁體中文
2按下休眠 (SLEEP) 按鈕,啟動安靜休眠模式。
,, 休眠 (SLEEP) 指示燈會亮起。
,, 其他指示燈會關閉,若您設定了定時功能,則其中一個小時
(HOUR) 指示燈會亮起。
如果想要返回風扇速度模式或自動模式,只要按下風扇速度 (FAN
SPEED) 按鈕或自動 (AUTO) 按鈕,休眠模式便會關閉。
調整空氣品質感測器敏感度
患有某些健康問題 (如過敏或氣喘) 的人,更加需要健康的空氣。基
於這個原因,本空氣清淨機可調整空氣品質感測器的敏感度。敏感
度的等級設為較高時,產品在污染程度較低時就會開始潔淨空氣,
讓空氣更加乾淨。
敏感度的等級有 3 種:
-- 超敏感
-- 敏感
-- 標準
空氣品質感測器的設定為標準敏感度。空氣品質感測器的敏感度可
依照下列方式調整:
1如果產品已經插電,請將產品的插頭拔下,等待幾分鐘。
2按住定時 (TIMER) 按鈕,同時將電源插頭插入電源插座。
,, 產品會發出兩次嗶聲,其中一個小時 (HOUR) 指示燈會閃爍,
顯示空氣品質感測器目前的敏感度等級。
敏感度等級:
小時 (HOUR) 指示燈
敏感度等級
1 小時
超敏感
4 小時
敏感
8 小時
標準
3按下定時 (TIMER) 按鈕,調整空氣品質感測器的敏感度等級。
,, 其中一個小時 (HOUR) 指示燈會閃爍,顯示所設定的空氣品質
感測器敏感度等級。
4按住開關 (On/Off) 按鈕,關閉產品電源。
注意: 若您變更了敏感度等級,產品在開啟電源後,會依照您設定
的敏感度等級,自動開始運作。
清潔與維護
進行清潔前,請務必先拔離電源插頭。
切勿讓產品浸入水或其他液體中。
繁體中文
33
切勿使用漂白劑或酒精等刺激性或易燃洗劑清潔產品的任何部分。
只有前層濾網可以水洗,其他濾網「不得」水洗。
產品機體
定期清理機體內部與外殼,可避免內部與外殼累積灰塵。
1請使用柔軟的乾布擦拭產品的機體。
2請使用柔軟的乾布清潔進風口及出風口。
前層濾網
前層濾網可水洗。
-- 濾網清理指示燈閃爍時,請清洗前層濾網,確保產品發揮最佳
效果。
1將本產品的插頭拔除。
2
2將手指放入兩邊護板的凹處,朝自己的方向,將正面護板的底部
輕輕拉出。然後將護板頂部的扣鉤自產品頂部提起。
1
3若要取出前層濾網,抓住濾網上兩個凸出部分,朝向自己拉出。
4僅限 AC4004:取出前層濾網後方的全效濾網。
5將前層濾網置於水龍頭下清洗。如果前層濾網很髒,請使用軟刷
來清除灰塵。
提示: 清潔前層濾網的其他方法,就是使用吸塵器去除灰塵。
6讓前層濾網自然風乾。
注意: 請確認前層濾網完全乾燥。
7僅限 AC4004:將全效濾網重新裝回前層濾網後方。
注意: 請確認全效濾網正面朝向前層濾網。
34
繁體中文
8將前層濾網裝回產品中,所有扣鉤正確扣入產品。
注意: 請確認有兩個凸出部分的那一側朝向自己。
前面
咔
1
9若要重新裝入正面護板,先將二個扣鉤裝入產品頂部 (1),然後
將護板推入產品機體 (2)。
10 將插頭插入電源插座。
2
11 按住濾網 1的重設按鈕 (濾網清理指示燈下方的按鈕) 2 秒,將產
品重新設定。
秒
空氣品質感測器
每 2 個月清潔空氣品質感測器,確保產品發揮最佳效果。如果在佈
滿灰塵的環境中使用本產品,就要更常清潔空氣品質感測器。
注意: 室內濕度等級很高的時候,空氣品質感測器上可能會凝結水
滴,如此一來,即使空氣品質良好,控制面板上的空氣品質 (AIR
QUALITY) 指示燈可能會顯示空氣品質不良。在此情況下,您必須
清潔空氣品質感測器,或使用手動風速設定。
1請使用軟刷,清潔空氣品質感測器的進風口及出風口。
2取下空氣品質感測器的護蓋。
繁體中文
35
3請使用略濕的棉棒,清潔空氣品質感測器、進風口、出風口。
4使用乾的棉棒擦乾。
5裝上空氣品質感測器的護蓋。
更換濾網
保養濾網
當濾網阻塞,必須清潔或更換時,對應的指示燈  (前層濾網清潔指
示燈或其中一個更換濾網指示燈與更換濾網 (REPLACE FILTER) 指
示燈) 會開始閃爍。此時您必須清潔或更換此濾網。
本空氣清淨機亦具備健康空氣保護鎖 (HealthyAirProtect Lock) 功
能,可確保濾網在產品運作時處於最佳狀態。若不更換濾網 2 (僅
限 AC4004)、濾網 3 和/或濾網 4,產品會停止運作,然後鎖定。
產品鎖定後,對應濾網的更換濾網指示燈與更換濾網 (REPLACE
FILTER) 指示燈會持續亮起。
濾網清理指示燈與更換濾網指示燈
濾網清理指示燈與更換濾網指示燈會顯示哪一個濾網必須清潔或更
換。
-- 濾網清理指示燈 1 閃爍:您必須清潔濾網 1 (前層濾網)。請參閱
「清潔」單元,瞭解更進一步的說明。
-- 更換濾網指示燈 2 多重防護換濾網 (REPLACE FILTER) 指示燈
閃爍:濾網 2 (全效濾網,僅限 AC4004) 必須更換。
-- 更換濾網指示燈 3/4 和更換濾網 (REPLACE FILTER) 指示燈閃
爍:濾網 3 (活性碳濾網) 與濾網 4 (HEPA 濾網) 必須更換。
注意: 濾網 3 (活性碳濾網) 與濾網 4 (HEPA 濾網) 的使用壽命相
當,因此必須同時更換。
繁體中文
36
更換濾網鎖
如果不即時更換濾網,本產品會在更換濾網指示燈開始閃爍約 2 週
後停止運作。產品鎖定後,必須更換濾網,並按下重設按鈕才能恢
復運作。
注意: 更換濾網訊號到產品鎖定的時間會依據您使用產品的頻率而
不同。
注意: 當電源開關指示燈、更換濾網指示燈 2 或 3/4,以及更換濾
網 (REPLACE FILTER) 指示燈持續亮起時,本產品已鎖定 (請參閱
本章節中的「濾網保養」部分,取得詳細資訊)。
本產品進入鎖定狀態的前 1 天,每隔 30 分鐘會發出嗶聲,提示有
濾網需要更換。
本產品鎖住後,按下任何一個按鈕,都會聽見嗶聲。您可以按下開
關 (On/Off) 不放,以關閉產品電源。
如果產品已鎖住:
1檢查哪個濾網需要更換 (請參閱上方的「濾網清理指示燈與更換
濾網指示燈」)。
2關閉產品電源,並拔除插頭。
3更換對應的濾網 (請參閱下方的「更換濾網與重設產品」)。
更換濾網與重設產品
提示: 取出或裝入濾網時,將本產品靠牆擺放可獲得較穩定的支
撐。
2
1
1關閉產品電源,並拔除插頭。
2將手指放入兩邊護板的凹處,朝自己的方向,將正面護板的底部
輕輕拉出。然後將護板頂部的扣鉤自產品頂部提起。
3若要取出濾網 1 (即前層濾網),抓住濾網上兩個凸出部分,朝向
自己拉出。
4僅限 AC4004:取出前層濾網後方的濾網 2 (全效濾網)。
繁體中文
37
5若要取出濾網 3 (活性碳濾網),抓住濾網拉片,朝向自己拉出。
6若要取出濾網 4 (HEPA 濾網),抓住濾網拉片,朝向自己拉出。
7丟棄需要更換的濾網,拆開新濾網的包裝。
8將濾網 4 (HEPA 濾網) 裝回產品。
注意: 請確認有拉片的那一側朝向自己。
9將濾網 3 (活性碳濾網) 裝回產品。
10 僅限 AC4004:將濾網 2 (多重防護濾網) 重新安裝於濾網 1 (前
層濾網) 後方。
注意: 請確認多重防護濾網正面朝向前層濾網。
38
繁體中文
11 將濾網 1 (前層濾網) 裝回產品。
注意: 請確認有兩個凸出部分的那一側朝向自己。
前面
注意: 請確認所有扣鉤皆已正確裝入產品。
咔
1
12 若要重新裝入正面護板,先將二個扣鉤裝入產品頂部 (1),然後
將護板推入產品機體 (2)。
13 請將插頭插入電源插座,再度開啟產品電源。
14 按住已更換的濾網指示燈下方的重設按鈕,以重新設定產品。
2
-- 若您已更換濾網 2 (全效濾網),請按住濾網 2 的重設按鈕 2 秒。
秒
-- 若您已更換濾網 3 (活性碳濾網) 與 4 (HEPA 濾網),請按住濾網
3/4 的重設按鈕 2 秒。
,, 您會聽到嗶聲,然後產品會再度開始在自動模式下運作。
秒
配件
我們提供下列型號的新濾網:
濾網
型號
濾網 2:多重防護濾網
AC4121
濾網 3:活性碳濾網
AC4123
濾網 4:HEPA 濾網
AC4124
繁體中文
39
僅限 AC4002:使用多重防護濾網
AC4002 隨附前層濾網、活性碳濾網與 HEPA 濾網。本產品僅啟動
濾網 1 的濾網清理指示燈 (前層濾網),以及濾網 3 與 4 的更換濾網
指示燈 (活性碳濾網與 HEPA 濾網)。
若要享有多重防護濾網所帶來的好處,您可以另外選購此濾網 (請
參閱上方的表格)。相較於 HEPA 濾網,全效濾網可濾除灰塵、花
粉與大於 20 奈米的超微粒,其中包括病毒與細菌。根據世界衛
生組織的出版物指出,禽鳥類與人類的流感病毒以及退伍軍人菌
(Legionella) 大於 20 奈米。
安裝全效濾網後,您必須依照下列方法啟動濾網 2 的更換濾網指
示:
1同時按住濾網 1 (前層濾網) 與濾網 2 (多重防護濾網) 的重設按
鈕 2 秒。
-- 若要關閉濾網 2 的更換濾網指示,請同時按住濾網 1 (前層濾網)
與濾網 2 (多重防護濾網) 的重設按鈕 2 秒。
秒
注意: 若要檢查多重防護濾網的更換濾網指示是否啟動,請按下濾
網 2 的重設按鈕。如果濾網 2 的更換濾網指示燈閃爍幾秒鐘,則表
示全效濾網的更換濾網指示為啟動狀態。如果濾網 2 的更換濾網指
示燈沒有亮起,則表示更換濾網指示沒有啟動。
環境保護
-- 本產品壽命結束時請勿與一般家庭廢棄物一併丟棄。請將該產品
放置於政府指定的回收站,此舉能為環保盡一份心力。
保證書與服務
若您需要相關資訊,或是有任何問題,請瀏覽飛利浦網站,網址為
www.philips.com,或連絡您當地的飛利浦顧客服務中心 (您可以在全
球保證書上找到連絡電話)。若您當地沒有顧客服務中心,請洽詢當
地的飛利浦經銷商。
故障排除
本單元概述您使用本產品時最常遇到的問題。如果您無法利用以下
資訊解決您遇到的問題,請聯絡您所在國家/地區的顧客服務中心。
問題
可能的解決方法
產品不能運作。
若您忽略更換濾網指示燈,在對應的更換濾網指示燈與更換濾網
(REPLACE FILTER) 指示燈開始閃爍時未更換濾網,且在 2 週後產
品開始每隔 30 分鐘發出嗶聲時,並未因應處理。結果導致產品鎖
定,您必須更換濾網並重設本產品 (請參閱「更換濾網」單元),如
此一來產品才可再度提供健康的空氣。
40
繁體中文
問題
可能的解決方法
空氣品質 (AIR
QUALITY) 指示燈持續
閃爍,且產品無法運
作。
產品的空氣品質感測器故障。請聯絡您所在國家/地區的飛利浦客戶
服務中心 (電話號碼可參閱全球保證書)。如果您所在國家/地區沒有
顧客服務中心,請向您當地的飛利浦經銷商尋求協助。
出風口沒有空氣流出
產品電源沒有開啟,請將插頭插入電源插座,開啟產品電源。
空氣品質良好,且自動模式啟動,在此情況下,產品會在空氣乾淨
時自動停止運作,以節省電力。
出風口流出的風速比之
前慢。
前層濾網髒污,請清潔前層濾網 (請參閱「清潔」單元)。
您尚未拆下濾網的所有包裝材料,請確認已移除所有包裝材料。
即使本產品已經長時間
運作,空氣品質仍未獲
得改善。
其中一個濾網尚未放入產品中,請確認所有濾網都已按照下列順序
正確安裝,濾網由內至外分別為:HEPA 濾網、活性碳濾網、
多重防護濾網 (僅限 AC4004)、前層濾網。全效濾網 (僅限
AC4004) 必須安裝於前層濾網的後方。
空氣品質感測器潮濕。室內的濕度等級很高,造成水珠凝結。請確
認空氣品質感測器乾淨且乾燥 (請參閱「清潔」單元)。
本產品放置在超過 30 平方公尺的空間裡,本空氣清淨機可有效運
作的空間不得超過 30 平方公尺。
即使產品已經運作一段
時間,空氣品質 (AIR
QUALITY) 指示燈仍沒
有變更顏色。
空氣品質感測器髒污,請清潔空氣品質感測器 (請參閱「清潔」單
元)。
我會過敏,需要更乾淨
的空氣。
您可以變更空氣品質感測器敏感度 (請參閱「使用本產品」單元),
讓空氣清淨機把空氣清潔得更加徹底。
產品噪音很大。
您尚未拆下濾網的所有包裝,請確認已拆除所有包裝材料。
產品不斷要求更換濾
網,但濾網已經更換
了。
也許您沒有重設產品。請插上產品電源,按住您已更換的濾網的對
應重設按鈕。如果您有正確重設產品,產品會發出嗶聲。
按下休眠 (SLEEP) 按鈕
時,除了休眠 (SLEEP)
指示燈外,其他指示燈
都熄滅了。
按下休眠 (SLEEP) 按鈕時,產品會進入休眠 (SLEEP) 模式,此設計
是為了讓您在不受干擾的情況下安穩入眠。產品會安靜地運作,僅
有休眠 (SLEEP) 指示燈會亮起。如果您啟動了定時,其中一個小時
(HOUR) 指示燈也會亮起。在休眠 (SLEEP) 模式下,所有指示燈以
低亮度顯示,給您不受干擾的睡眠。
简体中文
41
产品简介
感谢您的惠顾,欢迎光临飞利浦!为了您能充分享受飞利浦提供的
支持服务,请登陆 www.philips.com/welcome 网站注册您的产品。
有了这款全新的空气净化器,您可以呼吸到更洁净的空气。为获得
至佳效果,请将该高效能空气净化器放置在您停留时间最长的处
所,如客厅或卧室。
有人、植物或宠物的地方,空气中就会有悬浮颗粒。空气中的悬浮
颗粒可能影响您的健康,如果您患有过敏症,则尤其如此。由于这
些悬浮颗粒的存在,房间内的空气污染可能比大城市的室外空气污
染更严重。
一般而言,悬浮颗粒是看不见的,并且没有异味。但它会影响您的
健康。高效能空气净化器可减少空气中动物皮屑以及工业污染物的
含量,因此能够改善空气质量。它还能过滤掉体积大于 20 纳米的
微小颗粒,这包括细菌和部分病毒。而世界卫生组织的刊物显示,
禽流感、人流感病毒和军团症细菌均大于 20 纳米。
多重过滤
该空气净化器具有独特的多重过滤系统,可保证至佳的空气质量:
-- 第 1 重:预过滤网经过抗菌物质处理,可滤除头发、宠物毛发
等较大颗粒。
-- 第 2 重:与 HEPA 过滤网相结合,多重防护过滤网可过滤掉大
于 20 纳米的灰尘、过敏原和微小颗粒,包括细菌和部分病毒。
世界卫生组织的刊物显示,禽流感、人流感病毒和军团症细菌均
大于 20 纳米。
-- 第 3 重:活性炭过滤网能够有效去除异味和有害气体。
-- 第 4 重:高性能复合 HEPA 过滤网具有抗菌涂层,可有效过滤
细小的灰尘和烟气,同时有机抗菌材料的抗菌和防霉功能也可以
抑制细菌和霉菌。
一般说明 (图 1)
A
B
C
D
E
F
G
H
1
2
3
空气质量传感器出风口
空气质量传感器
空气质量传感器进风口
进风口
电源线
出风口
手柄
控制面板
预过滤网清洁指示灯
过滤网更换指示灯
REPLACE FILTER(更换过滤网)指示灯持续亮起,表示“产品
已锁定”
4 AIR QUALITY 指示灯(AC4004:4 级指示灯,AC4002:3 级
指示灯)
5 HOUR 小时指示灯
6 TIMER 定时开/关按钮(带指示灯)
7 AUTO 自动按钮(带指示灯)
8 SLEEP 休眠按钮(带指示灯)
9 电源开/关按钮(带指示灯)
10 FAN SPEED(风速)按钮(带指示灯)
11 FAN SPEED 风速指示灯(AC4004:3 级指示灯;AC4002:2
级指示灯)
42
简体中文
12 预过滤网 RESET 重置按钮
13 过滤网 2 RESET 重置按钮
14 过滤网 3/4 RESET 重置按钮
I 过滤网 4:HEPA 过滤网 (AC4124)
J 过滤网 3:活性炭过滤网 (AC4123)
K 过滤网 2(仅限于 AC4004):多重防护过滤网 (AC4121)
L 过滤网 1:预过滤网
M 前面板
注意事项
使用产品之前,请仔细阅读本用户手册,并妥善保管以供日后参
考。
危险
-- 切勿让水或任何其它液体或易燃性清洁剂进入产品,以免发生触
电和(或)火灾。
-- 切勿用水或任何其它液体或(易燃性)清洁剂来清洁产品,以免
发生触电和(或)火灾。
警告
-- 在将产品接通电源以前,首先确认产品底部所标示的电压是否与
当地的电压相符。
-- 如果电源软线损坏,为了避免危险,必须由制造商、其维修部或
类似部门的专业人员来更换。
-- 如果插头、电源线或产品本身受损,请勿使用本产品。
-- 本产品不打算由肢体不健全、感觉或精神上有障碍或缺乏相关经
验和知识的人(包括儿童)使用,除非有负责他们安全的人对他
们使用本产品进行监督或指导。
-- 应照看好儿童,确保他们不玩耍该产品。
-- 请勿堵塞进风和出风口,例如不要将物体放置在出风口上或进风
口前方。
注意
-- 本产品不能替代正常通风、日常吸尘或者在烹饪时使用的抽油
烟机。
-- 如果连接产品的电源插座接触不良,则产品的插头可能会变得很
热。确保所连接的电源插座接触良好。
-- 一定要在干燥、稳固、平整且水平的表面上放置和使用本产品。
-- 产品的后侧及两侧均要留出至少 20 厘米的空间,产品上方至少
要留出 30 厘米的空间。
-- 切勿在产品顶部放置任何物品,也不要坐在产品上。
-- 切勿将产品直接放在空调下方,以防冷凝水滴到产品中。
-- 打开产品电源之前,务必确保已经正确安装所有过滤网。
-- 只能使用飞利浦专门为本产品设计的原装过滤网,切勿使用任何
其它过滤网。
-- 请勿用硬物敲击本产品(尤其是进风口和出风口)。
-- 请务必通过产品背面的手柄提起或移动产品。
-- 请勿将手指或其它物体插入出风口。
-- 当您使用室内喷雾式驱虫剂或在充满易燃气体的地方时,请勿使
用本产品。
-- 请勿在气体用具、加热装置或火炉附近使用本产品。
-- 使用之后和清洁产品前,务必先将电源插头拔掉。
-- 请勿在温度变化较大的房间内使用本产品,因为这可能导致产品
内部的冷凝。
简体中文
43
-- 为防止干扰,请将产品放置在距离使用空中电波的电器(例如电
视机、收音机和无线电控制时钟)至少 2 米的距离。
-- 当空气净化器长期不用时,过滤网上可能会生长细菌。长时间不
用之后,请仔细检查过滤网。如果过滤网非常脏,请加以更换(
请参阅“更换过滤网”一章)。
-- 本产品仅限于家用并在正常运行条件下使用。
-- 请勿在潮湿环境或高温环境中(例如浴室、卫生间或厨房)使用
本产品。
-- 本产品不能去除一氧化碳 (CO) 或氡 (Rn),因此在发生燃烧和危
险化学品事故时,不能作为安全设备使用。
电磁场 (EMF)
这款飞利浦产品符合关于电磁场 (EMF) 的相关标准。据目前的科学
证明,如果正确使用并按照本用户手册中的说明进行操作,本产品
是安全的。
初次使用之前
安装过滤网
2
1
本产品内部随附了所有过滤网,但是使用产品之前,务必首先除去
过滤网的包装。请按以下说明卸下所有过滤网并除去其包装,然后
重新放回产品中。
提示: 在取下或插入过滤网之前,请将产品靠墙摆放以使其更稳
固。
注意: 务必将过滤网插到正确位置。
1将手指放在侧面板的凹处,然后朝自己的方向轻轻拉出前面板的
底部。提拉面板上半部分的挂钩,将其从产品上半部拉出。
2要卸下预过滤网,请抓住两个凸缘,然后朝您自己的方向拉动过
滤网。
3卸下产品内的所有其它过滤网。
44
简体中文
4除去过滤网上的所有包装材料。
5将过滤网 4(HEPA 过滤网)放回产品内部。
注意: 确保带拉片的一面朝向您。
6将过滤网 3(活性炭过滤网)放回产品内部。
7仅限于 AC4004:将过滤网 2(多重防护过滤网)安装到过滤网
1(预过滤网)的背面。
注意: 确保过滤网 2(多重防护过滤网)的正面,也就是带拉片的
一面朝向预过滤网。
8将过滤网 1(预过滤网)放回产品内部。
注意: AC4004:确保已将多功能过滤网安装到预过滤网的背面。
前面
注意: 确保带两个凸缘的一面朝向您。
咔
注意: 确保所有挂钩均已正确连接到产品上。
简体中文
1
45
9要装回前面板,请首先将两个挂钩插入产品上半部 (1)。然后朝
产品机身方向推动面板 (2)。
2
使用本产品
1将插头插入插座
,, 所有指示灯亮起并熄灭两次,您将听到一声哔声。
2按开/关按钮启动产品。
,, 开机指示灯和控制面板上的某个 AIR QUALITY 空气质量指示灯
将亮起。
AC4004:AIR QUALITY 空气质量指示灯
颜色
空气质量
蓝色
非常好
深紫色
良好
紫色
一般
红色
较差
AC4002:AIR QUALITY 空气质量指示灯
颜色
空气质量
蓝色
非常好
深紫色
良好
红色
较差
,, 产品在自动模式下将自动运行。
要关闭产品,请再次按住开/关按钮,直至电源指示灯熄灭,然后拔
46
简体中文
下产品的电源插头。
注意: 当室内的湿度非常高时,空气质量传感器上可能会形成冷凝
水。此时,即使空气质量很好,控制面板上的 AIR QUALITY 空气
质量指示灯也可能会指示空气质量较差。在这种情况下,自动模式
将使产品的风扇高速运转。要解决这一问题,您可以清洁一下空气
质量传感器。如果在湿度很高的时候经常形成冷凝水,建议您使用
任一手动速度设定。
自动模式
打开产品之后,内置的空气质量传感器将自动测量室内的空气质
量。激活自动模式之后,产品将根据测定的空气质量选择最合适的
风扇速度。
注意: 在自动模式下,您也可以使用计时器功能(请参阅本章中
的“计时器功能”部分)。在此情况下,AUTO 自动指示灯、某级
FAN SPEED 风速指示灯、TIMER 定时指示灯和某个 HOUR 小时
指示灯将亮起。
1按开/关按钮启动产品。
,, 产品在自动模式下将自动运行。
注意: 当产品在其它模式下运行时,如果您想激活自动模式,只需
按 AUTO(自动)按钮。
,, AUTO 自动指示灯和某个 FAN SPEED 风速指示灯将亮起。
FAN SPEED 风速指示灯将指明产品运行时的风扇速度。
注意: 当空气质量非常好时,风扇将以很低的速度运行;当风扇
以最低速度运行时,FAN SPEED 风速指示灯将不亮起。在此情况
下,只有开机指示灯和 AUTO 自动指示灯亮起。
风扇速度
如果不使用自动模式,您可以自行选择需要的风扇速度。
注意: 在手动选择风扇速度时,您也可以使用计时器功能(请参阅
本章中的“计时器功能”部分)。在此情况下,某级 FAN SPEED
风速指示灯、TIMER 定时指示灯和某个 HOUR 小时指示灯将亮
起。
1按开/关按钮启动产品。
2按一下或按几下 FAN SPEED 风速按钮,选择所需的风扇速
度。
,, 对应的 FAN SPEED 风速指示灯将显示设置的风扇速度。
计时器功能
使用计时器功能,您可设定产品运行的小时数。到达设定的时间
时,产品将自动关闭。
您可在以下几种情况下使用计时器功能:
简体中文
47
-- 与 AUTO 自动模式(请参阅本章中的“自动模式”部分)一起
使用。在此情况下,AUTO 自动指示灯、某级 FAN SPEED 风速
指示灯、TIMER 定时指示灯和某个 HOUR 小时指示灯将亮起。
-- 手动选择风扇速度(请参阅本章中的“风扇速度”部分)时。在
此情况下,某级 FAN SPEED 风速指示灯、TIMER 定时指示灯
和某个 HOUR 小时指示灯将亮起。
-- 与 SLEEP 休眠模式一起使用(请参阅本章中“休眠模式”部
分)。在此情况下,SLEEP 休眠指示灯和某个 HOUR 小时指示
灯将亮起(但会变暗)。
1按开/关按钮启动产品。
2按 TIMER 定时按钮启用计时器功能。
,, TIMER 定时指示灯将亮起。
3反复按 TIMER 定时按钮可选择您想要产品运行的小时数。
,, 相应的 HOUR 小时指示灯将亮起。
要禁用计时器功能,请反复按 TIMER 定时按钮,直至 HOUR 小时
指示灯和 TIMER 定时指示灯熄灭。
休眠模式
当您在休眠模式下使用本产品时,它将非常安静地运行,所有的指
示灯将亮起并变暗,让您的睡眠不受打扰。
注意: 使用休眠模式时,您也可使用计时器功能(请参阅本章中
的“计时器功能”部分)。在此情况下,SLEEP 休眠指示灯和某个
HOUR 小时指示灯将亮起(但会变暗)。
1按开/关按钮启动产品。
48
简体中文
2按 SLEEP 休眠按钮可启用安静的休眠模式。
,, SLEEP 休眠指示灯将亮起。
,, 如果您已启用计时器功能,则除某个 HOUR 小时指示灯以外的
所有其它指示灯都将熄灭。
如果要返回到风扇速度模式或自动模式,只需按 FAN SPEED 风速
或 AUTO 自动按钮。此时,休眠模式将被禁用。
调节空气质量传感器的灵敏度
存在某些健康问题(例如过敏症或哮喘)的人更需要健康的空气。
出于这种考虑,本空气净化器可以调整空气质量传感器的灵敏度。
如果将它设置为较高的灵敏度级别,则本产品还会清洁污染程度较
低的空气,使空气前所未有地清新!
灵敏度分为三个级别:
-- 超级灵敏
-- 灵敏
-- 标准
空气质量传感器已设置为标准灵敏度。您可通过以下方法调节空气
质量传感器的灵敏度:
1如果产品已经插电,请拔下电源插头并等待几分钟。
2按住 TIMER 按钮,同时将电源插头插到插座上。
,, 此时,产品将发出两声哔声,并且某个 HOUR 小时指示灯将开
始闪烁,以指明空气质量传感器的灵敏度级别。
灵敏度级别:
HOUR 小时指示灯
灵敏度级别
1 小时
超级灵敏
4 小时
灵敏
8 小时
标准
3按 TIMER 定时按钮可调节空气质量传感器的灵敏度。
,, 某个 HOUR 小时指示灯将闪烁,显示设定的空气质量传感器灵
敏度。
4按住开/关按钮关闭产品。
注意: 当您更改灵敏度之后,只要打开产品,它就会按照您设置的
灵敏度开始运行。
清洁和保养
清洁产品前,务必先将电源插头拔掉。
切勿将本产品浸入水中或任何其它液体中。
简体中文
49
切勿使用具有腐蚀性或易燃性的清洁剂(例如漂白剂或酒精)清洁
本产品的任何部件。
只有预过滤网可以水洗,其它过滤网全部不可水洗。
产品机身
定期清洁机身的内侧和外侧可防止灰尘积聚在内侧和外侧。
1使用柔软的干布擦去产品机身上的灰尘。
2使用柔软的干布清洁进风口和出风口。
预过滤网
预过滤网
-- 当过滤网清洁指示灯闪烁时,请清洗预过滤网,以确保产品以最
佳性能运行。
1拔掉产品插头。
2
2将手指放在侧面板的凹处,然后朝自己的方向轻轻拉出前面板的
底部。提拉面板上半部分的挂钩,将其从产品上半部拉出。
1
3要卸下预过滤网,请抓住两个凸缘,然后朝您自己的方向拉动过
滤网。
4仅限 AC4004:从预过滤网的后面卸下多功能过滤网。
5在水龙头下冲洗预过滤网。如果很脏,请使用软刷清除上面的灰
尘。
提示: 您也可以使用吸尘器来除去上面的灰尘,从而达到清洁预过
滤网的目的。
6晾干预过滤网。
注意: 应确保预过滤网完全干燥。
7仅限于 AC4004:将多功能过滤网重新安装在预过滤网的背面。
注意: 确保多功能过滤网的正面朝向预过滤网。
50
简体中文
8将预过滤网放回产品内部,然后将所有挂钩正确连接到产品上。
注意: 确保带两个凸缘的一面朝向您。
前面
咔
1
9要装回前面板,请首先将两个挂钩插到产品上半部 (1)。然后,
朝产品机身方向推动面板 (2)。
10 将电源插头接入插座。
2
11 按住过滤网 1 重置按钮(过滤网清洁指示灯下面的按钮)2 秒钟
以重置本产品。
秒
空气质量传感
每 2 个月清洁一次空气质量传感器,确保产品以最佳性能运行。如
果产品用在多尘的环境中,请经常进行清洁。
注意: 当室内的湿度非常高时,空气质量传感器上可能会形成冷凝
水。此时,即使空气质量很好,控制面板上的 AIR QUALITY 指示
灯也可能会指示空气质量较差。在此情况下,您必须清洁空气质量
传感器或者使用任一手动速度设定。
1使用软刷清洁空气质量传感器进风口/出风口。
2卸下空气质量传感器的保护盖。
简体中文
51
3使用稍微浸湿的棉签,清洁空气质量传感器、进风口和出风口。
4使用干棉签将其擦干。
5重新装上空气质量传感器的保护盖。
更换过滤网
维护过滤网
当任一过滤网满载并且必须予以清洁或更换时,对应的指示灯
(预过滤网清洁指示灯或过滤网更换指示灯以及“REPLACE
FILTER”更换滤网指示灯)将开始闪烁。此时,您必须清洁或更换
过滤网。
本空气净化器具有健康空气智能锁功能,旨在确保产品运行过程
中,过滤网在最佳条件下工作。如果您没有更换过滤网 2(仅限
于 AC4004)、过滤网 3 和/或过滤网 4,产品将停止运行并被锁
定。一旦产品锁定,相关过滤网的滤网更换指示灯和“REPLACE
FILTER”(更换过滤网)指示灯将持续亮起。
过滤网清洁指示灯和过滤网更换指示灯
过滤网清洁指示灯和过滤网更换指示灯将指明需要清洁或更换的过
滤网。
-- 过滤网清洁指示灯 1 闪烁:表示必须清洁过滤网 1(预过滤
网)。有关详细说明,请参阅“清洁”一章。
-- 过滤网更换指示灯 2 和“REPLACE FILTER”(更换过滤网)
指示灯闪烁:表示必须更换过滤网 2(多重防护过滤网,仅限于
AC4004)。
简体中文
52
-- 过滤网更换指示灯 3/4 和“REPLACE FILTER”(更换过滤网)
指示灯闪烁:表示必须更换过滤网 3(活性炭过滤网)和过滤网
4(HEPA 过滤网)。
注意: 过滤网 3(活性炭过滤网)和过滤网 4(HEPA 过滤网)的
使用寿命相当。因此它们必须同时更换。
过滤网更换锁定
如果没有及时更换过滤网,则在过滤网更换指示灯开始闪烁约 2 周
后,产品将停止运转。一旦产品锁定,那么只有在更换过滤网并按
重置按钮之后,它才会恢复运行。
注意: 过滤网更换信号与产品锁定之间的时间有所不同,具体取决
于您使用产品的频率。
注意: 当电源开/关指示灯、过滤网更换指示灯 2 或 3/4 以及更换过
滤网(REPLACE FILTER)指示灯亮起,表示“产品已锁定”(有
关详细信息,请参阅本章中的“维护过滤网”部分)。
产品锁定之前 1 天左右,它会每 30 分钟发出一声哔声,提醒您某
个过滤网需要更换。
产品锁定之后,无论按哪个按钮,您都会听到一声哔声。您可以通
过按住开/关按钮来关闭产品。
如果产品锁定:
1检查是否需要更换过滤网(请参阅上述“过滤网清洁指示灯和过
滤网更换指示灯”部分)。
2关闭产品并拔下电源插头。
3更换相应的过滤网(请参阅下述“更换过滤网和重置产品”部
分)。
更换过滤网和重置产品
提示: 在取下或插入过滤网之前,请将产品靠墙摆放以使其更稳
固。
2
1
1关闭产品并拔下电源插头。
2将手指放在侧面板的凹处,然后朝自己的方向轻轻拉出前面板的
底部。提拉面板上半部分的挂钩,将其从产品上半部拉出。
简体中文
53
3要卸下过滤网 1(预过滤网),请抓住两个凸缘,然后朝您的方
向拉动过滤网。
4仅限于 AC4004:从预过滤网的背面卸下过滤网 2(多重防护过
滤网)。
5要卸下过滤网 3(活性炭过滤网),请抓住其拉片,然后朝您的
方向拉动。
6要卸下过滤网 4(HEPA 过滤网),请抓住其拉片,然后朝您的
方向拉动。
7丢弃需要更换的过滤网,并除去新过滤网的包装。
8将过滤网 4(HEPA 过滤网)放回产品内部。
注意: 确保带拉片的一面朝向您。
54
简体中文
9将过滤网 3(活性炭过滤网)放回产品内部。
10 仅限于 AC4004:将过滤网 2(多重防护过滤网)重新安装在过
滤网 1(预过滤网)的背面。
注意: 确保多功能过滤网的正面朝向预过滤网。
11 将过滤网 1(预过滤网)放回产品内部。
前面
注意: 确保带两个凸缘的一面朝向您。
注意: 确保所有挂钩均已正确连接到产品上。
咔
12 要装回前面板,请首先将两个挂钩插到产品上半部 (1)。然后,
朝产品机身方向推动面板 (2)。
1
13 重新将插头插入电源插座并打开产品。
14 按住所更换过滤网的更换指示灯下面的重置按钮以重置本产品。
2
-- 如果您已更换过滤网 2(多重防护过滤网),则需按住过滤网 2
重置按钮 2 秒钟。
秒
简体中文
55
-- 如果您已更换过滤网 3(活性炭过滤网)和 4(HEPA 过滤
网),则需按住过滤网 3/4 重置按钮 2 秒钟。
,, 您将听到一声哔声,产品在自动模式下将重新运行。
秒
附件
以下型号的新过滤网可供选择:
过滤器
型号
过滤网 2:多功能过滤网
AC4121
过滤网 3:活性炭过滤网
AC4123
过滤网 4:HEPA 过滤网
AC4124
仅限于 AC4002:添加多重防护过滤网
AC4002 随附了预过滤网、活性炭过滤网和 HEPA 过滤网。对于本
产品,只有过滤网 1 (预过滤网)的清洁指示灯和过滤网 3 和 4(
活性炭过滤网和 HEPA 过滤网)的更换指示灯已激活。
如果您想享受多功能过滤网所带来的诸多益处,可以单独购买此过
滤网(请参阅上表)。与 HEPA 过滤网相结合,多重过滤网可过
滤掉大于 20 纳米的灰尘、过敏原和微小颗粒,包括细菌和部分病
毒。世界卫生组织的刊物显示,禽流感、人流感病毒和军团症细菌
均大于 20 纳米。
安装多功能过滤网后,必须通过以下方法激活过滤网 2 的更换指
示:
1同时按住过滤网 1(预过滤网)的重置按钮和过滤网 2(多功能
过滤网)的重置按钮 2 秒钟。
-- 要禁用过滤网 2 的过滤网更换指示,同时按住过滤网 1 (预过
滤网)的重置按钮和过滤网 2(多功能过滤网)的重置按钮 2 秒
钟。
秒
注意: 要检查多重防护过滤网的过滤网更换指示是否已激活,请按
过滤网 2 的重置按钮。如果过滤网 2 的更换指示灯亮起几秒钟,则
表示多功能过滤网的更换指示已激活。如果过滤网 2 的更换指示灯
不亮,则说明过滤网更换指示未激活。
56
简体中文
环境
-- 弃置产品时,请不要将其与一般生活垃圾堆放在一起;应将其交
给官方指定的回收中心。这样做有利于环保。
保修和服务
如果您需要了解信息,或者有任何疑问,请访问飞利浦网站:www.
philips.com。您也可与您所在地的飞利浦顾客服务中心联系(可从
全球保修卡中找到其电话号码)。如果您的所在地没有飞利浦顾客
服务中心,则可以与当地的飞利浦经销商联系。
故障种类和处理方法
本章归纳了使用本产品时最可能遇到的问题。如果您无法根据下面
的信息解决问题,请与贵国(地区)的飞利浦客户服务中心联系。
问题
可能的解决方法
产品不能启动。
您忽视了过滤网更换指示灯。当对应的过滤网更换指示灯和
REPLACE FILTER(更换过滤网)指示灯开始闪烁时,您没有更换
过滤网;在约 2 周后,当产品开始每隔 30 分钟发出一声哔声时,
您没有及时回应。因此,产品现在已经锁定,您必须更换对应过滤
网并重置产品(请参阅“更换过滤网”一章),然后产品才能重新
提供健康空气。
AIR QUALITY 空气质量
本产品的空气质量传感器出现问题。请与您所在国家/地区的飞利
指示灯一直在闪烁,产品 浦客户服务中心联系(可在全球保修卡中找到其电话号码)。如果
不工作。
您所在的国家/地区没有飞利浦客户服务中心,请与当地的飞利浦
经销商联系。
出风口中没有排出空气
产品没有打开。请将插头插入电源插座并且打开产品。
空气质量很好,而且自动模式已经激活。在这种情况下,当空气干
净清新时,产品将自动停止运行以达到节能的目的。
出风口排出的气流比之前 预过滤网很脏。请清洁预过滤网(请参阅“清洁”一章)。
明显减弱。
您没有除去过滤网上的所有包装材料。请确保您已经除去所有包
装材料。
即使在产品已经运行很长 某一过滤网可能没有放置在产品内部。请确保按以下顺序正确安装
时间以后,空气质量也没 所有过滤网,首先从最里面的过滤网开始:HEPA 过滤网、活性炭
有显著提高。
过滤网、多重防护过滤网(仅限于 AC4004)、预过滤网。多功能
过滤网(仅限于 AC4004)必须安装在预过滤网的后面。
空气质量传感器是湿的。室内湿度过高,因此形成了冷凝水。请确
保空气质量传感器清洁干燥(请参阅“清洁”一章)。
简体中文
问题
57
可能的解决方法
产品所在房间的面积超过 30 平方米,而这是本空气净化器最大的
有效使用范围。
即使本产品已经运行了一 空气质量传感器很脏。请清洁空气质量传感器(请参阅“清洁”一
章)。
段时间,AIR QUALITY
空气质量指示灯仍不改变
颜色。
我是过敏症患者,需要更 您可以更改空气质量传感器的灵敏度(请参阅“使用本产品”一
干净清新的空气。
章),使本空气净化器更全面细微地净化空气。
产品声音过大。
您没有除去过滤网上的所有包装材料。请确保您已经除去所有包
装材料。
我已经更换过了过滤网, 可能是您没有重置本产品。请将产品插电,按住所更换过滤网对应
但是产品还是一直说需要 的重置按钮。如果您已正确重置本产品,它会发出哔声。
更换过滤网。
按 SLEEP 休眠按钮时,
除 SLEEP 休眠指示灯以
外的所有指示灯都熄灭
了。
按 SLEEP 休眠按钮时,本产品进入 SLEEP 休眠模式,让您的睡
眠不受打扰。本产品将安静地运行,只有 SLEEP 休眠指示灯会
亮起。如果您已启用计时器功能,某个 HOUR 小时指示灯也将亮
起。在 SLEEP 休眠模式下,所有的指示灯将变暗,让您的睡眠不
受打扰。
产品:飞利浦空气净化器
型号
:AC4004
额定电压
:220V~
产品
:飞利浦空气净化器
额定频率
:50Hz
型号
:AC4002
额定输入功率 :40W
额定电压
:220V~
产地
:韩国
额定频率
:50Hz
生产日期
:YYMMDD
额定输入功率 :40W
生产日期
:请见产品底部
飞利浦(中国)投资有限公司
产地
:韩国
上海市天目西路218号1602-1605
产品
:飞利浦空气净化器
型号
:AC4004
额定电压
:220V~
额定频率
:50Hz
额定输入功率 :40W
生产日期
:请见产品底部
产地
:韩国
飞利浦(中国)投资有限公司
上海市天目西路218号1602-1605
全国顾客服务热线: 4008 800 008
飞利浦(中国)投资有限公司
上海市天目西路218号1602-1605
全国顾客服务热线: 4008 800 008
本产品根据国标GB4706.1-1998,GB4706.451999制造
本产品根据国标GB4706.1-1998,GB4706.451999制造
2009/06/11
4222.002.7312.1