1
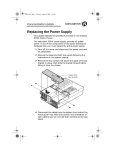
INSTALLATION
NSM5200-PS Replacement Power Supply
Endura® NSM5200/DAS5200 Series
C4611M (10/09)
The NSM5200 and DAS5200 units incorporate two independent, hot-swappable power supplies. Each power supply acts as a redundant alternate for the
other. This level of fault tolerance ensures that the NSM5200 and the DAS5200 are capable of sustaining uninterruptible operation, in the event of failure. If
a power supply fails, the hot-swappable feature simplifies replacement without shutting down the unit or interrupting normal operation.
This document describes how to replace a failed power supply in an NSM5200 Series network storage manager (NSM) and a DAS5200 Series
direct attached storage (DAS).
NOTES:
•
You can replace one failed power supply without shutting down the unit.
•
No tools are required to replace this component.
•
The NSM5200 rear panel is displayed in this document. The power supplies are in the same locations in the DAS5200.
To replace a power supply:
1. Review all instructions in this document before proceeding.
2. Identify the failed power supply. The status indicator of a failed power supply is red.
3. Disconnect the power cord from the failed power supply as follows:
WARNING: For safety, you must disconnect the power cord from the wall socket or other power source before disconnecting it from the failed
power supply on the unit.
a.
Disconnect the power cord of the failed power supply from the power source.
b.
Disconnect the power cord of the failed power supply at the rear panel of the unit.
4. Turn the captive thumbscrew counterclockwise to loosen it.
Figure 1. Loosening the Captive Thumbscrew
ì
î
ï
Power Supplies
Power Receptacles
Pull Handles
ñ
ó
Thumbscrew
Reserve Power Supply
5. Using the pull handle, gently remove the failed power supply from the unit.
Figure 2. Removing the Power Supply
6. Position the replacement power supply so that the cord receptacle is on the left side of the unit.
Figure 3. Replacing the Power Supply
7. Gently push the replacement power supply into the unit until it locks into place.
8. Turn the captive thumbscrew clockwise to tighten it.
9. Connect the power cord for the replacement power supply as follows:
WARNING: For safety, you must plug the power cord into the power supply before plugging it into the wall socket or other power source.
a.
Connect the power cord to the receptacle on the replacement power supply.
b.
Connect the power cord to the power source.
10. Verify that the indicator on the newly installed power supply glows green. The power supply alarm will stop.
REVISION HISTORY
Manual #
Date
Comments
C4611M
10/09
Original version.
The materials used in the manufacture of this document and its components are compliant to the requirements of Directive 2002/95/EC.
This equipment contains electrical or electronic components that must be recycled properly to comply with Directive 2002/96/EC of the European Union
regarding the disposal of waste electrical and electronic equipment (WEEE). Contact your local dealer for procedures for recycling this equipment.
Pelco, Inc. Worldwide Headquarters 3500 Pelco Way, Clovis, California 93612 USA
USA & Canada Tel (800) 289-9100 Fax (800) 289-9150
International Tel +1 (559) 292-1981 Fax +1 (559) 348-1120
www.pelco.com
Pelco and the Pelco logo are registered trademarks of Pelco, Inc.
©Copyright 2009, Pelco, Inc. All rights reserved.