1
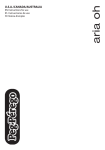
EN Instructions for use
ES Instrucciones de uso
FR Notice d’emploi
aria oh
U.S.A./CANADA/AUSTRALIA
1
2
2
1
3
4
5
6
2
1
7
8
9
10
11
12
13
1
2
14
15
16
17
18
19
1
20
21
2
22
23
24
Aria OH
16
3
1
20
4
19
2
5
6
7
18
17
8
15
10
11
14
13
1 SPST6068KDGR
SPST6068KSGR
2 SAPI6430•
3 SPST6069KGR
4 SPST6067•
5 SPST5474DGR
SPST5474SGR
6 SPST5475GL
7 SPST5115DGR•
SPST5115DGR•
8 ARPI0414•
9 ITAROHNA•
9
12
10
11
12
13
14
15
16
17
18
19
20
ERSHAA00--NY01RE53M
SPST5096GL
SPST6055•
SAPI6054GRN
ARPI0431•
SPST5198•
BCAAOH•
ARPI0446• PEG
ARPI0409•
BSAAOH•
MUCI5P14•
EN• Spare parts available in different colours to be specified when ordering.
ES• Repuestos disponibles en otros colores que se especificarán en el pedido.
FR• Pièces de rechange disponibles en plusieurs couleurs à spécifier dans la demande.
EN_English
Thank you for choosing a Peg-Pérego product.
WARNING
_ CAREFULLY READ INSTRUCTIONS AND KEEP FOR FUTURE USE.
THE CHILD’S SAFETY COULD BE PUT AT RISK IF THE INSTRUCTIONS ARE
NOT FOLLOWED.
_ THIS PRODUCT IS DESIGNED FOR A CHILD WHOSE MAXIMUM WEIGHT IS 45
POUNDS (20 KG) AND WHOSE MAXIMUM HEIGHT IS 43 INCHES (110 CM).
THIS SHOPPER BASKET IS DESIGNED TO CARRY A MAXIMUM WEIGHT OF 11
POUNDS (5 KG). ANY CUPHOLDER EVENTUALLY PROVIDED WITH THIS UNIT IS
DESIGNED TO CARRY A MAXIMUM WEIGHT SPECIFIED ON THE CUPHOLDER
ITSELF. ANY POACH OR POCKET PROVIDED WITH THIS UNIT IS DESIGNED TO
CARRY A MAXIMUM WEIGHT OF 0.44 POUNDS (0.2 KG).
_ FAILURE TO FOLLOW MANUFACTURER’S SPECIFICATIONS OR USE OF
ACCESSORIES OTHER THAN THOSE APPROVED BY THE MANUFACTURER MAY
CAUSE THE UNIT TO BECOME UNSTABLE.
_ AVOID SERIOUS INJURY FROM FALLING OR SLIDING OUT. ALWAYS USE
COMPLETE 5 POINT SEAT BELT.
_ NEVER LEAVE YOUR CHILD UNATTENDED.
_ ALWAYS USE ALL THE BRAKES WHENEVER PARKED.
_ TO AVOID SERIOUS INJURY, WHEN MAKING ADJUSTMENTS ENSURE THE
CHILD’S BODY IS CLEAR OF ALL MOVING PARTS.
_ ALL OPERATING AND ASSEMBLY PROCEDURES SHOULD BE PERFORMED BY AN
ADULT.
_ DO NOT LIFT THE STROLLER BY GRIPPING THE FRONT BAR. THE FRONT BAR IS
NOT DESIGNED TO WITHSTAND LOADS.
_ ENSURE THAT THE STROLLER IS OPENED CORRECTLY AND LOCKED IN
POSITION OF USE.
_ CHECK TO MAKE SURE THAT THE CAR SEAT OR THE BABY CARRIAGE IS
CORRECTLY FASTENED TO THE STROLLER (WHERE APPLICABLE).
_ DO NOT DRIVE THIS PRODUCT AROUND STAIRS OR STEPS; CARE MUST BE
TAKEN IF UNIT IS USED ON STAIRS OR ESCALATORS.
_ DO NOT USE THE PRODUCT IF IT HAS BROKEN OR MISSING PARTS.
_ DO NOT USE NEAR FIRE OR EXPOSED FLAME.
_ NOTICE: THIS ARTICLE MEETS OR EXCEEDS ALL REQUIREMENTS COVERED IN
ASTM F833 STANDARD AND LATEST REVISIONS.
INSTRUCTIONS
1 OPENING THE STROLLER: (fig_a) To open the stroller, completely disconnect the two
fasteners, press the button (1) on the handlebar and simultaneously press the handle (2),
firmly lift the handlebar upwards (fig_b), then push it downwards until it clicks into place
(fig_c).
2 FITTING THE REAR WHEELS: Take care to mount the two wheels fitted with brakes
on the rear of the stroller. Fit the wheel, push button while pushing the wheel further until
3
4
5
6
7
8
9
10
11
12
13
14
15
16
17
18
19
20
you hear the final click: the wheel is securely fastened.
FITTING THE FRONT WHEELS: To mount the front wheels, lower the lever (fig_a) and click
the wheels into place (fig_b).
FITTING THE FRONT BAR: Attach the front bar as shown in the figure.
HOOD: To attach the hood, insert the tabs into the notches (fig_a) and button the hood to
the rear of the backrest (fig_b).
The hood can be moved to different positions while your child is sleeping (fig_a). To remove
the hood, press the side buttons while lifting the hood off (fig_b).
CUP HOLDER: The cup holder can be placed on the left or right hand side of the stroller,
thanks to the attachment which is already fitted on both sides. To fit the cup holder, click it
on (fig_a). Fitted cup holder (fig_b).
BRAKE: Press down on the brake lever situated on the rear wheel unit to set the brake on
the stroller. Lift the lever to release the brake. Always set the brake when the stroller is at a
standstill.
5-POINT SAFETY BELT: Attach by inserting the two buckles of the waist strap (with
shoulder straps attached) into the leg divider until they click into place (fig_a). To unfasten
the belt, press on the buckle sides and pull out the waist strap (fig_b).
In order to put on the safety belt, pass the strap adjustor through the slot in the backrest
(fig_a) and detach it after strapping the child in, thus allowing more freedom of movement
(fig_b). The strap adjustor must remain below the child’s shoulders so that the straps do not
slip (fig_c).
ADJUSTING THE BACKREST: To recline the backrest, lower the backrest adjuster button
while pushing the backrest down (fig_a). To raise the backrest, push the backrest adjuster
button upwards (fig_b).
SWIVELLING WHEELS: Lower the lever (fig_a) to allow the front wheels to swivel. Lift the
lever for fixed wheels (fig_b).
FRONT BAR-CHILD TRAY The front bar-child tray can be opened to make it easier for the
child to get in and out of the stroller when he or she is older. To open the front bar on one
side only press one of the two buttons (1 or 2) and lift it upwards. To remove the front barchild tray, press the two buttons as shown in the figure while pulling it upwards (fig_a). To
remove it press both buttons (1 and 2) while pulling it upwards (fig_b). Do not place boilinghot drinks on the front bar-child tray; this could be dangerous.
REPLACING THE BASKET: If it is necessary to replace the basket, fasten the front of the
new basket to the hooks (fig_a) and close the buttons on the back (fig_b).
REMOVING THE WHEELS: The wheels on the stroller are removable. To remove the front
wheels, set them to swivel, press the levers (fig_a) and at the same time push the wheel
until it comes off (fig_b).
To remove the rear wheels, press the button (fig_a) and at the same time push the wheels
down until they come off (fig_b).
FOLDING UP THE STROLLER: If the hood is attached, close it before folding up the
stroller. To close the stroller, move the handle in the same way as you do when opening it:
press the button (1) on the handlebar and at the same time push the handle (2).
Push the backrest and the hood towards the stroller, while lowering the handlebar into its
housing (fig_a). Check to make sure that the stroller is fastened securely with the safety clip
(fig_b). The folded-up stroller will stand upright by itself and it is possible to carry it thanks to
the practical handle (fig_c).
REMOVABLE LINING: To remove the lining from the stroller, first of all remove the hood,
then remove the little cover on the side by pressing on it (fig_a). Push the pin upwards and
then outwards (fig_b). Slip the pin out of the hole in the sack. Repeat on the other side.
To detach the sack from the seat, remove the leg divider from under the seat (fig_a), and
unbutton (fig_b). Unscrew the safety belt from both sides (fig_c) and slip the sack off the
stroller (fig_d).
GANCIOMATIC SYSTEM: Ganciomatic is the practical, fast system for attaching the Primo
Viaggio car seat to the stroller. The car seat is fitted with the Ganciomatic System, and is
sold separately.
21 STROLLER GANCIOMATIC FASTENERS: To raise the Ganciomatic fasteners on the
stroller, pull the sack up in the seat corners and lift the two fasteners. They will automatically
move outwards (fig_a). To lower the Ganciomatic fasteners, push them inwards and then
down (fig_b).
22 STROLLER + CAR SEAT: To fasten the car seat to the stroller: set the brake on the stroller,
remove the hood, completely lower the backrest and raise the Ganciomatic fasteners. Place
the car seat, facing the adult, on the stroller and push down until it clicks into place. Do not
remove the front bar from the stroller when attaching the car seat. See the car seat’s user
manual for instructions on how to detach it from the stroller.
ACCESSORY LINE
23 RAIN CANOPY: The rain canopy made of transparent with elastic around the edge can be
fastened over the hood on the Aria stroller. This rain canopy has been designed for use with
the "Primo Viaggio" car seat attached to the stroller as well, to guarantee total protection.
24 BORSA CAMBIO: Diaper-Changing Bag with pad for changing the baby. Attaches to the
stroller.
CLEANING AND MAINTENANCE
PRODUCT MAINTENANCE: protect from the weather: water, rain, or snow; prolonged and
continuous exposure to bright sunlight may give rise to colour changes of various different
materials; store this product in a dry place.
CLEANING THE CHASSIS: periodically clean all plastic parts with a damp cloth. Do not use
solvent or similar cleaning products; keep all metal parts dry to prevent rusting; keep moving
parts clean (adjustment mechanisms, locking mechanisms, wheels, ...) and free of dust and
sand and, if necessary, lubricate with light machine oil.
CLEANING FABRIC PARTS: brush fabric parts to remove dust and wash by hand at a
maximum temperature of 30°C; do not wring; do not use chlorine bleach, do not iron; do not
dry clean; do not apply solvent-based stain removers and do not dry in a tumble dryer.
CLEANING THE RAIN CANOPY: wash with a sponge and soapy water; do not use
detergents.
PEG-PÉREGO S.p.A.
Peg Pérego can make changes at any time to the models described in this publication for
technical or commercial reasons.
PEG-PÉREGO AFTER-SALES SERVICE
If any parts of your Peg Pérego product should be accidentally mislaid or damaged, use
exclusively genuine original Peg Pérego replacements. For any repairs, replacements,
product information, and orders for genuine original replacement parts and accessories,
contact Peg Pérego After-Sales Service:
CANADA
tel. 905.839.3371
fax 905.839.9542
call us toll free 1.800.661.5050
website www.pegperego.com
USA
tel. 800.671.1701
fax 260.471.6332
call us toll free 1.800.671.1701
website www.pegperego.com
ES_Español
Le agradecemos haber elegido un producto Peg-Pérego.
ADVERTENCIA
_ LEER ATENTAMENTE ESTAS INSTRUCCIONES Y CONSERVARLAS PARA
FUTURAS CONSULTAS.
LA SEGURIDAD DEL NIÑO PUEDE PONERSE EN PELIGRO SI NO SE SIGUEN
ESTAS INSTRUCCIONES.
_ ESTE PRODUCTO HA SIDO DISEÑADO PARA UN NIÑO CON UN PESO
MÁXIMO DE 20 KG Y UNA ALTURA MÁXIMA DE 110 CM. LA CESTILLA HA
SIDO REALIZADA PARA SOPORTAR UN PESO MÁXIMO DE 5 KG. LOS POSIBLES
PORTABEBIDAS QUE VAN CON ESTE PRODUCTO ESTÁN CONCEBIDOS PARA
SOPORTAR EL PESO MÁXIMO ESPECIFICADO EN EL PORTABEBIDAS EN
CUESTIÓN. CUALQUIER BOLSA ENTREGADA JUNTO AL PRODUCTO ESTÁ
REALIZADA PARA SOPORTAR UN PESO MÁXIMO DE 0,2 KG.
_ SI NO SE RESPETAN LAS INDICACIONES ESPECIFICADAS O SI SE USAN
ACCESORIOS DIFERENTES DE LOS HOMOLOGADOS POR EL FABRICANTE, EL
PRODUCTO PUEDE SER INESTABLE.
_ PARA EVITAR LESIONES GRAVES POR CAÍDAS O SI ESCAPA EL NIÑO DE LA
SILLA DE PASEO, USAR SIEMPRE UN CINTURÓN DE SEGURIDAD DE 5 PUNTOS
COMPLETO.
_ NO DEJAR NUNCA AL NIÑO SIN VIGILANCIA.
_ USAR SIEMPRE TODOS LOS DISPOSITIVOS DE BLOQUEO CADA VEZ QUE LA
SILLA DE PASEO NO ESTÉ EN MOVIMIENTO.
_ PARA EVITAR LESIONES GRAVES, ASEGURARSE DE QUE EL NIÑO NO PUEDA
MOVERSE PELIGROSAMENTE MIENTRAS SE REGULA EL PRODUCTO.
_ TODAS LAS OPERACIONES DE ENSAMBLAJE DEBE REALIZARLAS SOLO UN
ADULTO.
_ NO LEVANTAR LA SILLA DE PASEO COGIÉNDOLA POR LA BARRA FRONTAL. LA
BARRA FRONTAL NO HA SIDO CONCEBIDA PARA SOPORTAR PESOS.
_ ASEGURARSE DE QUE LA SILLA DE PASEO ESTÉ ABIERTA CORRECTAMENTE Y
BLOQUEADA EN LA POSICIÓN CORRECTA PARA SU UTILIZACIÓN.
_ ASEGURARSE DE QUE LA SILLA DE AUTO O EL COCHECITO ESTÉN
ENGANCHADOS CORRECTAMENTE A LA SILLA DE PASEO.
_ NO USAR LA SILLA DE PASEO CERCA DE ESCALERAS O ESCALONES; PRESTAR
ATENCIÓN CUANDO SE UTILIZA EN ESCALERAS O ESCALERAS MECÁNICAS.
_ NO UTILIZAR EL PRODUCTO SI PRESENTA PARTES DAÑADAS O SI FALTA
ALGUNA PARTE.
_ NO USAR EN PRESENCIA DE LLAMAS O FUENTES DE CALOR.
_ AVISO: ESTE PRODUCTO CUMPLE SUFICIENTEMENTE CON TODOS LOS
REQUISITOS ESTABLECIDOS POR LA NORMA ASTM F833 Y ULTERIORES
REVISIONES.
INSTRUCCIONES DE USO
1 APERTURA: (fig_a) para abrir la silla de paseo, desenganchar las dos palanquitas al mismo
2
3
4
5
6
7
8
9
10
11
12
13
14
15
16
17
18
tiempo, pulsar el botón (1) colocado en el manillar y presionar simultáneamente sobre la
manija (2). Levantar con firmeza el manillar hacia arriba (fig_b) y luego empujarlo hacia
abajo hasta oír el clic de enganche (fig_c).
MONTAJE DE LAS RUEDAS TRASERAS: Poner atención en montar las dos ruedas con
freno en la parte posterior de la silla de paseo. Introducir la rueda, apretar el pulsador
hasta el fondo y al mismo tiempo empujar más la rueda hasta que salte el mecanismo de
enganche.
MONTAJE DE LAS RUEDAS DELANTERAS: para introducir las ruedas delanteras, bajar la
palanca (fig_a) e introducir la rueda hasta oír un clic.
MONTAJE DE LA BARRA FRONTAL: enganchar la barra frontal como indica la imagen.
CAPOTA: para montar la capota, introducir los acoples en sus respectivos alojamientos
(fig_a) y abotonar la capota por detrás del respaldo (fig_b).
Cuando su hijo duerme, la capota puede colocarse en varias posiciones (fig_a). Para quitar
la capota, pulsar los botones laterales y tirar simultáneamente de ella (fig_b).
PORTABEBIDAS: el portabebidas puede colocarse a la derecha o a la izquierda de la silla
de paseo gracias al gancho ya existente en ambos lados. Para colocar el portabebidas,
presionar sobre él hasta oír un clic (fig_a). Un portabebidas colocado (fig_b).
FRENO: para frenar la silla de paseo, bajar con el pie la palanca de freno del grupo de
ruedas traseras. Para desbloquear el freno, repetir las mismas operaciones pero en sentido
contrario. Cuando la silla está parada, accionar siempre el freno.
CINTURÓN DE SEGURIDAD 5 PUNTOS: para engancharlo, meter las dos hebillas de la
correa ventral (eganchando los tirantes) en la tira entrepiernas hasta oír un “click” (fig. a).
Para desengancharlo, pulsar sobre ambos lados de la hebilla y simultáneamente tirar hacia
fuera la correa ventral (fig. b).
Para ponerse el cinturón de seguridad, introducir el regulador de arnés en la presilla del
respaldo (fig. a) y quitarlo después de haber enganchado el cinturón para que el niño pueda
moverse (fig. b).Colocar el regulador de arnés justo debajo de los hombros del niño para
que no se deslicen.
REGULACIÓN DEL RESPALDO: para reclinar el respaldo, bajar el botón regulador del
respaldo y al mismo tiempo empujar hacia abajo el respaldo (fig_a). Para subir este último,
empujar hacia arriba el regulador del respaldo (fig_b).
RUEDAS PIVOTANTES: para hacer que las ruedas delanteras giren ha de bajarse la
palanca (fig_a) y para que no giren, ha de subirse la palanca (fig_b).
BARRA FRONTAL-BANDEJA: puede abrirse la barra frontal-bandeja para que el niño entre
y salga fácilmente cuando es más grande. Para abrir la barra frontal desde un solo lado,
pulsar uno de los dos botones (1 o 2) y girarlo hacia arriba. Para quitar la barra frontalbandeja, pulsar los dos botones como indica la imagen y tirar al mismo tiempo hacia arriba
(fig_a). Para quitarla, pulsar los dos botones (1 y 2) y tirar al mismo tiempo hacia arriba
(fig_b). No apoyar en la barra frontal-bandeja bebidas calientes porque puede ser peligroso.
CAMBIO DE LA CESTA: si hubiera que cambiarse la cesta, para montarla engánchela por
delante a los ganchos (fig_a) y abotónela a continuación (fig_b).
EXTRACCIÓN DE LAS RUEDAS: las ruedas de la silla de paseo se extraen. Para quitar
las ruedas delanteras, hay que hacer que giren, presionar sobre las palanquitas (fig_a) y
empujar al mismo tiempo la rueda hasta extraerla (fig_b).
Para quitar las ruedas traseras, pulsar el botón (fig_a) y empujar al mismo tiempo las
ruedas hacia abajo hasta extraerlas (fig_b).
CIERRE: antes de cerrar la silla de paseo, quitar la capota en caso de que esté puesta.
Para cerrar la silla de paseo accionar el asa como cuando debe abrirse: pulsar el botón (1)
del manillar y ejercer al mismo tiempo una presión sobre el asa (2).
A continuación, empujar el respaldo y la capota hacia la silla de paseo y bajar el manillar
19
20
21
22
hasta que se introduzca en su alojamiento (fig_a). Comprobar que la silla de paseo se haya
cerrado correctamente mediante el gancho de seguridad (fig_b). La silla de paseo cerrada
se sostiene en pie por sí sola y puede transportarse gracias a su práctico manillar.
DESENFUNDABLE: para desenfundar la silla de paseo, quitar primero la capota y después
la tapita colocada en el lateral y hacer palanca (fig_a). Empujar hacia arriba el pivote y
luego empujarlo hacia fuera (fig_b). Sacar el pivote por el ojal del forro. Repetir la misma
operación en el lado opuesto.
Para desenganchar el forro del asiento, extraer la tira entrepiernas por debajo (fig_a) y
desabrocharlo (fig_b). Destornillar la correa por ambos lados (fig_c) y sacar el forro (fig_d).
GANCIOMATIC SYSTEM: Ganciomatic System es el sistema práctico y rápido que gracias
a los enganches Ganciomatic permite enganchar a la silla de paseo la silla de auto Primo
Viaggio, dotada a su vez de Ganciomatic System que se vende por separado.
ENGANCHES GANCIOMATIC DE LA SILLA DE PASEO: para subir los enganches
Ganciomatic de la silla de paseo, levantar el forro en los bordes del asiento y subir los
dos enganches que automáticamente se desplazarán hacia fuera (fig_a). Para bajar los
enganches Ganciomatic, empujar primero los enganches hacia dentro y luego bajarlos
(fig_b).
SILLA DE PASEO + SILLA DE AUTO: para enganchar la silla de auto a la silla de paseo
hacer lo siguiente: frenar la silla de paseo, quitar la capota, bajar completamente el respaldo
y levantar los enganches Ganciomatic. Colocar la silla de auto de cara a la madre y encajar
la silla hasta oír un clic. Se aconseja no quitar la barra frontal de la silla de paseo cuando se
engancha la silla de auto. Consultar el manual de instrucciones para desenganchar la silla
de auto de la silla de paseo.
ACCESORIOS
23 PLÁSTICO DE LLUVIA: transparente con goma, aplicable a la capota de la silla de paseo
Aria. Este plástico de lluvia ha sido concebido también para cuando se monta a la silla de
paseo la silla de auto Primo Viaggio, garantizando una protección total.
24 BORSA CAMBIO (Bolso cambiador): bolso con colchoncito para cambiar al bebé se
engancha a la silla de paseo.
LIMPIEZA Y MANTENIMIENTO
MANTENIMIENTO DEL PRODUCTO: proteger contra agentes atmosféricos (agua, lluvia
o nieve). Una exposición contínua y prolongada al sol podría causar cambios de color de
muchos materiales. Conservar este producto en un lugar seco.
LIMPIEZA DEL CHASIS: Limpiar periódicamente las partes de plástico con un paño
húmedo sin usar solventes u otros productos similares. Mantener secas todas las partes
de metal para prevenir la oxidación. Mantener limpias todas las partes móviles (dispositivo
de regulación, de enganche, ruedas...) quitando el polvo o la arena y, en caso necessario,
engrasarlas con aceites ligeros.
LIMPIEZA DE LAS PARTES DE TEJIDO: cepillar las partes de tejido quitando el polvo y
lavar a mano a una temperatura máxima de 30º. No torcer, no usar lejía, no planchar, no
lavar en seco, no usar solventes y no secar utilizando secadoras de tambor rotativo.
LIMPIEZA DEL PROTECTOR DE LLUVIA: lavar con una esponja con agua y jabón, sin
usar detergentes.
PEG-PÉREGO S.p.A
Peg-Pérego podrá aportar en cualquier momento modificaciones a los modelos que se
describen en el presente manual por razones técnicas o comerciales.
SERVICIO DE ASISTENCIA PEG-PÉREGO
En caso de que se pierdan o se dañen partes del producto, utilizar sólo repuestos originales
Peg-Pérego. Para eventuales reparaciones, cambios e informaciones sobre los productos,
así como la venta de recambios originales y accesorios, contactar el Servicio de Asistencia
Peg-Pérego:
CANADA
tel. 905.839.3371
fax 905.839.9542
call us toll free 1.800.661.5050
website www.pegperego.com
FR_Français
Merci d’avoir choisi un produit Peg-Pérego.
AVERTISSEMENT
_ LIRE CES INSTRUCTIONS AVEC ATTENTION ET LES CONSERVER POUR
TOUTE RÉFÉRENCE FUTURE.
LA SÉCURITÉ DE VOTRE ENFANT POURRAIT ÊTRE MENACÉE SI CES
INSTRUCTIONS NE SONT PAS RESPECTÉES.
_ CE PRODUIT A ETE CONÇU POUR UN ENFANT DONT LE POIDS N’EXCEDE
PAS 20 KG (45 LIVRES) ET LA TAILLE NE DEPASSE PAS 110 CM (43 POUCES). LE
PANIER A ETE CONÇU POUR SUPPORTER DES CHARGES MAXIMALES DE 5 KG
(11 LIVRES). LE PORTE-BOISSONS EVENTUELLEMENT FOURNI AVEC LE PRODUIT
A ETE CONÇU POUR SUPPORTER DES CHARGES INDIQUEES SUR LE PORTEBOISSONS LUI-MEME. LES POCHETTES OU SACS FOURNIS AVEC CE PRODUIT
ONT ETE CONÇUS POUR SUPPORTER DES CHARGES MAXIMALES DE 0,2 KG
(0,44 LIVRES).
_ LE DEFAUT D’OBSERVATION DES SPECIFICATIONS DU FABRICANT OU L’EMPLOI
D’ACCESSOIRES NON APPROUVES PAR LE FABRICANT PEUT AFFECTER LA
STABILITE DU PRODUIT.
_ POUR ÉVITER DE GRAVES BLESSURES SUITE À LA CHUTE OU AU GLISSEMENT
DE L’ENFANT DU PRODUIT, TOUJOURS UTILISER UNE CEINTURE DE SÉCURITÉ À
5 POINTS COMPLÈTE.
_ NE JAMAIS LAISSER L’ENFANT SANS SURVEILLANCE.
_ TOUJOURS ACTIONNER LES FREINS LORSQUE LE PRODUIT EST A L’ARRET.
_ POUR ÉVITER DE GRAVES BLESSURES LORS DU RÉGLAGE DU PRODUIT,
S’ASSURER QUE LES MEMBRES DE L’ENFANT NE SONT PAS EN CONTACT AVEC
DES PIÈCES EN MOUVEMENT.
_ L’ENSEMBLE DES PROCÉDURES DE MONTAGE ET D’UTILISATION DOIT ÊTRE
EFFECTUÉ PAR UN ADULTE
_ NE PAS SOULEVER LA POUSSETTE PAR LA BARRE FRONTALE. ELLE N’A PAS ÉTÉ
CONÇUE POUR SUPPORTER DES CHARGES.
_ S’ASSURER QUE LA POUSSETTE EST CORRECTEMENT OUVERTE EST BLOQUÉE
DANS LA POSITION CONVENANT À SON UTILISATION.
_ CONTRÔLER QUE LE SIÈGE ENFANT OU LE LANDAU EST CORRECTEMENT
ACCROCHÉ À LA POUSSETTE.
_ NE PAS UTILISER CE PRODUIT À PROXIMITÉ DE MARCHES OU D’ESCALIERS;
PRÊTER ATTENTION À LA MANIPULATION DU PRODUIT DANS DES ESCALIERS
OU DES ESCALATORS.
_ NE PAS UTILISER LE PRODUIT SI DES PIÈCES SONT MANQUANTES OU CASSÉES.
_ NE PAS UTILISER PRÈS DU FEU OU D’UNE FLAMME DIRECTE.
_ REMARQUE : CET ARTICLE REMPLIT LES CONDITIONS REQUISES PAR LA NORME
ASTM F833 ET RÉVISIONS RÉCENTES OU SATISFAIT À DES CONDITIONS PLUS
SÉVÈRES.
INSTRUCTIONS D’UTILISATION
1 OUVERTURE : (fig_a) pour ouvrir la poussette, décrocher simultanément les deux fixations.
Appuyer sur le bouton (1) situé sur le guidon et, en le même temps, pousser la poignée (2),
tirer énergiquement le guidon vers le haut (fig_b) puis le pousser vers le bas jusqu’au déclic
final (fig_c).
2 MONTAGE ROUES ARRIÈRE : ATTENTION: montez les deux roues avec freins
sur la partie arrière de la poussette. Insérez la roue, appuyez à fond sur le bouton,
simultanément poussez la roue jusqu'à entendre le CLIC de fixation.
3 MONTAGE ROUES AVANT : pour insérer les roues avant, abaisser le levier (fig_a) et
insérer la roue jusqu’au déclic (fig_b).
4 INSTALLATION DE LA MAIN COURANTE: accrocher la main courante comme indiqué sur
la figure.
5 CAPOTE : pour installer la capote, insérer ses fixations dans les emplacements prévus à
cet effet (fig_a) et la boutonner à l’arrière du dossier (fig_b).
6 Il est possible d’orienter la capote dans plusieurs positions quand l’enfant est endormi
(fig_a). Pour enlever la capote, appuyer sur les boutons latéraux et la faire sortir par le haut
(fig_b).
7 PORTE-BOISSONS : le porte-boissons peut être monté du côté droit ou gauche de la
poussette, grâce au support présent de chaque côté de la poussette. Pour accrocher le
porte-boissons, l’insérer sur son support jusqu’au déclic (fig_a). Porte-boissons accroché
(fig_b).
8 FREIN : pour immobiliser la poussette, abaisser à l’aide du pied le levier de frein situé sur le
groupe roues arrière. Pour débloquer le frein, relever le dossier. Toujours actionner le frein
lorsque la poussette est à l’arrêt.
9 CEINTURE DE SÉCURITÉ À 5 POINTS: pour accrocher la ceinture de sécurité à 5 points,
insérer les deux clips de la sangle ventrale (avec les bretelles accrochées) dans la sangle
d’entrejambes jusqu’au déclic (fig. a). Pour la décrocher, appuyer sur les côtés du clip tout
en tirant la sangle ventrale vers l’extérieur (fig. b).
10 Pour attacher l’enfant, insérer tout d’abord l’élément de réglage des bretelles dans l’embout
tissu du dossier (fig. a), attacher l’enfant et retirer l’élément de réglage de l’embout de tissu
afin que l’enfant soit libre de ses mouvements (fig. b). Positionner l’élément de réglage des
bretelles juste sous les épaules de l’enfant de sorte que les bretelles ne glissent pas (fig. c).
11 RÉGLAGE DU DOSSIER : pour incliner le dossier, appuyer sur le bouton du dispositif de
réglage du dossier tout en poussant ce dernier vers le bas (fig_a). Pour relever le dossier,
pousser vers le haut le dispositif de réglage du dossier (fig_b).
12 ROUES PIVOTANTES : pour mettre les roues avant en position pivotante, abaisser le levier
(fig_a); pour les mettre en position fixe, relever le levier (fig_b).
13 MAIN COURANTE-PLATEAU : la main courante-plateau peut être ouverte de manière à
faciliter l’entrée et la sortie de l’enfant une fois qu’il a grandi. Pour ouvrir la main courante
d’un côté seulement, appuyer sur l’un des deux boutons (1 ou 2) et la faire pivoter vers le
haut. Pour enlever la main courante-plateau, appuyer sur les deux boutons comme indiqué
sur la figure tout en la tirant vers le haut (fig_a). Pour enlever la main courante, appuyer sur
les deux boutons (1 et 2) tout en la tirant vers le haut (fig_b). Ne pas placer de boissons
brûlantes sur la main courante-plateau, cela pourrait être dangereux.
14 INSTALLATION DU PANIER : pour installer le panier, le monter à l’avant sur les petits
crochets (fig_a) et le boutonner à l’arrière (fig_b).
15 DÉMONTAGE DES ROUES : les roues peuvent être démontées de la poussette. Pour
enlever les roues avant, il convient au préalable de les rendre pivotantes. Appuyer ensuite
sur les languettes (fig_a) tout en tirant la roue jusqu’à ce qu’elle s’enlève (fig_b).
16 Pour enlever les roues arrière, appuyer sur le petit bouton (fig_a) tout en tirant les roues
17
18
19
20
21
22
vers le bas jusqu’à ce qu’elles s’enlèvent (fig_b).
PLIAGE: avant de replier la poussette, refermer la capote si elle est installée sur la
poussette. Pour replier la poussette, actionner la poignée comme lors de son ouverture :
appuyer sur le bouton (1) situé sur le guidon tout en appuyant sur la poignée (2).
Pousser ensuite le dossier et la capote vers la poussette et abaisser le guidon jusqu’à ce
qu’il rentre dans son logement (fig_a). S’assurer de la bonne fermeture de la poussette en
contrôlant la position du crochet de sécurité (fig_b). Une fois fermée, la poussette reste
debout toute seule. Elle peut être transportée grâce à sa poignée de transport sur le côté
(fig_c).
POUR ENLEVER LA HOUSSE : pour enlever la housse de la poussette, commencer
par retirer la capote, puis enlever le petit couvercle situé sur le côté et faire levier (fig_a).
Pousser le goujon vers le haut puis le sortir de son logement (fig_b). Pour finir, le faire sortir
de la boutonnière de la housse. Procéder de même des deux côtés.
Pour décrocher la housse du siège, enlever la sangle d’entrejambes par en dessous (fig_a)
et déboutonner la housse (fig_b). Dévisser la ceinture de chaque côté (fig_c) et retirer la
housse (fig_d).
SYSTÈME GANCIOMATIC : le système Ganciomatic, pratique et rapide, permet d’accrocher
le siège-auto Primo Viaggio (vendu séparément) également équipé du système Ganciomatic
à la poussette grâce aux fixations Ganciomatic.
FIXATIONS GANCIOMATIC DE LA POUSSETTE : pour relever les fixations Ganciomatic
de la poussette, soulever la housse dans les angles de l’assise et relever les deux fixations
qui se déplaceront automatiquement vers l’extérieur (fig_a). Pour abaisser les fixations
Ganciomatic, les pousser tout d’abord vers l’intérieur puis les abaisser (fig_b).
POUSSETTE + SIÈGE-AUTO : pour accrocher le siège-auto à la poussette, procéder
comme suit : actionner le frein de la poussette, retirer la capote, abaisser complètement
le dossier et relever les fixations Ganciomatic. Positionner le siège-auto vers maman et le
pousser vers le bas jusqu’à ce qu’il s’enclenche. Il est recommandé de ne pas enlever la
main courante de la poussette lors de l’installation du siège-auto. Pour décrocher le siègeauto de la poussette, consulter le manuel d’instructions correspondant.
ACCESSOIRES EN OPTION
23 BÂCHE transparent avec élastique, applicable à la capote de la poussette Aria. Cette bâche
a été également conçue en cas de montage du siège auto Primo Viaggio sur la poussette,
garantissant ainsi une protection totale.
24 BORSA CAMBIO (Sac à langer): ce sac muni d’un petit matelas pour changer bébé peut
être accroché à la poussette.
NETTOYAGE ET ENTRETIEN
ENTRETIEN DE L’ARTICLE: protéger l’article des agents atmosphériques (eau, pluie ou
neige); une exposition continue et prolongée au soleil pourrait entraîner un changement de
couleur de nombreux matériaux; ranger cet article dans un lieu sec.
NETTOYAGE DU CHÂSSIS: nettoyer régulièrement les pièces en plastique à l’aide d’un
linge humide; ne pas utiliser de solvants ou autres produits similaires. Veiller à ce que toutes
les pièces métalliques restent sèches pour prévenir la formation de rouille. Maintenir le
bon état de propreté de toutes les pièces mobiles (mécanismes de réglage, mécanismes
de fixation, roues, etc.) en enlevant poussière ou sable; graisser avec une huile légère si
nécessaire.
NETTOYAGE DES ÉLÉMENTS EN TISSU : brosser les éléments en tissu pour enlever la
poussière et laver à la main à une température maximale de 30° ; ne pas tordre ; ne pas
utiliser d’eau de javel ; ne pas repasser ; ne pas laver à sec ; ne pas détacher à l’aide de
solvants ; ne pas sécher dans un sèche-linge à tambour rotatif.
NETTOYAGE DE L’HABILLAGE PLUIE: utiliser une éponge et de l’eau savonneuse; ne pas
utiliser de détergents.
PEG-PÉREGO S.p.A.
Peg-Pérego se réserve le droit de procéder à tout moment à des modifications sur les
modèles décrits dans cet ouvrage, pour des raisons de nature technique ou commerciale.
SERVICE D’ASSISTANCE PEG-PÉREGO
En cas de perte de pièces ou de rupture de l'une d'elles, utiliser exclusivement des
pièces de rechange originales Peg-Pérego. Pour les réparations, les remplacements, les
demandes d'informations relatives aux produits et l’achat de pièces de rechange originales
et d’accessoires, contacter le service d'assistance Peg-Pérego:
CANADA
tél. 905.839.3371
fax 905.839.9542
call us toll free 1.800.661.5050
site Internet www.pegperego.com
PEG PEREGO U.S.A. Inc.
3625 INDEPENDENCE DRIVE FORT WAYNE INDIANA 46808
phone 260 482 8191 fax 260 484 2940
Call us toll free: 1 800 671 1701
PEG PEREGO CANADA Inc.
585 GRANITE COURT PICKERING ONTARIO CANADA L1W3K1
phone 905 839 3371 fax 905 839 9542
Call us toll free: 1 800 661 5050
aria oh
PEG PEREGO S.p.A.
VIA DE GASPERI 50 20043 ARCORE MI ITALIA
tel. 0039 039 60881 fax 0039 039 615869/616454
Servizio Post Vendita - After Sale:
tel. 0039 039 6088213 fax: 0039 039 3309992
www.pegperego.com
WARNING
AVOID SERIOUS INJURY FROM FALLING OR SLIDING OUT.
ALWAYS USE COMPLETE 5 POINT SEAT BELT.
FINA0703I44
14/12/07