1
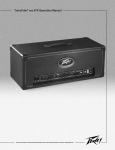
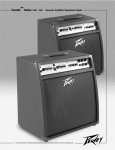
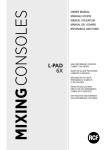
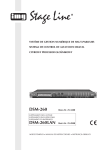
TransTube® 110 EFX Operation Manual
For more information on other great Peavey products, go to your local Peavey dealer or online at www.peavey.com
Intended to alert the user to the presence of uninsulated “dangerous voltage” within the productʼs
enclosure that may be of sufficient magnitude to constitute a risk of electric shock to persons.
Intended to alert the user of the presence of important operating and maintenance (servicing)
instructions in the literature accompanying the product.
CAUTION: Risk of electrical shock — DO NOT OPEN!
CAUTION: To reduce the risk of electric shock, do not remove cover. No user serviceable parts inside. Refer
servicing to qualified service personnel.
WARNING: To prevent electrical shock or fire hazard, do not expose this appliance to rain or moisture. Before
using this appliance, read the operating guide for further warnings.
Este símbolo tiene el propósito, de alertar al usuario de la presencia de “(voltaje) peligroso” sin aislamiento dentro de la caja del producto y que puede tener una magnitud suficiente como para constituir
riesgo de descarga eléctrica.
Este símbolo tiene el propósito de alertar al usario de la presencia de instruccones importantes sobre la
operación y mantenimiento en la información que viene con el producto.
PRECAUCION: Riesgo de descarga eléctrica ¡NO ABRIR!
PRECAUCION: Para disminuír el riesgo de descarga eléctrica, no abra la cubierta. No hay piezas útiles dentro.
Deje todo mantenimiento en manos del personal técnico cualificado.
ADVERTENCIA: Para evitar descargas eléctricas o peligro de incendio, no deje expuesto a la lluvia o humedad
este aparato Antes de usar este aparato, Iea más advertencias en la guía de operación.
Ce symbole est utilisé dans ce manuel pour indiquer à lʼutilisateur la présence dʼune tension dangereuse
pouvant être dʼamplitude suffisante pour constituer un risque de choc électrique.
Ce symbole est utilisé dans ce manuel pour indiquer à lʼutilisateur quʼil ou quʼelle trouvera dʼimportantes
instructions concernant lʼutilisation et lʼentretien de lʼappareil dans le paragraphe signalé.
ATTENTION: Risques de choc électrique — NE PAS OUVRIR!
ATTENTION: Afin de réduire le risque de choc électrique, ne pas enlever le couvercle. Il ne se trouve à lʼintérieur
aucune pièce pouvant être reparée par lʼutilisateur. Confiez Iʼentretien et la réparation de lʼappareil à un réparateur
Peavey agréé.
AVERTISSEMENT: Afin de prévenir les risques de décharge électrique ou de feu, nʼexposez pas cet appareil à
la pluie ou à lʼhumidité. Avant dʼutiliser cet appareil, lisez attentivement les avertissements supplémentaires de ce
manuel.
Dieses Symbol soll den Anwender vor unisolierten gefährlichen Spannungen innerhalb des Gehäuses
warnen, die von Ausreichender Stärke sind, um einen elektrischen Schlag verursachen zu können.
Dieses Symbol soll den Benutzer auf wichtige Instruktionen in der Bedienungsanleitung aufmerksam
machen, die Handhabung und Wartung des Produkts betreffen.
VORSICHT: Risiko — Elektrischer Schlag! Nicht öffnen!
VORSICHT: Um das Risiko eines elektrischen Schlages zu vermeiden, nicht die Abdeckung enfernen. Es befinden sich keine Teile darin, die vom Anwender repariert werden könnten. Reparaturen nur von qualifiziertem
Fachpersonal durchführen lassen.
ACHTUNG: Um einen elektrischen Schlag oder Feuergefahr zu vermeiden, sollte dieses Gerät nicht dem Regen
oder Feuchtigkeit ausgesetzt werden. Vor Inbetriebnahme unbedingt die Bedienungsanleitung lesen.
2
IMPORTANT SAFETY INSTRUCTIONS
WARNING: When using electrical products, basic cautions should always be followed, including the following:
1.
2.
3.
4.
5.
6.
7.
8.
9.
10.
11.
12.
13.
14.
15.
16.
17.
Read these instructions.
Keep these instructions.
Heed all warnings.
Follow all instructions.
Do not use this apparatus near water.
Clean only with a dry cloth.
Do not block any of the ventilation openings. Install in accordance with manufacturer’s instructions.
Do not install near any heat sources such as radiators, heat registers, stoves or other apparatus (including
amplifiers) that produce heat.
Do not defeat the safety purpose of the polarized or grounding-type plug. A polarized plug has two blades with
one wider than the other. A grounding type plug has two blades and a third grounding plug. The wide blade or
third prong is provided for your safety. If the provided plug does not fit into your outlet, consult an electrician for
replacement of the obsolete outlet.
Protect the power cord from being walked on or pinched, particularly at plugs, convenience receptacles, and the
point they exit from the apparatus.
Only use attachments/accessories provided by the manufacturer.
Use only with a cart, stand, tripod, bracket, or table specified by the manufacturer, or sold with the apparatus. When
a cart is used, use caution when moving the cart/apparatus combination to avoid injury from tip-over.
Unplug this apparatus during lightning storms or when unused for long periods of time.
Refer all servicing to qualified service personnel. Servicing is required when the apparatus has been damaged
in any way, such as power-supply cord or plug is damaged, liquid has been spilled or objects have fallen into the
apparatus, the apparatus has been exposed to rain or moisture, does not operate normally, or has been dropped.
Never break off the grounding pin. Write for our free booklet "Shock Hazard and Grounding." Connect only to a
power supply of the type marked on the unit adjacent to the power supply cord.
If this product is to be mounted in an equipment rack, rear support should be provided.
Exposure to extremely high noise levels may cause a permanent hearing loss. Individuals vary considerably in
susceptibility to noise-induced hearing loss, but nearly everyone will lose some hearing if exposed to sufficiently
intense noise for a sufficient time. The U.S. Government’s Occupational and Health Administration (OSHA) has
specified the following permissible noise level exposures:
Sound Duration Per Day In Hours
8
6
4
3
2
1 1/2
1
1/2
1/4 or less
Sound Level dBA, Slow Response
90
92
95
97
100
102
105
110
115
According to OSHA, any exposure in excess of the above permissible limits could result in some hearing loss. Ear plugs or protectors to
the ear canals or over the ears must be worn when operating this amplification system in order to prevent a permanent hearing loss, if
exposure is in excess of the limits as set forth above. To ensure against potentially dangerous exposure to high sound pressure levels, it is
recommended that all persons exposed to equipment capable of producing high sound pressure levels such as this amplification system be
protected by hearing protectors while this unit is in operation.
SAVE THESE INSTRUCTIONS!
3
ENGLISH
TRANSTUBE® 110 EFX
Combining today’s hottest effects with the killer tone of Peavey’s patented TransTube circuitry, the EFX
Series offers unbelievable replication of tube amp characteristics. Nine footswitchable digital effects
allows this two-channel amp to create a vast array of awesome sounds, without using external effects
processors. The TransTube 110 EFX is a ruggedly constructed unit representing years of research and
development in amplifier design and manufacturing. From user-friendly controls to specially voiced
speakers, these amps demonstrate Peavey’s commitment to quality performance and unsurpassed
durability. Plugging into an EFX amp puts the sound you want at your discretion, allowing you to
concentrate on the reason you play...the music!
FEATURES
TransTube 110 EFX
• 40 W into 6 Ohms
• 10" Blue Marvel speaker
• Clean and lead channels with 3-band EQ and Gain/EQ voicing switches on each channel
• 9 digital effects
- Tremolo
- Octaver
- Rotary speaker
- Funk wah
- Delay
- Reverb
- Flanger
- Chorus
- Phaser
• Headphone jack
• Effects loop
• Can be used with PFC 3 footswitch (not included)
4
Rear Panel
2
1
4
3
5
FEATURES AND CONTROLS
(1) AC POWER CORD (Under chassis)
This line cord provides the AC power to the unit. Connect the line cord to a properly grounded AC supply. Damage
to the equipment may occur if improper line voltage is used. (See voltage marking on unit.) Never remove or cut
the ground pin of the line cord plug.
Note for UK only
If the colors of the wires in the mains lead of this unit do not correspond with the colored markings identifying the
terminals in your plug, proceed as follows: (1) The wire that is colored green and yellow must be connected to the
terminal that is marked by the letter E, the earth symbol, colored green, or colored green and yellow. (2) The wire
that is colored blue must be connected to the terminal that is marked with the letter N or the color black. (3) The
wire that is colored brown must be connected to the terminal that is marked with the letter L or the color red.
(2) REMOTE SWITCH CONNECTOR
This 8-pin DIN connector is provided for the connection of the PFC 3 footswitch (not included). The footswitch
cable should be connected before the amp is powered up. See the FOOTSWITCH section of this manual for
explanation of switch operation.
(3) HEADPHONE JACK
This stereo jack allows signal to flow to both sides of any stereo headset. A monaural headset may be used, but it
is not recommened.
(4) EFFECTS RETURN
Input for returning signals from external low-level effects or signal processing equipment.
(5) EFFECTS SEND
Output for supplying signals to external low-level effects or signal processing equipment.
(6) INPUT
5
Front Panel
13
6
13
7
10
10
8
9
11
12
14
15
16
17
Input jack will accept signals from all types of guitar pickups. Be sure to use a high quality shielded instrument
cable to connect the guitar to the amplifier.
(7) VOLUME
Controls the volume level of the Clean channel and is not affected by the Lead, Pre or Post Gain controls.
(8) PRE GAIN
Controls the input volume level of the Lead channel. The Pre Gain can be used to control the distortion level in
the Lead channel. To obtain more distortion simply increase the Pre Gain and set the Post Gain (9) to the desired
volume level.
(9) POST GAIN
Controls the overall volume level of the Lead channel. The final level adjustment should be made after the desired
sound has been achieved.
(10) MODERN/VINTAGE SWITCH
This switch allows you to instantly change the voicing to reflect the tones of modern and vintage amplifiers. The
MODERN position maintains a warm, standard voicing. The VINTAGE position changes the overall function of the
EQ and adds a hint of brightness to emulate some classic amp designs. Experiment with this switch, along with
the EQ (11) adjustments, to capture your desired tone. You may refer to the Recommended Settings on page 6 for
some creative starting points.
(11) LOW, MID AND HIGH EQ
Passive tone controls that regulate the low, mid and high frequencies, respectively.
(12) CHANNEL SELECT
This switch selects the channel (Lead or Clean). The ACTIVE CHANNEL LEDs (13) indicate the active channel
— green for Clean; red for Lead.
(13 ACTIVE CHANNEL LEDs
These indicators signify the active channel. Green indicates Clean channel activation; red indicates Lead channel
activation.
(14) EFX ADJUST
Pressing this control selects the effect. A yellow LED adjacent to the effect name will illuminate to indicate the
selected effect. Rotating this control clockwise changes the parameter of the active effect according to the
descriptions below. The surrounding LED ring indicates relative value of the parameter being adjusted.
EFX ADJ PARAMETERS
Tremolo - Rate increase
Octaver - Wet/Dry mix
Flanger - Rate increase
Chorus - Rate increase/depth decrease
Funk Wah - Sensitivity increase
Rotary Speaker - Rate increase
Phaser - Rate increase
EFX amps are built with factory settings loaded into the presets. To return to the factory settings, press
and hold both the EFX ADJUST (14) and DELAY (16) controls while turning the amp on.
(15) REVERB
6
This control adjusts the overall reverb level. The surrounding LED ring indicates level.
(16) DELAY
This control adjusts delay type, time, and volume. Three types of delay are available: SLAP (1 repeat), ECHO (3
- 4 repeats), or INFINITE (5 - 6 repeats). The LEDs in each section of the control indicate which type is active and
volume level. Pressing the control twice sets the delay time to interval between presses.
(17) POWER SWITCH
Press the switch to the “ON” position to apply power to the unit.
MODE SELECT
Footswitch (not included)
EFX
SELECT
DELAY
REVERB
MODULATION
CHANNEL
PFC 3
TM
1
PRESET
MODE
18
19
20
DOUBLE-CLICK
TO STORE PRESET
21
2
22
PRESET
23
3
PRESET
24
25
The PFC 3 footswitch operates in two modes: EFX Select mode and Preset Select mode. Pressing the
MODE SWITCH (18) selects between the two modes. The active mode is indicated by the MODE LED (19).
Illumination of the LED indicates EFX Select Mode; a dark LED indicates Preset Select Mode. Controls and
indicators 20-25 perform different functions relative to the active mode.
EFX SELECT MODE
NOTE: When entering this mode, the current preset will remain active.
In this mode, PRESET 1 (20) selects between the Lead and Clean channels. The CHANNEL LED (21) will illuminate
when the Lead channel is active. PRESET 2 (23) toggles between two effects and their respective settings. This
switch may be used as an on/off switch if one of the settings has no effects active. To use the MODULATION LED
(22) as a status indicator, the “off ” (or lower setting) should be made with the LED dark, and the “on” (or higher
setting) made with the LED illuminated. PRESET 3 (25) toggles between two reverb and delay settings. As with
effects settings, this switch may be used as an on/off for reverb and delay. Both functions change simultaneously
when this switch is depressed.
PRESET SELECT MODE
In this mode, all three switches control effects presets. Their corresponding LEDs indicate which preset is active.
Once desired settings are achieved utilizing the effects controls on the front panel, double-click one of the
Preset switches (15, 23, or 25) to store the settings. To return to the last saved settings for a Preset, press
the desired Preset switch once.
For a detailed explanation on creating and storing presets, refer to the TWEAK FEATURES section of this manual
on the following page.
7
Tweak Features
EFX amplifiers offer hidden features to further adjust the parameters of the digital effects. In addition to the
adjustments described in the EFX ADJ PARAMETERS section of this manual, additional tweaks may be made to
customize effects to user preference. Tweaks are made by pressing and holding the EFX ADJUST (14) control while
simultaneously rotating the REVERB (15) control. The EFX ADJUST control must be pressed for at least one second
to enter Tweak Mode. Reverb setting will not be affected while in Tweak Mode. The LED ring surrounding the
control will now reflect the value of the effect being tweaked. As in standard parameter changes, the effect being
tweaked will be the active effect as indicated by the LED adjacent to the effect name.
TWEAK ADJ PARAMETERS
Tremolo - Intensity
Flanger - Depth
Funk Wah - Decay time
Rotary Speaker - Wet/Dry mix
Phaser - Depth
Chorus - Wet/Dry mix
To recover the factory settings for both Standard and Tweak Modes, press the EFX ADJUST (14) control and hold
for one second to enter Tweak Mode, then press the DELAY (16) control.
CREATING AND STORING A CUSTOM PRESET
The following steps explain the creation and storage of two different effects/settings, as well as two different
settings for Delay/Reverb. The Flanger and Octaver effects were selected at random. These steps will accomplish
custom presets using any of the effects.
1. Assure the footswitch is in the EFX Select Mode by pressing the MODE SWITCH (18) if necessary. The MODE
LED (19) will illuminate.
2. Use PRESET 1 (20) to select Lead or Clean channel. The CHANNEL LED (21) will illuminate for Lead channel.
3. Select the position of PRESET 2 (23). The MODULATION LED (22) may be illuminated or dark at the discretion
of the user.
4. Select Flanger and adjust rate to preference using the EFX ADJUST (14) control on the front panel (standard
adjustment).
5. Press and hold the EFX ADJUST (14) control while adjusting Flanger depth to preference with the REVERB (15)
control on the front panel (tweak).
6. Press PRESET 2 (23) to change to the other Modulation position.The MODULATION LED (22) will illuminate or
go dark depending on its status in step 5.
7. Select Octaver and adjust wet/dry mix to preference using the EFX ADJUST (14) control on the front panel
(standard adjustment).
8. Select the position of PRESET 3 (25). The DELAY/REVERB LED (24) may be illuminated or dark at the discretion
of the user.
9. Adjust reverb to preference using the REVERB (15) control on the front panel.
10. Press PRESET 3 (25) to change to the other Delay/Reverb position. The DELAY/REVERB LED (24) will
illuminate or go dark depending on its status in step 10.
11. Adjust delay type, time, and volume to preference using the DELAY (16) control.
12. Set the position of PRESET 2 (23) and PRESET 3 (25) to the settings preferred as defaults. (Default setting is
the one that is active when the preset is selected.)
13. Press the MODE SWITCH (18) to return to the Preset Mode.
14. Double-click PRESET 1, 2, or 3 (20, 23, or 25) to store the settings in that location.
8
TRANSTUBE® 110 EFX
RECOMMENDED SETTINGS
NOTE: Tone settings given are general recommendation and will vary depending on make of
guitar and type of pickup.
Metal
Modern
Modern
Adjust to
Taste
Alternative
Modern
Adjust to
Taste
High Gain
Adjust to
Taste
Country
Vintage
Adjust to
Taste
Vintage
Adjust to
Taste
Adjust to
Taste
9
Specifications are subject to change without notice.
10
INPUT
CLEAN
LEAD
VOLUME
MODERN
VINTAGE
SWITCH
LOW
MID HIGH
FOOTSWITCH
DIGITAL
EFFECTS
RETURN
POWER
AMP
HEADPHONE
SEND
EFFECTS
LOOP
This block diagram shows signal flow within the unit. In order to thoroughly understand
the unit’s functions, please study the block diagram carefully
PRE
POST
HIGH GAIN
MODERN
VINTAGE
SWITCH
HIGH GAIN AMP
TRANSTUBE® 110 EFX BLOCK DIAGRAM
6 OHM SPEAKER
TRANSTUBE® 110 EFX SPECIFICATIONS
POWER AMP SECTION:
Rated power and load:
40 Watts (RMS) into 6 Ohms
Volume (minimum level): 10
Preamp input (clean channel):
Impedance: High Z, 250 k Ohms
Nominal input level: -14 dBV, 200 mV (RMS)
Minimum input level: -24 dBV, 64 mV (RMS)
Power @ clipping (typically):
(5% THD, 1 kHz, 120 VAC line)
35 Watts (RMS) into 6 Ohms
Effects send:
Output impedance: 1k Ohms
Nominal output Level: -7.4 dBV, 425 mV (RMS)
Total harmonic distortion:
Less than 0.5% THD, 100 mW to 15 Watts (RMS),
100 Hz to 10 kHz
Effects return:
Input impedance: 31 k Ohms
Nominal input level: -7.4 dBV, 425 mV (RMS)
Power amp hum and noise @ nominal input
level:
(20 Hz to 20 kHz, unweighted)
Greater than 82 dB below rated power
Headphone output:
Load impedance: 8 Ohms or greater
Nominal Power Output: 30 mW (RMS) into
Power Consumption:
75 Watts 50/60 Hz, 120 VAC
8 Ohms
(Stereo jack, monaural signal disconnects
internal speaker when phone plug is inserted.)
PREAMP SECTION:
The following specs are measured @ 1 kHz
with the controls preset as follows:
Channel select: CLEAN
EQ voicing switch: MODERN
Low, mid, and high: 5
Pre gain and post gain: 10
Efx adjust: OFF
Reverb: OFF
Delay: OFF
Volume (nominal level): 5
System Hum and noise @ nominal input
level:
(20 Hz to 20 kHz, unweighted)
Greater than 75 dB below rated power
Features and specifications are subject to change without notice
11
FRANÇAIS
TRANSTUBE® 110 EFX
Combinant un processeur d’effets modernes avec l’incroyable sonorité du circuit breveté Peavey
TransTube, les amplis EFX vous permettent d’obtenir une mutitude de sonorités différentes, y compris
celles habituellement réservées aux amplificateur classiques à lampes et le processeur d’effets interne
comprend tous les effets standarts rencontrés dans le monde de la guitare. Le TransTube 110 EFX est
de fabrication robuste et résulte de nombreuses années d’expérience dans ce domaine. Sa simplicité
d’utilisation malgrès des possibilités insoupconnées en fait une unité idéale pour de très nombreuses
applications, tout en vous laissant vous concentrer sur le plus important....la musique!
FEATURES
TransTube 110 EFX
• 40 W sous 6 Ohms
• Haut-parleur 10" Blue Marvel®
• Canaux clair et saturé avec equalisation 3 bandes et interrupteur gain/EQ
• 9 effets digitaux
- Tremolo
- Octaver
- Rotary speaker
- Funk wah
- Delay
- Reverb
- Flanger
- Chorus
- Phaser
• Prise casque d’écoute
• D’effects boucle
• Peut être piloté par le pédalier PFC 3 (non inclu)
12
Panneau Arriere
2
1
3
4
5
CARACTERISTIQUES ET CONTROLES
(1) AC POWER CORD (Under chassis)
Ce cordon vous permet de connecter votre unité à une source d’alimentation électrique. Utiliser une prise
correctement liée à la terre pour votre propre sécurité et celle de votre unité.
(2) REMOTE SWITCH CONNECTOR
Cette fiche 8-pin DIN est prévue pour recevoir un pédalier PFC 3 (non-inclu). Ce cable doit être connecté avant la
mise sous tension de votre unité.
(3) HEADPHONE JACK
Cette sortie Jack 1/4" stéréo (TRS) accepte tout casque standard. En utilisant cette sortie, vous coupez le signal
de l’ampli de puissance (pas de son en sortie aux haut-parleurs), idéale pour une application silencieuse.
(4) RETOUR BOUCLE D’EFFETS
Entrée vous permettant de connecter un processeur externe d’effets de bas niveau (A connecter à la sortie de
votre processeur d’effets).
(4) ENVOIE BOUCLE D’EFFETS
Sortie vous permettant de connecter un processeur externe d’effets de bas niveau (A connecter à l’entrée de votre
processeur d’effets).
13
Panneau Avant
13
6
10
13
7
8
10
9
11
12
14
15
16
17
(6) INPUT
Entrée prévue pour la plupart des instruments.Assurez-vous d’utiliser un cable blindé de haute qualité pour relier
votre guitare à votre amplificateur.
(7) VOLUME
Contrôle le volume général du canal Clair. Ce volume ne sera pas affecté par les contrôles de gain du canal saturé.
(8) PRE GAIN
Contrôle le niveau d’entrée du canal Crunch. En tournant ce contrôle dans le sens horaire, le niveau de saturation
du signal est accru.
(9) POST GAIN
Contrôle le niveau général du canal Crunch. Ce contrôle doit être ajusté une fois que vous avez trouvé votre son et
peut être considéré comme le contrôle de volume du canal Crunch.
(10) MODERN/VINTAGE SWITCH
Ce commutateur vous permet de changer instantanément l’agencement sonore pour reproduire les tonalités des
amplificateurs modernes et vintage. La position moderne donne un son naturel chaud alors qu’en mode vintage,
vous obtiendrez un son plus clair et des contrôles d’EQ différents.
(11) LOW, MID AND HIGH EQ
Equalisation passive vous permettant de controler le niveau des fréquences basses, mediums et aigues dans
votre signal.
(12) CHANNEL SELECT
Ce sélecteur vous permet de choisir le canal actif de votre unité (Clair ou Saturé). La Led correspondante (13)
indique le canal actuellement actif, vert pour le canal clair et rouge pour le saturé.
(13) ACTIVE CHANNEL LEDs
Ces indicateurs signalent le canal actuellement actif de votre unité. Une illumination verte indique que le canal
clair est actif, alors qu’une illumination rouge indique le canal saturé.
(14) EFX ADJUST
Appuyez sur ce contrôle pour sélectionner l’effet. Une Led jaune adjacente au nom de l’effet vous indique la
sélection actuelle. En tournant ce contrôle horairement, vous modifiez le paramètre de l’effet sélectionné suivant
le descriptif ci-dessous. La ‘ceinture’ de Leds indique une valeur relative du paramètre en cours de modification.
EFX ADJ PARAMETERS
Tremolo - Rate increase
Octaver - Wet/Dry mix
Flanger - Rate increase
Chorus - Rate increase/depth decrease
Funk Wah - Sensitivity increase
Rotary Speaker - Rate increase
Phaser - Rate increase
Les unités EFX sont assemblées avec des valeurs d’usine prédéterminées. Pour revenir aux paramètres
d’usine, enfoncez et maintenez pendant la mise sous tension les boutons EFX ADJUST (14) et DELAY (16).
14
(15) REVERB
Ce contrôle vous permet d’ajuster le niveau de réverbération dans votre signal. La ‘ceinture’ de Leds indique le
niveau actuel.
(16) DELAY
Ce contrôle vous permet de sélectionner le type de délai, au nombre de trois dans les unités EFX: SLAP (1
répétition), ECHO (3-4 répétitions), ou INFINITE (5-6 répétitions). Les Leds dans chaque section du contrôle
vous indique le type de délai ainsi que son volume. Appuyez sur ce contrôle 2 fois donnera donnera un délai où
l’interval sera celui entre les ‘appuis’.
(17) POWER SWITCH
Positionner cet interrupteur sur la position ‘ON’ pour mettre votre unité sous tension.
Pedalier (non inclu)
EFX
SELECT
DELAY
REVERB
MODULATION
CHANNEL
PFC 3
TM
1
PRESET
MODE
18
19
20
DOUBLE-CLICK
TO STORE PRESET
21
2
22
PRESET
23
3
24
PRESET
25
MODE SELECT
Le pédalier PFC 3 fonctionne sous 2 modes: EFX Select et Preset Select. Appuyez sur le sélecteur de mode (18)
pour passer de l’un à l’autre. Le mode actif est indiqué par la Led (19). La Led illuminée indique le mode de
sélection d’effets (EFX SELECT) alors qu’éteinte indique le mode de séction de presets (PRESET SELECT). Les
contrôles et indicateurs 20-25 ont des fonctions différentes suivant le mode de votre pédalier.
EFX SELECT MODE
Dans ce mode, les trois interrupteurs controlent les effets présélectionnés. Leurs leds correspondantes indiquent
la preset active. Lorsque vous avez obtenu un son satisfaisant grace aux contrôles de la face avant de votre EFX,
double-cliquez sur l’un des interrupteurs de preset (15, 23, ou 25) pour mémoriser vos réglages
sur cette preset. Pour retourner à l’une des preset, appuyer une seule fois sur l’interrupteur correspondant.
Reportez-vous au paragraphe ‘Trucs et Astuces’ de ce manuel pour de plus amples details.
MODE EFX SELECT
NOTE: Une fois que vous entrez dans ce mode, la preset sélectionnée reste active. Dans ce mode, l’interrupteur 1
(20) change la sélection du canal actif (Clair/Saturé). La Led de canal (21) s’illuminera pour indiquer l’activation
du canal saturé. L’interrupteur 2 (23) vous permet de passer d’une mémoire à l’autre pour le paramétre de l’effet
(Chaque paramètre d’effet possède 2 mémoires accessibles uniquement par le pédalier dans ce mode). La Led
correspondante (22) vous indique la mémoire active (allumée : mémoire origine, éteinte: mémoire secondaire).
L’interrupteur 3 (25) vous permet de passer d’une mémoire à l’autre pour les paramètres de Delay et Reverb (Ces
paramètres possèdent également 2 mémoires tout comme les paramètres d’effet). La Led correspondante (24)
vous indique la mémoire active (allumée : mémoire primaire, éteinte: mémoire secondaire). Ces 2 paramétres
changent simultanément. Reportez-vous au paragraphe ‘Trucs et Astuces’ de ce manuel pour de plus amples
details.
For a detailed explanation on creating and storing presets, refer to the TWEAK FEATURES section of this manual
on the following page.
15
Trucs Et Astuces
Les unités de la série EFX offrent des possibiltés vous permettant de configurer, mémoriser et rappeler de
nombreuses configurations d’effets sur chaque preset. Une fonction très intéressante est l’ajustement des
mémoires secondaires pour les paramètres d’effets. Vous devez pour cela utiliser le pédalier en mode EFX SELECT
et utiliser les interrupteurs 2 et 3 pour accéder aux mémoires primaires/secondaires de chaque paramètre. Une
autre fonction très intéressante est la possibilité d’accéder à un deuxième paramètre pour l’effet en pressant
pendant au moins 1 seconde (et gardant enfoncé ensuite) le contrôle EFX ADJUST (14) tout en modifiant le
paramètre en tournant le contrôle REVERB (15).
Le paramètre de reverb général sur la preset ne sera pas modifié dans ce mode caché (quand vous gardez
enfoncé le EFX ADJUST (14).
PARAMETRES SECONDAIRES
Tremolo - Intensity
Flanger - Depth
Funk Wah - Decay time
Rotary Speaker - Wet/Dry mix
Phaser - Depth
Chorus - Wet/Dry mix
Pour revenir aux réglages d’usine sur toutes les mémoires, pressez et gardez enfoncé le EFX ADJUST (12) pour
passer en mode Paramètres Secondaires, puis appuyer sur le contrôle DELAY (14).
CREER ET MEMORISER UNE PRESELECTION DE SONORITE SUR UNE PRESET
La démarche suivante vous permet sur une seule preset de mémoriser une famille de son proche (jusqu’à 4 sons
sur une seule preset). Nous choisirons au hasard pour cet exemple les effets Flanger et Octaver. Cette démarche
est valable pour tout effet sélectionné.
1. Assurez vous que le pédalier soit en mode EFX SELECT. (Pressez l’interrupteur MODE (18) si nécessaire, la Led
correspondante (19) doit être illuminé).
2. Utilisez l’interrupteur 1 (20) pour sélectionner le canal clair ou saturé désiré. La Led correspondante s’illumine
pour indiquer le canal saturé.
3. Sélectionnez une position pour l’interrupteur 2 (23). La Led correspondante (22) sera illuminée à la discétion de
l’utilisateur (mémoire primaire/secondaire).
4. Sélectionnez l’effet Flanger et ajustez sa vitesse grace au contrôle EFX ADJUST (14) du panneau avant.
5. Pressez et maintenez enfoncez le contrôle EFX ADJUST (14) pour ajustez sa profondeur grace au contrôle de
REVERB (15) du panneau avant (paramètre secondaire).
6. Pressez l’interrupteur 2 (23) pour passer sur les secondes mémoires (primaires ou secondiares suivant le choix
du 5). La Led correspondante (22) indique le statut opposé au 5.
7. Sélectionnez Octaver et ajustez le mix wet/dry en utilisant le contrôle EFX ADJUST (14) du panneau avant.
8. Sélectionez une position pour l’interrupteur 3 (25). La Led correspondante (24) sera illuminée à la discétion de
l’utilisateur (mémoire primaire/secondaire).
9. Ajustez le niveau de reverb grace au contrôle REVERB (15).
10. Pressez l’interrupteur 3 (25) pour passer sur les secondes mémoires (primaires ou secondaires suivant le
choix du 8). La Led correspondante (24) indique le statut opposé au 8.
11. Ajustez le type, temps et volume du Delay grace au contrôle DELAY (16).
12. Positionnez les interrupteurs 2 (23) et 3 (25) dans la position vous voulez les avoir à l’appel de la preset
(positions par défault).
13. Pressez l’interrupteur de mode (18) pour reveniren mode PRESET SELECT.
14. Double-cliquer sur l’un des interrupteurs PRESET 1, 2, ou 3 (20 23, ou 25) pour déterminer la location de votre
réglage.
16
SPECIFICATIONS DU TRANSTUBE® 110 EFX
POWER AMP SECTION:
Rated power and load:
40 Watts (RMS) into 6 Ohms
Volume (minimum level): 10
Preamp input (clean channel):
Impedance: High Z, 250 k Ohms
Nominal input level: -14 dBV, 200 mV (RMS)
Minimum input level: -24 dBV, 64 mV (RMS)
Power @ clipping (typically):
(5% THD, 1 kHz, 120 VAC line)
35 Watts (RMS) into 6 Ohms
Effects send:
Output impedance: 1k Ohms
Nominal output Level: -7.4 dBV, 425 mV (RMS)
Total harmonic distortion:
Less than 0.5% THD, 100 mW to 15 Watts (RMS),
100 Hz to 10 kHz
Effects return:
Input impedance: 31 k Ohms
Nominal input level: -7.4 dBV, 425 mV (RMS)
Power amp hum and noise @ nominal input
level:
(20 Hz to 20 kHz, unweighted)
Greater than 82 dB below rated power
Headphone output:
Load impedance: 8 Ohms or greater
Nominal Power Output: 30 mW (RMS) into
Power Consumption:
75 Watts 50/60 Hz, 120 VAC
8 Ohms
(Stereo jack, monaural signal disconnects
internal speaker when phone plug is inserted.)
PREAMP SECTION:
The following specs are measured @ 1 kHz
with the controls preset as follows:
Channel select: CLEAN
EQ voicing switch: MODERN
Low, mid, and high: 5
Pre gain and post gain: 10
Efx adjust: OFF
Reverb: OFF
Delay: OFF
Volume (nominal level): 5
System Hum and noise @ nominal input
level:
(20 Hz to 20 kHz, unweighted)
Greater than 75 dB below rated power
Les spécifications sont sujettes à modification sans avis préalable.
17
ESPAÑOL
TRANSTUBE® 110 EFX
Combinando los mejores efectos de hoy con el tono de los circuitos TransTube patentados por Peavey,
la serie EFX ofrece replicas increíbles de las características sonoras de un amplificador de bulbos. Nueve
efectos digitales controlables por pedal permiten que este amplificador de dos canales cree una gran
gama de sonidos sin precedente sin unidades de efectos externas. El TransTube 110 EFX es una unidad
solidamente construida que representa años de investigación en diseño y construcción de amplificadores.
De los controles de fácil acceso, a las bocinas de diseño particular, estos amplificadores demuestran el
compromiso de Peavey con la calidad y durabilidad. Conectarte a un amplificador EFX pone el sonido que
quieres a tu alcance, permitiéndote concéntrate en la razón por la que empezaste a tocar… la música.
CARACTERÍSTICAS
TransTube 110 EFX
• 40 W a 6 ohimos
• Bocinas Blue Marvel® de 10"
• Canales limpio y líder con ecualizador de 3 bandas e interruptor de EQ de sonido gain/EQ
• 9 efectos digitales
- Tremolo
- Octavador
- Bocina Rotativa
- Wah funky
- Delay
- Cámara (reverb)
- Flanger
- Chorus
- Faser
• Conectador de auriculares
• Circuíto de effctos
• Puede ser usado con la pedalera PFC 3 (no incluida)
CONTROLES Y CARACTERÍSTICAS
18
Panel Trasero
2
4
3
1
5
(1) CABLE DE CORRIENTE (CA) (Bajo el chasis)
Este cable alimenta al amplificador de corriente CA. Conecta este cable a una fuente de energía propiamente
aterrizada. El equipo puede sufrir daños si se usa un voltaje equivocado (ver indicaciones de voltaje en la unidad).
Nunca cortes o dobles la aguja de tierra del conector.
(2) CONECTOR DE CONTROL REMOTO
Este conectador tipo DIN de 8 agujas es incluido para la conexión de la pedalera PFC 3 (no incluida). El cable de
la pedalera debe ser conectado antes de encender la unidad. Ver la sección de PEDALERA en este manual para
explicaciones de su operación.
(3) SALIDA DE AURICULARES
Esta salida estéreo permite que pase la señal de los dos canales estéreo a cualquier par de auriculares. Un
auricular mono también puede ser usado, pero no es recomendable.
(4) RETORNO DE EFECTOS
Entrada para señales que regresan de unidades de efectos externas de baja entrada o equipo de proceso de
señal.
(5) ENVIO DE EFECTOS
Salida para alimentar unidades de efectos externas de baja entrada o equipo de proceso de señal.
(6) ENTRADA
19
Panel Frontal
13
6
13
7
10
10
8
9
11
12
14
15
16
17
Este conectador de entrada acepta señales de todo tipo de pastillas de guitarra. Hay que asegurarse de usar un
cable de alta calidad propiamente aislado para conectar la guitarra al amplificador.
(7) VOLUMEN
Controla el nivel de volumen del canal Limpio y no es afectado por los controles Líder (lead) o Ganancia Post.
(8) PRE GANANCIA
Controla el nivel de volumen de entrada para el Canal Líder. La pre ganancia puede ser usada para controlar el
nivel de distorsión en el Canal Líder. Para obtener más distorsión simplemente incrementa la pre ganancia y
ajusta la Post Ganancia (9) al volumen deseado.
(9) POST GANANCIA
Controla el volumen general del nivel del Canal Líder. El ajuste final debe ser llevado a cabo después de haber
conseguido el sonido deseado.
(10) INTERRUPTOR MODERNO/CLÁSICO
Este interruptor permite cambiar de manera instantánea la textura del sonido para reflejar tonos de
amplificadores modernos y clásicos. La posición MODERNO mantiene un sonido cálido estándar. La posición
CLÁSICA (vintage) cambia las funciones del ecualizador y añade un poco de brillo para emular los diseños de
los amplificadores clásicos. Experimenta con este interruptor, así como con los ajustes del ecualizador (11) para
capturar el tono deseado. Puedes hacer referencia a los ajustes recomendados en la página 6 para tener unos
puntos de inicio interesantes.
(11) ECUALIZADOR GRAVE, MEDIO Y AGUDO
Estos controles pasivos regulan las frecuencias graves, media y agudas respectivamente.
(12) SELECTOR DE CANAL
Este interruptor selecciona el canal (Líder o Limpio). El LED DE CANAL ACTIVO (13) indica el canal que esté activo
–verde para Limpio, rojo para Líder.
(13) LED DE CANAL ACTIVO
Estos indicadores muestran el canal activo. El verde indica actividad en el Canal Limpio, mientras que el rojo
indica actividad en el Canal Líder.
(14) AJUSTE DE EFX (efectos)
Oprimir este control selecciona el efecto. El LED amarillo adyacente al nombre del efecto se iluminará para indicar
que dicho efecto ha sido seleccionado. Rotar este control en dirección de las manecillas del reloj cambia el
parámetro del efecto activado de acuerdo a las descripciones siguientes. El anillo de LEDs a su alrededor indica el
valor relativo del parámetro afectado.
PARÁMETOS DE AJUSTE DE EFECTOS
Tremolo- Incremento de razón
Wah Funky – incremento de sensibilidad
Octavador- Mezcla mojado/seco
Bocina rotativa – Incremento de razón
Flanger - Incremento de razón
Faser - Incremento de razón
Chorus - Incremento de razón, incremento de profundidad.
Los amplificadores EFX son construidos con ajustes hechos en la fábrica. Para regresar a los ajustes de
20
fábrica, oprime y mantén oprimidos los botones de AJUSTE DE EFX (14) y DELAY (16) mientras enciendes
el amplificador.
(15) REVERB (Cámara)
Este control ajusta el nivel general del reverb. El anillo de LEDs a su alrededor indica el nivel.
(16) DELAY
Este control ajusta el tipo de nivel, tiempo y volumen. Hay tres tipos de delay: SLAP (una repetición), ECO (3-4
repeticiones) e INFINITO (5-6 repeticiones). Los LEDs en cada sección del control indican el tipo de delay que
está activado y el nivel de volumen. Oprimir este control dos veces ajusta el tiempo de delay al intervalo entre
presiones.
(17) INTERRUPTOR DE PODER
Oprime este interruptor a la posición de encendido (ON) para aplicar corriente a la unidad.
SELECCIÓN DE MODO
Pedalera (no
EFX
SELECT
DELAY
REVERB
MODULATION
CHANNEL
PFC 3
TM
1
PRESET
MODE
18
19
20
DOUBLE-CLICK
TO STORE PRESET
21
2
22
PRESET
23
3
PRESET
24
25
La pedalera PFC 3 opera en dos modos: Modo de selección EFX y modo de selección de presets. Oprimir el
INTERRUPTOR DE MODO (18) selecciona entre los dos modos. El modo activo es indicado por el LED DE MODO
(19). La iluminación del LED indica Modo de Selección de EFX, el LED oscuro indica Modo de Selección de Preset.
Los controles e indicadores 20-25 ejecutan diferentes funciones relativas al modo activo.
MODO DE SELCCIÓN DE EFX
NOTA: Cuando se entra en este modo, el preset activo se mantendrá activo. En este modo, el PRESET 1 (20)
selecciona entre los canales Limpio y Líder. El LED DE CANAL (21) se iluminará cuando el canal Líder esté
activo. El PRESET 2 (23) cambia entre dos efectos y sus respectivos ajustes. Este interruptor puede ser usado
como interruptor de encendido y apagado si uno de los ajustes no tiene un efecto activo. Para usar el LED DE
MODULACIÓN (22) como indicador de estatus, la posición apagada (o posición inferior) debe ser hecha con el LED
oscuro, y la posición encendida (o posición superior) con el LED encendido. El PRESET 3 (25) cambia entre dos
posiciones de reverb y delay. Como con los ajustes de efectos, este interruptor puede ser usado como interruptor
de encendido y apagado para el reverb y delay. Las dos funciones cambian de manera simultánea cuando el
interruptor es encendido.
MODO DE SELECCIÓN DE PRESETS
En este modo, los tres interruptores controlan presets de efectos. Sus LEDs correspondientes indican qué preset
está activo. Una vez que se consiguen los ajustes deseados usando los controles de efectos en el panel frontal,
haz clic doble en uno de los interruptores de Preset
(14, 23 ó 25) para salvar los ajustes. Para regresar al último ajuste salvado de un preset, oprime el interruptor
de dicho preset una vez.
Para una explicación detallada de cómo crear y salvar presets, ver la sección CAMBIOS en la siguiente pagina de
este manual.
Los amplificadores EFX ofrecen posibilidades ocultas para ajustar aun más los parámetros de los efectos
21
Cambios (Tweak Mode)
digitales. Además de los ajustes descritos en la sección de AJUSTE DE PARÁMETROS DE EFECTOS en este
manual, se puede cambiar aun más los efectos para personalizarlos. Estos cambios son posibles oprimiendo y
manteniendo oprimido el control de AJUSTE DE EFX (14) mientras se rota el control de REVERB (15) de manera
simultánea. El control de AJUSTE DE EFX tiene que estar oprimido por lo menos por un segundo para entrar al
Modo de Cambios. Los ajustes del reverb no sufrirán cambios mientras estés en Modo de Cambios. El anillo de
LEDs alrededor del control ahora reflejará el valor del efecto siendo cambiado. Como en un cambio paramétrico
estándar, el efecto siendo afectado será el efecto activo, como lo indica el LED adyacente a su nombre.
PARAMETROS DE AJUSTE DE CAMBIOS
Tremolo – Intensidad
Flanger - Profundidad
Wah Funky - Tiempo de decaída
Bocina Rotativa - Mezcla mojado/seco
Faser – Profundidad
Chorus - Mezcla
mojado/seco
Para recuperar los ajustes de fábrica tanto para el Modo Estándar como de Cambios, oprime el control de AJUSTE
DE EFX (14) y mantenlo oprimido por un segundo para entrar en el Modo de Cambios, luego oprime el Control de
Delay (16).
CREANDO Y SALVANDO UN PRESET DE USUARIO
Los siguientes pasos explican la creación y forma de salvar de dos diferentes tipos de efectos/ajustes, así como
dos ajustes diferentes para el Delay/Reverb. Los efectos de octavador y flanger fueron seleccionados a la suerte.
Estos pasos se pueden seguir usando cualquiera de los efectos.
1. Asegúrate que la pedalera esté en Modo de Selección de EFX oprimiendo el INTERRUPTOR DE MODO (18) si es
necesario. El LED DE MODO (19) se iluminará.
2. Usa el PRESET 1 (20) para seleccionar entre los canales Líder y Limpio. El LED DE CANAL (21) se iluminara para
el canal Líder.
3. Selecciona la posición PRESET 2 (23). El LED DE MODULACIÓN (22) puede iluminarse o no al gusto del usuario.
4. Selecciona el Flanger y ajusta su razón a tu preferencia usando el control de AJUSTE DE EFX (14) en el panel
frontal (ajuste estándar).
5. Oprime y mantén oprimido el control de AJUSTE DE EFX (14) mientras ajustas la profundidad de Flanger a tu
gusto con el control de REVERB (15) del panel frontal.
6. Oprime PRESET 2 (23) para cambiar a la otra posición de Modulación. El LED DE MODULACIÓN (22) se iluminara
o se mantendrá oscuro dependiendo del estatus en el paso 5.
7. Selecciona el Octavador y ajusta su mezcla mojada/seca a tu preferencia usando el control de AJUSTE DE EFX
(14) en el panel frontal (ajuste estándar).
8. Selecciona la posición de PRESET 3 (25). El LED DE DELAY/REVERB (24) se iluminara o se mantendrá oscuro
dependiendo del gusto del usuario.
9. Ajusta el reverb a tu gusto usando el control de REVERB (15) en el panel frontal.
10. Oprime PRESET 3 (25) para cambiar a la otra posición de Delay/Reverb. El LED DE DELAY/REVERB (21) se
iluminara o se mantendrá oscuro dependiendo del estatus en el paso 10.
11. Ajusta el tipo de delay, tiempo, y volumen a tu gusto usando el control de DELAY (16).
12. Ajusta la posición del PRESET 2 (23) y PRESET 3 (25) a los niveles preferidos como punto de partida (punto de
partida es el valor al que se activara el efecto cuando sea seleccionado).
13. Oprime el INTERRUPTOR DE MODO (18) para regresar al Modo de Preset.
14. Haz doble clic en PRESET 1, 2 ó 3 (20, 23, ó 25) para salvar los ajustes en esa locación.
22
TRANSTUBE® 110 EFX ESPECIFICACIONES
POWER AMP SECTION:
Rated power and load:
40 Watts (RMS) into 6 Ohms
Volume (minimum level): 10
Preamp input (clean channel):
Impedance: High Z, 250 k Ohms
Nominal input level: -14 dBV, 200 mV (RMS)
Minimum input level: -24 dBV, 64 mV (RMS)
Power @ clipping (typically):
(5% THD, 1 kHz, 120 VAC line)
35 Watts (RMS) into 6 Ohms
Effects send:
Output impedance: 1k Ohms
Nominal output Level: -7.4 dBV, 425 mV (RMS)
Total harmonic distortion:
Less than 0.5% THD, 100 mW to 15 Watts (RMS),
100 Hz to 10 kHz
Effects return:
Input impedance: 31 k Ohms
Nominal input level: -7.4 dBV, 425 mV (RMS)
Power amp hum and noise @ nominal input
level:
(20 Hz to 20 kHz, unweighted)
Greater than 82 dB below rated power
Headphone output:
Load impedance: 8 Ohms or greater
Nominal Power Output: 30 mW (RMS) into
Power Consumption:
75 Watts 50/60 Hz, 120 VAC
8 Ohms
(Stereo jack, monaural signal disconnects
internal speaker when phone plug is inserted.)
PREAMP SECTION:
The following specs are measured @ 1 kHz
with the controls preset as follows:
Channel select: CLEAN
EQ voicing switch: MODERN
Low, mid, and high: 5
Pre gain and post gain: 10
Efx adjust: OFF
Reverb: OFF
Delay: OFF
Volume (nominal level): 5
System Hum and noise @ nominal input
level:
(20 Hz to 20 kHz, unweighted)
Greater than 75 dB below rated power
Specifications are subject to change without notice.
23
DEUTSCH
TRANSTUBE® 110 EFX
Die EFX-Serie kombiniert die heißesten Effekte von heute mit dem fantastischen Klang von
Peaveys patentierter TransTube-Schaltung und gibt so die charakteristischen Eigenschaften von
Röhrenverstärkern auf unglaubliche Weise wieder. Der Zweikanalverstärker bietet neun über Fußschalter
zuschaltbare digitale Effekte, mit denen ganz ohne externe Effektprozessoren ein breites Spektrum an
beeindruckenden Sounds geschaffen werden kann. Der TransTube 110 EFX ist ein robust gefertigtes Gerät,
das von vielen Jahren der Forschung und Entwicklung in der Konstruktion und Herstellung von Verstärkern
profitiert. Von bedienerfreundlichen Reglern bis hin zu besonders abgestimmten Lautsprechern
verdeutlichen diese Verstärker Peaveys Engagement gegenüber Qualität, Leistung und überragender
Lebensdauer. Mit einem EFX-Verstärker schaffen Sie genau den Sound, den Sie sich wünschen, so dass
Sie sich auf den Sinn und Zweck Ihres Spiels konzentrieren können – die Musik!
MERKMALE
TransTube 110 EFX
• 40 W an 6 Ohm
• 10" Blue Marvel®-Lautsprecher
• Clean- und Lead-Kanäle mit 3-Band-EQ und Gain/EQ-Voicing-Schalter
• 9 digitale Effekte
- Tremolo
- Octaver
- Rotary Speaker
- Funk Wah
- Delay
- Reverb
- Flanger
- Chorus
- Phaser
• Kopfhörerklinke
• Effektschleife
• Kann mit PFC 3-Fußschalter eingesetzt werden (nicht beiliegend)
24
Rückseite
2
1
3
4
5
FUNKTIONEN UND REGLER
(1) WECHSELSTROM-NETZKABEL (Unter dem Gehäuse)
Über dieses Netzkabel wird das Gerät mit Netzstrom versorgt. Schließen Sie das Netzkabel an eine korrekt
geerdete Wechselstromversorgung an. Wird eine ungeeignete Netzspannung verwendet, kann dies das Gerät
beschädigen (siehe Spannungsangaben am Gerät). Der Erdungsstift am Stecker des Netzkabels darf auf keinen
Fall entfernt oder abgeschnitten werden.
(2) REMOTE SWITCH-STECKER (FERNBEDIENUNGSSCHALTER)
Dieser 8-Stift-DIN-Stecker dient zum Anschließen des PFC 3-Fußschalters (nicht beiliegend). Das Fußschalterkabel
muss angeschlossen werden, bevor der Verstärker eingeschaltet wird. Erläuterungen zum Betrieb dieses
Schalters entnehmen Sie bitte dem Abschnitt FUSSSCHALTER in dieser Anleitung.
(3) HEADPHONE (KOPFHÖRERKLINKE)
Diese Stereoklinke ermöglicht einen Signalfluss an beide Seiten eines Stereokopfhörers. Ein Monokopfhörer kann
zwar ebenfalls verwendet werden, dies wird jedoch nicht empfohlen.
(4) EFFECTS RETURN
Eingang für die Rücksendung von Signalen von externen Effekten oder Signalbearbeitungsgeräten mit niedrigem
Pegel.
(5) EFFECTS SEND
Ausgang für die Weiterleitung von Signalen an externe Effekte oder Signalbearbeitungsgeräte mit niedrigem
Pegel.
25
Vorderseite
13
6
13
7
10
8
10
9
11
12
14
15
16
17
(6) INPUT
Die Eingangsklinke nimmt Signale aller Arten von Gitarren-Tonabnehmern an. Achten Sie darauf, dass Sie für den
Anschluss der Gitarre an den Verstärker ein hochwertiges geschirmtes Instrumentenkabel verwenden.
(7) VOLUME
Regelt den Lautstärkepegel des Clean-Kanals und wird nicht von den Lead-, Pre Gain- oder Post Gain-Reglern
beeinflusst.
(8) PRE GAIN
Mit diesem Regler wird der Eingangslautstärkepegel des Lead-Kanals eingestellt. Der Pre Gain kann eingesetzt
werden, um den Verzerrungsgrad im Lead-Kanal zu regeln. Um eine stärkere Verzerrung zu erreichen, brauchen
Sie nur den Pre Gain zu erhöhen und den Post Gain (9) auf den gewünschten Lautstärkepegel einzustellen.
(9) POST GAIN
Mit diesem Regler wird der Gesamtlautstärkepegel des Lead-Kanals eingestellt. Die endgültige Pegeleinstellung
sollte erfolgen, wenn der gewünschte Klang erzielt wurde.
(10) MODERN/VINTAGE-SCHALTER
Mit diesem Schalter können Sie das Voicing schnell umschalten, um den Klang moderner bzw. Vintage-Verstärker
wiederzugeben. Auf der Position MODERN erhalten Sie ein warmes, standardmäßiges Voicing. Auf der Position
VINTAGE wird die Gesamtfunktion des EQ verändert und die Helligkeit leicht verstärkt, um den Klang bestimmter
klassischer Amps zu simulieren. Probieren Sie zusammen mit den Einstellungen des EQ (11) verschiedene
Möglichkeiten aus, bis Sie den gewünschten Klang bekommen. Einige kreative Einstiegshilfen finden Sie auf Seite
6 unter „Empfohlene Einstellungen".
(11) LOW, MID UND HIGH EQ
Diese passiven Klangregler regulieren jeweils die niedrigen, mittleren und hohen Frequenzen.
(12) CHANNEL SELECT
Mit diesem Schalter wird der Kanal ausgewählt (Lead oder Clean). Die ACTIVE CHANNEL-LEDs (13) zeigen den
aktiven Kanal an – Grün für Clean und Rot für Lead.
(13) ACTIVE CHANNEL-LEDs
Diese Anzeigen zeigen den aktiven Kanal an. Leuchtet die grüne LED, ist der Clean-Kanal aktiviert, leuchtet die
rote LED, ist der Lead-Kanal aktiviert.
(14) EFX ADJUST
Durch Drücken dieses Reglers wird der Effekt ausgewählt. Eine gelbe LED neben dem jeweiligen Effektnamen
leuchtet auf und zeigt so an, welcher Effekt ausgewählt wurde. Durch Drehen dieses Reglers im Uhrzeigersinn
wird der Parameter des aktiven Effekts verändert (siehe nachfolgende Beschreibung). Der umgebende LED-Ring
zeigt den relativen Wert des Parameters an, der verändert wird.
EFX ADJ-PARAMETER
Tremolo – Erhöhung der Rate
Funk Wah – Erhöhung der Empfindlichkeit
Octaver - Wet/Dry-Mix
Rotary Speaker – Erhöhung der Rate
Flanger – Erhöhung der Rate
Phaser – Erhöhung der Rate
Chorus – Erhöhung der Rate/Verringerung der Tiefe
26
Die EFX-Verstärker sind so konstruiert, dass die Werkseinstellungen bereits in die Presets geladen sind.
Um die Werkseinstellungen wieder aufzurufen, drücken Sie die Regler EFX ADJUST (14) und DELAY (16)
nach unten und halten sie gedrückt, während Sie den Verstärker einschalten.
(15) REVERB
Mit diesem Regler wird der Gesamtpegel des Reverb eingestellt. Der umgebende LED-Ring zeigt den Pegel an.
(16) DELAY
Mit diesem Regler werden Typ, Dauer und Volumen des Delay eingestellt. Es stehen drei Delay-Typen zur
Verfügung: SLAP (1 Wiederholung), ECHO (3-4 Wiederholungen) oder INFINITE (5-6 Wiederholungen). Die LEDs
im jeweiligen Abschnitt des Reglers zeigen den aktiven Delay-Typ und den Volumenpegel an. Durch zweimaliges
Drücken des Reglers wird die Delay-Dauer auf das Intervall zwischen dem Drücken eingestellt.
(17) POWER (NETZSCHALTER)
Stellen Sie diesen Schalter auf die Position „ON", um die Stromversorgung des Geräts einzuschalten.
Fussschlter (nicht
EFX
SELECT
DELAY
REVERB
MODULATION
CHANNEL
PFC 3
TM
1
PRESET
MODE
18
19
20
DOUBLE-CLICK
TO STORE PRESET
21
2
22
PRESET
23
3
24
PRESET
25
MODE SELECT
Der PFC 3-Fußschalter arbeitet in zwei Modi: EFX Select-Modus und Preset Select-Modus. Durch Drücken des
MODE-Schalters (18) wird zwischen den beiden Modi umgeschaltet. Der aktive Modus wird durch die MODE-LED
(19) angezeigt. Leuchtet die LED auf, ist der EFX Select-Modus eingeschaltet, leuchtet sie nicht auf, ist der Preset
Select-Modus eingeschaltet. Die Regler und Anzeigen 20-25 führen je nach aktivem Modus unterschiedliche
Funktionen aus.
EFX SELECT-MODUS
HINWEIS: Wenn in diesen Modus geschaltet wird, bleibt der aktuelle Preset aktiv. In diesem Modus wird mit
PRESET 1 (20) zwischen Lead- und Clean-Kanal umgeschaltet. Die CHANNEL-LED (21) leuchtet auf, wenn der LeadKanal aktiv ist. Mit PRESET 2 (23) wird zwischen zwei Effekten und ihren jeweiligen Einstellungen umgeschaltet.
Dieser Schalter kann auch als Ein/Aus-Schalter verwendet werden, wenn bei einer der Einstellungen keine
Effekte aktiv sind. Um die MODULATION-LED (22) als Statusanzeige zu verwenden, muss die Einstellung “off ”
(oder untere Einstellung) bei nicht aufleuchtender LED und die Einstellung “on” (oder höhere Einstellung)
bei aufleuchtender LED erfolgen. Mit PRESET 3 (25) wird zwischen zwei Reverb- und Delay-Einstellungen
umgeschaltet. Wie bei den Effekteinstellungen kann dieser Schalter auch als Ein/Aus-Schalter für Reverb und
Delay verwendet werden. Beide Funktionen verändern sich gleichzeitig, wenn dieser Schalter gedrückt wird.
PRESET SELECT-MODUS
In diesem Modus regeln alle drei Schalter die Effekt-Presets (Voreinstellungen). Welcher Preset aktiv ist, wird von
der jeweiligen LED angezeigt. Sind die gewünschten Einstellungen mit Hilfe der Effektregler auf der Vorderseite
erreicht, klicken Sie zweimal auf einen der Preset-Schalter (14, 23 oder 25), um die Einstellungen zu
speichern. Um die zuletzt gespeicherten Einstellungen für einen Preset wieder aufzurufen, drücken Sie den
gewünschten Preset-Schalter einmal.
Ausführliche Erläuterungen zum Erstellen und Speichern von Presets entnehmen Sie bitte dem weiter
hinten folgenden Abschnitt FUNKTIONEN ZUR FEINEINSTELLUNG (TWEAKS) in diesem Handbuch.
27
Funktionen Zur Feineinstellung
Die EFX-Verstärker sind mit verborgenen Funktionen ausgestattet, mit denen die Parameter der digitalen Effekte
noch weiter eingestellt werden können. Zusätzlich zu den Veränderungen, die im Abschnitt EFX ADJ-PARAMETER
in diesem Handbuch beschrieben sind, können weitere Feineinstellungen (Tweaks) vorgenommen werden, um die
Effekte ganz den persönlichen Wünschen des Anwenders anzupassen. Feineinstellungen werden vorgenommen,
indem der EFX ADJUST-Regler (14) gedrückt gehalten und gleichzeitig der REVERB-Regler (15) gedreht wird.
Der EFX ADJUST-Regler muss mindestens eine Sekunde lang gedrückt werden, um in den Tweak-Modus zu
schalten. Solange der Tweak-Modus aktiv ist, wird die Reverb-Einstellung nicht beeinflusst. Der LED-Ring um den
Regler zeigt nun den Wert des feineingestellten Effekts an. Wie bei Veränderungen der Standardparameter ist der
Effekt, der feineingestellt wird, der aktive Effekt, was durch die LED neben dem Effektnamen angezeigt wird.
TWEAK ADJ-PARAMETER
Tremolo - Intensität
Flanger - Tiefe
Funk Wah - Abklingdauer
Rotary Speaker - Wet/Dry-Mix
Phaser - Tiefe
Chorus - Wet/Dry-Mix
Um die Werkseinstellungen sowohl für Standard- als auch Tweak-Modi wieder aufzurufen, drücken Sie den EFX
ADJUST-Regler (14), halten ihn für eine Sekunde gedrückt, um in den Tweak-Modus zu schalten, und drücken
danach den DELAY-Regler (16).
ERSTELLEN UND SPEICHERN PERSÖNLICHER PRESETS
Die folgenden Schritte erläutern das Erstellen und Speichern von zwei unterschiedlichen Effekten bzw.
Einstellungen sowie von zwei verschiedenen Einstellungen für Delay/Reverb. Als Beispiel wurden die Effekte
Flanger und Octaver ausgewählt. Mit Hilfe dieser Schritte können persönliche Presets für sämtliche Effekte
eingestellt werden.
1. Stellen Sie sicher, dass sich der Fußschalter im EFX Select-Modus befindet, und drücken Sie dazu den MODESchalter (18), falls erforderlich. Die MODE-LED (19) leuchtet auf.
2. Wählen Sie mit PRESET 1 (20) den Lead- oder Clean-Kanal. Die CHANNEL-LED (21) leuchtet für den Lead-Kanal
auf.
3. Wählen Sie die Position von PRESET 2 (23). Die MODULATION-LED (22) leuchtet auf oder bleibt unbeleuchtet,
je nach Auswahl des Anwenders.
4. Wählen Sie Flanger, und stellen Sie die Rate wie gewünscht mit dem EFX ADJUST-Regler (14) auf der Vorderseite
ein (Standardeinstellung).
5. Drücken Sie den EFX ADJUST-Regler (14) und halten Sie ihn gedrückt. Stellen Sie gleichzeitig die Flanger-Tiefe
wie gewünscht mit dem REVERB-Regler (15) auf der Vorderseite ein (Feineinstellung).
6. Drücken Sie PRESET 2 (23), um auf die andere Modulation-Position umzuschalten. Die MODULATION-LED (22)
leuchtet auf oder verlischt, je nach ihrem Status entsprechend Schritt 5.
7. Wählen Sie Octaver, und stellen Sie den Wet/Dry-Mix wie gewünscht mit dem EFX ADJUST-Regler (14) auf der
Vorderseite ein (Standardeinstellung).
8. Wählen Sie die Position von PRESET 3 (25). Die DELAY/REVERB-LED (24) leuchtet auf oder bleibt unbeleuchtet,
je nach Auswahl des Anwenders.
9. Stellen Sie den Reverb wie gewünscht mit dem REVERB-Regler (15) auf der Vorderseite ein.
10. Drücken Sie PRESET 3 (25), um auf die andere Delay/Reverb-Position umzuschalten. Die DELAY/REVERB-LED
(24) leuchtet auf oder verlischt, je nach ihrem Status entsprechend Schritt 10.
11. Stellen Sie Typ, Dauer und Volumen des Delay wie gewünscht mit dem DELAY-Regler (16) ein.
12. Stellen Sie die Position von PRESET 2 (23) und PRESET 3 (25) auf die gewünschten Einstellungen als
Standardeinstellungen ein. (Die Standardeinstellung ist die Einstellung, die bei Auswahl des Presets aktiv ist.)
13. Drücken Sie den MODE-Schalter (18), um wieder zum Preset-Modus zurückzukehren.
14. Drücken Sie zweimal auf PRESET 1, 2 oder 3 (20, 23 oder 25), um die Einstellungen auf dieser Position zu
speichern
28
TECHNISCHE DATEN DES TRANSTUBE® 110 EFX
POWER AMP SECTION:
Rated power and load:
40 Watts (RMS) into 6 Ohms
Volume (minimum level): 10
Preamp input (clean channel):
Impedance: High Z, 250 k Ohms
Nominal input level: -14 dBV, 200 mV (RMS)
Minimum input level: -24 dBV, 64 mV (RMS)
Power @ clipping (typically):
(5% THD, 1 kHz, 120 VAC line)
35 Watts (RMS) into 6 Ohms
Effects send:
Output impedance: 1k Ohms
Nominal output Level: -7.4 dBV, 425 mV (RMS)
Total harmonic distortion:
Less than 0.5% THD, 100 mW to 15 Watts (RMS),
100 Hz to 10 kHz
Effects return:
Input impedance: 31 k Ohms
Nominal input level: -7.4 dBV, 425 mV (RMS)
Power amp hum and noise @ nominal input
level:
(20 Hz to 20 kHz, unweighted)
Greater than 82 dB below rated power
Headphone output:
Load impedance: 8 Ohms or greater
Nominal Power Output: 30 mW (RMS) into
Power Consumption:
75 Watts 50/60 Hz, 120 VAC
8 Ohms
(Stereo jack, monaural signal disconnects
internal speaker when phone plug is inserted.)
PREAMP SECTION:
The following specs are measured @ 1 kHz
with the controls preset as follows:
Channel select: CLEAN
EQ voicing switch: MODERN
Low, mid, and high: 5
Pre gain and post gain: 10
Efx adjust: OFF
Reverb: OFF
Delay: OFF
Volume (nominal level): 5
System Hum and noise @ nominal input
level:
(20 Hz to 20 kHz, unweighted)
Greater than 75 dB below rated power
Änderungen der technischen Daten vorbehalten.
29
NOTES:
30
PEAVEY ELECTRONICS CORPORATION LIMITED WARRANTY
Effective Date: July 1, 1998
What This Warranty Covers
Your Peavey Warranty covers defects in material and workmanship in Peavey products purchased and serviced in the U.S.A. and Canada.
What This Warranty Does Not Cover
The Warranty does not cover: (1) damage caused by accident, misuse, abuse, improper installation or operation, rental, product modification or
neglect; (2) damage occurring during shipment; (3) damage caused by repair or service performed by persons not authorized by Peavey; (4) products
on which the serial number has been altered, defaced or removed; (5) products not purchased from an Authorized Peavey Dealer.
Who This Warranty Protects
This Warranty protects only the original retail purchaser of the product.
How Long This Warranty Lasts
The Warranty begins on the date of purchase by the original retail purchaser. The duration of the Warranty is as follows:
Product Category
Duration
Guitars/Basses, Amplifiers, Pre-Amplifiers, Mixers, Electronic
Crossovers and Equalizers
2 years *(+ 3 years)
Drums
2 years *(+ 1 year)
Enclosures
3 years *(+ 2 years)
Digital Effect Devices and Keyboard and MIDI Controllers
1 year *(+ 1 year)
Microphones
2 years
Speaker Components (incl. speakers, baskets, drivers,
diaphragm replacement kits and passive crossovers)
and all Accessories
1 year
Tubes and Meters
90 days
[*Denotes additional warranty period applicable if optional Warranty Registration Card is completed and returned to Peavey by original retail purchaser within
90 days of purchase.]
What Peavey Will Do
We will repair or replace (at Peavey's discretion) products covered by warranty at no charge for labor or materials. If the product or component must
be shipped to Peavey for warranty service, the consumer must pay initial shipping charges. If the repairs are covered by warranty, Peavey will pay the
return shipping charges.
How To Get Warranty Service
(1) Take the defective item and your sales receipt or other proof of date of purchase to your Authorized Peavey Dealer or Authorized Peavey
Service Center.
OR
(2) Ship the defective item, prepaid, to Peavey Electronics Corporation, International Service Center, 412 Highway 11 & 80 East, Meridian, MS 39301
or Peavey Canada Ltd., 95 Shields Court, Markham, Ontario, Canada L3R 9T5. Include a detailed description of the problem, together with a copy of
your sales receipt or other proof of date of purchase as evidence of warranty coverage. Also provide a complete return address.
Limitation of Implied Warranties
ANY IMPLIED WARRANTIES, INCLUDING WARRANTIES OF MERCHANTABILITY AND FITNESS FOR A PARTICULAR PURPOSE, ARE LIMITED
IN DURATION TO THE LENGTH OF THIS WARRANTY.
Some states do not allow limitations on how long an implied warranty lasts, so the above limitation may not apply to you.
Exclusions of Damages
PEAVEY'S LIABILITY FOR ANY DEFECTIVE PRODUCT IS LIMITED TO THE REPAIR OR REPLACEMENT OF THE PRODUCT, AT PEAVEY'S
OPTION. IF WE ELECT TO REPLACE THE PRODUCT, THE REPLACEMENT MAY BE A RECONDITIONED UNIT. PEAVEY SHALL NOT BE
LIABLE FOR DAMAGES BASED ON INCONVENIENCE, LOSS OF USE, LOST PROFITS, LOST SAVINGS, DAMAGE TO ANY OTHER EQUIPMENT
OR OTHER ITEMS AT THE SITE OF USE, OR ANY OTHER DAMAGES WHETHER INCIDENTAL, CONSEQUENTIAL OR OTHERWISE, EVEN IF
PEAVEY HAS BEEN ADVISED OF THE POSSIBILITY OF SUCH DAMAGES.
Some states do not allow the exclusion or limitation of incidental or consequential damages, so the above limitation or exclusion may not
apply to you.
This Warranty gives you specific legal rights, and you may also have other rights which vary from state to state.
If you have any questions about this warranty or service received or if you need assistance in locating an Authorized Service Center, please contact
the Peavey International Service Center at (601) 483-5365 / Peavey Canada Ltd. at (905) 475-2578.
Features and specifications subject to change without notice.
31
Features and specifications subject to change without notice.
Peavey Electronics Corporation • 711 A Street • Meridian • MS • 39301
(601) 483-5365 • FAX (601) 486-1278 • www.peavey.com
©2003
80305090