1
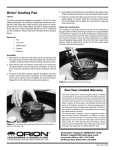
instruction Manual RedBeam™ SP Self-Powered Red LED Flashlight #5762 Power switch Function switch Figure 1. The Red Beam SP Congratulations on your purchase of the Orion RedBeam SP Self-Powered Red LED Flashlight! The RedBeam SP is a groundbreaking astronomy accessory that will never require replacement batteries. That’s right, never! Simply rotating the built-in handle on the RedBeam SP charges its internal battery and allows you to illuminate your astronomy equipment and observing charts. The RedBeam SP utilizes red LEDs (Light Emitting Diodes) which allow you to retain your dark-adapted vision while still providing light. Charging the RedBeam SP The RedBeam SP is self-powered by rotating the built-in handle. When charging the flashlight, be sure the function switch is set to the flashlight icon and the power switch is set to the OFF position (Figure 1). Unfold the handle arm and grasp the end of the handle in one hand while holding the flashlight body firmly in the other hand (Figure 2). Rotate the handle clockwise or counter-clockwise to charge the flashlight. Turning the handle continuously for a period of one minute will provide up to 15 minutes of light at the LO setting or 10 minutes of illumination at the HI setting. While you are turning the handle, the indicator light on the bottom of the flashlight (Figure 2) will shine to show the RedBeam SP is receiving charge. You can fully charge the RedBeam SP with your computer by using the USB charge feature. Plug the male end of the included charge cable into the DC jack on the back end of the flashlight (Figure 3). Plug the USB end of the charge cable into the USB port of your computer. The indicator light on the bottom of the flashlight will shine when the RedBeam SP is Indicator light Flashlight body Handle arm Figure 2. Charging the Red Beam SP receiving charge from the computer’s USB port. It will take 5 hours to receive a full charge. This will give you 2 hours at LO or 1.5 hours at HI. Operation To turn the flashlight on once it has been charged, simply set the power switch to the LO or HI setting. Setting the switch to LO will illuminate three of the red LEDs while setting the switch to HI will illuminate all five LEDs for a wider and brighter beam. Be sure the function switch near the end of the flashlight is set to the flashlight icon, or the LEDs will not shine. Customer Support (800) 676-1343 E-mail: [email protected] Corporate Offices (831) 763-7000 Providing Exceptional Consumer Optical Products Since 1975 89 Hangar Way, Watsonville, CA 95076 IN 325 Rev C 08/09 There is a small compass set into the handle of the RedBeam SP. To use the compass most effectively, unfold the handle and hold it horizontally so the compass is free to rotate. Cell phone Charging Function The RedBeam SP can also be used as an emergency cell phone charger if the need should arise. We have included five adapters for use with many models of cell phone (Figure 4). Compass Indicator light Handle NOTE: The cell phone charging function may not work with all makes and models of cell phone. To use the RedBeam SP as an emergency cell phone charger, plug the appropriate adapter into your cell phone and then plug the adapter into the female end of the included charging cable. Plug the USB end of the charging cable into the USB port of the RedBeam SP (Figure 3). Set the function switch near the end of the flashlight to the cell phone icon (Figure 1). Rotate the handle to begin charging the connected cell phone. The indicator light on the bottom of the flashlight will shine while the cell phone is being charged. The RedBeam SP will provide approximately 15 minutes of standby time, or approximately 2 minutes of talking time, for every 120 turns of the handle. Motorola Sony USB port DC jack Figure 3. The Red Beam SP Siemens Samsung Nokia Figure 4. Cell phone charging adapters One-Year Limited Warranty This Red Beam SP is warranted against defects in materials or workmanship for a period of one year from the date of purchase. This warranty is for the benefit of the original retail purchaser only. During this warranty period Orion Telescopes & Binoculars will repair or replace, at Orion’s option, any warranted instrument that proves to be defective, provided it is returned postage paid to: Orion Warranty Repair, 89 Hangar Way, Watsonville, CA 95076. If the product is not registered, proof of purchase (such as a copy of the original invoice) is required. This warranty does not apply if, in Orion’s judgment, the instrument has been abused, mishandled, or modified, nor does it apply to normal wear and tear. This warranty gives you specific legal rights, and you may also have other rights, which vary from state to state. For further warranty service information, contact: Customer Service Department, Orion Telescopes & Binoculars, 89 Hangar Way, Watsonville, CA 95076; (800)‑676-1343.