1
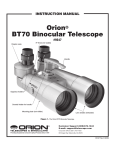
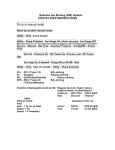
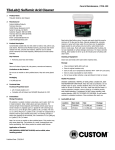
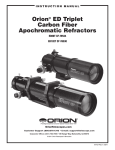
INSTRUCTION MANUAL
Orion
Terra
®
™
#9374 18-36x60mm Zoom Spotting Scope
Zoom eyepiece
Focus knob
Retractable lens shade
Objective Lens
Altitude lock knob
Altitude slow-motion knob
Azimuth lock ring
azimuth slow-motion knob
Tripod leg
Figure 1. The Terra 60mm Spotting Scope.
Congratulations
on your purchase of a quality
Orion spotting scope. Your Terra spotting scope is
a high-quality optical instrument for viewing birds,
wildlife, sports events, or anything else you want to
see more closely. It will provide many years of
enjoyable viewing. Before using your Terra spotting
scope, we recommend that you read through the
following instructions.
Mounting the Terra Spotting Scope to the
Mini-tripod
The Terra Spotting scope comes complete with a mini-tripod.
This tripod will allow you to immediately enjoy using your spotting scope. Attach the spotting scope to the mini-tripod by
threading the 1/4"-20 stud on the tripod into the 1/4"-20
threaded hole on the spotting scope’s body.
Using the Mini-Tripod
Once the spotting scope has been mounted to the mini-tripod,
it can be precisely aimed by the use of the altitude (up/down)
and azimuth (left/right) slow-motion knobs (Figure 1). For
large movements in altitude, loosen the altitude lock knob and
raise or lower the spotting scope to the desired level.
Retighten the altitude lock knob. For large movements in
azimuth, loosen the knurled azimuth lock ring and move the
spotting scope left or right to the desired position. Retighten
the azimuth lock ring.
Mounting the Terra Spotting Scope to an
Optional Tripod
The Terra spotting scope can also be attached to an optional
camera tripod by use of the 1/4"-20 threaded hole located on
the spotting scope’s body. This hole accepts 1/4"-20 mounting
studs that are standard on most camera tripods.
Focusing the Spotting Scope
Point the spotting scope so that it is aiming in the general
direction of an object at least 33 feet away. Turn the focus knob
(Figure 1) with your fingers until the object comes into sharp
focus. Make certain that you are turning the focus knob and
not turning the zoom eyepiece. Go a little bit beyond sharp
focus until the image just starts to blur again, then reverse the
rotation of the knob, just to make sure you’ve hit the exact
focus point.
Customer Support (800) 676-1343
E-mail: [email protected]
Corporate Offices (831) 763-7000
Providing Exceptional Consumer Optical Products Since 1975
P.O. Box 1815, Santa Cruz, CA 95061
IN 199 Rev. A
07/02
Using the Zoom Eyepiece
The Terra spotting scope provides a continuous zoom from
18x to 36x. The magnification is adjusted to the desired level
by rotating the rubber grip on the zoom eyepiece. The red dot
indicator and magnification scale show the magnification setting. Changing the magnification may also require a slight
refocusing of the spotting scope to achieve the sharpest
image.
For general use, it’s a good idea to start viewing at the lowest
magnification (18x) until you’ve acquired your viewing target.
Then you can zoom in to a higher magnification to see more
detail. Note that as magnification increases, the images will
not be as bright as they are at lower powers.
Photography
The Terra spotting scope comes with a 35mm camera
adapter. This adapter, along with an optional, brand-specific Tring and 35mm SLR camera, can be used to take pictures
through your spotting scope. To properly use the spotting
scope and camera adapter, you must remove the lens from
the camera and thread the T-ring in place of the lens. Thread
the camera adapter onto the body of the spotting scope
straight over the zoom eyepiece. Then thread the camera and
T-ring onto the camera adapter. When finished, the
camera/spotting scope assembly should resemble Figure 2.
Cleaning the Lenses
The lens surfaces of the Terra are coated with anti-reflection
coatings, which can be damaged with careless handling.
Avoid touching lens surfaces with your fingers or any coarse
material. Clean the lenses a few times a year, or more frequently if they get noticeably dirty. The dust that builds up on
them promotes mold growth, which etches the glass and
destroys the coatings. Always use lens cleaning tissue and
fluid designed specifically for telescope optical coatings. Do
not use regular tissue or fluids made for eyeglasses or household use. Do not disassemble the spotting scope to clean it.
To clean the lenses, first blow air on the lens with a blower
bulb or compressed air to remove any large particles. Then
brush the lens with a soft lens brush and blow air again to
remove any dislodged particles. Put two drops of lens cleaning fluid on a sheet of lens tissue (never directly on the lens).
Wipe the lens gently in a circular motion, taking care to avoid
undue pressure or rubbing. Quickly remove the excess fluid by
wiping with a clean, dry lens tissue. On the objective lens,
clean only a small area at a time, using a fresh lens tissue on
each area.
Specifications
Objective lens diameter: 60mm
Coatings: Fully coated
Magnification range: 18x to 36x continuous zoom
Field of view: 2.3°(at 18x) to 1.6°(at 36x)
Close focus: 33 ft.
Tripod adaptable: Yes, accepts 1/4"-20 mounting studs
Weight: 1 lb. 6 oz.
Length: 13.5"
Lens shade: Retractable
Figure 2. The Terra spotting scope with attached camera adapter
and 35mm SLR camera
Retractable Lens Shade
Your spotting scope features a sliding retractable lens shade.
Normally the lens shade is kept retracted, but in circumstances where glare is a problem the lens shade can be
extended. This is useful for keeping unwanted light from
reaching the objective lens and washing out the image.
Care and Maintenance
Although the Terra spotting scope is durable, it should not be
exposed to the elements for extended periods. Keep the Terra
in its case and indoors when not in use. Both the spotting
scope and the mini-tripod can be stored in the provided carry
case. Make certain that the mini-tripod goes in the bottom
compartment of the carry case and the spotting scope goes in
the top compartment.
One-Year Limited Warranty
This Terra spotting scope is warranted against defects in materials
or workmanship for a period of one year from the date of purchase.
This warranty is for the benefit of the original retail purchaser only.
During this warranty period Orion Telescopes & Binoculars will
repair or replace, at Orion’s option, any warranted instrument that
proves to be defective, provided it is returned postage paid to:
Orion Warranty Repair, 89 Hangar Way, Watsonville, CA 95076. If
the product is not registered, proof of purchase (such as a copy of
the original invoice) is required.
This warranty does not apply if, in Orion’s judgment, the instrument has been abused, mishandled, or modified, nor does it apply
to normal wear and tear. This warranty gives you specific legal
rights, and you may also have other rights, which vary from state
to state. For further warranty service information, contact:
Customer Service Department, Orion Telescopes & Binoculars,
P. O. Box 1815, Santa Cruz, CA 95061; (800) 676-1343.
Orion Telescopes & Binoculars
Post Office Box 1815, Santa Cruz, CA 95061
Customer Support Help Line (800) 676-1343 • Day or Evening
2