1
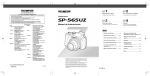
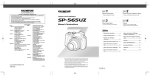
DIGITAL CAMERA
SP-590UZ
Instruction Manual
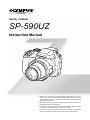
● Thank you for purchasing an Olympus digital camera. Before you start to
use your new camera, please read these instructions carefully to enjoy
optimum performance and a longer service life. Keep this manual in a safe
place for future reference.
● We recommend that you take test shots to get accustomed to your camera
before taking important photographs.
● In the interest of continually improving products, Olympus reserves the right
to update or modify information contained in this manual.
● The screen and camera illustrations shown in this manual were produced
during the development stages and may differ from the actual product.
Step
1
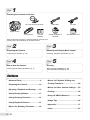
Checking the contents of the box
Lens cap and lens cap strap
USB cable
AV cable
OLYMPUS Master 2
CD-ROM
microSD Attachment
Digital camera
Camera strap
Four AA
batteries
Other accessories not shown: Instruction Manual, warranty card
Contents may vary depending on purchase location.
Step
2
Step
3
Preparing the Camera
Shooting and Playing Back Images
“Preparing the Camera” (p. 10)
“Shooting, Playback and Erasing” (p. 14)
Step
4
Step
5
How to Use the Camera
Printing
“Three Types of Setting Operations” (p. 3)
Direct printing (PictBridge) (p. 58)
Print reservations (DPOF) (p. 61)
Contents
Names of Parts.......................................6
Preparing the Camera..........................10
Shooting, Playback and Erasing.........14
Using Shooting Modes.........................17
Using Shooting Functions...................21
Using Playback Features.....................27
Menus for Shooting Functions............29
Menus for Playback, Editing and
Printing Functions................................44
Menus for Other Camera Settings......50
Printing..................................................58
Using OLYMPUS Master 2...................64
Usage Tips............................................66
Appendix...............................................71
Index......................................................83
EN
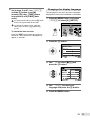
Please read “Menu Settings” (p. 29 to 57) while referring to this page.
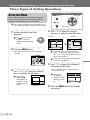
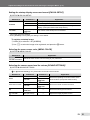
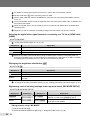
Three Types of Setting Operations
Using the Menu
Buttons in use
Arrow pad
button
Various camera settings can be accessed through the
menus, including functions used during shooting and
playback and the date/time and screen display.
E button
There may be unavailable menus depending on the
other related settings or the position of the mode dial.
o button
4 Use 78 to select the desired
1 Set the mode dial to one of the
submenu 1, and press the o button.
selections.
Page tab
The
symbol in “Menu
Settings” (p. 29 to 43)
indicates available shooting
modes.
Submenu 2
CAMERA MENU
1 WB
AUTO
2 ISO
AUTO
3 DRIVE
o
4 FINE ZOOM
OFF
5 DIGITAL ZOOM
OFF
EXIT
2 Press the button.
MENU
SET OK
CAMERA MENU
DIGITAL ZOOM
1 WB
AUTO
OFF
2 ISO
AUTO
ON
o
3 DRIVE
4 FINE ZOOM
OFF
5 DIGITAL ZOOM
OFF
BACK
SET OK
MENU
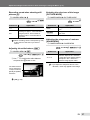
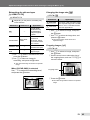
To quickly jump to the desired submenu,
● This example shows how to set the [DIGITAL
press 9 to highlight the page tab, and then
use 78 to move the page tab. Press : to
return to the submenu 1.
ZOOM].
CAMERA MENU
Some menus include submenus that appear
by pressing the o button.
EXIT
SET
MENU
OK
Shooting mode top menu
3 Use 789: to select the desired
menu, and press the o button.
Pressing and
holding the E
button displays an
explanation (menu
guide) of the option
selected.
1 WB
AUTO
2 ISO
AUTO
3 DRIVE
o
4 FINE ZOOM
OFF
5 DIGITAL ZOOM
OFF
MENU
Submenu 1
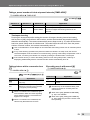
and press the button.
● Once a setting is made, the display returns to
the previous screen.
There may
CAMERA MENU
EXIT
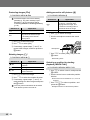
5 Use 78 to select the submenu 2,
be additional
operations. “Menu
Settings” (p. 29 to
57)
EN
1 WB
AUTO
2 ISO
AUTO
3 DRIVE
o
4 FINE ZOOM
OFF
5 DIGITAL ZOOM
ON
EXIT
MENU
SET OK
SET OK
6 Press the button to complete
the setting.
CAMERA MENU
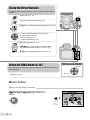
Using the Direct Buttons
Frequently used shooting functions can be accessed using the direct
buttons.
Shutter button (p. 14)
u button (monitor/viewfinder) (p. 25)
z/m button (custom/sequential playback) (p. 26, 28)
7 button (exposure compensation) (p. 23)
9 button (macro) (p. 24)
: button (flash) (p. 22)
8 button (self-timer) (p. 24)
q button (playback) (p. 15)
g/E button (menu guide/information display
change/date and time check) (p. 3, 13, 25, 27)
f/D button (SHADOW ADJ/erase) (p. 16, 22)
Using the FUNC menu (p. 26)
Buttons in use
Arrow pad
Frequently used shooting menu functions can be set with less steps using
the FUNC menu.
o button
button (p. 26)
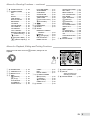
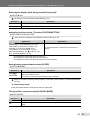
Menu Index
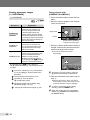
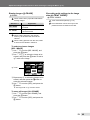
Menus for Shooting Functions
When the mode dial is set to a shooting mode position
(h P A S M r I n), settings can be
adjusted.
CAMERA MENU
1
5
4
EXIT
MENU
2
6
3
7
SET
Shooting mode top menu
EN
OK
Menus for Shooting Functions — continued
1 A IMAGE QUALITY......... p. 29
2 KCAMERA MENU
WB............................... p. 30
ISO.............................. p. 31
DRIVE......................... p. 32
FINE ZOOM................ p. 33
DIGITAL ZOOM........... p. 33
METERING................. p. 33
AF MODE.................... p. 34
FOCUS MODE............ p. 34
FULLTIME AF.............. p. 35
AF PREDICT............... p. 35
AF ILLUMINAT............. p. 35
IMAGE STABILIZER.... p. 35
w (Flash intensity)..... p. 36
Q FLASH.................. p. 36
R (Still picture REC).... p. 37
> (WB fine adjust).. p. 37
PICTURE MODE......... p. 37
SHARPNESS.............. p. 37
CONTRAST................. p. 38
SATURATION.............. p. 38
NOISE REDUCT.......... p. 38
TIMELAPSE................ p. 39
1 (Conversion lens)... p. 39
R (Movie REC)............ p. 39
3Js............................ p. 40
4 GPANORAMA................. p. 42
5 D RESET......................... p. 43
6ESETUP
MEMORY FORMAT/
FORMAT.................. p. 50
BACKUP...................... p. 50
W (Language)........ p. 50
PW ON SETUP........... p. 51
MENU COLOR............ p. 51
SOUND SETTINGS.... p. 51
REC VIEW................... p. 52
MENU DISPLAY.......... p. 52
LIVE VIEW BOOST..... p. 52
FILE NAME................. p. 53
PIXEL MAPPING......... p. 53
s (Monitor)............... p. 54
X (Date/time)............ p. 54
DUALTIME................... p. 54
PIC ORIENTATION..... p. 54
VIDEO OUT................. p. 55
HDMI........................... p. 56
u (Histogram)........... p. 56
MY MODE SETUP...... p. 56
m/ft.............................. p. 57
CUSTOM BUTTON..... p. 57
SLEEP......................... p. 57
7 F SILENT MODE............ p. 57
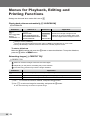
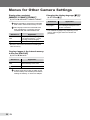
Menus for Playback, Editing and Printing Functions
When the mode dial is set to the q position, settings can be
adjusted.
PLAYBACK MENU
1
4
7
2
5
8
6
9
3
EXIT
MENU
SET OK
Playback mode top menu
1 G SLIDESHOW............... p. 44
2 H PERFECT FIX............. p. 44
3 FBEAUTY FIX................ p. 45
4 I EDIT
Q (Resize)................ p. 45
P (Crop).................... p. 45
COLOR EDIT............... p. 46
CALENDAR................. p. 46
FACE FOCUS............. p. 46
INDEX......................... p. 47
EDIT............................ p. 47
MOVIE INDEX............. p. 47
5 J PLAYBACK MENU
0 (Protect)............... p. 48
y (Rotate).................. p. 48
R (Post REC).............. p. 48
INDEX PLAY................ p. 48
6 K ERASE........................ p. 49
7 L PRINT ORDER............ p. 49
8 ESETUP*
*
Same as “Menu for
shooting functions”
9 F SILENT MODE............ p. 57
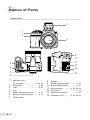
EN Names of Parts
Camera unit
3
1
2
4
9
10
11
12
13
5
6
7
8
1
2
3
4
5
6
7
EN
14
Self-timer lamp/
AF illuminator.......................... p. 24, 35
Microphone................................... p. 48
Flash............................................. p. 22
Lens
Battery compartment cover........... p. 10
Battery compartment lock............. p. 10
Tripod socket
8
9
10
11
12
13
14
Speaker
Diopter adjustment dial................. p. 25
# button (flash flip-up)................. p. 22
Multi-connector................. p. 55, 58, 64
DC-IN jack.................................... p. 72
HDMI mini connector.................... p. 55
Connector cover............... p. 55, 58, 64
1
4
5
2
6
7
8
9
10
11
12
3
15
16
17
13
18
14
1
2
3
4
5
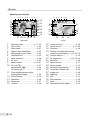
Viewfinder..................................... p. 25
Strap eyelet................................... p. 10
Monitor................................ p. 8, 14, 54
u button (monitor/viewfinder).... p. 25
z/m button (custom/sequential
playback)................................ p. 26, 28
6 Card access lamp......................... p. 73
7 m button................................... p. 3
8 q button (playback).................... p. 15
9 Arrow pad..................................... p. 12
7button
(exposure compensation)..... p. 23
9button (macro)...................... p. 24
8button (self-timer)................. p. 24
:button (flash)......................... p. 22
10
11
12
13
14
15
16
17
18
o button (OK/FUNC)................... p. 26
f/D button
(SHADOW ADJ/erase)............ p. 16, 22
g/E button
(menu guide/information display
change/date and time check)
.......................................p. 3, 13, 25, 27
Card slot........................................p. 11
Card cover.....................................p. 11
Zoom lever.............................. p. 21, 27
Shutter button......................... p. 14, 20
n button.................. p. 11, 12, 14
Mode dial.................................. p. 3, 14
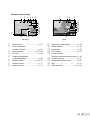
EN Monitor
Shooting mode display
1
32
31
30
29
28
27
26
2 3 4 5 6 7 8 9
NR
C
AFL
+2.0
+2
+2
+2
ISO
1600
12M
F INE
11
AEL
12s
+2.0 1/400 F3.5
IN
4
25 24 23 22 21 20
13
15
17
1
10
12
14
16
18
19
11
12
13
14
15
Shooting mode........................ p. 17, 29
Flash mode................................... p. 23
Silent mode................................... p. 57
Digital image stabilization............. p. 35
Macro/super macro mode............. p. 24
SHADOW ADJ.............................. p. 22
Noise reduction............................. p. 38
AE lock.......................................... p. 57
Battery check.......................... p. 10, 67
AF lock (s)................................ p. 57
Manual focus (a)........................ p. 34
AF predict ({)........................... p. 35
Flash standby/camera shake warning/flash charge..................... p. 66
Flash intensity............................... p. 36
Saturation..................................... p. 38
Sharpness..................................... p. 37
Contrast........................................ p. 38
EN
9
32
30
28
27
26
21
VGA
15 +2.0
25
Still image
1
2
3
4
5
6
7
8
9
10
2 3 4 5 6
12s
22
IN
00:34
17
18
19
20
Movie
16
17
18
19
20
21
22
23
24
25
26
27
28
29
30
31
32
Conversion lens............................ p. 39
Sound record.......................... p. 37, 39
Dual time....................................... p. 54
Number of storable still pictures/
remaining recording time.... p. 15, 20, 73
Current memory............................ p. 72
AF target mark.................. p. 14, 26, 34
Self-timer...................................... p. 24
Aperture value.............................. p. 17
Shutter speed............................... p. 17
Exposure compensation............... p. 23
Compression/frame rate............... p. 29
Image size.................................... p. 29
Metering........................................ p. 33
ISO................................................ p. 31
White balance............................... p. 30
Drive............................................. p. 32
White balance fine adjust.............. p. 37
Playback mode display
1
2
3 4 5 6
1
3 4
6
x10
1/1000 F3.5
+2.0
ISO 1600
NORM 12M
17
100-0004
IN 4
2009.08.26 12:30
16
15
7
8
9
10
11
12
13
15 VGA
2009.08.26 12:30
100-0004
IN 00:14 /00:34
14
14
Still image
1
2
3
4
5
6
7
8
Silent mode................................... p. 57
Print reservation/
number of prints............................ p. 61
Sound record.......................... p. 37, 39
Protect.......................................... p. 48
Sequential playback (index/slideshow).......................... p. 28
Battery check.......................... p. 10, 67
Shutter speed............................... p. 17
Aperture value.............................. p. 17
15
10
11
17
12
13
Movie
9
10
11
12
13
14
15
16
17
Exposure compensation............... p. 23
White balance............................... p. 30
Image size.................................... p. 29
File number................................... p. 53
Frame number
Playing time/total recording time... p. 16
Current memory............................ p. 72
Compression/frame rate............... p. 29
ISO................................................ p. 31
Date and time......................... p. 12, 54
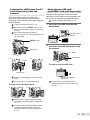
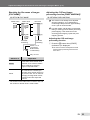
EN Preparing the Camera
Attaching the camera strap
and lens cap
Loading the batteries
1
1
2
2
3
Battery
compartment lock
3
●
4
● Attach the strap to the other eyelet in the
same manner.
5
Slide the battery compartment lock from ) to =
and ensure that the battery compartment cover is
securely locked (7). Failure to do so may cause
the battery compartment cover to open during
shooting and the batteries to fall out, resulting in
loss of image data.
For the types of batteries that can be used,
see “Battery handling precautions” (p. 71).
If using rechargeable batteries, charge the
batteries.
Turn off the camera before opening or
closing the battery compartment cover.
When to replace the batteries
Replace the batteries when the error
message shown below appears.
Flashes in red
Pull the strap tight so that it does not come
loose.
BATTERY EMPTY
Monitor top right
10
EN
Error message
Loading the xD-Picture Card™
(sold separately) into the
camera
This camera allows the user to take more
pictures and record longer movies using an
xD‑Picture Card (sold separately) than using the
internal memory.
“Using an xD-Picture Card” (p. 72)
Be sure to press the n button to turn
off the camera before inserting or removing
the card.
Do not insert anything other than an
xD-Picture Card or the microSD Attachment
into the camera.
1
Using the microSD card/
microSDHC card (sold separately)
microSD card/microSDHC card (hereinafter
called the microSD card) is also compatible with
this camera by using the microSD Attachment.
“Using a microSD Attachment” (p. 74)
1 Insert the microSD card into the
attachment.
Insert the card to
the end.
n button
2 Insert the microSD Attachment into
Card cover
the camera.
Notch
2
3
Contact area
Notch
To remove the microSD card
Contact area
Insert the card straight in until it clicks into
place.
Do not touch the contact area directly.
To remove the xD-Picture Card
1
Pull the microSD card
straight out.
Do not touch the contact area of the
microSD Attachment and microSD card
directly.
2
Press in the card until it clicks and comes
out slightly, and then grasp the card to pull it
out.
“Number of storable pictures (still pictures)/
continuous recording length (movies) in
the internal memory and xD-Picture Card”
(p. 73)
EN
11
Arrow pad and operation guide
The symbols , KJLM displayed
on various setting and movie playback screens
indicate that the arrow pad is used.
CALENDAR
Setting the date and time
The date and time set here are saved to image
file names, date prints and other data.
1 Remove the lens cap, and press
the n button to turn on the
camera.
X
● The date and time setting screen is displayed
Y
M D
when the date and time are not set.
TIME
SET OK
2009 08 26 12 30
Y M D
CANCEL
SET OK
MENU
X
2009.08.26 12:30
100-0004
IN 00:14 /00:34
/
Y
M D
CANCEL
MENU
2 Use 78 to select the year for [Y].
M
X
Y
J
M D
TIME
2009 -- -- -- --
Arrow pad
Operation guides displayed at the bottom of the
screen indicate that the m button, button,
zoom lever or D button is used.
CAMERA MENU
CANCEL
3 Press : to save the setting for [Y].
X
Y
MENU
SET
M D
OK
SEL. IMAGE
SET OK
1
WT
BACK
Operation guide
12
EN
Y M D
MENU
TIME
2009 08 -- -- -EXIT
Y M D
Date and time setting screen
K
L
TIME
---- -- -- -- --
IN
2
4
5
MENU
OK
CANCEL
3
6
GO
MENU
Y M D
4 As in steps 2 and 3, use 789:
and the button to set [M]
(month), [D] (day), [TIME] (hours
and minutes) and [Y/M/D] (date
order).
For precise time setting, press the o button
as the time signal strikes 00 seconds.
Changing the display language
The language for the menu and error messages
displayed on the monitor/viewfinder is selectable.
1 Press the button, and press
789: to select [E] (SETUP).
SETUP
To change the date and time, make the
setting from the menu. [X (Date/time)]
(p. 54)
To check the date and time
Press the g button while the camera is
turned off. The current time is displayed for
approx. 3 seconds.
EXIT
SET OK
MENU
2 Press the o button.
SETUP
1 MEMORY FORMAT
2 BACKUP
ENGLISH
3
4 PW ON SETUP
5 MENU COLOR
EXIT
NORMAL
MENU
SET OK
3 Use 78 to select [W] and
press the o button.
4 Use 789: to select your
language and press the o button.
5 Press the button.
EN
13
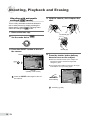
Shooting, Playback and Erasing
4 Hold the camera, and compose the
Shooting with automatic
settings (h mode)
shot.
This is a fully automatic mode that allows the
user to take pictures by simply pressing the
shutter button. Settings in the shooting menu
cannot be changed in h mode.
Monitor
AUTO $
12M
NORM
1 Remove the lens cap.
IN
4
Horizontal grip
2 Set the mode dial to h.
3 Press the n button to turn on
Vertical grip
the camera.
Number of storable still pictures (p. 73)
AUTO $
5 Press the shutter button halfway
down to focus on the subject.
● When the camera focuses on the subject, the
exposure is locked, and the AF target mark
changes to green.
● The camera was unable to focus if the AF target
12M
NORM
IN
4
mark flashes red. Try focusing again.
AUTO $
Monitor (standby mode screen)
Press the n button again to turn off
the camera.
Press halfway
AF target mark
“Focusing” (p. 68)
14
EN
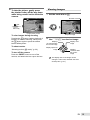
6 To take the picture, gently press
the shutter button all the way down
while being careful not to shake the
camera.
Viewing images
1 Set the mode dial to q.
Number of frames
AUTO $
Press fully
NORM 12M
100-0001
2009.08.26 12:30
Image review screen
To view images during shooting
Pressing the q button enables playback of
images. To return to shooting, either press
the q button again or press the shutter
button halfway down.
To shoot movies
“Shooting movies (A mode)” (p. 20)
To turn off the camera
Press the n button to turn off the
camera, and attach the lens cap to the lens.
IN
1
Playback image
2 Use 789: to select an image.
Displays
10 frames before
the current image
Displays previous
image
Displays next
image
Displays
10 frames after
the current
image
The display size of the image can be
changed. “Index view, calendar view and
closeup view” (p. 27)
EN
15
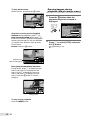
To play back movies
Select a movie, and press the button.
Erasing images during
playback (Single image erase)
1 Press the D button when the
MOVIE PLAY OK
2009.08.26 12:30
100-0004
IN 4
playback image to be erased is
displayed.
ERASE
IN
Movie
YES
Operations during movie playback
Volume: During playback, press 78.
Fast-forward/rewind: Select with 9:.
Each time a button is pressed, the playback
speed cycles through 2x, 20x and standard
(1x) speed in the direction of the pressed
cursor button.
Pause: Press the button.
2009.08.26 12:30
100-0004
IN 00:12 /00:34
Elapsed time/
Total recording time
During playback
First (last) frame/frame advance:
During pause, press 7 to display the first
frame, and press 8 to display the last
frame. Press 9 to display the previous
frame, and press : to display the next
frame. Press the button to resume
playback.
2009.08.26 12:30
100-0004
IN 00:14 /00:34
/
During pause
To stop movie playback
Press the button.
16
EN
NO
CANCEL
MENU
SET OK
2 Press 7 to select [YES], and press
the button.
[K ERASE] (p. 49)
Using Shooting Modes
Using the best mode for the
shooting scene ( mode)
Shooting with optimum
aperture value and shutter
speed (P mode)
1 Set the mode dial to .
In this mode, automatic camera shooting can
be used while also allowing changes to a wide
range of other shooting menu functions, such as
exposure compensation, white balance, etc.
on when needed.
PORTRAIT
1 Set the mode dial to P.
EXIT
MENU
SET OK
P mode indicator
P
● The sample image and explanations on suitable
NR
shooting methods will be displayed on the screen.
The explanations will be displayed as well by
pressing down the E button.
2 Use 78 to select the best
12M
shooting mode for the scene, and
press the button to set.
NORM
1/400
Shutter speed
Icon indicating
the scene mode
that is set
F3.5
IN
4
Aperture
value
12M
NORM
IN
4
To change to another scene mode, use the
menu. [J s] (p. 40)
EN
17
Selecting the aperture value
for shooting pictures (A mode)
In this mode, the shutter speed is automatically
set by the camera. This is useful for shooting
while controlling the range in which subjects
appears sharp.
1 Set the mode dial to A.
In this mode, the aperture value is automatically
set by the camera. This is useful for shooting a
moving subject, such as sports photos.
1 Set the mode dial to S.
S mode indicator
A mode indicator
A
Selecting the shutter speed
for shooting pictures (S mode)
S
NR
NR
12M
12M
NORM
NORM
1/1000 F4.0
Shutter speed
IN
Aperture
value
2 After pressing 7, select the
aperture value using 78, and
press the o button.
7 : Aperture value becomes larger
(the range where the subjects appear
sharp becomes wider).
:
8 Aperture value becomes smaller
(the range where the subjects appear
sharp becomes narrower).
When the aperture value appears red, the
correct exposure cannot be obtained.
18
EN
4
1/100
Shutter speed
F2.8
IN
4
Aperture
value
2 After pressing 7, select the shutter
speed using 78, and press the
o button.
7 : Shutter speed becomes faster (fast moving objects will be shot as though it
was stationary).
:
8 Shutter speed becomes slower (moving objects will become blurry when
shot).
When the shutter speed appears red, the
correct exposure cannot be obtained.
Selecting the aperture value
and shutter speed for shooting
pictures (M mode)
Smoothing out skin tone and
texture (I mode)
This mode enables the user to set the aperture
value and shutter speed manually.
The camera finds a person’s face and gives the
skin a smooth, translucent look for taking the
picture.
1 Set the mode dial to M.
1 Set the mode dial to I.
I mode indicator
M mode indicator
M
NR
12M
12M
NORM +2.0 1/1000 F2.8
Difference between
the current and
correct exposures
Shutter speed
IN
4
Aperture
value
2 After pressing 7, select the
aperture value / shutter speed using
789:, and press the o button.
NORM
IN
4
2 Point the camera toward the
subject. Check the frame appearing
around the face detected by the
camera, and then press the shutter
button to take the picture.
● The unedited image and edited image are both
saved.
● If the image cannot be retouched, only the
unedited image is saved.
9
:
7
8
:
:
:
:
Aperture value becomes larger.
Aperture value becomes smaller.
Shutter speed becomes faster.
Shutter speed becomes slower.
The frame may not appear or may take
some time to appear for some subjects. In
addition, this function may have no visible
effect on some subjects.
The [IMAGE SIZE] of the retouched image
is limited to [J] or lower.
When the difference between the current
and correct exposures exceeds EV±3.0, the
indicator appears red.
Long-exposure (bulb) shooting
Set the shutter speed to [BULB] by pressing
8. The shutter stays open while the shutter
button is pressed and held.
The maximum time that the shutter can
remain open is 8 minutes. This is possible
only when [ISO] (p. 31) is set to [64].
EN
19
Shooting movies (n mode)
1 Set the mode dial to n.
A mode indicator
E
15
IN
00:34
To record audio when shooting
[R (Movie REC)] (p. 39)
To zoom while recording audio
The optical zoom is not available when
recording. Use [DIGITAL ZOOM] (p. 33).
2 Press the shutter button halfway
down to focus on the subject, and
gently press the button all the way
down to start recording.
Red during shooting
REC
Press halfway
Press fully
00:34
Remaining recording time (p. 73)
3 Gently press the shutter button all
the way down to stop recording.
20
EN
Using Shooting Functions
Using the optical zoom
The zoom bar appearance identifies the
status of the fine zoom/digital zoom.
Turning the zoom lever adjusts the shooting
range.
When using
optical zoom
Optical zoom range
Turning to the
wide (W) end
P
12M
NORM
Turning to the
telephoto (T) end
P
NR
W
T
1/400
F3.5
12M
IN
4
NORM
When using
fine zoom
NR
W
Fine zoom range
When using
digital zoom
T
1/400
F3.5
IN
4
Zoom bar
Digital zoom range
Optical zoom: 26x, Digital zoom: 5x
Use of [IMAGE STABILIZER] (p. 35) is
recommended when shooting with the
telephoto zoom.
To take larger images without reducing
image quality
[FINE ZOOM] (p. 33)
To take larger images
[DIGITAL ZOOM] (p. 33)
EN
21
Brightening the subject
against backlight
(SHADOW ADJ*1)
The camera finds a person’s face that has been
darkened by backlight and makes it appear
brighter.
*1
Shadow adjustment technology
Using the flash
The flash functions can be selected to best
match the shooting conditions and render the
desired image.
1 Press the # button to flip up the
built-in flash.
1 Press the f button.
P
$
OFF NR
SET OK
# button
SHADOW ADJ
OFF ON
2 Use 9: to select [ON], and press
the o button to set.
3 Point the camera toward the
subject. Check the frame appearing
around the face detected by the
camera, and then press the shutter
button to take the picture.
For some subjects, the frame may not
appear or may take some time to appear.
[METERING] (p. 33) is automatically
fixed to [ESP], and [AF MODE] (p. 34) is
automatically fixed to [FACE DETECT].
[i] is automatically switched to [j].
Also, in sequential shooting, this function
is applied only to the first frame. [DRIVE]
(p. 32)
22
EN
The flash settings cannot be adjusted with
the flash closed.
To turn off the flash
Press the flash down back into the camera.
This sets to $ (FLASH OFF) mode.
2 Press :.
P
NR
AUTO
SET OK
1/400 F3.5
FLASH AUTO
AUTO ! #
$ L N
3 Use 9: to select the setting
option, and press the o button to
set.
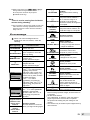
Item
Description
FLASH AUTO*1
The flash fires automatically in
low-light and backlight conditions.
REDEYE*1
This emits pre-flashes to reduce
the occurrence of red eye in your
photos.
FILL IN
The flash fires regardless of the
available light.
RED-EYE +
FILL-IN
After the pre-flashes that reduce
the red eye, the flash fires
regardless of the available light.
FLASH OFF
The flash does not fire.
SLOW
The flash fires at a slow shutter
speed immediately after the
shutter is opened (first curtain
sync). Both the subject in the
foreground and the night scene in
the background are captured.
This combines the pre-flashes of
RED-EYE SLOW red-eye reduction with the flash in
SLOW (first curtain sync).
SLOW2
*1
Adjusting the brightness
(Exposure compensation)
The standard brightness (correct exposure) set
by the camera based on the shooting mode
(except for M) can be adjusted brighter or darker
to obtain the desired shot.
1 Press 7.
P
+2.0 1/1000 F8.0
Exposure compensation value
2 Use 9: to adjust the brightness,
and press the o button to set.
9 : Darken
: : Brighten
The flash fires at a slow shutter
speed immediately before the
shutter is closed (second curtain
sync). This can be used to create
effects such as the taillights of a
car streaming backwards.
This cannot be set in S and M modes.
EN
23
Shooting closeups
(Macro shooting)
Using the self-timer
This function enables the camera to focus and
shoot subjects at close distances.
1 Press 9.
P
$
OFF
NR
After the shutter button is pressed all the way
down, the picture is taken after a time delay. By
securing the camera on a tripod, this function
enables the user to take a picture of himself/
herself at a distance from the camera (h) or to
take pictures without the camera shake (k).
1 Press 8.
SET OK
P
% & OFF
SELFTIMER
12M
2 Use 9: to select the setting
Item
Description
OFF
Macro mode is deactivated.
MACRO
This enables shooting as close as
10 cm (3.9 in.)*1 to the subject.
SUPER MACRO
*1
*2
This enables shooting as close as
1 cm (0.39 in.)*2 to the subject.
When the zoom is at the widest (W) setting.
The zoom is automatically fixed.
Y
SET OK
OFF
option, and press the o button to
set.
$
NORM
OFF
12s
2s
OFF
1/400 F3.5
2 Use 78 to select the setting
option, and press the o button to
set.
Item
OFF
Description
This cancels the self-timer.
After setting, when the shutter
button is pressed all the way
down, the self-time lamp turns
12s SELFTIMER
on for approx. 10 seconds, and
then blinks for approx. 2 seconds
before taking the picture.
2s SELFTIMER
After setting, when the shutter
button is pressed all the way
down, the self-time lamp blinks for
approx. 2 seconds before taking
the picture.
Self-timer shooting is automatically canceled
after one shot.
To cancel the self-timer after it starts
Press 8 again.
The self-timer cannot be set when [AF
PREDICT] (p. 35) is set to [ON] or [DRIVE]
(p. 32) is set to [PRE-CAPTURE ON].
24
EN
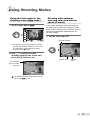
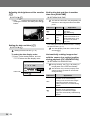
Switching between the
monitor and viewfinder
Both the monitor and viewfinder are available to
compose a shot. There may be cases where the
monitor is difficult to see due to bright light being
reflected on it while shooting under a clear sky.
In such cases, use of the view finder is helpful
when composing a shot.
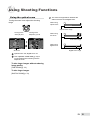
Changing the shooting
information display
The display of the screen information can be
changed to best match the situation, such as
clearing the view of the screen or for creating
a presicse compostion by the use of the grid
display.
1 Press the g button.
● The displayed shooting information changes in
the order shown below each time the button is
pressed. “Shooting mode display” (p. 8)
Normal
Histogram
P
P
NR
NR
12s
ISO
1600
ISO
1600
1 Press the u button.
● Each time the button is pressed, the camera
display switches between the monitor and the
viewfinder.
12M
NORM
12s
+2.0 1/400 F3.5
12M
IN
4
No information
NORM +2.0 1/400
u button
Diopter
adjustment dial
Viewfinder
IN
4
IN
4
Grid
P
To view clearer images through the
viewfinder
Turn the diopter adjustment dial while
looking through the viewfinder until the
viewfinder display appears sharp.
F3.5
NR
ISO
1600
12s
12M
NORM +2.0 1/400
12s
F3.5
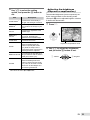
[u (Histogram)] (p. 56)
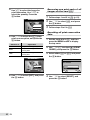
Reading a histogram
If the peak fills too much of the frame,
the image will appear mostly white.
If the peak fills too
much of the frame,
the image will
appear mostly black.
The green section shows
the luminance distribution
within the center of the
screen.
EN
25
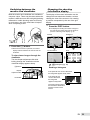
Locking the exposure and/or
focus position for shooting
(AE LOCK/AF LOCK)
Once the exposure and/or focus position are/is
set for a subject in shooting mode, you can
continue shooting at the same exposure, focus
positior or both (AE LOCK, AF LOCK or AF
LOCK + AE LOCK) even if the composition of
the shot is changed.
1 Assign either [AE LOCK], [AF
Using a function assigned to
the z button (Custom button)
This allows you to register a frequently used
function (except h, I, A). Once
registered, you can set the settings directly with
the button instead of displaying the screen from
the menu.
[CUSTOM BUTTON] (p. 57)
1 Press the z button.
P
LOCK] or [AF LOCK + AE LOCK] to
the z button.
● In the default setting, [AE LOCK] is assigned to
NR
SET OK
this button.
[CUSTOM BUTTON] (p. 57)
FINE ZOOM
2 Compose the shot and press the z
button.
● The exposure/focus position setting assigned in
step 1 is locked.
OFF ON
2 Use 9: to select the setting option,
and press the o button to set.
B mark
P
AEL
AFL
AF target mark
^ mark
1/400
F3.5
When setting the
[AF LOCK + AE LOCK]
To cancel the setting
Press the z button again so that the
B/^ mark no longer appears.
3 After changing the composition of
the shot, press the shutter button.
Using the FUNC menu
The FUNC menu provides the following menu
functions that can be quickly called and set.
•
•
•
•
•
•
[DRIVE] (p. 32)
[WB] (p. 30)
[METERING] (p. 33)
[A IMAGE QUALITY] (p. 29)
[MY MODE SETUP] (p. 56)
[ISO] (p. 31)
When the mode dial is set to the r, s to
d are selectable.
1 Press the o button before
shooting.
c
3
ISO
1600
12M
F INE
MY MODE 2
2 Use 78 to select the menu
function and 9: to select the
setting option, and then press the
o button to set.
26
EN
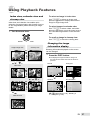
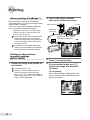
Using Playback Features
Index view, calendar view and
closeup view
Index view and calendar view enable quick
selection of a target image, and closeup view (up
to 10x magnification) allows checking of image
details.
1 Turn the zoom lever.
To select an image in index view
Use 789: to select an image, and
press the o button to display the selected
image in single-image view.
To select images in calendar view
Use 789: to select a date, and either
press the o button or turn the zoom lever to
T to view the images taken on the selected
date.
To scroll an image in closeup view
Use 789: to move the viewing area.
W side
T side
Single-image view
Changing the image
information display
Closeup view
Shooting information displayed on the screen
can be changed.
W
1 Press the g button.
NORM 12M
100-0004
2009.08.26 12:30
W
IN
Index view
4
● The displayed image information changes in
T
the order shown below each time the button is
pressed.
T
Normal
Histogram
T
1/1000 F3.5
+2.0
ISO 400
x10
2009.08.26 12:30
IN
4
W
W
2009.08.26 12:30
W
IN
NORM 12M
NORM 12M
2009.08.26 12:30
100-0004
IN 4
2009.08.26 12:30
IN
4
4
Detailed
T
No information
1/1000 F3.5
+2.0
ISO 400
2009.08.26 12:30
IN
4
W
8
NORM 12M
2009.08.26 12:30
IN
4
2009.08.26 12:30
100-0004
IN 4
[u (Histogram)] (p. 56), “Reading a
histogram” (p. 25)
Calendar view
2009
T
SUN MON TUE WED THU FRI SAT
26
27
28
29
30
31
1
2
3
4
5
6
7
8
9
10
11
12
13
14
15
16
17
18
19
20
21
22
23
24
25
26
27
28
30
31
1
2
3
29
IN
EN
27
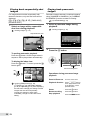
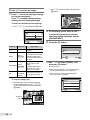
Playing back sequentially shot
images
Playing back panoramic
images
Panorama images that were combined together
using [COMBINE IN CAMERA 1] or [COMBINE
IN CAMERA 2] can be scrolled for viewing.
For images that were shot sequentially with
the below functions, only the first frame will be
displayed.
[j], [\], []], [i], [7], [TIMELAPSE],
[S SMILE SHOT]
[G PANORAMA] (p. 42)
1 Select a panorama image during
1 Select an image with a sequential-
playback.
shot icon during playback.
“Viewing images” (p. 15)
“Viewing images” (p. 15)
Sequential-shot icon
2009.08.26 12:30
12M
EXPAND
100-0002
IN 2
NORM
100-0003
2
2 Press the button.
To perform automatic playback
Press the button. All the images taken in
sequence will be played back automatically.
To display the index view
Press the m button. To cancel, press the m
button again.
Current viewing area
Operations during panorama image
playback
BACK
28
EN
IN
2
Applying [0 (Protect)] (p. 48),
[y (Rotate)] (p. 48), [L PRINT ORDER]
(p. 49) and [ERASE] (p. 16) when displaying
the first frame will apply the setting to all the
images that were shot sequentially.
To apply the settings to each frame
individually, change to index view before
setting.
Zoom in/Zoom out : Turn the zoom lever.
Playback direction : Press 789: during
zoom playback to scroll
in the direction of the
pressed button.
Pause
: Press the o button.
Restart scrolling
: Press the o button.
Stop playback
: Press the button.
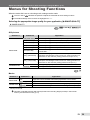
Adjust the settings for the functions while referring to “Using the Menu” (p. 3).
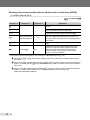
Menus for Shooting Functions
When the mode dial is set to a shooting mode, settings can be made.
The icon next to
indicates the position to adjust the mode dial to when setting functions.
The default settings of the function are highlighted in
.
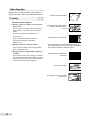
Selecting the appropriate image quality for your application [A IMAGE QUALITY]
A IMAGE QUALITY
:hPASMrI
Still pictures
Submenu 1
Submenu 2
IMAGE SIZE
COMPRESSION
Application
12M (3968×2976)
Suitable for printing pictures over A3 (11×17 in.).
5M (2560×1920)
Suitable for printing pictures at A4 (8.5×11 in.).
3M (2048×1536)
Suitable for printing pictures up to A4 (8.5×11 in.).
2M (1600×1200)
Suitable for printing pictures at A5 (5×7 in.).
1M (1280×960)
Suitable for printing pictures at postcard size.
VGA (640×480)
Suitable for viewing pictures on a TV or using pictures on emails
and web sites.
16:9G (3968×2232)
Suitable for conveying the expansiveness of subjects such as
landscapes and utilizing the entire screen for viewing pictures on a
widescreen TV. Also used for printing pictures at A3 (11×17 in.).
16:9F (1920×1080)
Suitable for conveying the expansiveness of subjects such as
landscapes and utilizing the entire screen for viewing pictures on a
widescreen TV. Also used for printing pictures at A5 (5×7 in.).
FINE
Shooting at high quality.
NORMAL
Shooting at normal quality.
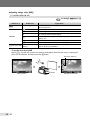
:A
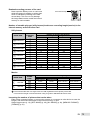
Movies
Submenu 1
IMAGE SIZE
FRAME RATE
*1
Submenu 2
VGA
Application
Image size is set to 640x480. This will be played back in a full screen.
QVGA
Image size is set to 320x240.
N 30fps*1
Provides smoother video images. Shoots with image quality as the priority.
O 15fps*1
Provides standard video images. Shoots with movie length as the priority.
frames per second
“Number of storable pictures (still pictures)/continuous recording length (movies) in the internal
memory and xD‑Picture Card” (p. 73)
EN
29
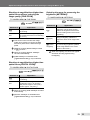
Adjusting image color [WB]
K CAMERA MENU WB
:PASMrIA
Submenu 2
Submenu 3
AUTO
—
PRESET
Application
The camera automatically adjusts the white balance according to
the shooting scene.
5
For shooting outdoors under a clear sky
3
For shooting outdoors under a cloudy sky
1
For shooting under tungsten lighting
w
For shooting under daylight fluorescent lighting (household
lighting, etc.)
x
For shooting under neutral fluorescent lighting (desk lamps, etc.)
y
For shooting under white fluorescent lighting (offices, etc.)
(Proceed to the setting For setting a more precise white balance than preset white
V(One-touch WB)
screen.)
balance, [AUTO] or [PRESET].
To set the One-touch WB
Select [V], and aim the camera at a sheet of white paper which fills the screen, making sure
there are no shadows, and then press the button.
One-touch WB icon
ONE TOUCH WB
P
NR
12M
BACK
MENU
SET OK
Setting screen
30
EN
button
NORM
1/400
F3.5
IN
Standby mode screen
4
Adjust the settings for the functions while referring to “Using the Menu” (p. 3).
Selecting the ISO sensitivity [ISO]
K CAMERA MENU ISO
:PASMr
A method for indicating film speed by the International Organization for Standardization (ISO) (e.g.
“ISO100”).
In the ISO setting, although smaller values result in less sensitivity, sharp images can be taken under
fully lit conditions. Larger values result in higher sensitivity, and images can be taken at fast shutter
speeds even under dimly lit conditions. High sensitivity introduces electronic noise into the resulting
picture, which may give it a grainy appearance.
Submenu 2
Application
AUTO
The camera automatically adjusts the sensitivity according to the shooting scene.
HIGH ISO AUTO
The camera automatically adjusts to a higher sensitivity than [AUTO] to reduce
blurring caused by camera shake and motion of the subject.
64/100/200/400/800/1600/
Set ISO sensitivity to a numerical value.
3200/6400
If set to [3200] [6400], [IMAGE SIZE] is limited to [H] or lower.
The ISO setting of [3200] [6400] is not available when [FINE ZOOM] (p. 33) or [DIGITAL ZOOM]
(p. 33) is set to [ON].
[AUTO], [HIGH ISO AUTO] is not available when M mode is selected.
EN
31
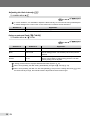
Shooting pictures sequentially while the shutter button is held down [DRIVE]
K CAMERA MENU DRIVE
:PASMr
Submenu 2
Submenu 3
Submenu 4
o
j*1
Application
One frame is shot each time the shutter button is
pressed.
—
—
Sequential shooting at a focus and brightness
(exposure) that is locked in the first frame.
c
Sequential shooting at a higher speed than [j].
d
PRE-CAPTURE OFF/
PRE-CAPTURE ON
—
Sequential shooting at a speed of approx. 10 frames/sec.
When set to [PRE-CAPTURE ON], 10 frames (from
pressing the button halfway down until shooting starts)
will be saved.
i
—
—
Sequential shooting while adjusting the focus for each
image.
7
*1
±0.3/±0.7/±1.0
×3/×5
Sequential shooting that automatically changes the
exposure for each frame while using the focus and
white balance that were locked at the first frame
(Bracket shooting). The exposure interval and the
number of shots are selectable.
The shooting speed varies depending on the settings for [A IMAGE QUALITY] (p. 29).
When set to [c] or []], flash is fixed to $ (FLASH OFF) mode and the available [ISO] settings
are limited.
When set to [c], [IMAGE SIZE] is limited to [H] or lower, and the number of sequential images is
approx. 25 or less. (When [H] and [COMPRESSION] of “FINE” are selected, the number becomes
20 or less.)
When set to []], [IMAGE SIZE] is limited to [I] or lower, and the number of sequential images is
approx. 25 or less. (This includes the 10 images immediately before shooting when [PRE-CAPTURE ON] is selected.)
32
EN
Adjust the settings for the functions while referring to “Using the Menu” (p. 3).
Shooting at magnifications higher than
optical zoom without reducing the
image quality [FINE ZOOM]
K CAMERA MENU FINE ZOOM
Selecting the range for measuring the
brightness [METERING]
K CAMERA MENU METERING
:PASMrA
:PASMrI
Submenu 2
Submenu 2
Application
OFF
Only optical zoom is used to zoom in
for shooting.
ON
Optical zoom and image cropping
are combined to zoom in for shooting
(up to 39×).
This function will not reduce the image
quality since it dose not convert the data
with fewer pixels into the data with larger
pixels.
When set to [ON], [IMAGE SIZE] is limited
to [I] or lower.
When set to [ON], [DIGITAL ZOOM] is
canceled automatically.
[FINE ZOOM] is not available when
[% SUPER MACRO] (p. 24) is selected.
Application
ESP
Shoots to obtain a balanced
brightness over the entire screen.
(Meters the brightness at the center
and surrounding areas of the screen
separately.)
5 (spot)
Shoots the subject at the center
during backlighting. (Meters the
brightness within the AF target mark
only.)
4 (center
weighted)
Shoots without being affected by
the surrounding brightness. (Meters
a wide range based on the center
section of the screen.)
When set to [ESP], the center can appear
dark when shooting against strong
backlighting.
Shooting at magnifications higher than
optical zoom [DIGITAL ZOOM]
K CAMERA MENU DIGITAL ZOOM
:PASMrIA
Submenu 2
Application
OFF
Only optical zoom is used to zoom in
for shooting.
ON
Optical zoom and digital zoom are
combined to zoom in for shooting
(Still pictures: Approx. 130x (max.),
Movies: Approx. 78x (max.)).
When set to [ON], [FINE ZOOM] is canceled
automatically.
[DIGITAL ZOOM] is not available when
[% SUPER MACRO] (p. 24) is selected.
EN
33
Selecting the focusing area [AF MODE]
K CAMERA MENU AF MODE
:PASMr
Submenu 2
This is used for taking pictures of
people.
The camera automatically detects
and focuses on a face.
iESP
This enables you to compose the shot
without worrying about the focusing
position.
The camera finds the subject to focus
on and then automatically adjusts
the focus.
SPOT
The camera focuses on the subject
within the AF target mark.
AREA
The AF target mark position is moved
to focus the camera on the subject
located at a position other than the
center.
:PASMr
Submenu 2
Application
AF
Press the shutter button halfway.
The camera automatically focuses.
MF
Adjust the focus manually.
When set to [MF]
Rough indication of shooting distance (MF bar)
P
Use 789: to move the AF target mark
(V) on the screen. To lock the AF target
mark, press and hold the button until the
mark changes to R. To unlock the AF target
mark, press and hold the button until the
mark changes to V.
EN
1m
3m
5m
MF
12M
For some subjects, the frame may not appear or
may take some time to appear.
To move and lock the AF target mark
[AREA]
34
K CAMERA MENU FOCUS MODE
Application
FACE
DETECT*1
*1
Changing the focus method
[FOCUS MODE]
F INE
1/400
F3.5
Enlarged view
IN
4
a mark
1Press 9: to adjust the focus while
checking the focus on the enlarged view.
The display units in the MF bar can be
selected. [m/ft] (p. 57)
To lock the shooting distance
Press and hold the o button until the a
mark turns red. To unlock the shooting
distance, press and hold the o button until
the a mark returns to green.
Adjust the settings for the functions while referring to “Using the Menu” (p. 3).
Shooting pictures while keeping the
subject in focus [FULLTIME AF]
K CAMERA MENU FULLTIME AF
Using the AF illuminator to focus on a
shadowy subject [AF ILLUMINAT.]
K CAMERA MENU AF ILLUMINAT.
:PASMrI
:PASMrIA
Submenu 2
Application
OFF
Pressing the shutter button
halfway down brings the subject
into focus and locks the focus.
ON
Fulltime AF keeps the subject in
focus, without having to press the
shutter button down halfway. This
reduces focusing time.
Submenu 2
The AF illuminator is not used.
ON
When the shutter button is pressed
halfway down, the AF illuminator
turns on to aid focusing.
Also, the subject is automatically kept in
focus during movie shooting.
Shooting pictures while focusing
on subjects moving back and forth
[AF PREDICT]
K CAMERA MENU AF PREDICT
:PASMr
Submenu 2
AF illuminator
Retouch the blur effects caused by
the camera shake when shooting
[IMAGE STABILIZER]
K CAMERA MENU IMAGE STABILIZER
:PASMrIA
Application
OFF
Pressing the shutter button
halfway down brings the subject
into focus and locks the focus.
ON
When the shutter button is
pressed halfway down, the camera
tracks the focusing subject, and
it continues to keep the subject
in focus while the button is held
halfway down. This reduces
focusing time.
The camera may not be able to bring some
subjects into focus even when set to [ON].
[AF PREDICT] is not available when using
[& MACRO] and [% SUPER MACRO].
(p. 24)
Application
OFF
Submenu 2
Application
OFF
The image stabilizer is
deactivated. This is recommended
for shooting when the camera is
fixed in place on a tripod or other
stable surface.
ON
The image stabilizer is used for
taking pictures. Pressing the
shutter button halfway down
activates the stabilizing function.
There may be a noise coming from inside
the camera when the shutter button is
pressed with [IMAGE STABILIZER] (still
images) set to [ON].
The image stabilizer can be less effective
during night shooting and other situations
where the shutter speed is extremely slow.
Images may not be stabilized if camera
shake is too severe.
When set to [ON], shooting a movie for
an extended period of time results in the
camera heating up, and the protective circuit
automatically shuts off the power.
EN
35
Adjusting the flash intensity [w]
K CAMERA MENU w
:PASMrI
In certain situations, it is advisable to adjust the flash intensity, such as when shooting small subjects
or distant backgrounds. This function is also used when increased contrast is desired.
Submenu 2
−2.0 to +2.0
Application
Adjust the flash intensity for the shooting scene.
Using an external flash [Q FLASH]
K CAMERA MENU Q FLASH
:PASMrI
Submenu 2
Submenu 3
IN
—
Application
The built-in flash is used for taking pictures.
#RC
CH1 to CH4
An Olympus Wireless RC Flash System compatible flash is
used for taking pictures. The channel (CH1 to CH4) can be
selected.
SLAVE
1 to 10
The commercially-available slave flash that is synchronized
with the camera flash is used for taking pictures. The flash
intensity setting can be adjusted.
“Taking pictures with the Olympus Wireless RC Flash System” (p. 74)
When set to [SLAVE], the flash setting automatically changes to [# FILL IN] (p. 23).
When set to [SLAVE], the flash can fire when [DRIVE] (p. 32) is set to a setting other than [o], but if
the flash intensity is large, the interval between sequential shots becomes longer.
36
EN
Adjust the settings for the functions while referring to “Using the Menu” (p. 3).
Recording sound when shooting still
pictures [R]
K CAMERA MENU R
Selecting the color tone of the image
[PICTURE MODE]
K CAMERA MENU PICTURE MODE
:PASMr
Submenu 2
Application
:PASMr
Submenu 2
OFF
No sound is recorded.
ON
The camera automatically starts
recording for approx. 4 seconds after
taking the picture. This is useful for
recording notes or comments about
the picture.
When recording, aim the microphone (p. 48)
at the source of the sound you want to
record.
This gives the image a vivid color
tone.
NATURAL
This gives the image a natural
color tone.
Adjusting the sharpness of contours
[SHARPNESS]
K CAMERA MENU SHARPNESS
:PASMrIA
Adjusting the white balance [>]
K CAMERA MENU >
Submenu 2
:PASMrIA
1Use 78 to adjust the white balance
and press the o button to set.
>
BLUE
The white balance
can be adjusted in
7 steps in both the
[BLUE] and [RED]
directions.
Application
VIVID
−5 to +5
Application
This adjusts the sharpness of
contours. Adjust in the + direction
to make the image appear sharper,
and adjust in the – direction to
make the image appear softer.
If you adjust the sharpness too far in the + direction, noise may appear in the image.
RED
BACK
MENU
SET OK
[WB] (p. 30)
EN
37
Adjusting the contrast of the image
[CONTRAST]
K CAMERA MENU CONTRAST
Reducing noise during long exposures
[NOISE REDUCT.]
K CAMERA MENU NOISE REDUCT.
:PASMrIA
Submenu 2
−5 to +5
Application
This adjusts the contrast between
light and dark areas. Adjusting in the
+ direction produces a crisper image.
Adjusting in the – direction softens the
overall impression of the image.
Adjusting the color saturation
[SATURATION]
K CAMERA MENU SATURATION
:PASMrIA
Submenu 2
−5 to +5
38
EN
Application
This adjusts the color saturation.
Adjusting in the + direction produces
deeper colors. Adjusting in the – direction
produces more subdued colors.
:PASMr
Submenu 2
Application
OFF
The camera takes pictures at a fast
shutter speed. No noise reduction is used.
ON
The camera takes pictures at a slow
shutter speed. Noise reduction is
activated when the shutter speed is
slower than 1/2 second.
When set to [ON], the time for shooting and
saving data is approx. twice as long as usual.
During this wait time, no pictures can be taken.
This function may not work effectively for
some subjects and shooting conditions.
This function is fixed to [ON] when the
shutter speed is set to [BULB]. “Selecting
the aperture value and shutter speed for
shooting pictures (M mode)” (p. 19)
Adjust the settings for the functions while referring to “Using the Menu” (p. 3).
Taking a preset number of shots at preset intervals [TIMELAPSE]
K CAMERA MENU TIMELAPSE
:PASMr
Submenu 2
Submenu 3
Submenu 4
—
—
OFF
ON
2 to 99
1MIN to 99MIN
Application
The timelapse shooting function is deactivated.
The timelapse shooting function is activated. The
amount of images and shooting interval can be
selected.
Timelapse shooting
Pressing the shutter button after setting the amount of images, shooting interval and setting
this function to [ON], the first frame will be taken, and the camera takes the remaining frames
thereafter automatically. The camera automatically enters sleep mode (p. 57) after the first frame
has been saved. Sleep mode is exited around 7 seconds before the next shot. Once the preset
number of frames is taken, the camera automatically turns off.
Use of new batteries or an AC adapter is recommended when taking frames over an extended period
of time.
If any of the following operations are performed while the camera is in sleep mode, the camera
cancels timelapse mode and returns to normal shooting: opening of the battery compartment cover or
card cover, connecting the camera to a computer, pressing the shutter button or arrow pad.
If the internal memory or card or the battery power runs out during sleep mode, a warning is
displayed, [TIMELAPSE] mode is canceled and the camera automatically turns off.
Taking pictures with a conversion lens
[1]
Recording movie with sound [R]
K CAMERA MENU R
K CAMERA MENU 1
:A
:PASMrIA
Submenu 2
Submenu 2
Application
OFF
No conversion lens is used (camera
body only).
ON
The camera takes pictures by
attaching a conversion lens specified
by Olympus (sold separately).
When a conversion lens is attached, light
from the built-in flash can cause vignetting
where shadows from the conversion lens
appear on the images.
When a conversion lens is attached, the
camera may take extra time to focus.
Application
OFF
No sound is recorded.
ON
Sound is recorded while shooting
movies.
Sounds may not be recorded clearly if the
camera is more than 1m away from the
sound source.
When set to [ON], [IMAGE STABILIZER]
(p. 35) is not available.
When set to [ON], setting [FULLTIME AF]
(p. 35) to [ON] may record the sound of the
lens operating.
EN
39
Selecting a scene mode according to
the shooting situation [J s]
Js
:
Making an overlay image with
fireworks
([b MULTI FIREWORKS] mode)
1Select [b MULTI FIREWORKS].
In mode, the optimum shooting
settings are pre-programmed for specific
shooting scenes. For this reason, settings
may not be changed in some modes.
Submenu 1
B PORTRAIT/F LANDSCAPE/
C SPORT/G NIGHT SCENE*1/
U NIGHT+PORTRAIT/
N INDOOR/W CANDLE/
S SUNSET/X FIREWORKS*1/
b MULTI FIREWORKS/
0 MULTIPLE EXPOSURE/
V CUISINE/d DOCUMENTS/
l SMILE SHOT/
q BEACH & SNOW/
z BIRD WATCHING/
1 SOFT BACKGROUND SHOT/
Y PRE-CAPTURE MOVIE/
r QUICK SHUTTER/
*1
Application
12M
NORM
IN
4
2Press the shutter button to take the first
frame.
The camera takes
a picture in the
mode for the
shooting scene.
When the subject is dark, [NOISE REDUCT.] (p. 38)
is automatically activated. Time taken to shoot will
be doubled, and no other shooting can be done in
that time.
The sample image and explanations on
suitable shooting methods will be displayed on
the screen. The explanations will be displayed
as well by pressing down the E button.
To select a mode
“Using the best mode for the shooting scene
( mode)” (p. 17)
● The exposure is locked at the first frame. The
saved image is displayed as the background.
To retake the first shot, press the o button,
and then press the shutter button again.
12M
EXIT OK
IN
3
3Adjust the position of the fireworks that
will be taken in the second frame over the
first frame used as the background, and
then press the shutter button.
● The overlay image is saved as a separate
image from the first and second frames.
To retake the second shot, press the shutter
button again.
Making an overlay image
([0 MULTIPLE EXPOSURE] mode)
The method of shooting is the same as
in [b MULTI FIREWORKS] mode. While
shooting settings cannot be changed in [b
MULTI FIREWORKS], it is possible to do so
in [0 MULTIPLE EXPOSURE].
40
EN
Adjust the settings for the functions while referring to “Using the Menu” (p. 3).
Detecting a smiling face to
release the shutter automatically
([l SMILE SHOT] mode)
Capturing the perfect moment when
shooting
([r QUICK SHUTTER] mode)
1Select [l SMILE SHOT], and then aim
the camera towards the subject.
1Select [r QUICK SHUTTER], and then
press the shutter button to take pictures.
● The self-timer lamp turns on. When a smiling
face is detected, the camera automatically
takes 3 sequential shots.
● The release time lag (time from when the
shutter button is pressed until the shutter
actually released) is shorter than normal.
Pictures can also be taken manually by
pressing the shutter button.
[FULLTIME AF] (p. 35) is automatically set
to [ON].
The camera may not be able to detect a
smiling face for some subjects.
[\] and []] can be set for [DRIVE]
(p. 32).
[IMAGE SIZE] is limited to [I] or lower.
Capturing the perfect moment when
shooting ([YPRE-CAPTURE MOVIE]
mode)
1Use 78 to select [YPRE-CAPTURE
MOVIE], and press the o button to set.
● This function is ready for shooting
immediately after setting this option.
2Press the shutter button to start movie
shooting.
● A 7-second movie, including 2-second movie
immediately before pressing the shutter
button, is taken.
Taking pictures with blurred
backgrounds ([1 SOFT
BACKGROUND SHOT] mode)
1Use 78 to select [1 SOFT
BACKGROUND SHOT], and press the
o button to set.
2Use 789: to select a frame, and
then press the o button.
● Select from “Face”, “Upper Body”, “Whole
Body” or “Circle”.
3Shoot the subject within the frame.
● The frame can be moved by pressing
789:.
● The optical zoom and auto focus function are
available during movie recording.
Sound is not recorded.
The AF target mark is not displayed.
Select [IMAGE SIZE] from [C] or [E],
and [FRAME RATE] from [N] or [O].
EN
41
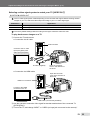
Creating panoramic images
[G PANORAMA]
Taking pictures with
[COMBINE IN CAMERA1]
G PANORAMA
:Pr
Submenu 2
COMBINE IN
CAMERA1*1*2
COMBINE IN
CAMERA2*2
*2
2Move the camera slightly in the direction
of the second frame.
Application
Three frames are taken and
combined by the camera. The
user only composes the shots
so that the target marks and
pointers overlap, and the camera
automatically releases the shutter.
The shooting functions are already
preset to the optimum settings for
panoramic shooting.
Three frames are taken and
combined by the camera. The
user composes the shots using
the guide frame and manually
releases the shutter.
The frames that were taken are
combined into a panorama image
using the OLYMPUS Master 2
COMBINE IN PC software from the provided
CD‑ROM. Pictures are taken in
the last [ISO] or [J s] settings
(except for some scene modes).
*1
1Press the shutter button to take the first
frame.
Not available when mode is selected.
The [A IMAGE QUALITY] (p. 29) setting cannot be
changed.
The focus, exposure (p. 14), zoom position
(p. 21) and [WB] (p. 30) are locked at the
first frame.
The optical zoom is limited up to 10x.
The flash (p. 23) is locked to
$ (FLASH OFF) mode.
Panoramic images can be edited using
[SHADOW ADJ] (p. 44) only.
“Playing back panoramic images” (p. 28)
Target mark
Pointer
CANCEL
MENU
SAVE OK
Screen when combining
images from left to right
3Move the camera slowly while keeping it
straight, and stop the camera where the
pointer and target mark overlap.
● The camera releases the shutter
automatically.
CANCEL
MENU
SAVE OK
To combine only two pictures, press the
o button before taking the third frame.
4Take the third frame in the same way as
step 3.
● After the third frame is taken, the camera
automatically processes the frames and the
combined panoramic image is displayed.
To cancel a panoramic picture during
shooting, press the button.
When the shutter does not automatically
release, try [COMBINE IN CAMERA2] or
[COMBINE IN PC].
42
EN
Adjust the settings for the functions while referring to “Using the Menu” (p. 3).
Taking pictures with
[COMBINE IN CAMERA2]
Taking pictures with [COMBINE IN PC]
1Use 789: to select the direction that
the frames are combined.
1Use 789: to select the direction that
the frames are combined.
2Press the shutter button to take the first
frame, and then compose the second
shot.
Direction for
combining the
next frame
● Compose the shot using the guide frame so
that the two adjacent frames overlap.
CANCEL
3Repeat step 2 until the number of
required frames are taken, and then press
the o button when done.
MENU
When the g mark is displayed, you cannot
continue shooting any further. Panorama
shooting is possible for up to 10 frames.
2Press the shutter button to take the first
frame.
Refer to the OLYMPUS Master 2 help guide
for details on how to create panoramic
images.
● A guide frame appears as a reference.
Guide frame
Joint area
Restoring the shooting functions to the
default settings [D RESET]
D RESET
:hPASMIA
CANCEL
CANCEL
MENU
MENU
SAVE OK
Submenu 1
1st frame
YES
NO
The current settings are not changed.
3Compose the second shot so that the
joint area overlaps the guide frame.
CANCEL
MENU
SAVE OK
Composition of the 2nd frame
Application
Restores the following menu functions
to the default settings.
• SHADOW ADJ (p. 22)
• Flash (p. 22)
• Exposure compensation (p. 23)
• Macro (p. 24)
• Self-timer (p. 24)
• [A IMAGE QUALITY] (p. 29)
• [J s] (p. 40)
• Menu functions in [K CAMERA
MENU] (p. 30 to 39)
• Switching between the monitor and
viewfinder (p. 25)
4Press the shutter button to take the
second frame.
To combine only two pictures, press the o
button before taking the third frame.
5Take the third frame in the same way as
steps 3 to 4.
● After the third frame is taken, the camera
automatically processes the frames and the
combined panoram image is displayed.
To cancel a panoramic picture during
shooting, press the button.
EN
43
Menus for Playback, Editing and
Printing Functions
Settings can be made when mode dial is set to q.
Playing back pictures automatically [G SLIDESHOW]
G SLIDESHOW
Submenu 1
ALL*1*2/
STILL PICTURE/
MOVIE*1*2/
CALENDAR*1*2*3
Submenu 2
NORMAL/SCROLL/
FADER/SLIDE/
ZOOM DOWN/ZOOM UP/
CHECKERBOARD/BLINDS/
SWIVEL/RANDOM
Submenu 3
Application
OFF/
STANDARD/ Selects the coverage of images for the
slideshow, the type of transition effect used
SPEED/
between images and the background music.
CYBER/
AQUA/SHINY
*1 [TYPE] is fixed to [NORMAL].
*2 The movie sound will be played back when [OFF] in [BGM] is selected while in movie mode.
*3 When [CALENDAR] is selected, select the date in the calendar playback screen.
To start a slideshow
Make the [BGM] settings and press the o button to start the slideshow. To stop the slideshow,
press the o button or button.
Retouching images [H PERFECT FIX]
H PERFECT FIX
Edited or retouched images cannot be retouched again.
Depending on the picture, the editing may not be effective.
The retouching process may lower the image resolution.
Submenu 1
Application
ALL
[SHADOW ADJ] and [REDEYE FIX] are applied together.
SHADOW ADJ
Only sections darkened by backlighting and dim lighting are brightened.
REDEYE FIX
Eyes that are reddened by the flash are corrected.
1Use 78 to select a correction method, and press the o button.
2Use 9: to select an image for retouching, and press the o button.
● The retouched image is saved as a separate image.
44
EN
Adjust the settings for the functions while referring to “Using the Menu” (p. 3).
Retouching the skin and eyes
[F BEAUTY FIX]
Changing the image size [Q]
I EDIT Q
F BEAUTY FIX
Depending on the picture, the editing may
not be effective.
Submenu 1
Submenu 2
ALL
―
CLEAR SKIN
Application
[CLEAR SKIN],
[SPARKLE EYE]
and [DRAMATIC
EYE] are applied
together.
Makes skin look
smooth and
translucent. Select
the correction effect
from 3 levels.
SOFT/AVG/
HARD
SPARKLE EYE
―
Enhances the
contrast in the eyes.
DRAMATIC
EYE
―
Enlarges the
subject’s eyes.
1Use 78 to select a correction item, and
press the o button.
2Use 9: to select an image for
retouching, and press the o button.
Submenu 2
C 640 × 480
E 320 × 240
Application
This saves a high-resolution image
as a separate image with a smaller
size for use in e-mail attachments
and other applications.
1Use 9: to select an image, and press
the o button.
2Use 78 to select the image size, and
press the o button.
● The resized image will be saved as a
separate image.
Cropping images [P]
I EDIT P
1Use 9: to select an image, and press
the o button.
2Use the zoom lever to select the size of
the cropping frame, and use 789: to
move the frame.
● The retouched image