1
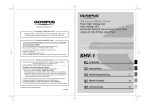
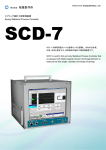
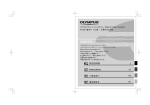
主な仕様
MODEL NO.
形式
ガイドナンバー
:FS-FL50
:デジタルスチルカメラ用外部フラッシュ
:自動切換
50:42mm時(135時85mm)
28:12mm時(135時24mm)
18/20切り換え:ワイドパネル使用時
照射角度
:自動切換
12mm時:上下61°
、左右78°
(12mmレンズの画角をカバー)
※
42mm時:上下21°
、左右28°
(42mmレンズの画角をカバー)
※
ワイドパネル使用8mm時:上下83°
、
左右101°
(8mmレンズの画角を
カバー)
※
※ZOOM表示はFOUR THIRDS時
発光時間
:約1/20000秒∼1/500秒(発光量により変わる:FP発光時を除く)
発光回数
:約150回
(単3アルカリ電池 LR6使用時)
(フル発光時)
約220回
(リチウム電池LB-01使用時)
(撮影条件により変わる)
充電時間
:約6.5秒
(単3アルカリ電池使用時)
(フル発光してから
約4.5秒
(リチウム電池LB-01使用時)
チャージランプ点灯まで)
発光モード
:TTL AUTO、AUTO、MANUAL、FP TTL AUTO、FP MANUAL
バウンス角度
:上側:0∼90°
下側:7° 右側:0∼90°
左側:0∼180°
オートパワーオフ
:通信可能なカメラのオートパワーオフに連動
AFイルミネ−タ
:通信可能なカメラとの組合せのみ低輝度で自動照射
有効距離の目安
(使用するカメラ、レンズの種類によって異なります)
0.7m∼7m
電源
:単3アルカリ電池
(LR6タイプ)4本、単3ニッカド電池 4本、単3ニッ
ケル水素電池 4本、単3ニッケルマンガン電池(ZR6タイプ) 4本、
単3リチウム電池
(FR6タイプ)4本、CR-V3
(当社製LB-01)
リチウム
電池パック 2個
外部電源
:フラッシュパワーグリップFP-1、フラッシュハイボルテージセットSHV-1
大きさ
:78mm
(幅)×141mm(高さ)
×107mm
(奥行き)
(突起部含まず)
質量
:375g(電池別)
使用環境
:温度0∼40℃、湿度80%以下(結露しないこと)
外観・仕様は予告なく変更することがあります。あらかじめご了承ください。
34
●ホームページ http://www.olympus.co.jp/
●電話でのご相談窓口
カスタマーサポートセンター 0120-084215
携帯電話・PHSからは TEL: 0426-42-7499
FAX: 0426-42-7486
営業時間 平日 9:30∼21:00
土、日、祝日 10:00∼18:00
(年末年始、システムメンテナンス日を除く)
●修理に関するお問い合わせ(オリンパス岡谷修理センター)
TEL: 0266-26-0330 / FAX: 0266-26-2011
〒394-0083 長野県岡谷市長地柴宮 3-15-1
営業時間 9:00∼17:00(土・日・祝日及び当社休日を除く)
Thank you for purchasing the OLYMPUS Electronic Flash (FL-50). Before use, please read this instruction manual to ensure
your safety, and keep it handy for future reference.
SAFETY PRECAUTIONS (Be sure to read and observe the following.)
This instruction manual uses a variety of common symbols and icons to assist you in proper handling and usage of this
product properly, and to warn you of potential hazards to yourself and others as well as to property. These symbols and their
significance are described below.
DANGER
Failure to observe the
precautions indicated by this
symbol may result in serious
injury or death.
WARNING
Failure to observe the
precautions indicated by this
symbol may result in injury
or death.
Symbols for prohibiting action
Prohibited
CAUTION
Failure to observe the
precautions indicated by this
symbol may result in injury or
property damage.
Symbol instructing action
Disassembly
prohibited
Mandatory
For customers in Europe
The “CE” mark indicates that this product complies with the European requirements for safety, health, environment and customer protection. CE-mark products are for sale in Europe.
For customers in USA
FCC Notice
This device complies with part 15 of the FCC rules. Operation is subject to the following two conditions:(1) This device may
not cause harmful interference, and (2) this device must accept any interference received, including interference that may
cause undesired operation.
Any unauthorized changes or modifications to this equipment would void the user’s authority to operate.
For customers in CANADA
This Class B digital apparatus complies with Canadian ICES-003.
■ This electronic flash has been designed exclusively for use with Olympus digital cameras. Do not connect the electronic
flash to a camera not manufactured by Olympus, as this may result in a malfunction or damage to the camera and/or
flash.
DANGER
■ The electronic flash incorporates high-voltage circuitry. Never attempt to disassemble or modify it, as this may
result in electric shock and/or injury.
■ Do not use the electronic flash in a place where it may be exposed to flammable or explosive gas. Otherwise,
fire ignition or explosion may result.
■ To prevent a traffic accident, do not direct the flash towards the driver of a car.
WARNING
■ Do not fire the flash or AF illuminator light immediately in front of a person’s eyes (particularly an infant).
Exposure to the light from the flash at a very short range may cause irreparable injury to the eyes. Be especially careful to avoid using the electronic flash at a distance of less than 1 meter from an infant.
■ Do not leave the electronic flash and batteries within reach of children.
• If a child swallows a battery or small accessory, see a doctor immediately.
• If the flash is emitted near a child, their eyes may be injured irreparably.
• Moving parts of the electronic flash could injure a child.
■ Avoid the following actions to prevent fire or injury due to battery fluid leak, overheating, fire ignition or bursting.
• Do not use batteries that are not specified for use with this electronic flash.
• Do not throw the battery in a fire, expose it to heat, short-circuit it, or disassemble it.
• Do not mix old and new batteries, or batteries of different types or brands.
• Do not attempt to recharge non-rechargeable batteries such as alkaline batteries.
• Do not load batteries with the +/– polarity reversed.
■ Do not store the electronic flash in a place exposed to excessive dust or moisture. Otherwise, fire or electric
shock may result.
36
■ Do not use the flash when it is covered by a flammable object such as a handkerchief.
Do not touch the light-emitting area after use. It will be very hot and could burn you.
■ If the electronic flash is dropped in water or any fluid gets inside, immediately remove the batteries and contact
your dealer or Olympus. Continued use could result in fire or electric shock.
CAUTION
■ If you notice any abnormalities such as leakage, discoloration, deformation, overheating, or odor, stop using this
device. Continued use could result in fire, overheating or explosion. Remove the batteries carefully to avoid burning yourself and to prevent exposure to gas or dangerous fluids that may be released. For repair, contact Olympus.
■ Always remove the batteries when you don’t expect to use the electronic flash for a long period. Otherwise,
heat generation or fluid leak from the batteries may result in fire, injury and/or contamination of the surroundings.
■ Do not use a leaking battery. Doing so could result in fire or electric shock. Please contact your dealer or
Olympus.
■ Do not handle the electronic flash with wet hands. Doing so could result in electric shock.
■ Do not leave the electronic flash in a place where it may be exposed to high temperatures. Otherwise, deterioration of parts or fire may result.
■ Do not take out the batteries immediately after using the electronic flash continuously for a long period.
Otherwise, the hot batteries may cause burns.
■ Do not deform the battery compartment or allow any foreign objects to get inside.
HANDLING PRECAUTIONS
■ The electronic flash is composed of precision electronic parts. Absolutely avoid using or storing the electronic
flash in the following places, as this may result in malfunction or failure.
• Under direct sunlight, on a beach, etc.
• Anywhere exposed to high temperatures and humidity or rapid fluctuations in temperature and humidity.
• Any place exposed to excessive sand, dust or dirt.
• Near a fire.
• Near an air conditioner or air humidifier.
• Any place exposed to water or moisture.
• Any place subject to vibrations.
• Inside an automobile.
■ Do not apply a strong vibration or shock to the electronic flash by dropping it or hitting it against something.
■ When the electronic flash has not been used for a long period, mold or moss may form. This can cause a
malfunction. To prevent this, it is recommended to check the operations before using the electronic flash
after a long period of storage.
■ Do not touch the electric contacts of the electronic flash to prevent malfunction.
■ To prevent overheating and deterioration of the light-emitting section, do not continue full activation more than 10
times in a row. After 10 successive operations, stop firing for a while until the light-emitting section cools down.
BATTERY PRECAUTIONS
■ Use only the specified batteries.
• AA (R6) alkaline dry cell batteries (LR6 type) .................... x 4
• AA (R6) Ni-Cd batteries ..................................................... x 4
• AA (R6) Ni-Mh batteries ..................................................... x 4
• AA (R6) Ni-Mn batteries (ZR6 type) ................................... x 4
• AA (R6) lithium batteries (FR6 type) .................................. x 4
• Lithium battery packs (CR-V3 type) (Olympus LB-01) ....... x 2
• AA (R6) manganese batteries cannot be used.
■ Be sure to observe the following points. Otherwise, battery fluid leak, overheating, fire ignition and/or bursting
may result.
• Do not mix old and new batteries, recharged and discharged batteries, batteries of different capacities, or
batteries of different types or brands.
• Do not attempt to recharge non-rechargeable batteries such as alkaline batteries.
• Do not load or use the batteries with the +/– polarity reversed. If the batteries do not fit smoothly in the battery
compartment, do not force them.
• Never use a battery if its outer coating (insulation) has been partially or entirely peeled off. Otherwise, leakage, overheating or explosion may result.
• Some brand-new batteries may also have their outer coating (insulation) peeled off completely or partially.
Never use these batteries.
37
■ Do not use the following kinds of batteries.
Outer coating (insulation) is peeling or
has peeled off (even
if the battery is
brand-new).
CONTENTS
The negative end is
slightly swollen and is
not covered by the
coating (insulation).
The negative end is
flat (whether or not a
part of the negative
pole is covered by
the coating).
■ All rechargeable batteries must be recharged using the specified battery charger, simultaneously and completely. Be sure to read the battery and battery charger instruction manual.
■ Improper use of batteries may result in fluid leak, heat generation and/or damage. Sweat and oil smudges may
cause battery contact failure. To prevent this, remove any stain completely with a dry cloth and insert the
batteries by observing the +/– polarity.
■ In general, battery performance will be temporarily reduced as the ambient temperature drops. When using
batteries in a cold place, keep them warm by keeping the electronic flash in cold protection gear or clothing.
■ If battery fluid gets on your skin or clothes, it may irritate your skin. Immediately rinse your skin or clothes with
clean water.
■ If battery fluid comes in contact with your eyes, blindness may result. Rinse your eyes with clean water without
rubbing them and see a doctor immediately.
■ Do not apply a strong shock to a battery or throw it.
■ When traveling, it is a good idea to carry spare batteries with you. In some countries, it may be difficult to
obtain certain batteries.
■ Do not immerse batteries in water or expose to moisture including rain, seawater and animal urine.
■ If the +/– terminals of a battery are stained with sweat or oil smudges, contact failure may result. Clean the
terminals well with a dry cloth before using the batteries.
■ Do not throw a battery in fire or heat it.
■ When disposing of batteries, be sure to follow local regulations.
■ When disposing of a rechargeable battery, insulate the +/– terminals with pieces of tape and take them to your
nearest rechargeable battery recycling center.
Note on the cameras used with the Electronic Flash
● The functions available from the electronic flash are limited with certain digital cameras. For details, please check the
Olympus website (http://www.olympusamerica.com/E1).
Before reading this manual
○ The information in this manual may be subject to change without notice.
○ This manual has been compiled as carefully as possible. However, if you have any questions or wish to report an error
or omission, please contact Olympus.
○ Duplication of this manual in part or in whole without permission of Olympus is prohibited except for personal use.
Reproduction of the contents of this manual without permission of Olympus is strictly prohibited.
○ Olympus will not assume any liability for the damages, loss of profit or claims from any third party incurred due to
improper use of this product.
○ Olympus will not assume any liability for the damages and loss of profit related to the loss of image data due to a failure
of this product, servicing by a third party not designated by Olympus or any other reason.
○ Note that the quality of the pictures shot using this product differs from that of the pictures of ordinary film-based
cameras.
• Checking the Package Contents .................................................................................................. 39
• Nomenclature .............................................................................................................................. 40
• Control Panel Indicators ............................................................................................................... 41
• Loading Batteries ......................................................................................................................... 42
• Checking Batteries ....................................................................................................................... 43
• Attaching to the Camera/Removing from the Camera ................................................................. 44
• Picture Shooting Using a Digital Camera with Communication Capability .................................. 45
Selecting the control mode ................................................................................................. 45
TTL AUTO ........................................................................................................................... 46
AUTO .................................................................................................................................. 47
MANUAL ............................................................................................................................. 49
FP TTL AUTO ..................................................................................................................... 50
FP MANUAL ....................................................................................................................... 52
• Picture Shooting Using a Digital Camera without Communication Capability ............................. 53
Selecting the control mode ................................................................................................. 53
AUTO .................................................................................................................................. 54
MANUAL ............................................................................................................................. 55
• Other Operations ......................................................................................................................... 56
Bounce Shooting ................................................................................................................ 56
Close-up Flash ................................................................................................................... 57
Manual Switching of Firing angle (ZOOM) ......................................................................... 57
Using the Wide Panel ......................................................................................................... 58
Various Flash Shooting Methods ........................................................................................ 59
• Optional Accessories ................................................................................................................... 60
• Custom Setup .............................................................................................................................. 61
• All Reset ...................................................................................................................................... 62
• Continuous Firing ......................................................................................................................... 62
• Guide Number (GN) List .............................................................................................................. 64
• Warning Display List .................................................................................................................... 66
• Q&A ............................................................................................................................................. 67
• Main Specifications ...................................................................................................................... 68
CHECKING THE PACKAGE CONTENTS
Check that all parts and accessories are present.
If any item is missing or damaged, contact your dealer.
Trademark information
All brand names and product names mentioned in this manual are the trademarks or registered trademarks of their respective owners.
• Electronic flash, main body
38
• Batteries must be purchased separately.
• Flash case
39
NOMENCLATURE
CONTROL PANEL INDICATORS
Wide panel (Page 58)
Wide panel warning (Page 58) FP emission (Pages 50 & 52) Control mode (Pages 45 & 53)
AF illuminator light-emitting area
When the subject is dark or lowcontrast, the built-in AF illuminator
emits light to facilitate focusing.
The AF illuminator can also be
defeated. (Page 61)
• The AF illuminator only works
with the Olympus Four Thirds
System digital SLR camera. It
does not work with other cameras.
Light-emitting
area
Close-up flash
shooting (Page 57)
Zoom value
(Page 57)
FOUR THIRDS
(Page 61)
Light intensity
adjustment
(Pages 46, 48,
49, 51 & 52)
Zoom mode (Page 57)
ISO speed (Page 47)
Auto light receptor
External power connector
Connect the optional flash
power grip FP-1 or flash high
voltage pack HV-1.
Lens iris (F)
(Page 61)
Guide Number (GN)
(Pages 64 & 65)
Feet
(Page 61)
Lock pin (Page 44)
Meter
(Page 61)
Setting display
(GN, ISO, F, light control range, optimum shooting
range, and light intensity adjustment value)
Terminal cover
Lock ring (Page 44)
Electric contact
(Page 44)
• To simplify explanation, this figure shows the panel with all indicators lit.
Bounce lock release button
(Page 56)
Accessory shoe
Bounce up/down angle indices
(Page 56)
Bounce left/right angle indices
(Page 56)
Control panel (Page 41)
LIGHT button
Press to light up the control
panel for about 15 sec.
The panel also lights under
control by a digital camera with
communication capability.
Dial A
Dial B
40
Notes on This Manual
MODE button (Pages 45 & 53)
ZOOM button (Page 57)
AUTO CHECK lamp
(Page 46)
Battery compartment cover
(Page 42)
Charge lamp/Test button
(Page 43)
Power button
• The indications on the control panel may differ from those shown in the illustration above depending on the setup of the electronic flash, the camera in use,
and the shooting conditions.
For example, the firing angle (ZOOM) can be displayed in either of the following
modes.
① FOUR THIRDS : Focal length of a Four Thirds System digital camera
② 135
: Focal length converted to an equivalent angle of view
on a 135 type (35 mm film) camera
The text in this manual employs the FOUR THIRDS display mode and puts value
in the 135 display mode inside parentheses, such as “(XX mm with 135)”. For the
selection of the display modes, see page 61.
41
LOADING BATTERIES
CHECKING BATTERIES
The batteries are available separately. Always use one of the following battery combinations.
• AA (R6) alkaline batteries (LR6 type) .................................. x 4
• AA (R6) Ni-Cd batteries ....................................................... x 4
• AA (R6) Ni-Mh batteries ....................................................... x 4
• AA (R6) Ni-Mn batteries (ZR6 type) ..................................... x 4
• AA (R6) lithium batteries (FR6 type) .................................... x 4
• Lithium battery packs (CR-V3 type) (Olympus LB-01) ......... x 2
After loading the batteries, check the remaining battery capacity by turning the electronic flash on.
1. Press the Power button to turn the electronic flash on.
• The control panel lights up and battery charging starts.
2. Ensure that the Charge lamp lights up.
• Replace the batteries if the time taken for the Charge lamp
to light up is longer than the values specified below.
Alkaline or Ni-Mn batteries:
30 sec.
Lithium, Ni-Cd or Ni-Mh batteries: 10 sec.
• If the Charge lamp and AUTO CHECK lamp blink alternately, it means that the battery capacity is running low. In
this case, replace the batteries.
• The AA (R6) manganese batteries cannot be used.
How to load the batteries
1. Open the battery compartment cover.
2. Insert the batteries with correct +/– polarity.
Memo: To perform test flash activation, press the Test button.
3. Close the battery compartment cover.
3. Press the Power button again to turn the electronic flash off.
Turn the electronic flash off in the following cases:
• Before mounting it on the camera or dismounting it from
the camera.
• When flash emission is not required.
• When not using the electronic flash.
■Flash Interval and Flash Count
AA (R6) batteries
CR-V3
The following products (optional) can also be used as an external power supply:
Flash Power Grip
FP-1
Flash High Voltage Set
SHV-1
■Notes
• Do not mix old and new batteries or batteries of different types together.
• Remove the batteries when the electronic flash is not going to be used for a long period.
• Carry spare batteries when traveling or when using the flash in cold areas.
The following table shows the flash intervals and flash counts for various batteries. Data is
based on using batteries all of the same type.
Batteries used
Flash interval
Flash count
AA (R6) alkaline dry cell batteries (LR6 type)
Approx. 6 sec.
Approx. 150 times
AA (R6) lithium batteries (FR6 type)
Approx. 7 sec.
Approx. 170 times
AA (R6) Ni-Mn batteries (ZR6 type)
Approx. 5 sec.
Approx. 160 times
Lithium battery packs (CR-V3)
Approx. 5 sec.
Approx. 220 times
AA (R6) Ni-Cd batteries, 1000 mAh
Approx. 4 sec.
Approx. 110 times
AA (R6) Ni-Mh batteries, 1900 mAh
Approx. 4 sec.
Approx. 170 times
• The flash emission interval and count data were obtained from in-house tests at Olympus.
42
43
ATTACHING TO THE CAMERA/REMOVING FROM THE CAMERA
Confirm that both the camera and electronic flash are off.
Attaching or removing the electronic flash while either the flash or the camera is on may result in
malfunction.
PICTURE SHOOTING USING A DIGITAL CAMERA WITH COMMUNICATION CAPABILITY
<Selecting the control mode>
1. Turn the camera on.
How to attach
2. Turn the electronic flash on. The batteries are recharged
when the Charge lamp lights up.
1. Place the light-emitting section in the standard position
3. Press the Shutter button of the camera gently to start com-
(horizontal, front). If it is in the locked position, press and
turn the Bounce lock release button.
munication of shooting information including ISO speed,
lens iris and shutter speed between the camera and electronic flash.
2. Remove the hot shoe cover from the camera.
• Store the hot shoe cover in the pocket located on the inner
side of the flash case.
4. Press the MODE button of the electronic flash to select
the flash control mode.
• The selected mode is shown in the control panel.
• The mode is switched every time the MODE button is
pressed.
3. Loosen the lock ring.
• If the lock pin is in the out position, press it in by turning it
all the way in the opposite direction to [←LOCK] until it
stops.
Flash control
mode
Lock pin
TTL AUTO
Electric contact
• Do not apply excessive force to the lock pin.
• Do not touch the electric contact with a finger or metallic object.
• Do not attach the electronic flash while the lock pin is in the out position.
Otherwise, malfunction may result.
4. Slide the electronic flash all the way into the hot shoe until
AUTO
MANUAL
it stops with a click.
5. Turn the lock ring all the way into the direction of
[←LOCK]
FP
TTL AUTO
until it stops.
How to remove
1. Loosen the lock ring completely, then slide the electronic
flash out of the hot shoe.
2. Attach the hot shoe cover to the camera.
FP
MANUAL
Control panel
display
Control operation
Main application
Ref.
Pages
Flash is controlled automatically
by performing pre-flash according to the camera setup.
Usually use this mode with a
camera with communication
capability.
46
Flash light intensity is controlled
according to the light detected
through the auto light receptor of
the flash and to the camera setup.
If the camera has communication capability, this mode can be
used only when the camera is
an AUTO-compatible model.
47
Flash is performed according to
the manually set guide number
(GN).
Shooting using manual flash.
TTL AUTO and MANUAL modes
with Super FP emission that can
synchronize with the high-speed
shooting of the single-lens-reflex
focal plane shutter.
Outdoor shooting using flash,
such as sync shooting in the
daytime.
49
50 & 52
■Notes
• Certain modes may be unavailable depending on the shooting mode set on the camera and the functions of the
camera in use.
• It is not possible to select an unavailable mode.
■Notes
To use the electronic flash with a digital camera not equipped with hot shoe:
• If the camera has an external flash terminal, the electronic flash can be attached and connected using the flash
bracket and bracket cable (optional).
• The electronic flash cannot be used with a camera that is not equipped with a hot shoe or external flash terminal.
44
45
<TTL AUTO>
<AUTO>
In this mode, pre-flash is performed to measure the optimum flash intensity and then actual flash
is performed.
In this mode, the flash light intensity is controlled automatically according to the lens iris (F)
setting and the amount of light input to the auto light receptor.
Displayed according to the
focal length of the lens.
1. The control panel shows the light control range according
to the camera setup.
Displayed according to the
focal distance of the lens.
2. Confirm that the distance to the subject is within the light
control range.
If not, adjust the lens iris (F) or the subject distance.
The light control range varies according to the camera type
and camera setup (ISO speed, lens iris (F) and lens focal
distance (ZOOM)).
AUTO CHECK lamp blinks for about 5 seconds after the
shutter is released.
■Light intensity adjustment
to the camera setup.
The light control range is not displayed if the camera setup
(ISO speed and lens iris (F)) does match one of the usable ISO speed/lens iris (F) combinations.
In this case, the ISO and F indicators blink to alert you.
Change the camera setup (ISO speed and/or lens iris (F)).
2. Confirm that the distance to the subject is within the light
3. When flash activation has been performed correctly, the
Light control range
1. The control panel shows the light control range according
Light control range
control range.
If not, adjust the lens iris (F) or the subject distance.
The light control range varies according to the camera setup
(ISO speed, lens iris (F) and lens focal length (ZOOM)).
■Combinations of ISO speeds and lens irises
controllable in AUTO mode
The flash light intensity can be adjusted between +3 and –3.
The light intensity adjustment must be set to ON in the
custom setup operation (page 61).
• The
indicator appears in the control panel.
ISO speed
1. Turn dial B to select a light intensity adjustment value in
Lens iris
the following steps.
(This selection is also possible with dial A.)
0 → +0.3 → +0.7→ +1.0 ... +3.0
0 → –0.3 → –0.7→ –1.0 ... –3.0
3200
1600
800
400
200
100
F8
F5.6
F4
F2.8
F2
F1.4
F11
F8
F5.6
F4
F2.8
F2
F1.4
F16
F11
F8
F5.6
F4
F2.8
F2
F1.4
F22
F16
F11
F8
F5.6
F4
F2.8
F2
F32
F22
F16
F11
F8
F5.6
F4
F2.8
F32
F22
F16
F11
F8
F5.6
F4
F32
F22
F16
F11
F8
F5.6
F32
F22
F16
F11
F8
F32
F22
F16
F11
2. The display shows the light intensity adjustment value except when the value is 0, in which case the display does
not show the light control range.
3. If the camera’s flash adjustment mode is selected, the
actual flash light intensity will be the total of the light
intensity adjustment value set on the FL-50 and that
set on the camera. The light intensity adjustment value
displayed is that of the FL-50 only.
Light intensity adjustment value
[Example]
Selected
adjustment value
46
FL-50
+0.3
Camera
+0.3
Adjustment value
Actual light intensity
displayed on FL-50 adjustment
+0.3
50
25
3. When flash activation has been performed correctly, the
AUTO CHECK lamp blinks for about 5 seconds after the
shutter is released.
Memo: Test flash activation
Flash activation can be tested before actually releasing
the shutter.
Press the Test button for test flash activation.
The light control is OK when the AUTO CHECK lamp blinks
for about 5 seconds after the test flash activation.
If the lamp does not blink, change the lens iris (F), ISO
speed, subject distance, etc.
• The light check by means of test flash activation is possible only in the AUTO mode.
+0.6
47
■Light intensity adjustment
<MANUAL>
The flash light intensity can be adjusted between +3 and –3.
In this mode, the flash is emitted according to the guide number (GN) setting.
The light intensity adjustment must be set to ON in the
custom setup operation (page 61).
• The
indicator appears in the control panel.
Displayed according to the
focal distance of the lens.
1. Turn dial B to select a light intensity adjustment value in
0 → +0.3 → +0.7→ +1.0 ... +3.0
0 → –0.3 → –0.7→ –1.0 ... –3.0
2. The display shows the light intensity adjustment value except when the value is 0, in which case the display does
not show the light control range.
Guide number (GN)
Optimum shooting distance
actual flash light intensity will be the total of the light
intensity adjustment value set on the FL-50 and that
set on the camera. The light intensity adjustment value
displayed is that of the FL-50 only.
Light intensity adjustment value
together with the optimum shooting distance according to
the camera setup.
2. Turn dial A to set the guide number (GN).
the following steps.
(This selection is also possible with dial A.)
3. If the camera’s flash adjustment mode is selected, the
1. The control panel shows the current guide number (GN)
(This is also possible by turning dial B.)
Set the guide number (GN) so that the optimum shooting
distance is equal to the subject distance.
When the optimum shooting distance is 0.6 m (0.5 m in
case of close-up flash) or less, the displayed figure blinks
to warn that the subject is located outside the flash light
emission area.
The optimum shooting distance varies according to the
camera setup (ISO speed, lens iris (F), lens focal distance
(ZOOM), and shutter speed). See page 64 for details.
Memo: Assuming that the ISO speed is 100, the optimum shooting distance can be calculated with the following formula.
Optimum shooting distance = Guide number (GN)/Lens iris (F)
(See