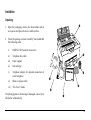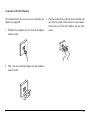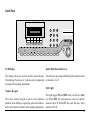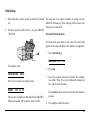
1
OKIFAX 740
User’s Guide
1
Every effort has been made to ensure that the information
in this document is complete, accurate, and up-to-date. Oki
assumes no responsibility for the results of errors beyond
its control. Oki also cannot guarantee that changes in
software and equipment made by other manufacturers and
referred to in this guide will not affect the applicability of
the information in it. Mention of software products
manufactured by other companies does not necessarily
constitute endorsement by Oki.
© 1996 by Oki. All rights reserved.
First edition February 1996.
Written and produced by the Documentation Department.
2
Oki and Okifax are registered trademarks of Oki Electric
Industry Company, Ltd.
WinFax Pro is a registered trademark of Delrina Corp.
LaserFax is a registered trademark of Wordcraft
International Ltd.
Safety
Your OKIFAX 740 has been carefully designed to give you years
of safe, reliable performance. As with all electrical equipment,
there are a few basic precautions you should take to avoid hurting
yourself or damaging the unit:
•
•
•
•
•
•
•
Read the setup and operating instructions in this manual
carefully. Be sure to save it for future reference.
Read and follow all warning and instruction labels on the
machine itself.
Unplug the OKIFAX 740 before you clean it. Use only a
damp cloth; do not use liquid or aerosol cleaners.
Place your OKIFAX 740 on a firm, solid surface. If you
put in on something unsteady, it might fall and be damaged;
if you place it on a soft surface, such as a rug, sofa, or bed,
the vents may be blocked, causing it to overheat.
To protect your OKIFAX 740 from overheating, make sure
no openings on the machine are blocked. Do not put the
machine on or near a heat source, such as a radiator or heat
register. If you put the machine in any kind of enclosure,
make sure it is well ventilated.
Do not use your OKIFAX 740 near water, or spill liquid of
any kind into it.
Be certain that your power source matches the rating listed
on the back of the machine. If you are not sure, check with
your dealer or with your local power company.
•
•
•
•
•
Your OKIFAX 740 has an earthed, 3-pin plug as a safety
feature, and it will only fit into a earthed outlet. If you can
not plug it in, chances are that you have an older,
non-earthed outlet; contact an electrician to have it replaced
with a earthed outlet. Do not use an adapter to defeat the
earthing.
The outlet into which you plug your OKIFAX 740 must
remain easily accessible at all times.
To avoid damaging the power cable, do not put anything
on it or place it where it will be walked on. If the cable
becomes damaged or frayed, replace it immediately.
If you’re using an extension cable or power strip with the
machine, make sure that the total current required by all
the equipment on the extension is less than the extension’s
rating. Generally, the total ratings of all equipment plugged
into any one power line should not exceed 15 amperes. Do
not exceed this unless you know that the power line your
equipment is plugged into has a rating above 15 amperes.
Aside from the routine maintenance described in this
manual, don’t try to service the machine yourself; opening
the cover may expose you to shocks or other hazards. Do
not make any adjustments other than those outlined in the
manual, you might cause damage requiring extensive repair
work.
3
•
If anything happens that indicates that your OKIFAX 740
is not working properly or has been damaged, unplug it
immediately and contact your Oki dealer for service. These
are some of the things to look for:
•
•
•
•
4
The power cable or plug is frayed or damaged.
Liquid has been spilled into the housing, or the machine
has been exposed to water.
The machine has been dropped or its cabinet has been
damaged.
The machine doesn’t function normally when you are
following the operating instructions.
Contents
Safety .............................................................................. 3
Installation ...................................................................... 9
Unpacking .................................................................. 9
Removal of Transport Materials .............................. 10
Connecting to Power and Telephone Network ........ 11
Connection of Telephone (Optional) ....................... 12
Connection of Serial Telephone .......................... 12
Connection of Parallel Telephone........................ 13
Installing the Ink Cartridge ...................................... 14
Installing Paper ........................................................ 15
Choosing Paper .................................................... 15
Loading Paper ...................................................... 15
Control Panel ........................................................... 17
LCD Display ........................................................ 17
Numeric Keypad .................................................. 17
Quick Dial (One-Touch) Keys ............................. 17
Shift Light............................................................ 17
COPY/START Key .............................................. 18
STOP Key ............................................................ 18
ORIGINAL Key ................................................... 18
RECEIVE MODE Key ........................................ 18
SHIFT Key ........................................................... 18
YES Key .............................................................. 18
RESERVATION/NO Key .................................... 18
FUNCTION Key .................................................. 18
RESOLUTION Key ............................................. 18
MEMORY Key .................................................... 19
CLEAR Key ......................................................... 19
QUICK Key ......................................................... 19
REDIAL/PAUSE Key .......................................... 19
HOOK VOICE REQUEST Key .......................... 19
POWER/ALARM Light ...................................... 19
TEL, TEL/FAX & TAD Lights ........................... 20
COMMUNICATION Light ................................. 20
VOICE REQUEST Light .................................... 20
FINE & PHOTO Lights....................................... 20
MEMORY Light .................................................. 20
Initial Settings .......................................................... 21
Personal ID (Function 24) ................................... 21
Sender ID (Function 25) ...................................... 22
CSI/TSI (Function 26) ......................................... 23
Date & Time (Function 40) ................................. 23
Speaker Volume (Function 41) ............................ 24
Buzzer On/Off (Function 42) .............................. 24
Print Quality (Function 43) ................................. 25
Paper Size (Function 44) ..................................... 25
Reduction (Function 45) ...................................... 26
Page Count (Function 46).................................... 26
5
Contents
Transmission................................................................. 27
Prepare to Send ........................................................ 27
Transmission After Voice ......................................... 28
Dialling with the Numeric Keypad .......................... 28
Dialling with the Quick Dial Feature ...................... 29
On-Hook Dialling .................................................... 30
Last Number Redial ................................................. 30
Auto Redial .............................................................. 30
Polling Transmission (Function 10) ........................ 31
Delayed Transmission (Function 11) ....................... 32
Memory Transmission ............................................. 33
Reserved Transmission ............................................ 34
Reception ...................................................................... 35
TEL Mode ................................................................ 35
FAX Mode................................................................ 35
TEL/FAX Mode ....................................................... 35
TAD Mode................................................................ 35
TAD Ring Count (Function 51)........................... 36
Polling Reception ..................................................... 37
Setting the ID Code (Function 22) ...................... 37
Setting Polling Reception (Function 10)............. 38
Cancellation of Receive Polling (Function 62) ... 39
Printing a File in Memory (Function 60) ................ 39
Deleting a File in Memory (Function 61) ............... 40
6
Substitute Memory ................................................... 40
Voice Request ........................................................... 40
Using Your OKIFAX 740 as a Copier .......................... 41
Printing Reports & Lists .............................................. 42
Activity Report (Function 30) ................................. 42
User Setup List (Function 31) ................................. 42
Telephone Number List (Function 32) .................... 42
Receive Polling List (Function 33) .......................... 43
Memory File List (Function 34) .............................. 43
Report Auto Printing (Function 48) ......................... 43
Programming Fax Numbers ......................................... 46
Programming Quick Dial Numbers (Function 20) .. 46
Programming Fax Number Groups (Function 21) .. 46
Restricted Access .......................................................... 48
Setting a Password (Function 23) ............................ 48
User Setup (Function 47) ............................................. 49
Contrast ................................................................ 50
Resolution ............................................................ 51
Receive Mode ...................................................... 51
Redial Count ........................................................ 52
Ring Resp ............................................................ 52
Line Select ........................................................... 53
Contents
Restricted Access ................................................. 53
Closed Network ................................................... 54
Error Correcting Mode (ECM) ............................ 54
PC Interface On/Off ............................................. 55
Routine Maintenance.................................................... 56
Care of Recording Paper .......................................... 56
Cleaning External Surfaces ...................................... 56
Ink Nozzle Test (Function 52) ................................. 57
Cleaning or Changing the Ink Cartridge (Function 53)
57
Cleaning the Ink Carrier Contacts ........................... 60
Cleaning the Document Feeder ............................... 60
Clearing a Document Jam ........................................ 61
Clearing a Recording Paper Jam.............................. 61
Using the PC Interface ................................................. 62
Connecting the PC ................................................... 62
PC Software Settings ............................................... 63
PC Interface Operation ............................................ 63
Sending a Fax ...................................................... 63
Receiving a Fax ................................................... 63
Installing Additional Memory ...................................... 64
Error Messages ............................................................. 67
Function Summary ....................................................... 70
Specification ................................................................. 71
TEL/FAX Change Over ........................................... 75
NOTE 2 ................................................................ 75
Index ............................................................................. 77
7
8
Installation
Unpacking
➊
1. Open the packaging, remove the fax machine and its
accessories and place them on a stable surface.
2. Check the package contents carefully. You should find
the following items:
i)
OKIFAX 740 facsimile transceiver;
ii)
Telephone line cable;
iii)
Paper support;
iv)
Ink cartridge;
v)
Telephone adapter for optional connection of
serial telephone;
vi)
Mains ac power cable;
vii)
This User’s Guide.
If anything appears to be missing or damaged, contact your
Oki dealer without delay.
➎
➍
➋
➌
➏
➐
9
Removal of Transport Materials
1. Remove any adhesive tape from the outside surfaces
of the machine.
2. Press down the cover release tab (1) and lift the top
cover to the fully upright position.
5. Pull the paper feeder (1) towards the front of the
machine to open the feeder. Pull out the sheet of transit
paper (2) from the paper feeder.
➋
➊
➊
6. Push the feeder (1) towards the rear of the machine to
close it.
3. Pull out the sheet of transit paper from under the paper
feed roller (2).
7. Install the paper support (3) into the slots at the rear of
the paper feeder (1).
➌
➋
➊
➍
4. Lower the top cover and press down firmly to close.
10
8. Pull out the paper catch tray (4) to accomodate the size
of recording paper you will use.
Connecting to Power and Telephone Network
1. Insert the telephone line cable plug into the line jack 3. Plug the ac power cable into the rear panel socket on
your OKIFAX 740, and the other end into a suitable ac
(“LINE”) on the left-hand side of the machine.
power socket.
LINE
TEL
2. Ensure that the ac power on/off switch (2) is in the
OFF (down) position.
Note: The ac power socket must be nearby and should
remain easily accessible at all times.
4. Plug the telephone line jack into the appropriate
telephone network socket.
➋
11
Connection of Telephone (Optional)
Connection of Serial Telephone
If you intend to use a normal telephone in conjunction with This method does not require a two-way adapter, but instead
your fax machine, follow the steps in this section. Otherwise utilises the TEL socket on your fax machine.
skip to the next section.
Note: This method of connection is available in certain
There are two methods by which a telephone may be
countries only.
connected: serial telephone connection and parallel
telephone connection. Either method allows the same 1. With the fax machine installed as described earlier, plug
telephone line to be used for voice and facsimile
the line jack from your telephone into the telephone
communication.
(TEL) socket (1) on the left-hand side of the fax
machine.
Serial Telephone Connection
Parallel Telephone Connection
➊
12
Connection of Parallel Telephone
This method involves the use of a two-way telephone jack
adapter (not supplied).
1. Withdraw the telephone line jack from the telephone
network socket.
3. Plug the telephone line jack from the fax machine into
one of the two input sockets on the two-way adapter,
and the line jack from the telephone into the other
socket.
2. Plug a two-way telephone adapter into the telephone
network socket.
13
Installing the Ink Cartridge
1. Press down the cover release tab and lift the top cover
to the fully upright position.
5. Lower the ink cartridge into the carrier with the copper
contacts facing the front of the machine.
2. Slide the ink cartridge carrier towards the centre of its
travel, and then slightly to the left, opposite the loading
tab (1).
6. Squeeze the top of the cartridge towards the front of
the carrier until it snaps into position.
➊
3. Carefully remove the ink cartridge from its packing.
Note: Hold the cartridge by its top. Do NOT touch the
copper area — contacts (1) or nozzles (2).
7. Lower the top cover and press down firmly to close.
➊
➋
4. Carefully peel off the tape covering the print head.
14
Note: Do not remove the ink cartridge except to replace it
or if your printer is to be transported. The ink nozzles
will dry out if exposed for long periods of time.
Installing Paper
Your fax machine uses plain paper to print incoming
messages. Any paper suitable for use in a standard ink jet
printer may be used.
Three sizes of paper may be used:
A4
US Letter
US Legal
210 x 297mm
8½" x 11" (216 x 279mm)
8½" x 14" (216 x 356mm)
Choosing Paper
Loading Paper
Examples of suitable paper types are:
Depending upon thickness, up to about 150 sheets of paper
may be loaded into the paper feeder.
•
•
•
•
•
inkjet printer paper
copier paper
laser printer paper
plain bond paper
recycled bond paper
1. Remove paper fresh from its wrapping.
2. Fan the sheets to ensure no sheets are stuck together.
Examples of unsuitable paper are:
•
•
•
•
•
•
•
continuous form feed paper
erasable bond paper
synthetic paper
thermal paper
multi-sheet forms and documents
chemically treated multi-part forms
paper with embossed printing
15
3. Flush the sheets into a neat stack.
5. Adjust the paper width levers (1) & (2) to either
LETTER or A4 as appropriate.
➊
➋
4. Pull the paper feeder towards the front of the fax
machine to open the feeder chute.
6. Insert the stack, short edge first, into the feeder. Do not
force, but allow the stack to drop in gently under its
own weight.
➊
7. Return the paper feeder to its original closed position.
16
Control Panel
STOP
POWER/
ALARM
ORIGINAL
TEL
RECEIVE
MODE
TAD/FAX
SHIFT
TAD
COMMUNICATION
YES
VOICE
REQUEST
RESERVATION
NO
FINE
FUNCTION
PHOTO
RESOLUTION
COPY/START
MEMORY
MEMORY
CLEAR
/
QUICK
REDIAL/
PAUSE
HOOK
VOICE
REQUEST
LCD Display
Quick Dial (One-Touch) Keys
The display shows the current machine status (Ready,
Transmitting, Receiving, etc.) and also gives prompts and
messages when making adjustments.
These five keys provide quick dialling of fax numbers stored
in memories A to F.
Shift Light
Numeric Keypad
The 10-key numeric keypad is used to enter telephone
numbers when dialling or registering quick dial numbers,
and to enter function numbers when making adjustments.
This light toggles ON and OFF when you press the [SHIFT]
key. When OFF, the quick dial keys select fax number
memories A to E. When ON, the quick dial keys select
memories F to J.
17
COPY/START Key
SHIFT Key
This key starts the required operation, such as transmitting,
manual receiving or copying a document.
This key is used to determine whether the five quick dial
keys select memory numbers A to E, or F to J.
STOP Key
YES Key
This key stops the current operation, such as transmitting,
receiving or copying a document. It is also used to cancel
an alarm signal after a malfunction.
This key is used to answer YES to questions and prompts
which appear on the LCD display panel during adjustment.
RESERVATION/NO Key
ORIGINAL Key
This key is used to set the required contrast for your
document for light originals, dark orginals (or coloured
paper), or normal (clear black and white) originals.
This key is used to answer NO to questions and prompts
which appear on the LCD display panel during adjustment.
It is also used to initiate a reserved transmission when the
machine is busy receiving a long message.
RECEIVE MODE Key
FUNCTION Key
This key is used to select the required receive mode: Fax,
Tel, Tel/Fax or TAD. The selected mode is indicated by the
TEL, TEL/FAX and TAD lights.
This key is used in conjunction with the numeric keypad to
select the required function when making adjustments.
RESOLUTION Key
This key is used to select the appropriate resolution (degree
of fineness) when sending or copying a document.
18
MEMORY Key
REDIAL/PAUSE Key
This key selects memory transmit operation. Documents
may be scanned into memory for immediate or later
transmission.
This key redials the most recently dialled fax number. It is
also used to enter a brief pause in a stored fax number,
such as the pause sometimes required after the access digit
for an outside line via an internal telephone exchange.
CLEAR Key
HOOK VOICE REQUEST Key
This key is used to delete entries for various machine
settings or stored numbers. It is also used during editing
numbers and settings to advance the editing position one
character at a time when changing settings or stored fax
numbers.
This key is used to place the machine in an on-line state for
manual dialling, so that you may monitor the audible
progress of a call. It is also used to signal to the remote
party that you require voice communication after the
currently transmitting or receiving fax message.
QUICK Key
POWER/ALARM Light
This key is used to initiate quick dialling of stored fax
numbers. Pressing [QUICK] followed by a two-digit number
or a one-touch quick dial key selects one of up to 60 stored
fax numbers.
This light illuminates when power is applied and the
machine is switched on. In the event of a malfunction, or if
recording paper runs out, this lamp will flash on and off.
19
TEL, TEL/FAX & TAD Lights
FINE & PHOTO Lights
These three lights indicate the selected receive mode. The
available modes are:
These lights indicate the resolution selected. Fine resolution
is appropriate for documents with very small print or other
fine detail. Photo resolution is appropriate for photographs,
coloured documents or those with several shades of grey.
Standard resolution (both lights off) is appropriate for most
normal black and white documents.
Fax
Normal dedicated fax mode with auto-answer.
Tel
Manual voice/fax receive without auto-answer.
Tel/Fax
Voice/fax receive with auto-answer and audible
indication.
TAD
Voice/fax receive with auto-answer and support
for an external telephone answering machine.
These modes are more fully explained later in this book.
COMMUNICATION Light
This light illuminates during fax transmission or reception.
VOICE REQUEST Light
This light illuminates during fax transmission or reception
when either operator has pressed the [VOICE REQUEST] key. At
the end of the fax message and audible alarm sounds to
attract the operator’s attention.
20
MEMORY Light
This light illuminates when memory transmission has been
selected, or when memory reception is in progress.
Initial Settings
1. Ensure that the ac power socket, if switched, is turned
on.
2. Set the ac power on/off switch (1) on your OKIFAX
740 to ON.
The next task is to adjust a number of settings in your
OKIFAX 740 memory. These settings will be stored, even
after power is turned off.
Personal ID (Function 24)
This item holds your name (or any other text) which will
appear on the remote display if this function is supported.
➊
1. Press
[FUNCTION] [2] [4].
PERSONAL ID? Y/N
The display reads:
2. Press [YES].
INITIALIZE, WAIT
After a few seconds, the display reads:
READY
99% 12:00
Three items are displayed: Machine Status (READY),
Memory Available (99%) and the Time (12:00).
3. Select the required characters from the list available
(see table). Press [*] to move backwards through the
list, or [#] to move forwards.
Press [CLEAR] to advance the cursor to the next character
position.
4. Press [YES] to confirm the entry.
21
Sender ID (Function 25)
This item holds your name or company name if you wish
this information to be printed at the top of each page. The
entry may be up to 32 characters long, including spaces.
1. Press [FUNCTION] [2] [5].
SENDER ID?
Personal/Sender ID Character Table
■
!
“
#
‘
(
)
*
+
/
Ø
1
2
3
7
8
9
:
;
@
A
B
C
D
H
I
J
K
L
P
Q
R
S
T
X
Y
Z
[
¥
$
,
4
<
E
M
U
]
%
–
5
=
F
N
V
^
&
.
6
>
G
O
W
Y/N
2. Press [YES].
3. Select the required characters from the list available
(see table). Press [*] to move backwards through the
list, or [#] to move forwards.
Press [CLEAR] to advance the cursor to the next character
position.
4. Press [YES] to confirm the entry.
Notes: 1. The first character in this table (■) means ‘no
character,’ i.e. end of entry. Entering this
character in the middle of a text entry deletes
all characters to the right. Entering this
character at the start of your entry deletes the
whole entry.
2. Some models of fax machine do not print your
fax number on their received pages. To ensure
that your fax number is always printed, you may
wish to include it in this entry along with your
name.
3. Sender ID text is printed inside the printable
image area of your document. If your document
image begins closer than about 20mm from the
top of the page, a small portion may be omitted
to make room for the Sender ID text.
22
CSI/TSI (Function 26)
Date & Time (Function 40)
Your fax telephone number (Calling Station ID /
Transmitting Station ID) entered here appears on the remote
machine during fax communication. To set the number:
Your OKIFAX 740 has an internal clock, which provides
the following functions:
• Time display on the LCD panel
• Date and time printed on transmissions
• Delayed transmission and polling operations
1. Press [FUNCTION] [2] [6].
CSI/TSI?
Y/N
To adjust the date and time:
2. Press [YES].
1. Press
3. Enter your fax number from the table of available
characters, using [#] to move forwards through the table
or [*] to move backwards.
Character Table
■
+
5
6
7
1
8
2
9
3
Ø
4
Note: Numeric digits may also be entered directly using
the numeric keypad.
[FUNCTION] [4] [0].
ADJUST CLOCK Y/N
2. Press [YES].
3. Use the [CLEAR] key if you need to move the cursor to
the right.
4. Press the numeric keypad keys to enter the date and
time in the format: YY-MM-DD HH:MM. For
example, 3:05 p.m. on 12 February 1996 would be
entered as 96-02-12 15:05. Note the use of the 24hour clock.
5. Press [YES] to confirm your entry.
23
Speaker Volume (Function 41)
Buzzer On/Off (Function 42)
Your OKIFAX 740 has a built-in speaker to allow
monitoring of call progress during dialling. The volume
setting may be set to one of eight levels, from silent to
loud, as follows:
As you press keys on the control panel, you may hear an
audible beep. This function may be turned on or off as
required.
1. Press
[FUNCTION] [4] [2].
1. Press [FUNCTION] [4] [1].
SET BUZZER?
ADJUST VOL?
Y/N
Y/N
2. Press [YES].
2. Press [YES].
ON-* OFF-# */#/Y
L>>>>
H */#/Y
3. Press [*] for buzzer ON or [#] for buzzer OFF.
3. Press [*] to decrease or [#] to increase the volume.
4. Press [YES] to confirm your entry.
4. Press [YES] to confirm your entry.
24
Print Quality (Function 43)
Paper Size (Function 44)
The print quality of your OKIFAX 740 may be set to either
Draft (faster speed, ink conservation) or Letter (slower
speed, best print quality). To select your preference:
Three sizes of recording paper are available:
A4
210 x 297mm
US Letter 8½" x 11" (216 x 279mm)
US Legal 8½" x 14" (216 x 356mm)
To set the appropriate size for the paper in use:
1. Press [FUNCTION]
[4] [3].
SET QUALITY? Y/N
2. Press [YES].
DRAFT-* LETTER-#
1. Press
[FUNCTION] [4] [4].
PAPER SIZE?
Y/N
2. Press [YES].
3. Press [*] for Draft or [#] for Letter.
3. Press [*] until the appropriate size is displayed.
4. Press [YES] to confirm your entry.
4. Press [YES] to confirm your entry.
25
Reduction (Function 45)
Page Count (Function 46)
It is possible to reduce the vertical size of incoming fax
messages so that an over-sized message may fit on a single
page, avoiding paper wastage. Six settings are available:
This function automatically prints the page count on your
outgoing transmissions. For example, the pages of a three
page document will be labelled 1/3, 2/3 and 3/3. This
enables the receiving party to easily assemble your
document and check that no pages are missing.
•
•
•
•
•
•
68%
85%
93%
97%
100%
Auto
Legal to Letter
Legal to A4
A4 to Letter
Small margin adjustment
No reduction
Your OKIFAX 740 receives the document
into its memory and calculates the best
reduction figure before printing.
When the function is set to ON, you will be prompted to
enter the actual page count when you insert documents to
send. To set the page count:
1. Press
[FUNCTION] [4] [6].
PAGE COUNT?
Y/N
To set the reduction ratio:
2. Press [YES].
1. Press [FUNCTION] [4] [5].
3. Press [*] to set Page Count to ON, or [#] to set it to OFF.
SET REDUCN?
Y/N
4. Press [YES] to confirm your entry.
2. Press [YES].
3. Press [*] until the required setting is displayed.
4. Press [YES] to confirm your entry.
26
Transmission
Prepare to Send
1. Ensure the OKIFAX 740 is in standby mode (display
reads READY).
4. Place the document face down, top first, into the
document feeder. You may load documents up to 20
pages.
2. Select the resolution required:
Fine
LED
Off
On
On
Photo
LED Resolution Application
Off
Standard
Ordinary, clear, black &
white text or line drawings.
Off
Fine
Documents which contain
fine detail, including very
small print.
On
Photo
Documents containing
photographs or other full
colour pictures.
To set the resolution, press [RESOLUTION] until the
appropriate LED’s are illuminated.
Ensure that documents are flat, undamaged, dry and
contain no paper clips or staples. If a document to be
sent cannot meet these requirements, photocopy it and
use the copy.
5. If the Page Count feature is turned on, you will be
prompted to enter the number of pages in your
document. If you do not wish to enter this detail on
this occasion, press [NO].
Note: Throughout this guide, where a dialling prompt
appears in the display, the [QUICK] key switches back
and forth between keypad number entry and quick
dialling of stored fax numbers.
3. Select the required contrast. Press [ORIGINAL] until the
display confirms Light, Normal or Dark.
27
Transmission After Voice
This method of transmission is used if you have been in
conversation with the remote party, and you then wish to
send a fax before hanging up.
1. Load your document face down, top first, into the
document feeder.
2. Ask the remote party to press their Start key.
3. Press [START] while still keeping your telephone off hook.
4. Wait for the message “TRANSMITTING” to appear
in the display.
5. Hang up the telephone handset.
Dialling with the Numeric Keypad
This method is used to send fax messages to infrequent
destinations (frequent destinations may be programmed into
the Quick Dial feature).
1. Prepare your document to send as described earlier (see
Prepare to Send).
28
With your document loaded, the display will read:
QUICK:_■
■
KEYPAD
or
DIAL: KPAD/QUICK
2. Press [QUICK] if necessary, so that the display reads:
DIAL: KPAD/QUICK
3. Dial the number you require using the numeric keypad.
If you enter an incorrect digit, press [CLEAR] to erase it.
If you are connected via an internal telephone exchange
which requires an access digit (usually 9) for an outside
line, followed by a short pause, press [PAUSE] after the
access digit. This will appear in the display as “–”.
4. Press [START] to commence dialling.
The call is placed automatically. When the remote fax
machine answers, the message “TRANSMITTING” is
displayed and your document is sent. During the
transmission the remote identification (name or
telephone number) is displayed.
1. Prepare your document to send as described in Prepare
to Send earlier.
QUICK:_■
■
KEYPAD
or
When transmission is complete, your OKIFAX 740
returns to standby automatically.
Dialling with the Quick Dial Feature
Your OKIFAX 740 has 60 memories to store frequently
called telephone numbers. 10 numbers can be stored for
one-touch dialling using the keys [A] to [J], and a further 50
numbers may be stored in memory locations numbered 10
to 59, accessed via the numeric keypad.
DIAL: KPAD/QUICK
2. Press [QUICK] if necessary, so that the display reads:
QUICK:_■
■
KEYPAD
3. For one-touch dialling, press the appropriate one-touch
key [A] to [J] . For two-touch quick dialling, enter the
appropriate two-digit memory number via the numeric
keypad.
This section describes how to dial a frequently used number
using the Quick Dial feature. It is assumed that your
Note: Five one-touch keys are provided, for memories A
frequently used numbers have already been programmed
to E. To access memories F to J, first press [SHIFT],
into the OKIFAX 740 memories. For information on
then press the appropriate one-touch key.
programming numbers see later in the “Programming”
section.
29
The call is placed automatically, and transmission begins
when the remote fax machine answers. At completion your
OKIFAX 740 will return to standby.
On-Hook Dialling
Last Number Redial
Your OKIFAX 740 can remember the last number dialled.
This does not, of course, apply to numbers dialled on an
attached telephone. To redial the last number:
This function enables one-handed dialling with audible
progress monitoring (if you have the volume setting above
minimum). This can be useful, for example, if you have a
telephone connected and wish to make a voice call and
pick up when the remote party answers.
1. Prepare your document to send.
1. If you intend to send a fax message, prepare your
document to send as described earlier.
If when trying to send a fax message your OKIFAX 740
was unable to connect with the remote party, for example
the number was busy or did not answer, it will make up to
five further dialling attempts (user adjustable in some
countries). If you wish to cancel further attempts, simply
remove your document from the feeder.
2. Press [HOOK]
3. Dial the number using either the numeric keypad or
quick dial feature described earlier.
4. When the remote party answers, press [START] to begin a
fax transmission, or pick up the telephone handset to
commence a voice call.
30
2. Press
[REDIAL].
Auto Redial
Polling Transmission (Function 10)
Your OKIFAX 740 can be set to automatically send a
document to a calling machine while unattended. This might
be used, for example, when your head office calls during
the night to collect a report. Two types of polling
transmission are possible:
3. Press [YES].
4. If you are prompted for the number of pages, enter the
number or press [NO].
CHK ID CODE? Y/N
Free Polling
Any fax machine with remote polling
facilities can call your machine and request
the document you have left.
Secure Polling Your OKIFAX 740 has a special polling
password as a security feature. Only a
remote machine with the same password
can request your document.
5. For secure polling press [YES], or for free polling press
[NO].
AWAITING POLLING
or
FREE POLLING
To set a document for polling transmission:
1. Load your document face down, top first, into the
document feeder.
Note: To cancel polling transmission, simply remove your
document from the document feeder.
2. Press [FUNCTION] [1] [0].
POLL MODE?
Y/N
31
Delayed Transmission (Function 11)
You may set a document for transmitting unattended at a
later time up to 24 hours ahead. This is useful for
transmitting during the night to take advantage of off-peak
call charges.
To set up a delayed transmission:
1. Load your document face down, top first, into the
document feeder.
4. Press [YES] to confirm your entry.
DIAL KPAD/QUICK
5. For manual fax number entry, enter the required number
using the numeric keypad. Then press [START].
For quick dialling a stored number, press [QUICK]
followed by either a one-touch key or a two-digit
memory location. Then press [START].
2. Press [FUNCTION] [1] [1] .
TIME 12:00 KPD/Y
Note: The actual time displayed is the current time.
3. Enter the time you wish the call to begin, using 24hour clock notation, on the numeric keypad. The [CLEAR]
key may be used to advance the cursor to the required
editing position.
If you enter an earlier time, transmission will begin at
that time on the next day.
32
Note: To cancel a delayed transmission, simply remove
your document from the document feeder.
Memory Transmission
Using this feature your OKIFAX 740 can store a document
in its internal memory for subsequent transmission, either
immediately or at a later time.
2. Press [MEMORY] and see that the Memory lamp is
illuminated.
DELAYED TX?
You may scan your document into memory, then retrieve it
leaving your fax machine to place the call and send the
document.
Y/N
3. For delayed transmission press [YES]. For immediate
transmission press [NO], then skip to step 5 below.
A document scanned into memory for delayed transmission,
TIME 15:30 KEY/Y
up to 24 hours ahead, eliminates the need to leave the
document in the document feeder until after transmission. 4. Enter the required start time using the numeric keypad,
then press [YES].
A document stored in memory may be sent, either
immediately or later, to up to 70 different locations,
■ */KPAD
QUICK:_■
including a pre-stored ‘group’ of correspondents using the
Group Dial feature (see later).
5. Enter the quick dial number for your correspondent, or
press [*] for Group Dial.
To set up a document for memory transmission:
1. Load your document face down, top first, into the
document feeder.
NEXT FAX NO? Y/N
6. Press [YES] to enter another fax number or
are no more numbers to enter.
[NO]
if there
33
7. Press [START] to begin scanning your document into
memory.
S F.01 P.01
94%
The display indicates the current file number (stored
documents are called ‘files’), the current page number,
and the amount of memory remaining.
Reserved Transmission
This feature enables you to prepare a document for
transmission, including entering the fax number, when your
OKIFAX 740 is currently receiving a long transmission.
This avoids having to wait for the current transaction to
complete.
To set up a reserved transmission:
When scanning is complete, the OKIFAX 740 returns
to standby if delayed transmission has been selected,
or it begins to place the first call if immediate
transmission was chosen.
Note: To cancel delay ed transmission, delete the
appropriate file from memory (function 61).
1. Load your document into the document feeder.
2. Press [RESERVATION].
3. Select the required transmission feature, e.g. manual
dialling, quick dialling, etc.
4. Enter the fax number using the keypad or quick dialling.
When the current transaction is complete, your call will
be placed and your document sent.
Note: To cancel reserved transmission, simply remove your
document from the feeder.
34
Reception
FAX Mode
Your OKIFAX 740 provides four modes for call reception:
In this mode of operation your OKIFAX will automatically
answer incoming calls with a fax answer tone. This is
appropriate if your telephone line is dedicated to fax.
•
•
•
•
TEL mode
FAX mode
TEL/FAX mode
TAD mode
Each mode is selectable at any time by pressing [RECEIVE
MODE]. You may also set the machine’s default mode (the
mode adopted by your OKIFAX 740 when it is switched
on) by programming function 47.
TEL Mode
In this mode your OKIFAX 740 will not automatically
answer incoming calls. This is convenient if you have a
normal telephone installed and wish to answer incoming
voice calls on the same line.
If you answer a call and hear a remote fax machine (short
beeps at 3-second intervals), press [START] to begin fax
reception.
TEL/FAX Mode
In this mode your OKIFAX 740 will automatically answer
incoming calls. If it detects a remote fax machine calling it
will automatically respond and receive the fax message.
If no remote fax machine is detected your OKIFAX 740
will emit a high-pitched audible tone. In this case, lift your
telephone handset and press [STOP] to begin a voice
conversation.
After a voice exchange, to commence a fax exchange press
[START] and hang up the telephone.
TAD Mode
TAD stands for ‘Telephone Answering Device,’ and is
appropriate if you wish to receive both voice and fax calls
while the OKIFAX 740 is unattended.
35
For this application you will require a voice telephone
answering machine to be connected on the same line. The
answering machine may be connected via the TEL socket
on your OKIFAX 740 (if available in your country), or via
a two-way telephone adapter. In either case, connection is
similar to that for an external telephone, see under
‘Installation’.
3. Press [*] until the required number of rings is displayed,
then press [YES].
TAD Ring Count (Function 51)
4. Press [*] to increment the silence (waiting) period from
5 to 30 seconds in 5-second intervals, then press [YES].
When using a telephone answering machine with your
OKIFAX 740, it is necessary to set the TAD Ring Count to
determine how quickly your fax machine answers an
incoming call.
To set the TAD Ring Count:
1. Press [FUNCTION] [5] [1] .
SET TAD I/F? Y/N
2. Press [YES].
TAD RING=1
36
*/Y
SILENCE=05SEC*/Y
Your OKIFAX 740 will switch to fax receive if no
incoming voice is heard for a set period of time.
When correctly set up, your OKIFAX can receive incoming
voice or fax messages completely unattended.
Polling Reception
Setting the ID Code (Function 22)
This feature enables your OKIFAX 740 to call other fax
machines and request a document from them. The remote
machines must, of course, be set for polling transmission.
To set your OKIFAX 740 ID code:
This application is useful if, for example, you wish to collect
reports or other documents from each of your branch offices.
1. Press
[FUNCTION [2] [2].
SET ID CODE? Y/N
2. Press [YES].
Delayed polling reception allows this activity to be carried
out at night, taking advantage of off-peak telephone call
charges.
There are two kinds of polling transmission:
Free Polling
ID Polling
Any fax machine with remote polling
facilities can call and request document
which has been prepared.
ID NO:■■■■
■■■■
3. Enter a unique 4-digit code using digits from 0 to 9
and/or A to F. Use the numeric keypad for numeric
digits and the [*] and [#] keys for the letters A to F.
4. Press [YES] to confirm your entry.
The transmitting machine has a special ID
code as a security feature. Only a remote
machine with the same ID code can request
a prepared document.
Note: This feature works with most (but not all) fax
machines equipped with remote polling facilities.
37
Setting Polling Reception (Function 10)
To set your OKIFAX 740 for polling reception:
1. Ensure that you have set the correct ID code to match
the remote machine(s) — see Setting the ID Code.
2. Press [FUNCTION] [1] [0] .
POLL MODE?
Y/N
POL RECEIVE? Y/N
4. Press [YES].
7. To enter another fax number, press [YES], and repeat step
6 above.
If you have finished entering fax numbers, press [NO].
POLL LATER?
Y/N
5. Press [YES] if you wish to poll at a later time, or [NO] for
immediate polling.
38
To enter the number using the Quick Dial feature, press
[QUICK] followed by either a one-touch dial key or a twodigit memory number.
NEXT FAX NO? Y/N
3. Press [YES].
DIAL
6. To enter a number manually, enter the number using
the numeric keypad. If you enter an incorrect digit use
the [CLEAR] key to erase it. When the number is correctly
displayed, press [YES] to confirm.
KEYPAD
PRESS START
8. Press [START].
Your OKIFAX 740 will print your polling list. If
immediate polling was requested, the activity will
begin. If delayed polling was requested, the fax machine
will return to standby.
Cancellation of Receive Polling (Function 62)
Printing a File in Memory (Function 60)
When polling reception has been programmed, a polling
file, containing the time and remote fax number, is set up
in memory to receive the incoming transmission. To cancel
receive polling, this file must be deleted.
Each document stored in memory is placed in a file and
allocated a file number. This applies to files stored for later
transmission as well as received files. However, when
documents stored for transmission are sent they are
automatically deleted.
1. Press [FUNCTION]
[6] [2].
CLEAR POLL?
Y/N
If you have several documents stored in memory, you may
identify them without printing by referral to the printed
memory file list (function 34).
2. Press [YES].
To print a document stored in memory:
FILE NO:■
■
Y/N
1. Press
[FUNCTION] [6] [0].
3. Enter the file number to delete, and then press [YES].
FILE PRINT?
4. Press
Y/N
[CLEAR].
2. Press [YES].
FILE CLEARED!
FILE NO:_■
■ KEY/N
After a few seconds your OKIFAX 740 will return to
standby.
3. Enter the file number you wish to print and press [YES].
39
Deleting a File in Memory (Function 61)
Substitute Memory
Files stored in memory occupy reduce the amount of
available memory for other documents. It is a good idea to
print them and then delete them as soon as convenient.
If a document is received when your OKIFAX 740 is out
of paper or ink, or when there is a paper jam, the document
will still be received in memory. At this time the display
will read:
To delete a file:
1. Press [FUNCTION
MEMORY RECEIVING
[6] [1].
CLEAR FILE?
Y/N
2. Press [YES].
FILE NO:_■
■ KEY/N
3. Enter the file number to delete, then press [YES].
FILE NO: 01CLR/N
4. Check that the file number displayed is the file you
actually wish to delete. If it is, press [CLEAR]. If not,
press [NO].
When the machine returns to standby you will see that there
is a greater amount of memory available.
40
When you load more paper, replace the ink cartridge or
clear the paper jam, the document will print automatically.
Voice Request
If, during fax transmission or reception, you wish to attract
the remote operator to the telephone for a voice conversation
after the fax exchange has completed, press [VOICE REQUEST].
When fax transmission is complete, the remote fax machine
will emit an audible tone. If the remote operator picks up
the telephone, your fax machine will emit an audible tone.
When you hear this, pick up your telephone handset and
press [STOP] . When you hang up the telephone, the fax
machine will return to standby.
UsingYour OKIFAX 740 as a Copier
To make multiple copies, press [YES].
Your OKIFAX 740 may be used as a convenience local
copier. When making a single copy your original document
is printed as it is scanned. For multiple copies, the document
COPY 01 SETS
Y
is first scanned into memory and then printed the required
number of times. Up to 99 copies can be made.
5. Enter the number of copies required, up to a maximum
of 99, using the numeric keypad.
To make a copy:
6. Press [YES].
1. Load the original document face down, top first, into
the document feeder.
7. Press [START].
2. Select the contrast and resolution required (see Prepare
to Send).
3. Press
Each page of your original document is scanned into
memory. When scanning is complete, printing
commences.
[START].
MULTI COPY?
Y/N
When printing is complete, your OKIFAX 740 will
return to standby.
4. To make a single copy, press [NO].
After copying your OKIFAX 740 will return to standby.
41
Printing Reports & Lists
User Setup List (Function 31)
Your OKIFAX 740 can print five reports and lists:
This report prints a list of all user parameters and their
current settings.
•
•
•
•
•
Activity Report
User Parameter List
Telephone Number List
Receive Polling List
Memory File List
Activity Report (Function 30)
This report lists information about each transaction. It
includes the remote fax number, date, time, duration and
result (OK or Error). The activity report is printed
automatically after every 35 transactions (if auto printing
is enabled). However, you can request this report to print at
any time.
1. Press [FUNCTION]
[3] [0].
ACTIVITY RPT? Y/N
2. Press [YES].
After printing, your OKIFAX 740 will return to standby.
42
1. Press
[FUNCTION] [3] [1].
USER SETUP?
Y/N
2. Press [YES].
Telephone Number List (Function 32)
This report prints a list of all remote fax numbers stored in
memory, including all one-touch, two-touch and group
numbers.
1. Press
[FUNCTION] [3] [2].
FOR TEL LIST Y/N
2. Press [YES].
After printing, your OKIFAX 740 will return to standby.
Receive Polling List (Function 33)
Report Auto Printing (Function 48)
This report prints a list of all currently programmed receive
polling files.
Using this function you may instruct your OKIFAX 740 to
automatically print useful reports at appropriate times. The
automatic reports available are:
1. Press [FUNCTION]
[3] [3].
FOR POL LIST? Y/N
Activity Report
A log listing the most recent 35 transactions, including
remote fax number, date, time and result.
2. Press [YES].
After printing, your OKIFAX 740 will return to standby.
Memory File List (Function 34)
This report prints a list of all files currently stored in
memory.
1. Press [FUNCTION]
[3] [4].
MEMORY LIST? Y/N
2. Press [YES].
After printing, your OKIFAX 740 will return to standby.
TX Result
A single line report giving confirmation of the last
transmission. This can be useful if you file an outgoing fax
document and wish to include with it confirmation of
transmission.
RX Result
A single line report giving confirmation of the last fax
message received.
Memory File List
A list of memory files printed each time a new file is added.
Polling Reservation List
A confirmation entry printed each time a new polling file
is added.
43
To set of cancel report auto printing for any of these reports: 5. To set or cancel auto printing of the Tx result report,
press [YES].
1. Press [FUNCTION] [4] [8] .
To move on to the next report, press [NO] , then skip to
step 7.
AUTO PRINT
Y/N?
2. Press [YES].
AUTO SET:ON
ACTIVITY RPT? Y/N
3. To set or cancel auto printing of the activity report,
press [YES].
To move on to the next report, press [NO], then skip to
step 5.
AUTO SET:ON
*/Y
4. Press [*] to switch the current setting between ON an
OFF. When the setting is correct, press [YES] to confirm.
TX REPORT
Y/N
6. Press [*] to switch the current setting between ON an
OFF. When the setting is correct, press [YES] to confirm.
RX REPORT
Y/N
7. To set or cancel auto printing of the Rx result report,
press [YES].
To move on to the next report, press [NO] , then skip to
step 9.
AUTO SET:ON
*/Y
8. Press [*] to switch the current setting between ON an
OFF. When the setting is correct, press [YES] to confirm.
NEW FILE R.
44
*/Y
Y/N
9. To set or cancel auto printing of the memory file list,
press [YES].
To move on to the next report, press [NO], then skip to
step 11.
AUTO SET:ON
*/Y
10. Press [*] to switch the current setting between ON an
OFF. When the setting is correct, press [YES] to confirm.
NEW POLL R.
Y/N
11. To set or cancel auto printing of the memory file list,
press [YES].
To reurn to standby, press [NO].
45
Programming Fax Numbers
Programming Quick Dial Numbers (Function 20)
5. Press [YES] to confirm your entry.
Your OKIFAX 740 can store up to 60 frequently use fax
telephone numbers, 10 for one-touch dialling via the onetouch keys [A] to [J] , and 50 via two-touch numeric codes 10
to 59 on the numeric keypad (keys [0] to [9] ).
Note: To erase a telephone number, press [CLEAR] at step 4,
and enter the new number if required.
1. Press [FUNCTION] [2] [0] .
You can allocate frequently used numbers to groups. Using
this feature your OKIFAX 740 can transmit a document to
all destinations in a group in sequence, from just one
initiating action.
PROG. QUICK? Y/N
Programming Fax Number Groups (Function 21)
2. Press [YES].
QUICK NO.
:KPAD
3. To program a one-touch key, press the appropriate key
[A] to [J] (using the [SHIFT] key first for [F] to [J]).
To program a two-touch code, enter the two digit code
from 10 to 59 on the numeric keypad.
4. Press [YES] and enter the telephone number to be stored.
If you enter an incorrect digit, press [CLEAR] to erase it.
46
You can enter up to 5 groups, each having up to 30 fax
numbers. Fax numbers may appear in more than one group
if you wish.
Note: If you reprogram a Quick Dial number it will be
removed from any groups to which it belonged.
1. Press
[FUNCTION] [2] [1].
GROUP DIAL?
Y/N
6. To enter this number into the group, press [YES].
2. Press [YES].
GROUP:■
■
A-E
3. Press a one-touch key from [A] to [E].
GROUP#:A
To choose a different number, press [NO].
To remove this number from the group, press [CLEAR].
Y/N/C
4. To begin entering numbers in this group, press [YES].
To select a different group, press [NO].
To clear all numbers from this group, press [CLEAR] .
(A):QUICK:■■
■■KPAD
■■
5. Enter a Quick Dial code by pressing the appropriate
one-touch key [A] to [J], or a two-digit code from 10 to
59 via the numeric keypad.
(A):QUICK:10Y/N/C
47
Restricted Access
Setting a Password (Function 23)
Your OKIFAX 740 has a special security feature which
you can utilise to prevent unauthorised use. Using this
feature, you can allocate a password which must be entered
before anyone can dial out.
1. Press
[FUNCTION] [2] [3].
SET PASSWORD?Y/N
2. Press [YES].
To apply password protection, two steps are required:
1. Turn on Restricted Access Mode in the User Parameters
list;
2. Set a 4-digit password from 0001 to 9999.
To set a password, follow the procedure below. To turn on
Restricted Access Mode see User Parameters.
48
PASSWORD:■■■■
■■■■
3. Enter a 4-digit password from 0001 to 9999 via the
numeric keypad.
User Setup (Function 47)
Many of the adjustments on your OKIFAX 740 can be set
up to default to the settings you prefer. This means that
these settings will be automatically adopted by your
OKIFAX 740 each time you switch it on.
Redial Count
Sets the number of attempts your
OKIFAX 740 will make to place a call
if the remote number does not answer
or is busy. (Certain countries only.)
This gives you several advantages:
Ring Resp
Sets the number of rings after which
your OKIFAX 740 answers an
incoming call in FAX or TEL/FAX
modes.
Line Select
Sets the method of dialling to pulse or
tone dialling to suit your telephone
exchange. (Certain countries only.)
Restricted Access
Turns on or off restricted access mode.
When on, this mode requires a
password before anyone may use the
machine to dial out.
Closed Network
Sets closed network mode on or off.
When on, this mode rejects incoming
fax calls from machines which do not
have the same ID code as your
OKIFAX 740. This mode may reject
unsolicited fax mail.
• It saves you time in day-to-day operation;
• The machine is easier to use;
• Your OKIFAX 740 can be personalised to suit your
needs.
The user parameters which may be set are as follows:
Contrast
Adjusts the scanned image for light,
normal or dark documents.
Resolution
Adjusts the fineness of detail to normal
or fine.
Receive Mode
Sets the normal receive mode to TEL,
FAX, TEL/FAX or TAD.
49
ECM
Turns ECM mode (error correction) on
or off. ECM mode is helpful in
overcoming noisy telephone line
conditions, but does require the remote
machine to support the same
communication standard.
Contrast
CONTRAST?
Y/N
1. To adjust contrast, press [YES].
To move on to the next parameter, press [NO].
The user parameters are accessed in sequence. If you only
need to adjust one parameter, enter the user parameter setup
BRIGHT:NORMAL */Y
as described below and answer [NO] to each prompt until
you reach the required setting.
2. Press [*] until the required setting is displayed, then
press [YES].
To exit from the user parameters list without moving
through all the rest, press [FUNCTION] again.
3. To return to standby, press [FUNCTION].
To enter the User Parameter setup:
1. Press [FUNCTION] [4] [7] .
PARAMETER?
Y/N
2. Press [YES] to move to the first parameter.
50
Receive Mode
Resolution
RESOLUTION?
Y/N
1. To adjust resolution, press [YES].
RECEIVE MODE?Y/N
1. To set receive mode, press [YES].
To move on to the next parameter, press [NO].
To move on to the next parameter, press [NO].
RES:STANDARD */Y
RECEIVE:FAX
*/N
2. Press [*] until the required setting is displayed, then
press [YES].
2. Press [*] until the required setting is displayed, then
press [YES].
3. To return to standby, press [FUNCTION].
3. To return to standby, press [FUNCTION].
51
Ring Resp
Redial Count
REDIAL COUNT Y/N
1. To adjust the redial count, press [YES].
SET RING RSP?Y/N
1. To set the number of rings in FAX mode, press [YES].
To move on to the next parameter, press [NO].
To move on to the next parameter, press [NO].
REDIAL:■
■
COUNTER=1 KPAD/Y
KPAD/Y
2. Enter the required number of call attempts, from 1 to
5, then press [YES].
2. Enter the number of rings required, from 1 to 9, then
press [YES].
3. To return to standby, press [FUNCTION].
3. To return to standby, press [FUNCTION].
52
Restricted Access
Line Select
LINE SELECT? Y/N
1. To select either pulse or tone dialling, press [YES].
LIMIT TX?
Y/N
1. Press [YES] to turn on restricted access.
To move on to the next parameter, press [NO].
To move on to the next parameter, press [NO].
DP-* MF-#
TX:ON-* TX:OFF-# Y
*/#/Y
2. Press [*] for Dial Pulse or [#] for Touch Tone, then press
[YES].
3. To return to standby, press [FUNCTION].
2. Press [*] for ON or
[#]
for OFF, then press [YES].
Note: ON requires a password before anyone may transmit
a document.
3. To return to standby, press [FUNCTION].
53
Closed Network
LIMIT RX?
Error Correcting Mode (ECM)
Y/N
ECM TRX?
1. Press [YES] to set closed network access.
1. Press [YES] to set ECM.
To move on to the next parameter, press [NO].
To return to standby, press [NO].
RX: ON-* OFF-#
ECM: ON-* OFF-#
2. Press [*] to turn closed network ON, or
OFF, then press [YES].
[#]
to turn it
Note: ON requires that the remote transmitting OKIFAX
740 must have the same ID code set as your machine.
(Other types of remote fax machine may not support
this function.)
54
Y/N
2. Press [*] to turn ECM ON, or
press [YES].
[#]
to turn it OFF, then
4. Press [YES] to confirm your choice and return to standby.
3. To return to standby, press [FUNCTION].
PC Interface On/Off
Your OKIFAX 740 is equipped with a serial interface for
connection to a serial ‘COM’ port on a PC.
This facility enables a PC running a fax program, such as
WinFax Pro or LaserFax, to send and receive fax messages
without the need for intermediate printing.
Note: When an incoming or outgoing fax message is in
progress via the PC Interface, all buttons except [STOP]
are disabled. To halt the progress of a fax transaction
in this mode, press [STOP] on the fax machine, or select
the STOP function within your PC fax program.
In order to use this facility you must first set the PC Interface
function to ON. If you wish to discontinue using this
facility, you must set the PC Interface function to OFF.
PC I/F MODE? Y/N
1. To turn this mode ON or OFF, press [YES].
IF: ON=* OFF-#
The current setting, ON or OFF, will flash.
2. Press [*] to turn this facility ON, or [#] to turn it OFF.
3. Press [YES] to confirm your choice and return the
machine to standby.
55
Routine Maintenance
Cleaning External Surfaces
Your OKIFAX 740 is designed to give reliable and troublefree operation for many years. However, occasional care
and attention to the items covered in this section will help
to ensure optimum performance.
If you wish to clean the outside of your fax machine, follow
the precautions below:
1. Switch off power to your OKIFAX 740 and remove
the ac power plug from the wall or floor socket.
Care of Recording Paper
Your OKIFAX 740 is designed to print on ordinary plain
paper. Paper designed for use in inkjet or laser printers or
copiers should be satisfactory in most applications.
2. Use a clean, damp (but not soaking wet) cloth to gently
wipe clean the external surfaces. Avoid the use of
proprietary cleaners and polishes. Especially avoid
contact with solvents, which may discolour or damage
the casing.
1. Store paper sealed in its wrapper until required for use,
and store flat in a clean, dry environment. Damp paper
causes poor print quality and may result in paper jams
and misfeeds.
3. Ensure that no liquids enter the inside of the machine
at any time. Should this happen by accident, do not
apply power, but call for service.
2. Avoid overloading the automatic sheet feeder. It is
designed to hold 150 sheets maximum.
4. Ensure that all surfaces are completely dry before
restoring ac power to the machine.
3. Ensure that the paper guide is set to the correct width
(Letter or A4) for the size of paper in use.
56
Ink Nozzle Test (Function 52)
Cleaning or Changing the Ink Cartridge (Function 53)
This function prints a test pattern to check print quality.
If you notice that print quality becomes poor, showing light
or dark bands across the width of the page, you may be
able to effect an immediate improvement by careful cleaning
of the ink cartridge. Follow the procedure below:
1. Press [FUNCTION] [5] [2] .
NOZZLE TEST? Y/N
1. Press
[FUNCTION] [5] [3].
2. Press [YES].
CHANGE INK?
Y/N
INK NOZZLE TEST
2. Press [YES].
A test pattern will print, then your OKIFAX 740 will return
to standby.
If print quality is poor, clean or change the ink cartridge or
clean the ink carrier contacts.
COVER OPEN & CHG
3. Press the cover release tab and raise the top cover to its
fully open position.
57
4. Gently push the top of the ink cartridge towards the
rear of the machine until its snaps free.
6. To clean the cartridge, use a lightly damped, clean,
lint-free cloth to gently wipe clean the copper areas,
including the contacts (1) and the ink nozzles (2) on
the under side. To remove any dried ink from the
nozzles, hold the damp cloth against this area for about
three seconds.
➊
➋
5. Holding the cartridge by its top, lift it free of the carrier.
Avoid touching the copper areas with your fingers.
58
7. Still holding the cartridge by its top, ensure it is the
correct way round for re-loading (copper contacts
towards the front of the machine) and lower it back
into the carrier.
8. Place your thumb on the loading tab and your finger
behind the top of the cartridge, then gently squeeze the
tab and cartridge together until the ink cartridge snaps
into place.
NEW INK?
Y/N
10. Press [YES] or [NO] as appropriate.
11. Run a nozzle test to check the print quality.
9. Close the top cover, pressing down firmly to lock it
down.
59
Cleaning the Ink Carrier Contacts
Cleaning the Document Feeder
The ink carrier contacts are located inside the ink cartridge
carrier. To clean them it will be necessary to again remove
the ink cartridge.
The feed rollers in the document feeder may become smooth
over time, due to paper dust residue. Cleaning with a damp
cloth will bring back the proper friction for reliable
document feeding.
1. Remove the ink cartridge (see pages 49-50).
2. Use a clean dry cloth to reach into the ink carrier and
wipe the contacts clean.
1. Switch off your OKIFAX 740 and disconnect from ac
power.
3. Re-install the ink cartridge (see pages 50-51).
2. Press the cover release tab and raise the top cover to its
fully open position.
4. Run a nozzle test (function 52) to re-check the print
quality.
3. Wipe the upper and lower feed rollers clean with a clean
damp cloth.
If print quality is still poor, replace the ink cartridge. If
there is still no improvement, contact your dealer for
service.
➊
➋
4. Lower the top cover and press down firmly to lock it
closed.
5. Reconnect ac power and switch on.
60
Clearing a Document Jam
Clearing a Recording Paper Jam
1. Press the cover release tab and raise the top cover to its
fully open position.
1. Press the cover release tab and raise the top cover to its
fully open position.
2. Gently pull out the document towards the front of the
machine.
2. Pull forward the blue paper release lever (1) to release
the paper.
➊
3. Lower the top cover and press down firmly to lock it
closed.
3. Carefully withdraw the jammed sheet.
4. Return the blue paper release lever (1) to its original
position.
5. Lower the top cover and press down firmly to lock it
closed.
61
Using the PC Interface
Connecting the PC
Your OKIFAX 740 is equipped with a serial interface (1)
for connection to a serial ‘COM’ port on a PC.
LaserFax is normally supplied with a suitable RS-232 data
cable, other programs may not. If you need to purchase a
cable, contact your dealer or usual PC accessory supplier.
The PC interface port on your OKIFAX 740 is presented
as a 9-way D-type socket. Pin assignments are as follows:
➊
This facility enables a PC running a fax program, such as
WinFax Pro or LaserFax, to send and receive fax messages
without the need for intermediate printing.
In addition to an IBM-compatible PC, you will need a
suitable PC fax application program, such as WinFax Pro
or LaserFax, and an RS-232 serial data cable to connect
the PC interface to a serial ‘COM’ port on the PC.
62
Pin
1
2
3
4
5
6
7
8
9
Notes:
Signal
Data Carrier Detect (DCD)
Receive Data (RD)
Transmit Data (TD)
Data Terminal Ready (DTR)
Signal Ground (SG)
Data Set Ready (DSR)
Request To Send (RTS)
Clear To Send (CTS)
Ring Indicator
Note
1
2
3
1
1
4
1 Pins 1, 4 & 6 are connected together inside
the fax machine.
2 Data on pin 2 in received from the telephone
line and sent to the host PC.
3 Data on pin 3 is sent from the host PC to the
telephone line.
4 No connnection.
PC Software Settings
Sending a Fax
Your PC fax program will normally provide several
communication settings which need to be adjusted to suit
the external fax modem, in this case your OKIFAX 740.
Appropriate settings are as follows:
When the PC interface function has been turned on, your
OKIFAX 740 will operate as an external fax modem.
Modem type:
Generic Class 1 (software flow
control).
Modem initialisation:
Leave at default setting.
Pulse/Tone dialling:
Set to suit your local telephone
network (the same setting as used
in your OKIFAX 740).
Detect dial/busy tones: On.
Use ECM for Tx/Rx:
Usually on.
Max. baud rate:
9600 bit/s.
Min. baud rate:
2400 bit/s.
Outgoing fax documents may be prepared using a variety
of text editors and other programs, or with the editor buit
into your PC fax program. The operation manual supplied
with your PC fax program will guide you through the
normal operations of sending and receiving fax messages.
Receiving a Fax
To receive messages automatically when your PC fax
program is running, set the number of rings in the program
to a value from 1 to 9, as required. If this setting is set to 0,
your OKIFAX 740 will not receive messages automatically.
When set to a value greater than 9, your OKIFAX 740 will
receive incoming fax messages without using the host PC.
Note: When an incoming or outgoing fax message is in
progress via the PC Interface, all buttons except [STOP]
are disabled. To halt the progress of a fax transaction
In order to use this facility you must first set the PC Interface
in thos mode, press [STOP] on the fax machine, or
function to ON. If you wish to discontinue using this
select
the STOP function within your PC fax
facility, you must set the PC Interface function to OFF
program.
(see User Parameters).
PC Interface Operation
63
Installing Additional Memory
This kit contains an additional 1MByte extra memory in
the form of two memory chips, which may be fitted to
your OKIFAX 740 in a matter of minutes.
4. Pull out the paper catch tray to reveal the small silver
coloured panel (1) on the bottom of the machine.
Note: These memory chips are extremely sensitive to static
electricity. Care must be exercised in handling them.
Also take care not to bend or damage the pins on
these devices. If in any doubt, consult your dealer.
To install the option memory, proceed as follows:
1. Switch off the ac power switch on your fax machine.
2. Remove any documents from the document feeder, and
remove all paper from the automatic paper feeder.
3. Turn the machine onto its left side.
64
➊
5. Insert a small screwdriver into the slot on the cover
and gently push the cover upwards, and then towards
you and away from the machine.
6. Grasp the cover with your fingers and pull it down and
clear of the machine.
7. Carefully examine the two locations for the new chips,
outlined in white on the main board.
12. Press the chip into the socket on the main board, taking
great care not to bend the pins.
13. Repeat steps 9 to 12 for the other chip.
14. Refit the metal cover so that it snaps back into its
original position.
15. Restore your OKIFAX 740 back to its original operating
position and reload the recording paper.
8. Note the position of the curved edges. These are at the
bottom of the white outline markings as you view them.
It is essential that the half-circles at one end of each 16. Switch ac power on and wait a few seconds for the
machine to initialise. Observe that the normal READY
chip match this position when installed, i.e. are at the
message appears in the display.
bottom with the machine in this position.
9. Withdraw one of the chips from its packaging. Take
care not to touch the pins with your fingers.
17. Carry out a memory test as follows:
•
10. Orient the chip with the half-circle towards the bottom
and the pins facing away from you, i.e. towards the
machine.
[FUNCTION] [5] [4].
MEMORY TEST?
•
11. Carefully match up each pin with its corresponding
socket on the main board. Take care to match the
position of each pin carefully, so that there is no overlap
at either end or at either side.
Press
Y/N
Press [YES].
BASIC MEMORY TEST
65
The word TEST will flash on and off for a few seconds
while the test is performed.
BASIC MEMORY
•
OK
Press [STOP].
OPT
MEMORY TEST
The word TEST will flash on and off for a few seconds
while the test is performed.
OPTION MEMORY OK
•
66
Press [STOP] to return your OKIFAX 740 to standby.
Error Messages
Message
Cause
Action
TOP COVER OPEN
Top cover not closed properly.
Close the top cover and press down
to lock it closed.
NO PAPER
Recording paper has run out.
Replenish.
REMOVE JAM & STP
Recording paper misfeed or jam.
Clear jam.
CLEAR ORIGINAL
Document misfeed or jam.
Clear document jam.
PRESS STOP
Communication error.
Press [STOP].
INK LOW
Ink cartridge down to 10% or less.
Ensure you have new ink cartridge
available. Normal operation may be
continued.
CHANGE INK
Ink cartridge empty.
Replace ink cartridge.
67
Message
Cause
Action
MEMORY OVERFLOW
Internal memory is full.
No further memory operations are
possible until some memory is
freed. Delete some files. If this
problem occurs frequently, contact
your dealer for a memory upgrade.
NOT PROGRAMMED
You are attempting to use a [QUICK]
number which contains no fax number.
Program the required fax number
into this memory location, or select
another memory number which has
been programmed.
INCORRECT PSWD
You have entered an incorrect password.
Enter the correct password (see
Restricted Access).
SET PASSWORD
The current password is 0000.
Valid passwords are 0001 to 9999
(see Restricted Access).
MEMORY FILE FULL
The current memory file is full.
Use immediate transmission until
more memory becomes available. If
this problem occurs frequently,
contact your dealer for a memory
upgrade.
68
Message
Cause
Action
NOT REGISTERED
You pressed [REDIAL] but no number has
been stored.
Use manual dialling.
REMOVE PAPER
The last sheet of recording paper has
not ejected.
Clear recording paper jam.
CHECK PAPER FEED
Recording paper misfeed.
Check condition of recording paper
stack. Try fanning the stack in case
sheets are sticking together. If paper
is damp, replace it. If the problem
persists, call your dealer for service.
69
Function Summary
Function
70
Description
10
11
Polling transmission & reception
Memory transmission
20
21
22
23
24
25
26
Quick Dial entry and edit
Group Dial entry and edit
ID Code entry and edit
Password entry and edit
Personal ID entry and edit
Sender ID entry and edit
TSI/CSI entry and edit
30
31
32
33
34
Activity report printing
User setup list printing
Telephone number list printing
Receive polling list printing
Memory file list printing
Function
Description
40
41
42
43
44
45
46
47
48
Date and time adjustment
Speaker volume adjustment
Buzzer on/off
Print quality selection
Recording paper size
Reduction ratio
Document page count
User parameter set-up
Report auto-printing set-up
50
51
52
53
54
Total transactions check
TAD interface set-up
Ink nozzle test
Ink cartridge change
Memory test
60
61
62
Print memory file
Delete memory file
Delete receive polling file
Specification
Applicable telephone line:
Public switched telephone network (PSTN)
or private branch exchange (PBX)
Communication system:
Direct coupled
Document:
Width:
Length:
Thickness:
Weight:
Effective scanning width:
216mm
Effective recording width:
203mm
Resolution (lines / mm):
Horizontal:
Vertical:
Transmission speed (ITU #1):
17 sec. ± 1 sec. (MR) ITU-T No. 1 chart
Reception speed (ITU #1):
24 sec. ± 2 sec. (memory)
46 sec. ± 4 sec. (immediate)
Coding scheme:
MH, MR
Modem speed:
9600 / 7200 / 4800 / 2400 bit/s.
220mm max.
104mm – 750mm
0.05mm – 0.15mm
52 g/m² – 120 g/m²
8 lines/mm
3.85 lines/mm (standard)
7.7 lines/mm (fine)
71
Recording method:
Ink jet printing
Scanning method:
CIS
PC interface:
9-pin D-type socket
Signals conform to CCITT V.28
Class 1 fax interface (PC software not supplied).
Power consumption:
Standby:
Transmit:
Receive:
Copy:
Document feeding:
20 sheets max. (face down)
Recording paper feeding:
150 sheets max. (automatic)
Dimensions:
Width:
Length:
Height:
Weight:
7 Kg
ECM:
Standard
Halftone:
32 grey scales
Memory:
0.5Mbyte (standard); 1Mbyte (upgrade option)
72
12W
20W
23W
28W
363 ± 5mm
285 ± 5mm (358 ± 5mm)
173 ± 5mm (255 ± 5mm)
Statutory User Information (UK only)
The OKIFAX 740 is approved for connection to
telecommunications systems specified in the instructions
for use subject to the conditions set out in them. The BABT
approval number for the OKIFAX 740 is:
The OKIFAX 740 has a REN (ringer equivalence number)
value of 1. The REN is a customer guide indicating the
maximum number of apparatus that should be
simultaneously connected to the line. The total REN values
of each of the items of apparatus must not exceed a REN
value of 4. This value includes a telephone which, unless
otherwise stated, has a REN value of 1.
This apparatus has been approved for the use of the
following facilities:
•
•
•
•
•
•
manual call initiation
operation in the absence of proceed indication
auto answer
modem
series connection
simple telephone
Any other usage will invalidate the approval of the apparatus
if as a result it ceases to conform to the standards against
which the approval was granted.
Interconnection circuits should be such that this equipment
continues to comply with the requirements of 4.2 of EN
41003 for TNV circuits and 2.3 of EN60950 for SELV
circuits after making connections between circuits.
Interconnection points ‘Line/TEL1/TEL2’ are for
connection to TNV circuits, and the ‘Power Inlet Socket’
is for connection to a 220-240VAC, 50/60Hz supply.
The apparatus has been approved for connection to the
public switched telephone network provided by British
Telecommunications Plc, Kingston Communications Plc,
or Mercury Communications Ltd.
The OKIFAX 740 may be connected to any direct PSTN
exchange line except as an extension to a payphone. The
exchange line must provide facilities for either loopdisconnect or multi-frequency (MF) dialling.
73
In order to prevent the misdirection of calls and network
interference, please ensure that all manually programmed
telephone numbers are correctly entered.
Series Connection
This apparatus is also approved for use as an extension
instrument to compatible PBXs. The supplier of the
apparatus should be consulted for an up-to-date list of PBXs
with which this apparatus is compatible.
The OKIFAX 740 causes a voltage drop of 1.35V when
passing a PSTN current up to and including 40mA dc. Do
not connect the OKIFAX 740 with apparatus which, with
associated wiring causes the aggregate of the voltage drops
to exceed a value of 2V at a PSTN line current of 40mA dc.
The handset can be used to make “999” calls to the
Emergency Services.
The second telephone or answering machine must be
connected to the TEL 2 jack by means of the two-way
adaptor provided.
The apparatus is suitable for connection to PBXs which
return Secondary Proceed Indication. In these situations,
please insert pauses between the initial access digit and the
number to be dialled to the PSTN.
NOTE 1
The 2V level indicates the maximum impairment that may
be introduced between the terminal apparatus and the
Network Terminal Point (NTP) of a Relevant Branch system
(RBS) containing the apparatus.
Only one OKIFAX 740 should be connected between any
series connected apparatus and the PSTN.
Difficulties may occasionally be experienced when making
calls from other apparatus connected to the PSTN via the
series apparatus. Such difficulties may include:
(i) Difficulty in making calls
(ii) Problems in telephone conversation being
experienced by both parties to the call
74
(iii) Such that any apparatus which forms part of the RBS
or is connected via it, is so connected that no signals of
any kind may be conveyed between that apparatus and
a PSTN circuit or vice-versa, except by means of other
apparatus that does not materially affect the electrical
conditions presented to one another by that apparatus
and the PSTN.
compatible. Failure of the apparatus to work under these
circumstances may not be the responsibility of the network
operator.
If such difficulties are experienced, please consult your
OKIFAX supplier.
NOTE 2
Further information is contained in the proposed British
A Relevant Branch system (RBS) is a telecommunication
Standard for RBS to PSTN lines.
system other than a public telecommunication system that
TEL/FAX Change Over
is:When the OKIFAX 740 is in changeover mode, care must (i) Run under a license granted or having effect under
be taken to ensure that you only connect the apparatus to
section 7 of the Telecommunications Act 1984.
telephone lines not listed in the telephone directories issued
by the Public Telephone Network Operators.
(ii) Connected to one or more PSTN lines.
The telephone number of this apparatus should not be issued
to other parties without instructions concerning the correct
method of making calls to this apparatus.
While operation may be possible initially, changes to or
modernisation of the network taking place in the normal
course of events may result in the apparatus being connected
to a network service with which it was not designed to be
75
Line Socket Installation (UK only)
To request the installation of a socket for the connection of
your OKIFAX 350 to the telephone network, you should
send a postcard containing the following information to
your local BT Sales Office:
1) The model no. of your fax machine:
OKIFAX 740
2) The approval no. of your fax machine:
3) The number of extension sockets you require.
4) Your name, address and telephone number.
The card should be signed and dated.
Note: If your wiring does not belong to British Telecom,
then it is not necessary to apply to BT for socket
installation.
76
Index
B
F
L
Buzzer
On/Off setting................................ 24
Fax Numbers
dialling .................................... 28, 30
groups ............................................ 46
printing .......................................... 42
programming ................................. 46
Fax numbers
dialling ........................................... 29
Function Summary............................. 70
Line Select
select (tone/pulse dialling) ........... 53
C
Cleaning
external surfaces ............................ 56
ink carrier contacts........................ 60
ink cartridge .................................. 57
Contrast
setting ............................................ 27
setting the default .......................... 50
Control Panel ..................................... 17
CSI/TSI
setting ............................................ 23
D
Document
condition ........................................ 27
Documents
No. of pages .................................. 15
I
ID Code
setting ............................................ 37
Ink
carrier contacts .............................. 60
cartridge ........................................... 9
CHANGE INK message ............... 67
cleaning or changing ..................... 57
conservation .................................. 25
INK LOW message ....................... 67
installing ........................................ 14
nozzle test ...................................... 57
out of.............................................. 40
M
Memory
installing ........................................ 64
testing ............................................ 65
Memory Files
deleting .......................................... 40
printing .......................................... 39
receiving ........................................ 40
transmitting ................................... 33
Memory Reception ............................ 39
Memory Transmission ....................... 33
P
Packing
checking contents ............................ 9
removing transport materials ........ 10
Paper
care of ............................................ 56
catch tray ....................................... 10
CHECK PAPER FEED message .. 69
choosing......................................... 15
feed roller ...................................... 10
feeder ............................................. 10
installing ........................................ 15
jam clearing ................................... 61
loading ........................................... 15
NO PAPER message ..................... 67
No. of sheets .................................. 72
release lever ................................... 61
REMOVE PAPER message .......... 69
size ................................................. 25
sizes ............................................... 15
suitable types ................................. 15
support ............................................. 9
transit ............................................. 10
unsuitable types ............................. 15
width lever ..................................... 16
Password
INCORRECT message ................. 68
restricted access ..................... 48, 53
SET PASSWORD message ........... 68
setting ............................................ 48
PC Interface
connecting ..................................... 62
On/Off setting................................ 55
operation ........................................ 63
PC software ................................... 63
receiving a fax ............................... 63
sending a fax ................................. 63
using .............................................. 62
Personal ID ......................................... 21
Polling
cancelling ............................... 31, 39
free ................................................. 31
ID (secure) ..................................... 31
printing receive list ....................... 43
reception ........................................ 37
setting clock .................................. 23
setting up ................................ 31, 38
transmission ................................... 31
Power
cable................................................. 9
connecting to ................................. 11
consumption .................................. 72
On/Off switch ......................... 11, 21
plug ................................................ 11
safety ........................................ 3, 56
Print Quality
ink nozzle test ............................... 57
setting ............................................ 25
Printing
activity report ......................... 42, 43
memory file list ............................. 43
memory files .................................. 39
polling reservation list .................. 43
receive polling list ......................... 43
reduction ........................................ 26
report auto ..................................... 43
reports & lists ................................ 42
Rx result ........................................ 43
telephone number list .................... 42
Tx result ......................................... 43
user parameter list ......................... 42
R
Receive Mode
description ..................................... 35
setting the default .......................... 51
Redial Count
description ..................................... 30
setting ............................................ 52
Reserved Transmission ...................... 34
Resolution
appropriate settings ....................... 27
setting ............................................ 27
setting the default .......................... 51
specifications ................................. 71
Ring Count
setting ............................................ 52
S
T
Safety .................................................... 3
Sender ID ........................................... 22
setting ............................................ 21
Settings
default ............................................ 49
initial .............................................. 21
printing .......................................... 42
PS software .................................... 63
reduction ........................................ 26
Speaker
volume adjustment ........................ 24
TAD Ring Count ................................ 36
Telephone
adapter ............................................. 9
answering machine ....................... 35
connecting to line .......................... 11
dialling with keypad ..................... 28
fax after voice................................ 28
frequently called numbers ............ 29
instrument ...................................... 12
internal exchange .......................... 28
line cable ......................................... 9
number groups ............................... 46
number redial ................................ 30
off-peak charges ............................ 37
on-hook dialling ............................ 30
parallel connection ........................ 13
printing number list ...................... 42
programming numbers .................. 46
serial connection ........................... 12
TEL mode...................................... 35
voice request .................................. 40
your fax number ............................ 23
Transmitting
delayed (unattended) ..................... 32
to a group....................................... 46
Oki Systems Companies
Oki Systems (UK) Limited
550 Dundee Road
Slough Trading Estate
SLOUGH
SL1 4LE
Tel: +44 (0) 1753 819819
Fax: +44 (0) 1753 819899
Oki Systems (Ireland) Limited
The Square Industrial Complex
Tallaght
Dublin 24
Tel: +353 (0)1 459 8666
Fax: +353 (0)1 459 8840
80