1
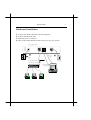
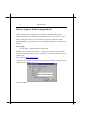
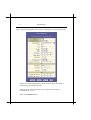
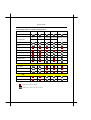
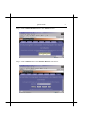
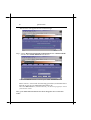
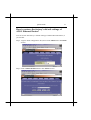
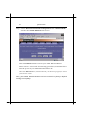
Heritage Series ADSL Bridge/ Router
Multi-Mode
ADSL Ethernet Router
Quick Installation Guide
July. 2003
Copyright
All rights reserved. No part of this document may be reproduced in any
form or by any means without written permission from the product
manufacturer.
Changes are periodically made to the information in this document. They
will be incorporated in subsequent editions. The product manufacturer
may make improvements and/or changes in the product described in this
document at any time.
Heritage Series ADSL Bridge/ Router
Quick Guide
1
Getting Started
This quick guide provides a quick and easy way to install and configure
your ADSL Ethernet Router to match which do you need.
The major functions of the ADSL Ethernet Router are performed via
Ethernet 10/100Base-T network interface. Your computer has to installed
an Ethernet NIC card and set up the TCP/IP protocol before start to using
your ADSL Ethernet Router.
The factory’s default settings of ADSL Ethernet
Router
LAN IP address: 192.168.7.1
VPI: 0
VCI: 32
Encapsulation type: LLC
Connection Type: RFC1483 Bridged
Internal DHCP server: Disabled
Route function: Disabled
NAT function: Disabled
Use DNS, which located in your ISP: Disabled
Web-Configuration
Login Username: DSL (upper case)
Password: DSL (upper case)
Note:
1
You have to change it, which assigned by your ISP, before you used.
2
Quick Guide
Collect the necessary information
You need to gather the connection information supplied by your ADSL
service provider.
VPI value: ______
VCI value: ______
Encapsulation type: □LLC/SNAP or □VC/MUX
For RFC1483 or RFC1577
Host: ______________________
Domain: ___________________
Gateway: __________________
IP address: _______________________
Subnet Mask: _____________________
DHCP Server IP : __________________
DNS Server IP: ____________________
For PPPoA (RFC2364) or PPPoE (RFC2516)
User Name: _______________________
Password: ________________________
Authentication method: □PAP or □CHAP
Host or IP address: _________________
Heritage Series ADSL Bridge/ Router
Quick Guide
3
Hardware Installation
1. Connect the ADSL cable and optional telephone
2. Connect the Ethernet cable
3. Attach the power connector
4. Turn on the ADSL Ethernet router and power up your system.
ADSL Ethernet Router
3
RS-232C
cable
AC adapter
1
or
Wall outlet
Straight-through cable
to Hub for LAN PCs .
Wall jack
2
Straight-through
cable to a PC
Stand-alone computer
Computer
Computer
Computer
4
Quick Guide
How to login to Web-Configuration?
Web-Configuration is designed to work best with Microsoft Internet
Explorer® version 5.0, Netscape Navigator® version 4.7, or later versions.
Please configure the IP of your computer in the same subnet as ADSL
Ethernet Router. The DHCP server of ADSL Ethernet Router is enabled by
default.
For example:
IP: 192.168.7.3, Subnet Mask: 255.255.255.0.
Restart your computer if necessary. Open your web browser and fill in
the following URL address in the web address (or location) filed, and press
<Enter> key.
URL address: http://192.168.7.1 .
A login screen displayed. Fill in the default login username and password,
which both are ‘DSL’ (upper case).
Then click OK.
Heritage Series ADSL Bridge/ Router
Quick Guide
The’ System View’ page displays each time you login to the
Web-Configuration.
How to create your new connection, simply and
quickly?
Step 1. Login to Web-Configuration, then click Quick Configuration to
begin your configure procedures.
5
6
Quick Guide
Step 2. Quick Configuration sub-session will appears several setting items.
Please refer to the settings table, which on next page, and choice a
connection type which you want.
Then fill in the correct settings/values in the fields of Quick
Configuration session.
Then click Submit button.
Heritage Series ADSL Bridge/ Router
Quick Guide
7
The settings table for Quick Configuration
ATM Interface
0
0
PPPoA
PPPoE
0
0
0
Operation Mode
Encapsulation
VC-Mux or LLC
1483 Routed IP 1483 Bridged IP 1483 Routed IP (1577)
VC-Mux or LLC VC-Mux or LLC VC-Mux or LLC
VPI
VCI
Bridge
IGMP
IP address
Subnet Mask
Default Route
Gateway IP Address
PPP
Username
Password
Use DNS
DNS
Primary DNS Server
Secondary DNS Server
: Disabled / Don't Care / Don't Needed
: Enabled / Have to assign by your ISP, if necessary
LLC
8
Quick Guide
Step 3. Click Yes to continue.
Step 4. Click Admin tab in Web-Configuration screen.
Heritage Series ADSL Bridge/ Router
Quick Guide
Step 5. Click Commit & Reboot tab in the Admin session.
Step 6. Click Commit button in Commit & Reboot sub-session.
9
10
Quick Guide
The browser will appear the successful message.
Step 7. Choice Reboot From Default Configuration item in Reboot Mode
selection in Commit & Reboot sub-session.
Then click Reboot button to reboot your ADSL Ethernet Router.
Please wait 15 ~ 20 seconds for rebooting procedures, meanwhile don’t
turn the power of your ADSL Ethernet Router off.
Then click Refresh button, which located in your browser program, to renew
your browser screen.
Now, your ADSL Ethernet Router has been changed to new connection
mode!
Heritage Series ADSL Bridge/ Router
Quick Guide
11
How to restores the factory’s default settings of
ADSL Ethernet Router?
You can restore the factory’s default settings of ADSL Ethernet Router, if
you needed.
Step 1. Login to Web configuration first, then Click Admin tab in the Home
session.
Step 2. Click Commit & Reboot tab in the Admin session.
12
Quick Guide
Step 3. Choice Reboot From Default Configuration item in Reboot Mode
selection in Commit & Reboot sub-session.
Then click Reboot button to reboot your ADSL Ethernet Router.
Please wait 15 ~ 20 seconds for rebooting procedures, meanwhile don’t
turn the power of your ADSL Ethernet Router off.
Then click Refresh button, which located in your browser program, to renew
your browser screen.
Now, your ADSL Ethernet Router has been restored to factory’s default
settings successfully!