1
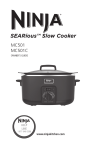
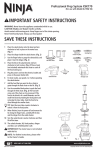
®
3-in-1 Cooking System
MC701
OWNER’S GUIDE
®
HELP
LINE
1 877 646-5288
www.ninjakitchen.com
IMPORTANT SAFETY INSTRUCTIONS
For Household Use Only
WHEN USING ELECTRICAL APPLIANCES,
BASIC SAFETY PRECAUTIONS SHOULD
ALWAYS BE FOLLOWED, INCLUDING THE
FOLLOWING:
READ ALL INSTRUCTIONS BEFORE
USING YOUR NINJA® 3-in-1 COOKING
SYSTEM.
POLARIZED PLUG
WARNING: To reduce the risk of electric
shock, this appliance has a polarized plug
(one blade is wider than the other). This plug
will fit into a polarized outlet only one way.
If the plug does not fit fully into the outlet,
reverse the plug. If it still does not fit, contact
a qualified electrician to install the proper
outlet. DO NOT modify the plug in any
way.
WARNING:
TO REDUCE THE RISK OF FIRE, ELECTRIC
SHOCK OR INJURY:
1 To protect against electrical shock, do not
submerge the unit or allow the power cord
to come into contact with water or any other
liquid. If the unit falls into liquid, unplug
the power cord from the electrical outlet
immediately. DO NOT reach into the liquid.
2 Please note that the appliance may become
hot during use. DO NOT touch hot surfaces;
always use the handles. Always use oven
mitts or pot holders when removing the pot.
3 DO NOT allow young children to operate the
appliance or use as a toy. Close supervision is
necessary when any appliance is used by or
near children.
4 Remove the power cord from the electrical
outlet when not in use, before assembling
or disassembling parts and before cleaning.
To unplug, grasp the plug and pull from the
electrical outlet. Never pull from the power
cord. Allow the appliance to cool before
adding or removing parts.
5 DO NOT abuse the power cord. Never carry
the appliance by the power cord or yank it
to disconnect from electrical outlet; instead
grasp the plug and pull to disconnect.
6 DO NOT operate any appliance with a
damaged cord or plug, or after the appliance
malfunctions, has been dropped or damaged
in any manner. Return the appliance to
EURO-PRO Operating LLC for examination,
repair or adjustment.
7 Please refer to the Cleaning & Maintenance
section for regular maintenance of the
appliance. Return the appliance to EURO-PRO
Operating LLC for any other servicing.
8 DO NOT let the power cord touch hot
surfaces such as the stove.
9 Always use the appliance on a dry, level
surface.
1
TOLL FREE: 1-877-646-5288
10 Extreme caution must be used when
moving an appliance containing hot
oil or other hot liquids. Always use
oven mitts or pot holders when moving
the cooking system. Allow hot oil to
cool prior to removal or cleaning the
appliance.
22 To disconnect, turn the Function Dial to
“Off”, then remove the plug from the wall
outlet.
11 To avoid possible steam damage, place the
cooking system away from walls and cabinets
during use.
24 THIS PRODUCT IS INTENDED FOR
HOUSEHOLD USE ONLY. Do not use this
appliance for anything other than its intended
use. Do not use outdoors.
12 When using this appliance, provide adequate
air space above and on all sides for air
circulation. On surfaces where heat may
cause a problem, use of an insulated heat pad
or trivet is recommended.
13 Use extreme caution when removing the lid
after cooking. Serious burns can result from
the steam inside. Always lift and tilt the lid
away from you when removing, using care to
ensure that water does not drip back into the
appliance.
14 DO NOT use outdoors or anywhere the cord
or unit housing might come into contact with
water while in use.
15 DO NOT use the appliance for anything other
than its intended use.
16 DO NOT obstruct the steam release vent
during use.
17 Always position the steam vent hole in the
back of the unit away from you.
18 DO NOT place or operate this appliance on or
near any hot surfaces (such as gas or electric
burner, stove or in a heated oven).
19 The use of attachments or accessories not
recommended by the manufacturer may
result in fire, electric shock or personal injury.
20 DO NOT use this appliance for deep frying.
21 CAUTION: TO REDUCE THE RISK OF
ELECTRIC SHOCK, COOK ONLY IN THE
POT PROVIDED OR IN CONTAINERS
RECOMMENDED BY EURO-PRO
PLACED ON THE COOKING RACK IN
THE PROVIDED POT. DO NOT USE THE
APPLIANCE WITHOUT THE REMOVABLE
COOKING POT INSIDE.
23 This appliance has a cut off switch which
will not allow the appliance to heat if the
cooking pot is not inserted into the housing
or removed while cooking.
25 To avoid the possibility of the cooking system
accidentally being pulled off the counter top
or tabletop, which could result in damage to
the cooking system or personal injury, do not
let the power cord hang over the edge of the
counter or table.
26 Leaving food out too long at room
temperature can cause bacteria to grow to
dangerous levels that can cause illnesses.
In the event of a loss of power, an error
message will display on the unit. It is
recommended to dispose of any food that has
been at room temperature for more than an
hour.
NOTE: This unit has a short power supply cord
to reduce the risk resulting in becoming
entangled in or tripping over a long cord. A
longer extension cord may be used if you are
careful in its use.
1.If using a longer extension cord, the electrical
rating of the extension cord should be rated
at least 15 amperes. Extension cords rated for
less amperage may overheat.
2.A longer extension cord must be arranged so
that it will not drape over the countertop or
tabletop where it can be pulled on by children
or tripped over accidentally.
SAVE THESE
INSTRUCTIONS
www.ninjakitchen.com
2
THIS BOOK COVERS MODEL NUMBERS:
MC701 15
TECHNICAL SPECIFICATIONS
3
Voltage:
120V., 60Hz.
Power:
1200 Watts
Euro-Pro and Ninja are trademarks of
Euro- Pro Operating LLC.
TOLL FREE: 1-877-646-5288
Contents
Thank you for
purchasing the
Ninja® 3-in-1
Cooking System.
Getting to Know Your Ninja® 3-in-1 Cooking System ................................................5
Getting to Know Your Ninja® 3-in-1 Cooking System Control Panel...........................7
Preparing to Use the Ninja® 3-in-1 Cooking System..................................................7
Using the Different Functions.......................................................................................8
Hints & Tips .................................................................................................................10
Troubleshooting Guide.................................................................................................11
Cleaning & Maintenance.............................................................................................11
Replacement Parts.......................................................................................................11
Warranty & Registration.................................................................................14
www.ninjakitchen.com
4
Getting To Know Your Ninja® 3-in-1 Cooking System
a
b
c
d
e
f
OVEN
a Roasting Lid with Handle
e Main Housing
b Multi Purpose Pan
f Control Panel
c Roasting Rack
g Power Cord (not shown)
d Cooking Pot
5
TOLL FREE: 1-877-646-5288
The Ninja® 3-in-1 Cooking System Steam Oven offers a revolutionary new way to cook your foods faster, healthier
and easier. The easy 1-2-3 electronic controls allow you the flexibility for true one pot cooking.
OVEN
FEATURES:
• Stovetop Settings: Low (simmer), Med (sauté), High (sear)
• Slow Cooker Settings: High, Low
• Buffet Settings
•Oven Function: 250°F - 425°F
•Digital Oven Controls with Timer
•Auto Warm for Slow Cook function only
• Auto Shut Off
www.ninjakitchen.com
6
Getting to Know the Ninja® 3-in-1 Cooking System Control Panel
OVEN
Function Dial
LED Display Screen
Turn the dial to select Stovetop, Slow Cook or Oven
mode.
The LED screen displays the timer settings for the Slow
Cook, Buffet and Oven modes. It also displays the oven
temperature settings for the Oven mode.
Stovetop - Use the Ninja® 3-in-1 Cooking System as
you would a stovetop. You can simmer, sauté, or sear.
Slow Cook - Use the Ninja® 3-in-1 Cooking System
as a slow cooker. Select the temperature - low or high
and let the cooking system do all the work. When it
has finished cooking, it will automatically switch to
Auto Warm.
Buffet - Use the Buffet mode after cooking is
completed to keep food warm from 30 minutes up to
12 hours.
Oven - Use the Ninja 3-in-1 Cooking System instead
of the regular oven. You can roast, bake or even cook
with steam.
®
Time/Oven Temp. Button
Use the Time/Oven Temp. button to toggle between the
Time and Temperature when using the Oven mode.
Adjustment Dial
Use the Adjustment dial to set the count down
timer in Slow Cook mode or to change the time and
temperature when using the Oven mode.
Auto Warm
The Ninja® 3-in-1 Cooking System will go into auto
warm when the set cooking time in Slow Cook mode is
over.
Preparing to Use the Ninja® 3-in-1 Cooking System
Before using the cooking system for the first time:
3Plug the unit into the wall outlet.
1Carefully remove all the parts from the box. Wash the
cooking pot, roasting rack, multi purpose pan and the
roasting lid with warm, soapy water. The cooking pot
may also be washed in the dishwasher. The roasting
lid, multi purpose pan and roasting rack are not
dishwasher safe. Do not place the main housing in
water or in the dishwasher. Wipe it clean with a damp
cloth.
4The cooking system will not turn “On” as long as the
Function Dial is in the “Off” position.
2When ready to use, place the cooking pot inside the
main housing. Never use the cooking system without
the cooking pot inserted into the housing.
7Follow recipe instructions on placement of the multi
purpose pan inside the cooking pot. DO NOT place it
directly into the main housing.
7
TOLL FREE: 1-877-646-5288
5When ready to start the appliance, turn the Function
Dial to the function that you want. The red Power light
will light up indicating that the appliance is on.
6Follow instructions on the following pages on how to
use the different functions.
Using the Different Functions
OVEN
OVEN
OVEN
Slow Cook:
The 6 qt. capacity makes this an ideal slow cooker for the
entire family. The Low and High settings automatically switch
to Auto Warm after the cooking is complete to keep the food
warm. Use the Stovetop function on “High” to sear meats and
vegetables before slow cooking to enhance flavors and create
gourmet meals.
Stovetop:
1Place the cooking pot inside the housing.
2Place the food that you wish to cook inside the pot in an
even layer for best results.
3Set the Function Dial to the desired Stovetop mode to get the
appliance heated. The LED Display will show “On” and the
Power light will turn on.
4When you have finished using the unit, turn the Function
Dial to “Off” and then unplug the unit and allow it to cool
completely before handling.
NOTE: The appliance will not function if the cooking pot is not
inside the main housing.
TIP:When you want to sear meats, set the Stovetop to “High”.
To sauté vegetables, set the Stovetop to “Med” or “High”.
Auto Shut Off for Stovetop:
Do not exceed the top of the cooking pot when filling with
food. This could result in the food boiling over.
1Place the ingredients into the cooking pot and place the lid
on top.
2Plug the unit into the electrical outlet.
3Turn the Function Dial to either Low or High under Slow Cook
depending on the recipe instructions. The LED Display will
show “8:00” or “4:00” depending on the slow cook setting
that is selected and the Power Light will turn on.
4The Display Screen will show “8:00” hours for Low setting
and “4:00” hours for High setting. Turn the Adjustment Dial
to set the desired time. The time will increase or decrease
in 30 minute increments for up to 12 hours. The timer will
begin counting down after 3 seconds. Do not lift the lid
continuously while cooking.
5After the cooking process is done, the unit will switch to Auto
Warm for up to 12 hours.
As a safety feature we have designed the unit to turn off
automatically based on the setting that has been selected.
6When you have finished using the unit, turn the Function
Dial to “Off” and then unplug the unit and allow it to cool
completely before handling
Stovetop High: Auto shut-off after 1 hour of use.
Auto Shut Off for Slow Cook:
Stovetop Med: Auto shut off after 2 hours of use.
Stovetop Low: Auto shut off after 4 hours of use.
As a safety feature we have designed the unit to turn off
automatically based on the setting that has been selected.
When in the Slow Cook “Low or High” modes, at the end of the
cooking cycle the unit will automatically switch to Auto Warm for
12 hours. At the end of the 12 hours the unit will automatically
shut off.
.
www.ninjakitchen.com
8
Using the Different Functions - cont.
OVEN
Oven:
Steam Infused Cooking:
Variable temperatures from 250° to 425° make this an ideal
oven for roasting meats and vegetables and for baking. The
programmable timer can be set in 5 minute intervals for up to
6 hours.
Steam Infused Cooking cooks foods fast and healthy all by the
introduction of steam during the cooking process. The Steam
Roasting technique can be applied to a variety of meats you
would traditionally roast in your oven. Some cuts of meat benefit
from searing BEFORE roasting while other cuts benefit from
searing AFTER roasting, refer to the recipes in the included
Inspiration Guide.
Using the Oven mode for Roasting:
1Place the food on the Roasting rack and lower into the
cooking pot. Cover with the lid.
2Plug the unit into the electrical outlet.
3Turn the Function Dial to Oven. The Power light will illuminate.
4The Display Screen will show “350”. Turn the Adjustment
Dial to set the temperature. The temperature will adjust in
25° increments up to 425°. Press the Time/Oven Temp button
once and then turn the Adjustment Dial to set the cooking
time. The time is pre-set at “1:00” hour and will increase in 5
minute increments up to a total of 6 hours.
5The timer will begin counting down after 3 seconds. The
time and temperature can be adjusted during the cooking
cycle. Press the Time/Oven Temp button and then turn the
Adjustment Dial to change the time or the temperature.
6Once cooking is complete the timer will blink for 2 minutes.
At the end of the 2 minutes, the power will shut off.
IMPORTANT: Use caution when handling hot foods.
7 W
hen you have finished using the unit, turn the Function
Dial to “Off”, unplug the unit and allow it to cool completely
before handling.
9
TOLL FREE: 1-877-646-5288
1No preheating is required when searing before roasting.
2Most meats can be seared for less than 10 minutes. You do
not want to cook the meat, simply brown the meat to add
color.
3Add water to the bottom of the cooking pot. In general, 1 cup
of water equals 10 minutes of steam time.
4If additional water is required during the cooking process,
cautiously lift the lid away from you and add room
temperature water. Water should NOT exceed the roasting
rack or touch the food as that will result in poaching.
Use caution when placing hot meats on roasting rack.
CAUTION: DO NOT add any liquids to the base of the main
housing of the appliance.
OVEN
Buffet:
Hints & Tips:
Use the Ninja® 3-in-1 Cooking System Buffet mode to keep
food warm from 30 minutes up to 12 hours. This can be used
for food already cooked in the Slow Cooker or for food already
prepared that you want kept warm.
1Cooking times may vary based on the selected
temperature, the current temperature of the cooking
pot and the temperature of the ingredients.
1Place the cooked food inside the cooking pot and cover with
the lid.
2Plug the unit into the electrical outlet.
3Turn the Function Dial to Buffet.
4Time is pre-set to “6:00” hours. Turn the Adjustment Dial to
set the desired time that you want the food kept warm.
5When you have finished using the unit, turn the Function
Dial to “Off” and unplug the unit. Allow it to cool completely
before handling.
2Always use nonstick utensils in the cooking pot. Metal
utensils may damage the non-stick coating.
3For even browning, make sure that the food is in an
even layer on the bottom of the cooking pot or roasting
rack.
4Cooking time and temperature can be adjusted at
any time during the cooking cycle in Slow Cook and
Oven. Press the Time/Oven Temp button and turn the
Adjustment Dial to adjust.
Auto Shut Off for Buffet:
5Cooked foods may not brown or crisp on top as much
as in a conventional oven. Instead foods will brown on
the bottom and crisp on the bottom and sides.
As a safety feature, we have designed the unit to turn off
automatically based on the setting that has been selected. At the
end of the pre-set time, the unit will automatically shut off.
6If you do not manually set a temperature and time, the
unit will automatically start at the preset temperature
and time.
7Multiple modes may be required to cook recipes. To
change modes during cooking cycles, simply turn the
Function Dial to select the new desired mode. Once the
new mode is selected, begin the programming process.
8If the cooking pot is removed during the cooking cycle
and then placed back into the unit, the cooking process
will continue as though it was not interrupted.
www.ninjakitchen.com
10
Troubleshooting Guide
PROBLEM
POSSIBLE SOLUTION
This occurs when power to the unit is interrupted or if the unit is plugged in and the
function dial is not in the “OFF” position.
“Err” Appears on the
Display Screen
Turn the function dial to “OFF” and then turn dial to desired cooking mode.
If the unit displays “Err” for a prolonged period of time due to power failure, dispose
of the food for health and safety reasons.
Call Customer Service at 1-877-646-5288.
“E01” Appears on the
Cooking pot is not inside the cooking system housing. Insert the cooking pot.
Display Screen
“E02” or “E03”
Appears On The LED
Display
Ninja® 3-in-1 Cooking System is not functioning.
Please contact customer service at 1-877-646-5288.
Cleaning & Maintenance
The Ninja® 3-in-1 Cooking System should be cleaned thoroughly after every use.
1Unplug the unit from the wall outlet.
2Never immerse the main housing in water or any other liquid.
3To clean the main housing and the control panel, wipe it clean with a damp cloth.
4The roasting lid, multi purpose pan and roasting rack are not dishwasher safe. Wash the cooking pot, multi purpose
pan, roasting rack and roasting lid with warm, soapy water. The cooking pot can be washed in the dishwasher.
5Dry all parts after each use.
6If food residue is stuck onto the cooking pot, fill the pot with water and allow to soak before cleaning. DO NOT use
scouring pads on the multi purpose pan or the cooking pot. If scouring is necessary, use a non-abrasive cleanser or
liquid detergent with a nylon pad or brush.
7Please return the unit to EURO-PRO Operating LLC for any other servicing.
NOTE: After usage, the exterior of the cooking pot may produce a black film when cleaned. This is due to oxidation and
occurs from normal usage.
Replacement Parts
T o order additional parts and accessories, please visit our website:
www.ninjakitchen.com or feel free to contact customer service: 1-877-646-5288.
11
TOLL FREE: 1-877-646-5288
Notes
www.ninjakitchen.com
12
Notes
13
TOLL FREE: 1-877-646-5288
ONE (1) YEAR LIMITED WARRANTY
EURO-PRO Operating LLC warrants this product to be free from material defects and
workmanship for a period of one (1) year from the date of purchase when utilized for normal
household use, subject to the following conditions, exclusions and exceptions.
The liability of EURO-PRO Operating LLC is limited solely to the cost of the repair or
replacement of the unit at our option. This Limited Warranty does not cover normal wear of
parts and does not apply to any unit that has been tampered with or used for commercial
purposes. This Limited Warranty does not cover damage caused by misuse, abuse, negligent
handling or damage due to faulty packaging or mishandling in transit. This Limited Warranty
does not cover damage or defects caused by or resulting from damages from shipping or
repairs, service or alteration to the product or any of its parts, which have been performed by
a repair person not authorized by EURO-PRO Operating LLC.
If your appliance fails to operate properly while in use under normal household conditions
within the Limited Warranty period, you may return the complete appliance and accessories
with proof of purchase and date, freight prepaid. For Customer Service support,
call 1-877-646-5288 or visit our website www.ninjakitchen.com.
If the appliance is found by EURO-PRO Operating LLC to be defective, in EURO-PRO
Operating LLC’s sole discretion, we will repair or replace it free of charge. Proof of purchase
date and a check made payable to EURO-PRO Operating LLC in the amount of $19.95 to
cover the cost of return shipping and handling must be included.*
This Limited Warranty is extended to the original purchaser of the unit and excludes all other
legal, implied and/or conventional warranties. The responsibility of EURO-PRO Operating
LLC if any, is limited to the specific obligations expressly assumed by it under the terms
of this Limited Warranty. In no event is EURO-PRO Operating LLC liable for incidental or
consequential damages to anyone of any nature whatsoever. Some states do not permit the
exclusion or limitation of incidental or consequential damages, so the above may not apply to
you.
This Limited Warranty gives you specific legal rights, and you may also have other rights
which vary from state to state or from province to province.
*IMPORTANT: Carefully pack item to avoid damage in shipping. Be sure to include proof of
purchase date and to attach tag to item before packing with your name, complete address
and phone number with a note giving purchase information, model number and what you
believe is the problem with the item. We recommend you insure the package (as damage
in shipping is not covered by your Limited Warranty). Mark the outside of your package
“ATTENTION CUSTOMER SERVICE”. We are constantly striving to improve our products,
therefore the specifications contained herein are subject to change without notice.
Product Registration
Please visit www.ninjakitchen.com or call 1-877-646-5288 to register your new Ninja®
product within ten (10) days of purchase. You will be asked to provide the store name,
date of purchase and model number along with your name and address.
The registration will enable us to contact you in the unlikely event of a product safety
notification. By registering you acknowledge to have read and understood the instructions
for use, and warnings set forth in the accompanying instructions.
www.ninjakitchen.com
14
Euro-Pro Operating LLC
US:
Newton, MA 02459
CAN: Ville St-Laurent, QC H4S 1A7
1-877-646-5288
www.ninjakitchen.com
Copyright © 2013 Euro-Pro Operating LLC
Euro-Pro and Ninja are trademarks of Euro- Pro Operating LLC.
Printed in China
Illustrations may differ from actual product.
MC701.E.130730.2