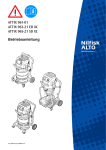
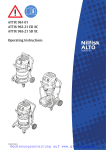
1
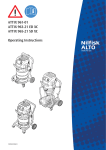
ATTIX 360-2M ATTIX 550-2M ATTIX 560-2MXC ATTIX 751-2M ATTIX 761-2MXC Operating Instructions................................1-15 Betriebsanleitung......................................16-30 français Notice d’utilisation ....................................31-45 nederlands Gebruiksaanwijzing ..................................46-60 italiano Istruzioni sull’uso......................................61-75 norsk Driftsinstruks.............................................76-90 svensk Bruksanvisning .......................................91-105 dansk Driftsvejledning .....................................106-120 suomi Käyttöohje..............................................121-135 slovensći Navodilo za uporabo ..............................136-150 hrvatski Uputstvo za rad .......................................151-165 slovenský Prevádzkový návod .................................166-180 český Provozní návod........................................181-195 polski Instrukcja obsługi....................................196-210 magyar Kezelési utasítás .....................................211-225 ðóññêèé Ðóêîâîäñòâî ïî ýêñïëóàòàöèè ...............226-240 español Instrucciones de manejo ......................241-255 português Instruções de operação........................256-270 ελληνικά Οδηγίες λειτουργίας..............................271-285 türkçe Ýþletme kýlavuzu.....................................286-300 english deutsch 302001674 - 2005-01-14 ATTIX 360-2M ATTIX 550-2M / ATTIX 560-2MXC ATTIX 751-2M / ATTIX 761-2MXC ATTIX 3 10 3 1 11 14 9 3 auto 4 5 6 8 ATTIX 5 10 1 2 7 14 9 3 auto auto 4 5 6 1 ATTIX 7 8 2 10 7 14 9 3 auto auto 4 5 12 8 5 6 12 13 ATTIX 360-2M ATTIX 550-2M / ATTIX 560-2MXC ATTIX 751-2M / ATTIX 761-2MXC english Contents 1 Important safety instructions ............................................................................................2 2 Description 2.1 2.2 Purpose................................................................................4 Operating elements ..............................................................5 3 Before start-up 3.1 Assembling the cleaner ........................................................5 4 Operation 4.1 4.1.1 4.1.2 4.1.3 4.2 4.2.1 4.2.2 4.2.3 4.3 4.4 4.5 4.6 Connections .........................................................................5 Connecting the suction hose ................................................5 Electrical connection ............................................................5 Connecting electrical appliances..........................................6 Switching on the vacuum cleaner.........................................6 Switch position “I” .................................................................6 Switch position „auto“ ...........................................................6 Suction power control...........................................................6 Check volume flow monitor ..................................................6 Acoustic warning ..................................................................7 Cleaning the filter element (ATTIX 360-2M) .........................7 Cleaning the filter element (ATTIX 560-2MXC/761-2MXC) ..7 5 Applications and techniques 5.1 Techniques ...........................................................................8 5.1.1 Picking up dry substances ...................................................8 5.1.2 Picking up liquids..................................................................9 6 After finishing work 6.1 Switching the vacuum cleaner off and storage.....................9 7 Maintenance 7.1 7.2 7.2.1 7.2.2 7.2.3 7.2.4 7.2.5 7.2.6 Maintenance plan ...............................................................10 Maintenance work ..............................................................10 Replacing the waste bag ....................................................10 Replacing the filter bag.......................................................11 Emptying dirt tank (ATTIX 3+5) ..........................................11 Emptying the dirt tank (ATTIX 7).....................................11 Replacing filter element (ATTIX 360-2M/550-2M/751-2M) .12 Replacing filter element (ATTIX 560-2MXC/761-2MXC) ....12 8 Troubleshooting 9 Further information 1) Option depending on model ..........................................................................................13 9.1 9.2 9.3 9.4 9.5 9.6 Recycling the vacuum cleaner ...........................................14 Guarantee ..........................................................................14 Tests and approvals ...........................................................14 Technical data ....................................................................15 Accessories ........................................................................15 EC declaration of conformity ..............................................15 1 ATTIX 360-2M ATTIX 550-2M / ATTIX 560-2MXC ATTIX 751-2M / ATTIX 761-2MXC english 1 Important safety instructions Symbols used to mark instructions Before using the vacuum cleaner, always read the operating instructions and keep them read- This symbol is used to mark safety instructions that must be observed to prevent damage to the vacuum cleaner and its performance. This symbol is used to mark safety instructions that must be observed to prevent damage to persons. This symbol indicates tips and instructions to simplify work and to ensure safe operation. Only allow the vacuum cleaner to be used by persons who have been trained in its use and who have been explicitly authorized to use it. The use of the vacuum cleaner is subject to valid national regulations. Besides the operating instructions and the binding accident prevention regulations valid in the country of use, observe recognized regulations for safety and proper use. ily available. For your own safety Despite its simple handling the vacuum cleaner is not suitable for children. Do not use any unsafe work techniques. Transport Before transporting the dirt tank, close all the locks. Do use a crane hook to lift the cleaner. Do not tilt the cleaner if there is liquid in the dirt tank. Purpose and intended use 2 The vacuum cleaners described in this operating manual are suitable for – commercial use, e.g. in hotels, schools, hospitals, factories, shops, offices and rental businesses. – for separation of dust with an exposure limit of greater than 0,1 mg/m³, (dust class M). solvents, acids, alkalis, etc.) – flammable, explosive dust (e.g. magnesium or aluminium dust, etc.) When dust removers are used, the rate at which air is exchanged in the room must be adequate if the exhaust air from the vacuum cleaner is blown into the room (please observe regulations valid in your country). The following materials should not be picked up by the vacuum cleaner: – hot materials (burning cigarettes, hot ash, etc.) – flammable, explosive, aggressive liquids (e.g. petrol, Before starting work, the operating staff must be informed on – use of the vacuum cleaner – risks associated with the material to be picked up – safe disposal of the picked up material. 1) Option depending on model ATTIX 360-2M ATTIX 550-2M / ATTIX 560-2MXC ATTIX 751-2M / ATTIX 761-2MXC Precautions and safety regulations when using the vacuum cleaner Before start-up Electrical components Inspect power cord regularly to detect signs of damage, e.g. cracks or ageing. Check the rated voltage of the vacuum cleaner before connecting it to the mains supply system. Ensure that the voltage shown on the rating plate corresponds to the voltage of the local mains power supply. If the power cord is damaged, it must be replaced by NilfiskAlto-Service or an electrician to avoid danger before use of the vacuum cleaner is continued. Use only the type of power cord specified in the operating manual. Do not damage the power cord (e.g. by moving over it or pulling or crushing it). Disconnect the power cord by pulling the plug only (do not pull or tug the power cord). Inspect the vacuum cleaners to ensure that they are in proper condition. Plugs and couplings in power cords must at least have splash protection. Never use the vacuum cleaner if the filter element is damaged. Picking up liquids If foam develops or liquid emerges, stop work immediately and empty the dirt tank. Regularly clean the built in float (ATTIX 360-2M/550-2M/7512M) and level indicator hose (ATTIX 560-2MXC/761-2MXC) to limit the water level and check that they are not damaged. english If you are using an extension cord, use only those specified by the manufacturer or higher quality ones (see section 9.4 „Technical data“). It is recommended that the vacuum cleaner should be connected via a residual current circuit breaker. This stops the supply of electricity if the leakage current to earth exceeds 30 mA for 30 ms or it has an earth tester circuit. When using an extension lead, check the minimum cross-sections of the cable: Cable length Cross section m <16 A <25 A up to 20 m ø1.5mm² ø2.5mm² 20 to 50 m ø2.5mm² ø4.0mm² Arrange the electrical parts (sockets, plugs and couplings) and lay down the extension lead so that the protection class is maintained. Never spray water on to the upper section of the vacuum cleaner. Danger for persons, risk or short-circuiting. Observe the latest edition of the IEC regulations. See section 5 for information on handling liquids and (hazardous) dust. 1) Option depending on model 3 ATTIX 360-2M ATTIX 550-2M / ATTIX 560-2MXC ATTIX 751-2M / ATTIX 761-2MXC english Tool socket Use the socket on the vacuum cleaner for the purpose defined in the operating instructions only. Before plugging an appliance into the appliance socket: 1. Switch off the vacuum cleaner Maintenance, cleaning repair and Only carry out maintenance work described in the operating instructions. Always pull out the mains plug before cleaning and maintenance of the vacuum cleaner. During maintenance and cleaning, handle the vacuum cleaner in such a manner that there is no danger for maintenance staff or other persons. In the maintenance area – use filtered compulsory ventilation – wear protective clothing – clean the maintenance are so that no harmful substances get into the surroundings. Before removing the vacuum cleaner from the area contaminated with harmful substances: Accessories and spare parts Use only the brushes supplied with the vacuum cleaner or specified in the operating manual. The use of other brushes can 2. Switch off the appliance to be connected. CAUTION! Follow the operating instructions and safety instructions for appliances connected to the power tool socket. – clean the outside of the vacuum cleaner, wipe it clean or pack the vacuum cleaner in well sealed packaging – and avoid spreading deposited harmful dust. During maintenance and repair work all contaminated parts that could not be cleaned satisfactorily must be: – packed in well sealed bags – disposed of in a manner that complies with valid regulations for such waste removal. A dust test must be performed at least once every year by NilfiskAlto service or a trained person. This test includes, for example, whether there is damage to the filter, the vacuum cleaner is sealed to the air and the control equipment works properly. adversely affect safety. Use only original Nilfisk-Alto accessories and spare parts (see section 9.5). The use of other parts can adversely affect safety. 2 Description 2.1 4 Purpose This cleaner is suitable to pick up dry, nonflammable dust, liquids, sawdust and hazardous dusts with maximum room concentration values ≥ 0.1 mg/m3 (dust class M). Depending on how hazardous the dust is, the cleaner must be fitted with appropriate filters. See table in section 5.1.1. 1) Option depending on model ATTIX 360-2M ATTIX 550-2M / ATTIX 560-2MXC ATTIX 751-2M / ATTIX 761-2MXC 2.2 Operating elements See fold-out page at the front of these operating instructions. 1 2 3 4 Handle Suction pipe support Accessory holder Applicance switch with suction power control 5 Retaining clamp 6 7 8 9 10 11 Dirt tank Grip to empty tank1) Inlet fitting Appliance socket1) Cable hook Operating knob for filter cleaning1) 12 Tank locks1) 13 Castor with brake 14 Hose diameter setting english 3 Before start-up 3.1 Assembling the cleaner On delivery some of the accessories are lying in the tank and must be removed before the vacuum cleaner is used for the first time. Remove the upper section of the vacuum cleaner: The mains plug should not be inserted into a socket. 1. Open the retaining clamps and lift off the upper section of the cleaner. 2. Take the accessories out of the dirt tank and the packaging. 3. To pick up dust with maximum room concentration values: Insert the filter bag into the dirt tank according to the instructions (instructions included). To pick up harmless dust: Insert the disposal bag (instructions included) into the tank. IMPORTANT: Press the filter bag connection firmly on to the inlet fitting. 4. Fit the upper section of the vacuum cleaner and close the retaining clamps. NOTE: Ensure that the retaining clamps fit properly. 4 Operation 4.1 Connections 4.1.1 Connecting the suction hose 1. Connect the suction hose. The suction hose diameter must suit the position of the switch in order to pick up dry, nonflammable dust with maximum room concentration values. 4.1.2 Electrical connection 1) Option depending on model The operating voltage shown on the rating plate must correspond to the voltage of the mains power supply. 1. Ensure that the vacuum cleaner is switched off. 2. Insert the power cord into a properly installed and fused socket with an earthing contact. 5 ATTIX 360-2M ATTIX 550-2M / ATTIX 560-2MXC ATTIX 751-2M / ATTIX 761-2MXC english 4.1.3 Connecting electrical appliances To comply with regulations, only approved dust producing tools should be connected. The maximum power consumption of the connected power tool is stated in section 9.4 “Technical data”. Switching on the vacuum cleaner 4.2.1 Switch position “I” 2 0 Hose ø ø27 ø32 ø36 ø50 0 27 0 50 The hose diameter and the setting for the suction hose diameter must be the same. 36 3 4.2 0 Before switching the switch to position „auto“, ensure that the tool connected to the appliance socket is switched off. 0 3 2 0 36 27 0 50 The hose diameter and the setting for the suction hose diameter must be the same. 0 Hose diameter setting ø27 ø32 ø36 ø50 6 Check volume flow monitor 2 0 0 50 27 0 0 36 3 4.2.3 Suction power control 4.3 1. Turn the switch to position „I“. The vacuum cleaner motor starts. Hose diameter setting ø27 ø32 ø36 ø50 4.2.2 Switch position „auto“ Hose ø ø27 ø32 ø36 ø50 1. Ensure that the electrical appliance is switched off. 2. Connect the electrical appliance to the appliance socket on the control panel. Before picking up dust with maximum room concentration values: 1. Turn the switch to position „auto“. The vacuum cleaner motor starts when the connected appliance is switched on. 2. When the power tool is switched off the vacuum cleaner continues to run for a short moment so that any dust in the suction hose is conveyed to the safety filter bag. The motor speed and the suction power can be varied with the suction power control. This allows precise adaptation of the suction power for different cleaning tasks. 1. Check that all the filters are present and properly fitted. 2. When the motor is running, hold the suction hose shut. An acoustic warning sounds after approx. 1 second. 1) Option depending on model ATTIX 360-2M ATTIX 550-2M / ATTIX 560-2MXC ATTIX 751-2M / ATTIX 761-2MXC english 4.4 Acoustic warning 4.5 Cleaning the filter element (ATTIX 360-2M) If the acoustic signal sounds again after repeated cleaning, replace the filter element (see section 7.2.5). For safety reasons, an acoustic warning sounds if the air speed in the suction hose drops to below 20 m/s. See section “Troubleshooting”. 1 0 auto I Push & Clean Filter Cleaning System Only after picking up harmless dust using the waste bag. If suction performance drops: 1. Set the suction power to maximum. 2. Close the nozzles or suction hose opening with the palm of your hand. 4.6 Cleaning the filter element (ATTIX 5602MXC/761-2MXC) To ensure that suction performance is always at its best, the filter element is automatically cleaned during operation. We recommend complete cleaning if the filter element becomes extremely dirty. 1) Option depending on model x3 2 3. Press the button to start filter cleaning three times. The resulting stream of air removes attached dust from the slats of the filter elements. 10 sec . After picking up harmless dust using the waste bag. 1. Switch off the vacuum cleaner 2. Close the nozzles or suction hose opening with the palm of your hand. 3. Turn the switch to position „I“ and let the cleaner operate for approx. 10 seconds with the suction hose opening closed. 7 ATTIX 360-2M ATTIX 550-2M / ATTIX 560-2MXC ATTIX 751-2M / ATTIX 761-2MXC english 5 Applications and techniques 5.1 Techniques 5.1.1 Picking up dry substances Do not pick up flammable substances. If used correctly, additional accessories, suction nozzles and suction hoses can enhance the cleaning action and reduce the cleaning effort. Effective cleaning is achieved if you follow just a few guidelines in combination with your own practical experience in special fields. Here are some basic tips. The suction hose diameter must suit the position of the switch in order to pick up dry, nonflammable dust with maximum room concentration values. There must always be a safety filter bag in the tank before dry substances with maximum room concentration values are picked up. See section 9.5 “Accessories” for ordering number. posal of the picked up material is then simple and hygienic. To pick up harmless dust we recommend the use of a waste bag. See section 9.5 “Accessories” for ordering number. Dis- After picking up liquids, the filter element is wet. A damp filter element clogs more quickly when dry substances are picked up. For this reason the filter element should be washed and dried or replaced by a dry element before dry substances are picked up. Always use a filter bag/waste bag that is suitable for the type of dust (see table): ATTIX 360-2M Type of dust Filter bag/waste bag Handling/waste disposal • Nonhazardous dust Waste bag No. 302000804 1. Thorough cleaning - see section 4.5. 2. Waste disposal - see section 7.2.1 Waste disposal - see section 7.2.2 • Dust with MAC values ≥ 0.1 mg/m³ wood dust Filter bag No. 302000449 Waste disposal - see section 7.2.2 • ATTIX 550-2M Type of dust Filter bag/waste bag Handling/waste disposal • Nonhazardous dust Waste bag ATTIX 550-2M: No. 302000728 ATTIX 751-2M: No. 302001480 Waste disposal - see section 7.2.1 • Dust with MAC values ≥ 0.1 mg/m³ wood dust Filter bag ATTIX 550-2M: No. 302000527 ATTIX 751-2M: No. 302001484 Waste disposal - see section 7.2.2 • ATTIX 560-2MXC Type of dust • Nonhazardous dust • Dust with MAC values ≥ 0.1 mg/m³ Observe any additional national regulations • • • 8 Dust with MAC values ≥ 0.1 mg/m³ wood dust Filter bag/waste bag Handling/waste disposal Waste bag ATTIX 560-2MXC: No. 302000728 ATTIX 761-2MXC: No. 302001480 Waste disposal: 1. Remove hose with tool sleeve from tool 2. Thorough cleaning - see section 4.6 3. Waste disposal - see section 7.2.1 Filter bag ATTIX 560-2MXC: No. 302001138 ATTIX 761-2MXC: No. 302001484 Waste disposal - see section 7.2.2 1) Option depending on model ATTIX 360-2M ATTIX 550-2M / ATTIX 560-2MXC ATTIX 751-2M / ATTIX 761-2MXC english 5.1.2 Picking up liquids Do not pick up flammable substances. Before liquids are picked up, always remove the filter bag/ waste bag and check that the float (ATTIX 360-2M/550-2M/ 751-2M) or the water level limit (ATTIX 560-2MXC/761-2MXC) works properly. (See section 7.2.5 and 7.2.6 “Replacing the filter element“.) If foam appears, stop work immediately and empty the tank. To reduce the amount of foam, use foam killer Nilfisk-Alto Foam Stop (see section 9.5 „Accessories“ for order number). The use of a separate filter element or filter screen is recommended. 6 After finishing work 6.1 Switching the vacuum cleaner off and storage ATTIX 360-2M ATTIX 751-2M ATTIX 761-2MXC 1) Option depending on model 1. After picking up hazardous dust, vacuum clean the outside of the cleaner. 2. Switch off the vacuum cleaner and pull the mains plug out of the socket. 3. Wind up the power cord and hang it on the handle. 4. Empty the tank and clean the vacuum cleaner. 5. After picking up liquids: Store the upper section of the cleaner separately so that the filter element can dry. 6. Store the vacuum cleaner in a dry room where it is protected from unauthorized use. ATTIX 550-2M ATTIX 560-2MXC 9 ATTIX 360-2M ATTIX 550-2M / ATTIX 560-2MXC ATTIX 751-2M / ATTIX 761-2MXC english 7 Maintenance 7.1 Maintenance plan After finishing work 7.2.1 Replacing the waste bag 7.2.2 Replacing the filter bag 7.2.3 Emptying dirt tank (ATTIX 3+5) 7.2.4 Emptying the dirt tank (ATTIX 7) 7.2.5 Replacing filter element (ATTIX 360-2M/550-2M/751-2M) 7.2.6 Replacing filter element (ATTIX 560-2MXC/761-2MXC) 7.2 Maintenance work 7.2.1 Replacing the waste bag 1 2 When using ATTIX 360-2M/5602MXC/761-2MXC clean them thoroughly before replacing the waste bag - see sections 4.5 bzw.4.6. 3 During the following work, ensure that dust is not unnecessarily spread around. Wear a P2 breathing mask. 2 1 10 1 3 As required ATTIX 360-2M/550-2M/ 560-2MXC: 1. Open the retaining clamps and remove the upper section of the cleaner from the dirt tank. 2. Carefully remove the waste bag connection (1) from the inlet fitting. 3. Close the waste bag connection with the slide (2). 4. Close the waste bag using the cable binder (3). 5. Dispose of the dirt in accordance with legal regulations. 6. Insert a new filter bag into the cleaned tank as described in the instructions enclosed. IMPORTANT: Press the filter bag connection firmly on to the inlet fitting. ATTIX 751-2M/761-2MXC: 1. Remove the upper section of cleaner from the dirt tank. 2. Open the retaining clamps (1) and remove the intermediate ring (2) from the tank. 3. Carefully remove the waste bag connection from the inlet fitting. 4. Close the waste bag using the cable binder (3). 5. Dispose of the dirt in accordance with legal regulations. 6. Insert a new filter bag into the cleaned tank as described in the instructions enclosed. IMPORTANT: Press the filter bag connection firmly on to the inlet fitting. 1) Option depending on model ATTIX 360-2M ATTIX 550-2M / ATTIX 560-2MXC ATTIX 751-2M / ATTIX 761-2MXC 7.2.2 Replacing the filter bag 1. Open the retaining clamps and remove the upper section of the cleaner from the dirt tank. 2. Carefully remove the filter bag connection from the inlet fitting. 3. Close the filter bag connection with the slide. 4. Dispose of the filter bag in accordance with legal regulations. 5. Place a new filter bag into the cleaned tank as described in the instructions (printed on the filter bag) IMPORTANT: Press the filter bag connection on the inlet fitting as far as possible. During the following work, ensure that dust is not unnecessarily spread around. Wear a P2 breathing mask. 7.2.3 Emptying dirt tank (ATTIX 3+5) english 1. Remove the upper section of cleaner from the dirt tank. 2. Using one hand, take hold of the dirt tank underneath and tip out the dirt. 3. Dispose of the dirt in accordance with legal regulations. 4. Clean the rim of the tank before fitting the upper section of cleaner. Before reinserting the suction hose: 5. Clean the inlet fitting and hose collar. Only after picking up harmless dust without a filter bag. 7.2.4 Emptying the dirt tank (ATTIX 7) 2 1 1 3 Only after picking up harmless dust without a filter bag. To empty the dirt tank after picking up liquids: remove the intermediate ring as a proper seal is only ensured during suction. After emptying the tank: clean the rim of the tank and the seals in the intermediate ring and the upper section of cleaner before refitting them. If the seal or groove is dirty or damaged, the suction performance will 1) Option depending on model 4 4 5 5 1. Remove the upper section of cleaner from the dirt tank. 2. Open the retaining clamps (1) and remove the intermediate ring (2) from the tank. 3. Pull the lever in the handle (3) upwards and tilt the tank. 4. Tip out the collected dirt. 5. Dispose of the dirt in accordance with legal regulations. or: 3. Open the tank locks (4). 4. Use the handles (5) to lift the tank out of the frame. 5. Tip out the collected dirt. 6. Place the empty tank in the frame and close the locks (4). 7. Dispose of the dirt in accordance with legal regulations. be reduced. Before reinserting the suction hose: clean the inlet fitting and hose collar. 11 ATTIX 360-2M ATTIX 550-2M / ATTIX 560-2MXC ATTIX 751-2M / ATTIX 761-2MXC english 7.2.5 Replacing filter element (ATTIX 360-2M/550-2M/ 751-2M) During the following work, ensure that dust is not unnecessarily spread around. Wear a P2 breathing mask. 1 3 2 4 1 6 2 1. Open the retaining clamps and remove the upper section of the cleaner from the dirt tank. Lay the upper section of the cleaner down with the filter element facing upwards. 2. Turn the filter holder anticlockwise (1) and remove it (2). 3. Place the protective filter bag1) over the filter element (3). 4. Carefully remove the filter element and close the protective filter bag with a knot. 5. Clean the filter seal (4). Check it for damage and replace it if necessary. 6. Check the antistatic clamp (5) for damage and have it replaced by Nilfisk-Alto Service if necessary. 7. Fit a new filter element. 8. Check that the float (6) works properly. When the filter holder is turned, the float inside must move about easily. 9. Fit the filter holder and turn it clockwise to secure it firmly. 10.Dispose of the used filter element in accordance with legal regulations. 5 Never use the vacuum cleaner without a filter. 7.2.6 Replacing filter element (ATTIX 560-2MXC/ 761-2MXC) During the following work, ensure that dust is not unnecessarily spread around. Wear a P2 breathing mask. 1 3 2 4 1) 12 Accessory. Order No. shown in section 9.5. 1. Open the retaining clamps and remove the upper section of the cleaner from the dirt tank. Lay the upper section of the cleaner down with the filter element facing upwards. Do not place the upper section of the cleaner on the guard (1) and do not damage the filter element. 2. Open the bar handle (2) and remove it. 3. Remove the filter holder (3). 4. Place the protective filter bag 1) over the filter element. 5. Carefully remove the filter element and close the protective filter bag with a knot. 6. Clean the filter seal (4). Check it for damage and replace it if necessary. 1) Option depending on model ATTIX 360-2M ATTIX 550-2M / ATTIX 560-2MXC ATTIX 751-2M / ATTIX 761-2MXC 7. Check the antistatic clamp (5) for damage and have it replaced by Nilfisk-Alto Service if necessary. 8. Check that the control flap (6) for filter cleaning works properly. The control flap should move back and forwards easily. 9. Clean the level hose (7). 10.Fit a new filter element. 11.Fit the filter holder. Ensure that it is in the correct position. 12.Fit bar and close bar handle. 13.Dispose of the used filter element in accordance with legal regulations. 6 5 7 english Never use the vacuum cleaner without a filter. 8 Troubleshooting Fault ‡ Motor does not start Cause Remedy > Fuse of the mains socket has blown. • Connect mains fuse. > Overload protection switch has tripped. • Switch off the vacuum cleaner and allow it to cool for approx. 5 minutes. If the cleaner cannot be started again, contact the Nilfisk-Alto service department. > Self-acting carbon brush is worn. • Have carbon brushes changed by Nilfisk-Alto Service. ‡ Motor does not run in auto- > Power tool is defective or not matic mode connected properly. • Check that the power tool works or that the plug is inserted correctly. > The power rating of the electrical tool is too low. • Note that minimum power rating is P>40W > Suction power selected with suction power control is too low. • Set suction power in accordance with section 4.2.3. „Setting suction power“. > Hose diameter and switch position do not correspond. • Set correct switch position for hose diameter. ‡ The acoustic warning sounds. (Reduced suction power) 1) Option depending on model > Clogged suction hose/nozzle. • Clean suction hose/nozzle > Filter bag is full. See section 7.2.2 „Replacing filter bag“. • 1) Accessory. Order No. shown in section 9.5. 13 ATTIX 360-2M ATTIX 550-2M / ATTIX 560-2MXC ATTIX 751-2M / ATTIX 761-2MXC english Fault ‡ The acoustic warning sounds. (Reduced suction power) Cause Remedy > Filter element is clogged. • See section 4.5/4.6 „Cleaning filter element“ and 7.2.5/7.2.6 „Replacing filter element“. > ATTIX 560-2MXC/761-2MXC only: Defective cleaning mechanism • Contact Nilfisk-Alto Service ‡ No suction power during wet cleaning > Tank is full. (Float does not close the suction opening). • Switch off the cleaner. Empty the tank. ‡ The vacuum cleaner switches off during wet cleaning > Tank is full. • Switch off the cleaner. Empty the tank. ‡ Voltage fluctuations > Impedance of power supply is • too high. Connect the cleaner to another socket closer to the fuse box. Voltage fluctuations over 7% should not occur if the impedance at the transfer point is ≤ 0.15 Ω . 9 Further information 9.1 Recycling the vacuum cleaner Make the old cleaner unusable immediately. 1. Unplug the cleaner and cut the power cord. Do not discard of electrical appliances with household waste. and electronic appliances, used electrical goods must be collected separately and recycled ecologically. Contact your local authorities or your nearest dealer for further information. As specified in European Directive 2002/96/EC on old electrical 9.2 Guarantee Our general conditions of business are applicable with regard to the guarantee. Subject to change as a result of technical advances. 9.3 Tests and approvals The vacuum cleaners have been tested as specified in IEC/EN 60335-2-69 including appendix AA. All the requirements were fulfilled for equipment in dust class M. The vacuum cleaners must be inspected regularly in accordance with national accident prevention regulations (in Germany as specified in BGV A2 and DIN VDE 0701 Part 1 and Part 3, at regular intervals and after repairs or modifications). 14 A dust test must be performed at least once every year by the manufacturer or a trained person. This test covers, for example, whether there is damage to the filter, the vacuum cleaner is sealed to the air and the control equipment works properly. 1) Option depending on model ATTIX 360-2M ATTIX 550-2M / ATTIX 560-2MXC ATTIX 751-2M / ATTIX 761-2MXC 9.4 english Technical data ATTIX 360-2M Voltage Mains frequency Fuse Power consumption Connected load for appliance socket Total connected load Volume flow (air) Negative pressure Measurement area sound pressure level at a distance of 1 m, EN 60704-1 Operating noise Power cord: Length EU 230 230 230 16 16 16 GB 110V 110 50/60 16 1200 761-2MXC 13 16 13 W 2400 1800 2400 1800 560 2400 2400 2400 W l/min Pa 3600 3000 3600 3000 1760 3600 23000 3600 3600 3600 7,5 7,5 7,5 7,5 H07BQF3G1,5 H05RRF3G1,5 62 dB(A) m 60 59 7,5 57 10.0 7,5 10.0 H05RR- F3G1,5 H05RR- F3G1,5 I IP X4 EN 55014-1 l mm mm mm kg 27 380 390 570 10 45 476 506 655 14 Minimum air flow volume l/min 27 32 36 50 690 970 1220 2360 9.6 Accessories Filter bag (5 pcs.) Waste bag (5 pcs.) Filter element Cloth insert filter Order No. 360-2M 550-2M 560-2MXC 302000449 302000527 302001138 302000804 302000728 302000461 302000726 302000606 302000525 Filter bag (5 pcs.) Waste bag (5 pcs.) Filter element Cloth insert filter 751-2M 761-2MXC 302001484 302001480 302000461 302000726 302000525 360-2M / 550-2M / 560-2MXC 751-2M / 761-2MXC Protective filter bag (10 pcs.) Filter screen Nilfisk-Alto-FoamStop (6 x 1 l) 1) EU 16 EU Suction hose diameter mm Description 751-2M EU 230 dB(A) Protection class Type of protection (splash water protected) Radio interference level Tank volume Width Depth Height Weight 560-2MXC V Hz A W Power cord: Length 9.5 230 550-2M GB 230/240V 230/240 GB 230/240V 230/240 EU Option depending on model 70 580 605 970 25 27 Associated negative pressure between suction hose/tool Pa 16300 15700 14200 7800 EC declaration of conformity EC declaration of conformity Alto Deutschland GmbH Guido-Oberdorfer-Straße 2-8 D-89287 Bellenberg Product: Vacuum cleaner for wet and dry operation Model: ATTIX 360-2M/550-2M/560-2MXC ATTIX 751-2M/761-2MXC Description: 110/230-240 V~, 50/60 Hz, 1200 W, Dust class M The design of the appliance corresponds to the following pertinent regulations: EC Machine Directive 98/37/EC EC Low Voltage Directive 73/23/EC EC EMC Directive 89/336/EC Applied harmonized standards: EN 12100-1, EN 12100-2 EN 60335-1 EN 60335-2-69 EN 55014-1, EN 55014-2, EN 61000-3-2 Applied national standards and technical specifications: DIN EN 60335-1 DIN EN 60335-2-69 30082 15475 8469 Dipl.-Ing. Wolfgang Nieuwkamp Tests and approvals Bellenberg, 22.10.2004 15 ).4%2.%4 HTTPWWWNILlSKALTOCOM (%!$15!24%2 .ILFISK!DVANCE'ROUP 3OGNEVEJ "RNDBY $ENMARK 4EL !5342!,)! .ILFISK!,4/ %GERTON3T 3ILVERWATER.37 4EL &AX !5342)! !,4/½STERREICH'MB( -ETZGERSTR "ERGHEIM3ALZBURG 4EL &AX %MAILINFO NILlSKALTOAT 7EBWWWNILlSKALTOAT "2!:), 7APDO"RASIL,TDA 2UADE!GOSTO 0INHAIS0ARANÈ 4EL &AX %MAILEXPORT WAPDOBRASILCOMBR #!.!$! !,4/#ANADA #ONSTELLATION2OAD 2EXDALE /NTARIO-7+ 4EL &AX #2/!4)! 7AP!,4/3TROJEVIZA:IÝ9ENJEDOO 3IGETA :AGREB 4EL &AX %MAILADMINWAP WAPSISTEMIHR #:%#(2%05",)# !,4/#ESKÈ2EPUBLIKASRO :ATECKâCH 0RAHA 4EL &AX %MAILWAP?P MBOXVOLCZ 7EBWWWWAPALTOCZ $%.-!2+ !,4/$ANMARK!3 )NDUSTRIVEJ (ADSUND 4EL &AX %MAILSALG NILlSKALTODK SERVICE NILlSKALTODK 7EBWWWNILlSKALTODK &2!.#% !,4/&RANCE3! !ÏROPARC 2UE)CARE &%NTZHEIM 4EL &AX %MAILINFO NILlSKALTOFR 7EBWWWNILlSKALTOCOM '%2-!.9 .ILlSK!DVANCE!' 'ESCHÊFTSBEREICH.ILlSK!,4/ 'UIDO/BERDORFER3TRAE "ELLENBERG 4EL &AX %MAILINFO NILlSKALTODE 7EBWWWNILlSKALTODE '2%!4"2)4!). .ILFISK!,4/ $IVISIONOF.ILFISK!DVANCE,TD "OWERBANK7AY 'ILWILLY)NDUSTRIAL%STATE 5+0ENRITH#UMBRIA#!"1 4EL &AX %MAILSALES NILFISKALTOCOUK 7EBWWWNILFISKALTOCOUK -!,!93)! !,4/$%.3).-ALAYSIA3DN"HD 3$*ALAN+)04AMAN 0ERINDUSTRIAN+)032)$AMANSARA +UALA,UMPUR -ALAYSIA 4EL &AX %MAILDENSIN TMNETMY .%4(%2,!.$3 !,4/.EDERLAND"6 (OUTSCHELF .,+"(ARDINXVELD'IESSENDAM 4EL &AX %MAILINFO NILlSKALTONL 7EBWWWNILlSKALTONL .%7:%!,!.$ !,4//VERSEAS)NC !4ARNDALE'ROVE !LBANY!UCKLAND 4EL &AX %MAILALTONZ IHUGCONZ ./27!9 !,4/.ORGE!3 "JRNERUDVEIEN /SLO 4EL &AX %MAILINFO NILlSKALTONO 3).'!0/2% !,4/$%.3).3INGAPORE0TE,TD .O,INK2OAD 3INGAPORE 4EL &AX %MAILDENSIN SINGNETCOMSG 7EBWWWDENSINCOM 3,/6%.)! 7AP!,4/:ISTILNISISTEMIDOO ,ETALIÝKA 3,/,JUBLJANA 4EL &AX %MAILWAPPRODAJA SIOLNET 3,/7!+)! 7AP!,4/:ISTIACESYSTÏMYSRO 2EMESELNÓCKA "RATISLAVA2A:A 4EL &AX %MAILWAP GTINETSK 7EBWWWWAPALTOSK 30!). .ILFISK!,4/ $IVISIONOF.ILFISK!,4/3! 4ORRE$@!RA 0ASEODEL2ENGLE0L %-ATARØ"ARCELONA 4EL &AX %MAILINFO NILlSKALTOES 7EBWWWNILlSKALTOCOM 37%$%. !,4/3VERIGE!" !MINOGATAN"/8 -ÚLNDAL 4EL &AX %MAILINFO NILlSKALTOSE 7EBWWWNILlSKALTOSE 53! !,4/#LEANING3YSTEMS)NC 0ARTOFTHE.ILFISK!DVANCE'ROUP .ATIONS&ORD2OAD 0INEVILLE 4EL &AX %MAILINFO ALTOCSICOM 7EBWWWNILlSKALTOCOM