1
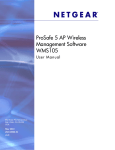
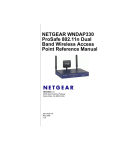
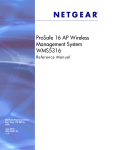
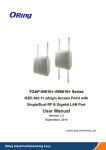
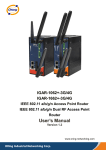
Bridging and repeating with WNDAP330
This document describes the different options to setup Bridging and Repeating (WDS – Wireless
Distribution System) with two or more WNDAP330.
The Bridging and Repeating concepts described are valid for all the other Netgear products
supporting WDS with new firmware (from May 2009).
Bridging and Repeating can be used in either 2.4 GHz or 5 GHz bands alternatively.
Table of Contents
Introduction – WDS .......................................................................................................... 2
Setup minimum requirements: SSID, Radio Channel, Encryption ........................... 2
Wireless Repeating .......................................................................................................... 3
Wireless Point-to-Point Bridge ....................................................................................... 6
Wireless Point to Multi-Point Bridge .............................................................................. 8
Final Notes ...................................................................................................................... 11
Introduction – WDS
A Wireless Distribution System (WDS) is a system that allows access points to be wirelessly
connected. WDS offers two modes of operation:
1-
Wireless Repeating in which access points communicate only with each other and don’t
allow wireless clients or stations to access them.
2-
Wireless Bridging in which the Access Points communicate with each other and with
other the wireless clients.
There are two different modes for Wireless Bridging: Point to Point and Point to Multipoint. The
distinction is simple, if the Access Point must associate directly with only one other Access Point
and Clients it uses Point to Point Bridging, if it must associate directly with more than one Access
Point and Clients it uses Point to Multi-point Bridging.
Setup minimum requirements: SSID, Radio Channel, Encryption
In order to setup any of the three available Bridging and Repeating options, the following
parameters must be set and be identical on all the APs:
- Wireless mode
- Wireless channel (except Auto)
- The Encryption level (this should be the same on each Point to Point link)
To perform the configuration access the GUI (Default URL http://192.168.0.235) and go to
Configuration – Wireless – Basic – Wireless settings.
•
Change the Wireless mode to 11bg
and tick the Turn Radio On box (a
message will advise the user to
confirm if it is required to switch from
11ng to 11bg – click OK)
•
Change the SSID to WDS
•
Change channel to 6 (or any other
channel depending on what is suitable
in the local area – Just make sure it is
the same for all Access Points)
NOTE: Although the SSID is not relevant for
the setup of Bridging and Repeating it is
possible to configure this to be the same on all
the APs.
Wireless Repeating
This option is designed to allow extending the Wireless reach of an existing AP adding a
maximum of two hops, in order to connect two locations in the same network. This option does
not allow Wireless client association and the SSID will not be visible.
Since Repeater configurations communicate in half-duplex mode, the bandwidth decreases as
you add Repeaters to the network. Also, you can extend the range of the wireless network with
NETGEAR wireless antenna accessories.
Access Point 1
❶
• In each Access Point, in the
Wireless Bridge Page, enable
Wireless Bridinging and
Repeating and select the option for
Repeater.
Access Point 2
• Note that two profiles will be enabled
➋
used in Access Point 2. As it is in the
middle, it must connect to both
Access Point 1 and Access Point 3.
Access Point 3
• Make note of the following:
➌
❶
MAC Adress of Access Point 2 = ➋
MAC Adress of Access Point 3 = ➌
MAC Adress of Access Point 1 =
Access Point 1
➋
• Enter the MAC Adress of Access Point
2 ( ) in the Remote MAC Address
field.
➋
• Enter your Network Authentication
details. Make sure the settings you use
here are set identically in all Access
Points.
• In the first profile, enter the MAC
Adress of Access Point 1 ( ) in the
Remote MAC Address field.
➊
Access Point 2
➊
➌
• Enter your Network Authentication
details. Make sure the settings you use
here are set identically in all Access
Points.
• Enter the MAC Adress of Access Point
3 ( ) in the Remote MAC Address
field.
➌
• Enter your Network Authentication
details. Make sure the settings you use
here are set identically in all Access
Points.
Access Point 3
➋
• Enter the MAC Adress of Access Point
2 ( ) in the Remote MAC Address
field.
➋
• Enter your Network Authentication
details. Make sure the settings you use
here are set identically in all Access
Points.
Wireless Point-to-Point Bridge
This option is designed to bridge wirelessly two locations in the same network.
By default when enabling this option Wireless client association will be possible, but this can be
disabled.
Wireless Point-to-Point Configuration
Access Point 1
• In each Access Point, in the Wireless
❶
Bridge Page, enable Wireless
Bridinging and Repeating and select
the option for Wireless Point-toPoint Bridge
Access Point 2
• Make note of the following:
➋
❶
MAC Adress of Access Point 2: ➋
MAC Adress of Access Point 1:
Click on the Edit button at the bottom of the screen to change the details of the profile you have
enabled:
Access Point 1
➋
• Enter the MAC Adress of Access
Point 2 ( ) in the Remote MAC
Address field.
➋
• Enter your Network Authentication
details. Make sure the settings you
use here are set identically in both
Access Points.
Access Point 2
❶
• Enter the MAC Adress of Access
❶
Point 1 ( ) in the Remote MAC
Address field.
• Enter your Network Authentication
details. Make sure the settings you
use here are set identically in both
Access Points.
Wireless Point to Multi-Point Bridge
This option is designed to allow connection of one central AP (Master) to other Bridge-Mode
stations. Each of the stations will communicate sending traffic directly to the Master.
By default this option support the association with Wireless Clients which cannot be disabled.
Wireless Point to Multi-Point Configuration
• On Access Point 1, in the Wireless
Access Point 1
❶
Bridge Page, enable Wireless
Bridinging and Repeating and select
the option for Wireless Point to
Multi-Point Bridge.
• Enable as many profiles as you have
Access Points; each profile will
associate your central Access Point to
one of the remote Access Points.
• Make note of the MAC Adress of
Access Point 1:
❶
Access Point 2
• On Access Point 2, in the Wireless
➋
Bridge Page, enable Wireless
Bridinging and Repeating and select
the option for Wireless Point to
Multi-Point Bridge.
• Enable one profile to associate this
remote Access Point to the central
location.
• Make note of the MAC Adress of
Access Point 2:
➋
Repeat the steps for Access Point 2 on each of the other Access Points, making sure you take
note of all the MAC Addresses.
Once you have gathered all the MAC addresses, and Wireless Briding and Repeating has been
enabled on all the Access Points, go back to Access Point 1 and select the first profile you
enabled. Click on the Edit button at the bottom of the screen to change the details of the profile:
Access Point 1
• Enter the MAC Adress of Access
Point 2 ( ) in the Remote MAC
Address field.
➋
➋
• Enter your Network Authentication
details. Make sure the settings you
use here are set identically in both
Access Points.
Repeat this procedure in each of the other profiles, assigning the MAC Addresses of Access
Point 3, 4 and 5 respectively to each of the profiles. Note that the Network Authentication should
be configured identically in each and all of the Access Points.
On Access Point 2, select the profile you enabled and click on the Edit button at the bottom of the
screen to change the details of the profile:
Access Point 2, 3, 4 and 5
❶
•
Enter the MAC Adress of Access Point 1
( ) in the Remote MAC Address field.
•
Enter your Network Authentication
details. Make sure the settings you use
here are set identically in both Access
Points.
❶
Repeat this same step in each of the other Access Points. They will all be configured in the exact
same way: Same Network Authentication settings and the MAC address of Access Point 1 in the
Remote MAC Address field.
Final Notes
- Bridging and Repeating will not reach 802.11n speeds even if one of the 11gn or 11an
speeds are selected
- Bridging and Repeating can be setup using 2.4GHz or 5GHz alternatively
- When switching from 2.4 GHz to 5 GHz please note that :
The Wireless channel will reset to Auto
Bridging and Repeating will be disabled
All the Security profile will be reset to default