1
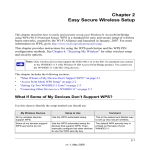
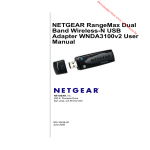
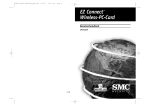
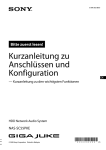
)NSTALLATION'UIDE
N600 Wireless Dual Band USB Adapter WNDA3100
Contents
English
1
Deutsch
7
Français
13
NETGEAR, Inc.
350 East Plumeria Drive
San Jose, CA 95135
version 1.0
English
)NSTALLATION'UIDE
N600 Wireless Dual Band USB Adapter WNDA3100
This guide explains Express installation with the NETGEAR Smart Wizard. For help
with custom installation, see the User Manual on the Resource CD.
Estimated completion time: 10 minutes.
Package Contents
Loop and hook
fasteners
Resource CD
USB Wireless Adapter
Plastic cradle
USB cable
1
English
Install the Software
1. Insert the Resource CD in your computer’s CD drive. If the CD main page does
not display, browse the files on the CD and double-click Autorun.exe.
2. Click Install the Software. The Software Update Check screen displays.
3. If you are connected to the Internet, click Check for Updates. If not, then
click Install from CD.
4. Accept the license agreement.
5. On the Setup Type screen, for Express (recommended) setup, click Next.
Insert Your Adapter
You are prompted to insert your adapter.
1. Insert the adapter into a USB port on
your computer, or connect it with the
USB cable (see “USB Cable and
Cradle” on the other side of this
guide).
Note: For best results, put the
wireless adapter at least 4 feet (1
meter) away from your router.
2. Click Next. The WNDA3100v2
software detects the adapter.
3. Follow the onscreen prompts for the NETGEAR wizard.
2
English
Connect to a Network
You are prompted to connect to a wireless network with one of these screens:
WPS network
No WPS
•
WPS network: This network supports Push 'N' Connect (also called WPS).
You can follow the steps to push the WPS button and connect without entering a
password.
•
No WPS: Select your wireless network from the list and click Next. To connect
to a secure network, you must enter its passphrase or network key.
The adapter connects to the network, which can take a minute or two. The Smart
Wizard Settings screen displays. Your settings are saved in a profile, which you can
name.
Profile name
The
icon appears in the system tray and on the desktop. You can use it to open
the Smart Wizard to make changes or connect to a different wireless network.
3
English
Status Bar
The status bar at the bottom of the Smart Wizard screen shows details about your
wireless connection.
1
3
4
5
6
7
2
Understanding the Status Bar
1. Wireless network
Identifies which wireless network you have joined.
2. Join a Network
Join a different wireless network or rejoin your current network, if you
were disconnected.
3. Connection
status
• Connected to Internet.
• Connected to Router. The adapter is connected to a router, but the
router is not connected to the Internet.
• 169.254.x.x or ___.___.___.___. You are connected to a router, but
the router has a problem. See the User Manual on the Resource CD.
4. Security
• A closed lock indicates a network with wireless security.
• An open lock indicates an open network without wireless security.
5. Channel
The wireless channel used by the network.
6. Data rate
Wireless data rate measured in megabits per second. To optimize this,
connect to a network with a high-speed router or access point and a
high-speed Internet connection.
7. Signal strength
More dots indicates a stronger signal. Usually, your connection works
best when the signal is strongest.
4
English
USB Cable and Cradle
You can use the USB cable and plastic cradle to place the adapter in a location that
will extend its range and obtain better wireless reception.
1. Three fasteners come in the
package. Locate the one with a
prickly side, peel off the plastic film,
and stick it on the back of the plastic
cradle.
2. Insert the adapter in
the plastic cradle.
3. Connect the USB
cable.
4. Place one of the other fasteners on the side or back of your monitor near the top
for better reception.
5. Then join the fasteners.
5
English
Technical Support
Thank you for selecting NETGEAR products.
After installing your device, locate the serial number on the label of your product
and use it to register your product at http://www.NETGEAR.com/register.
Registration is required before you can use the telephone support service.
Registration at the NETGEAR website is strongly recommended.
Go to http://support.netgear.com for product updates and Web support.
For complete DoC please visit the NETGEAR EU Declarations of Conformity website
at: http://kb.netgear.com/app/answers/detail/a_id/11621/
6
Deutsch
N600 Wireless Dual Band USB-Adapter WNDA3100
In dieser Anleitung wird Ihnen die Expressinstallation mithilfe des NETGEAR-SetupAssistenten erläutert. Hilfe zur benutzerdefinierten Installation finden Sie im
Benutzerhandbuch auf der Ressourcen-CD.
Geschätzte Einrichtungszeit: 10 Minuten.
Lieferumfang
KlettPads
Ressourcen-CD
Wireless USB-Adapter
Kunststoffhalterung
USB-Kabel
7
Deutsch
Installieren der Software
1. Legen Sie die Ressourcen-CD in das CD-ROM-Laufwerk des Computers ein.
Wenn der Hauptbildschirm der CD nicht angezeigt wird, durchsuchen Sie die
Dateien auf der CD, und doppelklicken Sie auf Autorun.exe.
2. Klicken Sie auf Install the Software (Software installieren). Der Bildschirm
Software Update Check (Nach Software-Updates suchen) wird angezeigt.
3. Wenn Sie Zugang zum Internet haben, klicken Sie auf Check for Updates
(Nach Updates suchen). Klicken Sie andernfalls auf Install from CD (Von CD
installieren).
4. Akzeptieren Sie die Lizenzvereinbarung.
5. Wählen Sie auf dem Bildschirm Setup Type (Konfigurationstyp) Express
(recommended) (Express [empfohlen]) als Konfigurationstyp aus und klicken
Sie auf Next (Weiter).
Einsetzen des Adapters
Sie werden aufgefordert, Ihren Adapter
anzuschließen.
1. Schließen Sie den Adapter an den
USB-Port an Ihrem Computer an,
oder verbinden Sie ihn mithilfe des
USB-Kabels (siehe “USB-Kabel und
Adapterhalterung” auf der Rückseite
dieser Anleitung).
Hinweis: Stellen Sie den WirelessAdapter mindestens einen Meter von
Ihrem Router entfernt auf.
2. Klicken Sie auf Next (Weiter). Der Adapter wird von der WNDA3100v2Software erkannt.
3. Folgen Sie den Bildschirmanweisungen für den NETGEAR-Assistenten.
8
Deutsch
Verbindung zu einem Netzwerk
herstellen
Durch eines dieser beiden Fenster werden Sie aufgefordert, eine WLAN-Verbindung
herzustellen:
WPS-Netzwerk
Kein WPS
•
WPS-Netzwerk: Dieses Netzwerk unterstützt Push 'N' Connect (auch WPS
genannt). Folgen Sie den Anweisungen, drücken Sie die WPS-Taste, und stellen
Sie eine Verbindung ohne die Eingabe eines Passwortes her.
•
Kein WPS: Wählen Sie Ihr Wireless-Netzwerk aus der Liste aus, und klicken
Sie auf Next (Weiter). Um eine Verbindung zu einem sicheren Netzwerk
herzustellen, müssen Sie eine Passphrase oder einen Netzwerkschlüssel eingeben.
Der Adapter stellt nun eine Verbindung zum Netzwerk her. Das kann eine Minute
oder länger dauern. Der Bildschirm Settings (Einstellungen) des NETGEAR-SetupAssistenten wird angezeigt. Ihre Einstellungen sind in einem Profil gespeichert, das
Sie beliebig benennen können.
Profilname
9
Deutsch
Das
-Symbol erscheint sowohl in der Taskleiste als auch auf dem Desktop. Über
dieses Symbol können Sie den Setup-Assistent öffnen, um Änderungen vorzunehmen
oder eine Verbindung mit einen anderen Wireless-Netzwerk herstellen.
Statusleiste
Die Statusleiste am unteren Rand des Bildschirms des Setup-Assistenten zeigt Daten
zu Ihrer WLAN-Verbindung an.
1
3
4
5
6
7
2
Die Anzeigen der Statusleiste
1. WLAN
Hier wird der Name des WLANs angezeigt, mit dem Sie verbunden sind.
2. Netzwerk suchen
Stellen Sie eine Verbindung zu einem anderen WLAN her, oder stellen
Sie erneut eine Verbindung mit Ihrem derzeitigen Netzwerk her, wenn
Ihre Verbindung abgebrochen wurde.
3. __ . __ . __ . __ or
169.254.x.y
• 169.254.x.x oder ___.___.___.___. Sie sind mit einem Router
verbunden, es liegt jedoch ein Routerfehler vor. Weitere
Informationen finden Sie im Benutzerhandbuch auf der Ressourcen-CD.
4. Sicherheit
• Ein geschlossenes Schloss zeigt an, dass das Wireless-Netzwerk
gesichert ist.
• Ein geöffnetes Schloss zeigt ein offenes Netzwerk mit deaktivierten
Wireless-Sicherheitseinstellungen an.
5. Kanal
Der vom Netzwerk verwendete Funkkanal.
6. Übertragungsrate
Übertragungsrate im WLAN in Megabit pro Sekunde (MBit/s). Zur Optimierung Ihres Durchsatzes sollten Sie Verbindungen nur über Highspeed-Router bzw. -Access Points herstellen und schnelle
Internetverbindungen nutzen.
7. Signalstärke
Je mehr Punkte angezeigt werden, desto stärker ist das Signal. In der
Regel funktioniert die Verbindung bei einem starken Signal am besten.
10
Deutsch
USB-Kabel und Adapterhalterung
Verwenden Sie das USB-Kabel und die Kunststoffhalterung, um den Adapter an
einem Ort zu befestigen, an dem die Reichweite Ihres Adapters vergrößert ist und
einen besserer Wireless-Empfang erzielt werden kann.
1. Im Lieferumfang sind drei Klett-Pads
enthalten. Kleben Sie das Pad mit
den Kletthäkchen, nachdem Sie den
Schutzfilm abgelöst haben, auf die
Rückseite der Kunststoffhalterung.
2. Setzen Sie den
Adapter in die
Kunststoffhalterung
ein.
3. Schließen Sie das
USB-Kabel an.
4. Bringen Sie eines der anderen Pads möglichst weit oben an der Seite bzw. der
Rückseite des Monitors an, um so einen besseren Empfang zu erzielen.
5. Drücken Sie anschließend die Klett-Pads zusammen
11
Deutsch
Technischer Support
Vielen Dank, dass Sie sich für Produkte von NETGEAR entschieden haben.
Nach der Installation des Geräts können Sie das Produkt unter
http://www.netgear.de/registrierung registrieren. Die Seriennummer finden Sie
auf dem Etikett Ihres Produkts. Die Registrierung ist Voraussetzung für die Nutzung
des telefonischen Supports. Die Registrierung auf der NETGEAR-Website wird
dringend empfohlen.
Produkt-Updates und Internetsupport finden Sie unter http://www.netgear.de/support.
Die vollständige DoC finden Sie auf der NETGEAR-Website mit der EUKonformitätserklärung unter: http://kb.netgear.com/app/answers/detail/a_id/11621/.
12
Français
Adaptateur USB sans fil bibande N600 modèle WNDA3100
Ce guide vous explique comment effectuer une installation expresse à l'aide de
l'assistant Smart Wizard NETGEAR. Pour en savoir plus sur l'installation
personnalisée, consultez le Manuel de l’utilisateur sur le CD.
Durée approximative de l'installation : 10 minutes.
Contenu de la boîte
Systèmes
d'attache
CD
Adaptateur USB sans fil
Support en plastique
Câble USB
13
Français
Installation du logiciel
1. Insérez le CD dans votre lecteur de CD-ROM. Si la page principale du CD ne
s'affiche pas, parcourez les fichiers du CD et double-cliquez sur Autorun.exe.
2. Cliquez sur Install the Software (Installer le logiciel). L'écran Software
Update Check (Détection de mises à jour) s'affiche.
3. Si vous êtes connecté à Internet, cliquez sur Check for Updates (Rechercher
des mises à jour). Dans le cas contraire, cliquez sur Install from CD (Installer
à partir du CD).
4. Acceptez les termes de la licence.
5. Sur l'écran Setup Type (Type d'installation), cliquez sur Next (Suivant) pour procéder
à une installation Express (recommended) (Expresse (recommandée)).
Insertion de l'adaptateur
Vous êtes invité à insérer votre adaptateur.
1. Insérez l'adaptateur dans un port
USB de votre ordinateur ou
connectez-le à l'aide du câble USB
(consultez la section “Câble USB et
support” au verso de ce guide).
Remarque : pour des résultats
optimaux, placez l'adaptateur sans
fil à un mètre du routeur minimum.
2. Cliquez sur Next (Suivant). Le
logiciel WNDA3100v2 détecte l'adaptateur.
3. Suivez les instructions de l'assistant NETGEAR qui s'affichent à l'écran.
14
Français
Connexion à un réseau
Vous êtes invité à vous connecter à un réseau sans fil via l'un des écrans suivants :
Réseau WPS
Pas de réseau WPS
Réseau WPS : ce réseau prend en charge la fonctionnalité Push 'N' Connect
(également appelée WPS). Suivez les étapes pour appuyer sur le bouton WPS
et vous connecter sans mot de passe.
• Pas de WPS : sélectionnez un réseau sans fil dans la liste, puis cliquez sur
Next (Suivant). Pour vous connecter à un réseau sécurisé, vous devez saisir la
phrase d'authentification ou la clé réseau de ce dernier.
L'adaptateur se connecte au réseau. L'opération peut prendre une minute ou deux.
L'écran des paramètres de l'assistant Smart Wizard s'affiche. Vos paramètres sont
sauvegardés dans un profil que vous pouvez renommer.
•
Nom de profil
L'icône
apparaît dans la zone de notification et sur le bureau. Utilisez cette
icône pour lancer l'assistant Smart Wizard pour apporter des modifications ou vous
connecter à un autre réseau sans fil.
15
Français
Barre d'état
La barre d'état située dans la partie inférieure de l'assistant Smart Wizard affiche
des informations relatives à votre connexion sans fil.
1
3
4
5
6
7
2
Description de la barre d'état
1. Réseau sans fil
Identifie le réseau sans fil auquel vous êtes connecté.
2. Join a Network
(Se connecter à
un réseau)
Permet de se connecter à un autre réseau sans fil ou de se reconnecter
au réseau sans fil actuel en cas de déconnexion.
3. Etat de la
connexion
• Connected to Internet (Connecté à Internet).
• Connected to Router (Connecté au routeur) : l'adaptateur est
connecté au routeur, mais le routeur n'est pas connecté à Internet.
• 169.254.x.x ou ___.___.___.___. Vous êtes connecté au routeur, mais
le routeur a un problème. Consultez le Manuel de l’utilisateur sur le CD.
4. Sécurité
• Si le cadenas est verrouillé, le réseau dispose d'une sécurité sans fil.
• Si le cadenas est ouvert, le réseau est ouvert et ne bénéficie d'aucune
protection.
5. Canal
Canal sans fil utilisé par le réseau.
6. Débit de transfert
de données
Débit de transfert de données du réseau sans fil mesuré en Mbit/s. Afin
d'optimiser le débit, connectez-vous à un réseau avec un point d'accès
ou un routeur haut débit, et utilisez une connexion Internet haut débit.
7. Puissance du
signal
Plus il y a de points, plus le signal est puissant. En règle générale, plus le
signal est puissant, plus la connexion est bonne.
16
Français
Câble USB et support
Vous pouvez utiliser le câble USB et le support de l'adaptateur en plastique pour
placer l'adaptateur à un endroit où il bénéficie d'une plus grande portée et
optimiser la réception sans fil.
1. Trois systèmes d'attache sont inclus
dans la boîte. Recherchez le
système d'attache disposant de
picots sur une face, retirez le film
plastique et collez le système
d'attache à l'arrière du support en
plastique.
2. Insérez l'adaptateur
dans le support en
plastique.
3. Branchez le câble
USB.
4. Placez l'un des autres systèmes d'attache sur le côté ou à l'arrière de votre
écran et vers le haut pour obtenir une meilleure réception.
5. Réunissez alors les systèmes d'attache.
17
Français
Assistance technique
Nous vous remercions d'avoir choisi les produits NETGEAR.
Après l'installation de votre appareil, notez le numéro de série inscrit sur l'étiquette
de votre produit. Il vous sera nécessaire pour enregistrer votre produit à l'adresse
http://www.netgear.fr/support/ Vous devez être enregistré pour utiliser le service
d'assistance téléphonique. Nous vous recommandons vivement de procéder à
l'enregistrement sur le site Web NETGEAR.
Visitez le site http://www.netgear.fr/support/ pour obtenir des mises à jour de
produits et consulter le support Web.
Pour consulter la déclaration de conformité complète, rendez-vous sur le site Web
NETGEAR des déclarations de conformité pour l'UE à l'adresse :
http://kb.netgear.com/app/answers/detail/a_id/11621/.
18
This symbol was placed in accordance with the European Union Directive 2002/96 on the Waste
Electrical and Electronic Equipment (the WEEE Directive). If disposed of within the European Union,
this product should be treated and recycled in accordance with the laws of your jurisdiction
implementing the WEEE Directive.
© 2010 by NETGEAR, Inc. All rights reserved. NETGEAR and the NETGEAR logo are registered trademarks of
NETGEAR, Inc. in the United States and/or other countries. Other brand and product names are trademarks or
registered trademarks of their respective holders. Information is subject to change without notice.
May 2010