1
IMPORTANT SAFETY INSTRUCTIONS
DTERM
HEADSET
CORDLESS II
QUICK START GUIDE
When using your telephone equipment these
basic safety precautions should be followed to
reduce the risk of fire, electric shock, and injury
to persons.
1. Read and understand all instructions.
2. Follow all warnings and instructions marked on the
product. The symbol
identifies and alerts the user
to the presence of important operating, safety, and
service instructions.
3. This product contains gold-plated nickel, phosphor
bronze and copper. If you experience a skin irritation,
discontinue use and contact Plantronics.
4. Unplug this product from the wall outlet before
cleaning. Do not use liquid cleaners or aerosol
cleaners. Use a damp cloth for cleaning.
5. Do not locate this product near water, for example,
near a bathtub, or sink, in a wet basement, or near
a swimming pool.
6. This product should never be placed near or over a
radiator or heat register. It should not be placed in
a built-in installation unless proper ventilation is
provided.
7. Do not allow anything to rest on the power cord.
Do not locate this product where persons walking
on it will damage the cord.
8. Do not overload outlets and extension cords as this
can result in risk of fire or electric shock.
9. Never disassemble or push objects of any kind into
the product as this may short out parts which could
result in a fire or electric shock. Never spill liquid of
any kind on the product.
10. Use caution when installing or modifying telephone
lines.
11. This product is intended to be powered by a Listed
Class 2 Direct Plug-In Power Unit, rated at an input
voltage of 120 VAC, 60Hz and an output voltage of
9 VDC at 800mA.
12. This product requires AC power in order to operate.
In order to have phone service during a power
outage, have another telephone available that is
powered only by the telephone line.
13. Keep all product cords and cables away from
operating machinery.
14. Avoid using telephone equipment during an
electrical storm.
15. Do not use this equipment to report a gas leak in
the vicinity of a gas leak.
16. Never allow children to play with the headset.
Printed in China 63913-02 (01-05)
BATTERY PRECAUTIONS
Patent U.S. 5,210 791 ; 6,735,453; D492,667 and D496,029; EM 69109
© 2003-2005 Plantronics, Inc. All rights reserved. Plantronics, the logo design,
and Plantronics and the logo design combined are trademarks or registered
trademarks of Plantronic, Inc. All other trademarks are the property of the
respective owners.
To reduce the risk of fire or injury to persons, read
and follow these instructions.
1. Always insert batteries correctly with regard to polarity
(+ and -) marked on the battery and the equipment.
Incorrectly installed batteries can overheat, causing
leakage and or explosion.
2. Immediately remove discharged batteries from the
equipment to avoid leakage.
3. Remove batteries if the equipment is not used for an
extended period of time.
4. Do not heat, crush, deform, or puncture batteries.
This can result in leakage and or explosion.
5. Do not disassemble the batteries. This can result in
contact with the harmful components.
6. Do not dispose of batteries in a fire. This can result
in an explosion.
7. Do not charge batteries. Attempting to charge a nonrechargeable battery can result in leakage, explosion
and or fire.
8. Keep batteries out of the reach of children.
SAVE THESE INSTRUCTIONS
FCC REGISTRATION INFORMATION
FCC Requirements—Part 15
This device complies with Part 15 of the FCC Rules.
Operation is subject to the following two conditions:
1.This device may not cause harmful interference, and
2.This device must accept any interference received,
including interference that may cause undesired operation.
This equipment has been tested and found to comply with
the limits for a Class B digital device, pursuant to Part 15 of
the FCC Rules. These limits are designed to provide reasonable
protection against harmful interference in a residential
installation. This equipment generates, uses, and can radiate
radio frequency energy and, if not installed and used in
accordance with the instructions, may cause harmful
interference to radio communications.
However, there is no guarantee that interference will not
occur in a particular installation. If this equipment does cause
harmful interference to radio or television reception which can
be determined by turning the radio or television off and on, the
user is encouraged to try to correct interference by one or more
of the following measures:
1. Reorient or relocate the receiving antenna.
2. Increase the separation between the equipment and receiver.
3. Connect the equipment into an outlet on another circuit.
4. Consult the dealer or an experienced radio/TV technician
for help.
RF Exposure Information
This device and it’s antenna must not be co-located or
operated in conjunction with any other antenna or transmitter.
To comply with FCC RF exposure requirements, only use
supplied antenna. Any unauthorized modification to the
antenna or device could void the user's authority to operate
this device.
FCC Requirements—Part 68
This equipment complies with Part 68 of the FCC Rules and
the requirements adopted by ACTA. On the bottom of the
base unit of this equipment is a label that contains, a product
identifier in the format US:AAAEQ##TXXXX. If requested,
this information must be provided to your telephone company.
If this equipment causes harm to the telephone network, the
telephone company will notify you in advance that temporary
discontinuance of service may be required. But if advance
notice isn't practical, the telephone company will notify the
customer as soon as possible. Also, you will be advised of
your right to file a complaint with the FCC if you believe it
is necessary.
The telephone company may make changes in its facilities,
equipment, operations or procedures that could affect the
proper functioning of your equipment. If they do, you will
be notified in advance in order for you to make necessary
modifications to maintain uninterrupted service.
If trouble is experienced with this unit, for repair or warranty
information, please contact customer service at the address
and phone listed in the Warranty section of this User’s Guide.
INDUSTRY C ANADA NOTICE
Notice: This equipment meets the applicable Industry Canada
Terminal Equipment Technical Specifications. This is confirmed
by the registration number. The abbreviation, IC, before the
registration number signifies that registration was performed
based on a Declaration of Conformity indicating that
Industry Canada technical specifications were met. It does
not imply that Industry Canada approved the equipment.
The Industry Canada registration number is located in the
bottom of the unit. Before installing this equipment, users
should ensure that it is permissible to be connected to the
facilities of the local telecommunications company. The
equipment must also be installed using an acceptable
method of connection. The customer should be aware
that compliance with the above conditions may not prevent
degradation of service in some situations. Repairs to certified
equipment should be coordinated by a representative
designated by the supplier. Any repairs or alterations made
by user to this equipment, or equipment malfunctions, may
give the telecommunications company cause to request the
user disconnect the equipment. Users should ensure for their
own protection that the electrical ground connections of the
power utility, telephone lines and internal metallic water pipe
system, if present, are connected together. This precaution
may be particularly important in rural areas.
Caution: Users should not attempt to make such connection
themselves, but should contact the appropriate electric
inspection authority, or electrician, as appropriate.
RSS 210
This digital apparatus does not exceed the Class B limit
for radio noise emissions from digital apparatus set out
in the Radio Interference Regulations of Industry Canada.
Operation is subject to the following two conditions:
1) this device may not cause interference, and 2) this device
must accept any interference, including interference that
may cause undesired operation of the device.
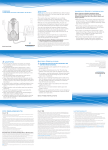
COMPONENTS OF THE DTERM HEADSET CORDLESS II
Talk
Indicator
(green)
Charging
Indicator
(amber)
Power
Indicator
(red)
Telephone
Headset
Jack
Telephone
Configuration
Dial
Charging
Cradle
Speaking
Volume
Buttons
Fixed
Cable
Lifter Jack
AC Power
Adapter
Jack
Handset
Lifter
On/Off
Switch
Speaking
Volume
Major Adjust
Listening
Volume
Major
Switch
Base Short
Cord
Base Front View
Speaker
DTR-1C-2
Switch
Base Underside View
Base Back View
Battery
Contacts
Short
Cord
Listening Volume/
Mute Control
Talk Button
Talk Indicator
Light
Retaining Ring
Microphone
Wearing Options
INSIDE
OUTSIDE
Headset
AC Power Adapter
SETTING UP THE DTERM HEADSET CORDLESS II
CONNECTING THE DTR-1C-2 SWITCH
The DTR-1C-2 is an electronic hook switch compatible
with most phones. NEC multiline terminals must be
fitted with an AP(R)-R analog adapter (not supplied)
before connecting the DTR-1C-2.
ADJUSTING
THE VOLUME
CHARGING
THE HEADSET
Slide the Headset into the
Charging Cradle on the Base.
The Amber Charging Indicator
will begin blinking. The Indicator
remains on once charging is
complete:
Charging
Indicator
(amber)
20 minutes = minimum charge
3 hours = complete charge
MAKING AND
RECEIVING CALLS
To make a call, lift the
telephone handset. Press
the Talk Button on the
Headset. Listen for the dial
tone and dial the number
on the telephone keypad.
The talk Indicator Light
blinks green.
To receive a call, lift the
handset. Press the Talk
Button on the Headset.
To disconnect a call, press
the Talk Button on the
Headset and return the
handset to the telephone.
Connect the AC Power Adapter to the AC Power
Adapter Jack on the underside of the Dterm Headset
Cordless II Base. Plug the AC Power Adapter into the
power source.
Connect the DTR-1C-2 Fixed Cable to the Lifter Jack
on the Base.
Connect the Base Short Cord to the DTR-1C-2 Switch.
Connect the DTR-1C-2 Short Cord to the telephone.
For NEC telephones, connect the Short Cord to the
AP(R)-R adapter and then connect the AP(R)-R
adapter to the telephone.
ASSEMBLING THE HEADSET
Snap the Speaker
end of the Headset
into the Retaining
Ring of the earloop
or the headband.
Rotate the Headset
in the Retaining Ring
until the Microphone
end is near your
mouth.
or
CONFIGURING THE HEADSET
TO YOUR TELEPHONE
If any of the following situations occur, the Headset
must be configured to be compatible with your
telephone.
•You do not hear a dial tone when making a call.
•You can not hear the recipient.
•The recipient does not hear you.
•You hear hissing or buzzing in your Headset.
Lift the handset from the telephone and press the
Talk Button on your Headset. Locate the Telephone
Configuration Dial on the side of the Base and rotate
the dial to another of the 4 positions until you hear a
dial tone. Align the number on the dial with the seam
line on the right side of the dial.
Adjust your listening
volume with the
Listening Volume/Mute
Control located on the
Speaker end of the
Headset. Rock the
Control up or down
for volume changes.
If the listening volume
is still too loud or too
soft, locate the Listening
Volume Major Switch on
the back of the Base and
move it to another one
of the 4 positions.
Adjust your speaking
volume with the
Speaking Volume
Buttons located on
the back of the Base.
If the speaking volume
is still too loud or too
soft, locate the Speaking
Volume Major Switch
on the underside of the
Base and move it to
another one of the
4 positions.
USING THE
MUTE FEATURE
On the Headset, push
in the Listening Volume/
Mute Control to mute
the Headset. Push
again to turn off the
mute feature.
You will hear a light
beep when the mute
is in use.
+
–