1
CHAPTER 1
Preface
1-2
Preface
Table of Content
Preface
Table of Content .............................................................................................................................1-2
Regulations Information................................................................................................................1-4
RF Exposure Warning ...............................................................................................................1-4
CE Conformity ...........................................................................................................................1-4
Safety Instructions .........................................................................................................................1-5
Safety Guideline for Using Battery ..............................................................................................1-8
WEEE Statement ............................................................................................................................1-8
Trademarks .....................................................................................................................................1-9
Revision History ............................................................................................................................1-9
Introductions
Manual Map ....................................................................................................................................2-2
Unpacking .......................................................................................................................................2-3
Specification ...................................................................................................................................2-4
Product Overview ..........................................................................................................................2-7
1-3
Preface
Getting Started
Charging Your Tablet PC ...............................................................................................................3-2
Connecting the AC Power .........................................................................................................3-2
Basic Operations ...........................................................................................................................3-4
Powering On Your Tablet PC .....................................................................................................3-4
Powering Off Your Tablet PC .....................................................................................................3-5
Unlocking Your Tablet PC ..........................................................................................................3-6
Entering the Camera/Camcorder Mode ....................................................................................3-7
Inserting a Micro-SD Card to Your Tablet PC ............................................................................3-8
Home Screen.............................................................................................................................3-9
How to Manage Apps ............................................................................................................. 3-12
Settings................................................................................................................................... 3-13
Camera ................................................................................................................................... 3-27
1-4
Preface
Regulations Information
RF Exposure Warning
This equipment must be installed and operated in accordance with provided instructions and must
not be co-locatedor operating in conjunction with any other antenna or transmitter. End-users and
installers must be providing with antenna installation instructions and transmitter operating
conditions for satisfying RF exposure compliance.
SAR Value:
Max. SAR Measurement (1g)
802.11b(2.4GHz): 0.110 W/kg
BT (1M): 0.021 W/kg
CE Conformity
This device is in compliance with the essential safety requirements and other relevant
provisions set out in the European Directive.
1-5
Preface
Safety Instructions
Read the safety instructions carefully and thoroughly.
All cautions and warnings on the equipment or user’s manual should be noted.
Keep the User’s Guide that comes with the package for future reference.
Keep this equipment away from humidity and high temperature.
Lay this equipment on a stable surface before setting it up.
The openings on the enclosure are used for air convection and to prevent the
equipment from overheating. Do not cover the openings.
Do not leave the equipment in an unconditioned environment with a storage
temperature above 60°C (140°F) or below 0°C (32°F), which may damage the
equipment.
The unit should be operated under maximum ambient temperature of 40°C
1-6
Preface
(120°F).
Make sure the power voltage is within safety range and has been adjusted
properly to the value of 100~240V before connecting the equipment to the
power outlet.
Always unplug the AC power cord before installing any add-on card or module
to the equipment.
Always disconnect the AC power cord or uninstall the battery pack or switch off
the wall socket if the equipment would be left unused for a certain time to
achieve zero energy consumption.
Never pour liquid into the opening that could damage the equipment or cause an
electrical shock.
Place the power cord in a way that people are unlikely to step on it. Do not place
anything on top of the power cord.
Always keep the strong magnetic or electrical objects away from the equipment.
To prevent explosion caused by improper battery replacement, use the same or
equivalent type of battery recommended by the manufacturer only.
Always keep the battery in a safe place.
1-7
Preface
If any of the following situations arises, get the equipment checked by a service
personnel:
The power cord or plug is damaged.
Liquid has penetrated into the equipment.
The equipment has been exposed to moisture.
The equipment has not worked well or you can not get it work according to
User’s Manual.
The equipment was dropped and damaged.
The equipment has obvious signs of breakage.
Green Product Features
Reduced energy consumption during use and stand-by
Limited use of substances harmful to the environment and health
Easily dismantled and recycled
Reduced use of natural resources by encouraging recycling
Extended product lifetime through easy upgrades
Reduced solid waste production through take-back policy
Environmental Policy
The product has been designed to enable proper reuse of parts and recycling
and should not be thrown away
Users should contact the local authorized point of collection for recycling and
disposing of their end-of-life products.
1-8
Preface
Safety Guideline for Using Battery
CAUTION: Danger of explosion if battery is incorrectly replaced.
recommended by the equipment manufacturer.
Replace only with the same or equivalent type
Discard used batteries according to manufacturer’s instructions.
WEEE Statement
Under the European Union ("EU") Directive on Waste Electrical and Electronic Equipment, Directive 2002/96/EC, which
takes effect on August 13, 2005, products of "electrical and electronic equipment" cannot be discarded as municipal waste
anymore and manufacturers of covered electronic equipment will be obligated to take back such products at the end of
their useful life.
Trademarks
All trademarks are the properties of their respective owners.
1-9
Preface
Revision History
Version
Revision History
Date
1.0
First Released
03, 2013
CHAPTER 2
Introductions
2-2
Introductions
Congratulations on becoming an user of this product, the finely designed tablet PC.
This
brand-new exquisite tablet PC will give you a delightful and professional experience in using it. We
are proud to tell our users that this product is thoroughly tested and certified by our reputation for
unsurpassed dependability and customer satisfaction.
Manual Map
This User’s Manual provides instructions and illustrations on how to operate this tablet PC. It is
recommended to read this manual carefully before using this tablet PC.
Chapter 1, Preface: Provide users the basic safety information and caution that is relevant when
using this tablet PC. It is recommended to read these information or caution when using this tablet
PC for the first time.
Chapter 2, Introductions: Include the descriptions of all the accessories of this tablet PC. It is
recommended to check out that if you have all the accessories included when you open the packing
box. If any of these accessories is damaged or missing, please contact the vendor where you
purchased this product.
Also, this chapter provides the specification of this tablet PC, and
introduces the function buttons, connectors, LED of this product.
Chapter 3, Getting Started: Provide the basic operation instructions when using this tablet PC.
2-3
Introductions
Unpacking
First, unpack the shipping carton and check all items carefully. If any item contained is damaged or
missing, please contact your local dealer immediately. Also, keep the box and packing materials in
case you need to ship the unit in the future. The package should contain the following items:
Tablet PC
Interchangeable Plug
Adapter
Micro-USB Cable
Quick Start Manual
Interchangeable Plug Head
USB OTG Cable
2-4
Introductions
Specification
Physical Characteristic
Dimension
248.5 (W) x 192.3 (D) x 10.2 (H) mm
Weight
593g
CPU
Processor Type
Allwinner A10
Memory
Memory
LPDDR2 1GB
Storage (Items listed here may vary depending on the model users purchased)
Storage
16GB
Special Notification
The actual storage preinstalled in this product depends on the
model you purchased, and may very without notice.
Power
AC/DC Adapter
5V, 2.0A
Battery Type
6800mAH, 3.7V 25.1W
2-5
Introductions
I/O Port
Micro-USB Connector
x1
Headphone out
x1
Micro HDMI-out Connector
x1
Internal Microphone
x2
Card Reader (microSD)
x 1 (Supports Maximum 32GB)
The supported memory cards may vary without notice.
Communication Port (Items listed here may vary without notice)
Wireless LAN
802.11 b/g/n
Bluetooth
BT2.0+EDR , BT3.0+HS
Audio
Internal Speaker
2 speakers with housing
Sound Volume
Adjust by volume button
Display
Type
9.7" (4:3) panel
Resolution
1024 x 768
Multi Touch
10-Point Touch Supported
Brightness
Brightness controlled by setting
2-6
Introductions
WebCam
Front Camera
0.30 Mega (optional supported)
Rear Camera
2.00 Mega (optional supported)
Others
e-Compass
Supported
G-Sensor
Supported
Vibration Motor
Supported
Special Notification
The actual function preinstalled in this product depends on the
model you purchased, and may vary without notice.
2-7
Introductions
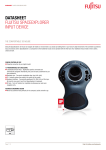
Product Overview
This section provides the description of basic aspects of this tablet PC. It will help you to know more
about the appearance of this device before using it. Please be aware that the device shown in this
section may vary from the actual one that users purchased.
1
2
3
10
5
6
7
8
The figures show here are
for reference only.
9
4
2-8
Introductions
11
13
13
12
1. Power/ Lock Button
Press this button to turn this product ON and OFF; or press the power button to lock the
screen.
2. Volume Up / Volume Down Button
Volume Up
Press the Volume Up or Volume Down button to decrease or
increase the sound volume.
Volume Down
2-9
Introductions
3. Front Camera
This built-in front camera can be used for picture taking, video recording or conferencing, and
any other interactive applications.
4. Touch Screen
Whenever the display is rotated, the touch screen will be rotated and expanded to fit the
display automatically.
5. Micro-SD Card Slot
Used for inserting or replacing micro-SD card to increase the storage capacity of the tablet
PC.
6. Micro-USB Port
Through micro-USB cable, the micro-USB port allows the tablet PC to connect to the
USB-interface peripheral devices, such as mouse, keyboard, modem, portable hard disk
module, printer and more.
7. Micro-HDMI Port
HDMI (High Definition Multimedia Interface) is a new interface standard for PCs, displays and
consumer electronics devices that supports standard, enhanced and high-definition video, plus
multi-channel digital audio on a single cable.
8. Headphone Jack
Used for connecting the speakers or headphones.
9. Reset Hole
When your tablet PC is crashed, you can use a straightened paperclip to inset the reset hole
to reset the tablet PC.
10. Internal Microphone
This is the built-in microphone and its function is the same with microphone.
2-10
Introductions
11. Rear Camera
This built-in rear camera can be used for picture taking, video recording or conferencing, and
any other interactive applications.
12. Second Microphone
This is the built-in microphone and its function is the same with microphone.
13. Stereo Speakers
Support high quality sound with stereo system.
CHAPTER 3
Getting Started
3-2
Getting Started
Charging Your Tablet PC
It is strongly recommended to use the AC power to fully charge the battery of the tablet PC for the
first time. When the AC power is connected, recharging the battery will start immediately.
Note that the adapter included in the package is approved for your tablet PC; using other
adapter model may damage either the tablet PC or other devices attached to it.
Do not cover the adapter since it will generate heat when plugging it. Always beware of
heat coming from the adapter when plugging it.
Connecting the AC Power
1. Unpack the package to find the tablet PC, interchangeable plug adapter, interchangeable
plug head and the micro-USB cable.
2. Press the clip of the interchangeable plug adapter upward.
3. Locate the steady gutter of the interchangeable plug head, and the bolt of the
interchangeable plug adapter. Align the steady gutter and adapter bolt with correct orientation.
Make sure they are joined properly. Then press downward the interchangeable plug head
until it is fixed with the interchangeable plug adapter.
3-3
Getting Started
4. Press the clip of the interchangeable plug adapter downward to fasten the interchangeable
plug head.
4
2
3
5. Connect the micro-USB cable to the micro-USB port of the tablet PC and the underneath
USB port of the interchangeable plug adapter.
6. Plug the joined interchangeable plug adapter to the electrical outlet.
Note: The interchangeable plug head may vary depending on countries or regions.
3-4
Getting Started
Basic Operations
Powering On Your Tablet PC
Powering on your tablet PC, follow the steps below:
1. Locate the power button as shown in the figure.
2. Press and hold the power button for 5 seconds to turn on your tablet PC.
Note: If the tablet PC crashes, insert a clip into the reset hole to reboot your tablet PC.
3-5
Getting Started
Powering Off Your Tablet PC
To power off the tablet PC, follow the steps below:
1. Locate the power button as shown in the figure.
2. Press and hold the power button for 5 seconds and there will be a popup window as shown in
the picture. Select “OK” to power off the device.
3-6
Getting Started
Unlocking Your Tablet PC
After powering on the tablet PC or awaking it from power saving mode, the following lock screen will
display. Please refer to the following instructions to unlock the tablet PC.
1. Firstly, this lock screen will display.
2. Touch and hold this lock icon until it becomes the circle icon. Then drag it rightward to unlock
the screen.
3-7
Getting Started
3. Then the unlock screen will display. This is the central Home screen.
Entering the Camera/Camcorder Mode
In the following lock screen, you can have another choice to unlock the screen and enter the
camera/ camcorder mode. Please refer to the following instructions to unlock the tablet PC.
1. Firstly, this lock screen will display.
2. Touch and hold this lock icon until it becomes the circle icon. Then drag it leftward to unlock the
screen and enter the camera/camcorder mode.
3-8
Getting Started
Home Screen
This is the central starting screen when using your tablet PC. It provides several quick accesses and
simple information to guide you control those shortcuts and widgets. Because the width of the tablet
PC display is limited, you can slide across the screen rightward or leftward to flip through another
extended home screen. The default setting will display the home screen as below.
Please be noted that the desktop may vary depending on the tablet model or the build
number of the firmware you use.
2
1
4
5
3
6
7
8
3-9
Getting Started
1.
Google Search
2.
3.
4.
5.
6.
Launch the internet browser to search
information on the internet.
Voice Search
Use this microphone to speak your request when
this function is activated.
Application Menu
Launch the application menu function.
Return
Switch screen to the previous page or action.
Central Home Screen
Switch screen to the central home screen.
Recent Applications
Show the recent applications you have used.
7.
The shortcuts of the default programs includes:
Programs Shortcuts
y
Browser: To access the internet.
y
Email: To send and receive emails.
y
Camera: To capture photos or record videos.
y
Gallery: To collect and manage photos or
videos.
y
Play Store: You can download the latest
y
Setting: To configure the internal settings of
applications/ games/ movies here.
your tablet PC
3-10
Getting Started
8.
Show current system status and notifications.
y Time 16:11: Show current local time.
y
Wi-Fi: Enable/ Disable Wi-Fi function.
System Status Bar
y
Bluetooth: Enable/ Disable Bluetooth
function.
y
Battery: Show current battery status.
3-11
Getting Started
How to Manage Apps
You can use apps shortcuts on the home screen to get quick access to the related applications. Please
follow the instructions below to create/ remove apps shortcuts.
Adding App Shortcuts on the Home Screen
Touch app icon
on the upper-right corner of the home screen to bring out the apps/ widgets
menu as shown in the picture. Select “APPS” tab and it will display all pre-installed and downloaded
apps. Because the width of the tablet PC display is limited, you can slide across the screen rightward
or leftward to flip through another extended home screen.
Please be noted that the applications may vary depending on the tablet model or build number
of the firmware you use.
3-12
Getting Started
In this apps menu, if you want to create the shortcut for any app on the home screen, touch and drag it
right or left to the page you want to locate. You can also drag the app icon to the top of the home
screen to show the detailed information of the app.
Removing App Shortcuts on the Home Screen
On the home screen, touch and hold the app shortcut you want to remove until the “Remove” icon
appears on the top of the screen. Drag it to this remove icon, and this app shortcut is
deleted from the home screen.
Grouping App Shortcuts on the Home Screen
On the home screen, you can group and organize the apps by making a folder. For example, choose
two apps you want to group, touch and drag one app onto another app to group them. Touch this group
icon will make a combination. When select this unnamed folder again will bring the virtual keyboard for
you to rename the folder. Then this new apps group is completed.
3-13
Getting Started
Settings
This section includes many basic settings to adjust, please make sure to follow the instructions to
customize your tablet PC. Here are some introductions of several major functions.
Wireless & Network Settings
Wi-Fi Setting
Wi-Fi function is to manage the Internet connection which allows users to perform fast data
transmission. Firstly, select “Settings”
to enable or disable this function.
from the home screen shortcuts, then select “Wi-Fi” tab
3-14
Getting Started
Bluetooth Setting
Bluetooth function is equipped with the Bluetooth module which allows users to connect various
Bluetooth devices. Firstly, select “Settings”
“Bluetooth” tab to enable on or disable this function.
from the home screen shortcuts, then select
3-15
Getting Started
Device Settings
Sound Setting
In this setting menu, you can adjust the speaker volume. Firstly, select “Settings”
home screen, and select “Sound” tab to show the sound menu in the right column.
from the
3-16
Getting Started
Volume: Tap the “Volume” string to bring the volume bars for each media group, such as music,
video, games, other media, ringtones, notifications and alarms. You can slide bars to adjust the
volume for respective media groups.
Ringtone & Notifications: There are three options you can select – “Phone ringtone”, “Default
Notification” or “Vibrate on ringing”.
System: There are four options you can select. These functions will be enabled if the options are
checked.
3-17
Getting Started
Display Setting
You can adjust the display setting of your tablet PC. Firstly, select “Settings”
from the home
screen shortcuts, then select “Display” tab to bring the setting menu in the right column.
Brightness: Select “Brightness” option to bring a setting slider to adjust the level of brightness.
Wallpaper: You can change your wallpaper from gallery, live wallpapers and wallpapers.
Auto-rotate: If you check this option, whenever the display is rotated, the screen will be rotated and
expanded to fit the display automatically.
Sleep: Set how many seconds your tablet PC will enter sleep mode from the last action. You can
check one option you want to use.
Font Size: Choose one font size you want to use in the display.
3-18
Getting Started
Storage
You can check the storage of your tablet PC from this setting. Firstly, select “Settings”
from
the home screen shortcuts, then select “Storage” tab to bring the storage menu in the right column.
You can view the used/ unused storage of SD card, USB external storage and USB OTG storage.
3-19
Getting Started
Apps
Firstly, select “Settings”
from the home screen shortcuts, then select “Apps” tab to bring
“Manage apps” menu in the right column. Touch “Manage apps” to view all the applications of your
tablet PC, including downloaded and running applications.
3-20
Getting Started
Personal Settings
Account Setting
You need to sign in your account to get more information from internet, update and synchronize your
information through internet access. For example, you can access Gmail, Google Talk, Google
Calendar, Google Groups, Google Sites, Youtube and so on.
Please refer to the following instructions to create a new Google account or use your existed Google
account to sign in.
1. Firstly, select “Settings”
from the home screen shortcuts.
2. Select “Accounts & sync” tab from the settings list.
3-21
Getting Started
3. Choose one function you want to use and to add one new account; for example, you select
Google.
4. “Add a Google Account” screen shows, select “Existing” or “New” to continue the progress.
5. You can sign in to your Google account.
6. When return back to the settings list and select “Accounts & sync” tab again, the new Google
account you set will show in the right column. Please follow the same steps to create your Email
or other corporate account.
3-22
Getting Started
Language & Input Setting
The virtual on screen keyboard will appear when touching the text input bar. For example, when you
touch
Google search on the upper-left home screen, the virtual keyboard will
appear and you can touch the on screen matching keys to search the words you want to use.
Before using the keyboard, please complete the following keyboard settings to choose which
language you want to use and the keyboard & input methods, etc.
1. Firstly, select “Settings”
from the home screen shortcuts.
3-23
Getting Started
2. Select “Language & input” tab from the settings list.
3. Touch “Language” in the right column and you will bring a language list to choose.
3-24
Getting Started
4. Set keyboard & input methods for your need in this setting list. Or touch this keyboard icon
from the bottom of the virtual keyboard to check and set keyboard setting.
3-25
Getting Started
Backup & Reset
Touch “Settings”
from the home screen shortcuts and select “Backup & Reset” tab to bring the
setting menu in the right column. Make a check on “Back up my data” and “Automatic restore” to
enable their functions.
3-26
Getting Started
System
Date & Time
Touch “Settings”
from the home screen shortcuts and select “Date & Time” tab to bring the
setting menu in the right column. Make a check on “Automatic date & time” and “Use 24-hour
format” to enable their functions.
3-27
Getting Started
Camera
Your tablet PC is equipped with two built-in cameras: the front camera and the rear camera. You can
take the photo or video and use gallery or video app to view them.
Using the Camera/Camcorder
You can enter camera/ camcorder mode by touching the camera shortcut on the home screen.
Or touch app icon
on the upper-right Home screen to enter the following app menu, select
camera app to activate them.
3-28
Getting Started
The following camera/camcorder mode screen will appear.
Camera Mode
Camcorder Mode
3-29
Getting Started
Camera/ Camcorder Function
The following introduction will explain the basic function of each button/icon under the camera/
camcorder mode.
8
7
6
5
4
3
1
2
1. Image Display Window
The image you select to take the photo or video will display in this window.
2. Camera Mode
When camera mode is enabled, the camera icon will be underlined. In the same time, the
start/ stop capturing button will become blue.
3-30
Getting Started
3. Camcorder Mode
When camcorder mode is enabled, the camcorder icon will be underlined. In the same time,
the start/ stop recording button will become red.
9
4. Settings
Touch this icon to adjust some special settings of camera/ camcorder, such as flash mode,
white balance and so on.
5. Start/ Stop Capturing and Start/ Stop Recording Button
This button will become blue when camera function is enabled. Touch this capturing button
to start to take the photo; and touch it again to stop capturing.
3-31
Getting Started
This button will become red when camcorder function is enabled. Touch this recording
button to start to take the video and there will be a white square appearing in the middle of
the red button; touch it again to stop recording.
6. Zoom in/ Zoom out
Zoom in/ zoom out the image when taking the photo or video.
7. Camera Switch
Touch the icon to switch to the front camera or the rear camera.
3-32
Getting Started
8. Preview Screen
This screen will show the previous image you have taken.
9. Camcorder Switch
Touch the icon to switch to the front camcorder or the rear camcorder.
How to View the Photos/Videos
When taking the photos or video, the files will be saved automatically in the gallery or video app.
Touch the gallery shortcut on the home screen or open gallery app to view the photos or videos you
have taken.
3-33
Getting Started
As to video viewer, touch app icon
on the home screen to enter the app menu, slide the
menu across the screen rightward to flip through the page of video app to view the videos you have
taken.
3-34
Getting Started
Gallery
You can view and manage the photos and videos through this application. Touch “Gallery” shortcuts
on the home screen to bring the following photos menu. They are classified by albums, locations,
times, people and tags, choose one type you desired to show the photos or videos.
3-35
Getting Started
Select one menu to open the photos or video as below, if you touch the “slideshow” icon
on the
upper-right screen, the photos will list by a slideshow mode, touch the screen again can stop the
slideshow.
3-36
Getting Started
When selecting one item from the menu, there will appear a tool bar with three functional icons on
the upper-right screen:
: Touch this icon to share the photo or video you selected via Email/ Bluetooth/ Gmail/
Messaging, choose one way you desire to use.
: Touch this icon to delete or cancel the photo or video you selected.
: Touch this icon to edit/ crop the photo or video you selected, or get more detailed information
about it.