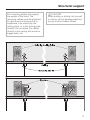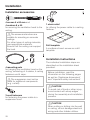
1
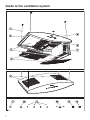
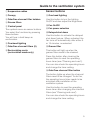
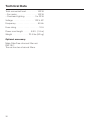
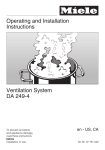
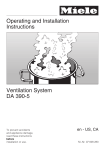
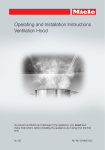
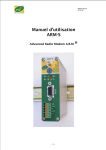
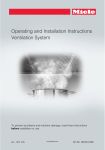
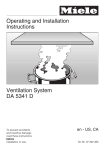
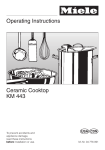
Operating and Installation Instructions
Ventilation System
To prevent accidents and machine damage, read these instructions
before installation or use.
en - US
M.-Nr. 09 973 040
2
Contents
IMPORTANT SAFETY INSTRUCTIONS. . . . . . . . . . . . . . . . . . . . . . . . . . . . . . . . . 4
Guide to the ventilation system . . . . . . . . . . . . . . . . . . . . . . . . . . . . . . . . . . . . . . 8
Description of function . . . . . . . . . . . . . . . . . . . . . . . . . . . . . . . . . . . . . . . . . . . . 10
Operation . . . . . . . . . . . . . . . . . . . . . . . . . . . . . . . . . . . . . . . . . . . . . . . . . . . . . . . 11
Turning the fan on s . . . . . . . . . . . . . . . . . . . . . . . . . . . . . . . . . . . . . . . . . . . . . . . 11
Selecting the fan power level. . . . . . . . . . . . . . . . . . . . . . . . . . . . . . . . . . . . . . . . . 11
Delayed shut down "5m15" . . . . . . . . . . . . . . . . . . . . . . . . . . . . . . . . . . . . . . . . . 12
Turning the fan off s . . . . . . . . . . . . . . . . . . . . . . . . . . . . . . . . . . . . . . . . . . . . . . . 12
Overhead lighting n . . . . . . . . . . . . . . . . . . . . . . . . . . . . . . . . . . . . . . . . . . . . . . . 12
Operating hours timer l| . . . . . . . . . . . . . . . . . . . . . . . . . . . . . . . . . . . . . . . . . . 13
Sensor button tone. . . . . . . . . . . . . . . . . . . . . . . . . . . . . . . . . . . . . . . . . . . . . . . . . 15
Automatic safety shut-off . . . . . . . . . . . . . . . . . . . . . . . . . . . . . . . . . . . . . . . . . 15
Cleaning and care . . . . . . . . . . . . . . . . . . . . . . . . . . . . . . . . . . . . . . . . . . . . . . . . 16
Grease filters . . . . . . . . . . . . . . . . . . . . . . . . . . . . . . . . . . . . . . . . . . . . . . . . . . . . . 17
Resetting the grease filter timer . . . . . . . . . . . . . . . . . . . . . . . . . . . . . . . . . . . . 18
Installing and replacing the OdorFree charcoal filters . . . . . . . . . . . . . . . . . . . . . 19
Resetting the charcoal filter timer . . . . . . . . . . . . . . . . . . . . . . . . . . . . . . . . . . 20
Changing the light bulbs . . . . . . . . . . . . . . . . . . . . . . . . . . . . . . . . . . . . . . . . . . . . 21
After Sales Service . . . . . . . . . . . . . . . . . . . . . . . . . . . . . . . . . . . . . . . . . . . . . . . 22
Installation instructions . . . . . . . . . . . . . . . . . . . . . . . . . . . . . . . . . . . . . . . . . . . 23
Caring for the environment . . . . . . . . . . . . . . . . . . . . . . . . . . . . . . . . . . . . . . . . . 24
Appliance dimensions . . . . . . . . . . . . . . . . . . . . . . . . . . . . . . . . . . . . . . . . . . . . . 25
Structural support . . . . . . . . . . . . . . . . . . . . . . . . . . . . . . . . . . . . . . . . . . . . . . . . 27
Installation . . . . . . . . . . . . . . . . . . . . . . . . . . . . . . . . . . . . . . . . . . . . . . . . . . . . . . 28
Installation accessories . . . . . . . . . . . . . . . . . . . . . . . . . . . . . . . . . . . . . . . . . . . . . 28
Installation instructions . . . . . . . . . . . . . . . . . . . . . . . . . . . . . . . . . . . . . . . . . . . . . 28
Electrical connection . . . . . . . . . . . . . . . . . . . . . . . . . . . . . . . . . . . . . . . . . . . . . . 29
Technical Data . . . . . . . . . . . . . . . . . . . . . . . . . . . . . . . . . . . . . . . . . . . . . . . . . . . 30
3
IMPORTANT SAFETY INSTRUCTIONS
READ AND SAVE THESE
INSTRUCTIONS
Keep these instructions in a safe
place and pass them on to any future
user.
Read these instructions carefully
before installing or using the
Ventilation System.
~ This appliance is intended for
residential use only. Use the appliance
only for its intended purpose.
~ This appliance complies with current
safety requirements. Improper use of
the appliance can lead to personal
injury and material damage.
,CAUTION
For General Ventilating Use
Only. Do Not Use To Exhaust
Hazardous Or Explosive
Materials And Vapors.
~ This appliance is designed to vent
cooking smoke and odors only.
~ This appliance is suitable for
installation above gas or electric
cooking surfaces.
~ This appliance is not intended for
outdoor use.
~ This appliance must not be used in
a non-stationary location (e.g. on a
ship).
4
,WARNING
TO REDUCE THE RISK OF
FIRE, ELECTRIC SHOCK, OR
INJURY TO PERSONS,
OBSERVE THE FOLLOWING:
~ a) Use this appliance only in the
manner intended by the manufacturer.
If you have questions, contact Miele.
~ b) Before servicing or cleaning the
appliance, switch power off at the service panel and lock the service
disconnecting means to prevent power
from being switched on accidentally. If
the service disconnecting means
cannot be locked, securely fasten a
prominent warning device, such as a
tag, to the service panel.
~ c) Be certain your appliance is
properly installed and grounded by a
qualified technician.
To guarantee the electrical safety of this
appliance, continuity must exist
between the appliance and an effective
grounding system. It is imperative that
this basic safety requirement be met. If
there is any doubt, have the electrical
system of the house checked by a
qualified electrician.
IMPORTANT SAFETY INSTRUCTIONS
~ d) Before connecting the appliance
to the power supply make sure that the
voltage and frequency listed on the
data plate correspond with the
household electrical supply.
This data must correspond to prevent
appliance damage. If in doubt consult a
qualified electrician.
~ e) Installation work and repairs
should only be performed by a qualified
technician in accordance with all
applicable codes and standards.
Repairs and other work by unqualified
persons could be dangerous.
~ f) Only open the casing as
described in the enclosed "Installation
diagram" and in the "Cleaning and care"
section of this manual. Under no
circumstances should any other parts
of the casing be opened. Tampering
with electrical connections or
components and mechanical parts is
highly dangerous to the user and can
cause operation faults.
~ g) Before discarding an old
appliance, disconnect it from the power
supply and remove the power cord to
prevent hazards.
Use
,WARNING
TO REDUCE THE RISK OF A
COOKTOP GREASE FIRE:
~ a) Never leave surface units
unattended at high settings. Boilovers
cause smoking and greasy spillovers
may ignite. Heat oils slowly on low or
medium settings.
~ b) Always turn the hood on when
cooking at a high heat.
~ c) Clean the ventilation hood
frequently. Grease should not be
allowed to accumulate on the fan or filter.
~ d) Use the proper pan size. Always
use cookware appropriate for the size
of the cooking area.
~ e) Do not flambé or grill with an
open flame beneath the hood.
Flames could be drawn up into the
hood by the suction and the grease
filters may catch fire.
5
IMPORTANT SAFETY INSTRUCTIONS
,WARNING
TO REDUCE THE RISK OF
INJURY TO PERSONS IN THE
EVENT OF A COOKTOP
GREASE FIRE, OBSERVE THE
FOLLOWING*:
~ a) SMOTHER FLAMES with a close
fitting lid, cookie sheet, or metal tray
then turn off the burner.
BE CAREFUL TO PREVENT BURNS.
If the flames do not go out immediately,
EVACUATE AND CALL THE FIRE
DEPARTMENT.
~ b) NEVER PICK UP A FLAMING
PAN - You may be burned.
~ c) DO NOT USE WATER, including
wet dishcloths or towels - a violent
steam explosion will result.
~ d) Use a fire extinguisher ONLY if:
1) You have a class ABC
extinguisher, and you know how to
operate it.
2) The fire is small and contained in
the area where it started.
3) The fire department is being
called.
4)You can fight the fire with your
back to an exit.
*
Based on "Kitchen Firesafety Tips"
published by NAFTA
~ This appliance is not intended for
use by persons (including children)
with reduced physical, sensory or
mental capabilities, or lack of
experience and knowledge, unless they
have been given supervision or
instruction concerning use of the
appliance by a person responsible for
their safety.
~ Children should be supervised to
ensure that they do not play with the
appliance.
,CAUTION
Accessible parts may become
hot when used with cooking
appliances.
~ Always turn on the hood when using
the cooktop to prevent damage from
condensation.
~ Never operate gas burners without
cookware. Turn the burner off when not
in use. Adjust the burner so that the
flames do not extend beneath the
cookware. Do not overheat the
cookware, e.g. when using a wok. The
hood can be damaged due to
excessive heat from the burners and
the cookware.
~ Do not use the hood without the
grease filters in place.
~ Do not use a steam cleaner to clean
the hood. Steam could penetrate
electrical components and cause a
short circuit.
6
IMPORTANT SAFETY INSTRUCTIONS
Installation
~ g) Do not install this hood over
cooktops that burn solid fuel.
,WARNING
TO REDUCE THE RISK OF
FIRE, ELECTRIC SHOCK, OR
INJURY TO PERSONS,
OBSERVE THE FOLLOWING:
~ a) Installation work and electrical
wiring must be done by qualified
person(s) in accordance with all
applicable codes and standards,
including fire-rated construction.
~ b) Sufficient air is needed for
combustion and exhausting of gases
through the flue (chimney of fuel
burning equipment to prevent back
drafting. Follow the heating equipment
manufacturer’s guideline and safety
standards such as those published by
the National Fire Protection Association
(NFPA) and the American Society for
Heating, Refrigeration and Air
Conditioning Engineers (ASHRAE), and
the local code authorities.
~ c) When cutting or drilling into the
wall or ceiling, do not damage electrical
wiring and other hidden utilities.
~ d) Ducted hoods must always be
vented to the outdoors.
~ e) Do not use this hood with any
solid-state speed control device.
~ h) Provided a larger distance is not
given by the manufacturer of the
cooktop, follow the minimum safety
distances between a cooktop and the
bottom of the hood given in the
"Appliance dimensions" section of this
manual.
If local building codes require a greater
safety distance, follow their
requirement.
If there is more than one appliance
beneath the hood and they have
different minimum safety distances
always select the greater distance.
~ i) Never connect an exhaust hood to
an active chimney, dryer vent, vent flue,
or room ventilating ductwork.
~ j) Seek professional advice before
connecting an exhaust hood vent to an
existing, inactive chimney or vent flue.
~ k) Any fittings, sealant, or materials
used to install the ductwork must be
made of approved non-flammable
materials.
,WARNING
TO REDUCE THE RISK OF
FIRE USE ONLY METAL
DUCTWORK.
~ f) Do not use an extension cord to
connect the appliance to electricity.
Extension cords do not guarantee the
required safety of the appliance,
(e.g. danger of overheating).
7
Guide to the ventilation system
8
Guide to the ventilation system
a Suspension cables
Sensor buttons
b Canopy
i Overhead lighting
c OdorFree charcoal filter holders
Use this button to turn the lighting
On/Off and also adjust the brightness.
d Grease filters
e Control panel
The symbols serve as sensor buttons.
You select the functions by pressing
these buttons.
You will hear a brief beep as
confirmation.
j Fan On/Off
k Fan power selection
l Delayed shut down
f Overhead lighting
Use this button to activate the delayed
shut down feature. When activated, the
fan turns off automatically after either 5
or 15 minutes, as selected.
g OdorFree charcoal filters (2)
m Grease filter
h Recirculating vents
(recirculation mode only)
This button will light up when the
grease filters need to be cleaned.
Press this button after cleaning the
grease filters to reset the operating
hours timer (see "Cleaning and care").
You can also check the operating hours
and change the timer setting.
n OdorFree charcoal filter button
The button lights up when the charcoal
filters need to be changed. To do this,
the operating hours timer needs to be
activated after installation of the
ventilation system.
Use this button to reset the operating
hours timer after changing the charcoal
filters (see "Cleaning and care").
You can also check the operating hours
and change the timer setting.
9
Description of function
The ventilation system works with air
recirculation:
The air drawn in is cleaned by the
grease filters and then by 2 OdorFree
charcoal filters. The cleaned air is then
recirculated back into the kitchen
through vents at the top of the hood.
Before using the ventilation system
for the first time, make sure that the
charcoal filters are in place; see
"Cleaning and care".
10
Operation
Turning the fan on s
^ Press the On/Off sensor button s.
The fan turns on at power level 2.
The On/Off button s and the 2 button
light up.
Selecting the fan power level
Depending on the intensity of the
cooking vapors, levels 1 through 3 are
usually sufficient for normal cooking.
^ Use the buttons 1, 2 or 3 to select the
desired power level.
Intensive setting
^ To remove intensive vapors or odors,
for example when frying or cooking
for with a strong aroma, select
intensive power level 4.
Automatically switching back from
the intensive setting
The intensive level can be programmed
to automatically switch back to level 3
after 10 minutes.
^ Turn the fan and the overhead
lighting off.
^ Press and hold the delayed shut
down button m for approx. 10
seconds, the 1 sensor button lights
up.
^ Press the following buttons one after
another:
– the overhead lighting sensor button
n,
– the 1 sensor button, and
– the overhead lighting sensor button
n again.
If the sensor buttons 1 and 4 flash,
automatic switch-back is not activated.
^ Press the 4 button to activate
automatic switch-back. The sensor
buttons 1 and 4 will light
continuously.
Press the 1 sensor button to
deactivate.
^ Confirm your selection by pressing
the delayed shut down sensor m.
If the setting is not saved within 4
minutes, the old setting is retained.
If the procedure is not confirmed
within 4 minutes of programming the
hood will automatically default to the
previous setting.
11
Operation
Delayed shut down "5m15"
Overhead lighting n
It is best to let the fan run for a few
minutes after cooking is completed to
neutralize any odors in the air.
The overhead lighting and the fan can
be turned on and off separately.
The delayed shut down feature can be
selected to turn the fan off automatically
after 5 or 15 minutes.
^ After cooking press the delayed shut
down button m while the fan is still
running:
– Press once: the fan automatically
switches off after 5 minutes (5m will
light up).
Turning the overhead lighting on
^ Press the light sensor button n
briefly.
The light comes on at maximum
brightness.
Dimming the overhead lighting
The brightness of the lighting can be
adjusted.
– Press twice: the fan automatically
switches off after 15 minutes (m15
will light up).
^ When the light is on, press the light
button n. The light will dim until you
release the button.
^ If you press the delayed shut down
button m again, the fan will not turn
off automatically (5m15 goes out).
^ If the n button is pressed and held
down again, the light will brighten
until the button is released.
Turning the fan off s
If the n button is pressed
continuously, the light cycles between
light and dark.
^ Press the On/Off sensor button s to
turn the fan off.
Turning the overhead lighting off
^ Briefly press the light sensor button
n to turn the light off.
12
Operation
Operating hours timer l|
To change the operating time:
A timer records how many hours the
hood has been in operation.
^ Press the On/Off sensor button s to
turn the fan off.
The timer signals when the grease
filters or the charcoal filters need to be
cleaned or replaced.
^ Press the delayed shut down sensor
button m and the grease filter
sensor button l simultaneously.
Grease filter timer
The grease filter sensor l and one of
the 1 to 4 sensors will flash.
After 30 hours of operation or the
preselected operating time, the grease
filter sensor button l will light up.
This means it is time to clean the
grease filters. After cleaning, the timer
needs to be reset (see "Cleaning and
care").
Reprogramming the grease filter
timer
The grease filter timer is preset to 30
hours. This time can be lengthened or
shortened to 20, 30, 40, or 50 hours
depending on your cooking habits.
– A time of 20 hours should be
programmed in kitchens with
frequent frying.
– A time of 20 hours should also be
programmed if the kitchen is only
used occasionally. This will help to
prevent grease which has
accumulated over a long period of
time from hardening on the filters
making cleaning more difficult.
– If you typically use very little fat for
cooking, an interval of 40 or 50 hours
can be selected.
The sensors 1 to 4 show the time set:
Sensor 1 = 20 hours
Sensor 2 = 30 hours
Sensor 3 = 40 hours
Sensor 4 = 50 hours.
^ To select a shorter time, press sensor
button 1, to select a longer time,
press sensor button 4. Hold the
button until the desired time is set.
^ Confirm your selection by pressing
the grease filter sensor button m.
All the sensors go out.
If the procedure is not confirmed
within 4 minutes of programming the
hood will automatically default to the
previous setting.
Checking the grease filter timer
To check the percentage of time
already used:
^ Press the On/Off sensor button s to
turn the fan on.
^ Press and hold the grease filter
sensor button l.
13
Operation
One or more of sensors 1 to 4 will flash.
OdorFree charcoal filter timer
The number of flashing sensors
indicates the percentage of operating
time that has already been used.
By factory default, the charcoal filter
timer is deactivated.
Sensor 1
Sensors 1 and 2
Sensors 1 to 3
Sensors 1 to 4
= 25 %
= 50 %
= 75 %
= 100 %
^ When you release the grease filter
sensor button l, the current fan
setting is displayed.
The number of operating hours remains
stored when the ventilation system is
turned off or if there is a power failure.
Set the timer to suit your cooking
habits.
The charcoal filter sensor button | will
light up after the hood has operated for
the number of hours set.
^ The charcoal filters must be replaced
with new filters.
After cleaning, the timer will need to be
reset (see "Cleaning and care").
Setting the charcoal filter timer
^ Press the On/Off sensor button s to
turn the fan off.
^ Press the delayed shut down sensor
button m and the charcoal filter
sensor button | simultaneously.
The charcoal filter sensor | and one of
the power level sensors 1 to 4 flash.
The sensors 1 to 4 show the time set:
Sensor 1 = 120 hours
Sensor 2 = 180 hours
Sensor 3 = 240 hours
Sensor 4 = deactivated.
^ To select a shorter time, press the 1
sensor button, to select a longer time,
press the 4 sensor button, until the
desired time has been set.
14
Operation
^ Confirm the setting by pressing the
charcoal filter sensor button |.
All the sensors go out.
If the procedure is not confirmed
within 4 minutes of programming the
hood will automatically default to the
previous setting.
Checking the charcoal filter timer
To check the percentage of time
already used:
^ Press the On/Off sensor button s to
turn the fan on.
^ Press and hold down the charcoal filter button |.
One or more of the sensors 1 to 4 will
flash.
The number of flashing sensors
indicates the percentage of operating
time already been used.
Sensor 1
Sensors 1 and 2
Sensors 1 to 3
Sensors 1 to 4
= 25 %
= 50 %
= 75 %
= 100 %
The number of operating hours used
remains stored when the ventilation
system is turned off or if there is a
power failure.
Sensor button tone
Whenever you press a sensor button,
you will hear a brief tone for
confirmation.
You can deactivate this audible tone.
^ Press the On/Off sensor button s to
turn the fan off.
^ Press the 4 sensor button and the
grease filter sensor button |
simultaneously for 5 seconds, until
you hear a tone. The audible tone is
now deactivated for all functions.
^ To reactivate the tone, repeat the
process.
If the ventilation system has been
disconnected from the power supply or
after a power failure, the audible tone is
automatically reactivated, regardless of
the previous setting.
Automatic safety shut-off
If the fan is left running and no button is
pressed for 10 hours, the fan will turn
off automatically.
The overhead lighting remains on.
^ Press the On/Off sensor button s to
turn the fan back on again.
15
Cleaning and care
,WARNING
TO REDUCE THE RISK OF
FIRE, ELECTRIC SHOCK, OR
INJURY TO PERSONS,
OBSERVE THE FOLLOWING:
Before cleaning or servicing the
hood, disconnect it from the power
supply, see "Important Safety
Instructions".
Avoid:
– cleaning agents containing soda,
acids, bleach or chlorides,
– abrasive cleaning agents,
e.g. powder or cream cleansers,
– abrasive sponges, i.e. pot scourers
or sponges which have been
previously used with abrasive
cleaning agents.
These will damage the surface.
,The halogen bulbs are very hot
when in use. They stay hot for some
time after turned off. Use caution,
danger of burns.
Wet cleaning the hot bulbs will
cause damage.
Wait a few minutes after turning
them off before cleaning.
Cleaning the casing
Never use abrasive cleaners,
scouring pads, steel wool or caustic
(oven) cleaners on the hood. They
will damage the surface.
^ All external surfaces and controls can
be cleaned with a mild solution of
warm water and liquid dish soap
applied with a soft sponge.
^ Wipe dry using a soft cloth.
Do not use too much water when
cleaning the controls. Water could
penetrate the electronics and cause
damage.
16
Glass surfaces
– Glass surfaces can be cleaned using
a glass cleaner.
Cleaning and care
Grease filters
Cleaning the grease filters
The grease filters should be cleaned
every 3 - 4 weeks to avoid the
accumulation grease.
– By hand: use a scrub brush with a
solution of warm water and mild dish
soap.
Do not use the pure detergent,
aggressive all purpose cleaners,
oven sprays, abrasive cleaning
agents or limescale removers. They
could destroy the filter.
Clean the grease filters at the latest
when the grease filter sensor l lights
up.
,A dirty filter is a fire hazard!
^ To remove a grease filter, pull the
locking clips forward, lower the filter
down 45°, unhook it at the rear, and
take it out.
Support the grease filter so that is
does not fall and damage the
cooktop.
– In a dishwasher: place the filter
vertically in the lower basket, making
sure that the spray arm is not
blocked.
Use a wash program with a max.
temperature of 150°F (65°C). In a
Miele dishwasher use the "Normal"
program.
Use the recommended amount of
dishwasher detergent. Overuse
could destroy the filter.
Depending on the detergent,
cleaning the grease filters in a
dishwasher may cause permanent
discoloration of the filter surface.
Performance of the filter is not
affected by this discoloration.
^ After cleaning, the filters can be
placed on a towel to air dry.
17
Cleaning and care
^ While the filters are removed, clean
any dirt or grease from the filter
casing. This reduces the risk of fire.
^ Replace the grease filters.
Resetting the grease filter timer
After cleaning the grease filter timer
needs to be reset.
^ With the fan running, press the
grease filter sensor button l for
about 3 seconds, until only the 1
sensor flashes.
The grease filter button l goes out.
If you clean the grease filters before
the operating time elapses:
^ Press the grease filter sensor button
l for about 6 seconds, until only the
1 sensor flashes.
18
Cleaning and care
Installing and replacing the
OdorFree charcoal filters
Two charcoal filters are installed in
addition to the grease filters. They are
designed to absorb and neutralize
cooking odors.
The charcoal filters are installed in the
ventilation hood below the recirculating
vents.
^ To install or replace the charcoal
filters, the grease filters must first be
removed as described in the
previous section of this manual.
The charcoal filter holders are in the
left and right hand underside of the
hood.
^ Open the lock and flip the charcoal
filter holder downwards.
^ Take the filters out of their packaging.
^ Place the charcoal filter in the holder.
^ Close the holder.
Before first use:
^ Activate the operating hours timer
(see "Operation").
19
Cleaning and care
Replace the charcoal filters when
– the charcoal filter sensor | lights up
or
– when the filter no longer absorbs
odors efficiently.
However, they should be changed at
least every 2 years.
Dispose of the charcoal filter with the
household waste.
Resetting the charcoal filter timer
After replacing the filters, reset the
charcoal filter operating hours timer.
^ With the fan running, press the
charcoal filter sensor button | for
about 3 seconds, until only the 1
sensor flashes.
The charcoal filter sensor | goes
out.
If you change the charcoal filters
before the operating time elapses:
^ Press the charcoal filter sensor
button | for about 6 seconds, until
only the 1 sensor flashes.
20
Cleaning and care
Changing the light bulbs
,WARNING
TO REDUCE THE RISK OF
FIRE, ELECTRIC SHOCK, OR
INJURY TO PERSONS,
OBSERVE THE FOLLOWING:
Disconnect the exhaust hood from
the power supply by either removing
the fuse, unplugging it, or manually
"tripping" the circuit breaker.
When in use halogen bulbs become
extremely hot, and can burn your
hands. Do not attempt to change the
bulbs until they have had sufficient
time to cool.
Do not press the bulb surface.
Fingerprints or body oils deposited
on the bulb will decrease its life.
Follow the bulb manufacturer’s
instructions.
^ To change the halogen bulb, first
gently press the light cover. The
cover will open and can now be
flipped down.
^ Pull the halogen bulb from its socket.
^ Using a cloth or glove, insert the new
halogen bulb (type 12 V, 20 W, G4).
Please follow the manufacturer's
instructions.
^ Flip the light cover back up, making
sure it clicks into place.
21
After Sales Service
Repairs
MieleCare
In the event of a fault which you cannot
easily fix yourself, please contact the
Miele Technical Service Department.
(USA only)
^ When contacting the Technical Service Department, please quote the
model and serial number of your
appliance.
These are shown on the data plate.
MieleCare, our Extended Service
Contract program, gives you the
assurance of knowing that your
appliance investment is covered by
5 years of worry free ownership.
MieleCare is the only Extended Service
Contract in the industry that guarantees
repairs by a Miele Authorized Service
Provider using genuine Miele parts.
Only genuine Miele parts installed by
factory trained professionals can
guarantee the safety, reliability, and
longevity of your Miele appliance.
Please note that unless expressly
approved in writing by Miele’s Service
department, Extended Service
Contracts offered by other providers for
Miele products will not be recognized
by Miele. Our goal is to prevent
unauthorized (and untrained) service
personnel from working on your Miele
products, possibly doing further
damage to them, you and/or your
home.
To learn more about MieleCare
Extended Service Contracts, please
contact your appliance dealer or visit
us online at:
http://mieleusa.com/mielecare
22
Installation Instructions
Read these instructions and the "Important Safety Instructions" before installing
this ventilation system.
The installation steps are described in the enclosed "Installation Diagram".
Leave these instructions with the appliance for the consumer/user.
Information is subject to change. Please refer to our website to obtain the most
current product specification, technical & warranty information.
Caring for the environment
Disposal of packing material
Disposal of an old appliance
The cardboard box and packing
materials protect the appliance during
shipping. They have been designed to
be biodegradable and recyclable.
Please recycle.
Old appliances may contain materials
that can be recycled. Please contact
your local recycling center about the
possibility of recycling these materials.
,DANGER
Ensure that any plastic wrappings,
bags, etc., are disposed of safely
and kept out of the reach of babies
and young children. Danger of
suffocation!
24
Before discarding an old appliance,
disconnect it from the electrical
supply and cut off the power cord to
prevent it from becoming a hazard.
Appliance dimensions
1) Power cord, 5.9 ft. (1.8 m) long
Keep the recirculating vents in mind during installation. If it is positioned to high
the extraction will be inefficient. There should be a sufficient gap from the hood
to the ceiling to allow air to flow freely from the vents. The distance should be at
least 1 ft. (300 mm).
25
Appliance dimensions
Distance between cooktop and hood (S)
Do not install this exhaust hood over cooktops that burn solid fuel.
Provided a greater clearance is not specified by the manufacturer of the
cooktop, observe the following minimum safety clearances between a cooktop
and the bottom of the hood:
Miele Cooktops
Non-Miele
Cooktops
Electric cooktops
24" (610 mm)
Electric barbecues and fryers
26" (660 mm)
Multiburner gas cooktops
< 43,000 BTU (12.6 KW)
and no burner > 15,000 BTU (4.5 KW)
26" (660 mm)
30" (760 mm)
Single burner (Wok) < 20,500 BTU (6 KW)
26" (660 mm)
30" (760 mm)
All other gas cooktops
30" (760 mm)
– If several gas surfaces are installed under the hood, the total output must be
taken into account when determining the minimum safety clearance.
– Be sure to follow the the gas cooktop manufacturer's minimum safety
clearances from easily flammable materials e.g. upper cabinets.
– If local building codes require a greater safety clearance, follow their
specifications.
– If there is more than one appliance beneath the hood and they have different
minimum safety clearances, always select the greater clearance.
See "Important Safety Instructions" for further information.
26
Structural support
The mounting cables will support
the weight of the hood. The
mounting cables must be attached
to rigid structural framing that is
supported in its entirety by the
ceiling joists, or to the ceiling joists
directly. Do not attach the cables
directly to the ceiling with anchors,
toggle bolts, etc.
,CAUTION
When cutting or drilling into the wall
or ceiling, do not damage electrical
wiring or other hidden utilities.
27
Installation
Installation accessories
4 screws 5 x 60 mm and
4 anchors 8 x 50
for securing the ventilation hood to the
ceiling.
,The screws and anchors are
suitable for mounting on concrete
ceilings.
For other types of ceiling materials,
use appropriate materials.
Ensure that the ceiling can support
the load.
1 strain relief
for affixing the power cable to a ceiling
fastener.
Drill template
A cardboard insert serves as a drill
template.
Installation instructions
4 mounting sets
for hanging the ventilation hood on the
ceiling, consisting of 4 cables, 4 ceiling
fasteners und 4 caps.
,The suspension must not be
used for additional components
(e.g. a shelf).
3 cord fasteners
for fastening the power cable to a
suspension cord.
The individual installation steps are
described on the installation sheet
provided.
Before installation, read the
information on the following pages
as well as "Appliance dimensions"
and "Important safety instructions".
,CAUTION
To avoid risk of hand or other injury,
avoid contact with sharp edges
during the assembly and installation
process.
,CAUTION
When cutting or drilling into the wall
or ceiling, do not damage electrical
wiring and other hidden utilities.
28
Electrical connection
,WARNING
TO REDUCE THE RISK OF
FIRE, ELECTRIC SHOCK, OR
INJURY TO PERSONS,
OBSERVE THE FOLLOWING:
All electrical work should be
performed by a qualified electrician
in strict accordance with national
regulations (for USA: ANSI-NFPA
70) and local safety regulations.
Installation, repairs and other work
by unqualified persons could be
dangerous.
Ensure that power to the appliance
is OFF while installation or repair
work is performed.
^ Verify that the voltage, load and
circuit rating information found on the
data plate (located behind the
grease filter), match the household
electrical supply before installing the
hood.
^ Use only with ventilation hood
cord-connection kits that have been
investigated and found acceptable
for use with this model hood.
Grounding Instructions
This appliance must be grounded in the
event of an electrical short circuit
grounding reduces the risk of electric
shock by providing a path of least
resistance.
WARNING - Improper grounding can
result in a risk of electric shock.
If there is any doubt, have the electrical
system of the house checked by a
qualified electrician.
Do not use an extension cord. If the
power cord is too short, have a
qualified electrician, install an outlet
near the appliance.
Important
The hood comes equipped with a 5.9 ft
(1.8 m) power cord.
The hood must be hard wired
accordingly:
Black/Red wire:
connect to L1 (live)
White wire:
connect to N (neutral)
Green wire: connect to GND (ground)
If there is any question concerning the
electrical connection of this appliance
to your power supply, please consult a
licensed electrician or contact Miele’s
Technical Service Department. See
back cover for contact information.
,WARNING:
THIS APPLIANCE MUST BE
GROUNDED
29
Technical Data
Total connected load. . . . . . . . . . 160 W
– Fan motor . . . . . . . . . . . . . . . . . 100 W
– Overhead lighting . . . . . . . . . 3 x 20 W
Voltage . . . . . . . . . . . . . . . . . 120 V AC
Frequency . . . . . . . . . . . . . . . . . . 60 Hz
Fuse rating . . . . . . . . . . . . . . . . . . . 10 A
Power cord length . . . . . . 5.9 ft. (1.8 m)
Weight . . . . . . . . . . . . . 70.5 lbs (32 kg)
Optional accessory:
Miele OdorFree charcoal filter set:
DKF 26-1
The set has two charcoal filters.
30
INFORMATION IS SUBJECT TO CHANGE. PLEASE REFER TO OUR WEBSITE
TO OBTAIN THE MOST CURRENT PRODUCT SPECIFICATIONS, TECHNICAL
& WARRANTY INFORMATION.
DA 7000 D
en - US
M.-Nr. 09 973 040 / 02