1
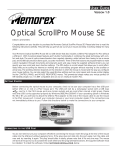
Optical Pro Mouse
User’s Guide
DEAR CUSTOMER
Congratulations on purchasing the Memorex Optical Pro Mouse. Please take the
time to read the following instructions carefully. They will ensure you get full use
out of your mouse and keep it working reliably for many years.
The Memorex Optical Pro Mouse contains a PS/2 connector for use in any PS/2
mouse port. Its key features include an ergonomic, innovative design and high
functionality. The contoured shape makes it the perfect mouse for left-handed
users. It is IBM compatible and can therefore run on nearly all modern PCs.
Using the supplied software (driver), you can specify your own scroll and zoom
function settings as well as configure the additional right (5) and left (4) mouse
buttons from a range of predefined functions. For example, these buttons allow
you to scroll effortlessly while you surf the internet or work with a text editing
program. You don’t need to use the scrollbar or the arrow keys. The scrolling
direction depends on the direction in which the mouse is moved and the way the
mouse buttons have been configured. The middle (3) and additional small right
(5) and left (4) mouse buttons can be configured with more than 20 functions.
And of course, the usual Windows settings such as cursor speed, mouse pointer
display and right (5) and left (4) mouse button assignment can still be selected
via the “Control Panel” and “Mouse Properties” menu.
GETTING STARTED
Before connecting the optical mouse to your computer, please ensure that your
computer has a free PS/2 mouse port. The PS/2 mouse port can be recognized
on most modern computers by a symbol next to the corresponding socket.
CONNECTING TO THE PS/2 MOUSE PORT
To connect the mouse to your computer, terminate all programs and turn the
computer off. Connect the PS/2 plug to the corresponding port on the rear of
your computer.
*To activate the scroll wheel and the programmable buttons, the supplied
software must be installed.
SOFTWARE INSTALLATION
Note Prior to installation you must delete previously installed mice drivers and
software, after deleting the files restart the computer.
Windows installation for Win 95/98/2000/ME, and Win NT 3.51/4.01.
1. Insert the supplied 3.5” disk in your drive.
2. Click the “Start” button on the task bar.
3. Select “Run” and Click on “Browse”.
4. Select 3.5” disk driver.
5. Double-click the “Setup” symbol.
6. Click on the “Ok” button.
7. The installation program is launched.
8. Follow the on-screen installation instructions.
9. Following successful installation, reboot your computer.
After your computer has successfully rebooted, the software will place a new
symbol in the system tray (lower right corner of your screen). Double-clicking
this icon will open the “Mouse Control Panel” for the mouse. You can select
the following setting options:
- Button
- Speed/Zoom in
Please note that the mouse setting only take effect after clicking “Apply” and
“OK”.
For additional technical support contact [email protected] or call
310-891-1680 Monday-Friday 9am-5pm Pacific Standard Time.