1
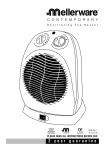
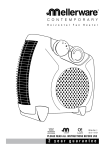
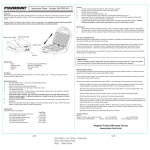
makes life easier
Reduces drying time
Automatic timer
10kg Capacity
ev
er l
o s e y o ur r e c
eip
t
N
Easy to store
PLEASE READ ALL INSTRUCTIONS BEFORE USE
complies with
INTERNATIONAL
IEC60355
SAFETY SPECIFICATIONS
23700_IM.indd 1
1000W
Model:
23700
Re
g i s t e r o n li n e
2012/11/01 11:30:58
1
2
3
4
5
6
7
8
9
10
Description:
1. Clothes rack
2. Upper supporting tube
3. Connector
4. Lower support tube
5. Cover
6. Water proof plate
7. Air outlet
8. Timer control dial
9. Air inlet
10. Legs
23700_IM.indd 2
2012/11/01 11:30:58
Safety Instructions:
1. Always keep the appliance away from water and
heat sources.
2. This appliance is for adult use only.
3.Children are to be supervised at all times to
ensure that they do not play with the appliance.
4. To protect against electric shock, never immerse
the appliance, its power cord or plug in water or
any other liquid.
5. Never reach for any appliance that has fallen into
water. Switch off the power at the wall socket
immediately and then remove the plug. Do not
re-use.
6. Ensure your hands are dry before operating the
appliance.
7.Ensure the appliance is switched off before
inserting the plug into the wall socket.
8. Do not touch the hot surfaces of the appliance
while it is in use, wait for the appliance to cool
down completely before touching the motor
body or packing the appliance away.
9. Do not carry the appliance by the power cord or
pull the power cord to remove the plug from the
wall socket.
10.Do not operate the appliance with a damaged
power cord or plug. Take it to your nearest authorized service centre for repair.
11.If the appliance stops unexpectedly or appears
to malfunction, unplug it from the wall socket and
discontinue use immediately.
12.Never leave the appliance unattended while it is
connected to the wall socket.
13.Keep the appliance and power cord away from
sources of heat, sharp objects or anything that
may damage it.
14.Keep all ventilation slots clear of debris and do
not cover.
15.Do not use the appliance outdoors.
16.
Only use the appliance as described in this
instruction manual.
17.
Before use, please make sure clothes have
already been spin-dried in a washing machine
to ensure that the clothes are not dripping wet
and to shorten the clothes drying period. This will
also save energy.
18.
Never touch the metal parts of the appliance
while it is in use.
19.The clothes you plan to dry should be able to
endure 700C heat and above.
20.Total drying weight is a maximum of 10kgs.
21.The air-outlet and entry should be kept clear at all
times to ensure good ventilation.
22.Never touch the appliance with wet hands.
23.The appliance must always be placed on a flat
and stable surface.
23700_IM.indd 3
24.Switch the appliance off and unplug it from the
wall socket before undertaking any cleaning
task.
25.
Do not use the appliance near bath-tubs,
showers, wash-basins or swimming pools.
26.Do not wrap the cable around the appliance
while it is still hot.
27.Never operate the appliance directly below any
air vents.
28.Do not connect the appliance to a device that
will switch the appliance on automatically.
29.Do not cover the appliance while it is in use.
30.Do not connect the appliance to an extension
cord.
31.
This appliance is not intended for use by
persons (including children) with reduced
physical, sensory or mental capabilities, or
lack of experience and knowledge, unless they
have been given supervision or instruction
concerning use of the appliance by a person
responsible for their safety.
Features:
1.The appliance uses the static clothes drying
method which is preferable to the traditional
friction method as this method can damage
clothes.
2.Clothes are protected against the elements
unlike traditional clothes drying.
3.The high temperatures of the appliance kill
bacteria on clothes.
4. In addition to drying clothes the appliance also
heats the room.
5. The appliance is efficient, it takes 1-3 hours to
dry clothes completely.
6. The appliance can be easily disassembled and
takes up minimal storage space.
2012/11/01 11:30:58
Assembly:
4. Insert the hanger into the upper supporting tube
1. Insert the 3 legs into the corresponding holes on
and then pull the aluminum hangers down into
the bottom of the motor unit as per the below
the level position.
diagram.
2. Connect the three tubes that form the support
arm by screwing them in to each other
5. Hang your clothes on the clothes racks, then
put on the cover over the unit and zip it closed.
3. Fit the water-proof plate onto the lower support
ing tube and then attach the lower supporting
tube onto the motor body by screwing it in a
Operation instructions:
clockwise direction.
1. Insert the plug into power socket; make sure the
voltage on the rating label corresponds to the
voltage of the mains socket. Ensure the mains
power is off when plugging the appliance in and
unplugging it.
2. Once you have plugged the appliance in switch
on the power at the wall socket.
23700_IM.indd 4
2012/11/01 11:30:58
3. Rotate the “Timer Control Dial” to the “On” position and set the drying time.
4. You can set the drying time to a maximum of three hours, remember never to leave the appliance
unattended when it is connected to the power socket.
5. To switch the power off, rotate the dial to the “Off” position.
6. Rotate the “Timer Control Dial” anti-clockwise to set it to work without the timer, the unit will continue
working until manually switched off.
Cleaning:
1. Ensure the appliance is unplugged from the mains outlet before undertaking any cleaning task.
2. Once the appliance has cooled you can clean it with a damp cloth.
3. Never use solvents with an acid or base Ph to clean the appliance.
4. Use a soft cloth and avoid using any detergents.
5. Wipe the appliance dry after cleaning.
Number
Problem
Possible cause
1.
Clothes are taking too long 1. Clothes are too thick.
to dry (180min)
2. Clothes were not spin-dried by the washing machine.
3. The cover isn’t closed properly and air is leaking.
2.
The appliance suddenly
stops working
1. The air-entry or outlet is blocked by clothes or other objects and
the overheat protection has switched the appliance off.
2. The timer has completed the set time and switched the appliance off.
3.
Power indicator light
doesn’t illuminate and the
appliance is not working.
1. There has been a power failure.
2. The power socket’s fuse has melted or broken.
3. The appliance’s fuse has melted or broken.
23700_IM.indd 5
2012/11/01 11:30:58
23700_IM.indd 6
2012/11/01 11:30:58