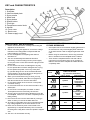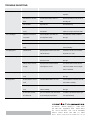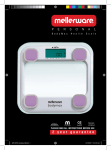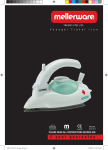
1
C O N T E M P O R A R Y
E
v
SABS
IEC60355
e
S
t
1200W
e
a
m
I
r
o
n
Model:
23009
PLEASE READ ALL INSTRUCTIONS BEFORE USE
2 year guarantee
KEY and CHARACTERISTICS
Description
1. Soleplate
2. Heat-insulated plate
3. Spray nozzle
4. Water tank
5. Spray button
6. Steam button
7. Pilot light
8. Temperature control knob
9. Handle
10. Front cover
11. Back cover
12. Power supply cord
IMPORTANT SAFEGUARDS
1. Please read all instructions carefully before using the
appliance for the first time.
2. Before connecting the appliance, check if the voltage
indicated on the rating label corresponds with the
mains voltage in your home.
3. Do not use appliance for anything other than its
intended use.
4. The iron should always be switched off before
connecting or disconnecting from the power supply.
Do not pull on the cord to disconnect the plug from the
wall socket.
5. Do not use the iron when it is damaged in any way.
Do not operate the iron with a damaged cord or plug.
Do not replace the power cord or any other parts
by yourself. Bring the iron to the nearest authorized
service facility or to the shop where you bought it, as
special tools are required for repair.
6. When you have finished ironing or when you only
leave it for a short while, stand the iron upright and
then disconnect the iron from the wall outlet.
7. Do not allow children to touch the iron or the power
cord when ironing.
8. Do not immerse the iron or the cord into water or any
other liquid.
9. Do not touch hot metal parts, hot water or steam.
These parts become hot and may cause burns.
10.The plug and cord should not be allowed to touch the
hot soleplate. Let the iron cool down completely before
taking it away.
11.Disconnect the iron from the wall outlet for pouring in
water or when you remove the water after use.
12.To avoid an overloaded circuit, do not operate another
high voltage appliance in the same electric circuit.
13.Never use an extension power cord set that is not
approved by a competent authority. The cord should
be arranged in a way that it cannot be pulled or tripped
over.
14.The iron is for household use only.
SAVE THE INSTRUCTION MANUAL FOR
FUTURE REFERENCE
• Some parts of the iron have been slightly greased and
as result the iron may smoke slightly when switched
on for the first time. It will not happen again after a few
uses.
• Before using for the first time, remove any protective
films or stickers from the soleplate and the cabinet.
• Then clean the soleplate with the soft cloth. When
using the iron for first time, test it on an old piece of
fabric to ensure that the soleplate and water tank are
completely clean.
NOTE:
LABEL
X
On label means: THIS ARTICLE
CANNOT BE IRONED!
(eg: Chlorofibre, Elastodiene)
KIND OF TEXTILE
FIBRE MATERIAL
Synthetic
Acrylic
Modacryl
Polypropylene
Polyurethane
Synthetic
Acetate
Triacetate
Synthetic
Metallized
Cupro
Polyamide (Nylon)
Polyester
Modal
Viscose (Rayon)
Silk
Silk
Wool
Wool
Cotton
Cotton
Linen
Linen
IRONING INSTRUCTIONS
CHOICE OF WATER
• This iron can be used with normal tap water.
• If the water in your area is particularly hard, it is
advisable to use distilled or de-mineralized water.
• Do not use chemically de-scaled water or any other
liquids for refilling.
HOW TO FILL IN WATER
• Unplug the iron from the wall outlet.
• Press the steam control button (6) down, so that the
steam won’t come out.
• Fill in the water through the inlet.
• Do not fill the water past the maximum level “MAX” of
the water tank. This may cause your iron to leak.
Important: Remove the water after use.
TEMPERATURE CONTROL SETTING
• Always check first to see whether a label with ironing
instructions is attached to the article to be ironed.
• Follow these instructions in all cases.
• First you should sort the laundry: Wool with wool,
Cotton with cotton etc. Start ironing the fabrics
requiring the lowest temperature and progress to
the higher ones because the iron heats up quicker
than it cools down. If the fabric consists of various
kinds of fibres (e.g. cotton with polyester) you must
always select the lowest ironing temperature for the
composition of those fibres.
SETTING THE TEMPERATURE
• Insert the plug into the wall socket and stand the iron
upright.
• Turn the temperature control knob (8) to the correct
temperature.
• The correct temperature will be reached when the
pilot light has turned off. The pilot light will be on
and off from time to time indicating that the selected
temperature is being maintained.
SPRAYING
This function can be used any time and it does not affect
the ironing temperature.
• Fill water into the iron as described above.
• Aim the nozzle to the garment.
• Press the spray button (5)
STEAM IRONING
This function can be used only at a higher ironing
temperature.
• 2 dots for moderate steam
• 3 dots or MAX for maximum steam
•
•
•
•
Fill water into the iron as described above.
Stand the iron upright.
Connect the iron to a suitable mains supply outlet.
Turn the temperature control (8) to the “2 dots”, “3
dots” or “MAX” setting.
• The pilot light turns off when the required temperature
is reached. The iron is ready for use.
• Turn the steam button (6) to the required position,
steam starts coming out from the holes in the
soleplate.
Note: With conventional steam ironing, water may leak
from the soleplate if a too low temperature has been
selected. If this happens, turn the temperature control
(8) to the advised position. Steam will recommence
as soon as the appropriate temperature has been
reached.
DRY IRONING
1. Connect the iron to a suitable mains supply outlet.
2. Ensure that the steam control knob (6) is in position
“O”.
3. Select the setting on the temperature control (8).
4. When the pilot light turns off, the required
temperature is reached. The iron is ready for use.
CARE AND CLEANING
1. Disconnect the iron from the wall outlet and let it cool
down completely.
2. Deposits and other residues on the soleplate can be
removed with a rough cloth soaked in a vinegar/water
solution.
3. The casting may be wiped with a damp cloth and
then polished with a dry one.
4. Never use any abrasives to clean the soleplate.
5. Keep the soleplate smooth: avoid hard contact with
metal objects.
STORAGE
• Turn the temperature control (8) to “MIN” and set the
steam control knob to position “O” (=no steam)
• Disconnect the iron from the wall outlet.
• Pour any remaining water out of the water tank.
• Stand the iron upright and let it cool down completely.
• The power cord can be wound around the iron.
• Always store the iron in an upright position.
SAFETY PROTECTIVE CUT – OUT
In the unlikely event of the thermostat failing, the
protection cut-out will operate to prevent the iron
overheating. Then the iron should be taken to the
nearest authorized service facility.
TROUBLE SHOOTING
Problem
Reason
Action
Pre-caution
Iron is leaking water.
Temperature is too low
Set the temperature to steam setting (cotton)
Check fabric type is suitable for high steam
temperature
Iron is not heating up
Steam switch is on self clean
Turn steam switch setting to steam or 0
Switch steam setting to 0 (off) after use or
function
position
when filling tank.
Tank is overfilled
Empty water tank
Fill to MAX mark only.
Iron is in the horizontal position
When adjusting item place iron down in the
If iron is left on the item in the horizontal
too long.
vertical position
position for too long it may burn the fabric.
Temperature control dial is in
Turn the temperature control dial to the
Check temperature setting is suitable for
the off position
desired temperature setting.
fabric type.
Household socket is off.
Switch on household socket
Ensure iron is in the upright position.
Household socket is not
Check the socket with another appliance
Appliance must be of similar wattage to
working
Iron is tripping mains
Iron sticking to clothing
Overloaded circuit.
prevent overloading.
Unplug all appliances attached to the same
Note that there can be up to 5 household
circuit and check iron.
plug sockets on 1 circuit.
Turn down temparature on control dial.
Check temperature setting is suitable for
Clean and rinse item.
fabric type.
Clothing is dirty or not rinsed
Use spray function to dampen item and
Use a old linen cloth to remove any trace
thoroughly.
check temperture is correct.
of dirt on the soleplate. Use iron soleplate
Temperature is too hot
cleaner for bad marks.
Creases not coming out
Item is too dry or temperature
Use steam function.
Check temperature setting is suitable for
too low.
Not Enough Steam
The steam control is off or set
fabric type.
Set the steam button/switch to on or full.
too low.
Ensure temperature control dial is set to the
3 dot position for steaming.
The iron temperature is
Set temperature control dial to MAX or 3 dot
Check temperature setting is suitable for
too low.
position for steaming.
fabric type.
The steam valve is blocked
If your iron is fitted with a self clean function
Use distilled or demineralised water in your
due to water scale.
carry out cleaning as per instructions.
iron to prevent blocking.
27 Nourse
Avenue Epping 2
Cape Town
P.O. Box 975 Eppindust 7475 South Africa
Tel: +27 21 534 8114 Fax: +27 21 534 8086
Service Centre Share Call: 086 111 5006
w e b : w w w. c r e a t i v e h o u s e w a r e s . c o . z a