1
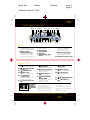
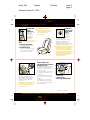
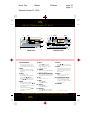
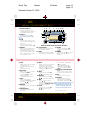
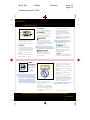
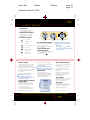
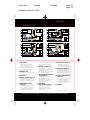
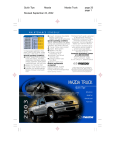
Quick Tips
Mazda
B-Series
page 20
page 1
Revised October 27, 2000
MAINTENANCE SCHEDULE
3,000*/5,000 miles
10,000 miles
15,000 miles
20,000 miles
25,000 miles
30,000 miles
35,000 miles
40,000 miles
45,000 miles
50,000 miles
55,000 miles
60,000 miles
65,000 miles
70,000 miles
75,000 miles
80,000 miles
85,000 miles
90,000 miles
95,000 miles
100,000 miles
A
A
A
A
A
A
A
A
A
A
A
A
A
A
A
A
A
A
A
A
B
B C
B
D
B C
B
E F
D
B C
G
A. Change: Engine oil/replace filter This Quick Tips® guide is provided
by MazdaTown to make your
Rotate tires/inspect for wear
Mazda ownership experience more
B . Inspect: Engine cooling
convenient. It is not intended to
system, hoses and clamps,
replace your Owner’s Manual.
automatic transmission fluid
If you have any questions about
level, steering linkage,
your vehicle, you are invited to
suspension, brake system
contact your local dealer.
inspect/lubricate: 4X2
Or if you need additional help,
ball joints
feel free to call our
C . Replace: Air filter and
Customer Assistance Center
fuel filter
at 1-800-222-5500
D. Change: Engine coolant
Monday through Friday,
E . Replace: PCV valve (2.5L only)
9 am-4:45 pm, Pacific
9 am-5:45 pm, Eastern/Central
F. Lubricate 4X2 wheel bearings
Replace: Manual transmission
fluid
G . Inspect: Accessory drive belt(s)
Replace: Spark plugs
©2000 Calcar, Quick Tips® is a trademark
Replace: PCV valve (2.3L/
of Calcar, made in USA 7/00 33.8M GL
Mazda North American Operations reserves
3.0L/4.0L)
* Special operating conditions
the right to change product specifications at
any time without incurring obligations.
Quick Tips
®
reference
guide for
2001
controls and
functions
®
Get in. Be moved.
Quick Tips
Mazda
B-Series
page 2
page 3
Revised October 27, 2000
DRIVER’S VIEW
7 8 9
10 11
12 13
7
6
5
4
3
2
1
14
15
16
21
25 24 23
22
20 19
18
17
Key
Operates ignition
and all locks
SecuriLock™ passive
anti-theft key
Electronically coded
key activates ignition;
without correct key,
engine will not start
Tip: Use key number
plate to purchase
new key; store in
safe place
Keyless remote
entry system*,
see Locks
*Denotes optional equipment
1. Power door locks*,
see Switches
2. Power window switches*,
see Switches
3. Dual power mirrors*,
see Switches
4. Lighting switch
Tail, parking and
dashboard lights on:
Rotate knob to first notch
Tail, parking, dashboard
and headlights on: Rotate
knob to second notch
5.
Instrument panel
lighting
To brighten/dim: Rotate
thumb-wheel up/down
6. Fuse panel
7. Air vents
To open/close: Move
thumb-wheel left/right
To direct air flow: Move tab
in center of vent
8. Side window defroster
9. Turn signals/headlight
high beams/wiper/
washer lever,
see Driver Controls
10. Horn/Air bag
To beep: Press
11.
Hazard warning switch
Press on/off
12. Gearshift lever (A/T)*,
see Transmission
13. 4x4 control*,
see Transmission
14. Power point electrical
outlet
Use for optional electrical
accessories, do not use
cigarette lighter for
accessories
15. Audio system,
see Audio Systems
16.
17.
18.
19.
20.
21.
22.
23.
24.
25.
Fog lamp switch*
Press on/off; on with lowbeams/parking lights only
Climate control panel,
see Climate Control
Ashtray
To open/close: Pull out/
push in
Passenger’s front air bag
deactivation switch/light,
see Seats
Cigarette lighter
Hood release handle
Pull to open partially
Cruise control*,
see Switches
Parking brake pedal
Parking brake release
lever
Tilt steering wheel lever*
To change position: Pull
lever, tilt wheel up or down,
release to lock
Always check the Owner’s Manual for more operating information and safety features
Driver’s
View
Quick Tips
Mazda
B-Series
page 4
page 5
Revised October 27, 2000
Instrument
Cluster
INSTRUMENT CLUSTER
22 11
2
23 17 3
14 4 5 6
7
8
16 24
DOOR
AJAR
CHECK
GAGE
4
5
6
3
H
CHECK
ENGINE
CHECK
FUEL
CAP
2
RPMx1000
C
FUEL DOOR
1
0
F
50 60 70
80
40
100
90
120
30 60 80
140
100
20 40 0 0 0 0 0 160
110
20
10
180
120
0
MPH
km/h
THEFT
BRAKE
E
H
L
SPEED
CONT
4X4
HIGH
4X4
LOW
H
L
O/D
OFF
21
1 20 13 19 18 12
10
12 25
9 15
GAUGES
1. Fuel gauge
Fuel tank capacity varies by
model, see Owner’s Manual
2. Engine coolant
temperature gauge
If above normal range, stop
truck and turn off engine,
check coolant level when safe
3. Tachometer
Avoid red zone
4. Speedometer
5. Trip odometer
6. Odometer
7. Trip odometer reset
button Push to reset
8. Oil-pressure gauge
If outside normal range,
stop truck and turn off
engine, check oil level
9. Battery voltage gauge
If outside normal range,
dealer inspection required
10. Gearshift indicator* (A/T)
WARNING LIGHTS
11.
12.
13.
14.
15.
16.
Check engine
Dealer inspection required
Turn signals/hazard
warning on
High beams on
Door ajar*
Door not completely shut
Overdrive off
indicator* (A/T)
When lit, transmission does
not shift into overdrive
Cruise control on*
Turn signals/
headlight
high beams/
wiper/washer
lever
High beams on/off: Push
17.
Charging system
warning light
Dealer inspection required
18.
Air bag readiness
Air bag malfunction; dealer
inspection required
19.
Brake system Parking
brake on/low brake fluid
20.
Anti-lock Brake
System (ABS)
ABS malfunction, normal
brakes only, dealer
inspection required
forward to detent/pull back
To flash high beams: Pull
rearward and release
To turn on wipers: Rotate knob
forward; first 7 detents are
progressively faster intervals,
21.
22.
23.
24.
25.
Always fasten
safety belts
Light and chimes
Check fuel cap
Fuel cap not securely tightened
Check gauge
Check temperature/oil/
fuel gauges
4wd high/4wd low*,
see Transmission
Anti-theft on*
8th detent is low speed,
9th is high
To activate washers: Push in
end of knob; will also operate
wipers
*Denotes optional equipment
Always check the Owner’s Manual for more operating information and safety features
Driver
Controls
Quick Tips
Mazda
B-Series
page 6
page 7
Revised October 27, 2000
Switches
SWITCHES
1
2
3
AU
TO
4
CK
LO
UN
CK
LO
5
Dual power mirrors*
To adjust left/right mirror:
Press control switch (1)
left/right, tilt knob (2) in
direction of desired mirror
movement
Tip: To lock mirrors in place,
move control switch (1) to
center position
2 Keyless remote
3 entry system*
Functions only
with ignition in
OFF position
To lock doors:
Press button (1); pressing
again within 5 seconds causes
doors to relock, horn to beep
once if all doors are closed,
twice if any door is ajar
To unlock doors: Press (2) to
open driver’s door; press again
within 5 seconds to open
other door
Panic alarm: Press
(3); horn
sounds, parking lights flash and
interior lights illuminate; press
(3) again to stop or insert key
and turn ignition to ON or ACC
position
1
Power window switches*
Operate only with ignition
in ACC or ON position
Both windows may be
controlled from driver’s
door; passenger door has
separate switch
Driver’s window (3): One
touch-down; press and release,
window goes all the way down;
tap front of switch to stop
Press and hold top of switch
to close
Passenger window switch (4):
Press bottom/top of switch to
open/close
Power door locks*
Master front door lock
switches
To lock/unlock both doors:
Press bottom/top on either
door switch (5)
4
8
5
6
7
Cruise control*
Operates above 30 mph
Press and release ON (4)
To set speed: Press and release
SET ACCEL (6) at desired speed;
hold (6) to accelerate
To decelerate: Press and hold
COAST (7), release at desired
speed; or tap brake pedal,
press and release (6) at desired
speed
Incremental deceleration: Press
and release (7), each tap =
minus 1 mph
Incremental acceleration: Press
and release (6), each tap =
plus 1 mph
To cancel: Tap brake/clutch
pedal or push OFF button (8)
To lock doors without key, exit
the vehicle, press lock on either
door, close the door
To unlock: Use key to unlock
either front door, open door
and press top of switch to
unlock other door
Manual door locks will override
power locks
Fuel pump
6 shutoff
Located in right front
trim panel under
instrument panel
Disables fuel pump
after a substantial jolt or collision
To reset: Press down top of
exposed red reset button (6)
WARNING: Do not reset
shutoff switch if you see
or smell fuel
Return to preset speed (after
braking): Press and release
RSM (resume) button (5)
11
9
10
Interior lights
9. Courtesy light
On: Turn thumb-wheel on
dash up or open either door
Off: Turn thumb-wheel down or
25 seconds after all doors close
or turn ignition to ON
10. Map/reading lights*
Move switch (11) right/left to
turn on right/left light
*Denotes optional equipment
Always check the Owner’s Manual for more operating information and safety features
Switches
Quick Tips
Mazda
B-Series
page 8
page 9
Revised October 27, 2000
Seats
SEATS
Shoulder belt
height
adjustment
To raise belt: Slide
adjuster up
To lower belt:
Push release
button (1) and
slide down
WARNING: Make sure adjuster
locks in one of its positions
Seats
2. Fore/aft adjustment
Raise lever and hold, slide
seat, release lever
3. Seatback angle*
To adjust: Lift and hold lever,
lean forward or backward
to tilt seat, release lever
1
WARNINGS: Air bags are
supplemental and do not
replace safety belt usage
Do not adjust seats
while driving
3
2
Child-restraint seat
To install, use dual-locking
mode retractor safety belts; see
Owner’s Manual for proper
installation and seat tether
instructions
WARNING: Children less than
4 years old and under 40
pounds should always use
a restraint seat
Dual locking mode
lap/shoulder belt retractor
(passenger only)
Emergency locking mode: Belt
locks only on hard braking/
cornering or impacts of about
5 mph or higher
Automatic locking mode: Must
be used when installing child
safety seat
To activate: Pull webbing fully
out of retractor; belt will only
tighten
To disengage: Unbuckle belt
and allow webbing to retract
fully, for complete details see
Owner’s Manual
Passenger’s
front air bag
deactivation
switch
Deactivate
passenger’s
front air bag
when using a rear-facing
child-restraint seat
To deactivate/activate: Insert
ignition key in switch, rotate
to OFF/ON, remove key
Amber OFF light illuminates when
deactivated and ignition is on
WARNING: You must deactivate
passenger’s front air bag when
using rear-facing child safety
seat in B-Series; if you choose
to install a forward-facing child
safety seat in the front seat,
move seat as far back as possible,
for complete details see
Owner’s Manual
ON
OFF
OFF
PASSENGER AIR BAG
2
1
3
Console (Split bench)
1. Coin tray
2. Map storage
3. Storage compartment
*Denotes optional equipment
Always check the Owner’s Manual for more operating information and safety features
Seats/
Console
Quick Tips
Mazda
B-Series
page 10
page 11
Revised October 27, 2000
Audio
Systems
AM/FM STEREO/COMPACT DISC
1
23
1
8 6 9 10
11 12
VOL-PUSH ON
VOL
PUSH
ON
TONE
TONE VOL
FM
AM
12
CLK
7
1
2
SEEK
TUNE
3
4
AM/FM
4
5
AM
FM
16
4
5
ST
TREB
BAL
FADE
CLK
DISC
SEEK
EJ
TUNE
COMP
1
AM/FM Stereo
2
3
4
5
14
15
6
AM/FM/CD Stereo*
5. Tune
Press / to change
frequency down/up
Press and hold to move
down/up quickly
6. AM/FM
Press to select AM/FM1/FM2
frequency bands
7. Memory preset buttons
To set: Tune to station, press
and hold until sound returns
8. CD
Press to select CD
9. Bass
Press / to
increase/decrease
10. Treble
Press / to
increase/decrease
11. Balance
Press / to shift sound
between right/left speakers
12. Fade
Press / to shift sound
between front/rear speakers
13. Scan
Press to briefly sample next
listenable selections, press
again to cancel; functions
in all modes
14. Eject
Press to eject CD; radio
resumes playing
15. Compression adjust
Press to bring soft and
loud CD passages closer
together for more consistent
listening levels
16. CD slot
*Denotes optional equipment
Always check the Owner’s Manual for more operating information and safety features
Audio
Systems
13
3
6
7
1. Power/Volume
Press to turn on/off; turn
clockwise/counterclockwise
to increase/decrease volume
2. Tone
Press to select Bass, Treble,
or Balance; then rotate (1)
to adjust
3. Clock
To display: Press
To set: Press and hold, then
press SEEK /
(4) or
TUNE /
(5) to decrease/
increase hours or minutes
4. Seek
Radio: Press and release /
for next strong station
down/up; press and hold to
skip stations
CD: Press and release /
to select previous/next
selection
SCN
FM 1
BASS
CD
Quick Tips
Mazda
B-Series
page 12
page 13
Revised October 27, 2000
Audio
Systems
AM/FM STEREO/COMPACT DISC
1. Volume Push On
Press to turn on/off; turn
clockwise/counterclockwise to
increase/decrease volume
2. CD door
To open: Press LOAD (3)
Tip: Insert CD only when
open
3. Load
Press to open CD door; load
up to six discs into player one
at a time
Select a specific slot by
pressing desired number (19)
4. Shuffle
Press to select SHUFFLE DISC
which plays random tracks
from all available discs; press
again to select SHUFFLE TRK
which plays tracks on current
disc in random order
5. Scan
Radio: Press to briefly sample
listenable stations
CD: Press to briefly sample
tracks
Press again to stop
6. Disc Tune
Radio: Press / to change
frequency down/up
CD: Press / to select
previous/next disc
Hold for rapid movement
7. Seek
Radio: Press / for
next listenable station down/up
CD: Press / to select
previous/next track
8. Rewind
Press and hold to play previous
disc tracks
9. Fast Forward
Press and hold to play next
disc tracks
4
5
3
2
6
7
8
9 10 11
12
13
14
15
16
17
CD • 6
1
21 20
19
18
Premium AM/FM Stereo in Dash Six CD Radio*
10. Compression
17. Treble
Press to bring soft and loud
Press, then press SEL (15)
/ to increase/decrease
CD passages together
11. Mute
18. MENU
Press to mute playing media;
Works with SEL (15) to activate
press again for normal volume
RDS or DSP, see Owner’s
Manual
To set CLOCK: Press MENU
12. Eject
(18) until SELECT
Press once to eject current CD
HOUR/SELECT MINUTE
Press and hold to eject all
displayed; press SEL (15)
stored discs one at a time
/ to increase/decrease
Press once, then press desired
number 1-6 (19) to eject a
19. Memory preset buttons
specific CD
1–6
To set: Tune to station, press
13. Bass
and hold until sound returns
Press, then press SEL (15)
/ to increase/decrease
20. CD
Press to select CD mode
14. Balance
Press, then press SEL (15)
21. AM/FM
/ to shift sound right/left
Press to select radio and
alternate among AM/ FM1/
15. SEL
FM2 bands; works with (19)
Press / to increase/
decrease selected function;
Tip: Press and hold AM/FM (21)
works with (13,14,16,17,18),
to enable/disable the AUTO
see Owner’s Manual
STORE function which stores
the six strongest stations in
16. Fade
memory preset buttons (19)
Press, then press SEL (15)
/ to shift sound to
front/rear
*Denotes optional equipment
Always check the Owner’s Manual for more operating information and safety features
Audio
Systems
Quick Tips
Mazda
B-Series
page 14
page 15
Revised October 27, 2000
Transmission
TRANSMISSION
1
Automatic transmission*
Gearshift must be in Park or
Neutral to start engine; it
must be in Park to remove
ignition key
P = Park
To move gearshift from Park:
You MUST press firmly on the
brake pedal and the ignition
must be in the ON position
Never put moving vehicle
in Park
Always apply parking brake
when exiting the vehicle
R = Reverse
Do not engage Reverse when
vehicle is moving forward
N = Neutral
No gear is engaged; vehicle
can roll freely, even on a
slight incline, unless the
brakes are applied
D (Overdrive)
For normal driving: Shifts
through all forward gears
automatically for more relaxed
highway driving and optimum
fuel economy
Tip: Torque converter lock-up
improves fuel economy and
can feel like an additional gear
D (Overdrive Off)
Press (1) to disengage
overdrive; an indicator light
on the instrument cluster
will illuminate
Manual
transmission*
Depress clutch
4x4
4x4
HIGH
pedal completely
2WD
LOW
to start engine
2 4 R
and change
gears; stop
truck completely before shifting
into reverse
Tip: Extended use of other than
the manufacturer’s specified
size tires on a limited-slip rear
axle could result in permanent
reduction in effectiveness; this
4-wheel drive system*
loss of effectiveness does not
affect normal driving and should 2WD = Two-wheel drive
not be noticeable to the driver Power to rear axle only, 4X4
indicator lights off
4x4 HIGH = Four-wheel drive
Power to front and rear axles
at normal speed, 4X4 light on
4x4 LOW = Four-wheel drive
(low range)
1
3 D
Driving without overdrive
provides a lower gear for
climbing hills and engine
braking when descending
hills; you can depress (1) at
any speed
To re-engage overdrive, press
(1) again and the instrument
cluster light will go out
Tip: A flashing Overdrive
Off light indicates a system
malfunction; dealer
inspection required
2 = Second
Place the gearshift lever in
second when accelerating on
slippery roads or to provide
additional engine braking
on downgrades
1 = Low
Low provides maximum engine
braking on steep downgrades
Power to front and rear axles
at reduced speed, 4X4 LOW
light on
To shift from 2WD to 4X4 HIGH:
Rotate switch from 2WD to 4x4
HIGH
To shift from 4X4 HIGH to 2WD:
Rotate switch from 4x4 HIGH
to 2WD
To shift into/out of 4X4 LOW:
Stop vehicle, depress brake,
place automatic transmission in
neutral (with manual transmission,
depress clutch pedal); rotate
switch to desired setting
Tip: Pulsation may occur during
cornering in 4X4 mode
*Denotes optional equipment
Always check the Owner’s Manual for more operating information and safety features
Transmission
Quick Tips
Mazda
B-Series
page 16
page 17
Revised October 27, 2000
Climate
Control
CLIMATE CONTROL
1. Fan control
To increase speed and flow:
Rotate knob clockwise
2. Temperature selection
Cooler/warmer = rotate
knob counterclockwise/
clockwise
3. Air flow selections
= air to dash
OFF = system off, no
air flow
= air to dash and floor
= air to floor
= air to floor and
windshield
= defrost, air to
windshield
Break-in period
First 1,000 miles: Avoid heavy
repeated brake use; avoid full
throttle, rapid acceleration or
kick-down of transmission; drive
at varying road and engine speeds
Do not tow a trailer for first
500 miles
Do not use special “break-in” oils
Tip: Follow the same
procedures with newly
overhauled engine or when
brakes are replaced
4-wheel Anti-lock Braking
System (ABS)
ABS automatically reduces
hydraulic pressure to all four
wheels (4-wheel ABS) on the
verge of locking up
You may feel a slight pulsing
of the brake pedal and hear a
clicking noise, this tells you the
OFF
A/C
MAX
A/C
1
2
3
Air conditioning system*
MAX A/C = cooling with inside
air, air to dash only
A/C = cooling with outside air,
air to dash only
Control positions for
maximum defrost
Fan to maximum, temperature
to maximum hot, air flow
selector knob to
Tips: To prevent moisture
buildup, never drive with
system off
When
, or
selected,
air is dried when temperature
is above 50° F
ABS is functioning properly,
increase pressure on pedal for
maximum braking
Tips: Maintain constant
pressure on the brake pedal
Do not pump the brakes
ABS self test
A self-diagnostic test is
performed when the engine is
started; you may feel some
pulsation and hear some
noise; this is normal
Tire economy and tips
Check pressure monthly when
tires are cold
Check for unusual wear and
overall condition, do not
exceed weight limit on tires
and axles
Maintain correct front-end
alignment and tire balance;
see Owner’s Manual for
rotation chart
Tire pressure
Decal on the edge of the driver’s
door provides tire size and
pressure information
Tire chains
Use SAE Class “S” chains
and install on rear tires; install
as tightly as possible and
retighten periodically
Gasoline
Unleaded
regular
87-octane
minimum
For fuel
capacity, see
Owner’s Manual
*Denotes optional equipment
Always check the Owner’s Manual for more operating information and safety features
Driving
Tips
Quick Tips
Mazda
B-Series
page 18
page 19
Revised October 27, 2000
Under Hood
UNDER HOOD
8
7
11
6
4
5
3
10
1
8
9
10
11
12
7
6
5
9
12
4
13
2
3
2
1
2.3-Liter Engine
13
2.5-Liter Engine
8
9
10
11
12
7
6
5
4
3
13
2
1
9
10
11
12
13
2
3
1
3.0-Liter Engine
1. Hood latch
Pull inside hood release
handle, hood pops up
slightly; while applying
upward pressure on hood,
lift auxiliary latch handle
and raise hood
2. Radiator cap
Remove cap only when safe
and engine is cool
3. Air filter
4. Engine coolant reservoir
Level should be at fill line
indicator mark; remove cap
only when safe and engine
is cool
5. Windshield washer
reservoir
Fill with windshield washer
fluid, not water; use fluids
containing non-methanol
antifreeze agents only if
8
7
6
5
4
4.0-Liter Engine
6.
7.
8.
9.
they will not damage paint,
wiper blades and washer
system
Engine oil filler cap
Use SAE 5W-30 oil for all
temperatures; use only oils
displaying American
Petroleum Institute Certified
for Gasoline Engines
Automatic transmission
fluid dipstick*
Check with engine on
at normal operating
temperature; fluid should
be within crosshatched
area on dipstick
Fuse block
Clutch fluid reservoir
With cap on, check that
fluid level is at ridge in
reservoir body, use DOT 3
brake fluid
10. Brake fluid reservoir
Clean filler cap before
removing; use only DOT 3
fluid from a sealed container
11. Engine oil dipstick
Check with engine off and
at normal temperature;
fluid should be within crosshatched area on dipstick: do
not fill above MAX/FULL line
12. Power steering fluid
reservoir
Check with engine off and
at normal temperature;
fluid level on dipstick
should be between arrows
in FULL HOT range
13. Battery
*Denotes optional equipment
Always check the Owner’s Manual for more operating information and safety features