1
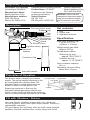
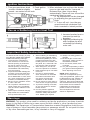
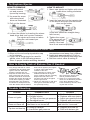
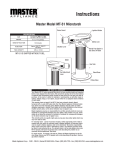
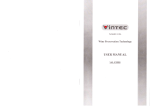
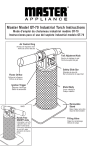
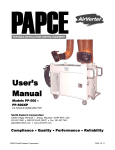
Designers and Manufacturers
of Heat Tools for Industry
Ultratorch
®
UT-300Si
Heat Tool
Instruction Manual
UT-300 Si
Made in Japan
Please read, understand and keep this
manual for future reference
Regulatory Information
Declaration of Conformity
(According to EN 45014)
Declares that the following product:
Product Name: UT-300Si
Manufacturer’s Name:
Master Appliance Corp.
Conforms to the following
product specifications:
Manufacturer’s Address:
2420-18th Street
Racine, WI 53402 U.S.A.
Safety Directives:
EN 123 12.81
EN 292 parts 1&2 EN 294
Quality Department
Master Appliance Corp.
FAX (262) 633-9745
IMPORTANT: Please read and
understand all instructions before
using this tool. Become familiar
with all controls for your safety.
Description
Gas open/close knob
Soldering tip
UT-300 Si
Windows
Tip-housing
Knurled nut
Stand
Shutter Lever
Ignition button
Gas level
window
Set contents
1. Tool
2. Plastic cap
3. Operation manual
Specification
Size (with soldering tip):
7.32 in. x 6.77 in.
(186mm x 172mm)
Weight when gas filled:
Approx. 352 gr.
Temperature values:
Soldering tip end…
approx. 932°F/500°C
Protective Cap
Hotblow tip end…
approx. 1112°F/600°C
Gas container capacity:
80 c.c.
Operating time per filling:
More than 3 hours
Gas refill nozzle
Principles of Operation
Chrome Plated Copper Base
This product uses a catalytic gas reaction
Iron Plated
system. The special catalyst contained in the
tip is preheated with a butane flame. The
preheated flame is extinguished when the
shutter is closed over the ignition vent.
Tinned
Butane gas continues to flow over the
Hot Air Vent
Catalyst
preheated catalyst generating infrared heat
which is either conducted through the soldering
iron tip or passed through the heat tip as hot gas.
Fill with Ultratane™ Butane
Use only Master Ultratane butane with your Ultratorch.
Do not fill gas or store near open flame, heater, furnace or
combustible materials.
Fill gas holding the unit firmly with the refill nozzle pointed
upwards. Gas will overflow from nozzle when tank is full.
Evaporated
Gas
Ignition Instructions
After Ignited
1. Turn gas open/close knob 2. Push ignition 3. When windows turn red, turn the shutter
button.
counter clockwise slightly
lever to right and hold for 3 seconds.
toward + as marked on the knob.
Release lever, then it turns back
automatically. Flame will turn off and the
catalyst will start to react.
4. Tip temperature can be changed
by adjusting the gas open/close
knob.
5. To turn off unit - turn the gas
open/close knob clockwise until
knob is seated in locked position.
Use as a Soldering Iron or Heat Tool
1. Loosen knurled nut to
remove tip and tip
housing.
2. Replace soldering tip
with hotblow tip and
re-install tip housing
onto unit.
Knurled nut
Tip housing
Soldering tip
Important Safety Instructions
To reduce the risk of injury or property damage, READ AND UNDERSTAND the following warnings:
1. To prevent fire or damage to
work surfaces, be sure hot air
exhaust opening is positioned
up. Hot air comes out of the
exhaust opening in the tip. Keep
combustibles and hands away
from the opening.
2. To prevent fuel tank leakage, do
not store in environmental area
that exceeds 104°F/40°C (such
as car dashboard or trunk, direct
sun, glove compartment, or other
enclosed, unventilated areas).
3. Be sure to turn “ON/OFF” switch
to “OFF” after use.
4. Do not perform maintenance or
repair unless unit is completely
cool. Be certain “ON/OFF” lever
is “OFF”.
5. Wait for tips to cool before changing.
Keep hands and combustibles
from tip area while in use.
6. When soldering or desoldering
always review material safety
data sheets (MSDS) for recommended precautions for safe
handling and use of solder, solder paste, flux, conformal coatings and any other chemicals.
7. Store away from, and do not
use in the presence of children.
8. Keep protective cap on unit while
not in use.
9. Use only in well-ventilated
area. Continuous or extended
use indoors should be done
only with a local exhaust
ventilation to the outside.
10. Do not expose to open flame or
other sources of high temperature.
11. To prevent clouding of window,
do not use alcohol or alcoholbased cleaner.
12. Use only Master Appliance
Ultratane Butane Fuel to insure
maximum safety and performance. MSDS upon request.
13. Always use safety glasses or
goggles.
14. Do not fill gas or store near
open flame, heater, furnace or
combustible materials.
15. Do not misuse, abuse, alter
or tamper.
16. It is your responsibility to follow
your governmental regulations
when disposing of this unit.
NOTE: When operating in
extremes of temperature (hot or
cold), at high altitude, ignition may
be difficult due to the variation of
gas pressure caused by these
extremes. Gas control settings will
also be affected and will vary from
those under normal conditions.
If difficulties are experienced,
please contact our Customer
Service Department who will
advise on adjustment.
Warnings:
WARNING: This product, when used for soldering and similar applications, produces chemicals
known to the State of California to cause cancer and birth defects or other reproductive harm.
WARNING: The Department of Transportation Hazardous material Regulations forbid the carriage of butane or other flammable gas products on passenger aircraft. Do not pack this item
or any other flammable gas item, in any checked or carry-on baggage.
To Replace Ejector
HOW TO MOUNT
1. Mount new ejector and tighten with minushead driver turning clockwise.
HOW TO REMOVE
1. Loosen knurled
nut and remove
tip and tip housing.
2. Un-screw the screw
with minus-head
driver as illustrated.
2. Insert the lead wire into the ceramic pipe
on the burner and push until the burner
does not go further.
3. Pull out the burner.
4. Loosen the ejector by inserting the minushead driver and turn counter clockwise.
The ejector will come out when
tilting the unit toward you.
lead wire
(Lead wire should be straight along
with burner.)
3. Tighten the screw.
(The screw will not
be tightened completely if the lead
wire is not inserted properly.)
Storage of Your Ultratorch Heat Tool
1. Allow unit to cool and put protective cap
on for storage.
2. If your unit is not going to be used for
awhile, store in the following manner.
Store in proper location avoiding elevated
temperatures and away from children.
3. Leave tank approximately 1/2 full so
lubrication of fuel pickup filter stays wet.
4. Set flow control valve at setting X.
How to Empty Tank of Butane Gas if Needed
does not hit against your fingers
1. Only empty fuel tank in a well
or hands. This could cause
ventilated area and away from
frostbite of the skin.
ignition sources. Remember
3. One method is to poke a small
butane is heavier than air.
bladed screwdriver through a
2. Depress the filler valve at the
piece of paper and then carefully
back of the tank with a small
this will clog the ejector and
depress the filler valve. The
bladed screwdriver and let the
lead to premature failure.
escaping gas will hit the paper 5. Never try to unscrew the filler
butane gas escape through the
and not your hand.
small orifice opening. It takes
valve as it is adhesively bonded
4. Never turn gas lever to “ON” and
approximately one minute for
to the tank. Breaking of this
allow gas to evacuate through
the butane to escape from the
bond will destroy the unit, causthe ejector/tip. Doing
tank. Be careful that the butane
ing the tank to leak.
Trouble Shooting
Problem
Probable cause
Solution
Does not ignite
a. Empty tank
b. Clogged ejector
c. Too high or too low gas pressure
d. Damaged burner
a.
b.
c.
d.
Refill with butane fuel
Replace with new ejector
Adjust gas open/close knob
Replace with new burner
Does not flame off
When make a low roaring sound,
the flame is not turned off
Turn the shutter lever again
and hold for 3 seconds
Tip does not heat up
a. Used-up catalyst
b. Insufficient gas pressure
a. Replace with new tip
b. Refill with butane gas
Optional Accessories
Soldering Tips
72-01-11
7mm dia. chisel soldering tip (std)
72-01-01
3mm dia. tapered needled soldering tip
72-01-05
1.5mm dia. tapered needle soldering tip
72-01-02
10mm dia. chisel soldering tip
72-01-06
4mm dia. micro spade soldering tip
72-01-03
4mm dia. spade soldering tip
72-01-07
1.5mm tapered pyramid soldering tip
72-01-12
4mm dia. chisel soldering tip
72-01-13
12.5mm dia. spade soldering tip
72-01-14
soldering tip adaptor
(5mm dia. x 0.8mm pitch)
Outside diameter
Heat Tips
72-01-51
5.6 O.D./3.6 I.D. (mm)
72-01-52
8.8 O.D./6.6 I.D. (mm)
Heat Shrink
Attachment
72-01-53
11.5 O.D./9.7 I.D. (mm)
Carrying Strap
Inside diameter
Protective Cap
78-02
72-52U
72-01-55 (std)
Ultratane™ Butane
“ULTRA-REFINED” by Master…the only approved butane for Ultratorches.
• Single piece universal tip
• Purest refining method possible
P/N 51773 - 5.125 oz.
• Special non-clogging formula to permit extended use
P/N 10448 - 26gm. canisters
One Full Year Warranty
Your butane powered heat tool was
carefully tested and inspected
before it was shipped from the
factory. We warrant this product to
be free from defects in materials
and workmanship under normal
use and service for one year from
date of purchase. In the event of a
defect in materials or workmanship,
we will either repair or replace,
without charge, at our option, any
part which in our judgement shows
evidence of such defect.
This warranty does not apply to the
attachments, tips, burner, or ejector,
which are items requiring periodic
replacement, nor does it apply if
the butane powered heat tool has
been misused, abused, altered,
tampered with, or used with butane
fuel other than Master Appliance
Ultratane butane fuel. At the end of
the warranty period, Master
Appliance shall be under no further
obligation, expressed or implied.
Some states do not allow limitations on how long an implied
warranty lasts, so the above
limitation may not apply to you.
Master Appliance assumes no
responsibility for and this warranty
shall not cover any incidental or
consequential damages from any
defect in this product or its use.
Some states do not allow the
exclusion or limitation of incidental
or consequential damages, so the
above exclusion may not apply
to you.
This warranty gives you specific
rights and you may also have other
rights which may vary from state
to state.
For warranty repair a proof of purchase receipt or other appropriate
proof of date is required with your
return for warranty repair to Master
Appliance. All warranty claims must
be made to Master Appliance and
not the distributor. We decline
responsibility where repairs have
been made or attempted by others.
Any different guarantee made by
others is not authorized by us. If a
warranty claim is to be made
please return your Master Heat
Tool prepaid, with proof of pur-
chase and a note describing the
problem to our Repair Department.
The Department of Transportation
Hazardous Material Regulations
forbid this item or any other flammable gas item from being shipped
via air. Please empty tool of
butane before shipping
as described in this manual under
“How to Empty Tank of Butane Gas
if Needed”. See address below.
For repair service we charge a flat
rate fee. Please call Master
Appliance for the flat rate charge.
return your Master Heat Tool
prepaid, with a note describing
the problem to:
Master Appliance Corp.
Attention: Repair Department
2420 - 18th Street
Racine, Wisconsin 53403
Phone (262) 633-7791
Fax (262) 633-9745
web: www.masterappliance.com
e-mail: sales@masterappliance. com
Form #53073