1
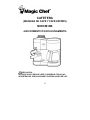
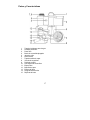
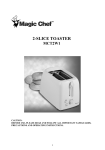
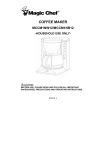
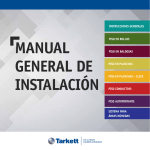
COFFEE MAKER
(COFFEE & ESPRESSO MACHINE)
MCECM1NB
-HOUSEHOLD USE ONLY-
CAUTION:
BEFORE USE, PLEASE READ AND FOLLOW ALL IMPORTANT
SAFEGUARDS, PRECAUTIONS AND OPERATING INSTRUCTIONS.
1
Table of Contents
Safety Instructions -------------------------------------------- 3-5
Parts and Features -------------------------------------------- 6
Operating Instructions --------------------------------------- 7-8
Auto Drip-Stop -------------------------------------------------- 8
Cleaning and Maintenance --------------------------------- 9
Mineral Deposit and Decalcifying ------------------------ 9-10
Warranty ---------------------------------------------------------- 11
Spanish Section ------------------------------------------------ 12-22
2
What You Need to Know About Safety Instructions
Warning and Important Safety Instruction appearing in this manual are not meant
to cover all possible conditions and situations that may occur. Common sense,
caution and care must be exercised when installing, maintaining, or operating
appliance.
Always contact your dealer, distributor, service agent or manufacturer about
problems or conditions you do not understand.
When using electrical appliances, basic safety precaution should always be
followed, including the following:
IMPORTANT SAFEGUARDS
1) Read all instructions.
2)
3)
4)
5)
6)
7)
This appliance is for household use only. Do not use outdoors.
Do not use this appliance for other than its intended use.
Before using for the first time, check if voltage indicated on the base
of the appliance corresponds to the voltage in your home.
Do not turn the power on unless this appliance is properly
assembled.
Close supervision is necessary when any appliance is used by or
near children.
Do not operate any appliance with a damaged cord or plug, or after
the appliance malfunctions or has been damaged in any manner.
3
8)
9)
10)
11)
12)
13)
14)
15)
16)
17)
18)
Return appliance to authorized service center for examination, repair
or adjustment.
The use of attachments or accessories not recommended or sold by
the manufacturer may result in fire, electric shock or injury.
Unplug the appliance from the outlet when not in use, assembling
and disassembling, and before cleaning. Make sure the appliance
cools down completely before assembling, disassembling and
cleaning.
Do not let cord hang over edge of table or counter, or touch hot
surfaces.
Do not place the appliance on or near a hot gas or electric burner, or
in a heated oven.
Do not touch hot surfaces. Use handles or knobs.
When making espresso, do not open the water tank boiler cap to
prevent injury.
To connect, always plug the cord into the wall outlet first, and then
press “power”. To disconnect, press “power” again to power off, then
remove plug from wall outlet.
Always use cold water to make coffee. Warm water or other liquids
could cause damage to the coffee maker.
Do not use a cracked carafe or a carafe having a loose or weakened
handle. Do not clean carafe with cleansers, steel wood pads or other
adhesive materials. Do not place in microwave oven.
Snap lid securely onto the glass carafe before serving any
beverages.
Scalding may occur if the lid is removed during the brewing cycle.
WARNING:
To protect against electric shock, fire, and injury to persons, do not
immerse main cord, plug or unit in water or any other liquid.
CAUTION:
Before removing the water tank boiler cap, please turn the control
knob to the “ “ position and wait for the steam pressure to dispel
completely.
4
CAUTION:
This product is equipped with a polarized plug (one blade is wider
than the other blade) as a safety feature to reduce the risk of
electrical shock. This plug will fit into a polarized outlet only one
way. This is a safety feature. If you are unable to insert the plug into
the electrical outlet, try reversing the plug. If the plug still does not
fit, contact a qualified electrician.
Never use the plug with an extension cord unless the plug can be
fully inserted into the extension cord. Do not alter the plug of the
appliance or any extension cord used with this appliance. Do not
attempt to defeat the safety purpose of the polarized plug.
SAVE THESE INSTRUCTIONS
5
Parts and Features
1.
2.
3.
4.
5.
6.
7.
8.
9.
10.
11.
12.
13.
14.
Water Tank Lid
Filter Basket Holder
Filter Basket
Power Button
Glass Carafe
Warming Plate
Water Tank Boiler Cap
Safety Valve
Control Knob
Espresso Filter Basket
Espresso Filter
Steam Nozzle
Espresso Carafe
Retainer Clip
15. Base Grid
6
Before Your First Use
Carefully unpack the coffee maker and remove all packaging materials. Wipe the
heating stand with a clean, damp cloth. Do not immerse the heating stand in
water or other liquid. To remove any dust that may have accumulated on the
removable parts during packaging, wash the carafe, lid and filter basket with
warm soapy water. Rinse and dry. We recommend that prior to brewing your first
pot of coffee, you “brew” just the cold water without ground coffee or a paper
filter. This will remove any dust that may have settled inside the coffee maker.
Operating Instructions
BREWING COFFEE
1) Open the water tank lid(1) and fill the water tank with desired amount of cold
water.
2) Swing the filter basket holder(2) outward to your right. Lift out the filter
basket(3). Insert a #4 cone-shaped filter into the filter basket(3).
3) Place the desired amount of ground coffee into the filter.
4) Insert the filter basket(3) with filter in the filter basket holder(2). Be sure the
filter basket(3) is seated properly in the filter basket holder(2). Swing the
filter basket holder close and snap into place.
NOTE: Do not operate your coffee maker if the filter basket holder does not
close completely. If the door does not close completely, check to see
that the filter basket is properly seated and snap the door back into its
place.
5) Press the right power button(4) to begin brewing. In 15 minutes the coffee
maker will complete the brewing cycle and switch over to warming mode,
keeping the coffee hot.
6) Press the right power button(4) again to turn the coffee maker off when the
carafe is empty or when the coffee maker is not in use.
MAKING ESPRESSO
1) Remove the espresso filter basket(10) by grabbing the handle and sliding
1/4 to the left. The espresso filter basket(10) will now be released.
2) Place the espresso filter(11) in the espresso filter basket(10).
3) Fill with fresh ground espresso coffee to the desired amount. Clean any
excess coffee from the rim of the espresso filter basket(10). This will assure
proper fit under the brew head.
4) Place the retainer clip(14) in the release position by pulling the clip back
toward your hand. Place the espresso filter basket(10) underneath the brew
head so that the handle is positioned to the left of the center. Lift the
espresso filter basket(10) up and insert it into the brew head. Make sure the
7
espresso filter basket(10) is secure.
Fill the espresso carafe(13) with cold water. Markings are provided as
measures to number of serving of espresso.
6) Remove the water tank boiler cap(7) and pour water into the water tank.
7) Plug the power cord into an electrical outlet.
8) Turn the control knob(9) to “ “position. Espresso will begin to flow into the
carafe.
9) When brewing has completed, you can use the steam remaining in the
water tank for frothing milk. First, pour 3 to 4 oz. of cold milk into a small
pitcher, which should fit underneath the steam nozzle(12). Then turn the
control knob to “ “ position for frothing. (If you find the steam is not
enough for frothing milk, pour some water into water tank. (To make sure
“do not remove the water tank boiler cap (7) until the steam pressure
in the machine has been released completely.”) In just a few seconds,
as steam is injected into the milk, it will begin to froth up. To finish frothing,
turn the control knob(9) back to “Off”.
10) When the espresso has stopped flowing into the carafe, press the power
button to turn the espresso machine off. Pour out the espresso coffee into a
cup, and then add the steam milk to the espresso and spoon on the frothed
milk.
11) Unplug the power cord and allow the machine to cool.
5)
Auto Drip-Stop
Your coffee maker is equipped with an auto drip-stop feature. If you wish to
temporarily remove the glass carafe from the warming plate at any time during
the brewing cycle, the auto drip-stop feature will temporarily stop the brewing,
causing no coffee to drip from the filter basket to the warming plate. Replacing
the glass carafe on the warming plate will restart the brewing cycle.
NOTE: If the glass carafe was removed during the brewing cycle, return it
within 30 seconds or the filter basket may overflow.
CAUTION:
The coffee maker will remain “On” until you press power button to
turn it “Off”. Also, do not leave empty glass carafe on the heated
warming plate.
8
Cleaning and Maintenance
COMPLETELY CLEAN AND DRY ALL PARTS AFTER EVERY USE.
Always turn coffee maker “Off” and remove the plug from the electrical outlet
before cleaning it.
Remove the glass carafe from the warming plate. Discard any remaining coffee.
The glass carafe, carafe lid and filter baskets may be washed in warm soapy
water and rinsed thoroughly, or on the top rack of a dishwasher. Do not place
any other parts of the coffee maker in the dishwasher. Do not use scouring
agents or harsh cleansers on any part of the coffee maker.
During cleaning of the filter basket, the spring (located lower back of the handle)
may become detached. If not reattached, it may prevent the anti-drip function
from working properly.
Never immerse base unit in water or any other liquid. To clean base, simply wipe
with a clean damp cloth and dry before storing. Wipe the warming plate with a
clean, damp cloth. Never use rough, abrasive materials or cleaners to clean the
warming plate. Do not try to clean the inside of the water tank with a cloth as
residue or lint might remain and clog up your coffee maker.
Mineral Deposits and Decalcifying
Mineral deposit build-up frequently occurs in coffee makers. This build-up is quite
normal and is caused by minerals commonly found in drinking water.
Periodically, your coffee maker will need cleaning to remove any mineral
deposits that may form. Excessive steaming or prolonged brewing cycle is a sign
that your coffee maker needs decalcifying. During decalcifying, more steaming
will occur than while brewing coffee.
1) Lift carafe lid. Pour two tablespoons of white vinegar in the carafe and add
cold water and fill up carafe.
2) Pour vinegar/water solution into water tank.
3) Place the glass carafe on the warming plate.
4) Open the filter basket holder and place a coffee filter into the filter basket.
5) Press power button to turn the coffee maker on.
6) Let half of the cleaning solution brew into the carafe, and then press the
power button again to turn the coffee maker “Off”.
7) Let the coffee maker cool for 15 minutes to soften the mineral deposits.
8) Pour the liquid that brewed into the carafe back into the water tank.
9
9) Turn the coffee maker on and let all the cleaning solution brew into the
carafe.
10) Turn the coffee maker off. Discard the cleaning solution and used coffee
filter.
11) Fill the coffee maker with fresh water and follow the steps in the “Before Your
First Use” to flush out remaining cleaning solution.
12) Hand wash carafe and lid with hot soapy water. Do not place in dishwasher.
SAVE THESE INSTRUCTIONS
10
Magic Chef Limited Warranty
This Magic Chef product is warranted, to the original purchaser or gift recipient,
to be free from any manufacturing defects under normal use and conditions for a
period of one (1) year from the date of purchase as shown on retailer’s receipt.
The obligation of Magic Chef under this warranty shall be limited to repair or
replacement (at our option) during the warranty period, of any part that proves to
be defective in material or workmanship under normal installation and use. The
product is returned to Magic Chef or an Authorized Service Center POSTAGE
PREPAID. A copy of the original receipt along with your name, address and
phone number must accompany products returned. Include a description of the
defect along with the date you purchased the product.
This warranty shall be invalid if the product is damaged as a result of misuse,
abuse, negligence, defacement, destruction, accident, fire or other casualties or
alterations in any manner. Improper repair, improper use of electrical voltages or
currents, alteration of serial number, maintenance by any person or entity other
than our own Service Facility or Center, or any use not in conformity with product
instruction, shall render this warranty invalid.
Magic Chef assumes no responsibility for damage resulting from the use of this
product in a manner or location other than that for which it was intended.
WARRANTY CONDITIONAL TO NORMAL AND NON-COMMERCIAL USE OF
THIS APPLIANCE FOR DOMESTIC USE ONLY.
For the nearest Authorized Service Center, contact:
Magic Chef Customer Service: 1-888-775-0202
Or visit our website at www.magicchef-ewave.com
Magic Chef is a trademark of the Maytag Corporation and is
used under license to MC Appliance Corp. All rights reserved.
11
CAFETERA
(MÁQUINA DE CAFÉ Y CAFÉ EXPRÉS)
MCECM1NB
-USO DOMESTICO EXCLUSIVAMENTE-
PRECAUCIÓN:
ANTES DE USAR, SÍRVASE LEER Y OBSERVAR TODAS LAS
ADVERTENCIAS, PRECAUCIONES E INSTRUCCIONES DE USO.
12
Tabla de Contenidos
Instrucciones de Seguridad -------------------------------- 14-16
Partes y Características ------------------------------------- 17
Instrucciones de Uso ----------------------------------------- 18-19
Sistema automático antigoteo ----------------------------- 19
Limpieza y Mantenimiento ---------------------------------- 20
Depósito de minerales y descalcificación ------------- 20-21
Garantía ----------------------------------------------------------- 22
13
¿Qué necesita saber sobre las instrucciones de seguridad?
Las advertencias e instrucciones de seguridad importantes que aparecen en
este manual no cubren todas las condiciones y situaciones que pueden
presentarse. Cuando instale, utilice o realice el mantenimiento del
electrodoméstico, aplique el sentido común, y opere con precaución y cuidado.
Si tiene alguna duda, póngase en contacto con su proveedor, distribuidor,
agente de servicios o fabricante.
Siempre que utilice un electrodoméstico, asegúrese de observar las
precauciones básicas de seguridad, incluyendo las siguientes:
MEDIDAS IMPORTANTES DE SEGURIDAD
1) Leer todas las instrucciones.
2) Este aparato es para uso doméstico exclusivamente. No utilizar en
exteriores.
3) No utilizar el electrodoméstico para un uso diferente del indicado.
4) Antes de utilizar por primera vez, verificar si la tensión indicada en la
base del electrodoméstico coincide con la tensión suministrada en su
hogar.
5) No poner en funcionamiento el aparato antes de armar
correctamente.
6) Se recomienda supervisar atentamente cuando el aparato sea
utilizado por niños o en presencia de éstos.
14
7) No poner en funcionamiento ningún electrodoméstico si el cable o
enchufe están dañados o si se detectó mal funcionamiento o
desperfecto alguno. Llevar a un servicio técnico autorizado para su
revisión, reparación o ajuste.
8) El uso de accesorios fuera de los recomendados o vendidos por el
fabricante puede originar incendios, golpes de corriente o lesiones.
9) Desenchufar el aparato cuando no se utilice, cuando se proceda al
armado o desarmado, y antes de limpiar. Verificar que esté
completamente detenido antes de desarmarlo.
10) No dejar el cable colgando del borde de la mesa o mesada, o en
contacto con las superficies calientes.
11) No colocar el artefacto sobre un quemador u horno caliente, ni en las
proximidades de los mismos.
12) No tocar las superficies calientes. Utilizar asas o perillas.
13) Cuando prepare café exprés no abra la tapa de salida de vapor para
evitar lesiones.
14) Para conectar, enchufar primero en el tomacorriente de la pared y
luego pulsar "Power." (encendido) Para desconectar, volver a pulsar
“power“ (apagado) para apagar y luego retirar el enchufe del
tomacorriente de la pared.
15) Siempre utilizar agua fría para preparar el café. El agua tibia u otros
líquidos pueden dañar la cafetera.
16) La jarra de vidrio está diseñada para ser utilizada en este
electrodoméstico. No se debe utilizar sobre la hornalla. No coloque la
jarra caliente sobre una superficie húmeda o fría. No utilice una jarra
agrietada o que tenga el asa floja o dañada. No limpie la jarra con
polvos limpiadores, esponjas de acero u otros productos abrasivos.
No utilizarla en el horno de microondas.
17) Verificar que la tapa esté bien ajustada a la jarra antes de servir
cualquier bebida.
18) Se pueden producir quemaduras si se saca la tapa durante el ciclo de
preparación.
ADVERTENCIA:
Para evitar riesgos de golpes de corriente, incendio y lesiones
personales, no sumergir el cordón, el enchufe o la unidad en agua u
otro líquido.
15
PRECAUCIÓN:
Antes de retirar la tapa de salida de vapor, por favor girar la perilla
de control hasta la posición " " y esperar hasta que la presión del
vapor se disipe por completo.
PRECAUCIÓN:
Este producto cuenta con un dispositivo de seguridad para reducir
el riesgo de golpe de corriente que consiste en un enchufe
polarizado (con una pata más ancha que la otra). Sólo hay una
forma de colocarlo en un tomacorriente polarizado. Ésta es una
medida de seguridad. Si no puede enchufar en el tomacorrientes,
intente darlo vuelta. Si a pesar de esto no logra enchufarlo, llame a
un electricista autorizado.
No utilice el enchufe con un alargue salvo que el enchufe calce
perfectamente en el mismo. No modifique el enchufe del aparato o
de cualquier alargue que utilice con este aparato. No intente burlar
el dispositivo de seguridad del enchufe polarizado.
GUARDE ESTAS INSTRUCCIONES
16
Partes y Características
1.
2.
3.
4.
5.
6.
7.
8.
9.
10.
11.
12.
13.
14.
15.
Tapa del recipiente para el agua
Canasta porta filtro
Porta filtro
Botón de encendido/apagado
Jarra de vidrio
Plato térmico
Tapa de salida de vapor
Válvula de seguridad
Perilla de control
Café Espres de Porta filtro
Espres filtro
Boquilla de vapor
Espres del jarra
Lengüeta de retención
Rejilla de la base
17
Antes de usar por primera vez
Desembalar con cuidado la cafetera y retirar todas los materiales del embalaje.
Limpiar el plato térmico con un paño húmedo limpio. No sumergir el plato térmico
en agua u otro líquido. Para retirar el polvo acumulado en las partes removibles
durante el proceso de embalaje, lavar la jarra, la tapa y el porta filtro con agua
jabonosa tibia. Enjuagar y secar. Antes de preparar la primera jarra de café,
recomendamos "procesar" sólo agua sin granos de café o filtro de papel. De esta
forma, se eliminará el polvo que se haya acumulado dentro de la cafetera.
Instrucciones de uso
PREPARACIÓN DEL CAFÉ
1) Abrir la tapa del recipiente para el agua (1) y llenar el recipiente con la
cantidad deseada de agua fría.
2) Girar la canasta porta filtro (2) hacia afuera y hacia su derecha. Levantar y
retirar el porta filtro (3). Colocar un filtro de papel #4 con forma de cono en
el porta filtro (3)
3) Colocar la cantidad deseada de café molido en el filtro.
4) Colocar el porta filtro (3) con el filtro en la canasta porta filtro(2). Verificar
que el porta filtro (3) esté correctamente colocado en la canasta porta filtro
(2). Calzar la canasta porta filtro en su posición original.
NOTA: No poner la cafetera en funcionamiento si la canasta porta filtro no
cierra correctamente. Si la canasta porta filtro no cierra por completo,
verificar si el porta filtro está colocado correctamente en su lugar y
volver a cerrar la tapa.
5) Pulsar el botón de encendido/apagado de la derecha (4) para iniciar la
preparación. En 15 minutos la cafetera completará la preparación y pasará
a funcionar en modo "calentar" para mantener el café caliente.
6) Volver a pulsar el botón de encendido/apagado de la derecha (4) para
apagar la cafetera cuando la jarra esté vacía o cuando la cafetera ya no
esté en uso.
PREPARACIÓN DE CAFÉ EXPRÉS
1) Retirar el porta filtro para café exprés (10) tomando del asa y girando 1/4
hacia la izquierda. Cuando está en esta posición, el porta filtro para café
exprés (10) se puede retirar.
2) Colocar el filtro para café exprés (11) en el porta filtro (10).
3) Colocar la cantidad deseada de café molido exprés. Limpiar el exceso de
café depositado en los bordes del porta filtro (10). Esto permitirá la correcta
colocación debajo del cabezal.
4) Coloque la lengüeta de retención (14) en posición para poder retirar jalando
18
hacia usted. Coloque el porta filtro para café exprés (10) bajo el cabezal de
forma que el asa quede hacia la izquierda. Levante el porta filtro (10) y
colóquelo en el cabezal. Verificar que el porta filtro (10) esté asegurado.
5) Llenar la jarra para café exprés (13) con agua fría. Las marcas indican las
medidas de café.
6) Retirar la tapa de salida de vapor (7) y verter agua en el recipiente para el
agua.
7) Enchufar en el toma corriente.
8) Girar la perilla de control (9) a la posición “ “. El café exprés comenzará a
filtrar en la jarra.
9) Cuando finalice la preparación, puede utilizar el vapor que queda en el
recipiente del agua para espumar leche. Primero verter de 3 a 4 onzas de
leche fría en una jarra pequeña, que debe caber debajo de la boquilla para
vapor (12). Girar la perilla de control a la posición “
“para espumar. (Si el
vapor no es suficiente para espumar la leche, verter agua en el recipiente
para el agua). (Recuerde que "no debe retirar la tapa de salida de vapor
(7) hasta que no haya salido toda la presión de vapor en de máquina".)
En pocos segundos, al inyectar vapor en la leche, ésta comenzará a
espumarse. Para terminar de espumar, girar la perilla de control(9) de
nuevo a la posición “Off (apagado).
10) Cuando haya terminado de filtrar el café exprés en la jarra, pulsar el botón
de encendido/apagado para apagar la máquina exprés. Servir el café en
una taza y luego agregar la leche espumada e incorporarla con una
cuchara.
11) Desenchufar y dejar enfriar la máquina.
Sistema automático antigoteo
Su cafetera está equipada con un dispositivo automático antigoteo. Si desea
retirar momentáneamente la jarra del plato térmico durante el ciclo de
procesamiento, el dispositivo automático antigoteo impedirá que el café siga
filtrando sobre el plato térmico. Al volver a colocar la jarra sobre el plato térmico
se reiniciará el proceso de filtrado y el café seguirá filtrando en la jarra de vidrio.
NOTA: Si la jarra se retira durante el ciclo de filtrado, vuelva a colocarla
dentro de los 30 segundos; en caso contrario, la canasta porta filtro
puede rebalsar.
PRECAUCIÓN:
La cafetera permanecerá “encendida" hasta que usted pulse el
botón "Off" (apagado). Recuerde no dejar la jarra de vidrio vacía
sobre el plato térmico caliente.
19
Limpieza y Mantenimiento
LIMPIAR Y SECAR BIEN TODAS LAS PARTES CADA VEZ QUE SE USA LA
CAFETERA.
Apagar la cafetera y retirar el enchufe del toma corriente antes de limpiarla.
Retirar la jarra de vidrio del plato térmico. Desechar el café que sobró. La jarra
de vidrio, la tapa de la jarra y los porta filtros se pueden lavar con agua jabonosa
tibia y enjuagar bien o lavar en la parte superior del lavavajillas. No colocar
ninguna otra parte de la cafetera en el lavavajillas. No utilizar agentes o
limpiadores abrasivos en ninguna de las partes de la cafetera.
Durante la limpieza de la canasta porta filtro, se puede desprender el resorte
(ubicado en la parte inferior del asa). Si no se vuelve a colocar, la función
antigoteo puede no operar correctamente.
No sumergir la base en agua u otro líquido. Para limpiar la base, utilizar un paño
húmedo y limpio, y secar antes de guardar. Limpiar el plato térmico con un paño
limpio y húmedo. No utilizar limpiadores abrasivos ni esponjas metálicas para
limpiar el plato térmico. No limpiar el interior del recipiente para el agua con
paños ya que estos podrían dejar pelusas que tapen la cafetera.
Depósito de minerales y descalcificación
Con frecuencia en las cafeteras se produce el depósito de minerales. Esta
acumulación es bastante normal y se produce por los minerales presentes en el
agua potable. Periódicamente, la cafetera requiere una limpieza para eliminar los
depósitos de minerales que se puedan formar. Si se produce mucho vapor o el
ciclo de filtrado se prolonga demasiado es posible que la cafetera necesite
descalcificación. Durante el proceso de descalcificación, se producirá más vapor
que durante el filtrado de café.
1) Levantar la tapa de la jarra. Verter dos cucharadas de vinagre blanco en la
cafetera y agregar agua fría hasta completar la jarra.
2) Verter la solución vinagre/agua en el recipiente para el agua.
3) Colocar la jarra de vidrio en el plato térmico.
4) Abrir la canasta porta filtro y colocar un filtro para café en el porta filtro.
5) Pulsar el botón “START“ (encendido) dos veces para poner la cafetera en
funcionamiento.
6) Dejar que la mitad de la solución de limpieza filtre en la jarra y luego pulsar
el botón "STOP" (apagado) para detener el funcionamiento de la cafetera.
20
7) Dejar que la cafetera se enfríe durante 15 minutos para que se ablanden los
depósitos de minerales.
8) Volver a verter en el recipiente para el agua el líquido filtrado en la jarra.
9) Volver a encender la cafetera y dejar que toda la solución de limpieza filtre
en la jarra.
10) Apagar la cafetera. Desechar la solución de limpieza y el filtro para café
usado.
11) Llenar la cafetera con agua limpia y seguir las instrucciones de la sección
"Antes de usar por primera vez" para eliminar la solución de limpieza
restante.
12) Lavar a mano la jarra y la tapa con agua jabonosa caliente. No introducir en
el lavavajillas.
GUARDE ESTAS INSTRUCCIONES
21
Garantía Limitada de Magic Chef
Se garantiza que el presente producto Magic Chef se entrega sin defectos de
fabricación y en perfecto estado de funcionamiento. Esta garantía es válida
únicamente para el comprador original, o quien lo hubiese recibido como regalo,
por el período de un (1) año a partir de la fecha de la factura o recibo de compra
del agente de venta minorista.
La obligación de Magic Chef en virtud de la presente garantía estará limitada a
la reparación o reemplazo (a nuestra opción), durante el período de garantía, de
cualquiera de las partes que se comprobase que, en condiciones de instalación
y uso normales, no funcionan correctamente por defectos del material o de mano
de obra. El producto deberá enviarse por SERVICIO POSTAL PREPAGO a
Magic Chef o a un Centro de Servicio Técnico Autorizado con una copia del
recibo original indicando su nombre, domicilio y teléfono. Por favor describa el
defecto y la fecha de compra del producto.
La presente garantía no será válida si el producto se hubiese dañado como
consecuencia de mal uso, abuso, negligencia, deformación, destrucción,
accidente, incendio u otras contingencias o se lo hubiese alterado de algún
modo. La presente garantía no será válida en caso de reparaciones indebidas,
uso con tensión o corriente eléctrica no apropiadas, alteración del número de
serie, mantenimiento realizado por personas o entidades que no fueran nuestros
propios Centros de Servicio o si el mismo no se hubiera usado en conformidad
con el modo de empleo recomendado para el producto.
Magic Chef no asume responsabilidad alguna por daños que resultasen de un
modo de empleo o ubicación del producto distinto del indicado para el mismo.
LA PRESENTE GARANTÍA SÓLO ES VÁLIDA PARA EL USO NORMAL Y NO
COMERCIAL DEL PRESENTE APARATO DISEÑADO PARA USO
DOMÉSTICO EXCLUSIVAMENTE.
Para información sobre el Centro de Servicio Técnico Autorizado más cercano,
dirigirse a: Servicio de atención al cliente Magic Chef 1-888-775-0202
o visite nuestro sitio en internet: www.magicchef-ewave.com
Magic Chef es una marca registrada de Maytag Corporation
utilizada bajo licencia a MC Appliance Corp. Se reservan todos
los derechos.
22