1
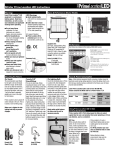
IR DMX Controller Instructions
Overview
IR Sensor
Software
Setting & Recalling Scenes
Buttons
For use
with Lowel/
Fluo-Tec Studio
Fluorescent
System
®
2
2-3
2
3
4-5
Buttons/Arrows
Using The IR DMX Controller
Replacing Batteries
Preparing for Use
Warranty, Problems, Repairs & Info
5
6
7
7
Back Cover
Overview
The Lowel IR DMX Controller™
& IR Sensor™ are designed to
allow wireless handheld control of
1 - 512 Lowel Fluo-Tec dimmable
studio fluorescent fixtures.
They also allow communication
with other DMX controllable fixtures
& dimmers, added to the DMX chain.
The Fluo-Tec studio fixtures
connect to each other via DMX
in/out cables, with the IR Sensor
being connected to the first fixture.
The IR Sensor receives infrared signals
from the IR DMX Controller and sends
them to the first DMX-512 dimmable
fixture in the chain, through the
“telephone” style cable. This allows
the IR DMX Controller to address each
fixture, via its separate DMX-512
address, and send dimming commands
to it, either separately or as part of
a larger group. The fixtures can be
dimmed throughout their entire range
(from maximum 100% light intensity
to minimum 0% or 1% depending on
how you have the fixtures set).
The IR DMX Controller can also
control other DMX-512 dimmable
fixtures, in this configuration, such as
fresnels, color scrollers, or any other
DMX-512 compatible fixtures that are
connected to the same DMX-512
circuit path as the Lowel Fluo-Tec
studio fixtures.
IR Sensor™
In addition, the Controller will
allow storage of up to 10
“scenes”, with each scene containing
dimming levels for up to 512 DMX-512
dimmable fixtures. This allows preset
storage of 10 different “looks” for the set
that is being lit.
The IR DMX Controller keeps all
address and dimming information
in an internal non-volatile memory,
which is retained even if the controller
has been shut off.
Important:
To use the IR DMX Controller,
Lowel Fluo-Tec fluorescent fixtures must first be ‘enabled’.
See Sub-Menu Mode, pg 4.
Note: If DMX chain is being controlled
by IR DMX Controller, powering down
1st fixture in chain will restore control to
attached DMX console when fixture
is powered back up. To return control
to IR DMX Controller, it must be
‘enabled’ (see pg 4).
Note: When batteries are removed
for longer than 15 seconds, all stored
information will be lost and the unit will
default all stored information to a level
of 0%. See “Changing Batteries”
for more information.
Software
Software revision
updates:
IR DMX Controller:
To find the software version installed on
your Controller, power it up and press
the MODE button for a few seconds.
The words “Scene Mode?” will be
displayed on the LCD screen. Pressing
the - LEVEL button once will scroll to
the installed software version. number
of the IR DMX Controller. It is important
information in case technical support
is needed.
Fluo-Tec Studio Fixtures:
all dimmable fixtures should have software Revision 2.3 or later installed, in
order to work with the IR DMX
Controller. To check the software version of your fixture, disconnect it from
the DMX-512 circuit and power it up.
The LED on the fixture back will display
the model of the fixture and its software
version. If it is not Revision 2.3 or later,
contact Lowel (800-334-3426).
2
Installation
Perform the installation
with the fixture power OFF.
Attach the IR Sensor with
the sensing element to a lighting truss,
fixture, yoke, ceiling, etc. using
enclosed velcro in such a way that there
will always be a line of sight between
the IR DMX Controller and the IR
Sensor from every point of the studio
where remote operation is likely
to be needed.
Use only the supplied
telephone style interconnecting cable,
and plug into both sensor and light.
Locate the IR Sensor
away from light sources that may
compete with the signal from the IR
DMX Controller, and therefore blind or
desensitize the IR Sensor.
The IR Sensor is designed
to be used at an maximum range of
45 ft. between the IR DMX Controller
and itself. If using the controller at a
distance closer than 6 ft., you may need
to slightly weaken the sensor’s “eye”
with a piece of diffusion gel to cut down
the strength of the incoming signal.
Ambient light levels may affect m
aximum operating distance.
Experiment to find the placement
and distance that works best for you.
IR Sensor™
After the installation,
make sure that the LED flashes steadily
from every intended point of operation
when operating the remote control,
and by watching the IR LED indicator
(located on the IR Sensor’s body).
By fine tuning its location using this
method, you will achieve the maximum
coverage of the room.
Signs of improper IR Sensor’s
positioning are a “jumping” displayed
level, or level differences between the
level indicated on the Remote IR Control
and the level displayed on the rear LED
of the fixture. Also, a non steadily
flashing LED in the pick-up IR Sensor
is an indication that the IR signal is not
being received properly.
Testing the
Configuration
Power up the Studio fixture and make
sure that it operates properly by watching the scrolling model name of the fixture in the rear LED display.
If it does not operate properly,
turn the unit off immediately and
disconnect the IR Sensor.
Check that the fixture operates
properly in a stand alone Manual mode.
If the problem appears to be
the IR Sensor, call Lowel Technical
Support (800-334-3426), and do not
attempt to reconnect the Sensor.
Note: In cases where no DMX console
is connected, attaching the Sensor
automatically gives control of the DMX
chain to the IR DMX Controller, provided the Controller has been ‘enabled’
(see pg. 4). If a DMX console is connected to the start of the DMX chain,
and a Sensor has also been connected
to the first fixture, the chain can be controlled by either source but the console
has default control, when fixture is
powered up.
Preparing for Use
Preparing for DMX-512
control using the
IR DMX Controller
and IR Sensor.
Whether you intend to control single
or multiple Lowel Fluo-Tec dimmable
fixtures (or other DMX-512 dimmable
fixtures (★) with the IR DMX Controller,
you must first assign DMX addresses
to them using the following procedure:
1 Power up the Lowel Fluo-Tec
fixture and make sure it is not connected to a DMX-512 console.
2 Press the fixture MODE button
repeatedly to scroll the LED
to DMX Address.
3 Hold down the fixture MODE
button for 4 seconds.The DMX
address will flash, and you can then
set or change that address by using
the Up/Down arrows to select
an address for 1- 64 fixtures.
Addresses must be from 1-64.
Care must be taken in properly
addressing the fixtures in multiple
unit configurations.
It is also recommended to set
the sensing (or master) fixture
to address #1 and the rest in
ascending order (#2, #3, etc.)
as they are physically positioned
in the DMX-512 daisy chain.
DMX-512 connections to multiple
fixtures must be daisy chained from
the 1st fixture’s DMX Out connector
to the 2nd fixture’s DMX In
connector, then from the 2nd fixture’s
DMX Out connector to the 3rd
fixture’s DMX In connector, etc.
For proper DMX-512 operation,
the final fixture must have a DMX
terminator plugged into its DMX Out
connector.
3
4 After selecting the desired
DMX-512 address, hold down the
fixture’s MODE button for 4 seconds,
and the address will be saved in the
fixture, even when it is turned off and
unplugged, until it is reset again as
described above.
Note: While being controlled by DMX512 console or IR DMX-512 Controller,
the only button in the rear control panel
of the Lowel Fluo-Tec fixture that is
operational is the MODE button. Manual
dimming, change of DMX-512 address,
resetting hours of lamp operation,
and memory save/recall functions are
disabled during these two modes of
operation. As soon as an IR signal
is detected by the attached IR Sensor,
the rear LED display of the fixture
will show its DMX-512 address
★ For adding other DMX-512
dimmable fixtures to the chain,
see mfr.s instructions for DMX
addressing.
Buttons
ON
MODE
ALL
Quickly press to turn the
Controller ON.
a multifunction button.
a toggle function.
Instant 100% ON / Instant OFF
ALL vs Single Fixture Command
■ By clicking on it once, an asterisk
■ Pressing this button, allows
■ To start or return to active operation
press the ON button.
Shutdown
■ To turn the IR DMX Controller OFF,
hold the SET button for 2 seconds.
Auto Shutdown
■ To extend the life of the batteries,
the unit will shut down automatically
after 5 minutes of no operation
(if no button is pressed).
will be displayed in the center of the
unit’s LCD display.
■ After this, if the + LEVEL button
is pressed, the level will be increased
quickly to 100% (instant ON).
■ If the –LEVEL is pressed, the level
will be quickly decreased to 0%
(instant OFF).
■ Clicking singly on any other button
will cancel the instant ON mode.
Entering Sub-Menu Mode
Pressing the MODE button for several seconds yields 5 sub-menu
choices, see below chart.
MODE Sub-Menu List (scroll through sub-menus using
–Level / +Level buttons)
1 Scene Mode? This selection gives the option of entering the Scene Mode.
To enter Scene Mode, press the MODE button again for several seconds.
See pg. 7 for instructions Setting & Recalling Scenes.
2 Enable IR/DMX? Press SET button in this mode to bypass a connected
DMX console and enable Controller.
3 Disable IR/DMX? Press SET button in this mode to bypass the Controller
and enable a connected DMX console. Note: Powering down the fixture that the
IR Sensor is connected to will also restore control of the DMX chain to the connected console.
4 Set DMX Channels? This selection gives the option to enter a mode where
you can determine the number of DMX channels (fixtures) the IR DMX Controller
will communicate with. To enter, press the MODE button again for several seconds and the LCD screen will display the maximum channels the controller is set
to control (min. 10, max. 512). Use –Address or + Address buttons to select total
number. Press MODE again to store that number & exit mode.
5 Software Version Number. This selection gives the revision number
of the software stored in the IR DMX Controller. It is important information in
case technical support is needed.
4
the IR DMX Controller to send
DMX-512 dimming commands
to ALL fixtures connected in the
circuit simultaneously.
■ The Address field of the LCD display
will read “ALL”, meaning that ALL
512 channels will receive the same
level dimming level (%) indicated in
the Level field.
■ Clicking the ALL button again
toggles it back to communicating
with a single chosen addressed
channel.
Note: When in ALL mode, the
ADDRESS and + ADDRESS buttons are
not active. It is important to understand
that once the ALL mode is turned off,
all channels but the one indicated in the
address field will revert back to their
previously set dimming levels.
Example: if channel 15 is set to a level
of 38%, selecting the ALL mode will
take all fixtures in the DMX-512 line go
to 38% intensity.
Once this mode is reverted back to
single channel operation, ONLY address
15 will be set to 38%. The rest of
the remaining channels will revert to
the intensity levels previously stored
in memory.
Buttons
Buttons/Arrows
SET
+ Level
–Address
a multifunction button.
Transmitting Pre-stored
Levels
will increase the dimming level (%) of the
fixture from 0–100%.
will change
the address of
the fixture that is
being accessed,
descending
from 512–1.
■ When pressed, the IR DMX
Controller updates (retransmits) all
512 channel levels to their previously
set levels, as saved in the remote’s
internal, non-volatile memory.
If the IR Sensor did not receive
any part of the infrared beam while
transmitting dimming commands
(ex. – something blocking the line of
sight between the Controller and the
IR Sensor unit), the dimmable fixture
will be set to a different level than is
displayed in the IR DMX Controller
LCD. By pressing the SET button,
all values will be retransmitted,
“re-synchronizing” the dimming
levels of the fixtures to the displayed
level in the IR DMX Controller.
Note: Pressing SET while sending values will interrupt transmission.
If one or more dimmable fixtures were
turned off (i.e. at night, or for lamp
change), their dimming levels will be
different than what has been saved in
the IR DMX Controller’s memory.
Pressing the SET button, updates all
the fixtures to their desired levels
simultaneously.
Saving Scenes
■ A secondary function of the SET
button is to save Scenes. See pg. 7
for more information.
■ The level can be increased one
percent at a time by clicking the button singly.
■ The + Address button advances
■ Holding the button down,
will gradually increase the fixture
to 100%.
one at a time by clicking the
button singly.
■ Holding the button down,
■ The longer the +Level button is held,
the faster dimming will occur.
Note: Due to the nature of dimmable
ballast’s, the Lowel Fluo-Tec dimmable
studio fixtures begin their dimming levels at 1%, to prevent flicker at lower
levels. You can set the fixture
to dim all the way to 0%, but that will
then require lamps to ‘start up’ before
full dimming up can occur.
– Level
will decrease
the dimming level (%)
of the fixture from
100%–0.
■ The level can be decreased
one percent at a time by clicking
the button singly.
will gradually scroll through
the addresses.
■ The longer the button is held,
the faster it will scroll.
■ After unit 512 is reached,
the remote control will return
to unit 1.
+ Address
will change the
address of the
fixture that is
being accessed
from 1–512.
■ The – Address button advances one
at a time by clicking the button
singly.
■ Holding the button down,
■ Holding the button down,
will gradually decrease the fixture
to 0%.
will gradually scroll downward
through the addresses.
■ The longer the button is held,
■ The longer the–Level button is held,
the faster it will scroll.
the faster dimming will occur.
■ After unit 1 is reached,
the remote control will return
to unit 512.
Shutting Down
■ To turn the IR DMX Controller
OFF, hold the SET button
for 2 seconds.
Note: See MODE sub-menu #5 (pg.4)
for more information on setting the
number of channels to be controlled.
5
Using The IR DMX Controller
Important To use the IR DMX Controller,
fluorescent fixtures must first
be ‘enabled’.
See Sub-Menu Mode, pg 4.
Once turned ON, the Left side
displays the DMX-512 Address channel
being accessed (1–512) or ALL
(in which case up to 512 fixtures will be
accessed simultaneously). The Right
side displays the dimming level
(0–100%) of the unit corresponding
to that address.
Note: a flashing “dot” in place of the
asterisk = low battery.
In addition, an asterisk will also be
displayed in the center of the lower line
when the MODE button has been
pressed, to indicate an instant ON
(level of 100%) or an instant OFF
(level of 0%) capability, upon pressing
the +LEVEL or –LEVEL. Otherwise,
the unit will dim up or down when the
LEVEL buttons are pushed.
LCD
2 line, 8 character Liquid
Crystal Display.
Buttons
Familiarize yourself with the location of the control buttons. Some buttons control more than one function.
Read pages 4-5 for more information.
LCD
(Liquid Crystal Display)
+Level
Will increase the dimming level (%) of
the fixture from 0-100%.
–Address
Will change the address
of the fixture that is being accessed,
descending from 512–1.
+Address
Will change the address of the fixture
that is being accessed from 1–512.
SET
–Level
Will decrease the dimming level (%)
of the fixture from 100%–0.
This is a multifunction button.
ON
ALL This is a toggle function.
Quickly press to turn the unit ON.
MODE
This is a multifunction button.
6
Setting & Recalling Scenes
The IR DMX Controller can store
up to 10 different scenes, with
each scene containing dimming
levels for up to 512 Lowel/FluoTec dimmable fixtures.
All scenes are saved in nonvolatile memory.
Note: see Replacing Batteries (pg. 7)
for important information.
To set and store scenes:
■ Select any addressed channels from
1–512 and set levels for them.
■ When you have set all selected
fixtures to desired levels, hold down
the MODE button for two seconds.
The LCD display will show a Scene
number, from 1–10.
■ Use the UP/DOWN arrow buttons
to move between scenes.
■ Once the desired scene is selected,
pressing the SET button to store the
levels for that scene in the IR DMX
Controllers memory.
■ Press the MODE button again
to exit.
To recall a stored scene:
■ Press the MODE button for
2 seconds, the LCD screen will
display “Scene Mode?”.
■ Press the MODE button once
more, quickly.
■ Find the desired scene using
the UP/DOWN arrow buttons and
press the MODE button once to
transmit those dimming values and
return to normal operation.
To save a variation of a stored
scene as a different scene:
■ Hold down the MODE button
for two seconds. The LCD display
will show Scene Mode?. Press the
MODE button again to nter.
The display will show the Scene
number, from 1–10.
■ Use the UP/DOWN arrow buttons
to move between scenes.
■ Once the scene you want to create
a variation of is selected, press the
MODE button again to exit.
The display will show Sending
Values as the fixtures are set to the
values of the scene.
■ You may now adjust the dimming
levels of any fixture you want to vary
in that scene.
■ When you have set all selected
fixtures to their desired levels, hold
down the MODE button again for two
seconds and then use the UP/DOWN
arrow buttons to select the number
for the new scene to be stored in.
■ Pressing the SET button stores
the levels for that scene in the IR
DMX Controllers memory.
Note:
the SET button will “refresh”
(re-send) the values of all 512 channels
corresponding to the values stored in
the current chosen scene. The display
again will show Sending Values,
as it updates itself.
Replacing Batteries
A flashing “dot” in place of
the asterisk = low battery.
In order to replace batteries
and keep stored address dimming
level & scene information:
Note: Be careful to properly install the
batteries. Battery reversal may cause a
permanent damage to the remote control.
3 Close the battery compartment.
4 After turning the IR DMX Controller
back ON, point it at the IR Sensor and
press the SET button a few times.
This will guarantee that the dimmable
fixtures are set to the same levels that
were previously saved
in the IR DMX Controller.
1 Press the SET button for 2 seconds
to turn the unit off, or wait until the IR
DMX Controller shuts down on its
own (after 5 minutes of no activity).
When powering the IR DMX Controller
up for the first time after a battery
change, the Controller’s LCD will show
its installed software version. Make
note of this number in case it is needed
for technical assistance.
2 Remove the 2 AA alkaline batteries
and quickly insert a new set within 15
seconds of the removal, making sure
to properly orient the battery contacts
as shown on the bottom of the battery
compartment.
Note: Be careful to properly install
the batteries. Battery reversal may
cause a permanent damage to the
remote control.
7
If the IR DMX Controller is left
without batteries for a period
longer than 15 seconds,
all the previously stored dimming,
addressing & scene information
will be lost, reverting to a default
value of 0%.
Note: Remove the batteries from the
compartment if you plan on not using
the IR DMX Controller for an extended
period of time
Read battery manufacturers warnings
for safe use.
Dispose of batteries safely per state
and federal guidelines.
Warranty, Problems, Repairs & Info
Lowel equipment and kits
are sold through authorized Lowel Dealers and,
in some countries, Authorized Lowel Distributors.
Lowel IR DMX Controller, Lowel IR Sensor, IR DMX Translator,
and Lowel Fluo-Tec Studio Fluorescents are trademarks of
Lowel-Light Manufacturing, Inc.
Repairs, problems, suggestions,
and requests for brochures, instructions, parts lists
Patent Pending
may be handled by your authorized Lowel Dealer (Distributor)
or directly through Lowel. Electrical repairs should be made
only by Lowel or a qualified electrician.
version: 3.1 © Lowel-Light Mfg., Inc. 2006
Lowel-Light
Manufacturing, Inc.
140 58th Street
Brooklyn, NY 11220
Call: 800 334-3426 or 718 921-0600
Fax: 718 921-0303
e-mail [email protected]
www.lowel.com
®
325