1
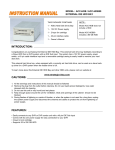
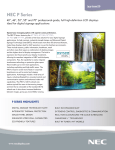
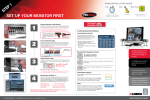
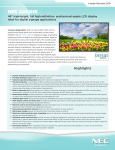
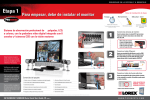
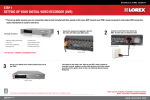
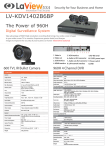
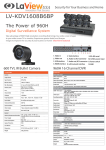
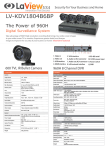
1/4”COLOR CCD DOME CAMERA
FOR OBSERVATION SYSTEMS
SG7125
FOR MORE INFORMATION
WWW.STRATEGICVISTA.COM
BEFORE OPERATING THIS SYSTEM, PLEASE READ THIS MANUAL THOROUGHLY
AND RETAIN IT FOR FUTURE REFERENCE
Thank you for purchasing the accessory color dome camera for use with your observation
system. LOREX is committed to providing our customers with a high quality, reliable security
product that customers have come to expect from us.
This camera features a 1/4-inch color CCD lens, allowing for excellent picture quality under
varying conditions, plus the added benefit of Listen-in audio. The compact smoked acrylic dome
housing blends with any décor and provides discrete video surveillance.
You can easily connect the dome camera to any Color LOREX, Home Sentinel or Sylvania
observation system. The camera receives power directly from the monitor.
To learn more about this Dome Camera and see the complete range or Lorex products, please
visit our website at:
www.strategicvista.com
SYSTEM INCLUDES:
COLOR DOME CAMERA
1 - 65 FT CABLE
OWNER’S MANUAL
MOUNTING BRACKET
CHECK YOUR PACKAGE TO MAKE SURE THAT YOU RECEIVED THE COMPLETE
CAMERA SYSTEM, INCLUDING THE COMPONENTS SHOWN ABOVE
FEATURES:
•
•
•
•
•
•
•
•
Compatible with Lorex, Sylvania and Home Sentinel Observation Systems
¼” Color CCD camera, fixed lens
350 lines, 1.0 lux
Indoor Dome Camera System
Light Weight, Compact Size
One-way audio communication (listen-in)
Smoked housing provides unobtrusive appearance
Manually rotate camera 360° and/or tilted 90° for optimum angle selection
-2-
CAMERA COMPONENTS:
2
1
4
3
1. Camera Lens – Delivers high quality image by using a
1/4” Color CCD Image sensor
2. Plastic Bubble Housing - Smoked acrylic housing
protects lens and provides an unobtrusive appearance
3. Camera Input – Connect the extension cable to the
back of the monitor
4. Microphone – Picks up sound around the camera
INSTALLATION:
Drywall Anchors
Adapter Plate
Screws
Before installation make sure that:
(A) You have the proper lift equipment or ladder to
reach the installation
(B) Electrical power is not connected to the dome
camera and surveillance monitor during
installation
Base Plate
Please refer to the camera component installation diagram above. To install the dome camera on a ceiling or
wall, follow these procedures:
1. Unscrew the base plate from the dome camera
2. Using the 2 screws and drywall anchors mount the base plate and adapter plate on the
wall or ceiling
3. Screw the dome camera onto the mounting bracket (base and adapter plate)
4. Connect the 65ft Din cable (included) to the male lead of the dome camera
5. Connect the other end of the 65ft cable to one of the camera inputs on the back of the
monitor and power unit
6. Adjust the camera direction for the desired picture view
-3-
Typical Configuration showing a dome camera connected to an Observation System:
Monitor
IMPORTANT NOTE:
Keep camera installed away from direct
sunlight. Also avoid places where humidity
and moisture are high.
Dome
Camera
Camera input
OPERATION:
Since this camera has a fixed lens, the camera lens must be adjusted manually to the desired position for
optimum viewing before installing the plastic bubble housing on the base plate.
TECHNICAL SPECIFICATIONS:
Image Sensor
1/4" Color CCD
Effective Pixels
512(H) x 492(V)
Horizontal Resolution
350 Lines
Lens
3.6mm, F2.0
Viewing Angle
62 degrees horizontally
Shutter Speed
1/60 ~ 1/10,000 sec.
S/N Ratio
More than 45dB
Minimum Illumination
1.0 Lux (F2.0)
Video Output
1.1Vp-p (75 Ohms)
Audio Output
1.3Vp-p (at 0.5M from camera)
Power Supply
Powered from monitor via cable
Operating Temperature
-10°C ~ +50°C (-14°F ~ 122°F)
Dimensions
5” (Diameter) x 3.5”(Height)
Distributed By:
STRATEGIC VISTA
300 Alden Road, Markham, Ontario, Canada L3R 4C1
For more information: www.strategicvista.com
As our products are subject to continuous improvement, SVII and its subsidiaries reserve the right to modify
product design, specifications and prices, without notice and without incurring any obligation. E&OE
-4-