Transcript
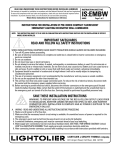
READ AND UNDERSTAND THESE INSTRUCTIONS BEFORE INSTALLING FIXTURE
INSTRUCTION SHEET NO.
This fixture is intended for installation in accordance with the National Electrical Code and local regulations. To
assure full compliance with local codes and regulations, check with your local electrical inspector before
installation. To prevent electric shock, turn off electricity at fuse box before proceeding.
IS:LAS56
Retain these instructions for maintenance reference.
Page 1 of 1
A0402
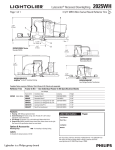
INSTALLATION PROCEDURE FOR: LAS56 AIRSEAL GASKET KIT
WITH 1004, IC, R, ICR, S, SIC, SR, SICR AND 1104, IC, R, ICR, S, SIC, SR, SICR, F1, F1R
LYTENING FRAME-IN-KITS
1. Align bottom edge of HOUSING with CEILING
SURFACE (FIG. A) (FIG. D)
Note: STEP 1 Needed for “NEW
CONSTRUCTION” HOUSINGS only
2. Apply appropriate size FLANGE GASKET to
CEILING SURFACE around edge of HOUSING
and bend flaps up into inside surface of
HOUSING (FIG. B) (FIG. C)
Note: CEILING SURFACE must be clean and
free of dust and debris before applying
FLANGE GASKET
Careful placement is needed to avoid openings
that would void airseal rating.
3. Apply 3 SLOT COVERS over slots in “NEW
CONSTRUCTION” HOUSING or over spring
openings in “REMODELER” HOUSING (FIG. B)
Note: SLOT COVERS are not needed in “NEW
CONSTRUCTION” HOUSING if the HOUSING
didn’t need to be adjusted vertically to align with
the CEILING SURFACE and knock-outs are in
the slots
HOUSING
CEILING
FIG A
FLANGE
GASKET
(1104 SERIES)
FIG B
SLOT
COVER
(1004 SERIES)
.
FLANGE
GASKET
NEW
CONSTRUCTION
HOUSING
CEILING
SURFACE
.
FLANGE
GASKET
.
REMODELER
HOUSING
FIG C
CEILING
SURFACE
FIG D
A
COMPANY
631 Airport Road, Fall River, MA 02720