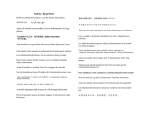
1
PRO SERIES OWNER’S MANUAL
M051-00416-A000
March 2001
1. SAFETY AND WARRANTY INFORMATION
It is the sole responsibility of the purchaser of LIFE FITNESS products to instruct all individuals,
whether they are the end user or supervising personnel on proper usage of the equipment.
It is recommended that all users of LIFE FITNESS exercise equipment be informed of the following
information prior to its use.
PROPER USAGE
1.
Do not use any equipment in any way other than designed or intended by the manufacturer. It is
imperative that weight stack machines as well as any other LIFE FITNESS equipment are used
properly to avoid injury.
2.
Keep hands and feet clear at all times from moving parts to avoid injury.
CHECK FOR DAMAGED PARTS
1.
DO NOT use any equipment that is damaged and or has worn or broken parts. Use only replacement parts supplied by LIFE FITNESS.
2.
MAINTAIN LABELS AND NAMEPLATES: Do not remove labels for any reason. They contain
important information. If unreadable or missing, contact LIFE FITNESS for a replacement.
3.
SECURING EQUIPMENT: All equipment MUST be secured to the floor to stabilize and eliminate
rocking or tipping over. This must be performed by a licensed contractor.
4.
MAINTAIN ALL EQUIPMENT: Preventative maintenance is the key to smooth operating equipment as well as keeping your liability to a minimum. Equipment needs to be inspected at regular
intervals.
5.
Ensure that any person(s) making adjustments or performing maintenance or repair of any kind is
qualified to do so. LIFE FITNESS will provide service and maintenance training at our corporate
facility upon request or in the field if proper arrangements are made.
1-1
1. Safety and Warranty Information
SPECIFIC OPERATING WARNINGS
1.
Routinely inspect all accessory clips that join attachments to the cables and replace at the first
sign of wear.
2.
Use only weight selector pins supplied by LIFE FITNESS on weight stacks. Substitutes are forbidden.
3.
Cables pose an extreme liability if used when frayed. Always replace any cable at first sign of
wear (consult LIFE FITNESS if uncertain).
4.
Do not allow users to wear loose fitting clothing while using equipment. It is also recommended to have users secure long hair back and up to avoid contact with moving parts.
5.
Fully insert weight selector pins. Partial insertion can cause weights to fall unexpectedly.
Never remove selector pin if any weights are suspended. Never attempt to release jammed
weights or parts.
6.
The Smith Machine could pose a danger if it is not properly secured to the floor. When used with
heavy weights, the unit may lift off of the floor causing user to lose his/her footing which could
result in injury. If unloaded one side at a time, the machine may tip over causing serious injury to
user as well as to other people standing nearby these machines.
7.
Do not use Lat Pulldown Bars on Multijungle Crossover cable systems or any other pulley
systems. These bars are designed for lat pulldown machines only. If improperly used, the Lat Bar
because of its weight, could fall unexpectedly striking the user when weight selector pin is pulled.
8.
Secure Cable crossover to the floor. This machine could pose a danger by tipping over when
used to perform certain chest exercise movements.
9.
Lat Pulldown Machines pose a danger if used with worn or damaged cables and connecting links.
User can be struck in the head if the cable or related parts break during use.
10. When adjusting any seat, knee hold down pad, range of motion limiter, foot hold pad or any other
type of black know adjuster, be sure that the adjusting pin is fully engaged in the hole to avoid
injury.
11. When using the Seated Press machine, make sure the user understands the proper usage of the
pre-stretch assist mechanism to avoid injury.
12. The Multi-Adjustable Bench when used with heavy dumbbells or other weight may become unstable and tip over if not secured to the floor causing injury to the user.
13. It is the purchaser’s sole responsibility to properly instruct its end users and supervising
personnel as to the proper operating procedures of all LIFE FITNESS equipment. It is
recommended that the end users physical condition be evaluated prior to beginning any exercise
program.
1-2
1. Safety and Warranty Information
14. UNDERSTANDING EACH AND EVERY WARNING TO THE FULLEST IS IMPORTANT. IF ANY
OF THESE WARNINGS ARE UNCLEAR, ASK FOR CLARIFICATION FROM LIFE FITNESS
PERSONNEL.
WARRANTY
WHAT IS COVERED
This Life Fitness commercial exercise equipment (“Product”.) is warranted to be free of all defects in
material and workmanship.
WHO IS COVERED
The original purchaser or any person receiving the Product as a gift from the original purchaser.
WHO PAYS TRANSPORTATION & INSURANCE FOR SERVICE
If the Product or any covered part must be returned to a service facility for repairs, We, Life Fitness,
will pay all transportation and insurance charges for the first year. You are responsible for
transportation and insurance charges during the second and third years (if applicable).
WHAT WE WILL DO TO CORRECT COVERED DEFECTS
We will ship to you any new or rebuilt replacement part or component, or, at our option, replace the
Product. Such replacement parts are warranted for the remaining portion of the original warranty
period.
WHAT IS NOT COVERED
Any failures or damage caused by unauthorized service, misuse, accident, negligence, improper
assembly or installation, debris resulting from any construction activities in the Product’s environment,
rust or corrosion as a result of the Product’s location, alterations or modifications without our written
authorization or by failure on your part to use, operate and maintain the Product as set out in your
Operation Manual (“Manual”). All terms of this warranty are void if this product is moved beyond
the continental borders of the United States of America (excluding Alaska, Hawaii and
Canada) and are then subject to the terms provided by that country’s local authorized Life
Fitness representative.
OPERATION MANUAL
It is VERY IMPORTANT THAT YOU READ THIS MANUAL before operating the Product. Remember
to perform the periodic maintenance requirements specified in the Manual to assure proper operation
and your continued satisfaction.
HOW TO GET PARTS & SERVICE
Simply call Customer Support Services at (800) 351-3737 or (847) 451-0036, Monday through Friday
from 8:00 a.m. to 6:00 p.m. Central Standard Time, and tell them your name, address and the serial
number of your Product. They will tell you how to get a replacement part, or, if necessary, arrange for
service where your Product is located or advise you on how and where to ship the Product for
service. Before shipping:
1. obtain a Return Authorization Number (RA#) from Customer Support Services
2. securely pack your Product (use the original shipping carton, if possible)
3. write the RA# on the outside of the carton
4. insure the Product, and
5. include a letter explaining the defect or problem and a copy of your proof of purchase if you
believe the service is covered by warranty
1-3
1. Safety and Warranty Information
EXCLUSIVE WARRANTY
THIS LIMITED WARRANTY IS IN LIEU OF ALL OTHER WARRANTIES OF ANY KIND EITHER
EXPRESSED OR IMPLIED, INCLUDING BUT NOT LIMITED TO THE IMPLIED WARRANTIES OF
MERCHANTABILITY AND FITNESS FOR A PARTICULAR PURPOSE, AND ALL OTHER
OBLIGATIONS OR LIABILITIES ON OUR PART. We neither assume nor authorize any person to
assure for us any other obligation or liability concerning the sale of this Product. Under no
circumstances shall we be liable under this warranty, or otherwise, of any damage to any person or
property, including any lost profits or lost savings, for any special, indirect, secondary, incidental or
consequential damages of any nature arising out of the use of or inability to use this Product. Some
states do not allow the exclusion or limitation of implied warranties or of liability for incidental or
consequential damages, so the above limitations or exclusions may not apply to you.
CHANGES IN WARRANTY NOT AUTHORIZED
No one is authorized to change, modify or extend the terms of this limited warranty.
EFFECT OF STATE LAWS
This warranty gives you specific legal rights and you may have other rights which vary from state to
state.
OUR PLEDGE TO YOU
Our Products are designed and manufactured to the highest standards.
We want you completely satisfied with our Products and will do everything possible under the
terms of this warranty to keep you secure in knowing you have bought the best!
1-4
2. GENERAL SPECIFICATIONS
1. Frame Construction
•
Frame is constructed of U.S. made mechanical quality steel purchased in mill run quantities.
•
Frame is primarily 2" square tubing with 11 gauge wall thickness. Different tubing sizes and wall
thickness shall be used as required through engineering stress analysis.
•
Frames are fully welded (not bolt together) for maximum structural integrity and minimum maintenance when possible. However, larger machines have a bolt-together configuration to facilitate
movement through smaller doorways and difficult installations.
2. Frame Finish
•
Prior to applying finish, each part is sandblasted to prepare the surface for maximum adhesion.
•
The frames are coated with an electrostatically applied epoxy powder coat finish applied in
powder form and then baked at 400 degrees F. This results in a smooth, consistent finish which is
very hard, assuring scratch and chip resistance.
3. Weight Selection
•
Weights are selected by using a 7/16” selector pin, which completely penetrates the weight plate
and locks in place to eliminate any chance of disengaging during use.
•
The selector pin is connected to the top weight to eliminate loss or substitution of substandard
pins.
4. Weight Plates
•
Machined from solid, 1” thick steel. Finish is wrinkle black powder coat.
5. Weight Plate Bushings
•
Each plate (not just the top weight) will contain low friction bushings, which surround the guide
rods to minimize friction and noise.
2-1
2. General Specifications
6. Top Weight Bushings
•
The top weight bushings shall float within the top weight utilizing rubber o-rings to assure ideal
alignment with the guide rods.
•
The bushings are self-lubricating in order that the guide rods will not require lubrication.
7. Weight Stack Guide Rods
•
Guide rods are 3/4” cold-drawn steel, turned ground and polished with hard chrome finish.
8. Weight Stack Suspension
•
Durable rubber bumpers are suspended under each stack to reduce shock and vibration stresses
to the frame and facility floor.
9. Weight Selection Shaft
•
The shaft is constructed of stainless steel and precision drilled for accurate pin selection.
10. Weight Transport
•
7 x 19 construction, 3/16” galvanized steel, lubricated, nylon-coated aircraft cable with breaking
strength rated at over 4000 pounds.
11. Cable Adjustment
•
All cables can be adjusted at the top weight utilizing a standard 7/8” open-end wrench.
12. Weight Stack Guards
•
All weight stacks are guarded on the back side to prevent bystanders from inadvertent contact
with the weight stack during use.
13. Pulleys
•
All pulleys are at least 4 -1/4” working diameter fiberglass impregnated nylon with precision fit
cable groove and double sealed bearings.
14. Pulley Covers
•
As a safety precaution, all pulleys are covered to minimize the danger of a moving pulley catching
a person’s finger or clothes.
15. Cams
•
2-2
All cams are laser cut steel and individually designed for each unit to match the appropriate muscle strength capability curve.
2. General Specifications
16. Counter Balanced Input Arms
•
Input arms on equipment are counter balanced where appropriate to eliminate the weight of the
assembly from the weight selected by the user.
17. Radial Bearings
•
Radial bearings are pillow block bearing with basic radial load rating of over 2000 pounds. Pillow
block bearings allow shaft to self-align as well as rotate, which results in smooth and friction free
movement.
18. Linear Bearings
•
Linear bearings are packed with grease at the factory and sealed with synthetic rubber and steel
seals.
•
Bearing plates are rolled from high quality bearing steel hardened to Rockwell 60C. Bearing balls
are chromed steel hardened to Rockwell 60C.
•
The bearings feature ball conforming grooves, axial compliance, and self-alignment capability.
19. Shafts
•
All Linear bearing machines run on Thompson 60 Case Class L shafts or equivalent.
20. Bolts
•
All hardware is grade 5, grade 8, or stainless steel.
21. Upholstery
•
A superior grade of Boltaflex colorguard vinyl is used on all pads and wear covers. This material
utilizes the Prefixx finish to resist wear and stains from sweat and other deteriorating factors.
•
All edges are stitched to eliminate any folds in the material that would limit durability.
•
Wear covers are provided on all high use areas, so that rather than replacing an entire pad, the
wear cover can be replaced at a fraction of the cost, reducing maintenance expense.
22. Foam
•
Three and four pound EVA foam (deformation resistant) or equivalent shall be used on all
machines. Foam shall be glued to a support board and contour shall be shaped. Wood backing
shall be set with minimum 1/4” x 20 T-nuts
2-3
2. General Specifications
23. Hand grips
•
Hand grips are an extruded 60 durometer thermorubber compound that is non-absorbing, wear
and tear resistant, and exhibits good dry and wet frictional characteristics.
•
The grips shall be retained to the machine through the use of aluminum collars thereby
eliminating the tendency of the grip to slide off the machine.
24. Seat Adjustments
•
Numerically engraved seat and pad adjustments correctly align body to machine for proper posture, muscle isolation and body stabilization.
•
Adjusting posts are stainless steel for superior life and corrosion resistance.
•
All tube in tube sliding parts are lined with UHMW plastic in order that the friction and wear
between the parts is reduced and the seats are thereby easier to adjust.
25. Foot Platforms
•
All foot platforms are diamond plate, finished with a slip resistant wrinkle black powder coat finish.
26. Instructional Placard
•
Placards provide step-by-step instructions as well as pictures to illustrate proper use and muscles
trained.
27. Equipment Anchoring
•
All machines have holes in the feet which allow for easy anchoring to the floor. Life Fitness
recommends that all machines be anchored to the floor to minimize the possibility that they will be
tipped.
28. Warranty
•
A 10-year minimum warranty on frames, 5-years on pillow block bearings, guide rods, pulleys and
weight plates, 1 year on linear bearings, cables, and grips, and 90 days on upholstery and any
items not specified.
29. Liability Insurance
•
2-4
Certificate of insurance available upon request.
3. PRO SERIES MACHINES
3-1
3. Pro Series Machines
UPPER BODY EXERCISE MACHINES
Life Fitness Pro Series machines that emphasize the upper body are:
1. Chest Press (SU05)
2. Incline Chest Press (SU10)
3. Pectoral Fly (SU15)
4. Shoulder Press (SU25)
5. Lateral Raise (SU31)
6. Rear Deltoid/ Pectoral Fly (SU35)
7. Lat Pulldown (SU45)
8. Low Row (SU50)
9. Seated Row (SU55)
10. Pullover (SU60)
11. Seated Dip (SU66)
12. Arm Extension (SU70)
13. Arm Curl (SU75)
14. Dip & Chin Assist (SU86)
3-2
3. Pro Series Machines
CHEST PRESS (SU05)
Starting Position
Ending Position
Muscles exercised: Primarily the pectoralis major and minor. Secondarily
emphasized are the anterior deltoid and tricep.
Setup: Adjust the range of motion by raising or lowering the seat. Choose a
comfortable hand position with palms facing away from you. Hand grips should
align with your upper chest. Adjust weight as desired. Keep your feet on the foot
plates, back and shoulders straight and on the back pad, head up.
Performing the exercise: Elbows should be slightly lower than the shoulders. Use
the foot bar to push out the handles to a comfortable position. As you slowly push
the handles outward, keep the elbows moving directly out to the sides until you
reach the top of your range. Slowly lower the handles. When you’ve finished the
set, use your feet to push and hold the foot lever until the bar is completely lowered.
3-3
3. Pro Series Machines
INCLINE CHEST PRESS (SU10)
Starting Position
Ending Position
Muscles exercised: Primarily the pectoralis major and minor. Secondarily
emphasized are the anterior deltoid and tricep.
Setup: Adjust the range of motion by raising or lowering the seat. Choose a
comfortable hand position with palms facing away from you. Hand grips should
align with your upper chest. Adjust weight as desired. Keep your feet on the floor,
back and shoulders straight, head up.
Performing the exercise: Slowly push the handles up and keep the elbows moving
directly out to the sides until you reach the top of your range. Hold in the top
position without locking elbows. Slowly lower the handles to the starting position.
3-4
3. Pro Series Machines
PECTORAL FLY (SU15)
Starting Position
Ending Position
Muscles exercised: Primarily the pectoralis major and minor. Secondarily the
anterior deltoid and tricep.
Setup: Raise or lower the seat so that your hands are comfortable on the handles
above the pads. Arms should be resting on the pads. Adjust the arm pads by using
the pull knobs. Select the desired weight. Keep back straight against the pad, head
up.
Performing the exercise: Slowly push with your elbows until the pads touch each
other. Hold the extended position for a second. Let the pads come back slowly to
the starting position.
Note: Your shoulders should not be hyperextended in the starting position.
3-5
3. Pro Series Machines
SHOULDER PRESS (SU25)
Starting Position
Ending Position
Muscles exercised: Primarily the anterior deltoid. Secondarily the medial deltoid
and the tricep.
Setup: Raise or lower the seat so that the handles are level with the top of your
shoulders. Select the desired weight. Choose a hand grip that’s comfortable. Sit
back against the seat back with chest, shoulders and head up.
Performing the exercise: Slowly push the handles upward. Don’t lock elbows at
the top of the exercise. Return the handles slowly to the start position.
3-6
3. Pro Series Machines
Deltoid Lateral Raise (SU31)
Starting Position
Ending Position
Muscles exercised: Primarily the medial deltoid. Secondarily the anterior deltoid
and the posterior deltoid.
Setup: Raise or lower the seat so that the red dots line up with your shoulder joints.
Select the desired weight. Loosely grip the handles. Sit slightly forward so that your
chest rests on the chest pad. Keep back straight and head up.
Performing the exercise: Using your shoulders, push the pads up until your arms
are just below your shoulders. Hold the upward position briefly and then lower the
pads slowly to the starting position.
3-7
3. Pro Series Machines
REAR DELTOID/PECTORAL FLY (SU35)- PEC FLY EXERCISE
Starting Position
Muscles exercised: The pectoralis and anterior deltoid.
Setup: Raise or lower the seat so that your hands are comfortable on the vertical
handles. Elbows should be slightly below the shoulders. Feet should be on the
floor. Adjust the arm positions by using the pull knobs. The knobs should be in
holes 2, 3, 4 or 5 for this exercise. Keep back straight against the pad, head up.
Performing the exercise: Push handles together until the bumpers on the inner
arms touch each other. Hold the position for a second. Let the arms come back
slowly to the starting position.
Note: Your arms should not be hyperextended in the starting position.
3-8
3. Pro Series Machines
REAR DELTOID/PECTORAL FLY (SU35)- REAR DELTOID EXERCISE
Starting Position
Muscles exercised: Trapezius, rear deltoid, rhomboids.
Setup: Use pull knob to position handles into hole number 1 (handles back toward
weight stack). Raise or lower the seat so that your feet are on the floor when your
hands grip the horizontal handles. Sit facing the chest pad. Select the desired
weight. Keep back straight and head up.
Performing the exercise: Grip the handles loosely. With your arms parallel to the
floor and elbows bent slightly, pull the handles back as far as comfortable. Hold the
extreme position briefly. Slowly return the handles to the starting position.
3-9
3. Pro Series Machines
LAT PULLDOWN- (SU45)
Starting Position
Ending Position
Muscles exercised: Primarily latissimus dorsi. Secondarily the bicep.
Setup: Use the pull knob to adjust the roller pads up or down so that legs will be
firmly anchored under the pads. Select desired weight. Stand and grip the bar with
palms facing away from you and thumbs under the bar. Hands should be about
shoulder width or slightly wider on the bar. While holding the bar, sit on the bench
and lock legs under the pads while keeping back straight and head up.
Performing the exercise: Pull the bar down to the front of the chest in a smooth
motion. Keep elbows under the bar. Slowly return the bar toward the starting
position. Finish by standing until weights come to rest on the stack.
Note: The back and head should be straight throughout the setup, exercise, and
return of the bar to the resting position.
Variations:
1. Hold the bar with the hands four to six inches apart to emphasize the lower lat
area.
2. Lean back on the bench keeping the back straight and the head up.
3-10
3. Pro Series Machines
LOW ROW (SU50)
Starting and Ending Positions
Muscles exercised: Primarily latissimus dorsi and rhomboid. Secondarily
trapezius, posterior deltoid, bicep, teres minor, teres major.
Setup: Select desired weight. With feet resting on the foot plates, sit far enough
back on the bench so that your back muscles stretch some to reach the grip. Hold
the handles in a comfortable grip. Rest feet on foot plates. Keep back straight and
head up.
Performing the exercise: Pull the handles toward you in a smooth motion using
your shoulders. Motion ends when the elbows line up with your body. Slowly
return the handles to the starting position. You should feel your back muscles
stretching toward the final part of the motion.
3-11
3. Pro Series Machines
SEATED ROW (SU55)
Starting Position
Ending Position
Muscles exercised: Primarily latissimus dorsi and rhomboid. Secondarily
trapezius, posterior deltoid, bicep, teres minor, teres major.
Setup: Adjust the seat up or down. The seat should be adjusted so that the top of
the chest pad lines up with the middle of the chest. Adjust the chest pad so that you
can grip the handles with arms completely extended. Select desired weight. Hold
the handles in a comfortable grip with palms facing away from you. Rest feet on
foot plates. Keep back straight and head up.
Performing the exercise: Pull the handles toward you in a smooth motion using
your shoulders. Motion ends when the elbows line up with your body. Slowly
return the handles to the starting position.
3-12
3. Pro Series Machines
PULLOVER (SU60)
Starting Position
Ending Position
Muscles exercised: Pectoralis, latissimus dorsi, posterior deltoid, teres minor, teres
major, tricep.
Setup: Adjust the seat up or down. The seat should be adjusted so that the pivot
point aligns with the shoulders. Select desired weight. Put arms onto pads and
hands on the handle. Do not grip the handle. Rest feet on floor. Keep back slightly
arched and head up.
Performing the exercise: With elbows pushing against the pads, bring your elbows
down and in front of you as much as possible. Do not use your hands to push on the
bar as doing so will bring the biceps into the exercise. Hold the bar down for a
second or two. Slowly return the bar to the upper position
Note: Achieving maximum benefit from this exercise requires some degree of
stretching. However, do not select so much weight that the initial resistance makes
the exercise overly difficult.
3-13
3. Pro Series Machines
SEATED DIP (SU66)
Starting Position
Ending Position
Muscles exercised: Primarily the tricep. Secondarily the anterior deltoid.
Setup: Adjust the seat up or down. The seat should be adjusted so that the elbows
are bent at 90 degree angles when gripping the handles. Select desired weight.
Rotate the handles inward or outward as desired. Rest feet on floor. Keep back
slightly arched and head up.
Performing the exercise: With back on the pad and elbows close to your sides,
slowly press the handles down. Do not lock elbows at the bottom. Slowly return
handles to start position.
3-14
3. Pro Series Machines
ARM EXTENSION (SU70)
Starting and Ending Position
Muscle exercised: Tricep.
Setup: Adjust the seat up or down. The seat should be adjusted so that the elbows
line up with the red pivot point. Select desired weight. Rest feet under bar. Keep
back straight and head up.
Performing the exercise: Rotate the handle back and grip it with palms facing
inward. Extend the elbows outward while keeping the upper arms parallel and on
the pad. Slowly return handles to start position.
3-15
3. Pro Series Machines
ARM CURL (SU75)
Starting Position
Ending Position
Muscle exercised: Bicep.
Setup: Adjust the seat up or down. The seat should be adjusted so that the elbows
line up with the red pivot point. Select desired weight. Rest feet on floor. Keep back
straight and head up.
Performing the exercise: Grip the bar handles with palms up. Arms should be
straight. Curl the handles up toward your neck. Keep your elbows on the pad and
aligned with the pivot point. Hold the bar briefly at the top of the exercise. Slowly
return the bar to the start position.
3-16
3. Pro Series Machines
DIP & CHIN ASSIST (SU86)
Dip Assist
Chin Assist
Dip Assist
Muscle exercised: Tricep.
Chin Assist
Muscle exercised: Bicep.
Dip Assist
Setup: For the Dip Assist, rotate the lower bar handles inward or outward. Lift the
pad up and lock it into place if assist is desired. Select desired weight. (Note:
weight chosen is weight that will be subtracted from body weight when performing
exercise. Hence, the more weight selected, the easier the exercise.)
Performing the exercise: Stand on the foot plates and grip the lower bar handles if
performing the Dip Assist. Choose a set of upper handles to perform the Chin
Assist. Place knees on the pad while stepping off of the foot plates. Keep back
straight and head up while raising and lower arms at the elbow. When finished,
remove one knee from pad while it is in the down position and step onto foot plate.
Remove second knee when pad gets toward top and step onto foot plate.
Chin Assist
3-17
3. Pro Series Machines
LOWER BODY EXERCISE MACHINES
Life Fitness Pro Series machines that emphasize the lower body are:
1. Horizontal Leg Press (SL05)
2. Seated Leg Press (SL10)
3. Leg Extension (SL20)
4. Leg Extension with range limiter (SL25)
5. Leg Curl (SL30)
6. Leg Curl with range limiter (SL35)
7. Seated Leg Curl (SL40)
8. Seated Leg Curl with range limiter (SL45)
9. Multi-Hip (SL50)
10. Hip Adductor (SL55)
11. Hip Abductor (SL60)
12. Standing Calf (SL65)
13. Glute (SL75)
3-18
3. Pro Series Machines
HORIZONTAL LEG PRESS (SL05)
Starting and Ending Positions
Muscle exercised: Primarily the quadriceps. Secondarily the gluteus and
hamstrings.
Setup: Pull the knob to adjust the start position. Your knees should be bent at about
a 90 degree angle to start. Select the desired weight.
Performing the exercise: Place your feet on the plate and grip the handles. Keep
your knees lined up over your feet and slowly straighten so that your knees are just
slightly bent. Do not lock knees. Slowly lower back down.
Variations: A narrow stance will place more emphasis on the adductors. A wide
stance will place more emphasis on the hip flexors and abductors.
3-19
3. Pro Series Machines
SEATED LEG PRESS (SL10)
Starting and Ending Positions
Muscle exercised: Primarily the quadriceps. Secondarily the gluteus and
hamstrings.
Setup: Pull the knob to adjust the start position. Your knees should be bent at about
a 90 degree angle to start. Select the desired weight.
Performing the exercise: Place your feet on the plate and grip the handles. Keep
your knees lined up over your feet and slowly straighten so that your knees are just
slightly bent. Do not lock your knees. Use about a three count to straighten your
legs. Hold the extreme position for a brief moment. Slowly lower back down using
a six count.
Variations: A narrow stance will place more emphasis on the adductors. A wide
stance will place more emphasis on the hip flexors and abductors.
3-20
3. Pro Series Machines
LEG EXTENSION (SL20)
Start Position
End Position
Muscle exercised: Quadriceps.
Setup: Pull the knob to adjust the start position. Your knees should be bent at about
a 90 degree angle to start. Select the desired weight.
Performing the exercise: Place your feet on the plate and grip the handles. Keep
your knees lined up over your feet and slowly straighten so that your knees are just
slightly bent. Use about a three count to straighten your legs. Hold the extreme
position for a brief moment. Slowly lower back down using a six count.
Using the Range limiter (SL25): If the machine is equipped with a range limiter,
you may adjust the range of motion and starting pad location. Set the desired pad
location by using the number coded pull knob. Set the desired range of motion by
using the letter coded pull knob.
3-21
3. Pro Series Machines
LEG CURL (SL30)
Start Position
End Position
Muscle exercised: Hamstrings.
Setup: Select desired weight. Lie face down with back of ankles under pad. Knees
should be off of the end of the bench so they line up with the pivot point of the
machine.
Performing the exercise: Grip the handles. Keeping your hips on the bench,
slowly bend your legs as much as possible. Hold the pad at the top position for a
moment. Slowly let the pad down.
Using the range limiter (SL35): If the machine is equipped with a range limiter,
you may adjust the range of motion and starting pad location. Set the desired pad
location by using the number coded pull knob. Set the desired range of motion by
using the letter coded pull knob.
3-22
3. Pro Series Machines
SEATED LEG CURL (SL40)
Start Position
End Position
Muscle exercised: Hamstrings.
Setup: Select desired weight. Sit down on seat and adjust the back pad by pulling
the knob under the left side of the seat. The seat should be adjusted so that the knee
lines up with the pivot point (the red dot). Adjust the ankle pad so it’s positioned
just under the ankles. Sit down with legs on top of the ankle pad. Lower the thigh
pad until it’s comfortable. Keep back straight and head up.
Performing the exercise: Hold the thigh pad handles. Curl the pad down and back
slowly. Hold the pad at the back position for a moment. Slowly let the pad out.
Raise the thigh pad to get off of the machine.
Using the range limiter (SL35): If the machine is equipped with a range limiter,
you may adjust the range of motion and starting pad location. Set the desired pad
location by using the number coded pull knob. Set the desired range of motion by
using the letter coded pull knob.
3-23
3. Pro Series Machines
MULTI-HIP (SL50)
Exercises
Muscle exercised: The multi hip machine can be used in four different ways as
shown in the figure above. The exercises use the hip adductors, hip abductors,
gluteus.
Setup: Select desired weight. Adjust the foot plate so that the pivot point aligns
with the hip. Adjust the roller pad so that it will be either just above the knee (for
abduction or flexion) or just under the knee (for adduction or extension exercises).
For hip abduction and adduction, face the weight stack and hold the handles. For
hip flexion and extension, turn 90 degrees away from the weight stack.
Performing the exercise: Grip the handles for the exercise you will be performing.
Lift and lower the weight with the pad either over or under the thigh.
3-24
3. Pro Series Machines
HIP ADDUCTOR (SL55)
Start Position
Muscle exercised: Hip adductors
Setup: Select desired weight. Sit down with feet on foot pegs so knees are bent 90
degrees. Use the lever to select a desired starting point with the knees apart.
Performing the exercise: Hold the handles and slowly move the pads in, pushing
with the knees. Hold the inward extreme position briefly. Slowly return to the start
position. When finished, pull the lever to release the weight pads to exit the
machine.
3-25
3. Pro Series Machines
HIP ABDUCTOR (SL60)
Start Position
Muscle exercised: Hip abductors
Setup: Select desired weight. Sit down with feet on foot pegs so knees are bent 90
degrees. Use the lever to select a desired starting point with the knees together.
Performing the exercise: Hold the handles and slowly move the pads out, pushing
with the knees. Hold the outward extreme position briefly. Slowly return to the start
position. When finished, pull the lever to release the weight pads to exit the
machine.
3-26
3. Pro Series Machines
STANDING CALF (SL65)
Start Position
End Position
Muscle exercised: Soleus, gastrocnemius
Setup: Select desired weight. While standing on the floor, adjust the pads to your
shoulder height by using the pull knob.
Performing the exercise: Step onto the platform with balls of the feet. Heels
should be hanging off of the back of the platform. Bend knees and slide shoulders
under the pads. Grip handles. Keep back straight while raising heels without
bending knees. Hold the upper position briefly and lower slowly. Finish by bending
knees to bring the weight stack down and then exit the machine.
3-27
3. Pro Series Machines
GLUTE (SL75)
Start Position
End Position
Muscle exercised: Gluteus
Setup: Select desired weight. Use the pull knob to adjust the knee pad so that it’s at
the back of the knee. Adjust the hip pad to support the torso.
Performing the exercise: Lie down and hold the handles. With roller pad over
back of leg, extend leg upward slowly. Return slowly.
3-28
3. Pro Series Machines
TORSO EXERCISE MACHINES
Life Fitness Pro Series machines that emphasize the torso are:
1. Abdominal (ST05)
2. Low Back Extension (ST20)
3. Low Back Extension with Range Limiter (ST25)
3-29
3. Pro Series Machines
Abdominal (ST05)
Start Position
End Position
Muscle exercised: Abdominals
Setup: Select desired weight. Use the pull knob to adjust the chest pad to the
desired start position. With a straight back, the pad should rest on the mid chest.
Adjust the foot plate so the knees are bent 90 degrees.
Performing the exercise: Holding the handles, slowly contract the abdominals into
a crunch position. Return slowly to an upright position.
3-30
3. Pro Series Machines
LOW BACK EXTENSION (ST25)
Start Position
End Position
Muscle exercised: Erector spinae, gluteus
Setup: Select desired weight. Adjust the foot plate so that with the knees bent, you
are sitting at the back edge of the cushion. Position the back pad to align with
shoulder blades.
Performing the exercise: Sit and align your hip with the pivot point. Fasten seat
belt and cross arms over chest. With chest up and shoulders back, move from the
waist, slowly pushing back the pad to the extended position. Hold the position
briefly. Slowly return to an upright position.
Using the range limiter (ST25): If the machine is equipped with a range limiter,
you may adjust the range of motion and starting pad location. Set the desired pad
location by using the number coded pull knob. Set the desired range of motion by
using the letter coded pull knob.
3-31
3. Pro Series Machines
MULTI USE EXERCISE MACHINES
Multiuse Life Fitness Pro Series machines are:
1. Smith Machine (PL06)
2. Multi Adjustable Bench (FB31)
3. Multi Jungle (SM10, SM11, SM20, SM21, SM22, SM30, SM40, SM41, SM42, SM50, SM51,
SM60, SM61, SM62, SM63, SM80, SM81, SM82, SM83)
3-32
3. Pro Series Machines
SMITH MACHINE (PL06)- Upper body exercises
General information: Many exercises can be performed on the Smith machine. The Smith
machine uses free weights as opposed to a weight stack. Some of the primary exercises that
can be performed on the machine are discussed below.
Upper body chest and arm exercises:
• Shoulder bench press (bench at 90 degrees) and standing shoulder press: Delts
• Flat bench press: Pecs
• Incline bench press (bench angled at 30 to 45 degrees): Pecs
• Close grip bench press: Triceps
Setup: Without weights on the bar, hook the bar to a position where your arms will be
nearly fully extended above you. Add desired weights to each side of the bar horns. With a
bench, the bar should be directly over your chest. Make sure your head is supported on the
bench. Feet should be on the floor (or on the bench when doing a flat bench press). With
back and head in a straight line, grip the bar at the desired width (see below for variations).
Performing the exercises: Unlock the bar from the hook and lower it toward the chest.
Work at keeping the bar off of the chest. Lowering the bar all the way to the chest could
place excessive strain on the anterior deltoids. Raise the bar away from the chest. Do not
lock elbows. Hold this position briefly. When finished, twist the bar into the bar hook at a
position that will make it easy to slide off of the bench.
Variations: Gripping the bar at less than shoulder width places more emphasis on the inner
pectorials and triceps. Gripping the bar at greater than shoulder width places more emphasis
on the outer pectorials and anterior deltoids.
3-33
3. Pro Series Machines
SMITH MACHINE (PL06)- Back exercises
Back exercises:
• Shrugs: Traps
• Bent over rows: Lats
• Dead lifts: Erector spinae
Performing the exercises:
Shrugs: Without weights on the bar, hook the bar to a starting position where your arms will
be nearly fully extended down around the thighs. Add desired weights to each side of the bar
horns. In the standing position, your feet should be slightly less than shoulder width apart.
Hands should touch just outside the edge of your legs. Palms should be facing away from
you. Keep your head up and back straight. Relax your shoulders and let them droop down.
Unlock the bar from the hook and raise it toward the chest as you slowly shrug your
shoulders upward and back as far as possible. Slowly lower the bar to the starting position.
Bent over rows: Without weights on the bar, hook the bar to a starting position near the
midpoint of your shin. Add desired weights to each side of the bar horns. Hands should grip
the bar at about shoulder width. Palms should be facing toward you. Keep your head up and
back straight. Bend your knees slightly and bend over so that your upper body is almost
parallel to the floor. Unlock the bar from the hook and raise it toward the waist. Slowly
lower the bar to the starting position. Keep your body at the same angle throughout the
exercise so as not to put pressure on the lower back.
Dead lifts: Without weights on the bar, hook the bar to a starting position on the lowest
hook. Add desired weights to each side of the bar horns. Hands should grip the bar at about
shoulder width. Palms should be facing away from you. Keep your head up and back arched
throughout the exercise. Squat down with your feet six to twelve inches apart and grip the
bar just outside your ankles. Pull your shoulders back and slowly raise the bar. Keep
shoulders back and head up. Maintain a straight back and do not hyperextend the back as
you rise up. Lower the bar back down to the start position.
3-34
3. Pro Series Machines
SMITH MACHINE (PL06)- Leg exercises
Leg exercises:
• Squats: Quads
• Lunges: Quads, glutes, hamstrings
Performing the exercises:
Squats: Without weights on the bar, hook the bar to a starting position about an inch
below the top of your shoulders. Add desired weights to each side of the bar horns. In the
standing position, your feet should be about shoulder width apart. Keep your head up and
back straight. Lift the bar onto your upper back resting the bar just above your shoulders.
Twist the bar out of its hook and stand up fully. Keeping your torso upright throughout
the exercise, slowly bend your knees until your glutes are lower than your knees. This
motion should take about five seconds. Pause for a moment and return to the starting
position. This motion should take about three seconds.
Lunges: Without weights on the bar, hook the bar to a starting position about an inch
below the top of your shoulders. Add desired weights to each side of the bar horns. In the
standing position, your feet should be next to each other. Keep your head up and back
straight. Lift the bar onto your upper back resting the bar just above your shoulders.
Twist the bar out of its hook and stand up fully. Keeping your torso upright throughout
the exercise, step forward a couple of feet with one leg keeping the toes pointed forward.
Keeping the back leg straight, begin to bend the forward leg. Doing so will bring the
back leg down. Stop the downward motion when the back leg is three to four inches from
the floor. Push off with the forward foot to return to the starting position. Alternate legs.
3-35
3. Pro Series Machines
MULTIJUNGLES (SM11, SM20, SM21, SM22, SM30, SM40, SM41,
SM42, SM50, SM51, SM60, SM61, SM62, SM63, SM80, SM81, SM82,
SM83)
General information: A multijungle is the most versatile piece of exercise equipment
other than free weights. A vast array of upper, lower and torso exercises can be
performed on a multijungle. Some of these exercises are discussed below.
Upper body exercises:
Pecorials- cable crossover
Deltoids- cable side lats, front cable raises
Trapezius- shoulder shrugs
Obliques- side bends
Triceps- pushdowns, kickbacks
Biceps- cable curls, pullups
Back- lat pulldown, bent over rows
Abdominals- hanging frog kicks, rope-and-cable crunches
3-36
3. Pro Series Machines
Lower body exercises:
Adductors, Abductors- cable adductors & abductors
Glutes- cable leg curls
Soleus, Gastrocnemius- calf raises (with belt)
3-37
3. Pro Series Machines
DUAL ADJUSTABLE PULLEY (SM22)
General information: The Dual Adjustable Pulley has two adjustable pulleys
positioned 53” (134 cm) apart to accommodate an infinite number of exercises. By
adjusting a lever, each weight stack can be configured to allow either one quarter or
one half resistance. The space between pulleys easily accommodates most benches and
wheelchairs. Exercises performed are the same as on a multijungle with the addition of
bench press exercises.
Upper body exercises:
Pecorials- cable crossover
Chest- bench press
Deltoids- cable side lats, front cable raises
Trapezius- shoulder shrugs
Obliques- side bends
Triceps- pushdowns, kickbacks
Biceps- cable curls, pullups
Back- lat pulldown, bent over rows
Abdominals- hanging frog kicks, rope-and-cable crunches
3-38
3. Pro Series Machines
MULTI ADJUSTABLE BENCH (FB31)
General information: The Life Fitness Multi-Adjustable Bench adjusts the back and seat simultaneously with a single pull pin. The seat pad automatically adjusts to an appropriate angle relative to the back pad. Rollers and the convenient lift-handle allow for easy movement.
3-39
3. Pro Series Machines
Chest Press (SU05) Specifications
Machine Weight:
556 lbs.
252 kg.
Weight Stack:
255 lbs.
119 kg.
Size:
in.= 53 x 53 x 68
cm= 135 x 135 x 173
• Foot assist lever moves independently from input arm.
• Foot assist lever requires only 80 percent of selected weight thus minimizing the force
required to move user arm to starting position and lower weight when finished.
• Weight stack adjusts easily from seated position.
• Dual grips, angled to maintain neutral wrist position.
• Diamond plate foot rest.
Incline Chest Press (SU10) Specifications
Machine Weight:
536 lbs.
243 kg.
Weight Stack:
255 lbs.
119 kg.
Size:
in.= 52 x 73 x 65
cm= 132 x 185 x 165
• Centerpull drive provides equal loading for both arms.
• Traditional and neutral hand grip positions for a choice of exercises.
• Weight stack adjusts easily from seated position.
• Adjustable start position enables user to select desired range of motion.
• Counterbalanced arm for low start weight.
Pectoral Fly (SU15) Specifications
Machine Weight:
505 lbs.
229 kg.
Weight Stack:
255 lbs.
119 kg.
Size:
in.= 43 x 57 x 82
cm= 109 x 145 x 208
• Start position adjusts in 10 degree increments.
• Axis of rotation parallel to seat back, maintaining correct axis of rotation relationship.
• Cams positioned overhead to simplify cable routing.
• Foot brace provides support throughout exercise.
• Unilateral input arms eliminate potential for one arm to assist the other.
3-40
3. Pro Series Machines
Shoulder Press (SU25) Specifications
Machine Weight:
508 lbs.
231 kg.
Weight Stack:
190 lbs.
95 kg.
Size:
in.= 50 x 71 x 65
cm= 127 x 180 x 165
• Traditional and neutral hand grip positions.
• Counter-balanced arm for low start weight.
• Full range of motion obtained for all body types through adjustable seat height.
• Centerpull drive provides equal loading for both arms.
Lateral Raise (SU31) Specifications
Machine Weight:
505 lbs.
230 kg.
Weight Stack:
190 lbs.
95 kg.
Size:
in.= 29 x 67 x 47
cm= 74 x 170 x 119
• Seat and chest pads are angled forward for optimal stability and isolation.
• Counterbalanced system provides reduced starting resistance.
• Swivel handles adjust for forearm length.
• Ten degree angle difference between body position and axis of rotation focuses
emphasis on medial deltoids.
Rear Deltoid/Pectoral Fly (SU35) Specifications
Machine Weight:
484 lbs.
220 kg.
Weight Stack:
255 lbs.
119 kg.
Size:
in.= 36 x 46 x 82
cm= 91 x 117 x 208
• Axis of rotation parallel to seat back, maintaining correct axis of rotation relationship.
• Horizontal and vertical handles.
• Start position adjusts in 10 degree increments.
• Cams positioned overhead to simplify cable routing.
• Unilateral input arms eliminate potential for one arm to assist the other.
3-41
3. Pro Series Machines
Lat Pulldown (SU45) Specifications
Machine Weight:
560 lbs.
254 kg.
Weight Stack:
300 lbs.
140 kg.
Size:
in.= 26 x 63 x 93
cm= 66 x 160 x 236
• Adjustable knee pads for maximum stability.
• A minimum 300 lb. weight stack.
• Safety rated carabiner provides reliable and safe performance.
• U.S. built pulldown bar.
Seated Row (SU55) Specifications
Machine Weight:
476 lbs.
216 kg.
Weight Stack:
255 lbs.
119 kg.
Size:
in.= 48 x 51 x 66
cm= 122 x 130 x 168
• Sternum pad contoured to avoid interference with arm motion.
• Sternum pad adjusts for varying arm lengths.
• Multi-position hand grips pivot to allow natural movement.
• Diamond plate, non-slip foot plates provide maximal stabilization and comfort.
Pullover (SU60) Specifications
Machine Weight:
590 lbs.
268 kg.
Weight Stack:
300 lbs.
140 kg.
Size:
in.= 47 x 60 x 65
cm= 119 x 152 x 165
• Start position adjustment to prevent users from extending beyond their range of motion.
• Start position adjusts in 10 degree increments.
• Counterbalanced system provides reduced starting resistance.
3-42
3. Pro Series Machines
Seated Dip (SU66) Specifications
Machine Weight:
540 lbs.
245 kg.
Weight Stack:
255 lbs.
119 kg.
Size:
in.= 42 x 52 x 66
cm= 107 x 132 x 168
• Seat height adjusts to control range of motion.
• Adjustable, two-position swivel hand grips.
• Seatbelt provides stability throughout exercise.
• Counterbalanced system provides reduced starting resistance.
Arm Extension (SU70) Specifications
Machine Weight:
453 lbs.
206 kg.
Weight Stack:
190 lbs.
95 kg.
Size:
in.= 40 x 45 x 65
cm= 102 x 114 x 165
• Arm pads angled down to help user maintain consistent position.
• Swivel handles automatically adjust for any forearm length.
• Arm pad configured to align elbow off pad to eliminate joint compression.
• Side supports provide increased stabilization.
Arm Curl (SU75) Specifications
Machine Weight:
440 lbs.
200 kg.
Weight Stack:
190 lbs.
95 kg.
Size:
in.= 40 x 43 x 65
cm= 102 x 109 x 165
• Handle pivots automatically to fit all forearm lengths.
• Counterbalanced arm for low start weight.
• Arm pad configured to align elbow off pad to eliminate joint compression.
• Arm pads angled down to help user maintain consistent position.
• Padded chest support helps user maintain axis alignment.
3-43
3. Pro Series Machines
Dip & Chin Assist (SU86) Specifications
Machine Weight:
480 lbs.
218 kg.
Weight Stack:
190 lbs.
95 kg.
Size:
in.= 47 x 52 x 88
cm= 119 x 132 x 224
•
Adjustable, two-position swivel hand grips for dip exercise.
•
Multiple hand grips on pull-up bar.
•
Knee assist pad folds down and away for unassisted training.
•
Dual access steps integrated into machine.
• 1:1 assistance ratio. The weight on the stacks equals the amount of assistance.
Horizontal Leg Press (SL05) Specifications
Machine Weight:
922 lbs.
418 kg.
Weight Stack:
395 lbs.
178 kg.
Size:
in.= 43 x 75 x 83
cm= 109 x 191 x 211
• Large diamond plate, non-slip footplate (30” x 27”) allows for a wide variety of foot
posi tions.
• Angled head pad and hand grips enhance comfort and proper alignment.
• Supported linear bearing system yields superior structural integrity.
• Choice of 12 start positions.
• User can adjust start position while in the exercise position.
Seated Leg Press (SL10) Specifications
Machine Weight:
780 lbs.
354 kg.
Weight Stack:
395 lbs.
178 kg.
Size:
in.= 40 x 68 x 69
cm= 102 x 173 x 175
• Upright seat position for ease of entry and exit.
• Large diamond plate, non-slip footplate (30” x 27”) allows for a wide variety of foot
posi tions.
• Choice of 10 start positions.
• Supported linear bearing system yields superior structural integrity.
• Lumbar pad support helps user maintain correct spinal alignment.
• User can adjust start position while in the exercise position.
3-44
3. Pro Series Machines
Leg Extension (SL20) Specifications
Machine Weight:
515 lbs.
234 kg.
Weight Stack:
255 lbs.
119 kg.
Size:
in.= 38 x 41 x 69
cm= 97 x 104 x 175
• Spring loaded seat back adjusts from seated position.
• Adjustable lower leg pad for varied leg lengths.
• Three degree angle in tibia pad provides balanced resistance.
• Roller pad has increased life over fixed pad because wear is distributed around entire
pad rather than focused on one spot.
• Handles positioned at side to provide stability.
• Range of motion limiter accommodates individual flexibility (Model SL25 only).
Leg Curl (SL30) Specifications
Machine Weight:
462 lbs.
210 kg.
Weight Stack:
190 lbs.
95 kg.
Size:
in.= 34 x 60 x 69
cm= 86 x 152 x 175
• Divergent angle between the hip and chest pads to help avoid lower back strain.
• Contoured chest pad for better weight distribution, stability and easier access to hand
grips.
• Adjustable lower leg pad for varied leg lengths.
• Three degree angle in tibia pad provides balanced resistance.
• Roller pad has increased life over fixed pad because wear is distributed around entire
pad rather than focused on one spot.
• Range of motion limiter accommodates individual flexibility (Model SL35 only).
3-45
3. Pro Series Machines
Seated Leg Curl (SL40) Specifications
Machine Weight:
570 lbs.
259 kg.
Weight Stack:
255 lbs.
119 kg.
Size:
in.= 36 x 57 x 69
cm= 91 x 145 x 175
• Spring loaded seat back adjusts from seated position.
• Adjustable lower leg pad for varied leg lengths.
• Three degree angle in tibia pad provides balanced resistance.
• Roller pad has increased life over fixed pad because wear is distributed around entire
pad rather than focused on one spot.
• Range of motion limiter accommodates individual flexibility (Model SL45 only).
Multi-Hip (SL50) Specifications
Machine Weight:
460 lbs.
209 kg.
Weight Stack:
140 lbs.
70 kg.
Size:
in.= 34 x 58 x 68
cm= 86 x 147 x 173
• Spring-assisted foot platform adjusts to align hip with axis of rotation.
• Leg pad adjusts to leg length.
• Dual-position handles for increased stability and safety.
• Roller pad has increased life over fixed pad because wear is distributed around entire
pad rather than focused on one spot.
Hip Adductor (SL55) Specifications
Machine Weight:
450 lbs.
205 kg.
Weight Stack:
190 lbs.
95 kg.
Size:
in.= 24 x 63 x 57
cm= 61 x 160 x 145
• Upright seat position for ease of entry and exit.
• User-accessible weight stack positioned to act as privacy shield.
• Leg support with knee pad and dual footpegs eliminate torque around knee.
• Start position adjusts from seated position with ratchet mechanism and handle release.
3-46
3. Pro Series Machines
Hip Abductor (SL60) Specifications
Machine Weight:
453 lbs.
206 kg.
Weight Stack:
190 lbs.
95 kg.
Size:
in.= 24 x 63 x 57
cm= 61 x 160 x 145
• Upright seat position for ease of entry and exit.
• User-accessible weight stack positioned to act as privacy shield.
• Leg support with knee pad and dual footpegs eliminate torque around knee.
• Start position adjusts from seated position with ratchet mechanism and handle release.
Standing Calf (SL65) Specifications
Machine Weight:
630 lbs.
286 kg.
Weight Stack:
395 lbs.
178 kg.
Size:
in.= 26 x 48 x 77
cm= 66 x 122 x 196
• Frame configuration offers a one-to-one lifting ratio with a weight selection up to 395
pounds.
• Input arm adjust for user height variation.
• Angled shoulder pads provide comfort and increased surface contact.
• Diamond plate foot plate does not wear like non-skid tape.
Glute (SL75) Specifications
Machine Weight:
375 lbs.
170 kg.
Weight Stack:
140 lbs.
70 kg.
Size:
in.= 36 x 53 x 65
cm= 91 x 135 x 165
• Adjustable torso and knee pads.
• Roller input pad positioned at back of knee to reduce quadriceps involvement.
3-47
3. Pro Series Machines
Abdominal (ST05) Specifications
Machine Weight:
400 lbs.
181 kg.
Weight Stack:
140 lbs.
70 kg.
Size:
in.= 46 x 37 x 65
cm= 117 x 94 x 165
• Dual angled chest pads with a rounded configuration and hand grips provide comfort
and upper torso stability.
• Starting range limiter provides ease of entry and exit, as well as to accommodate indi
viduals with varying torso flexibility.
• Diamond plate foot platform adjusts for varying leg length.
• Seat height adjusts for torso length.
Low Back Extension (ST20) Specifications
Machine Weight:
580 lbs.
263 kg.
Weight Stack:
300 lbs.
140 kg.
Size:
in.= 40 x 48 x 65
cm= 102 x 122 x 165
•
Shock dampening system at extension limit.
•
Seat belt for better stability.
•
Adjustable footplate with holddown.
•
Adjustable back roller pad.
• Range of motion limiter accommodates individual flexibility (Model ST25 only).
Cable Crossover (SM20) Specifications
Machine Weight:
841 lbs.
382 kg.
Weight Stack:
190 lbs. x 2
95 kg. x 2
Size:
in.= 31 x 159 x 95
cm= 79 x 404 x 241
• Stabilizing handles located above each weight stack.
• Swivel pulleys allow for smooth, unobstructed movement.
• Textured pull up bar.
• Also available with adjustable pulleys (Model SM21 only).
3-48
3. Pro Series Machines
Rear Deltoid/Pectoral Fly (SU35) Specifications
Machine Weight:
484 lbs.
220 kg.
Weight Stack:
255 lbs.
119 kg.
Size:
in.= 36 x 46 x 82
cm= 91 x 117 x 208
• Axis of rotation parallel to seat back, maintaining correct axis of rotation relationship.
• Horizontal and vertical handles.
• Start position adjusts in 10 degree increments.
• Cams positioned overhead to simplify cable routing.
• Unilateral input arms eliminate potential for one arm to assist the other.
Dual Adjustable Pulley (SM22) Specifications
Machine Weight:
810 lbs.
368 kg.
Weight Stacks:
190 lbs. (2)
95 kg. (2)
Size:
in.= 60 x 42 x 90
cm= 152 x 106 x 227
• Pulleys adjust from 8” (20 cm) to 84” (212 cm) high in 4” increments.
• An adjustment below the weight stack allows users to select ½ or ¼ of the resistance of
the weight indicated on the stack.
• With ¼ resistance selected and an increment weight, a user can select as little as 2 ½ lbs
of resistance or as much as 47 ½ lbs of resistance in 1 ¼ lb increments. By switching to
½ resistance, users can select from 5 lbs to 97.5 lbs of resistance in 2 ½ lb incre ments.
• Crossover handles, ankle strap and increment weight.
• Handles positioned above the user and between adjustable pulleys to accommodate pullup exercises.
Multi Adjustable Bench (FB31) Specifications
Machine Weight:
115 lbs.
52 kg.
Weight Stack:
none
none
Size:
in.= 26 x 55 x 17
cm= 66 x 140 x 43
• Back and seat pads adjust with a single pull pin.
• Seat pad automatically adjusts to the appropriate angle relative to the back pad.
• Rollers and lift handle allow for easy movement.
3-49
4. MAINTENANCE PROCEDURES
ACTION
DAILY
MONTHLY
QUARTERLY
BI-ANNUALLY YEARLY AS NEEDED
CLEAN
Upholstery
X
Guide Rods
X
Linear Rods
X
Shields
X
Hand Grips
X
INSPECT
Cables
Hardware
X
X
Frame
X
Hand Grips
X
LUBRICATE
Linear Bearing
X
Guide Rods
X
Range Limiter
X
4-1
4. Maintenance Procedures
ONCE A DAY
•
•
Wipe down upholstery with a mild soap and water or comparable all purpose cleaner.
Visually inspect all cables for wear at and around connections and along entire length of cable.
Always replace at first sign of wear.
ONCE A WEEK
•
•
•
•
•
Visually inspect all hardware for loosening, tampering or wear.
Check jam nut on weight stack for tightness.
Inspect all accessory and or carabiner clips or connecting links for wear.
Check condition of hand grips.
Check cables for stretch and adjust as necessary by loosening the large nut on top of the weight
stack and screw in the threaded plug until cable is tight and the weight pin goes in all holes easily.
Tighten the large nut to complete the adjustment.
ONCE A MONTH
•
Clean Guide Rods with paint thinner on a cloth and wipe off old residue. Clean tops of bearings at
stack and inspect for heavy buildup on rods below headplate (lift half of stack and do a visual
inspection, then clean as necessary).
LUBRICATION
•
•
•
•
Clean and lubricate all stainless steel slides as necessary.
Lubricate linear bearings with TF1000 grease (part number SK50-P0004-0000).
Lubricate guide rods with Break-Free (part number SK50-P0005-0000). Apply the Break-Free to a
cotton cloth, then run the cotton cloth up and down the guide rods as needed.
Range limiting device should be cleaned and lightly oiled using Break-Free.
NOTES
•
4-2
Use polishing compound (such as car wax) to clean and remove shoe scuffs from powdercoated
surfaces as necessary.
Copyright
© 2001 by Life Fitness.
All rights reserved. No part of this manual may be reproduced in any form whatsoever, by
photograph or xerography or by any other means, by broadcast or transmission, by
translation into any kind of language, nor by recording electronically or otherwise, without
permission in writing from the publisher.
Printed in the United States of America.
Life Fitness
10601 West Belmont Ave.
Franklin Park, Il 60131
800-634-8637