1
Operating Instructions
Wine Chiller
GB
7084 750-00
Many thanks for your trust.
Range of appliance use.
Congratulations on your purchase of this wine chiller. In
buying this product, which is distinguished by its perfect
user-friendliness, impeccable reliability and high quality,
you have chosen a top class appliance. We wish you a
lot of pleasure with your new wine chiller – and a lot of
enjoyment from your wines.
The appliance is suited only for storing wine. In the
case of commercial food cooling, the pertinent statutory regulations have to be observed.The appliance is
not suited for storing and cooling pharmaceutical, blood
plasma, laboratory preparations or similar substances
and products. Any misuse of the appliance may result in
damage to or spoilage of the stored goods. Furthermore,
the appliance is unsuited for use in areas exposed to an
explosion hazard.
The fewer the grapes produced in an area,
the better the wine.
Poor, well-drained soils are best for good wine. The
properties of the soil influence the vitality of the vine,
which in turn affects the quality of the grape. Climate is
another factor that is important for wine. Because light
and air humidity are important for the development of the
flavour of the wine.
The right environment for your wines.
A vine is an extremely sensitive plant. From the time it is
planted to its maturing period and the time the grapes
are harvested and the wine is made, it is dependent on
three factors: light, air humidity and ambient temperature. This sensitivity continues even once the wine is
bottled. To allow the flavour of the wine to fully develop
or preserve the excellent aroma, the wine has to be
stored perfectly – and your wine cooler offers the best
conditions for this.
2
Contents
Page
Safety instructions and warnings ....................................................................................................
General information .........................................................................................................................
Electrical requirements ....................................................................................................................
Dimension .....................................................................................................................................
Setting up........................................................................................................................................
Operating and control elements........................ ..............................................................................
Switching the appliance on and off.................................................................................................
Setting the temperature..................................................................................................................
Ventilation.......................................................................................................................................
Audible warning signal....................................................................................................................
Additional function .........................................................................................................................
Equipment ....................................................................................................................................
Defrosting........................................................................................................................................
Cleaning..........................................................................................................................................
Malfunction ....................................................................................................................................
Shutting your appliance down.........................................................................................................
Disposal notes..................................................................................................................................
4
4
4
4
5
5
5
5
6
6
6
7
7
7
7
7
7
Description of appliance and equipment
3
>
•
$
%
!
&
!
?
@
!
'
"
#
(
)
*
)
%
#
!
+
%
A
+
F
G
;
H
F
-
#
+
+
#
!
!
,
;
A
A
B
B
C
D
'
(
E
,
-
C
)
A
5
(
#
!
'
=
'
+
'
,
3
•
•
!
%
!
'
2
3
4
5
2
3
.
4
5
+
&
6
2
7
+
!
.
5
'
#
&
'
!
%
2
1
+
#
'
!
/
0
(
'
*
'
7
'
#
'
#
#
+
'
#
&
)
&
+
+
#
#
'
)
'
0
(
&
/
'
!
,
Power supply (AC) and voltage at operating point must comply
with the details on the type plate. The socket must be fused
with a 10 A fuse or higher, it must be away from the rear the
appliance and must be easily accessible.
,
'
&
(
,
#
,
Dimensions
,
0
;
:
'
'
WKb 1712: height: 850mm, width: 660mm, depth: 670mm
WKb 4112: height: 1644mm, width: 660mm, depth: 670 mm
WK 4612 : height: 1841mm, width: 660mm, depth: 670 mm
,
!
#
'
%
,
,
.
,
#
&
=
!
&
'
&
'
&
'
!
#
'
#
,
!
!
'
#
(
#
,
%
&
1
#
!
*
#
'
!
'
<
,
)
+
*
+
#
,
+
!
&
.
'
'
!
'
'
#
!
'
,
9
!
#
#
,
#
&
#
&
2
!
,
%
)
!
(
3
1
%
'
!
)
'
+
#
#
#
+
!
&
'
#
%
'
%
&
,
(
'
'
,
9
+
!
#
#
)
,
%
;
3
#
1
+
!
,
+
%
)
&
'
)
&
,
#
,
&
)
)
!
.
%
%
)
:
'
#
,
9
,
#
#
2
#
'
#
,
.
4
4
'
+
C
•
Electrical requirement
'
6
•
,
'
5
'
+
.
'
•
9
'
5
:
4
•
9
7
+
!
6
7
5
3
•
•
'
9
•
9
6
5
.
#
7
5
4
6
4
3
•
,
3
•
8
5
'
3
2
.
'
•
•
5
•
•
•
•
.
•
-
+
'
!
#
&
)
'
)
'
%
+
,
#
(
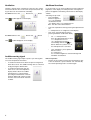
Setting up
Switching the appliance on and off
• Avoid locating the appliance in direct sunlight or near heat
You are recommended to clean the appliance before switching
it on for the first time (see “Cleaning”). Connect the appliance to the mains – the appliance is on.
•
To switch the appliance off : Keep ON/
OFF button pressed for 3 sec. so that the
temperature display goes out.
•
To switch the appliance on : Press the
ON/OFF button until the Display lights up.
•
•
•
sources such as an oven or a radiator.
The floor should be level and even. You can compensate for
an uneven floor by adjusting the adjustable feet.
Standard EN 378 specifies that the room in which you
install your appliance must have a volume of 1 m³ per 8 g
of R600a refrigerant used in the appliance, so as to avoid
the formation of inflammable gas/air mixtures in the room
where the appliance is located in the event of a leak in the
refrigerant circuit, The quantity of refrigerant used in your
appliance is indicated on the type plate on the inside of the
appliance.
The appliance is set to operate within specific ambient
temperature limits according to its climate rating. These
temperature limits should not be exceeded. The correct
climate rating for your appliance is indicated on the type
plate.
SN - ST = +10 ° C to +38 °C
SN – T = +10 °C to +43 °C
Operating and control elements
Setting the temperature
To reduce the temperature : Press the
To increase the temperature : Press the
button.
button.
While you are entering
the temperature, the set
temperature will flash on
the display.
•
You can change the
settings in increments of
1oC briefly pressing the
button again.
•
The electronic controls
will switch over automatically about 5 seconds after the
last time you pressed the button, and the actual temperature will be displayed.
•
Factory temperature setting is +12oC.
If F1appears in the display, the appliance has a fault. Consult
your nearest customer service point.
•
Temperature display
Temperature setting button
Audible warning on/off button
Interior light on/off button
Child - proof lock
On/off button
Ventilation on/off button
5
Ventilation
Additional functions
Thereby a climate which corresponds to that of a wine cellar is
achieved inside the wine cooler. Corks are prevented from drying out due to an increased level of humidity.
In set-up mode you can set the child-proof lock and adjust the
brightness of the display. The child-proof lock is designed to
protect the appliance from being switched off accidentally by
children.
To switch on: Press the
until
button and
button
Activating set-up mode :
•
Press Ventilation
button for approx. 5
secs - the Ventilation
on/off button flashes
- the display shows c for child-proof lock.
Note : the value to be altered flashes.
symbol appears on the display.
•
•
To switch off: Press the
until
button and
button
symbol disappears on the display.
Select the required function by pressing the Up/Down button :
c = child-proof lock, h = brightness of the display.
Now select /acknowledge function by
pressing Ventilation on/off button briefly
:
•
For c = chold-proof lock,
press the Up/Down button to select
c1 = child-proof lock on or
c0 = child-proof lock off and
acknowledge with the Ventilation
button. When the symbol
is lit,
the child-proof lock is activated.
•
Audible warning signal
The audible warning signal helps to protect your wine againts
excessive temperature fluctuations.
•
It sound when the door has been left open for longer than
about 60 seconds. The audible warning device is switched
off by pressing the Alarm button.
•
It sound when the interior gets too
warm or too cold. The temperature
display will also flash. The audible
warning device is switched off by
presssing the Alarm button. The temperature diaplay will continue to flash
until the cause of the alarm has been
rectified.
6
for h = brightness, press Up/Down
button to select
h1 = minimum to
h5 = maximum brightness and acknowledge with
Ventilation on/off button.
Exit set-up mode :
•
Exit the set-up mode by pressing the On/Off button; after
2 min. the electronic system switches over automatically.
The normal operating mode is activated again.
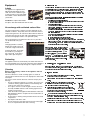
Equipment
I
J
T
Labels
The appliance is supplied with a
label holder with labels for each
shelf. Use these to label the type
of wine stored on each shelf. Additional labels can be obtained from
your dealer.
K
U
V
U
W
Y
U
[
W
W
]
\
U
q
y
Z
\
k
_
d
q
d
೬
e
|
v
w
t
x
{
l
U
_
c
[
d
^
d
`
]
e
X
_
\
\
]
e
d
X
V
g
d
U
`
Z
\
^
]
w
r
w
e
y
t
{
d
_
d
q
w
q
d
z
X
U
z
]
]
r
l
X
l
w
{
w
e
^
d
_
^
U
j
]
W
X
]
W
[
a
d
i
V
W
X
^
\
^
d
b
e
[
_
X
X
d
V
c
c
^
`
_
V
k
e
\
[
\
_
i
^
e
X
\
l
o
d
b
[
]
^
\
y
u
^
d
e
W
^
^
|
X
y
^
\
c
w
e
[
Z
d
[
e
Z
^
c
`
X
W
d
V
[
Z
U
W
^
d
\
X
X
d
h
d
U
U
\
U
a
\
d
W
^
\
^
X
o
U
]
i
e
c
\
_
^
Z
`
V
e
^
d
U
Y
W
U
W
W
^
e
Y
^
h
g
^
\
f
f
\
^
[
Z
^
Z
W
U
h
Z
^
_
m
d
^
X
_
X
`
\
[
^
h
e
^
f
d
e
^
X
Y
|
q
q
Y
}
u
r
y
Z
[
y
z
}
X
r
\
~
w
w
x
]
}
}
{
y
^
[
q
x
x
q
|
}
t
r
x
y
v
u
{
~
w
{
|
|
q
_
Y
W
U
c
V
d
_
^
d
e
[
^
\
q
X
d
|
Y
X
]
w
Y
Z
[
d
Y
^
W
Z
f
]
U
\
\
^
]
d
^
`
d
U
d
e
^
b
X
[
\
_
X
\
W
[
w
]
U
d
a
^
^
s
W
X
l
d
d
d
w
e
X
[
z
^
e
U
y
^
[
\
t
_
d
d
[
]
r
d
d
[
z
[
_
W
]
w
\
[
]
^
V
|
a
[
b
[
Y
_
[
d
_
|
X
_
d
_
[
X
\
h
Z
`
[
^
d
\
a
U
X
o
W
b
U
[
Z
`
f
U
U
\
d
i
[
e
\
^
a
a
\
W
U
[
U
V
_
\
^
`
_
j
[
\
j
\
U
w
]
]
u
U
W
q
`
r
X
z
\
]
|
^
w
i
[
{
d
q
e
d
q
e
x
^
w
z
_
|
^
]
d
y
[
U
q
q
\
t
w
z
y
y
s
|
೬
~
w
y
U
w
^
s
_
d
e
w
^
z
_
t
y
^
r
Y
z
X
W
w
X
d
^
Z
f
[
\
_
d
X
Z
Z
^
`
`
[
a
[
d
X
Z
d
^
b
Y
^
W
X
d
V
W
^
]
U
\
d
W
U
Z
Z
^
W
_
೬
೬
•
e
U
\
U
d
e
^
X
_
d
e
^
i
Z
]
U
[
X
Y
Y
\
V
Y
Z
Z
[
d
c
W
[
a
^
\
g
X
W
^
X
d
d
Y
U
f
w
Y
W
Y
[
d
[
Z
\
d
W
d
d
_
Z
b
Y
`
X
d
W
d
U
Z
[
\
^
`
\
d
e
\
`
W
U
d
h
^
e
e
f
]
d
^
]
^
W
d
X
W
c
f
^
c
U
Y
^
V
Z
W
b
_
U
Z
U
c
f
X
]
Z
c
`
^
_
e
X
d
^
\
U
W
_
[
[
\
X
a
o
^
g
^
a
X
\
f
j
`
[
\
]
^
]
^
d
\
d
^
^
V
e
U
_
U
d
c
^
[
_
g
o
e
f
[
a
^
c
U
X
d
\
\
Z
Z
d
i
Z
X
^
^
Y
U
]
\
_
[
d
f
_
X
U
^
W
d
d
W
X
\
[
]
Z
W
^
^
^
`
U
V
w
^
Y
^
Y
U
^
`
X
Y
f
b
u
\
]
[
U
y
X
[
^
X
^
d
^
d
W
Y
e
\
h
U
U
Y
^
^
X
Z
X
^
W
d
Y
h
^
V
_
e
`
X
Y
`
V
d
e
e
Y
^
^
\
d
a
_
`
_
X
\
U
\
V
c
]
a
_
b
_
X
^
X
X
U
[
Z
b
]
_
ཱ
Y
U
W
X
_
]
_
\
^
]
^
^
[
[
W
l
]
]
U
a
W
U
_
c
\
U
U
X
^
[
i
d
f
e
`
\
g
^
d
X
W
V
o
^
U
e
`
f
W
[
d
[
W
^
X
j
c
d
d
Z
X
U
[
X
ི
e
V
_
h
d
]
e
_
d
^
_
|
Z
d
U
b
^
X
]
X
d
^
]
^
U
`
W
^
W
^
Z
h
d
W
^
d
^
^
d
W
]
^
W
\
]
`
e
V
X
e
W
^
U
o
d
^
\
j
\
d
^
^
d
U
b
X
h
X
X
d
[
c
\
d
W
b
^
e
U
]
X
Z
_
U
^
\
U
^
^
\
W
[
b
e
e
^
[
]
\
d
d
^
^
e
\
X
Y
_
a
X
d
^
X
`
]
\
`
^
Z
\
V
e
_
U
U
d
k
n
c
i
k
_
Z
f
Y
e
^
^
^
c
d
m
j
M
k
^
t
x
~
y
The appliance defrosts automatically. The water that forms on
the rear wall drains into a reservoir at the back of the appliance
and evaporates automatically through the compressor heat.
e
^
•
W
]
^
Z
X
Defrosting
[
d
^
X
Inserting the filter ; Insert with
the handle in a vertical position. Turn it 90o to the left or
right until it clips into place.
w
v
x
^
r
e
Air exchange with activated carbon filter.
f
d
U
a
\
n
k
\
a
b
X
\
[
[
U
W
^
]
_
\
^
_
[
^
e
Y
X
o
`
d
U
^
W
v
|
e
೬
Changing the filter : Take the
filter by the handle. Turn it 90o
to the left or right and remove.
_
[
a
Z
S
[
i
\
^
•
We recommend that you replace the filter once a year. Filter
can be obtained from your
dealer.
N
^
^
[
_
R
]
c
n
u
•
The way in which wines continue to mature depends on the
ambient conditions. The quality of the air is therefore decisive
for preserving the wine. An activated carbon filter has been fitted in the lower area of the rear wall of the appliance to ensure
that the air throughput remains at an optimum quality.
\
[
W
j
d
q
೬
೬
V
W
t
Installation : Clip the label holder
into place and slide the label in from the side.
X
Q
j
s
w
P
Z
U
\
W
[
a
`
W
X
^
Z
\
_
d
r
~
[
W
V
i
p
W
^
O
Y
d
V
_
N
Y
X
a
^
M
X
^
]
d
L
c
f
X
U
\
P
V
P
W
`
Q
X
`
[
N
Y
_
Y
]
Z
U
[
\
X
R
\
\
M
]
^
^
]
[
d
d
J
_
d
e
U
^
h
Y
Z
K
^
V
`
a
Q
J
U
N
i
j
Z
O
\
^
X
X
\
\
d
f
Z
e
R
^
^
\
X
N
a
Y
d
Y
e
Z
[
U
X
c
\
d
]
[
b
^
^
X
g
\
_
i
`
Z
[
^
d
X
]
e
o
[
^
d
d
U
e
^
`
U
U
W
Cleaning
U
Y
^
\
[
\
U
W
`
^
W
d
U
Y
W
^
o
^
\
d
V
\
Y
Z
^
X
_
X
\
d
_
b
^
Z
Z
_
j
Before cleaning always switch off the appliance. Pull out
the mains plug.
Never use abrasive or acidic cleaning agents or chemical
solvents.We recommend the use of an all-purpose cleaner with
neutral pH.
Do not use steam cleaners because of the risk of injury and
damage.
•
Do not use abrasive sponges or scourers, do not use concentrated cleaning agents and these would damage the
surfaces and could cause corrosion.
•
Use a glass cleaner to clean the glass surfaces and commercially available stainless-steel cleaning agent for the
stainless-steel surfaces.
•
Clean the inside and equipment with lukewarm water and
little detergent, with the exception of the wooden trims on
the grid shelves.
•
Ensure that no cleaning water penetrate into the electrical
components.
•
Dry all parts well with a cloth.
•
Do not remove the type plate from the inside of the appliance; it is important for after-sales servicing.
Q
S
R
^
S
^
J
Y
Y
K
X
N
]
l
R
X
P
a
[
\
S
a
b
X
d
^
W
[
X
Z
_
X
i
X
f
c
W
U
b
]
e
[
Z
`
W
^
\
¢
Y
U
Z
f
d
e
^
\
^
¡
_
e
^
n
Z
^
^
d
X
_
X
_
\
^
W
`
^
h
d
V
X
W
a
\
_
d
]
e
X
^
\
Y
_
X
]
V
l
X
U
a
]
[
X
\
d
a
^
£
b
X
d
^
W
[
X
Z
d
U
X
\
U
¤
]
[
X
Z
]
U
Z
Z
^
]
d
[
U
\
Y
T
U
V
b
_
[
W
X
[
U
d
b
\
d
U
^
Z
W
Y
[
Z
`
X
X
Z
f
[
j
[
X
Y
X
i
_
Y
_
d
h
Z
\
e
Z
[
X
\
`
V
^
]
_
\
`
_
[
_
^
e
U
]
¥
U
W
X
V
d
W
Z
e
[
`
^
`
`
_
h
e
X
]
U
^
U
Y
\
`
[
V
Y
Z
_
[
d
_
^
X
X
Y
e
\
[
\
U
U
]
_
_
Z
^
_
^
`
h
b
U
W
_
U
`
^
c
f
V
W
^
c
W
_
^
W
Y
^
U
^
V
Y
_
^
X
W
Z
h
Z
f
^
¢
\
U
d
j
b
U
o
[
\
a
d
e
^
Y
Z
V
¦
a
^
]
\
X
\
`
\
`
^
\
X
X
W
U
l
]
d
d
^
e
^
V
d
^
h
_
V
[
]
]
W
d
d
a
X
U
^
\
d
]
b
e
d
W
e
d
d
d
U
V
^
X
e
W
\
X
e
V
a
V
Y
_
Y
^
W
e
X
^
^
d
h
W
[
[
a
^
Z
`
c
e
]
^
_
\
_
^
W
\
U
[
X
U
d
`
^
\
\
^
e
]
X
d
d
]
[
U
\
e
[
Z
]
`
X
W
h
^
Z
^
j
\
j
d
]
[
W
]
V
[
d
U
c
X
\
X
Y
Y
Z
[
X
\
]
^
d
e
X
d
[
_
§
\
U
d
`
^
Z
`
^
U
\
X
d
a
d
X
[
Z
^
W
X
_
\
b
^
V
U
c
d
^
\
e
[
^
`
[
]
[
W
_
Y
^
\
X
c
W
U
Z
[
d
]
a
U
^
`
Z
W
Z
X
^
X
b
]
\
d
X
d
[
V
a
U
^
\
_
`
Y
^
h
U
`
]
[
X
^
\
c
d
U
W
^
[
d
[
_
]
U
Z
Z
^
]
d
^
`
U
W
e
X
\
m
j
\
h
^
c
U
V
\
`
U
\
d
e
^
d
f
Y
^
Y
Z
X
d
^
j
k
\
c
U
W
b
X
d
[
U
\
U
\
]
U
Z
Z
^
]
d
[
U
\
`
X
d
^
_
U
W
]
U
Z
Z
^
]
d
[
U
\
Y
U
[
\
d
_
]
X
\
h
^
U
h
d
X
[
\
^
`
c
W
U
b
d
e
^
i
X
_
d
^
`
[
_
Y
U
_
X
Z
X
V
d
e
U
W
[
d
[
^
_
U
W
Z
U
]
X
Z
]
U
V
\
]
[
Z
j
7
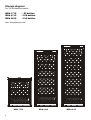
Storage diagram
For 750 ml Bordeaux bottles
WKb 1712
WKb 4112
WKb 4612
: 63 bottles.
: 168 bottles.
: 193 bottles.
Max. 36 bottles per shelf.
WKb 1712
8
WKb 4112
WKb 4612
9
©
ª
«
¬
®
¯
°
±
²
³
´
µ
¶
³
·
ª
¸
¹
±
°
®
º
ª
¶
»
³
®
¼
·
µ
¶
·
½
·
«
ª
°
µ
¹
¬
Æ
Â
®
½
¹
±
¹
±
ª
Ç
±
©
¾
°
²
®
¼
ª
²
µ
¿
Å
À
Á
Á
«
¶
»
³
Subject to modification Printed in Malaysia
Liebherr Appliances Kluang Sdn Bhd
¨
(153177-U)
®
¼
µ
¬
©
Â
©
±
µ
Ã
¹
¾
Ä
½
³
³
Å
¾
°
³
ª