1
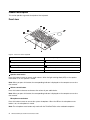
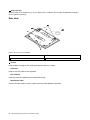
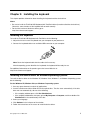
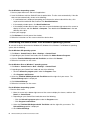
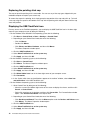
ThinkPad USB Keyboard with TrackPoint
User Guide
http://www.lenovo.com/safety
Note: Before installing the product, be sure to read the warranty information in Appendix C “Lenovo Limited
Warranty” on page 27.
Second Edition (October 2012)
© Copyright Lenovo 2009, 2012.
LIMITED AND RESTRICTED RIGHTS NOTICE: If data or software is delivered pursuant a General Services Administration
“GSA” contract, use, reproduction, or disclosure is subject to restrictions set forth in Contract No. GS-35F-05925.
Contents
Chapter 1. About the keyboard . . . . . 1
Appendix B. Service and Support . . .
25
Product description .
Front view. . .
Rear view . . .
System requirements
Online technical support . . . . . . . . . . .
Telephone technical support . . . . . . . . .
25
25
Appendix C. Lenovo Limited
Warranty. . . . . . . . . . . . . . . .
27
.
.
.
.
.
.
.
.
.
.
.
.
.
.
.
.
.
.
.
.
.
.
.
.
.
.
.
.
.
.
.
.
.
.
.
.
.
.
.
.
.
.
.
.
.
.
.
.
.
.
.
.
2
2
4
5
Chapter 2. Installing the keyboard . . . 7
Installing the keyboard . . . . . . . . . . . .
Installing the device driver on Windows operating
systems . . . . . . . . . . . . . . . . . .
Uninstalling the device driver from Windows
operating systems . . . . . . . . . . . . . .
Chapter 3. Using the keyboard . . . .
Using the Numeric Lock key . . . . . . .
Using the TrackPoint . . . . . . . . . .
Using the pointing stick . . . . . . .
Replacing the pointing stick cap . . . .
Displaying the USB TrackPoint icon. . .
Changing the pointing stick sensitivity .
Enabling Press-to-Select . . . . . . .
Enabling TrackPoint Scrolling Tips . . .
Choosing Scrolling or Magnifying Glass
function . . . . . . . . . . . . .
Changing button assignments . . . . .
Using the Fn function key . . . . . . . .
7
8
11
.
.
.
.
.
.
.
.
11
11
11
12
12
13
13
14
. .
. .
. .
14
15
17
Chapter 4. Troubleshooting . . . . . .
19
Appendix A. Product specifications. .
23
© Copyright Lenovo 2009, 2012
.
.
.
.
.
.
.
.
7
Part 1 - General Terms . . . . . .
Part 2 - Country-specific Terms . . .
Part 3 - Warranty Service Information .
Suplemento de Garantía para México.
.
.
.
.
27
30
32
33
Appendix D. Electronic emission
notices . . . . . . . . . . . . . . . .
35
Federal Communications Commission Declaration
of Conformity . . . . . . . . . . . . . . .
35
Appendix E. Notices . . . . . . . . . .
39
Trademarks . . . . . . . . . . . . . . . .
Recycling information . . . . . . . . . . . .
Recycling information for Brazil . . . . . . . .
39
39
40
Appendix F. Restriction of Hazardous
Substances Directive (RoHS) . . . . .
41
China RoHS.
Turkish RoHS
Ukraine RoHS
India RoHS .
.
.
.
.
.
.
.
.
.
.
.
.
.
.
.
.
.
.
.
.
.
.
.
.
.
.
.
.
.
.
.
.
.
.
.
.
.
.
.
.
.
.
.
.
.
.
.
.
.
.
.
.
.
.
.
.
.
.
.
.
.
.
.
.
.
.
.
.
.
.
.
.
.
.
.
.
41
41
41
41
i
ii
ThinkPad USB Keyboard with TrackPointUser Guide
Chapter 1. About the keyboard
This manual contains product description and instructions for installing and using the ThinkPad® USB
Keyboard with TrackPoint® (hereafter called the keyboard).
The ThinkPad USB Keyboard with TrackPoint is an external keyboard that has an ultra-slim design. It has the
same keys with the keyboard of the ThinkPad computer.
The keyboard has the following features:
• A smart size saves your desk space
• An integrated TrackPoint consisting of a pointing stick and three click buttons eliminates the needs
for an external mouse
• Function keys provide shortcuts for some common computer functions
The option package includes:
• ThinkPad USB Keyboard with TrackPoint
• Setup and warranty poster
• Software and User Guide CD
© Copyright Lenovo 2009, 2012
1
Product description
This section provides a general description of the keyboard.
Front view
Figure 1. Front view of the keyboard
1 Speaker mute button
7 TrackPoint pointing stick
2 Volume control button
8 TrackPoint click buttons (left, center, and right buttons)
3 Microphone mute button
9 Space bar
4
10 Fn key
ThinkVantage®
button
5 Scroll Lock or Numeric Lock key
11 Caps Lock key
6 Back and Forward keys
1
Speaker mute button
Press this button to mute or unmute audio volume. When the light-emitting diode (LED) on the speaker
mute button is on, the speaker is muted.
Note: When you press this button, the corresponding indicator is displayed on the computer screen for a
few seconds.
2
Volume control button
Press this button to increase or decrease the volume of your audio device.
Note: When you press this button, the corresponding indicator is displayed on the computer screen for a
few seconds.
3
Microphone mute button
Press this button to mute or unmute the system microphone. When the LED on the microphone mute
button is on, the microphone is muted.
Note: The microphone mute button only works with the ThinkPad T400s series notebook computers.
2
ThinkPad USB Keyboard with TrackPointUser Guide
4
The ThinkVantage button
The ThinkVantage button provides you with quick access to some of the programs installed on your
computer.
Note: Before using the ThinkVantage button, ensure that you have installed the keyboard driver.
• Microsoft® Windows® XP and Microsoft Windows Vista®:
Pressing the ThinkVantage button opens the ThinkVantage Productivity Center program or the Lenovo
CareSM program, which contains comprehensive help and information for your computer.
If the computer does not come with either of the programs, pressing the ThinkVantage button opens the
Windows System Information window.
• Microsoft Windows 7:
Pressing the ThinkVantage button opens one of the following programs. If the computer does not come
with any of the following programs, pressing the ThinkVantage button opens the Windows System
Information window.
– Lenovo® SimpleTap: This program provides you with a quick way to customize some basic computer
settings.
– Lenovo Solution Center: This program enables you to troubleshoot and resolve computer problems.
– Lenovo ThinkVantage Toolbox: This program enables you to evaluate system performance and
diagnose and resolve computer problems.
• Microsoft Windows 8:
Pressing the ThinkVantage button opens the Lenovo Device Experience program.
5
Scroll Lock key
When the Scroll Lock key is enabled, you can scroll the contents of a text window by pressing the arrow
keys instead of moving the cursor.
Note: Not all application programs support this function.
5
Numeric Lock key
When the Numeric Lock key is enabled, some alphabetic keys (M, J, K, L, U, I, and O) and numeric keys
(7, 8, and 9) on the keyboard work as a 10-key numeric keypad. For more information, see “Using the
Numeric Lock key” on page 11.
6
Back and Forward keys
Used to move backward and forward among the Web pages according to the sequence that you opened
them.
7
8
TrackPoint
The TrackPoint consists of a pointing stick and three click buttons. For more information, see “Using the
TrackPoint” on page 11.
9
Space bar
Press this key to type the space between words. In many programs for playback of linear media, press the
space bar to pause and resume playback, or manually advance through text.
10
Fn key
The Fn key is used together with a function key to perform certain tasks. For more information, see “Using
the Fn function key” on page 17.
Chapter 1. About the keyboard
3
11
Caps Lock key
When the LED on the CapsLk key is on, the CapsLk key is enabled. You can type all alphabetic characters
(A-Z) in uppercase directly.
Rear view
Figure 2. Rear view of the keyboard
1
1 Tilt feet (2)
3 Non-skid feet (5)
2 Cable slot
4 Identification label
Tilt feet
Used to adjust the angle of the keyboard to provide maximum comfort.
2
Cable slot
Used to store the cables of the keyboard.
3
Non-skid feet
Used to prevent the keyboard from unexpected moving.
4
Identification label
Contains the part number, version number, and some other product information.
4
ThinkPad USB Keyboard with TrackPointUser Guide
System requirements
Before installing the keyboard, do the following:
• Ensure that there is an available USB connector on your computer.
• Ensure that your computer has one of the following operating systems installed:
– Windows XP (32-bit)
– Windows Vista (32-bit or 64-bit)
– Windows 7 (32-bit or 64-bit)
– Windows 8 (32-bit or 64–bit)
Before installing this device, it is recommended that you check the Lenovo Support Web site
http://www.lenovo.com/support for the latest software updates, including updated basic input/output
system code (BIOS), utility programs, device drivers, and other software updates. You are responsible for
downloading and installing designated software updates from the Support Web site or other electronic
media, and following the instructions that your Service Provider provides.
Chapter 1. About the keyboard
5
6
ThinkPad USB Keyboard with TrackPointUser Guide
Chapter 2. Installing the keyboard
This chapter provides information about installing the keyboard and the device driver.
Notes:
• Be sure to install the ThinkPad USB Keyboard with TrackPoint driver (hereafter called the device driver).
Otherwise, some functions of the keyboard will not work correctly.
• For the latest version of the device driver, go to:
http://www.lenovo.com/support
Installing the keyboard
To install the ThinkPad USB Keyboard with TrackPoint, do the following:
1. Adjust the tilt feet to set the keyboard near your computer to your preference.
2. Connect the keyboard cable to an available USB connector on your computer.
Note: Route the keyboard cable into the cable slot if necessary.
After the operating system identifies the keyboard, the keyboard will be ready for use.
For additional information on this product, go to the Lenovo Web site at:
http://www.lenovo.com/support
Installing the device driver on Windows operating systems
To install the device driver on the Windows XP, Windows Vista, Windows 7, or Windows 8 operating system,
do the following:
For the Windows XP, Windows Vista, or Windows 7 operating system:
1. Save any open documents and exit all applications.
2. Insert the Software and User Guide CD into the optical drive. The disc starts automatically. If the disc
does not start automatically, do one of the following:
• If the autoplay window opens, click Run ViewHtml.exe.
• If the autoplay window does not open, go into My Computer or Computer, and then double-click
ViewHtml.exe in the root directory of the disc.
3. Select your language.
4. Click Software in the left pane of the window.
5. Follow the instructions on the screen to install the device driver.
© Copyright Lenovo 2009, 2012
7
For the Windows 8 operating system:
1. Save any open documents and exit all applications.
2. Insert the Software and User Guide CD into the optical drive. The disc starts automatically. If the disc
does not start automatically, do one of the following:
• If a notification box is displayed, prompting you to choose the action to do with the disc, click
anywhere of the notification box, and then click Run ViewHtml.exe.
• If the autoplay window opens, click Run ViewHtml.exe.
• If the autoplay window does not open, move the cursor to the bottom-right corner of the screen to
display the charms, and click Search ➙ Computer. Then double-click ViewHtml.exe in the root
directory of the disc.
3. Select your language.
4. Click Software in the left pane of the window.
5. Follow the instructions on the screen to install the device driver.
Uninstalling the device driver from Windows operating systems
To uninstall the device driver from the Windows XP, Windows Vista, Windows 7 or Windows 8 operating
system, do the following:
For the Windows XP operating system:
1. Click Start ➙ Control Panel or Start ➙ Settings ➙ Control Panel.
2. Depending on your Control Panel mode, click or double-click Add or Remove Programs.
3. Click the ThinkPad USB Keyboard with TrackPoint, and then click Remove.
4. Follow the instructions on the screen.
For the Windows Vista or Windows 7 operating system:
1. Click Start ➙ Control Panel or Start ➙ Settings ➙ Control Panel.
2. Depending on your Control Panel mode, do one of the following:
• Click the Uninstall a program option under the Programs menu.
• Click Programs and Features.
3. Select the ThinkPad USB Keyboard with TrackPoint and then right-click your mouse. The
Uninstall/Change option is displayed.
4. Click Uninstall/Change.
5. Follow the instructions on the screen.
For the Windows 8 operating system:
• From the Start screen
1. Move the cursor to the bottom-right corner of the screen to display the charms, and then click
Search ➙ Control Panel.
2. Depending on your Control Panel mode, do one of the following:
– Click the Uninstall a program option under the Programs menu.
– Click Programs and Features.
3. Select the ThinkPad USB Keyboard with TrackPoint and then right-click your mouse. The
Uninstall/Change option is displayed.
4. Click Uninstall/Change.
8
ThinkPad USB Keyboard with TrackPointUser Guide
5. Follow the instructions on the screen.
• From the desktop
1. Right-click anywhere on the desktop, and then click Personalize. The Personalization window opens.
2. Click Control Panel Home in the top-left area.
3. Depending on your Control Panel mode, do one of the following:
– Click the Uninstall a program option under the Programs menu.
– Click Programs and Features.
4. Select the ThinkPad USB Keyboard with TrackPoint and then right-click your mouse. The
Uninstall/Change option is displayed.
5. Click Uninstall/Change.
6. Follow the instructions on the screen.
Chapter 2. Installing the keyboard
9
10
ThinkPad USB Keyboard with TrackPointUser Guide
Chapter 3. Using the keyboard
This chapter provides information about using the keyboard.
Using the Numeric Lock key
When the Numeric Lock key is enabled, some alphabetic keys (M, J, K, L, U, I, and O) and numeric keys (7,
8, and 9) on the ThinkPad USB keyboard with TrackPoint work as a 10-key numeric keypad.
To enable or disable the numeric keypad, press Fn+ScrLk/NmLk. When you press this button, the
corresponding indicator is displayed on the computer screen for a few seconds.
Notes:
• For some ThinkPad computer models such as the ThinkPad T400s series, depending on the BIOS setting,
the On Screen Display (OSD) icon displays differently:
– When the system BIOS is set as Synchronized and you press Fn+ScrLk/NmLk on the ThinkPad USB
keyboard with TrackPoint or on the keyboard of your ThinkPad computer, the OSD icon displays as
in the lower right corner of your computer screen. And this is supported by the notebook internal
application.
– When the system BIOS is set as Independent, the OSD icon displays differently:
– If you press Fn+ScrLk/NmLk on the ThinkPad USB keyboard with TrackPoint, the OSD icon displays
as at the bottom center of your computer screen.
– If you press Fn+ScrLk/NmLk on the keyboard of your ThinkPad computer, the OSD icon displays as
in the lower right corner of your computer screen.
• For the Windows 8 operating system, the OSD support depends on your system. Refer to the User
Guide of your computer.
Using the TrackPoint
The TrackPoint consists of a pointing stick and three click buttons. The pointing stick is used to control
the cursor. The three click buttons are the left button, the right button, and the center button. This section
provides information on using the pointing stick, configuring the center button, and customizing the
TrackPoint.
Using the pointing stick
To use the pointing stick, do the following:
1. Place your hands at typing position, and press gently on the pointing stick in the direction that you want
the pointer to move. You can press the pointing stick away from you to move it up, toward you to move
it down, to one side or the other to move it sideways. The speed at which the pointer moves depends
on the pressure you apply to the pointing stick.
Note: The cursor might periodically drift. Stop using the pointing stick for a few seconds and try
again. The cursor will work normally.
2. To select and drag an item, stop the pointing stick and press the left or right button with your thumb.
The left and right buttons function the same as the left and right buttons on a conventional mouse.
© Copyright Lenovo 2009, 2012
11
Replacing the pointing stick cap
The cap on top of the pointing stick is removable. You can use any of the cap types shipped with your
notebook computer to replace your current cap.
To remove the cap on the pointing stick, simply grasp the top portion of the cap and pull it up. To install
a new cap, align the square at the bottom of the cap with the pointing stick and push down until the cap
seats into position.
Displaying the USB TrackPoint icon
For easy access to the TrackPoint properties, you can display the USB TrackPoint icon in the lower right
corner of your computer screen by doing the following:
• For the Windows XP or Windows Vista operating system, do the following:
1. Click Start ➙ Control Panel or Start ➙ Settings ➙ Control Panel.
2. Depending on your Control Panel mode, do one of the following:
– Click the Mouse.
– Doulbe-click Mouse.
– Click Printers and Other Hardware, and then click Mouse.
The Mouse Properties window opens.
3. Click the USB TrackPoint tab.
4. Select Show TrackPoint icon on the system tray.
5. Click Apply, and then click OK.
• For the Windows 7 operating system, do the following:
1. Click Start ➙ Control Panel.
2. Click Mouse. The Mouse Properties window opens.
3. Click the USB TrackPoint tab.
4. Select Show TrackPoint icon on the system tray.
5. Click Apply, and then click OK.
6. Click Show hidden icons icon in the lower right corner of your computer screen.
7. Click Customize.
8. In the “Select which icons and notifications appear on the taskbar” window, select show icon
and notifications in the USB TrackPoint area.
• For the Windows 8 operating system, do the following:
1. Go to Control Panel by doing one of the following:
– Move the cursor to the bottom-right corner of the screen to display the charms, and then click
Search ➙ Control Panel.
– Right-click anywhere on the desktop, and then click Personalize. The Personalization window
opens. Click Control Panel Home in the top-left area.
2. Depending on your Control Panel mode, do one of the following:
– Click Hardware and Sound. Then click the Mouse option under the Devices and Printers menu.
– Click Mouse. The Mouse Properties window opens.
3. Click the USB TrackPoint tab.
4. Select Show TrackPoint icon on the system tray.
5. Click Apply, and then click OK.
12
ThinkPad USB Keyboard with TrackPointUser Guide
You can now easily change the properties of the TrackPoint by clicking the USB TrackPoint icon.
To remove the USB TrackPoint icon from the lower right corner of your computer screen, do the following:
1. Right-click the USB TrackPoint icon.
2. Select Remove USB TrackPoint icon from system tray. The icon disappears.
Changing the pointing stick sensitivity
When you are using the pointing stick, you might prefer to use a light touch, or you might want to apply more
pressure. You can change the way the pointing stick responds to your touch by doing the following:
1. Click the USB TrackPoint icon.
2. Select TrackPoint Properties.
3. Click the USB TrackPoint tab.
4. In the TrackPoint Stick area, move the slider toward Firm Touch or Light Touch according to your
preference.
5. Click Apply. Then, test how the pointing stick responds to your new setting and make adjustments if
necessary.
6. Click OK to apply the setting.
Enabling Press-to-Select
When Press-to-Select is enabled, you can select text or items by simply pressing the pointing stick without
using the click buttons.
To enable Press-to-Select, do the following:
1. Click the USB TrackPoint icon.
2. Select TrackPoint Properties.
3. Click the USB TrackPoint tab.
4. Select Enable Press-to-Select.
5. Click Settings. The Press-to-Select Settings window opens. In this window, you can choose from the
following:
• Enable Dragging: When this option is selected, you can select and drag an item by applying
pressure to the pointing stick.
• Enable Release-to-Select: When this option is selected, you can select an item by pressing the
pointing stick once or double-click an item by pressing twice.
• In the Press means area, you can select which button on a conventional mouse you want the
pointing stick to act as.
– If you select Left-Click, the pointing stick acts as the left button on a conventional mouse.
– If you select Right-Click, the pointing stick acts as the right button on a conventional mouse.
• The Click Pace area enables you to adjust the pace you press the pointing stick for Press-to-Select.
– If you set the pace too slow, you might encounter a delay when you are moving or dragging the
pointing stick.
– If you set the pace too fast, you might encounter unintended clicks and find Press-to-Select
difficult to use.
6. Click OK to save your settings.
Chapter 3. Using the keyboard
13
Enabling TrackPoint Scrolling Tips
You can view information on the TrackPoint center button by enabling the TrackPoint Scrolling Tips.
To enable the TrackPoint Scrolling Tips to view information on the TrackPoint center button, do the following:
1. Click the USB TrackPoint icon.
2. Select TrackPoint Properties.
3. Click the USB TrackPoint tab.
4. Select Enable TrackPoint Scrolling Tips.
5. Click OK.
6. Press the center button for three times. The TrackPoint Scrolling Tips window opens.
7. Click Yes. The Using the TrackPoint Centre Button window opens.
Choosing Scrolling or Magnifying Glass function
After clicking the USB TrackPoint icon, you can find the following three options:
• Scrolling: This option enables you to scroll Web pages, long documents, large spreadsheets, or other
windows by pressing the center button and moving the pointing stick even if the target window is not
active.
• Magnifying Glass: The Magnifying Glass function is used to enlarge an area of your screen. You can
move the enlarged area by pressing the center button and moving the pointing stick.
• Neither: When this option is selected, the TrackPoint will perform its default functions. The default
functions vary according to the operating systems.
You can also find the three options by doing the following:
1. Click the USB TrackPoint icon.
2. Select TrackPoint Properties.
3. Click the USB TrackPoint tab.
4. In the Choosing Scrolling or Magnifying Glass Function area, you can find the three options.
You can adjust settings for the center button by clicking Settings in the Choosing Scrolling or Magnifying
Glass Function area. In the Center Button - Settings window, you can customize the following:
• Scrolling Type: There are three scrolling types for you to choose from:
– Standard: If you select this option, the scrolling function works on most of the applications.
– Smooth: If you select this option, the center button functions as the middle button on a mouse. For
some target applications, smooth scrolling might not work. In this case, try Standard or Auto-select.
– Auto-select: This option automatically selects Standard or Smooth, depending on the application
being scrolled.
• Magnifying Glass: This area offers the following options for the Magnifying Glass feature:
Select the magnification power:
– 1xZoom
– 2xZoom
– 4xZoom
– 8xZoom
Select the size of the magnifying glass:
– Small: 160x120
14
ThinkPad USB Keyboard with TrackPointUser Guide
– Medium: 240x180
– Large: 320x240
– Custom: Use this option to select a custom size for the Magnifying Glass window. You can either
enter the desired height and width or simply drag the frame of the Magnifying Glass window with
the center button.
You can change the magnifying power or the size of the Magnifying Glass window by pressing the left or
right button while holding down the center button, and then selecting the item on the pop-up menu.
Note: It is harder to move the Magnifying Glass window when it becomes larger.
You can also activate a Magnifying Glass window using the center button by doing the following:
1. Place the cursor over the item that you want to magnify.
2. Press and hold down the center button. The Magnifying Glass window opens and the area beneath
the pointer on your screen is magnified. The Magnifying Glass icon will also appear on your screen to
indicate that the Magnifying Glass function is enabled.
3. To position the Magnifying Glass window over a different item, move the pointing stick to the target
item while continuing holding down the center button.
You can also copy Magnifying Glass to Clipboard by pressing the left or right button while holding the
center button down and selecting Copy Magnifying Glass to Clipboard in the pop-up window.
Notes:
1. With the Magnifying Glass window open, you can keep the contents in the Magnifying Glass window
in focus while moving the pointer and activate another window.
2. The Magnifying Glass window will disappear automatically after several seconds. You can also close
the Magnifying Glass window by pressing the center button once again.
• Controlling Method: There are two options as follows:
– Press Center Button, then use TrackPoint: If you select this option, you will be able to control the
scrolling or the Magnifying Glass window by holding down the center button and moving the pointing
stick.
Note: If you are not holding down the center button, the pointing stick only controls the cursor and
the Magnifying Glass window cannot be moved.
– Use TrackPoint: This option enables you to move the Magnifying Glass window without holding down
the center button. You can cancel the magnifying operation by clicking the center button. And you can
then control the cursor with an externally attached mouse.
Note: You can still use the TrackPoint to control the cursor by pressing the center button and moving
the pointing stick in the direction in which you want the cursor to move.
Changing button assignments
The left and right buttons of your ThinkPad USB keyboard with TrackPoint work as the left and right
buttons on a conventional mouse. The left button is set to click or double-click items. The right button is
set to open context-related menus and explanations. You can switch the functions of the two buttons
by doing the following:
1. Click the USB TrackPoint icon.
2. Select TrackPoint Properties. The Mouse Properties window opens.
3. Click the Buttons tab.
4. Select Switch primary and secondary buttons.
Chapter 3. Using the keyboard
15
Note: Depending on your operating system, when you make your selection, the mouse will display different
color or graphics to show the functions that you have assigned.
16
ThinkPad USB Keyboard with TrackPointUser Guide
Using the Fn function key
The following table describes the functions of Fn key combinations.
Function key combination
Function
Function Supported By
Fn+F2
Launch the program for locking the
computer.
Note: The combination is workable for
Windows 8 without on screen displays.
Installed applications and the device
driver
Fn+F3
Launch the Power Manager program.
Note: The combination is not workable
for Windows 8.
Installed applications and the device
driver
Fn+F4
Put the computer into standby mode.
Notes: To return to normal operation,
do one of the following:
Operating system
• For Windows XP , press the Fn key
on your ThinkPad computer.
• For Windows vista, Windows 7, or
Windows 8, press any key.
Fn+F5
• Launch the wireless network
application.
Installed applications and the device
driver
• For Windows 8: Launch Windows
8 inbox Airplane charm and enable
Airplane mode.
Fn+F6
• Launch camera settings and
microphone mute button settings.
Installed applications and the device
driver
• For Windows 8: Enable camera
mute mode or launch the Lenovo
Settings program.
Note: Only works with the ThinkPad
T400s series currently.
Fn+F7
• Launch the presentation and display
scheme.
• For Windows 8: Launch Windows 8
inbox display switching charm
Installed applications, Windows 7
operating system internal applications,
and the device driver
Fn+F8
Open the Mouse Properties window.
The device driver
Fn+F12
Put the computer into hibernation
mode.
Note: To return to normal operation,
press the power button on the
keyboard of your ThinkPad computer
for several seconds.
The device driver
Fn+Spacebar
FullScreen Magnifier
Note: The combination is not workable
for Windows 8.
Installed applications and the device
driver
Fn+Home
The computer display becomes
brighter.
Note: The combination is workable for
Windows 8 without on screen displays.
Installed applications and the device
driver
Chapter 3. Using the keyboard
17
Function key combination
Function
Function Supported By
Fn+End
The computer display becomes
dimmer.
Note: The combination is workable for
Windows 8 without on screen displays.
Installed applications and the device
driver
Fn+PrtSc/SysRq
Has the same function as the
PrtSc/SysRq key on a conventional
keyboard.
Operating system
Fn+Pause/Break
Has the same function as the
Pause/Break key on a conventional
keyboard.
Operating system
If the Fn key combinations do not work correctly on some ThinkPad computers with the Windows XP
operating system, ensure that the computer has the latest version of the Lenovo System Interface driver
installed.
The most up-to-date software and device drivers for your ThinkPad computer are always available for
download at http://www.lenovo.com/support.
Notes:
• Ensure that the Fn key combinations are functional on the keyboard of your ThinkPad computer. There are
software dependencies to get the most complete Fn key combination support for your ThinkPad computer.
• Most of the Fn key combinations do not work with the ThinkPad SL series, Lenovo desktop computers,
and computers from other manufacturers.
• Some Fn key combinations have different functions on different ThinkPad computer models.
For more information about the Fn key combinations, refer to the Access Help information system that
comes with the ThinkPad computer.
18
ThinkPad USB Keyboard with TrackPointUser Guide
Chapter 4. Troubleshooting
This chapter contains troubleshooting information for the ThinkPad USB Keyboard with TrackPoint.
Problem: All or some of the Fn function key combinations or function keys do not work.
Solution: Read the following for solutions or explanations:
• Ensure all the Fn function key combinations are functional on the keyboard of your ThinkPad computer.
There are software dependencies to get the most complete Fn key and hot key combination support for
your ThinkPad computer. You can get more detailed information about the Fn function key combinations
from the documentation that comes with your ThinkPad computer. You might need to download the
updated software components for your ThinkPad computer at http://www.lenovo.com/support.
• Ensure that you have correctly installed the keyboard driver.
• The Fn function key combinations work with all the ThinkPad computers except SL series. Most of the Fn
function key combinations do not work with SL series, Lenovo desktop computers, or computers from
other manufacturers.
• It is normal if you found some of the Fn function key combinations act differently on different ThinkPad
computer models due to the differences in internal notebook applications.
• Some function keys are not supported on the Windows 8 operating system.
Problem: The TrackPoint cursor drifts when the computer is turned on or after it resumes normal operation.
Solution: The cursor might drift when you are not using the TrackPoint during normal operation. This is
a normal feature of the TrackPoint and is not a defect. Cursor drifting might occur for several seconds
under the following conditions:
• The computer is turned on.
• The computer resumes normal operation.
• The TrackPoint pointing stick is kept pressed for a long time.
• The temperature changes.
Problem: A number appears when you type a letter.
Solution: This is because the numeric lock mode is enabled. To disable the numeric lock mode, press
Fn+ScrLk/NmLk.
Problem: Pressing the ThinkVantage button opens the Windows System Information window, rather than
any of the following programs:
• Lenovo Care
• Lenovo Device Experience
• ThinkVantage Productivity Center
• Lenovo SimpleTap
• Lenovo Solution Center
• Lenovo ThinkVantage Toolbox
Solution: The listed programs might not be available on your computer.
© Copyright Lenovo 2009, 2012
19
Problem: You pressed a button once, but the computer responded as if you pressed it twice.
Solution: Depending on your operating system, adjust the keyboard Repeat delay or Repeat rate settings
by doing one of the following:
• For Windows XP and Windows Vista:
1. Depending on your Start menu mode, click Start ➙ Control Panel or Start ➙ Settings ➙ Control
Panel
2. Depending on your Control Panel mode, click or double-click Keyboard.
3. Click the Speed tab.
4. Move the Repeat delay slider to Long or the Repeat rate slider to Slow.
5. Click OK.
• For Windows 7:
1. Depending on your Start menu mode, click Start ➙ Control Panel or Start ➙ Settings ➙ Control
Panel
2. Click the View by menu and select Small icons or Large icons. The All Control Panel Items
category is expanded.
3. Click Keyboard.
4. Click the Speed tab.
5. Move the Repeat delay slider to Long or the Repeat rate slider to Slow.
6. Click OK.
• For Windows 8:
– From the Start screen
1. Move the cursor to the top-right or bottom-right corner of the screen to display the charms, and
then click Search ➙ Control Panel. The Control Panel window is displayed.
2. Click the View by menu and select the Small icons or Large icons view. The All Control Panel
Items category is expanded.
3. Click Keyboard.
4. Click the Speed tab.
5. Move the Repeat delay slider to Long or the Repeat rate slider to Slow.
6. Click OK.
– From the desktop
1. Right-click anywhere on the desktop, and then click Personalize. The Personalization window
opens.
2. Click Control Panel Home in the top-left area. The Control Panel window opens.
3. Click the View by menu and select the Small icons or Large icons view. The All Control Panel
Items category is expanded.
4. Click Keyboard.
5. Click the Speed tab.
6. Move the Repeat delay slider to Long or the Repeat rate slider to Slow.
7. Click OK.
20
ThinkPad USB Keyboard with TrackPointUser Guide
Problem: The keyboard does not function correctly.
Solution: Verify if the keyboard cable is firmly connected to the USB connector, or reconnect the keyboard
cable to another USB connector on the computer. If the problem persists, contact your Lenovo service
representative.
Chapter 4. Troubleshooting
21
22
ThinkPad USB Keyboard with TrackPointUser Guide
Appendix A. Product specifications
The following table describes the keyboard specifications.
Keys
87-92 (Varies by country)
Color
Raven black
Dimensions (Height x Width x Depth)
312.8 mm x 220.3 mm x 19 mm (12.3 inches x 8.67 inches x 0.75 inch)
Weight
440 grams (0.97 pounds)
PC interface
USB 2.0 low speed
Connector type
4-pin USB Type A
Cable length
1.5 m (4.92 feet)
Operating voltage
+5 V (Typical)
Power consumption
100 mA maximum
System interface
USB Type A connector
Supported operating system
Windows 8 (32-bit and 64-bit)
Windows 7 (32-bit and 64-bit)
Windows Vista (32-bit and 64-bit)
Windows XP (32-bit)
© Copyright Lenovo 2009, 2012
23
24
ThinkPad USB Keyboard with TrackPointUser Guide
Appendix B. Service and Support
The following information describes the technical support that is available for your product, during the
warranty period or throughout the life of your product. Refer to the Lenovo Limited Warranty for a full
explanation of Lenovo warranty terms.
Online technical support
Online technical support is available during the lifetime of a product at:
http://www.lenovo.com/support
Product replacement assistance or exchange of defective components also is available during the warranty
period. In addition, if your option is installed in a Lenovo computer, you might be entitled to service at your
location. A Lenovo technical support representative can help you determine the best alternative.
Telephone technical support
Installation and configuration support through the Customer Support Center will be available until 90 days
after the option has been withdrawn from marketing. After that time, the support is cancelled, or made
available for a fee, at Lenovo’s discretion. Additional support is also available for a nominal fee.
Before contacting a Lenovo technical support representative, please have the following information available:
option name and number, proof of purchase, computer manufacturer, model, serial number and manual,
the exact wording of any error message, description of the problem, and the hardware and software
configuration information for your system.
Your technical support representative might want to walk you through the problem while you are at your
computer during the call.
Telephone numbers are subject to change without notice. The most up-to-date telephone list for Lenovo
Support is always available at http://www.lenovo.com/support/phone. If the telephone number for your
country or region is not listed, contact your Lenovo reseller or Lenovo marketing representative.
© Copyright Lenovo 2009, 2012
25
26
ThinkPad USB Keyboard with TrackPointUser Guide
Appendix C. Lenovo Limited Warranty
L505-0010-02 08/2011
This Lenovo Limited Warranty consists of the following parts:
Part 1 - General Terms
Part 2 - Country-specific Terms
Part 3 - Warranty Service Information
The terms of Part 2 replace or modify terms of Part 1 as specified for a particular country.
Part 1 - General Terms
This Lenovo Limited Warranty applies only to Lenovo hardware products you purchased for your own use and
not for resale. This Lenovo Limited Warranty is available in other languages at www.lenovo.com/warranty.
What this Warranty Covers
Lenovo warrants that each Lenovo hardware product that you purchase is free from defects in materials and
workmanship under normal use during the warranty period. The warranty period for the product starts on
the original date of purchase as shown on your sales receipt or invoice or as may be otherwise specified
by Lenovo. The warranty period and type of warranty service that apply to your product are as specified
in “Part 3 - Warranty Service Information” below. This warranty only applies to products in the country
or region of purchase.
THIS WARRANTY IS YOUR EXCLUSIVE WARRANTY AND REPLACES ALL OTHER WARRANTIES
OR CONDITIONS, EXPRESS OR IMPLIED, INCLUDING, BUT NOT LIMITED TO, ANY IMPLIED
WARRANTIES OR CONDITIONS OF MERCHANTABILITY OR FITNESS FOR A PARTICULAR PURPOSE.
AS SOME STATES OR JURISDICTIONS DO NOT ALLOW THE EXCLUSION OF EXPRESS OR
IMPLIED WARRANTIES, THE ABOVE EXCLUSION MAY NOT APPLY TO YOU. IN THAT EVENT, SUCH
WARRANTIES APPLY ONLY TO THE EXTENT AND FOR SUCH DURATION AS REQUIRED BY LAW AND
ARE LIMITED IN DURATION TO THE WARRANTY PERIOD. AS SOME STATES OR JURISDICTIONS DO
NOT ALLOW LIMITATIONS ON THE DURATION OF AN IMPLIED WARRANTY, THE ABOVE LIMITATION
ON DURATION MAY NOT APPLY TO YOU.
How to Obtain Warranty Service
If the product does not function as warranted during the warranty period, you may obtain warranty service by
contacting Lenovo or a Lenovo approved Service Provider. A list of approved Service Providers and their
telephone numbers is available at: www.lenovo.com/support/phone.
Warranty service may not be available in all locations and may differ from location to location. Charges may
apply outside a Service Provider’s normal service area. Contact a local Service Provider for information
specific to your location.
Customer Responsibilities for Warranty Service
Before warranty service is provided, you must take the following steps:
• follow the service request procedures specified by the Service Provider;
© Copyright Lenovo 2009, 2012
27
•
•
•
•
backup or secure all programs and data contained in the product;
provide the Service Provider with all system keys or passwords;
provide the Service Provider with sufficient, free, and safe access to your facilities to perform service;
remove all data, including confidential information, proprietary information and personal information, from
the product or, if you are unable to remove any such information, modify the information to prevent its
access by another party or so that it is not personal data under applicable law. The Service Provider shall
not be responsible for the loss or disclosure of any data, including confidential information, proprietary
information, or personal information, on a product returned or accessed for warranty service;
• remove all features, parts, options, alterations, and attachments not covered by the warranty;
• ensure that the product or part is free of any legal restrictions that prevent its replacement;
• if you are not the owner of a product or part, obtain authorization from the owner for the Service Provider
to provide warranty service.
What Your Service Provider Will Do to Correct Problems
When you contact a Service Provider, you must follow the specified problem determination and resolution
procedures.
The Service Provider will attempt to diagnose and resolve your problem by telephone, e-mail or remote
assistance. The Service Provider may direct you to download and install designated software updates.
Some problems may be resolved with a replacement part that you install yourself called a “Customer
Replaceable Unit” or “CRU.” If so, the Service Provider will ship the CRU to you for you to install.
If your problem cannot be resolved over the telephone; through the application of software updates or
the installation of a CRU, the Service Provider will arrange for service under the type of warranty service
designated for the product under “Part 3 - Warranty Service Information” below.
If the Service Provider determines that it is unable to repair your product, the Service Provider will replace
it with one that is at least functionally equivalent.
If the Service Provider determines that it is unable to either repair or replace your product, your sole
remedy under this Limited Warranty is to return the product to your place of purchase or to Lenovo for a
refund of your purchase price.
Replacement Products and Parts
When warranty service involves the replacement of a product or part, the replaced product or part becomes
Lenovo’s property and the replacement product or part becomes your property. Only unaltered Lenovo
products and parts are eligible for replacement. The replacement product or part provided by Lenovo may
not be new, but it will be in good working order and at least functionally equivalent to the original product or
part. The replacement product or part shall be warranted for the balance of the period remaining on the
original product.
Use of Personal Contact Information
If you obtain service under this warranty, you authorize Lenovo to store, use and process information about
your warranty service and your contact information, including name, phone numbers, address, and e-mail
address. Lenovo may use this information to perform service under this warranty. We may contact you to
inquire about your satisfaction with our warranty service or to notify you about any product recalls or safety
issues. In accomplishing these purposes, you authorize Lenovo to transfer your information to any country
where we do business and to provide it to entities acting on our behalf. We may also disclose it where
required by law. Lenovo’s privacy policy is available at www.lenovo.com/.
28
ThinkPad USB Keyboard with TrackPointUser Guide
What this Warranty Does not Cover
This warranty does not cover the following:
• uninterrupted or error-free operation of a product;
• loss of, or damage to, your data by a product;
• any software programs, whether provided with the product or installed subsequently;
• failure or damage resulting from misuse, abuse, accident, modification, unsuitable physical or operating
environment, natural disasters, power surges, improper maintenance, or use not in accordance with
product information materials;
• damage caused by a non-authorized service provider;
• failure of, or damage caused by, any third party products, including those that Lenovo may provide or
integrate into the Lenovo product at your request;
• any technical or other support, such as assistance with “how-to” questions and those regarding product
set-up and installation;
• products or parts with an altered identification label or from which the identification label has been
removed.
Limitation of Liability
Lenovo is responsible for loss or damage to your product only while it is in the Service Provider’s possession
or in transit, if the Service Provider is responsible for the transportation.
Neither Lenovo nor the Service Provider is responsible for loss or disclosure of any data, including
confidential information, proprietary information, or personal information, contained in a product.
UNDER NO CIRCUMSTANCES, AND NOTWITHSTANDING THE FAILURE OF ESSENTIAL PURPOSE
OF ANY REMEDY SET FORTH HEREIN, SHALL LENOVO, ITS AFFILIATES, SUPPLIERS, RESELLERS,
OR SERVICE PROVIDERS BE LIABLE FOR ANY OF THE FOLLOWING EVEN IF INFORMED OF THEIR
POSSIBILITY AND REGARDLESS OF WHETHER THE CLAIM IS BASED IN CONTRACT, WARRANTY,
NEGLIGENCE, STRICT LIABILITY OR OTHER THEORY OF LIABILITY: 1) THIRD PARTY CLAIMS
AGAINST YOU FOR DAMAGES; 2) LOSS, DAMAGE OR DISCLOSURE OF YOUR DATA; 3) SPECIAL,
INCIDENTAL, PUNITIVE, INDIRECT OR CONSEQUENTIAL DAMAGES, INCLUDING BUT NOT LIMITED
TO LOST PROFITS, BUSINESS REVENUE, GOODWILL OR ANTICIPATED SAVINGS. IN NO CASE
SHALL THE TOTAL LIABILITY OF LENOVO, ITS AFFILIATESS, SUPPLIERS, RESELLERS OR SERVICE
PROVIDERS FOR DAMAGES FROM ANY CAUSE EXCEED THE AMOUNT OF ACTUAL DIRECT
DAMAGES, NOT TO EXCEED THE AMOUNT PAID FOR THE PRODUCT.
THE FOREGOING LIMITATIONS DO NOT APPLY TO DAMAGES FOR BODILY INJURY (INCLUDING
DEATH), DAMAGE TO REAL PROPERTY OR DAMAGE TO TANGIBLE PERSONAL PROPERTY FOR
WHICH LENOVO IS LIABLE UNDER LAW. AS SOME STATES OR JURISDICTIONS DO NOT ALLOW
THE EXCLUSION OR LIMITATION OF INCIDENTAL OR CONSEQUENTIAL DAMAGES, THE ABOVE
LIMITATION OR EXCLUSION MAY NOT APPLY TO YOU.
Your Other Rights
THIS WARRANTY GIVES YOU SPECIFIC LEGAL RIGHTS. YOU MAY HAVE OTHER RIGHTS
ACCORDING TO THE APPLICABLE LAWS OF YOUR STATE OR JURISDICTION. YOU MAY ALSO
HAVE OTHER RIGHTS UNDER A WRITTEN AGREEMENT WITH LENOVO. NOTHING IN THIS
WARRANTY AFFECTS STATUTORY RIGHTS, INCLUDING RIGHTS OF CONSUMERS UNDER LAWS
OR REGULATIONS GOVERNING THE SALE OF CONSUMER GOODS THAT CANNOT BE WAIVED
OR LIMITED BY CONTRACT.
Appendix C. Lenovo Limited Warranty
29
Part 2 - Country-specific Terms
Australia
“Lenovo” means Lenovo (Australia & New Zealand) Pty Limited ABN 70 112 394 411. Address: Level
10, North Tower, 1-5 Railway Street, Chatswood, NSW, 2067. Telephone: +61 2 8003 8200. Email:
[email protected]
The following replaces the same section in Part 1:
What this Warranty Covers:
Lenovo warrants that each hardware product that you purchase is free from defects in materials and
workmanship under normal use and conditions during the warranty period. If the product fails due to a
covered defect during the warranty period, Lenovo will provide you a remedy under this Limited Warranty.
The warranty period for the product starts on the original date of purchase specified on your sales receipt or
invoice unless Lenovo informs you otherwise in writing. The warranty period and type of warranty service
that apply to your product are set forth below in Part 3 - Warranty Service Information.
THE BENEFITS GIVEN BY THIS WARRANTY ARE IN ADDITION TO YOUR RIGHTS AND REMEDIES AT
LAW, INCLUDING THOSE UNDER THE AUSTRALIAN CONSUMER LAW.
The following replaces the same section in Part 1:
Replacement Products and Parts:
When warranty service involves the replacement of a product or part, the replaced product or part becomes
Lenovo’s property and the replacement product or part becomes your property. Only unaltered Lenovo
products and parts are eligible for replacement. The replacement product or part provided by Lenovo may
not be new, but it will be in good working order and at least functionally equivalent to the original product or
part. The replacement product or part shall be warranted for the balance of the period remaining on the
original product. Products and parts presented for repair may be replaced by refurbished products or parts
of the same type rather than being repaired. Refurbished parts may be used to repair the product; and repair
of the product may result in loss of data, if the product is capable of retaining user-generated data.
The following is added to the same section in Part 1:
Use of Personal Contact Information:
Lenovo will not be able to perform our service under this warranty if you refuse to provide your information
or do not wish us to transfer your information to our agent or contractor. You have the right to access
your personal contact information and request correction of any errors in it pursuant to the Privacy Act
1988 by contacting Lenovo.
The following replaces the same section in Part 1:
Limitation of Liability:
Lenovo is responsible for loss or damage to your product only while it is in the Service Provider’s possession
or in transit, if the Service Provider is responsible for the transportation.
Neither Lenovo nor the Service Provider is responsible for loss or disclosure of any data, including
confidential information, proprietary information, or personal information, contained in a product.
30
ThinkPad USB Keyboard with TrackPointUser Guide
TO THE EXTENT PERMITTED BY LAW, UNDER NO CIRCUMSTANCES AND NOTWITHSTANDING
THE FAILURE OF ESSENTIAL PURPOSE OF ANY REMEDY SET FORTH HEREIN, SHALL LENOVO,
ITS AFFILIATES, SUPPLIERS, RESELLERS, OR SERVICE PROVIDERS BE LIABLE FOR ANY OF THE
FOLLOWING EVEN IF INFORMED OF THEIR POSSIBILITY AND REGARDLESS OF WHETHER THE
CLAIM IS BASED IN CONTRACT, WARRANTY, NEGLIGENCE, STRICT LIABILITY OR OTHER THEORY
OF LIABILITY: 1) THIRD PARTY CLAIMS AGAINST YOU FOR DAMAGES; 2) LOSS, DAMAGE OR
DISCLOSURE OF YOUR DATA; 3) SPECIAL, INCIDENTAL, PUNITIVE, INDIRECT OR CONSEQUENTIAL
DAMAGES, INCLUDING BUT NOT LIMITED TO LOST PROFITS, BUSINESS REVENUE, GOODWILL OR
ANTICIPATED SAVINGS. IN NO CASE SHALL THE TOTAL LIABILITY OF LENOVO, ITS AFFILIATESS,
SUPPLIERS, RESELLERS OR SERVICE PROVIDERS FOR DAMAGES FROM ANY CAUSE EXCEED THE
AMOUNT OF ACTUAL DIRECT DAMAGES, NOT TO EXCEED THE AMOUNT PAID FOR THE PRODUCT.
THE FOREGOING LIMITATIONS DO NOT APPLY TO DAMAGES FOR BODILY INJURY (INCLUDING
DEATH), DAMAGE TO REAL PROPERTY OR DAMAGE TO TANGIBLE PERSONAL PROPERTY FOR
WHICH LENOVO IS LIABLE UNDER LAW.
The following replaces the same section in Part 1:
Your Other Rights:
THIS WARRANTY GIVES YOU SPECIFIC LEGAL RIGHTS. YOU ALSO HAVE OTHER RIGHTS AT LAW,
INCLUDING UNDER THE AUSTRALIAN CONSUMER LAW. NOTHING IN THIS WARRANTY AFFECTS
STATUTORY RIGHTS OR RIGHTS AT LAW, INCLUDING RIGHTS THAT CANNOT BE WAIVED OR
LIMITED BY CONTRACT.
For example, our products come with guarantees that cannot be excluded under the Australian Consumer
Law. You are entitled to a replacement or refund for a major failure and compensation for any other
reasonably foreseeable loss or damage. You are also entitled to have the products repaired or replaced if the
products fail to be of acceptable quality and the failure does not amount to a major failure.
New Zealand
The following is added to the same section in Part 1:
Use of Personal Information:
Lenovo will not be able to perform our service under this warranty if you refuse to provide your information or
do not wish us to transfer your information to our agent or contractor. You have the right to access your
personal information and request correction of any errors in it pursuant to the Privacy Act 1993 by contacting
Lenovo (Australia & New Zealand) Pty Limited ABN 70 112 394 411. Address: Level 10, North Tower, 1-5
Railway Street, Chatswood, NSW, 2067. Telephone: 61 2 8003 8200. Email: [email protected]
Bangladesh, Cambodia, India, Indonesia, Nepal, Philippines, Vietnam and Sri Lanka
The following is added to Part 1:
Dispute Resolution
Disputes arising out of or in connection with this warranty shall be finally settled by arbitration held in
Singapore. This warranty shall be governed, construed and enforced in accordance with the laws of
Singapore, without regard to conflict of laws. If you acquired the product in India, disputes arising out of or
in connection with this warranty shall be finally settled by arbitration held in Bangalore, India. Arbitration
in Singapore shall be held in accordance with the Arbitration Rules of Singapore International Arbitration
Center (“SIAC Rules”) then in effect. Arbitration in India shall be held in accordance with the laws of India
then in effect. The arbitration award shall be final and binding on the parties without appeal. Any award
Appendix C. Lenovo Limited Warranty
31
shall be in writing and set forth the findings of fact and the conclusions of law. All arbitration proceedings,
including all documents presented in such proceedings shall be conducted in the English language. The
English language version of this warranty prevails over any other language version in such proceedings.
European Economic Area (EEA)
The following is added to Part 1:
Customers in the EEA may contact Lenovo at the following address: EMEA Service Organisation, Lenovo
(International) B.V., Floor 2, Einsteinova 21, 851 01, Bratislava, Slovakia. Service under this warranty for
Lenovo hardware products purchased in EEA countries may be obtained in any EEA country in which the
product has been announced and made available by Lenovo.
Russia
The following is added to Part 1:
Product Service Life
The product service life is four (4) years from the original date of purchase.
Part 3 - Warranty Service Information
Product Type
Country or Region of Purchase
Warranty Period
Type of Warranty Service
ThinkPad USB Keyboard
with TrackPoint
Worldwide
3 years
1, 4
If required, your Service Provider will provide repair or exchange service depending on the type of warranty
service specified for your product and the available service. Scheduling of service will depend upon the time
of your call, parts availability, and other factors.
Types of Warranty Service
1. Customer Replaceable Unit (“CRU”) Service
Under CRU Service, the Service Provider will ship CRUs to you at its cost for installation by you. CRU
information and replacement instructions are shipped with your product and are available from Lenovo at any
time upon request. CRUs that are easily installed by you are called “Self-service CRUs”. “Optional-service
CRUs” are CRUs that may require some technical skill and tools. Installation of Self-service CRUs is your
responsibility. You may request that a Service Provider install Optional-service CRUs under one of the other
types of warranty service designated for your product. An optional service offering may be available for
purchase from a Service Provider or Lenovo under which Self-service CRUs would be installed for you.
You may find a list of CRUs and their designation in the publication that was shipped with your product
or at www.lenovo.com/CRUs. The requirement to return a defective CRU, if any, will be specified in the
instructions shipped with a replacement CRU. When return is required: 1) return instructions, a prepaid
return shipping label, and a container will be included with the replacement CRU; and 2) you may be charged
for the replacement CRU if the Service Provider does not receive the defective CRU from you within thirty
(30) days of your receipt of the replacement CRU.
2. On-site Service
Under On-Site Service, a Service Provider will either repair or exchange the product at your location. You
must provide a suitable working area to allow disassembly and reassembly of the product. Some repairs
32
ThinkPad USB Keyboard with TrackPointUser Guide
may need to be completed at a service center. If so, the Service Provider will send the product to the
service center at its expense.
3. Courier or Depot Service
Under Courier or Depot Service, your product will be repaired or exchanged at a designated service center,
with shipping at the expense of the Service Provider. You are responsible for disconnecting the product and
packing it in a shipping container provided to you to return your product to a designated service center.
A courier will pick up your product and deliver it to the designated service center. The service center will
return the product to you at its expense.
4. Customer Carry-In Service
Under Customer Carry-In Service, your product will be repaired or exchanged after you deliver it to a
designated service center at your risk and expense. After the product has been repaired or exchanged, it will
be made available to you for collection. If you fail to collect the product, the Service Provider may dispose of
the product as it sees fit, with no liability to you.
5. Mail-In Service
Under Mail-In Service, your product will be repaired or exchanged at a designated service center after you
deliver it at your risk and expense. After the product has been repaired or exchanged, it will be returned to
you at Lenovo’s risk and expense, unless the Service Provider specifies otherwise.
6. Customer Two-Way Mail-In Service
Under Customer Two-Way Mail-In Service, your product will be repaired or exchanged after you deliver it to
a designated service center at your risk and expense. After the product has been repaired or exchanged,
it will be made available to you for return shipping at your risk and expense. If you fail to arrange return
shipment, the Service Provider may dispose of the product as it sees fit, with no liability to you.
7. Product Exchange Service
Under Product Exchange Service, Lenovo will ship a replacement product to your location. You are
responsible for its installation and verification of its operation. The replacement product becomes your
property in exchange for the failed product, which becomes the property of Lenovo. You must pack the
failed product in the shipping carton in which you received the replacement product and return it to Lenovo.
Transportation charges, both ways, shall be at Lenovo’s expense. If you fail to use the carton in which the
replacement product was received, you may be responsible for any damage to the failed product occurring
during shipment. You may be charged for the replacement product if Lenovo does not receive the failed
product within thirty (30) days of your receipt of the replacement product.
Suplemento de Garantía para México
Este Suplemento se considera parte integrante de la Garantía Limitada de Lenovo y será efectivo única y
exclusivamente para los productos distribuidos y comercializados dentro del Territorio de los Estados
Unidos Mexicanos. En caso de conflicto, se aplicarán los términos de este Suplemento.
Todos los programas de software precargados en el equipo sólo tendrán una garantía de treinta (30) días por
defectos de instalación desde la fecha de compra. Lenovo no es responsable de la información incluida
en dichos programas de software y/o cualquier programa de software adicional instalado por Usted o
instalado después de la compra del producto.
Los servicios no cubiertos por la garantía se cargarán al usuario final, previa obtención de una autorización.
Appendix C. Lenovo Limited Warranty
33
En el caso de que se precise una reparación cubierta por la garantía, por favor, llame al Centro de soporte
al cliente al 001-866-434-2080, donde le dirigirán al Centro de servicio autorizado más cercano. Si no
existiese ningún Centro de servicio autorizado en su ciudad, población o en un radio de 70 kilómetros
de su ciudad o población, la garantía incluirá cualquier gasto de entrega razonable relacionado con el
transporte del producto a su Centro de servicio autorizado más cercano. Por favor, llame al Centro de
servicio autorizado más cercano para obtener las aprobaciones necesarias o la información relacionada
con el envío del producto y la dirección de envío.
Para obtener una lista de los Centros de servicio autorizados, por favor, visite:
http://www.lenovo.com/mx/es/servicios
Importado por:
Lenovo México S. de R.L. de C.V.
Av. Santa Fe 505, Piso 15
Col. Cruz Manca
Cuajimalpa, D.F., México
C.P. 05349
Tel. (55) 5000 8500
34
ThinkPad USB Keyboard with TrackPointUser Guide
Appendix D. Electronic emission notices
The following information refers to the ThinkPad USB Keyboard with TrackPoint.
Federal Communications Commission Declaration of Conformity
ThinkPad USB Keyboard with TrackPoint - SK-8855
This equipment has been tested and found to comply with the limits for a Class B digital device, pursuant
to Part 15 of the FCC Rules. These limits are designed to provide reasonable protection against harmful
interference in a residential installation. This equipment generates, uses, and can radiate radio frequency
energy and, if not installed and used in accordance with the instructions, may cause harmful interference
to radio communications. However, there is no guarantee that interference will not occur in a particular
installation. If this equipment does cause harmful interference to radio or television reception, which can be
determined by turning the equipment off and on, the user is encouraged to try to correct the interference by
one or more of the following measures:
• Reorient or relocate the receiving antenna.
• Increase the separation between the equipment and receiver.
• Connect the equipment into an outlet on a circuit different from that to which the receiver is connected.
• Consult an authorized dealer or service representative for help.
Lenovo is not responsible for any radio or television interference caused by using other than specified or
recommended cables and connectors or by unauthorized changes or modifications to this equipment.
Unauthorized changes or modifications could void the user's authority to operate the equipment.
This device complies with Part 15 of the FCC Rules. Operation is subject to the following two conditions: (1)
this device may not cause harmful interference, and (2) this device must accept any interference received,
including interference that may cause undesired operation.
Responsible Party:
Lenovo (United States) Incorporated
1009 Think Place - Building One
Morrisville, NC 27560
Phone Number: 919-294-5900
Industry Canada Class B emission compliance statement
This Class B digital apparatus complies with Canadian ICES-003.
Cet appareil numérique de la classe B est conforme à la norme NMB-003 du Canada.
European Union - Compliance to the Electromagnetic Compatibility Directive
This product is in conformity with the protection requirements of EU Council Directive 2004/108/EC on the
approximation of the laws of the Member States relating to electromagnetic compatibility. Lenovo cannot
accept responsibility for any failure to satisfy the protection requirements resulting from a non-recommended
modification of the product, including the installation of option cards from other manufacturers.
© Copyright Lenovo 2009, 2012
35
This product has been tested and found to comply with the limits for Class B Information Technology
Equipment according to European Standard EN 55022. The limits for Class B equipment were derived
for typical residential environments to provide reasonable protection against interference with licensed
communication devices.
Lenovo, Einsteinova 21, 851 01 Bratislava, Slovakia
German Class B compliance statement
Deutschsprachiger EU Hinweis:
Hinweis für Geräte der Klasse B EU-Richtlinie zur Elektromagnetischen Verträglichkeit
Dieses Produkt entspricht den Schutzanforderungen der EU-Richtlinie 2004/108/EG (früher 89/336/EWG) zur
Angleichung der Rechtsvorschriften über die elektromagnetische Verträglichkeit in den EU-Mitgliedsstaaten
und hält die Grenzwerte der EN 55022 Klasse B ein.
Um dieses sicherzustellen, sind die Geräte wie in den Handbüchern beschrieben zu installieren und zu
betreiben. Des Weiteren dürfen auch nur von der Lenovo empfohlene Kabel angeschlossen werden.
Lenovo übernimmt keine Verantwortung für die Einhaltung der Schutzanforderungen, wenn das Produkt
ohne Zustimmung der Lenovo verändert bzw. wenn Erweiterungskomponenten von Fremdherstellern ohne
Empfehlung der Lenovo gesteckt/eingebaut werden.
Deutschland:
Einhaltung des Gesetzes über die elektromagnetische Verträglichkeit von Betriebsmitteln
Dieses Produkt entspricht dem „Gesetz über die elektromagnetische Verträglichkeit von Betriebsmitteln“
EMVG (früher „Gesetz über die elektromagnetische Verträglichkeit von Geräten“). Dies ist die Umsetzung der
EU-Richtlinie 2004/108/EG (früher 89/336/EWG) in der Bundesrepublik Deutschland.
Zulassungsbescheinigung laut dem Deutschen Gesetz über die elektromagnetische Verträglichkeit
von Betriebsmitteln, EMVG vom 20. Juli 2007 (früher Gesetz über die elektromagnetische
Verträglichkeit von Geräten), bzw. der EMV EG Richtlinie 2004/108/EC (früher 89/336/EWG), für
Geräte der Klasse B.
Dieses Gerät ist berechtigt, in Übereinstimmung mit dem Deutschen EMVG das EG-Konformitätszeichen
- CE - zu führen. Verantwortlich für die Konformitätserklärung nach Paragraf 5 des EMVG ist die Lenovo
(Deutschland) GmbH, Gropiusplatz 10, D-70563 Stuttgart.
Informationen in Hinsicht EMVG Paragraf 4 Abs. (1) 4:
Das Gerät erfüllt die Schutzanforderungen nach EN 55024 und EN 55022 Klasse B.
Korea Class B compliance statement
Japan VCCI Class B compliance statement
36
ThinkPad USB Keyboard with TrackPointUser Guide
Lenovo product service information for Taiwan
Appendix D. Electronic emission notices
37
38
ThinkPad USB Keyboard with TrackPointUser Guide
Appendix E. Notices
Lenovo may not offer the products, services, or features discussed in this document in all countries. Consult
your local Lenovo representative for information on the products and services currently available in your
area. Any reference to a Lenovo product, program, or service is not intended to state or imply that only that
Lenovo product, program, or service may be used. Any functionally equivalent product, program, or service
that does not infringe any Lenovo intellectual property right may be used instead. However, it is the user's
responsibility to evaluate and verify the operation of any other product, program, or service.
Lenovo may have patents or pending patent applications covering subject matter described in this
document. The furnishing of this document does not give you any license to these patents. You can send
license inquiries, in writing, to:
Lenovo (United States), Inc.
1009 Think Place - Building One
Morrisville, NC 27560
U.S.A.
Attention: Lenovo Director of Licensing
LENOVO PROVIDES THIS PUBLICATION “AS IS” WITHOUT WARRANTY OF ANY KIND, EITHER EXPRESS
OR IMPLIED, INCLUDING, BUT NOT LIMITED TO, THE IMPLIED WARRANTIES OF NON-INFRINGEMENT,
MERCHANTABILITY OR FITNESS FOR A PARTICULAR PURPOSE. Some jurisdictions do not allow
disclaimer of express or implied warranties in certain transactions, therefore, this statement may not apply
to you.
This information could include technical inaccuracies or typographical errors. Changes are periodically
made to the information herein; these changes will be incorporated in new editions of the publication.
Lenovo may make improvements and/or changes in the product(s) and/or the program(s) described in this
publication at any time without notice.
Trademarks
The following terms are trademarks or service marks of Lenovo in the United States, other countries, or both:
Lenovo
Lenovo Care
ThinkPad
ThinkVantage
TrackPoint
Microsoft, Windows, and Windows Vista are trademarks of the Microsoft group of companies.
Other company, product, or service names may be trademarks or service marks of others.
Recycling information
Lenovo encourages owners of information technology (IT) equipment to responsibly recycle their equipment
when it is no longer needed. Lenovo offers a variety of programs and services to assist equipment owners in
recycling their IT products. For information on recycling Lenovo products, go to:
http://www.lenovo.com/recycling
Recycling and disposal information for Japan is available at:
http://www.lenovo.com/recycling/japan
© Copyright Lenovo 2009, 2012
39
Recycling information for Brazil
Declarações de Reciclagem no Brasil
Descarte de um Produto Lenovo Fora de Uso
Equipamentos elétricos e eletrônicos não devem ser descartados em lixo comum, mas enviados à pontos de
coleta, autorizados pelo fabricante do produto para que sejam encaminhados e processados por empresas
especializadas no manuseio de resíduos industriais, devidamente certificadas pelos orgãos ambientais, de
acordo com a legislação local.
A Lenovo possui um canal específico para auxiliá-lo no descarte desses produtos. Caso você possua
um produto Lenovo em situação de descarte, ligue para o nosso SAC ou encaminhe um e-mail para:
[email protected], informando o modelo, número de série e cidade, a fim de enviarmos as instruções
para o correto descarte do seu produto Lenovo.
40
ThinkPad USB Keyboard with TrackPointUser Guide
Appendix F. Restriction of Hazardous Substances Directive
(RoHS)
China RoHS
The information in the following table is applicable for products manufactured on or after March 1, 2007 for
sale in the People’s Republic of China.
Turkish RoHS
The Lenovo product meets the requirements of the Republic of Turkey Directive on the Restriction of the Use
of Certain Hazardous Substances in Electrical and Electronic Equipment (EEE).
Ukraine RoHS
India RoHS
RoHS compliant as per E-Waste (Management & Handling) Rules, 2011.
© Copyright Lenovo 2009, 2012
41
42
ThinkPad USB Keyboard with TrackPointUser Guide