1
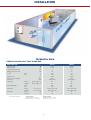
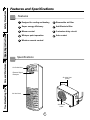
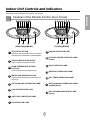
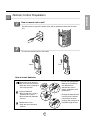
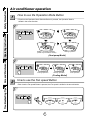
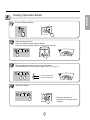
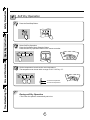
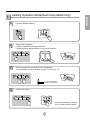
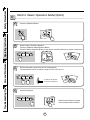
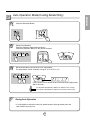
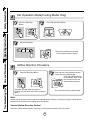
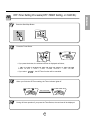
APPLICATION GUIDE
• Heat pump
• Cooling Capacities of 8 a 13 kW
FLOOR STANDING
INSTALLATION
TECHNICAL DATA
VERTICAL FLOOR SPLIT. HEAT PUMP R22
HEAT PUMP UNIT
Cooling capacity
Heating capacity
Cooling mode power input
Heating mode power input
Current
Voltage: 50 Hz
Indoor U. air flow (Height)
Compressor
Sound level
Bevel coupling pipe
Dimensions
Net weight
(1) At Eurovent Conditions
Cool
Heat
Indoor U.
Outdoor U.
Liquid
Gas
Indoor U.
Outdoor U.
Indoor U.
Outdoor U.
W
W
kW
kW
A
A
V/f
m3/h
Type
dB(A), Height, 1m
dB(A), Height, 1m
H x L x D (mm)
H x L x D (mm)
kg
kg
Cooling operation
Indoor air 27o C d.b.- 19o C w.b.
Outdoor air 35o C w.b. - 24o C w.b.
VHA 30
VHA 50
8.150
8.150
3
2,8
14,5
13,5
230/I
1140
Reciprocating
46
58
3/8"
5/8"
1.800 x 500 x 320
800 x 870 x 320
40
65
12.895
14.070
4,5
4,5
7,8
7,5
400/III
2100
Reciprocating
48
58
3/8"
3/4"
1.810 x 590 x 440
1.225 x 900 x 370
62
90
Heating operation
Indoor air 20o C d.b. - 12o C w.b.
Outdoor air 7o C d.b. - 6o C w.b.
1
Safety Precautions
Operating Instructions
Care and Maintenance
Troubleshooting Tips
Features and Specifications
Features
1 Designed for cooling and heating
6 Removable air filter
2 Super energy efficiency
7 Anti-Bacteria filter
3 Micom control
8 3 minutes delay circuit
4 Whisper quiet operation
9 Auto restart
5 Wireless remote control
Specifications
Air Outlet Vent
Remote Signal
Receptor
Air Inlet Vent
(Rear)
Air Inlet Vent
Air Outlet
Vent
2
Indoor Unit Controls and Indicators
The remote control transmits the signals to the system.
6
7
6
9 10 12 13 14 15
5
7
11
8
13 14 15
5
A/CL
A/CL
M
M
L
L
H
ROOM TEMP SET TEMP
H
OUT
DOOR
ROOM TEMP SET TEMP
MODE
2
ENGLISH
Features of the Remote Control- Door Closed
OUT
DOOR
MODE
3
4
2
1
(Heat Pump Model)
3
4
1
(Cooling Model)
9
HEATING OPERATION LAMP
10
ELECTRIC HEATER OPERATION LAMP
(Option)
11
AUTO OPERATION LAMP
12
DEFROST OPERATION LAMP
INDOOR FAN SPEED SELECTION
Used to select fan speed in three steps-low,
med, high.
13
OFF TIMER OPERATION LAMP
5
OUTDOOR UNIT OPERATION LAMP
14
AUTO AIRFLOW OPERATION LAMP
(HORIZONTAL)
6
COOLING OPERATION LAMP
1
2
3
4
START/STOP BUTTON
Operation starts when this button is pressed
and stops when the button is pressed again.
OPERATION MODE SELECTION BUTTON
Used to select the operation Mode.
ROOM TEMPERATURE SETTING
BUTTONS
Used to select the room temperature.
15 AIR CLEANER OPERATION LAMP
(Option)
7
SOFT DRY OPERATION LAMP
8
FAN OPERATION LAMP
3
Safety Precautions
Operating Instructions
Name and Function-Remote Control
Control
1
1
2
2
12
11
4
10
9
7
8
3
6
Care and Maintenance
Operation Display of the Remote
Control
3
Indoor Fan Speed Selection Button
• To select the desired fan speed in three
steps [Low, Med, High]
4
5
Cooling ON Button
6
Power ON/OFF Button
• Operation will start when this button is
pressed, and stop when the button is
pressed again.
7
Timer Set Button
• Each time the button is pressed, the
mode is changed in the following
process.
Timer set (1, 2, 3, 4, 5, 6, 7 hours)
If you select “0:00” the off Timer function
will be cancelled.
8
Auto Airflow Direction Control Button
• The vertical louvers swing left and right.
• The horizontal louvers can be set by
hand.
5
Troubleshooting Tips
Signal Transmitter
• Transmits the signals to the Floor
standing Type air conditioner
9
Temperature Setting Buttons
Heating Button (Heat Pump Model Only)
Auto Mode Operation Button
(Cooling Model Only)
10
Soft Dry Operation Button
11
Indoor Fan Operation Button (Cooling
Model Only)
12
Electric Heater ON/OFF Button (Option)
Wireless Remote Control Puts all functions at your fingertips
Handling the remote control
• Aim at the signal receptor on the Floor standing Type air conditioner when operating.
• The remote control signal can be received at a distance of up to about 7meters.
• Be sure that there are no obstructions between the remote control and the signal receptor.
• Do not drop or throw the remote control.
• Do not place the remote control in a location exposed to direct sunlight, or next to a heating unit, or
other heat source.
4
1
ENGLISH
Remote Control Preparation
How to mount onto a wall
Use the screws to secure the holder to the wall or attach the holder side of indoor
unit.
2
To insert the remote control to the holder.
Insert
Pull
How to insert batteries
• Do not use rechargeable
batteries such batteries
are different from
standard dry cells in
shape, dimensions, and
performance.
Remove the cover from the
back of the remote controller.
• Slide the cover according to
the arrow direction.
Insert two batteries.
• Be sure that the (+) and (-)
directions are correct.
• Be sure that both batteries
are new.
• Change the batteries with
a new one if the remote
control does not work
properly after using for an
extended length of time.
Re-attach the cover.
• Slide the cover into back
position.
5
Safety Precautions
Air conditioner operation
1
How to use the Operation Mode Button
• Each time the Operation Mode Selection Button is pressed, the Operation Mode is
shifted in the arrow direction.
MODE
H
Care and Maintenance
Operating Instructions
H
ROOM TEMP SET TEMP
OUT
DOOR
ROOM TEMP SET TEMP
Cooling Operation
OUT
DOOR
Soft Dry Operation
H
ROOM TEMP SET TEMP
H
OUT
DOOR
ROOM TEMP SET TEMP
Heating + E/Heater Operation
(model only with Electirc heater)
OUT
DOOR
Heating Operation
(Heat pump Model)
MODE
H
ROOM TEMP SET TEMP
H
OUT
DOOR
ROOM TEMP
Cooling Operation
OUT
DOOR
Soft Dry Operation
H
ROOM TEMP SET TEMP
OUT
DOOR
Auto Operation
(Cooling Model)
2
How to use the Fan speed Button
Troubleshooting Tips
• Each time the Fan speed Button is pressed, the Fan speed is shifted in the arrow direction.
MODE
M
H
High
6
L
Low
Medium
Cooling Operation Mode
1
2
ENGLISH
3
Press the Start/Stop Button.
Select Cooling Operation.
Press the Operation Mode Selection Button.
Press the Cooling Operation Button on the remote controller.
MODE
H
3
ROOM TEMP SET TEMP
OUT
DOOR
ROOM TEMP SET TEMP
OUT
DOOR
Set the temperature lower than the room temperature.
The temperature can be set within a range of 16°C~30°C by 1°C.
MODE
To raise the temperature
H
To lower the temperature
4
Set the Fan Speed.
MODE
• Each time the Button is
pressed, the Fan Speed mode
is shifted.
7
Safety Precautions
Operating Instructions
Soft Dry Operation
4
Press the Start/Stop Button.
1
2
Select Soft Dry Operation.
Press the Operation Mode Selection Button.
Press the Soft Dry Operation Button on the remote controller.
MODE
H
Troubleshooting Tips
Care and Maintenance
ROOM TEMP SET TEMP
3
OUT
DOOR
Set the temperature lower than the room temperature.
The temperature can be set within a range of 16°C~30°C by 1°C.
MODE
H
ROOM TEMP SET TEMP
To raise the temperature
To lower the temperature
During soft Dry Operation
• The indoor fan speed is automatically set to low.
8
OUT
DOOR
ENGLISH
5 Heating Operation Mode(Heat Pump Model Only)
Press the Start/Stop Button.
1
2
Select heating Operation.
Press the Operation Mode Selection Button.
Press the heating Operation Button on the remote controller.
MODE
H
ROOM TEMP SET TEMP
3
OUT
DOOR
Set the temperature upper than the room temperature.
The temperature can be set within a range of 16°C~30°C by 1°C.
MODE
H
ROOM TEMP SET TEMP
OUT
DOOR
To raise the temperature
To lower the temperature
4
Set the Fan Speed.
MODE
• Each time the Button is pressed,
the Fan Speed mode is shifted.
9
Safety Precautions
Operating Instructions
6
Electric Heater Operation Mode(Option)
1
2
Press the Start/Stop Button.
Select heating+ E/heater Operation.
Press the Operation Mode Selection Button.
Press the Heater Operation Button on the remote controller.(When the unit operates in heating mode.)
MODE
H
OUT
DOOR
Troubleshooting Tips
Care and Maintenance
ROOM TEMP SET TEMP
3
Set the temperature upper than the room temperature.
The temperature can be set within a range of 16°C~30°C by 1°C.
MODE
H
To raise the temperature
To lower the temperature
4
ROOM TEMP SET TEMP
OUT
DOOR
Set the Fan Speed.
MODE
• Each time the Button is pressed,
the Fan Speed mode is shifted.
10
Auto Operation Mode(Cooling Model Only)
1
2
ENGLISH
7
Press the Start/Stop Button.
Select Auto Operation.
Press the Operation Mode Selection Button.
Press Auto Operation Button on the remote controller.
MODE
H
ROOM TEMP SET TEMP
3
OUT
DOOR
Set the temperature upper than the room temperature.
The temperature can be set within a range of 16°C~30°C by 1°C.
MODE
H
ROOM TEMP SET TEMP
OUT
DOOR
Cold Cool Proper
Warm Hot
(This indication will be shifted to the initial Auto Mode Display state
after 4 seconds.)
To raise the temperature. (When you feel too cool or cold)
To lower the temperature. (When you feel too warm or hot)
During Auto Operation
• It is impossible to switch the indoor fan speed because of being already set to the
best condition by fuzzy rule.
11
Safety Precautions
Fan Operation Mode(Cooling Model Only)
8
1
Press the Start/Stop
Button.
2
Press Fan Operation Button.
H
Troubleshooting Tips
Care and Maintenance
Operating Instructions
ROOM TEMP SET TEMP
3
OUT
DOOR
Set the Fan Speed.
MODE
❑ Each time the Button is pressed,
the Fan Speed mode is shifted.
Airflow Direction Procedure
9
1
Press the Auto Swing Button and then
Press the Start/Stop Button.
left and right.
2 louvers will swing
Press the Airflow Direction
Control Button again to set
the Vertical louver at the
desired airflow direction.
(Operation will start when the button is
pressed, and stop when the button is pressed
again.)
The vertical louver swing left and right.
Note
Always use the remote control to adjust the right/left airflow direction, manually moving the vertical airflow
direction louver by hand could change the air conditioner.
Vertical Airflow Direction Control
Adjust the vertical airflow direction manually by moving the horizontal louvers with hand.
12
OFF Timer Setting Procedure(OFF TIMER Setting, or CANCEL)
1
2
Press the Start/Stop Button.
Press the Timer Button.
H
ROOM TEMP SET TEMP
OUT
DOOR
• If you press the button, the selected off timer is displayed as follows;
• If you select ‘
3
’, the Off Timer function will be cancelled.
When you finish the Off Timer setting, the Timer indicator lights off.
After 4 seconds
H
ROOM TEMP SET TEMP
4
H
OUT
DOOR
ROOM TEMP SET TEMP
OUT
DOOR
During off-timer operation if you press the Timer Button, the rest time will be displayed.
13
ENGLISH
10
Safety Precautions
11 Child Lock Operation Procedure
Press the low and high temperature setting buttons simultaneously for 3 seconds.
The unit will respond with beep.
1
MODE
H
Care and Maintenance
Operating Instructions
ROOM TEMP SET TEMP
H
OUT
DOOR
ROOM TEMP SET TEMP
After 3 seconds,
it will be shifted.
2
ROOM TEMP SET TEMP
OUT
DOOR
After 3 seconds,
it will be shifted.
During Child Lock Operation
➊ Whenever you press any Button on Display Panel, it will immediately display
“
”, which means Display panel is Locked.
❷ All the Button on the indoor unit Display panel will not work.
❸ But the Button on the remote controller will work.
3
For releasing child lock Operation
Press the low and high temperature setting buttons
simultaneously for 3 seconds again.
The unit will respond with beep, Child Lock Operation will
removed.
MODE
H
ROOM TEMP SET TEMP
Troubleshooting Tips
H
OUT
DOOR
OUT
DOOR
H
ROOM TEMP SET TEMP
After pressing
the buttons it will be shifted
immediately
OUT
DOOR
H
ROOM TEMP SET TEMP
OUT
DOOR
After 3 seconds,
it will be shifted.
Auto restart
In case the power comes on again after a power failure, Auto Restarting Operation is the
function to operate procedures automatically to the previous operating conditions.
14
Care and Maintenance
CAUTION: Before performing any maintenance, turn off the main power to the system.
Cleaning of the air filters.
Recommended about once every two weeks
Cleaning of the air cleaner.
Recommended about once every three months
Remove the Air Filter.
Take hold of the tab and pull slightly forward to
remove the filter.
Remove the Air Cleaner.
Take hold of the tab and pull slightly forward to
remove the air cleaner.
Clean.
• To remove the dust adhering to the filters, either use a
vacuum cleaner, or wash them in water and dry in the
shade.
• Re-insert the filter to the original position.
Clean.
• Dip the air cleaner into the water mixed with
detergent, for 20~30 minutes, and dry in the shade.
• Re-insert the air cleaner to the original position.
Never use any of the followings.
Cleaning of the air conditioner
• Water hotter than 40°C.
Could cause deformation
and/or discoloration.
• Don’t wash with water.
• Wipe with a soft dry cloth.
• Volatile substances.
Could damage the surfaces
of the air conditioner.
When the air conditioner is not going to be used for a long time.
At the start of the season
At the end of the season
Operate the air conditioner at the following
settings for 2 to 3 hours.
• Type of operation : Cooling.
• Temperature setting : 30°C.
This will dry out the internal mechanisms.
Clean the air filters, re-insert, then operate
the air conditioner.
Remove the batteries from the Remote Control.
Be sure that nothing obstructs the air outlet
and intake vents.
Turn off the circuit breaker.
CAUTION
Turn off the circuit breaker when the air conditioner
is not going to be used for a long time.
Dirt may collect and may cause a fire.
Operation Tips
Do not overcool the room.
Keep blinds or curtains closed.
Keep the room temperature uniform.
This is not good for your health and
wastes electricity.
Do not let direct sunshine enter the
room when the air conditioner is in
operation.
Adjust the vertical and horizontal airflow
direction to ensure a uniform
temperature in the room.
Make sure that the doors and
windows are shut tight.
Clean the air filter regularly.
Ventilate the room occasionally.
Avoid opening doors and windows as
much as possible to keep the cool air in
the room.
Blockages in the air filter reduce the
airflow and lower cooling and
dehumidifying effects. Clean at least
once every two weeks.
Since windows are kept closed, it is a
good idea to open them and ventilate
the room now and then.
15
ENGLISH
During the season
Safety Precautions
Before you call for service...
?
Troubleshooting Tips! Save time and money!
Check the following points before requesting repairs or service.... If the fault persists, please
contact your dealer or service center.
Case
Troubleshooting Tips
Care and Maintenance
Operating Instructions
Does not operate.
Explanation
See page
• Have you made a mistake in timer operation?
• Has the fuse blown or has the circuit breaker been
tripped?
• Is the power Switch at Off?
• Is the unit at the starting of Heating Operation?
If yes, Hot-start is activating.
• Is the unit in the Deicing?
If yes, wait for finishing the Deicing.
-
The room has a peculiar
odor.
• Check that this is not a damp smell exuded by the
walls, carpet, furniture, or cloth items in the room.
-
It seems that condensation is
leaking from the air
conditioner.
• Condensation occurs when the airflow from the air
conditioner cools the warm room air.
Air conditioner does not
operate for about 3 minutes
when restarted.
• This is the Protection device of the air conditioner .
• Wait about three minutes and operation will begin.
• If the airflow begins before its temperature become
warm, it will cause an undesired cooling effect. In
order to prevent this, the airflow will not begin until
it is sufficiently warm.
Does not cool or heat
effectively.
• Is the air filter dirty? See air filter cleaning
instructions.
• The room may have been very hot when the room
air conditioner was first turned on. Allow time for it
to cool down.
• Has the temperature been set incorrectly?
• Are the indoor unit's air inlet or outlet vents
obstructed?
The air conditioner operation
is noisy.
Remote controller display is
faint, or no display at all.
• For a noise that sounds like water flowing.
-This is the sound of freon flowing inside the air
conditioner unit.
• For a noise that sounds like the compressed air
releasing into atmosphere.
-This is the sound of the dehumidifying water being
processed inside the air conditioning unit.
-
17
-
-
-
• Are the batteries depleted?
• Are the batteries inserted in the opposite (+) and (-)
directions?
7
NOTE
WATER RESISTANT: The outdoor side of this appliance is WATER RESISTANT.
The indoor side is not water resistant and should not be exposed to excess water.
16
BELGIUM :
CZECH REPUBLIC :
FRANCE :
GERMANY :
LENNOX BENELUX N.V./S.A.
tél. : + 32 3 633 30 45
fax : + 32 3 633 00 89
e-mail : [email protected]
LENNOX JANKA
tél. : + 420 2 510 88 111
fax : + 420 2 579 10 393
e-mail : [email protected]
LENNOX FRANCE
tél. : + 33 4 72 23 20 20
fax : + 33 4 78 20 07 76
e-mail : [email protected]
LENNOX DEUTSCHLAND GmbH
tél. : + 49 69 42 09 79 0
fax : + 49 69 42 09 79 40
e-mail : [email protected]
MIDDLE EAST :
LENNOX DISTRIBUTION
tél. : + 971 4 262 9309
fax : + 971 4 266 7082
e-fax : + 1 240 368 73 62
Mobile : 971 50 4510669
e-mail : [email protected]
NETHERLANDS :
LENNOX BENELUX B.V.
tél. : + 31 33 2471 800
fax : + 31 33 2459 220
e-mail : [email protected]
POLAND :
PORTUGAL :
RUSSIA :
SLOVAKIA :
SPAIN :
UKRAINE :
LENNOX POLSKA Sp. z o. o.
tél. : + 48 22 832 26 61
fax : + 48 22 832 26 62
e-mail : [email protected]
LENNOX CLIMATIZAÇAO LDA.
tél. : +351 22 999 84 60
fax : +351 22 999 84 68
e-mail : [email protected]
LENNOX DISTRIBUTION MOSCOW
tél. : + 7 095 246 07 46
fax : + 7 502 933 29 55
e-mail : [email protected]
LENNOX SLOVAKIA
tél. : + 421 2 44 87 19 27
fax : + 421 2 44 88 64 72
LENNOX REFAC S.A.
tél. : + 34 915 40 18 10
fax : + 34 915 42 84 04
e-mail : [email protected]
LENNOX DISTRIBUTION KIEV
tél. : + 380 44 213 14 21
fax : + 380 44 213 14 21
e-mail : [email protected]
UNITED KINGDOM :
LENNOX INDUSTRIES LTD
tél. : + 44 1604 599400
fax : + 44 1604 594200
e-mail : [email protected]
OTHER EUROPEAN
COUNTRIES, AFRICA,
LENNOX DISTRIBUTION :
tél. : + 33 4 72 23 20 14
fax : + 33 4 72 23 20 28
e-mail : [email protected]
AGU-FS-April 02
w w w. L e n n oxe u ro p e . c o m