1
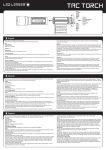
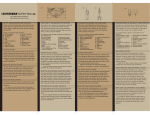
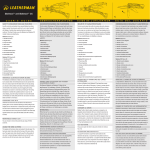
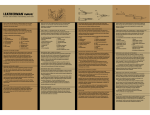
6
2
5
2
7
2
1
3
4
3
4
1
A
5
6
3
4
1
5
B
D
C
E
F
G
Serac™ S1 (Drawing A)
Features:
Serac™ S2 (Drawing B)
Features:
Serac™ S3 (Drawing C)
Features:
Serac™ S1 (Zeichnung A)
SPEZIFIKATIONEN:
Serac™ S2 (Zeichnung B)
SPEZIFIKATIONEN:
Serac™ S3 (Zeichnung C)
SPEZIFIKATIONEN:
1. 6061-T6 Hard-anodized
Aluminum Body
2. Aluminum Bezel
3. Tail Switch
4. Detachable Lanyard
5. Reversible Pocket Clip
> Detachable Keychain Ring
> Regulated Light Output System
> Length: 3.23 in | 8.2 cm
> Bezel Width: .56 in | 1.42 cm
1. 6061-T6 Hard-anodized
Aluminum Body
2. Stainless Steel Bezel
3. Glass Lens with
Anti-reflective Coating
4. Textured Aluminum Reflector
5. Tail Switch
6. Detachable Lanyard 7. Reversible Pocket Clip
> Detachable Keychain Ring
> Regulated Light Output System
> Length: 3.48 in | 8.84 cm
> Bezel Width: .56 in | 1.42 cm
1. 6061-T6 Hard-anodized
Aluminum Body
2. Stainless Steel Bezel
3. Glass Lens with
Anti-reflective Coating
4. Textured Aluminum Reflector
5. Tail Switch
6. Reversible Pocket Clip
> Detachable Lanyard > Regulated Light Output System
> Length: 3.2 in | 8.13 cm
> Bezel Width: .9 in | 2.29 cm
1. Korpus aus harteloxiertem
6061-T6 Aluminium
2. Aluminiumfassung
3. Endschalter
4. Abnehmbare Anhängeöse
5. Umdrehbarer Befestigungsclip
> Abnehmbarer Schlüsselring
> Geregelter Lichtausgang
> Länge: 3.23 in | 8.2 cm
> Breite: .56 in | 1.42 cm
1. Korpus aus harteloxiertem
6061-T6 Aluminium
2. Edelstahleinfassung
3. Entspiegelte Glaslinse
4. Strukturierter Aluminumreflektor
5. Endschalter
6. Abnehmbare Anhängeöse
7. Umdrehbarer Befestigungsclip
> Abnehmbarer Schlüsselring
> Geregelter Lichtausgang
> Länge: 3.48 in | 8.84 cm
> Breite: .56 in | 1.42 cm
1. Korpus aus harteloxiertem
6061-T6 Aluminium
2. Edelstahleinfassung
3. Entspiegelte Glaslinse
4. Strukturierter Aluminumreflektor
5. Endschalter
6. Umdrehbarer Befestigungsclip
> Abnehmbarer Schlüsselring
> Geregelter Lichtausgang
> Länge: 3.2 in | 8.13 cm
> Breite: .9 in | 2.29 cm
Leatherman Serac™ S1, S2 and S3 LED Flashlights User’s Guide
Light Operation – On/Off
Depress the tail switch (button) at the base of the light once, until you hear a “click” to turn on. Repeat to turn off.
Light Operation – Low/Med/High Settings for S2 and S3
Once light is on, gently press tail switch again until light goes out (not hard enough to hear a “click”) then let go. Light will come back
on at the next highest setting (S2 high and S3 medium). Depress gently again to get to the last setting (S3 only - high). Depress firmly
till you hear a “click” to turn off completely.
Changing the Battery*
To change the battery on the Serac S1, S2, or S3 unscrew the bezel from the body of the flashlight until the two parts are completely
separated. Gently tap the side of the flashlight body and the battery should slide out. Insert new battery* negative-end first. Screw
bezel back onto the body of the flashlight and depress tail switch to operate. *NOTE: For S1 and S2 AAA-size battery is required. For
S3 CR123A battery is required. DO NOT use rechargeable batteries as they may damage lighting circuitry.
Accessories: Keychain Clip (S1 and S2)
Align tips of clip with the slot and push into position. (Drawing D) Attach keychain clip to keychain ring.
Accessories: Pocket Clip (S1 and S2)
To remove the pocket clip, hold the flashlight in hand. With the thumb from the same hand, push up on the outside of the clip, sliding
the clip ring up the body of the flashlight until it slips off the switch-end. To re-attach fix the pocket clip ring around the switch-end of
the flashlight. Slide the clip down the body of the light by pushing on the outside of the clip. (Drawing E)
Accessories: Pocket Clip (S3)
Move clip lock down clip arm to loosing the clip ring. (Drawing F) Pull clip back from the body of the flashlight, moving side to side as
needed, to free clip ring from notch at the bottom of the flashlight. To reattach make sure the clip lock is in the unlocked position. Fit
clip ring back into the ring notch and slide the clip lock into the back up into the locked position (Drawing G).
Lanyard Ring Hole (S3)
Insert included lanyard line through hole and double back securing the flashlight on the end of the lanyard.
Caution
Batteries may explode or leak and cause burn injury if recharged, disposed of in fire, mixed with different battery types, inserted
backwards, or disassembled. Replace all used batteries at the same time. Do not carry batteries loose in your pocket or purse. Do not
remove battery labels.
WARRANTY
If within 10 years from the date of purchase you find any defect in material or workmanship with your Leatherman Serac, return it to
Leatherman Tool Group, Inc. or a local authorized repair center. For repair centers in your area contact the address shown below or
visit www.leatherman.com.
When returning your tool for repair, please send it by an insured method. Leatherman cannot be responsible for items that do not
reach us. At our option, we may replace your Serac light rather than repair it; and if discontinued, replace it with a product of equal
or greater value.
Gebrauchsanleitung für Leatherman Serac™ S1, S2 und S3 LED-Taschenlampen
Beleuchtung – Ein/Aus
Zum Einschalten den Druckschalter am Ende der Taschenlampe einmal drücken, bis ein „Klick“ hörbar ist. Zum Ausschalten erneut
drücken.
Beleuchtung – Einstellungen für S2 und S3 für Schwach/Mittel/Stark
Sobald die Beleuchtung eingeschaltet ist, Endschalter leicht erneut drücken bis das Licht aus ist (jedoch nicht so stark drücken, dass ein
„Klick“ hörbar ist). Danach loslassen. Die Beleuchtung ist für die nächst höhere Einstellung wieder eingeschaltet (S2 Stark und S3 Mittel).
Für die letzte Einstellung (nur S3 – Stark) erneut leicht drücken. Zum völligen Ausschalten fest drücken, bis ein „Klick“ hörbar ist.
Batterieaustausch*
Zum Austauschen der Batterie bei Serac S1, S2 oder S3 die Einfassung vom Gehäuse abschrauben, bis beide Teile völlig separat
sind. Das Taschenlampengehäuse leicht antippen bis die Batterie herausgleitet. Neue Batterie* (negative Seite zuerst) einsetzen.
Einfassung wieder auf das Taschenlampengehäuse schrauben und Endschalter zum Einschalten drücken. *Für S1 und S2 werden
Mikrozellen benötigt. Für S3 wird eine CR 123V Lithiumbatterie benötigt. KEINE wiederaufladbaren Batterien verwenden, weil sie
möglicherweise die Lichtschaltung beschädigen könnten.
Zubehör: Schlüsselringclip (S1 und S2)
Die Enden des Clips mit der Kerbe ausrichten und in Position drücken. (Zeichnung D) Schlüsselringclip in Schlüsselringkerbe einsetzen.
Zubehör: Befestigungsclip (S1 und S2)
Taschenlampe zum Entfernen des Befestigungsclip in der Hand halten. Mit dem Daumen derselben Hand den Clip an seiner
Außenseite am Gehäuse der Taschenlampe hochschieben bis der Clipring am Schalterende herausgleitet. Zum Wiederanbringen
den Befestigungsclipring auf das Schalterende der Taschenlampe setzen. Den Clip am Taschenlampengehäuse entlang nach unten
schieben. (Zeichnung E)
Zubehör: Befestigungsclip (S3)
Zum Lösen des Cliprings die Clipsperre am Cliparm nach unten bewegen. (Zeichnung F) Clip vom Taschenlampengehäuse abnehmen
(eventuell hin- und herbewegen, damit sich der Clipring aus der Kerbe am Ende der Taschenlampe loslöst). Zum Wiederanbringen
darauf achten, dass sich die Clipsperre in der entriegelten Position befindet. Clipring wieder in der Ringkerbe anbringen und die
Clipsperre wieder nach oben in die verriegelte Position bringen (Drawing G).
Bändsel-Ringöse (S3)
Die beigefügte Kordel durch die Öse fädeln und damit die Taschenlampe sicher mit der Kordel verknoten.
Vorsicht
Batterien können explodieren oder auslaufen und Verbrennungen hervorrufen falls sie wieder aufgeladen oder ins Feuer geworfen,
mit anderen Batteriearten gemischt, verkehrt eingesetzt oder zerlegt werden. Alle gebrauchten Batterien zur selben Zeit austauschen.
Batterien niemals lose in einer Hosentasche oder Handtasche bei sich tragen. Batterieschilder nicht entfernen.
Garantie
Sollten Sie innerhalb von 10 Jahren ab Kaufdatum am Leatherman Serac einen Material- oder Herstellungsfehler feststellen, senden
Sie es an die Leatherman Tool Group, Inc., oder geben Sie es an eine Vertragswerkstatt in Ihrer Nähe. Adressen von Vertragswerkstätten in Ihrer Nähe erhalten Sie unter der unten angegebenen Anschrift oder unter www.leatherman.com.
The warranty does not cover abuse, alteration, unauthorized or unreasonable use of your Leatherman Serac. This warranty does not
cover sheaths, accessories or colored finishes.
Falls Sie das Werkzeug an Leatherman schicken, tun Sie dies bitte als Wertpaket. Leatherman übernimmt keine Verantwortung für
den Verlust von eingesandten Artikeln. Es liegt in unserem Ermessen, das Serac an Stelle einer Reparatur zu ersetzen. Sollte das
entsprechende Modell nicht mehr verfügbar sein, ersetzen wir es durch ein mindestens gleichwertiges Produkt.
Leatherman Tool Group, Inc. is not liable for incidental or consequential damages. Some jurisdictions do not allow the exclusion or
limitation of incidental or consequential damages, so the above exclusion may not apply to you.
Diese Garantie erstreckt sich nicht auf unsachgemäße Behandlung und Modifikation sowie unsachgemäße oder unvernünftige
Verwendung des Leatherman Serac. Diese Garantie gilt nicht für Etuis, Zubehör und Farbbeschichtungen.
This warranty also gives you specific legal rights, and you may also have other rights that may vary from jurisdiction to jurisdiction.
Die Leatherman Tool Group, Inc. haftet nicht für Folgeschäden aus dem Gebrauch des Werkzeugs. Der Haftungsausschluss für
Folgeschäden entfällt, wenn er nach den Gesetzen Ihres Landes nicht zulässig ist.
Weitere, Ihnen nach dem Gesetz zustehende Rechte werden von dieser Garantie nicht berührt.
Leatherman Tool Group, Inc.
P.O. Box 20595
Portland, OR 97294-0595 USA
N.E. Ainsworth Circle
Portland, OR 97220-9001 USA
+1 503 253-7826
Fax/Télécopieur: +1 503 253-7830
www.leatherman.com
Serac™ S1 (Abbildung A)
Caractéristiques :
Serac™ S2 (Abbildung B)
Caractéristiques :
Serac™ S3 (Abbildung C)
Caractéristiques :
Serac™ S1 (Figura A)
Características:
Serac™ S2 (Figura B)
Características:
Serac™ S3 (Figura C)
Características:
1. 6061-T6 Structure
en aluminium anodisé dur
2. Boîtier en aluminium
3. Interrupteur arrière
4. Anneau martingale détachable
5. Clip de poche réversible
> Anneau de porte clé détachable
> Système d’éclairage à sortie régulée
> Longueur : 3.23 in | 8.2 cm
> Largeur du boîtier : .56 in | 1.42 cm
1. 6061-T6 Structure
en aluminium anodisé dur
2. Facette en acier inoxydable
3. Lentille de verre avec
revêtement anti-reflet
4. Réflecteur en aluminium texturé
5. Interrupteur arrière
6. Anneau martingale détachable
7. Clip de poche réversible
> Anneau de porte clé détachable
> Système d’éclairage à sortie régulée
> Longueur: 3.48 in | 8.84 cm
> Largeur du boîtier : .56 in | 1.42 cm
1. 6061-T6 Structure
en aluminium anodisé dur
2. Facette en acier inoxydable
3. Lentille de verre avec
revêtement anti-reflet
4. Réflecteur en aluminium texturé
5. Interrupteur arrière
6. Clip de poche réversible
> Anneau de porte clé détachable
> Système d’éclairage à sortie régulée
> Longueur: 3.2 in | 8.13 cm
> Largeur du boîtier : .9 in | 2.29 cm
1. Cuerpo de aluminio
anodizado duro 6061-T6
2. Bisel de aluminio
3. Interruptor trasero
4. Portacordón desprendible
5. Gancho para bolsillo reversible
> Llavero desprendible
> Sistema de salida de luz regulado
> Longitud: 3.23 in | 8.2 cm
> Ancho del bisel: .56 in | 1.42 cm
1. Cuerpo de aluminio
anodizado duro 6061-T6
2. Bisel de acero inoxidable
3. Lente de vidrio con
revestimiento antirreflectante
4. Reflector de aluminio texturizado
5. Interruptor trasero
6. Portacordón desprendible
7. Gancho para bolsillo reversible
> Llavero desprendible
> Sistema de salida de luz regulado
> Longitud: 3.48 in | 8.84 cm
> Ancho del bisel: .56 in | 1.42 cm
1. Cuerpo de aluminio
anodizado duro 6061-T6
2. Bisel de acero inoxidable
3. Lente de vidrio con
revestimiento antirreflectante
4. Reflector de aluminio texturizado
5. Interruptor trasero
6. Gancho para bolsillo reversible
> Llavero desprendible
> Sistema de salida de luz regulado
> Longitud: 3.2 in | 8.13 cm
> Ancho del bisel: .9 in | 2.29 cm
Manuel d’utilisateur des lampes torches avec voyant S1, S2 et S3 Leatherman Serac™
Guía del usuario de linternas del diodo fotoemisor de Leatherman Serac™ S1, S2 y S3
Fonctionnement de la lampe – Marche / Arrêt
Enfoncez l’interrupteur arrière (bouton) à la base de la lampe jusqu’à entendre le déclic de l’allumage. Répétez la procédure pour
l’éteindre.
Funcionamiento de luz – Encendido/apagado
Presione el interruptor trasero (botón) en la base de la linterna una vez, hasta que escuche un “clic” para encenderla. Repita para
apagarla.
Fonctionnement de la lampe – Réglages faible / moyen / élevé pour les outils S2 et S3
Une fois la lampe allumée, appuyez légèrement sur l’interrupteur arrière jusqu’à ce que la lumière disparaisse (pas suffisamment
pour entendre le déclic) puis relâchez. La lumière revient au réglage supérieur suivant (S2 élevé et S3 moyen). Renfoncez légèrement
l’interrupteur pour accéder au dernier réglage (S3 uniquement - élevé). Enfoncez fermement jusqu’à entendre un déclic pour l’éteindre
complètement.
Funcionamiento de luz – Ajustes bajo/medio/alto para S2 y S3
Una vez que la luz esté encendida, vuelva a presionar el interruptor trasero cuidadosamente hasta que la luz se apague (no muy fuerte
de manera que escuche un “clic”) luego libere. La luz se volverá a encender con el siguiente ajuste más alto (S2 alto y S3 medio).
Vuelva a presionar cuidadosamente para ir al último ajuste (sólo S3 - alto). Presione firmemente hasta que escuche un “clic” para
apagarla por completo.
Remplacer la pile*
Pour remplacer la pile des Serac S1, S2, ou S3 dévissez la lunette de la structure de la lampe torche jusqu’à ce que les deux éléments
soient entièrement séparés. Tapotez le côté de la lampe-torche pour faire glisser la pile. Introduisez une nouvelle pile* avec le pole
négatif du côté opposé. Revissez la lunette sur la structure de la lampe-torche et enfoncez l’interrupteur arrière pour la faire fonctionner. *Pour les outils S1 et S2, il faut une pile de taille AAA. Pour S3, il faut une pile CR123A. NE PAS utiliser de piles rechargeables au
risque d’endommager les circuits d’éclairage.
Cambio de la batería*
Para cambiar la batería en la Serac S1, S2 o S3, desatornille el bisel del cuerpo de la linterna hasta que las dos partes estén completamente separadas. Golpee ligeramente el lado del cuerpo de la linterna y la batería deberá deslizarse hacia fuera. Inserte primero el
polo negativo de la batería nueva*. Vuelva a atornillar el bisel encima del cuerpo de la linterna y presione el interruptor trasero para
poner a funcionar. *Para S1 y S2, se requieren las baterías tamaño AAA. Para la S3, se requiere la batería CR123A. NO utilice baterías
recargables ya que pueden dañar la circuitería de iluminación.
Accessoires : Anneau de porte-clé (S1 et S2)
Alignez les extrémités de l’anneau avec la fente et enclenchez-le. (Abbildung D) Fixez l’anneau à votre porte-clé.
Accesorios: Gancho del llavero (S1 y S2)
Alinee las puntas del gancho con la ranura y presione en su lugar. (Figura D) Fije el gancho del llavero al anillo del llavero.
Accessoires : Clip de poche (S1 et S2)
Pour détacher l’attache de poche, tenez la lampe torche en main. Avec le pouce de cette main, poussez l’extérieur de l’attache en
faisant remonter l’attache sur la structure jusqu’à pouvoir l’extraire de l’extrémité de l’interrupteur. Pour la rattacher, fixez l’attache de
poche autour de l’extrémité de l’interrupteur de la lampe-torche. Faites descendre l’attache sur la structure de la lampe en poussant
sur l’extérieur de l’attache. (Abbildung E)
Accesorios: Gancho del llavero (S1 y S2)
Para retirar el gancho para bolsillo, sujete la linterna en su mano. Con el pulgar de la misma mano, empuje hacia arriba en la parte
exterior del gancho, deslice el anillo del gancho hacia arriba del cuerpo de la linterna hasta que se deslice por el extremo del interruptor. Para volverlo a fijar, coloque el anillo del gancho para bolsillo alrededor del extremo del interruptor de la linterna. Deslice el gancho
hacia bajo del cuerpo de la linterna al empujar la parte exterior del gancho. (Figura E)
Accessoires : Attache de poche (S3)
Déplacez le verrou de l’attache le long du bras de l’attache pour desserrer l’anneau. (Abbildung F) Tirez l’attache vers l’arrière de la
structure de la lampe-torche, en jouant d’un côté vers l’autre pour dégager l’anneau d’attache en bas de la lampe-torche. Pour le
rattacher, assurez-vous que le verrou de l’anneau se trouve en position ouverte. Replacez l’anneau d’attache dans l’encoche d’anneau
et faites glisser le verrou d’attache de la base en position fermée (Abbildung G).
Accesorios: Gancho para bolsillo (S3)
Mueva la lengüeta de seguro del gancho para aflojar el anillo del gancho. (Figura F) Jale el gancho hacia atrás desde el cuerpo de la
linterna, moviéndolo de lado a lado según sea necesario, para liberar el anillo del gancho de la muesca que está en la parte inferior de
la linterna. Para volver a fijar, asegúrese de que el seguro del gancho esté en la posición de desbloqueo. Vuelva a colocar el anillo del
gancho en la muesca del anillo y deslice el seguro del gancho en el soporte en la posición bloqueada (Figura G).
Orifice d’anneau martingale (S3)
Introduisez le filin inclus via l’orifice et l’endos secondaire en fixant la lampe-torche à l’extrémité du filin.
Agujero del anillo portacordón (S3)
Inserte el cordón del portacordón incluido a través del agujero y dé dos vueltas hacia atrás, asegurando la linterna en el extremo del
portacordón.
Avertissement
Les piles risquent d’exploser ou de fuir et de provoquer des accidents si vous les rechargez, les jetez dans le feu, les combinez à
d’autres types de piles, les insérez en sens inverse ou de travers. Remplacer toutes les piles usagées ensemble. Ne pas porter de piles
individuelles dans votre poche ou votre porte-monnaie. Ne pas décoller les étiquettes des piles.
Garantie
Si, au cours des 10 ans suivant la date d’achat, vous trouvez un défaut dans la matière ou la fabrication du Serac Leatherman,
renvoyez-le à Leatherman Tool Group, Inc., ou au centre de réparation agréé le plus proche. Pour obtenir une liste des centres de
réparation dans votre région, veuillez écrire à l’adresse donnée ci-dessous ou consulter le site www.leatherman.com.
Lorsque vous renvoyez votre outil pour être réparé, veuillez l’envoyer par une méthode d’expédition assurée. Leatherman ne peut être
tenu responsable des articles qui ne lui parviennent pas. Nous procéderons, à notre discrétion, au remplacement du Serac plutôt qu’à
la réparation. Le cas échéant, nous le remplacerons par un outil de valeur équivalente ou supérieure.
Cette garantie ne s’applique pas en cas d’abus, de modification ou d’utilisation non-autorisée ou déraisonnable du Serac Leatherman.
Cette garantie ne s’applique pas aux gaines, accessoires ou finitions en couleur.
Precaución
Las baterías pueden explotar o gotear y causar quemaduras si se recargan, desechan al fuego, mezclan con un tipo distinto de batería, insertan al revés o se desarman. Reemplace al mismo tiempo todas las baterías usadas. No lleve baterías sueltas en su bolsillo o
bolso. No retire las etiquetas de las baterías.
Garantía
Si dentro de un período de 10 años, a partir de la fecha de compra, usted descubre algún defecto en el material o en la mano de obra
de su Serac de Leatherman, devuélvala a Leatherman Tool Group, Inc., o a un centro autorizado de reparaciones local. Para localizar
centros de reparación en su área póngase en contacto con la dirección que se muestra abajo o visite www.leatherman.com.
Al devolver su herramienta para que sea reparada, tenga a bien enviarla con un método seguro. Leatherman no puede hacerse responsable de aquellos artículos que no llegan a nuestras manos. A opción nuestra, podríamos reemplazar su Serac en lugar de repararla; y
de no fabricarse más, reemplazarla con un producto de igual o mayor valor.
Esta garantía no cubre maltrato, modificación, o uso no autorizado o no razonable de la Leatherman Serac. Esta garantía no cubre
fundas, accesorios o acabados en colores.
Leatherman Tool Group, Inc. n’est pas responsable en cas de dommages fortuits ou indirects. Certaines juridictions ne permettent pas
l’exclusion ou la limitation des dommages fortuits ou indirects, il est donc possible que cette exclusion ou limitation ne s’applique pas
à votre cas.
Leatherman Tool Group, Inc. no se responsabiliza por daños incidentales o consiguientes. Algunas jurisdicciones no permiten la
exclusión o la limitación de daños incidentales o consiguientes, por lo que la exclusión anterior pudiera no ser aplicable en su caso.
Cette garantie vous confère aussi certains droits spécifiques auxquels peuvent s’ajouter d’autres droits qui varient d’une juridiction à
une autre.
Esta garantía asimismo le otorga derechos jurídicos específicos, y usted quizá también tenga otros derechos que pudieran variar de
jurisdicción en jurisdicción.
©2008 LEATHERMAN TOOL GROUP, INC 0608