1
Quick Setup Guide - Programming The Klipsch Icon™ SB 1 To Your TV Remote
The Klipsch Icon™ SB 1 soundbar has four control buttons under the status indicator lights
on its front panel. From the top button down, they are Source, Mute, Volume Up, and Volume
Down. MUTE, VOLUME UP, AND VOLUME DOWN can easily be programmed to your TV, Satellite or
Cable box remote control so that you can use that remote to control these functions.
Status LightS
Source
Mute
NOTE: The Klipsch Icon™ SB 1 model comes with its own remote and controls not only the
four control buttons but has a separate button for the 3D Surround Mode On/Off feature. MUTE,
VOLUME UP, AND VOLUME DOWN can be programmed into other remote controls using the builtin Learning Remote feature, but the 3D Surround mode On/Off button cannot be learned by any
other remote and must be controlled with the included remote.
Volume Up
Volume Down
IMPORTANT NOTE: There is not a power on/off button on the front of the soundbar (there is a Main Power switch on the soundbar’s rear
panel). You do not need to turn off the soundbar (or subwoofer) when finished watching TV. When finished, turn off your TV (or Satellite or
Cable box if the soundbar is connected to that). The soundbar (and the subwoofer) will automatically go into a Standby or “sleep” mode
if they do not receive an audio signal from your TV, Satellite or Cable Box for approximately 10 minutes. Standby mode is indicated by a
solid red status light on the soundbar front and on the subwoofer rear panel. When your TV, Satellite or Cable box is turned back on and a
signal is again received, the soundbar (and subwoofer) will automatically come out of Standby mode and turn on.
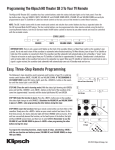
Easy, Three-Step Remote Programming
The following 3 steps should be used to program each function of your TV or cable box
remote control buttons (MUTE, VOLUME UP, and VOLUME DOWN). IF THE SOUNDBAR IS
IN STANDBY MODE (solid RED status light), push the <SOURCE> button on the soundbar until the status light is solid GREEN.
1
2
Red and
Green
Solid
Orange
(alternating)
STEP ONE (Place the unit in learning mode): With the status light showing solid GREEN,
press and hold the <SOURCE> and <MUTE> buttons on the front of the soundbar at the
same time (approximately 3 seconds) until the status light flashes RED and GREEN.
STEP TWO (Select the function to learn): Press the <MUTE> button once on the soundbar
(the status light changes to solid ORANGE). (Substitute the VOLUME UP, and VOLUME DOWN
in place of <MUTE> when programming the other buttons during this step)
STEP THREE (Learn the function): Hold your remote control within one foot and pointed
at the front of the soundbar. Slowly press the <MUTE> button on your remote control
four times. On the first three presses, the status indicator light will flicker ORANGE with
each press. If the unit has successfully learned the function, on the fourth press of the
button, the light will flash GREEN several times and then turn to solid GREEN. (Remember to use the VOLUME UP, and VOLUME DOWN in place of <MUTE> when programming the other buttons during this step)
To program the remaining functions, simply repeat all steps, substituting <MUTE>
with the new function and button presses (VOLUME UP, and VOLUME DOWN) on steps
TWO and THREE.
3
x4
1 Foot
© 2012 Klipsch Group, Inc.
SUBWOOFER
VOLUME
Quick Setup Guide - Connecting The Klipsch Icon™ SB 1
MIN
Step 1
Once you have placed the Klipsch Icon™ SB 1
soundbar where you want it either below or
above your TV, connect one end of an optical
digital cable (not supplied) to your TV’s
optical digital audio output jack and connect
the other end of the cable into the optical
input jack on the rear of the soundbar.
OFF
MAX
ON
Television Connection Panel
Soundbar Connection Panel
POWER
1
ON
OFF
AC~100-240V
50/60Hz
90W
NOTE: THE SOURCE BUTTON ON THE
SOUNDBAR SWITCHES INPUTS BACK AND
FORTH FROM OPTICAL TO L/R RCA.
SOURCE
2
DC IN
R
POWER
24V – 2.5A
65W
L
OFF
ON
Digital Optical Cable
(Not Supplied)
Step 2
Soundbar Connection Panel
Next, plug the AC power cord into the soundbar power supply, then connect the power
supply into the DC Input on the rear of the
soundbar. Plug the AC power supply into a
“live” electrical outlet and turn the soundbar’s
Main Power switch on the rear of the soundbar
to “On”. On the front of the soundbar, make
sure the left status light is either solid green
or orange (press any button once if light is
steady red).
Step 3
1
SOURCE
R
2
1
DC IN
SOURCE
2
DC IN
24V – 2.5A
65W
L
L
POWERON
OFF
24V – 2.7A
65W
R
POWER
OFF
ON
Power Supply
and AC Cord
Subwoofer Rear Connection Panel
Last, after placing the Klipsch Icon SB 1
subwoofer where you want it in the room,
take the subwoofer AC power cord and
plug one end into the “AC Input” on the
back of the subwoofer and the other end
into a nearby “live” power outlet. Turn the
subwoofer Main Power switch on the back of
the subwoofer to “On”. The red light will turn
on until it finds the wireless signal coming
from the soundbar. Once it finds that signal
(approximately 15 seconds), the solid red
light will change to solid blue, indicating the
subwoofer is now connected to the soundbar.
Your Klipsch Icon™ SB 1 system is now
ready to operate!
™
Status Light
SUBWOOFER
VOLUME
1
MIN
MAX
L
R
SOURCE
2
DC IN
AC Power Cord
24V – 2.7A
65W
POWER
OFF
ON
POWER
ON
OFF
AC~100-240V
50/60Hz
90W
(For more information, refer to the owner’s manual)
© 2012 Klipsch Group, Inc.