1
6 4 8
537
42 6
315
Reset Dial
4.
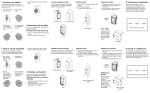
Set your new threedigit combination.
5.
Be sure to rotate the Reset dial to
its original position. Caution: Hold
the number dials in place while
rotating the Reset dial to maintain
your combination.
Dirt
Guard
use the metal plate with double-sided
tape. Place the plate over the magnet
and remove the paper covering the
foam tape. Mount the Stor-A-Key™ on
any clean, smooth surface by pressing
firmly to secure the adhesive.
Cable Model:
1.
Cap
Locking Stor-A-Key™
Model Nos. 001844, 001859, 001902
II. Using Your Stor-A-Key™
1.
Cable
Adjustable
Steps
Combination
Lock
2.
Dirt
Guard
Cable
Release
Button
Cable
Lock
Button
3.
Cap
Portable Stor-A-Key™
Model Nos. 001845, 001858, 001900, 001860
001941, 001942, 001949, 001950
I. Selecting Your Combination
The AccessPoint™ Stor-A-Key™ comes
with a factory preset combination of
000. For greater security, please change
the combination and keep the new one
in a safe place.
1.
2.
3.
Slide open the dirt-guard cover to
reveal the combination lock. Caution: Key container must be closed
to change combination.
Set the numbered
dials to 000 so
that they are
aligned with the
combination line.
Combination Line
2 2 2
1 1 1
OOO
999
8 8 8
Rotate the Reset dial 90 degrees so
4.
2.
To open your Stor-A-Key™, spin
the number dials so that your
set combination is aligned
with the
combination
line.
To close your Stor-A-Key™, rotate
the cap back to its original position
and press up until the container
clicks. Spin the number dials so
that your combination is scrambled, then slide the dirt-guard
cover over the combination lock.
III. Mounting Your Stor-A-Key
™
Magnet/Adhesive Model:
The Stor-A-Key™ can be mounted to
any steel surface using the magnet
on the back of the
Optional
container.
Plate
To mount the
Stor-A-Key™ on
another surface
Push the Cable
Release button
to release the
cable.
El AccessPoint™ Stor-A-Key™ incluye
una combinación preestablecida en la
fábrica en 000. Para mayor seguridad,
cambie la combinación y guarde la
combinación nueva en un lugar seguro.
2.
Pull out the cable and loop around
desired object.
4.
To re-lock the cable, insert the
loose end into the Stor-A-Key™ and
tighten to desired length. Press the
Cable Lock button or simply close
the key container. Note: In order to
adjust the length of the cable, the
key container must be open and
the Cable Lock button must be
extended.
5.
I. Selección de su combinación
1.
To release the
cable, the key
container must
be open (see
Section II).
3.
Pull down hard
on the bottom
cap of the container and rotate.
Insert your key into the foam
interior. Caution: Do not insert the
key too far into the foam or it may
be difficult to remove. For a larger
storage area, the foam insert can
be removed.
This warranty gives you specific legal rights and you
may also have other rights which vary based on
your place of residence. To obtain repair or replacement information under the terms of this warranty,
return the product and proof of purchase along
with owner’s name and address, postage prepaid
to: UTC Fire & Security, Inc., 4001 Fairview Industrial
Drive SE, Salem, OR 97302.
AccessPoint™ Stor-A-Key™ –
Candado de combinación
3.
Candado de
combinación
Protector
contra
el polvo
Spin the number dials so your
combination is scrambled, then
slide the dirt-guard cover over the
combination lock.
Stor-A-Key con cerradura
Modelo N.º 001844, 001859, 001902
Pasos
ajustables
Botón de
liberación
del cable
Botón de
bloqueo
del cable
8 8 8
Tapa
2.
Inserte su llave en la pieza interior
de espuma. Precaución: No inserte
la llave profundamente dentro de
la espuma porque podría resultar
difícil quitarla. Para obtener un área
de almacenamiento más grande,
puede retirar la pieza de espuma.
4.
Para cerrar su Stor-A-Key™, vuelva
a girar la tapa a su posición original
y presione hacia arriba hasta que
el recipiente emita un chasquido.
Gire los cuadrantes numéricos
a fin de mezclar los números de
la combinación, y luego deslice
la cubierta de protección contra
el polvo sobre el candado de
combinación.
75 9
6 4 8
537
42 6
Gire el
esfera (RESET)
cuadrante de
restablecimiento
90 grados para que el texto de
restablecimiento (RESET) quede
alineado con la línea de la
combinación.
315
II. Uso del Stor-A-Key™
Protector
contra
el polvo
Stor-A-Key™ portátil
delo N.º 001845, 001855, 001900, 001860
01941, 001942, 001903, 001949, 001950
1 1 1
999
Asegúrese de hacer girar el
cuadrante (Reset) a su posición
original. Precaución: Mantenga fijos los cuadrantes numéricos mientras hace girar el cuadrante (Reset)
para conservar su combinación.
1.
UTCFS MAKES NO OTHER WARRANTY EXPRESS
OR IMPLIED OF MERCHANTABILITY OR FITNESS
FOR A PARTICULAR PURPOSE. IN NO EVENT SHALL
UTCFS BE LIABLE FOR LOSS OF USE, LOST PROFITS,
THEFT, PROPERTY DAMAGE, SPECIAL, INCIDENTAL
OR CONSEQUENTIAL DAMAGES. SOME STATES
DO NOT ALLOW LIMITATIONS ON HOW LONG AN
IMPLIED WARRANTY LASTS AND/OR DO NOT ALLOW EXCLUSION OF CONSEQUENTIAL DAMAGES,
SO ABOVE LIMITATIONS MAY NOT APPLY TO YOU.
2 2 2
OOO
5.
Cable
Candado de
combinación
línea de la
combinación
Configure la nueva combinación
de tres dígitos.
1-YEAR LIMITED WARRANTY
UTC Fire & Security Americas Corporation, Inc.
(“UTCFS”) warrants that this product will be free
of defects in material and workmanship for one
year from the date of purchase. This warranty is
limited to repair or replacement at UTCFS’ option. This warranty does not cover forgotten or
incorrectly set combinations. Damage caused by
modification, abuse or misuse is not covered.
Configure los
cuadrantes
numerados en
000 de modo que
queden alineados
con la línea de la
combinación.
4.
Tapa
™
Deslice la cubierta de protección
contra el polvo para revelar
el candado de combinación.
Precaución: El recipiente para llaves
debe estar cerrado cuando se va a
cambiar la combinación.
recipiente hacia abajo, y gírela.
3.
Para abrir su Stor-A-Key™, gire
los cuadrantes numéricos de
modo que la
combinación
establecida
quede alineada con la
línea de la
combinación.
Tire de la tapa inferior del
164 mm
75 9
82 mm
Combination
Lock
that the “RESET” text
is lined up with the
combination line.
AccessPoint™
Locking Stor-A-Key™
Stor-A-Key™ con cerradura
Stor-A-Key™ verrouillable
Model Nos. 001844, 001859, 001902
Portable Stor-A-Key™
Stor-A-Key™ portátil
Stor-A-Key™ portable
Model Nos. 001845, 001858,
001900, 001860, 001941, 001942,
001903, 001949, 001950
82 mm
AccessPoint™ Stor-A-Key™
Combination Lock
Instructions
Instrucciones
Instructions
10094057P1 Rev E
NEVER BE LOCKED OUT AGAIN
01844/5 INSTRUCTIONS
SUGGESTED MATERIALS
GRAPHICS INSERT: 24LB. TEXT
56.00 mm
56.00 mm
56.00 mm
56.00 mm
56.00 mm
336.00 mm
III. Montaje del Stor-A-Key™
Modelo magnético/adhesivo:
El Stor-A-Key™ puede montarse a
cualquier superficie de acero usando
el imán en la
parte posterior del
placa
opcional
recipiente.
Para montar el
estuche para llaves
sobre otra superficie,
utilice la placa
metálica con cinta de doble cara.
Coloque la placa sobre el imán y quite
el papel que cubre la cinta de espuma.
Monte el Stor-A-Key™ sobre cualquier
superficie limpia y lisa, presionando
firmemente para fijar el adhesivo.
Modelo con cable:
1.
2.
Para soltar el cable, el recipiente
para llaves
debe estar abierto
(consulte la
sección II).
Pulse el botón
de liberación
del cable
para soltar el
bloqueo del
cable.
3.
Extraiga el cable y enlácelo
alrededor del objeto deseado.
4.
Para volver a bloquear el cable,
inserte el extremo suelto en el
Stor-A-Key™ y apriete hasta la longitud deseada. Pulse el botón de
bloqueo del cable o simplemente
cierre el recipiente para llaves.
Nota: A fin de ajustar la longitud
del cable, el recipiente para llaves
debe estar abierto y el botón de
bloqueo del cable debe estar
extendido.
5.
Gire los cuadrantes numéricos
a fin de mezclar los números de
la combinación, y luego deslice
la cubierta de protección contra
el polvo sobre el candado de
combinación.
AccessPoint™ Stor-A-Key™
Verrou à combinaison
UTC Fire & Security Americas Corporation, Inc.
(“UTCFS”) garantiza que este producto estará
libre de defectos en los materiales y mano de obra
durante un año a partir de la fecha de compra.
Esta garantía está limitada a la reparación o al
reemplazo, a opción de UTCFS. Esta garantía no
cubre combinaciones olvidadas o configuradas
incorrectamente. No se cubren los daños causados
por modificación, abuso o uso indebido.
Couvercle
antisalissures
Capuchon
Crans
réglables
Bouton de
verrouillage
du câble
4.
Définissez votre nouvelle
combinaison à 3 chiffres.
5.
Veillez à ramener le cadran de
réglage à sa position d’origine.
Attention : Maintenez le cadran
de numéros en place tout en
tournant le cadran de réglage pour
maintenir votre combinaison.
1.
2.
Réglez les cadrans
numérotés à 000
pour aligner cette
combinaison
trait de
combinaison
2 2 2
1 1 1
OOO
999
8 8 8
Modèle aimanté/adhésif :
UTC Fire & Security Americas Corporation, Inc.
(“UTCFS“) garantit que ce produit sera dépourvu
de vices de matériau et de défauts de fabrication
pendant un an à partir de la date d’achat.
Cette garantie est limitée aux réparations ou
au remplacement au choix de UTCFS. Cette
garantie ne couvre pas les combinaisons oubliées
ou mal réglées. Les dommages causés par une
modification ou un usage abusif ou impropre ne
sont pas couverts.
La Stor-A-Key peut être fixée sur
n’importe quelle surface en acier au
moyen de l’aimant situé à l’arrière.
Pour fixer la Stor-A-Key™ sur une autre
surface, utilisez la plaque métallique
avec le ruban double face. Placez la
plaque sur l’aimant et retirez le papier
qui recouvre le ruban-mousse. Attachez
la Stor-A-Key™ à n’importe quelle
surface lisse et propre en appuyant
fermement pour bien fixer l’adhésif.
™
Modèle à câble :
1.
Pour dégager le
câble, la boîte
à clé doit être
ouverte (cf.
section II).
Appuyez sur
le bouton de
libération du
câble pour
ouvrir le verrou du câble.
3.
2.
Tirez sur le capuchon inférieur de
la boîte et tournez.
Retirez le câble et acheminez-le
autour de l’objet désiré.
4.
3.
Insérez votre clé dans l’intérieur en
mousse. Attention : N’insérez pas
la clé trop loin dans la mousse sous
peine d’avoir du mal à la récupérer.
Pour avoir plus de place, vous
pouvez retirer la mousse.
4.
Pour fermer la Stor-A-Key™,
ramenez le capuchon à sa position
d’origine et appuyez en remontant
jusqu’à ce que vous entendiez un
déclic.
Pour le reverrouiller, insérez l’extrémité libre dans la
Stor-A-Key™ à clé et serrez à la
longueur souhaitée. Appuyez sur
le bouton du verrou du câble ou
fermez simplement la boîte. Remarque : Pour ajuster la longueur
du câble, la boîte à clé doit être
ouverte et le bouton du verrou du
câble remonté.
5.
Faites tourner les cadrans
numérotés pour que votre
combinaison ne s’affiche plus, puis
refermez le couvercle sur le verrou
à combinaison.
I. Sélection de votre
combinaison
Glissez le couvercle pour révéler
le verrou à combinaison. Attention : Pour pouvoir en changer
la combinaison, la boîte doit être
fermée.
GARANTIE LIMITÉE 1 AN
2.
Capuchon
La AccessPoint™ Stor-A-Key™ est fournie avec une combinaison préréglée
en usine (000). Pour plus de sécurité,
modifiez cette combinaison et conservez la nouvelle en lieu sûr.
III. Fixation de la boîte scellée
Pour ouvrir la Stor-A-Key™, faites
tourner les
cadrans
numérotés
pour aligner votre
combinaison
sur le trait
correspondant.
Couvercle
antisalissures
Stor-A-Key™ portable
Modelo N.º 001845, 001858, 001900, 001860,
001941, 001942, 001903, 001949, 001950
1.
42 6
II. Mode d’emploi
Câble
Verrou à
combinaison
Bouton de
libération
du câble
6 4 8
537
315
Tournez le cadran
cadran « RESET »
de réglage de
90 degrés pour que le texte
« RESET » soit aligné sur le trait de
combinaison.
Stor-A-Key™ verrouillable
Modelo N.º 001844, 001859, 001902
UTCFS NO HACE NINGUNA OTRA GARANTÍA
EXPRESA O IMPLÍCITA DE COMERCIABILIDAD O
IDONEIDAD PARA UN PROPÓSITO EN PARTICULAR.
EN NINGÚN CASO SERÁ UTCFS RESPONSABLE
POR PÉRDIDA DE USO, LUCRO CESANTE, ROBO,
DAÑOS A LA PROPIEDAD, Y DAÑOS ESPECIALES,
INCIDENTALES O CONSECUENCIALES. ALGUNOS
ESTADOS NO PERMITEN LIMITACIONES CON
RESPECTO A LA DURACIÓN DE UNA GARANTÍA
IMPLÍCITA Y/O NO PERMITEN LA EXCLUSIÓN DE
DAÑOS CONSECUENCIALES, POR LO QUE LAS
LIMITACIONES ANTERIORES PODRÍAN NO APLICARSE A SU CASO EN PARTICULAR.
75 9
3.
Verrou á
combinaison
2- GARANTÍA LIMITADA DE 1 AÑO
Esta garantía le otorga derechos legales específicos
y usted también podría tener otros derechos que
varían según su lugar de residencia. Para obtener
información de reparación o reemplazo bajo los
términos de esta garantía, devuelva el producto y
un comprobante de compra, junto con el nombre
y la dirección del propietario, con franqueo
prepagado, a: UTC Fire & Security, Inc., 4001
Fairview Industrial Drive SE, Salem, OR 97302,
EE.UU.
avec le trait
correspondant.
5.
Faites tourner les cadrans
numérotés pour que votre
combinaison ne
s’affiche plus,
puis refermez
le couvercle
sur le verrou à
combinaison.
la plaque
UTCFS NE DONNE AUCUNE AUTRE GARANTIE,
EXPRESSE OU TACITE DE QUALITÉ COMMERCIALE
OU D’ADAPTATION À UN BUT PARTICULIER. UTCFS
NE POURRA EN AUCUN CAS ÊTRE RESPONSABLE
DE LA PERTE D’UTILISATION OU DE BÉNÉFICES,
D’UN VOL, DE DÉGÂTS MATÉRIELS OU DE DOMMAGES SPÉCIAUX, INDIRECTS OU CONSÉCUTIFS.
CERTAINS ÉTATS N’AUTORISANT PAS LES LIMITATIONS SUR LA DURÉE D’UNE GARANTIE TACITE ET/
OU L’EXCLUSION DES DOMMAGES CONSÉCUTIFS,
IL EST POSSIBLE QUE LES LIMITATIONS CIDESSUS
NE VOUS CONCERNE PAS.
Cette garantie vous donne des droits spécifiques.
Vous pourrez bénéficier d’autres droits, variables
selon votre lieu de résidence. Pour obtenir une
réparation ou un remplacement dans le cadre de
cette garantie, retournez le produit et son justificatif d’achat accompagnés de vos nom et adresse,
avec affranchissement, à : UTC Fire & Security,
Inc., 4001 Fairview Industrial Drive SE, Salem, OR
97302, États-Unis.
© 2012 Kidde.
All rights reserved.
Kidde
1016 Corporate Park Drive
Mebane, NC 27302
www.keysafe.com
6 4 8
537
42 6
315
Reset Dial
4.
Set your new threedigit combination.
5.
Be sure to rotate the Reset dial to
its original position. Caution: Hold
the number dials in place while
rotating the Reset dial to maintain
your combination.
Dirt
Guard
use the metal plate with double-sided
tape. Place the plate over the magnet
and remove the paper covering the
foam tape. Mount the Stor-A-Key™ on
any clean, smooth surface by pressing
firmly to secure the adhesive.
Cable Model:
1.
Cap
Locking Stor-A-Key™
Model Nos. 001844, 001859, 001902
II. Using Your Stor-A-Key™
1.
Cable
Adjustable
Steps
Combination
Lock
2.
Dirt
Guard
Cable
Release
Button
Cable
Lock
Button
3.
Cap
Portable Stor-A-Key™
Model Nos. 001845, 001858, 001900, 001860
001941, 001942, 001949, 001950
I. Selecting Your Combination
The AccessPoint™ Stor-A-Key™ comes
with a factory preset combination of
000. For greater security, please change
the combination and keep the new one
in a safe place.
1.
2.
3.
Slide open the dirt-guard cover to
reveal the combination lock. Caution: Key container must be closed
to change combination.
Set the numbered
dials to 000 so
that they are
aligned with the
combination line.
Combination Line
2 2 2
1 1 1
OOO
999
8 8 8
Rotate the Reset dial 90 degrees so
4.
2.
To open your Stor-A-Key™, spin
the number dials so that your
set combination is aligned
with the
combination
line.
To close your Stor-A-Key™, rotate
the cap back to its original position
and press up until the container
clicks. Spin the number dials so
that your combination is scrambled, then slide the dirt-guard
cover over the combination lock.
III. Mounting Your Stor-A-Key
™
Magnet/Adhesive Model:
The Stor-A-Key™ can be mounted to
any steel surface using the magnet
on the back of the
Optional
container.
Plate
To mount the
Stor-A-Key™ on
another surface
Push the Cable
Release button
to release the
cable.
El AccessPoint™ Stor-A-Key™ incluye
una combinación preestablecida en la
fábrica en 000. Para mayor seguridad,
cambie la combinación y guarde la
combinación nueva en un lugar seguro.
2.
Pull out the cable and loop around
desired object.
4.
To re-lock the cable, insert the
loose end into the Stor-A-Key™ and
tighten to desired length. Press the
Cable Lock button or simply close
the key container. Note: In order to
adjust the length of the cable, the
key container must be open and
the Cable Lock button must be
extended.
5.
I. Selección de su combinación
1.
To release the
cable, the key
container must
be open (see
Section II).
3.
Pull down hard
on the bottom
cap of the container and rotate.
Insert your key into the foam
interior. Caution: Do not insert the
key too far into the foam or it may
be difficult to remove. For a larger
storage area, the foam insert can
be removed.
This warranty gives you specific legal rights and you
may also have other rights which vary based on
your place of residence. To obtain repair or replacement information under the terms of this warranty,
return the product and proof of purchase along
with owner’s name and address, postage prepaid
to: UTC Fire & Security, Inc., 4001 Fairview Industrial
Drive SE, Salem, OR 97302.
AccessPoint™ Stor-A-Key™ –
Candado de combinación
3.
Candado de
combinación
Protector
contra
el polvo
Spin the number dials so your
combination is scrambled, then
slide the dirt-guard cover over the
combination lock.
Stor-A-Key con cerradura
Modelo N.º 001844, 001859, 001902
Pasos
ajustables
Botón de
liberación
del cable
Botón de
bloqueo
del cable
8 8 8
Tapa
2.
Inserte su llave en la pieza interior
de espuma. Precaución: No inserte
la llave profundamente dentro de
la espuma porque podría resultar
difícil quitarla. Para obtener un área
de almacenamiento más grande,
puede retirar la pieza de espuma.
4.
Para cerrar su Stor-A-Key™, vuelva
a girar la tapa a su posición original
y presione hacia arriba hasta que
el recipiente emita un chasquido.
Gire los cuadrantes numéricos
a fin de mezclar los números de
la combinación, y luego deslice
la cubierta de protección contra
el polvo sobre el candado de
combinación.
75 9
6 4 8
537
42 6
Gire el
esfera (RESET)
cuadrante de
restablecimiento
90 grados para que el texto de
restablecimiento (RESET) quede
alineado con la línea de la
combinación.
315
II. Uso del Stor-A-Key™
Protector
contra
el polvo
Stor-A-Key™ portátil
delo N.º 001845, 001855, 001900, 001860
01941, 001942, 001903, 001949, 001950
1 1 1
999
Asegúrese de hacer girar el
cuadrante (Reset) a su posición
original. Precaución: Mantenga fijos los cuadrantes numéricos mientras hace girar el cuadrante (Reset)
para conservar su combinación.
1.
UTCFS MAKES NO OTHER WARRANTY EXPRESS
OR IMPLIED OF MERCHANTABILITY OR FITNESS
FOR A PARTICULAR PURPOSE. IN NO EVENT SHALL
UTCFS BE LIABLE FOR LOSS OF USE, LOST PROFITS,
THEFT, PROPERTY DAMAGE, SPECIAL, INCIDENTAL
OR CONSEQUENTIAL DAMAGES. SOME STATES
DO NOT ALLOW LIMITATIONS ON HOW LONG AN
IMPLIED WARRANTY LASTS AND/OR DO NOT ALLOW EXCLUSION OF CONSEQUENTIAL DAMAGES,
SO ABOVE LIMITATIONS MAY NOT APPLY TO YOU.
2 2 2
OOO
5.
Cable
Candado de
combinación
línea de la
combinación
Configure la nueva combinación
de tres dígitos.
1-YEAR LIMITED WARRANTY
UTC Fire & Security Americas Corporation, Inc.
(“UTCFS”) warrants that this product will be free
of defects in material and workmanship for one
year from the date of purchase. This warranty is
limited to repair or replacement at UTCFS’ option. This warranty does not cover forgotten or
incorrectly set combinations. Damage caused by
modification, abuse or misuse is not covered.
Configure los
cuadrantes
numerados en
000 de modo que
queden alineados
con la línea de la
combinación.
4.
Tapa
™
Deslice la cubierta de protección
contra el polvo para revelar
el candado de combinación.
Precaución: El recipiente para llaves
debe estar cerrado cuando se va a
cambiar la combinación.
recipiente hacia abajo, y gírela.
3.
Para abrir su Stor-A-Key™, gire
los cuadrantes numéricos de
modo que la
combinación
establecida
quede alineada con la
línea de la
combinación.
Tire de la tapa inferior del
164 mm
75 9
82 mm
Combination
Lock
that the “RESET” text
is lined up with the
combination line.
AccessPoint™
Locking Stor-A-Key™
Stor-A-Key™ con cerradura
Stor-A-Key™ verrouillable
Model Nos. 001844, 001859, 001902
Portable Stor-A-Key™
Stor-A-Key™ portátil
Stor-A-Key™ portable
Model Nos. 001845, 001858,
001900, 001860, 001941, 001942,
001903, 001949, 001950
82 mm
AccessPoint™ Stor-A-Key™
Combination Lock
Instructions
Instrucciones
Instructions
10094057P1 Rev E
NEVER BE LOCKED OUT AGAIN
01844/5 INSTRUCTIONS
SUGGESTED MATERIALS
GRAPHICS INSERT: 24LB. TEXT
56.00 mm
56.00 mm
56.00 mm
56.00 mm
56.00 mm
336.00 mm
III. Montaje del Stor-A-Key™
Modelo magnético/adhesivo:
El Stor-A-Key™ puede montarse a
cualquier superficie de acero usando
el imán en la
parte posterior del
placa
opcional
recipiente.
Para montar el
estuche para llaves
sobre otra superficie,
utilice la placa
metálica con cinta de doble cara.
Coloque la placa sobre el imán y quite
el papel que cubre la cinta de espuma.
Monte el Stor-A-Key™ sobre cualquier
superficie limpia y lisa, presionando
firmemente para fijar el adhesivo.
Modelo con cable:
1.
2.
Para soltar el cable, el recipiente
para llaves
debe estar abierto
(consulte la
sección II).
Pulse el botón
de liberación
del cable
para soltar el
bloqueo del
cable.
3.
Extraiga el cable y enlácelo
alrededor del objeto deseado.
4.
Para volver a bloquear el cable,
inserte el extremo suelto en el
Stor-A-Key™ y apriete hasta la longitud deseada. Pulse el botón de
bloqueo del cable o simplemente
cierre el recipiente para llaves.
Nota: A fin de ajustar la longitud
del cable, el recipiente para llaves
debe estar abierto y el botón de
bloqueo del cable debe estar
extendido.
5.
Gire los cuadrantes numéricos
a fin de mezclar los números de
la combinación, y luego deslice
la cubierta de protección contra
el polvo sobre el candado de
combinación.
AccessPoint™ Stor-A-Key™
Verrou à combinaison
UTC Fire & Security Americas Corporation, Inc.
(“UTCFS”) garantiza que este producto estará
libre de defectos en los materiales y mano de obra
durante un año a partir de la fecha de compra.
Esta garantía está limitada a la reparación o al
reemplazo, a opción de UTCFS. Esta garantía no
cubre combinaciones olvidadas o configuradas
incorrectamente. No se cubren los daños causados
por modificación, abuso o uso indebido.
Couvercle
antisalissures
Capuchon
Crans
réglables
Bouton de
verrouillage
du câble
4.
Définissez votre nouvelle
combinaison à 3 chiffres.
5.
Veillez à ramener le cadran de
réglage à sa position d’origine.
Attention : Maintenez le cadran
de numéros en place tout en
tournant le cadran de réglage pour
maintenir votre combinaison.
1.
2.
Réglez les cadrans
numérotés à 000
pour aligner cette
combinaison
trait de
combinaison
2 2 2
1 1 1
OOO
999
8 8 8
Modèle aimanté/adhésif :
UTC Fire & Security Americas Corporation, Inc.
(“UTCFS“) garantit que ce produit sera dépourvu
de vices de matériau et de défauts de fabrication
pendant un an à partir de la date d’achat.
Cette garantie est limitée aux réparations ou
au remplacement au choix de UTCFS. Cette
garantie ne couvre pas les combinaisons oubliées
ou mal réglées. Les dommages causés par une
modification ou un usage abusif ou impropre ne
sont pas couverts.
La Stor-A-Key peut être fixée sur
n’importe quelle surface en acier au
moyen de l’aimant situé à l’arrière.
Pour fixer la Stor-A-Key™ sur une autre
surface, utilisez la plaque métallique
avec le ruban double face. Placez la
plaque sur l’aimant et retirez le papier
qui recouvre le ruban-mousse. Attachez
la Stor-A-Key™ à n’importe quelle
surface lisse et propre en appuyant
fermement pour bien fixer l’adhésif.
™
Modèle à câble :
1.
Pour dégager le
câble, la boîte
à clé doit être
ouverte (cf.
section II).
Appuyez sur
le bouton de
libération du
câble pour
ouvrir le verrou du câble.
3.
2.
Tirez sur le capuchon inférieur de
la boîte et tournez.
Retirez le câble et acheminez-le
autour de l’objet désiré.
4.
3.
Insérez votre clé dans l’intérieur en
mousse. Attention : N’insérez pas
la clé trop loin dans la mousse sous
peine d’avoir du mal à la récupérer.
Pour avoir plus de place, vous
pouvez retirer la mousse.
4.
Pour fermer la Stor-A-Key™,
ramenez le capuchon à sa position
d’origine et appuyez en remontant
jusqu’à ce que vous entendiez un
déclic.
Pour le reverrouiller, insérez l’extrémité libre dans la
Stor-A-Key™ à clé et serrez à la
longueur souhaitée. Appuyez sur
le bouton du verrou du câble ou
fermez simplement la boîte. Remarque : Pour ajuster la longueur
du câble, la boîte à clé doit être
ouverte et le bouton du verrou du
câble remonté.
5.
Faites tourner les cadrans
numérotés pour que votre
combinaison ne s’affiche plus, puis
refermez le couvercle sur le verrou
à combinaison.
I. Sélection de votre
combinaison
Glissez le couvercle pour révéler
le verrou à combinaison. Attention : Pour pouvoir en changer
la combinaison, la boîte doit être
fermée.
GARANTIE LIMITÉE 1 AN
2.
Capuchon
La AccessPoint™ Stor-A-Key™ est fournie avec une combinaison préréglée
en usine (000). Pour plus de sécurité,
modifiez cette combinaison et conservez la nouvelle en lieu sûr.
III. Fixation de la boîte scellée
Pour ouvrir la Stor-A-Key™, faites
tourner les
cadrans
numérotés
pour aligner votre
combinaison
sur le trait
correspondant.
Couvercle
antisalissures
Stor-A-Key™ portable
Modelo N.º 001845, 001858, 001900, 001860,
001941, 001942, 001903, 001949, 001950
1.
42 6
II. Mode d’emploi
Câble
Verrou à
combinaison
Bouton de
libération
du câble
6 4 8
537
315
Tournez le cadran
cadran « RESET »
de réglage de
90 degrés pour que le texte
« RESET » soit aligné sur le trait de
combinaison.
Stor-A-Key™ verrouillable
Modelo N.º 001844, 001859, 001902
UTCFS NO HACE NINGUNA OTRA GARANTÍA
EXPRESA O IMPLÍCITA DE COMERCIABILIDAD O
IDONEIDAD PARA UN PROPÓSITO EN PARTICULAR.
EN NINGÚN CASO SERÁ UTCFS RESPONSABLE
POR PÉRDIDA DE USO, LUCRO CESANTE, ROBO,
DAÑOS A LA PROPIEDAD, Y DAÑOS ESPECIALES,
INCIDENTALES O CONSECUENCIALES. ALGUNOS
ESTADOS NO PERMITEN LIMITACIONES CON
RESPECTO A LA DURACIÓN DE UNA GARANTÍA
IMPLÍCITA Y/O NO PERMITEN LA EXCLUSIÓN DE
DAÑOS CONSECUENCIALES, POR LO QUE LAS
LIMITACIONES ANTERIORES PODRÍAN NO APLICARSE A SU CASO EN PARTICULAR.
75 9
3.
Verrou á
combinaison
2- GARANTÍA LIMITADA DE 1 AÑO
Esta garantía le otorga derechos legales específicos
y usted también podría tener otros derechos que
varían según su lugar de residencia. Para obtener
información de reparación o reemplazo bajo los
términos de esta garantía, devuelva el producto y
un comprobante de compra, junto con el nombre
y la dirección del propietario, con franqueo
prepagado, a: UTC Fire & Security, Inc., 4001
Fairview Industrial Drive SE, Salem, OR 97302,
EE.UU.
avec le trait
correspondant.
5.
Faites tourner les cadrans
numérotés pour que votre
combinaison ne
s’affiche plus,
puis refermez
le couvercle
sur le verrou à
combinaison.
la plaque
UTCFS NE DONNE AUCUNE AUTRE GARANTIE,
EXPRESSE OU TACITE DE QUALITÉ COMMERCIALE
OU D’ADAPTATION À UN BUT PARTICULIER. UTCFS
NE POURRA EN AUCUN CAS ÊTRE RESPONSABLE
DE LA PERTE D’UTILISATION OU DE BÉNÉFICES,
D’UN VOL, DE DÉGÂTS MATÉRIELS OU DE DOMMAGES SPÉCIAUX, INDIRECTS OU CONSÉCUTIFS.
CERTAINS ÉTATS N’AUTORISANT PAS LES LIMITATIONS SUR LA DURÉE D’UNE GARANTIE TACITE ET/
OU L’EXCLUSION DES DOMMAGES CONSÉCUTIFS,
IL EST POSSIBLE QUE LES LIMITATIONS CIDESSUS
NE VOUS CONCERNE PAS.
Cette garantie vous donne des droits spécifiques.
Vous pourrez bénéficier d’autres droits, variables
selon votre lieu de résidence. Pour obtenir une
réparation ou un remplacement dans le cadre de
cette garantie, retournez le produit et son justificatif d’achat accompagnés de vos nom et adresse,
avec affranchissement, à : UTC Fire & Security,
Inc., 4001 Fairview Industrial Drive SE, Salem, OR
97302, États-Unis.
© 2012 Kidde.
All rights reserved.
Kidde
1016 Corporate Park Drive
Mebane, NC 27302
www.keysafe.com