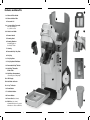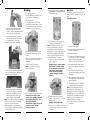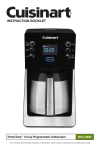
1
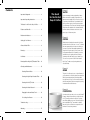
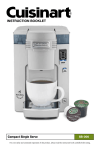
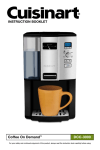
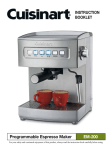
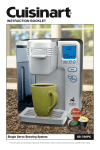
INSTRUCTION BOOKLET Compact Single Serve SS-300C For your safety and continued enjoyment of this product, always read the instruction book carefully before using. Important Safeguards cord into the wall outlet. To disconnect, turn controls to Off, then remove plug from wall outlet. 12.Scalding may occur if the water filter compartment cover is removed during the brewing cycles. 13.Do not use appliance for other than intended use. 14.Do not lift handle to open the lid of the brewer while brewing is in progress. 15.Do not overfill the water reservoir with water. Use only water in this appliance! Do not put any other liquids or foods in the water reservoir except as instructed in the cleaning instructions in this guide. 16.Do not clean drip tray with cleansers, steel wool pads, or other abrasive materials. 17.WARNING: TO REDUCE THE RISK OF FIRE OR ELECTRIC SHOCK, DO NOT REMOVE THE BASE PANEL. NO USER-SERVICEABLE PARTS ARE INSIDE. REPAIR SHOULD BE DONE ONLY BY AUTHORIZED PERSONNEL. 18. Do not operate your appliance in an appliance garage or under a wall cabinet. When storing in an appliance garage, always unplug the unit from the electrical outlet. Not doing so could create a risk of fire, especially if the appliance touches the walls of the garage or the door touches the unit as it closes. When using electrical appliances, basic safety precautions should always be followed to reduce the risk of fire, electric shock and/or injury to persons, including the following: 1. READ ALL INSTRUCTIONS. 2. Always unplug from outlet when not in use and before cleaning. Allow to cool before putting on or taking off parts and before cleaning the appliance. 3. Do not touch hot surfaces. Use handles and knobs. 4. To protect against electric shock and injury to persons, do not place cord, plug, or base unit in water or other liquids. 5. Close supervision is necessary when any appliance is used by or near children. 6. Do not operate any appliance with a damaged cord or plug or after the appliance malfunctions or has been dropped or damaged in any manner. Return appliance to the nearest Cuisinart Repair Centre for examination, repair, or electrical or mechanical adjustment. 7. The use of accessory attachments not recommended by Cuisinart may cause injuries, fire, electric shock or injury to persons. 8. Do not use outdoors. 9. Do not let cord hang over edge of table or counter, or touch hot surfaces. 10.Do not place on or near a hot gas or electric burner, or in a heated oven. 11.Always fill water reservoir first, then plug SAVE THESE INSTRUCTIONS FOR HOUSEHOLD USE ONLY WARNING: RISK Of FIRE OR ELECTRIC SHOCK The lightning flash with arrowhead symbol within an equilateral triangle is intended to alert the user to the presence of uninsulated dangerous voltage within the product’s enclosure that may be of sufficient magnitude to constitute a risk of fire or electric shock to persons. The exclamation point within an equilateral triangle is intended to alert the user to the presence of important operating and maintenance (servicing) instructions in the literature accompanying the appliance. 2 SPECIAL CORD SET INSTRUCTIONS If a grounding-type outlet is not available, an adapter, shown in Figure B, may be obtained so that a 2-slot wall outlet can be used with a 3-prong plug. As shown in Figure C, the adapter must be grounded by attaching its grounding lug under the screw of the outlet cover plate. A short power-supply cord is provided to reduce the risks resulting from becoming entangled in or tripping over a longer cord. Longer extension cords are available and may be used if care is exercised in their use. NOTE: Do not remove the grounding prong. If a long extension cord is used, the marked electrical rating of the extension cord must be at least as great as the electrical rating of the appliance. The extension cord should be a grounding-type 3-wire cord, and the longer cord should be arranged so that it will not drape over the countertop or tabletop where it can be pulled on by children or tripped over. NOTICE If you have a diecast metal unit, for your protection it is equipped with a 3-conductor cord set that has a molded 3-prong grounding-type plug, and should be used in combination with a properly connected grounding-type outlet as shown in Figure A. CAUTION: Before using an adapter, it must be determined that the outlet cover plate screw is properly grounded. If in doubt, consult a licensed electrician. Never use an adapter unless you are sure it is properly grounded. Note: Use of an adapter is not permitted in Canada. IMPORTANT UNPACKING INSTRUCTIONS A. Circuit Grounding Conductor Connected Properly Grounding Prong 1.Place the box on a large, sturdy, flat surface. 2.Remove the instruction book and any other literature. 3.Turn the box so that the back side of the brewer is down and slide the coffeemaker from the box. B. Adapter Grounding Lug 4.After removing the brewer, place the box out of the way and take the side pulp molded inserts away. C. Cover Mounting Screw Cover of Grounded Outlet Box 5.Remove the polybag covering the brewer. We suggest you save all packing materials in the event that future shipping of the machine is needed. Keep all plastic bags away from children. WARNING RISK OF FIRE OR ELECTRIC SHOCK DO NOT OPEN WARNING: TO REDUCE THE RISK OF FIRE OR ELECTRIC SHOCK, DO NOT REMOVE COVER (OR BACK) NO USER-SERVICEABLE PARTS INSIDE REPAIR SHOULD BE DONE BY AUTHORIZED SERVICE PERSONNEL ONLY 3 Contents Element 1 Important Safeguards . . . . . . . . . . . . . . . . . . . . 2 Important Unpacking Instructions . . . . . . . . . . . 3 The Quest for the Perfect Cup of Coffee . . . . . . 5 Features and Benefits . . . . . . . . . . . . . . . . . . . . 6 The Quest for the Perfect Cup of Coffee Water Any hot beverage is made up primarily of water. Often overlooked, the quality of the water is as important as the quality of the coffee, tea or cocoa. A good rule of thumb is that if your water doesn’t taste good from the tap, it won’t taste any better in your beverage. That’s why the Cuisinart® Compact Single Serve has added a charcoal water filter that removes chlorine, bad tastes and odors, for the purest cup of coffee every time. Buttons and Indicators . . . . . . . . . . . . . . . . . . . . 8 Element 2 Setting Up Your Brewer . . . . . . . . . . . . . . . . . . . 9 Charcoal Water Filter . . . . . . . . . . . . . . . . . . . . . 9 Brewing . . . . . . . . . . . . . . . . . . . . . . . . . . . . . . . 10 Hot Water . . . . . . . . . . . . . . . . . . . . . . . . . . . . . 11 Brewing with the My K-Cup® Reusable Filter . . . 12 Cleaning and Maintenance . . . . . . . . . . . . . . . . 13 Cleaning External Parts . . . . . . . . . . . . . . . . 13 Cleaning the My K-Cup® Reusable Filter . . . 13 Cleaning the K-Cup® Holder . . . . . . . . . . . . . 13 Cleaning the Water Reservoir . . . . . . . . . . . . 14 Emptying the Internal Water Tank . . . . . . . . 14 De-Scaling Your Brewer . . . . . . . . . . . . . . . . 14 Troubleshooting . . . . . . . . . . . . . . . . . . . . . . . . . 16 Warranty . . . . . . . . . . . . . . . . . . . . . . . . . . . . . . 17 4 Coffee While the bulk of the liquid is water, all of the flavor should be from the coffee, tea or cocoa. To achieve the same great quality you receive at coffee bars, you need to use the same quality ingredients. By using the K-Cup®, brought to you by some of the most premium brands on the market, you can be assured that you’re getting the finest, freshest gourmet product with every cup you brew. If you choose to use your own coffee in the included My K-Cup®, make sure all your ingredients are at their freshest. Element 3 Grind The grind of coffee and cocoa, or the refinement of your tea leaves, is critical for proper flavor extraction. With the pre-measured, pre-ground ingredients found in every K-Cup®, you can rest easy knowing that it’ll brew perfectly each and every time, locking in maximum flavor and freshness. Element 4 Proportion No matter which cup size you choose, the Cuisinart® Compact Single Serve, working in conjunction with K-Cup®, always produces the perfect cup every time. When grinding your own coffee and using it in the included My K-Cup®, remember to add the amount of ground coffee that corresponds to the number of ounces being brewed. 5 Features and Benefits 1a 1a. Charcoal Filter Holder 2 1b. Charcoal Water Filter 2.Reservoir Lid 3a.10-ounce Water Reservoir with cup markings at 6, 8, and 10 ounces 5 4 3b. Water Level Guide 4. Brewer Handle 5. Brewing Head 6.Brewing Chamber holds My K-Cup® or the K-Cup® Holder 1b 3a 7.Housing 8.Removable Drip Tray Plate 9.Drip Tray 12 15a 15b 6 10.Drip Tray Base 15c 11.Drip Tray Overfill Indicator 16 12.Removable K-Cup® Holder 13.My K-Cup® Reusable Coffee Filter 3b 17 14 14.My K-Cup® Compartment conveniently stores My K-Cup® 15a. LED Display 7 15b.Add Water Indicator 15c.K-cup® Indicator 18 16. Brew Button 11 17. Hot Water Button 8 18. Power Button 19. Power Cord (not shown) 10 13 9 20.BPA Free (not shown) all materials that come in contact with water or coffee are BPA free 6 7 Buttons and Indicators Setting Up Your Brewer Initial Cleaning and First Brew Perform an initial cleaning before making your first beverage. Follow these instructions but do not insert a K-Cup®. Power Button (does not illuminate) Press to turn the Brewer on and off. 1.Plug the power cord into an independent, grounded outlet. Press the Power button to turn the unit on. Brew and Hot Water Buttons When buttons are flashing blue it indicates that a selection (Brew or Hot Water) needs to be made. Once a selection is made button is solid blue, indicating water is heating and dispensing of beverage will begin in approximately 2 minutes. Your Next Brew When the brewing process is complete, the Add Water indicator LED will illuminate. At this point you can begin making the next beverage, or you can power off. Add Water Indicator LED Indicator will illuminate blue – Fill the water reservoir with cold water until it reaches just under the rim of the desired level– 6, 8, or 10 ounces (180, 235 or 300 mL) on the Water Level Guide. Automatic Shut-Off As a safety feature, your brewer will automatically shut off at any stage when it is idle for longer than 90 seconds. Press the power button to restart. If it shuts off while the Brew button LED was flashing blue, lift and lower brewer handle to reset. 6.Wait until all the water has drained into the brewer before lowering the brewer handle completely. 7.Place mug on the drip tray. 8.The Hot Water button LED will remain on, indicating that the water is heating. After about 2 minutes, the water starts to dispense. 9.The one-time cleaning process is complete. Discard hot water. Your brewer is ready to use. 2.Press the Hot Water button. The Add Water indicator will illuminate. 3.Lift the reservoir lid. Charcoal Water Filter 4.Pour water into the water reservoir until it reaches the 10 oz. rim on the water level guide. Close the lid. Your coffeemaker comes with a charcoal water filter that eliminates chlorine, bad tastes and odors from tap water. Inserting the Water Filter 1.Remove the filter and filter holder from the polybag. 2.Soak the filter, fully immersed in cold tap water, for 15 minutes. 3.Rotate the water filter compartment cover counterclockwise to remove the charcoal water filter holder. K-cup® Indicator LED Indicator will illuminate blue – The blue light flashes to indicate that the brewing head needs to be opened and a K-Cup® or My K-Cup® needs to be inserted. The light will continue stay on until you lift the brewer handle. Drip Tray Overfill Indicator Will pop up when excess coffee that does not dispense into mug or residual condensation from the brewing process fill the drip tray. 8 5.Lift the brewer handle but do not add a K-cup®. Water starts to drain from the water reservoir into the brewer. 9 Brewing 1.Press the Power button. 2.Press the Brew button. Add Water and K-cup® indicators will illuminate. Hot Water 9.Wait until all the water has drained into the brewer before lowering the brewer handle completely. Your brewer is equipped to dispense hot water to make hot chocolate, tea, soup, and more. To make hot water: 3.Lift the reservoir lid. 4.Pour water into the 10-ounce water reservoir until it reaches the rim of your desired fill level on the water level guide (minimum 6 ounces.) Close the lid. 4.Place the charcoal water filter in the holder and snap the holder cover closed. Be careful – improper placement can tear the filter skin (see figure). 5.Flush the filter and holder by running fresh water through the hole in bottom of compartment for 10 seconds. 10.The Brew button LED will remain on, indicating the water is heating. 6.Allow the filter to drain completely. 5.Lift the brewer handle. Water starts to drain from the water reservoir into the brewer. 6.Place mug on the drip tray. The drip tray can be removed to accommodate travel mugs. 7.Select a K-Cup® portion pack. Note: Do not remove the foil lid or puncture the K-Cup®. 7.Place the assembled water filter holder into the water reservoir, pushing it down to fit into place (see figure). Note: If Brew button was not pressed before you added water to the water reservoir (Brew and Hot Water LEDs are still flashing) you can do so after water has drained into the brewer and the brewing head is closed. The light will now stay on until heating/brewing is complete. 14. Press the Power button. 15.Press the Hot Water button. Add Water indicator will illuminate. 16.Lift the reservoir lid. 17.Pour water into the water reservoir until it reaches up to the rim of your desired fill level on the water level guide (minimum 6 ounces). Close the lid. 11.After about 2 minutes, the beverage starts to dispense. Caution: there is very hot water in the K-Cup® chamber during the brewing process. To avoid risk of injury, do not lift the handle or open the K-Cup® chamber during the brewing process. 18.Lift the brewer handle. Water starts to drain from the water reservoir into the brewer. 19.Place mug on the drip tray. The drip tray can be removed to accommodate travel mugs. 20.Wait until all the water has drained into the brewer before lowering the brewer handle completely. 21.The Hot Water button LED will remain on, indicating the brewer is heating. 8.Replace the water filter compartment cover. Turn it clockwise to close tightly. *Make sure compartment cover is in place securely and arrows line up in order for brewer to brew properly. Note: If the Hot Water button was not pressed before you added water to the water reservoir (Hot Water and Brew LEDs are still flashing) you can do so after water has drained into the brewer and the brew head is closed. The LED will now stay on until heating/brewing is complete. 8.Place a K-Cup® in the brewing chamber. Caution: There are two sharp needles in the brewing chamber that puncture the K-Cup®, one above and one below. To avoid risk of injury, do not put your fingers in the K-Cup® brewing chamber. Note: We recommend changing the water filter every 60 days or after 60 uses, and more often if you have hard water. Replacement filters can be purchased in stores, by calling Cuisinart Customer Service, or at www.cuisinart.com. 10 12.Lift the handle, then remove and dispose of the used K-Cup®. Close the brewing head. 22.After about 2 minutes, hot water starts to dispense. Caution: K-Cup® will be hot. 13.Enjoy your cup of gourmet coffee! Your brewer is ready to use again or you can power it off. 11 Brewing with the My K-Cup® Reusable Coffee Filter 2.Disassemble the My K-Cup® by turning the lid in a counterclockwise direction. Remove the filter basket from the holder. 6b.Drop the assembled My K-Cup® into the brewing chamber. There is no need to snap it into place. Maintenance The Cuisinart® Compact Single Serve comes with a My K-Cup® reusable coffee filter, which allows you to use your own ground coffee. The dishwasher-safe My K-Cup® conveniently stores in the easy-open compartment. 3.Wash the My K-Cup® lid, filter basket and holder in warm soapy water prior to use, making sure to rinse and dry thoroughly. All My K-Cup® parts are dishwasher safe. Caution: There are two sharp needles in the brewing chamber that puncture the K-Cup®, one above and one below. To avoid risk of injury, do not put your fingers in the K-Cup® brewing chamber. Cleaning the My K-Cup® Reusable Coffee Filter 4.Re-insert the filter basket into the holder. 5.Fill the filter basket with ground coffee, making sure not to fill past the top of the mesh. Adjust the amount to your personal preference. Do not tamp the grounds. Make sure there are no grounds remaining on the upper rim of the filter basket. Turn the lid clockwise to seal. 6.Follow brewing instructions on page 10, but instead of adding a K-cup® place the My K-cup® in the brewing chamber. 1.Before using the My K-Cup® Reusable Coffee Filter for the first time: open the storage compartment located on the right side of the brewer by pressing the finger indent. Remove the My K-Cup®. Any other servicing should be performed by an authorized service representative. 1.Open the storage compartment located on the right side of the brewer by pressing the finger indent. Remove the My K-Cup®. 2.Disassemble the My K-Cup® by turning the lid in a counterclockwise direction. Remove the filter basket from the holder. 7.After brewing raise the handle and remove the My K-Cup®. Use caution as the My K-Cup® will be hot. 8.Disassemble the My K-Cup® by turning the lid from the holder in a counterclockwise direction. Remove the filter basket from the holder, discard the grounds and rinse out the filter basket and holder. 3.Wash the My K-Cup® lid, filter basket and holder in warm soapy water making sure to rinse and dry thoroughly. All My K-Cup® parts are dishwasher safe. Cleaning the K-Cup® Holder 9.Replace the K-Cup holder, ensuring that the arrow on K-Cup® rim aligns with the arrow on the brewing chamber. Gently push the K-Cup® holder to snap into place. ® 1.The K-Cup® holder is top-shelf dishwasher safe (use low temperature cycles in the dishwasher). To remove, lift the handle to open the brewing chamber. Grasp the top of the K-Cup® holder and pull toward you. After cleaning, replace the K-Cup® holder, being sure to align the arrow on the K-Cup® holder rim with the arrow on the brewing chamber. Cleaning and Maintenance Cleaning External Parts 6a.Remove the K-Cup holder from the brewing chamber by pulling toward you. (If you like, store the K-Cup® holder in the My K-Cup® storage compartment.) ® We recommend regular cleaning of the brewer’s external components. 1.Never immerse the brewer in water or other liquids. The housing and other external components may be cleaned with a soapy, damp, non-abrasive cloth. 2.To remove the drip tray, simply slide it toward you, keeping it level at all times in order to prevent spills. The drip tray and drip tray plate are dishwasher safe. Do not clean drip tray with cleansers, steel wool pads or other abrasive materials. 2.Cleaning the Funnel – The funnel can be removed from the K-Cup® holder by pulling on it until it pops off (see figure). The funnel is top-rack dishwasher safe. To replace it, just snap it back onto the K-Cup® holder assembly. 12 13 De-Scaling your Brewer Mineral content in water varies from place to place. Depending on the mineral content of the water in your area, calcium deposits or scale may build up in your brewer. Though scale is non-toxic, it can hinder brewer performance. De-scaling your brewer will help maintain the heating element and other parts that come in contact with water. For optimal performance, de-scale your brewer every 3 to 6 months. It is possible for calcium deposits to build up faster, making it necessary to de-scale more often. 3.Cleaning the Exit Needle – The exit needle is located on the inside bottom of the K-Cup® holder assembly. Should a clog arise because of coffee grounds, it can be cleaned using a paper clip or similar tool. Remove K-Cup® holder and insert the paper clip to loosen the clog and push it out. • Once the vinegar is dispensed, discard it into sink. Step 2: Second Vinegar Rinse • Pour the remaining 10 ounces of vinegar into the water reservoir. • Place the ceramic mug on the drip tray. • Lift the brewer handle, but do not add a K-Cup®. • After all the vinegar has drained, lower the brewer handle and press the Hot Water button. • The Hot Water button will illuminate blue, indicating the brewer is heating. • Power the brewer off as it starts to dispense. • Allow brewer to sit for 30 minutes. • Power on the brewer, lift and lower brewer handle, then press the Brew button. CAUTION: There are sharp needles that puncture the K-Cup® above and below. To avoid risk of injury, do not put your fingers in the K-Cup® Assembly Housing. • Once the vinegar is dispensed, discard hot contents into sink. Step 3: Fresh Water Rinse • Repeat step 1 three times using freshwater in place of vinegar. Cleaning the Water Reservoir Note: Before de-scaling your brewer remember to remove the charcoal water filter from the water filter holder located in the water reservoir. It is normal over time for discoloration, spotting or staining to appear in the water reservoir. Results will vary depending on the mineral content of the bottled or filtered water used but will not affect the operation of the brewer. However, be sure to clean the water reservoir regularly to minimize buildup. • This will clean the brewer plumbing and remove any residual vinegar taste. The brewer is now ready for normal use. To begin, you will need the following: • 20 ounces of distilled white vinegar • 12-ounce ceramic mug (do not use paper cup) • Access to a sink Clean inside the water reservoir with a damp, lint-free cloth as necessary. Step 1: First Vinegar Rinse • Fill water reservoir with 10 ounces of undiluted white vinegar. Emptying the Internal Water Tank • Place the ceramic mug on the drip tray. Brewer must be powered off but plugged in. • Lift the brewer handle, but do not add a K-Cup®. 1.Lower the reservoir lid. 2.Place a mug on the drip tray. • After all the vinegar has drained, lower the brewer handle and press the Hot Water button. 3.Press and hold down the Brew button and continue to hold until all the water is dispensed into the mug. • The Hot Water button will illuminate blue, indicating the brewer is heating. There will be a 3- to 5-second delay before water begins to dispense. 14 15 TROUBLESHOOTING PROBLEM SOLUTION: Brewer does not have power. Plug brewer into an independent outlet. Make sure the brewer is securely plugged in. Plug into a different outlet. Reset your home’s circuit breaker. Confirm the power has been turned on and the brew and hot water indicators are flashing. Brewer will not brew. Turn off and unplug the brewer for 30 seconds or more. When you plug the brewer back in, be sure to turn the power back on. If the Add Water indicator is illuminated, check to make sure the water reservoir is properly filled. If not add desired amount of water (6 to 10 ounces). Make sure water has fully drained from the water reservoir into the brewer by lifting the brewing head. Make sure the water filter compartment cover is securely in place by turning clockwise to close tightly. The exit needle may be clogged (see page 14). If the Add Water indicator is illuminated even after adding 6 to 10 ounces of water to the water reservoir and water has fully drained into the brewer, contact Customer Service at 1-800-472-7606. Chlorine or mineral taste in coffee. Consider using bottled water, filtered water or the Cuisinart Charcoal Water Filer. Doesn’t brew a full cup. Water may not have fully drained from the water reservoir into the brewer. Check to see if there is water remaining in the reservoir. If there is, lift the brewing head to drain water into the brewer. WARRANTY LIMITED THREE-YEAR WARRANTY If the appliance should become defective within the warranty period, do not return the appliance to the store. Please contact our Customer Service Centre: We warrant that this Cuisinart product will be free of defects in materials or workmanship under normal home use for 3 years from the date of original purchase. This warranty covers manufacturer’s defects including mechanical and electrical defects. It does not cover damage from consumer abuse, unauthorized repairs or modifications, theft, misuse, or damage due to transportation or environmental conditions. Address: Cuisinart Canada 100 Conair Parkway Woodbridge, Ont. L4H 0L2 Products with removed or altered identification numbers will not be covered. This warranty is not available to retailers or other commercial purchasers or owners. If your Cuisinart product should prove to be defective within the warranty period, we will repair it or replace it if necessary. For warranty purposes, please register your product online at www.cuisinart.ca to facilitate verification of the date of original purchase and keep your original receipt for the duration of the limited warranty. This warranty excludes damage caused by accident, misuse or abuse, including damage caused by overheating, and it does not apply to scratches, stains, discolouration or other damage to external or internal surfaces that does not impair the functional utility of the product. This warranty also expressly excludes all incidental or consequential damages. • $10.00 for shipping and handling of the product (cheque or money order) Toll-free phone number: 1-800-472-7606 Email: [email protected] Model: SS-300C To facilitate the speed and accuracy of your return, please enclose: • Return address and phone number • Description of the product defect • Product date code*/copy of original proof of purchase • Any other information pertinent to the product’s return * Product date code can be found on the underside of the base of the product. The product date code is a 4 or 5 digit number. Example, 90630 would designate year, month & day (2009, June 30th). Note: We recommend you use a traceable, insured delivery service for added protection. Cuisinart will not be held responsible for in-transit damage or for packages that are not delivered to us. To order replacement parts or accessories, call our Customer Service Centre at 1-800-472-7606. For more information, please visit our website at www.cuisinart.ca. Your Cuisinart product has been manufactured to the strictest specifications and has been designed for use only in 120 volt outlets and only with authorized accessories and replacement parts. This warranty expressly excludes any defects or damages caused by attempted use of this unit with a converter, as well as use with accessories, replacement parts or repair service other than those authorized by Cuisinart. Turn off and unplug the brewer for 30 seconds or more. When you plug the brewer back in, be sure to turn the power back on. The exit needle may be clogged (see page 14). Clean the K-Cup® holder brewing chamber (refer to “Cleaning & Maintenance” page 13). De-scale the brewer (refer to page 14). If you have repeated the de-scaling procedure two times and it is still brewing only a partial cup, contact Customer Service at 1-800-472-7606. Coffee is too weak or watery. Consider brewing a smaller cup size or try an Extra Bold K-Cup®. It has 30% more ground coffee in each portion pack. 16 17 Food Processors Blenders Griddlers Cookware Tools and Gadgets Cuisinart offers an extensive assortment of top quality products to make life in the kitchen easier than ever. Try some of our other countertop appliances, cookware, tools and gadgets. www.cuisinart.ca ©2011 Cuisinart Canada 100 Conair Parkway, Woodbridge, Ontario L4H 0L2 Any trademarks or service marks of third parties used herein are the trademarks or service marks of their respective owners. Keurig, the Cup and Star Design, Keurig Brewed, and K-Cup are trademarks of Keurig, Incorporated, used with permission. For use and/or licensed under U.S. Pat. No. 7,165,488; and other U.S. and foreign patents pending. Printed in China 12CC129218 IB-11021-CAN