1
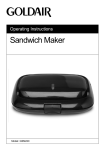
DO NOT IMMERSE THIS APPLIANCE IN WATER
Know your Kenwood Snack Maker
IMPORTANT SAFEGUARDS
When using electrical appliances basic safety precautions should
always be followed, including the following:1. Read all instructions.
3
Connecting to Power
4
2
1
6
Before switching on make sure that the voltage of your electricity
supply is the same as that indicated on the rating plate.
IMPORTANT (UK ONLY): The wires in the mains lead are coloured
in accordance with the following code:
GREEN and YELLOW EARTH
BLUE
NEUTRAL
BROWN
LIVE
NOTE:
This appliance complies with European Economic Community Radio
Interference Directive 89/336/EEC.
Key
1.
2.
3.
4.
3. To protect against electric shock do not immerse cord, plug or
appliance in water or other liquids.
4. Do not use metal objects, knives, forks or similar implements as
they may damage the plates.
5. This appliance is not intended for use by young children or infirm
persons without supervision.
5
7
2. Do not touch hot surfaces, and beware of steam which may escape
from the appliance during operation.
6. Do not leave your snack maker on unattended.
7. Do not use any unauthorised attachments with your snack maker,
they may be hazardous.
8. Unplug from outlet when not in use and before cleaning.
Handle latch
Handle
Lid
Indicator lights
5. Cord
6. Non-stick toasting plates
7. Feet
9. Do not cover your snack maker whilst it is hot or in use.
10. If the supply cord of this appliance is damaged, it must for safety
reasons be replaced by Kenwood or an authorised Kenwood
repairer.
11. The use of accessory attachments not recommended by the
appliance manufacturer may cause injury.
12. Do not use outdoors.
13. Do not let cord hang over edge of table or worktop or touch hot
surfaces.
14. Only use this appliance for its intended domestic use.
Fig. 1
Fig. 2
15. Young children should be supervised to ensure that they do not
play with this appliance.
SAVE THESE INSTRUCTIONS
Before using your Snack Maker
Before using your snack maker for the very first time, clean the
appliance and plates as described in the 'Cleaning' section.
Brush a little cooking oil on the plates, heat the appliance with the lid
open for 5 minutes. Unplug and allow to cool, then remove any surplus
oil with absorbent paper. The snack maker is now ready for use.
When using your snack maker for the first time you may notice a fine
smoke haze being emitted. This is normal and is due to the initial
heating of the internal components.
Operation
Please read all instructions before using this appliance.
To make Toasted Sandwiches
1. Close the lid of the snack maker.
2. Plug the appliance into the power supply. The red light will glow
indicating that the snack maker is heating, whilst the green light
remains off. Once the correct temperature for use has been
reached the red light will go off and the green light will come on.
3. Whilst the snack maker is heating prepare the bread and filling.
4. For golden toasted sandwiches, spread butter on the outside of the
bread. Beware of some spreads which are not suitable for toasting.
Always select bread of a suitable size to fit the plates. Place the
filling between the unbuttered sides of the bread. Ensure the
sandwiches are evenly filled to assist with even browning.
5. Open the snack maker by pulling the handle latch outwards and
lifting the lid (see fig. 1).
6. Place the sandwiches into the appliance (see fig. 2).
7. Close the lid, using a wooden spoon to hold the bread in place if
necessary, until the handle latch locks. Do not force the lid closed. If
the lid is difficult to close you may have too much filling or the bread
slices may be too thick.
8. Allow the sandwich to toast for 3-8 minutes according to taste and
ensuring that raw ingredients (eg bacon) are thoroughly cooked,
alternatively, pre-cook them before toasting. Beware of steam which
may escape from the front of the appliance.
9. Open the snack maker in one swift movement and remove the
toasted sandwiches. Do not use a metal implement for this as it
may damage the toasting plates.
10. After use, unplug the appliance and allow to cool.
Storage
When the appliance is cool, the cord can be wrapped around the
appliance.
Service
If the supply cord of this appliance is damaged, it must for safety
reasons be replaced by Kenwood or an authorised Kenwood repairer.
UK
For any repairs in or out of guarantee, servicing or selected spare parts,
contact your Kenwood Authorised Repairer in the Yellow Pages under
Electrical Appliance Repairs or telephone 023 92392333 and ask for
Customer Care.
EIRE
Contact local repairer from advertisement in the Golden Pages.
ALL OTHER MARKETS
Contact the dealer from whom you purchased your appliance.
To make Pastry Snacks
Ready made pastry sheets such as filo or puff pastry are ideal for
making quick and easy snacks.
1. Place a suitably sized piece of pastry sheet onto the pre-heated
cooking plate of your snack maker.
2. Form hollows in the pastry and spoon on the filling such as apple,
ricotta cheese or vegetables.
3. Top with another piece of pastry sheet and close the lid.
4. Cook until the pastry is golden brown and the filling cooked
IMPORTANT
Be careful when biting into anything cooked in the snack maker, as
some fillings such as cheese and jam can be extremely hot and will
burn if eaten too quickly.
Cleaning
Remove the plug from the power supply before cleaning.
Do not clean the snack maker under running water and do not immerse
in water.
To clean, allow the toasting plates to cool then wipe the appliance with
a damp cloth plus a little washing up liquid if necessary. Dry carefully
afterwards.
SM400 series
LIMITED
New Lane • Havant • Hants • PO9 2NH
www.kenwood.co.uk
10006/2