1
INSTALLATION AND SERVICE MUST BE PERFORMED BY A QUALIFIED INSTALLER.
IMPORTANT: SAVE FOR LOCAL ELECTRICAL INSPECTOR'S USE.
READ AND SAVE THESE INSTRUCTIONS FOR FUTURE REFERENCE.
FOR YOUR SAFETY: Do not store or use gasoline or other flammable
vicinity of this or any other appliance.
vapors and liquids in the
GENERAL INFORMATION
The Warm & Serve Drawer can be used:
o
•
As a stand alone appliance
As a combination Warm & Serve Drawer with a 30" (76 cm) built-in oven mounted above
IMPORTANT: The warmer drawer must be installed on a leveled surface from left to right, rear to front and the surface
must be capable of supporting 1O0 Ibs (45 Kg).
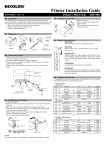
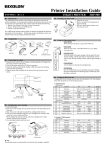
Warm & Serve Drawer Dimensions
IMPORTANT: The Warm & Serve Drawer runs off a
NOTE: A 60" (1 52 cm) long cable is supplied with the
Warm & Serve Drawer.
single phase three-wire
120 volt, 60 hertz, AC only
Stand Alone Installation
electrical supply with ground.
Combination
Warm & Serve Drawer/
30" (76 cm) Built-in Oven Installation
Caution: Two 3" (7,6 cm) wide X
3/4" (1,9 cm) thick planks have to
be install and they should be able
to support 200 pounds• (90,7 Kg)
B\
C
N*-101/8
(25.7cm) Min. is a Critical
dimension and has to he respected.
J** =3 (7.6cm) Max. Electrical Junction Box for wall oven can he
lower than warmer drawer cutout or higher than walloven cutout.
10" (25.4cm)
30" (76,2cm)
23 3/8" (59,4cm)
10"(25.4cm)
...........
Min.
Max.
8 3/8" (21,3cm)
8 5/8" (21,9cm)
28 1/2 " (72,4cm)
28 3/4 " (73 cm)
24"(61cm)
30"(76,2cm)
23 3/8"(59,4cm)
TO
Min.8 3/8"(21,3cm) 28 1/2" (72,4cm) 24"(61 cm) 1 1/2"(3,8cm)
Max.8 5/8"(21,9cm) 28 3/4" (73crn)
P/N 318201805
Printed in the USA
Bependsoncritical
dimensionH
(0606)
Rev. C
English
pages 1-2; Espaflol
p_iginas 3-4
Fran_ais pages 5%; Notes - pages 7-8
2.
Important
Notes to the Installer
I. Read all instructions contained in these installation
instructions before installing appliance.
2. Remove all packing material from appliance before
connecting the electrical supply.
3. Observe all governing codes and ordinances.
4. Be sure to leave these instructions with the consumer.
Slide drawer into cutout opening until front frame of
drawer is flush against cabinet. Be careful not to
pinch electrical cord.
Remove the drawer as instructed in the Use & Care
Guide and secure drawer housing to cabinet using
the 2 nickel-plated screws supplied (see Figure 2).
Do not overtighten
screws.
3.
Important
Note to the Consumer
Keep these instructions for future reference.
IMPORTANT SAFETY
INSTRUCTIONS
• Be sure your appliance
is installed
and plugged
into a 120 Volt grounded
outlet.
• This appliance
must be electrically
grounded
in
accordance
with the National
Electrical
Code ANSI/
NFPA No, 70--latest
or CSA C22,1, Part
requirements.
Tools You Will
edition
in the United
States,
1 in Canada,
and local code
Use screws
supplied to attach
drawer to front -_"
of cabinet,
Need
Figure 2
Phillips@ Screwdriver
Pencil
Ruler or Tape Measure and Straight-edge
Hand Saw or Saber Saw
Spirit Level
Warm
I.
& Serve
.
5.
Drawer
Installation
The 60" (152 cm) appliance power cord can now be
connected into the 120 Volt outlet.
Proceed with mounting built-in oven above the drawer
(if applicable). Follow installation instructions provided
with built-in oven. Make sure to use anti-tip brackets
supplied with the built-in oven.
Locate the 2 anti-tip brackets supplied as shown on
figure I.
Combination
Warm
and Cooktop
& Serve
Drawer
installation
A
Minimum Depth Spacing To Clear Cooktop Burner Box
Electric
Cooktop
Spacing
"A"
E301C75,
E361C75
4.5"
(11.43cm)
E30EC65,
E36EC65
6.0"
(15.24cm)
7.5"
(19.05cm)
8.5"
(21.59cm)
5.0"
(12.7cm)
E36EC75
Figure 1
E30EC70,
E36EC70
Gas
Cooktop
E36GC75
LA INSTALACION Y EL SERVICIO DEBEN SER EJECUTADOS POR UN INSTALADOR CALIFICADO.
IMPORTANTE: GUARDE ESTAS INSTRUCCIONES PARA EL USO DEL INSPECTOR LOCAL DE
ELECTRICIDAD. LEA Y GUARDE ESTAS INSTRUCCIONES PARA FUTURAS REFERENCIAS.
F.'_
PARA SU SEGURIDAD: No almacene o use gasolina
cerca
a _ste
o a cualquier
otro
u otros vapores y Jiquidos combustibJes
eJectrodom_stico.
INFORMACION GENERAL
El cajOn calentador puede ser usado:
* Como unidad independiente
En una combinaci6n entre el caj6n calentador y el homo de 30 (76 cm) pulgadas integrado y montado por encima del caj6n
IMPORTANTE:
de la parte
El caj6n
de atr_is
calentador
al frente.
debe
de estar
La superficie
debe
instalado
poder
Dimensiones
NOTA:
Un
suministrado
cable
con
el
de 60"
(152
cajOn calentador.
cm)
de largo
Instalaci6n de la unidad independiente
con
sostener
del
es
una
100
caj6n
surperficie
libras
liana,
de
la izquierda
a la dececha,
(45 Kg).
calentador
IMPORTANTE:
El cajOn calentador
funciona
con un
suministro
de energia electrica de corriente alterna, de
tres cables, de una sola fase, de 120 voltios, 60 hertz
con linea a tierra.
Instalaci6n
de la combinaci6n
caj6n
calentador
y homo de 30" (76 cm) integrado
Precauci6n: Dos tablas de 3"(7,6
cm) pot 3/4" (1,9 cm) necesitan ser
insta[adas y deberan soportar 200
libras (90,7 Kg)
B\
H* : 10 1/8" (25.7 cm) Min. es una
dilnensi6n cr{tica y necesita set respetada.
J**= 3" (7.6 cm) Max. La Caja para las conexiones electricas para
el horno de empotre puede estar de bajo de la abertura del cajon
calentador 0 p0r arriba de la abertura del homo.
10"(25.4cm)
30" (76,2cm)
8 3/8"(21,3cm)
8 5/8"(21,9cm)
Impreso en los EUA
23 3/8"(59,4cm)
28 1/2"(72,4cm)
28 3/4" (73cm)
24" (61 cm)
10" (25.4cm)
30"(76,2cm)
23 3/8"(59,4crn)
Min. _ 3/8"(21,3cm) 28 1/_,,(72,4cm) 241'(61 cm) 11/2"(3,8cm)
Max.B 5/8"(21,9cm) 28 3/4"(73 cm)
Uependedela
dimensi6n
¢riticaH
P/N 318201805 (0606) Rev.
English - pages 1-2; Espatiol - paginas 3-4
Fran_ais - pages 5-6; Notes - Pages 7-8
Notas importantes
para el instalador
I. Lea todas las instrucciones de instalaci6n antes de instalar
el electrodom6stico.
2. Retiretodos losmaterialesde empaq ue del electrodom6stico
antes de conectar la fuente de energia.
3. Observe todos los cOdigos y leyes del gobierno
4. Aseg0rese de dejarle estas instrucciones al consumidor.
2. Deslice el caj6n hacia dentro de la abertura de la abertura
hasta que el marco frontal del cajOn este a ras contra el
gabinete. Tenga cuidado de no )inchar el cable el_ctrico.
3. Remover el cajOncomo indica el manual de uso y cuidado
asegure el marco contra el gabinete utilizando los tornillos
niquelados. (vea la Figura 2). No apriete demasiado los
tornillos.
Nota importante para el consumidor
Guarde estas instrucciones para futura referencia.
/
/
1
INSTRUCCIONES
IMPORTANTES DE
SEGURIDAD
Aseg_rese de que su electrodom_stico
est_ instalado
y conectado
en un tomacorriente
de 120 voltios con
tierra.
Utilizar los tornillos
Este electrodom_stico
debe ser puesto el_ctricarnente
a tierra de acuerdo
con el C6digo Nacional
El_ctrico
ANSI/NFPA No 7--de la _ltima edici6n de los Estados
gabinete.
Unidos, o la CSA C22,1, Parte 1 en Canada,
requisitos
de c6digos locales.
Herramientas
que usted necesita
....
Figura
y con los
Destornillador de estrella (Phillips)
Lapiz
Regla o cinta medidora y regla recta
Serrucho manual o serrucho de sable
Nivel de burbuja
Instalad6n
para fijar el caj6n
al frente del-----_"
2
4. El cable de 60" (152 cm) del electrodom_stico puede
ahora conectarse en un tomacorriente de 120 voltios con
tierra.
5. Proceda con el montaje del homo integrado por encima
del caj6n (si esel caso). Siga lasinstrucciones provistas con
el homo integrado. Aseg0rese de usar las abrazaderas
antideslizantes provistas con el homo integrado.
Combinaci6n del caj6n calentador
la instalaci6n de una cubierta
del cajon calentador
I. Instalor los 2 brackets anti-volteo corno muestro la figura I.
y
A
Profundidad
minima
para no interferir
con la caja de
quemadores.
Cubierta
Figura
El_ctrica
Distancia
"A"
E301C75, E361C75
4.5"
(I 1.43cm)
E30EC65, E36EC65
6.0"
(15.24cm)
E36EC75
7.5"
(19.05cm)
8.5"
(21.59cm)
5.0"
(12.7cm)
1
E30EC70,
E36EC70
Cubierta
E36GC75
a Gas
L'INSTALLATION ET L'ENTRETIEN DOIVENT ETRE EFFECTU[:S PAR UN INSTALLATEUR COMP[:TENT,
IMPORTANT : CONSERVEZ CES INSTRUCTIONS POUR L'INSPECTEUR D'I_LECTRICITI_ LOCAL. LISEZ
ET CONSERVEZ CES INSTRUCTIONS POUR RleFERENCES ULTERIEURES.
liquides
inflammables
POUR VOTRE SECURITE: N'entreposez
et n'utilisez pas d'essence
a proximit_ de cet appareil ou de tout autre appareil m_nager.
ou autres gaz et
RENSEIGNEMENTSGENERAUX
Ce tiroir-r_chaud peut &tre utilis_ cornme:
* Appareil autonome
* Tiroir-r@chaud combin@a un four encastr@de 30" (76 cm) superpos@
IMPORTANT: Le tiroir-rechaud doit _tre install@sur une surface de niveau, de gauche a droite et de I'arri@rea I'avant. La
surface doit pouvoir supporter 100 Ibs (45 Kg).
Dimensions
du tiroir-r_chaud
NOTE: Un c_ble de 60" (152 cm) est fourni avec le tiroirr@chaud.
Installation
pour
appareil
autonome
IMPORTANT:
Le tiroir-r_chaud
fonctionne
seulement
avec un circuit electrique
mis a la terre a 3 fils de 120
volts, monophas_,
60 Hz CA.
Combin_
tiroir-r_chaud/
four
encastr&
de 30" (76 cm)
Attention: Deux planches de 3" (7,6
cm) de large X 3/4" (1,9 cm) d'epais
doivent _tre installees et olios doivent
_tre en mesure de supporter un poi(
de 200 Ibs. (90,7 Kg)
B\
plancher
C
41/2" (11,4 cm)
H* =10 1/8" (25.7 crn) Min. est une
dimension critique et deft Otre respect_e.
J**= 3" (7.6 cr'n) Max. La buite de junction _lectrJque pour Je four
encastr_ peut _tre situ_e en has du d_c0upage pour le tireir
chaufant ou en haut du d_cuupage poor le four encastr_.
10" (25.4cm)
30" (76,2cm)
8 3/s"(21,3cm)
8 %" (21,9cm)
28 V2" (72,4cm)
28 3/4"(73 cm)
23 3/8"(59,4cm)
24" (61cm)
10"(25.4cm)
30" (76,2cm)
233/8"(59,4cm)
iVlin.8 s/8"(21,3cm) 28 V2"(72,4cm) 24"(61cm) 1 _/2"(3,8cm)
Max8 s/s"(21,9cm) 28 %" (73cm)
P/N 318201805
Imprime aux Etats-Unis
_,.,_d_ladime,.
sio_ critique El
(0606)
Rev, C
English - pages 1-2; Espa_ol - paginas 3-4
FranCais- pages 5-6; Notes - pages 7-8
Notes importantes
a Iqnstallateur
I. Liseztoutes les instructions d'installation avant de proc6der
I'installation de cet appareil.
2. Retirez tout le materiel d'emballage de I'appareil avant de
brancher I'alimentation _lectrique.
3. Observez tousles r6glements et codes Iocaux applicables.
4. Assurez-vous de laisser ces instructions a I'utilisateur.
Note importante
2. Glissez le tiroir dans I'ouverture du d6coupage jusqu'a ce
que son cadre avant soit tout contre I'armoire. Veillez a ne
pas coincer le cordon _lectrique.
3. Retirez le tiroir tel qu'expliqu_ dans le manuel d'utilisation
et d'entretien et fixez le chassisdu tiroir a I'armoire a I'aide
des 2 vis plaqu6es au nickel fournies. Ne serrez pas les
vis outre mesure. (voir figure 2)
_ I'utilisateur
Conservez ces instructions pour r_f_rences ulterieures.
INSTRUCTIONS DE
SI CURITI[: IMPORTANTES
• Assurez-vous
que votre appareil
est install_ et
raccord_ a une prise murale de 120 volts raise a la
terre.
• Cet appareil doit _tre mis _ la terre conform_ment au
code d'_lectrkit_ national ANSUNFPA No. 70, derniere
_dition, aux Etats-Unis, ou a I'ACNOR C22.1, partie 1
au Canada, et aux codes et reglements Jocaux.
OutilS
n_cessaires
Tournevis Phillips
Crayon
R_gle ou ruban a mesurer et _querre
Scie a main ou scie sauteuse
Niveau a bulle
Installation
Utilisez les vis
fournies pour fixer le ..
chassis du tiroir--_ _"
I'armoire.
Figure
d'un tiroir=r_chaud
1. Localisez les supports anti-bascules tel qu'indiqu_ a la figure 1.
2
4. Le cordon d'alimentation de I'appareil de 60" (152 cm)
peut a present _tre branch_ a la prise murale de 120 volts.
5. Procedez maintenant au montage du four encastr_
superpose au tiroir-r_chaud (s'il y a lieu). Suivez les
instructions d'installation fournies avec le four encastr_.
Assurez-vousd'utiliser lescrochets anti-bascules fournis avec
le four.
installation combin_
tiroir-r_chaud
/ table de cuisson
A
% 25 5/16"
(64.3 cm):
(64.3 cm) Max.
23 5/8" (60 cm) Min.
Espacement minimum pour ne pas entrer en interference
avec le bottler de la table de cuisson.
Table
de
cuisson
_lectrique
E301C75,
E361C75
E30EC65,
E36EC65
Table
Espacement
"A"
4.5"
(11.43cm)
6.0"
(15.24cm)
7.5"
(19.05cm)
8.5"
(21.59cm)
5.0"
(12.7cm)
de
Figure 1
E36EC75
E30EC70,
E36EC70
cuisson
au gaz
E36GC75
Notes - Notas
Notes
_ Notas