1
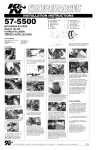
FILTERCHARGER INJECTION
PERFORMANCE KIT
®
-INSTALLATION MANUALToyota Supra Turbo
1987-1993
L6-3.0L Turbo
P/N 57-9004
CARB E.O.# D-269-3
K&N Engineering, Inc.
1455 Citrus Avenue
P.O. Box 1329
Riverside, CA 92502
K&N Filtercharger® Injection Performance Kit #: 57-9004
Application: 1987-93 Toyota Supra Turbo L6-3.0L engine
Air-flow sensing device:
Karman Vortex air flow meter
BASIC DESIGN CONCEPT
This K&N Filtercharger® Injection Performance Kit (hereafter referred to as: FIPK) is designed to be less restrictive
than the OEM air filter system. Low restriction air filters allow the engine to have better throttle response as well as
more power throughout the RPM band. K&N has designed this FIPK to exactly replace the OEM factory air cleaner
case, with a precision engineered aluminum adapter and all the necessary mounting brackets, bolts, screws and nuts.
Additionally, it is important to note, if the O.E.M. air cleaner case has emission control devices and/or hoses, that all
these parts will be installed as necessary to the new assembly.
Each FIPK has a specially designed filter with woven cotton fabric sandwiched between 2 layers of wire mesh screen.
The screen and fabric combination creates a grid-like effect which actually straightens out the incoming air as it
passes through the filter. In addition to the filter, this kit has a uniquely designed adapter with a built-in velocity stack.
This velocity stack is beneficial in further smoothing out the incoming air flow and allowing for a less restrictive entry
into the engine. (Air moving in a straight direction moves faster than tumbling air thus creating an increase in air flow).
See the figure below.
AIR CLEANER DESIGN EFFECTIVENESS
To design an effective performance air filter assembly, two factors must be considered: the air filtering element and
the air filter adapter. On fuel injected, computer controlled vehicles, there can be a substantial gain in performance by
using a less restrictive air filter assembly. Original equipment air filter assemblies tend to be more restrictive than the
performance enthusiast would like, therefore, by changing to the less restrictive K&N FIPK, the air flow potential of the
engine can be fully maximized without jeopardizing important emission standards. (see figures below)
EMISSIONS LEGAL
The FIPK is street legal for use on the emission controlled vehicles that it was originally designed to fit. These kits
replace the original air filter case and do not eliminate the emission controls. The high temperature label contains the
EO # assigned by C.A.R.B. that will allow a vehicle installed with the FIPK to pass the visual inspection at an
authorized Smog Inspection station.
BEFORE F.I.P.K.
air sensor
airfl
ow
ve
filter element
stock airbox
OEM air filter assembly
ti
air intake
to engine
restric
AFTER F.I.P.K.
un
res
tric
tiv
ea
irfl
ow
air sensor
Filtercharger® element
ve
cti
tri
es
r
un
to engine
w
flo
air
stock airbox
1
FIPK assembly
INSTALLATION INSTRUCTIONS
CAUTION!! PLEASE READ CAREFULLY AND COMPLETELY BEFORE BEGINNING WORK ON YOUR VEHICLE.
K&N suggests that you have a repair manual available for reference during installation of the K&N Filtercharger®
Injection Performance Kit.
TOYOTA SUPRA TURBO
ENGINE COMPARTMENT
INSTALLATION
1)
2)
3)
4)
5)
Disconnect the vehicle's negative battery cable.
Remove the inter-cooler tubes from the vehicle, held in place by hose clamps. (see fig. 1)
Remove the bolts holding the airbox to the body. There are 2 on the airbox and 1 on the mass-air bracket.
Loosen the hose clamp where the intake hose connects to the mass-air sensor.
Carefully unplug the power cable from the mass-air sensor (held in place by a small spring-clip) and remove the wire from
the mass-air sensor (hooked to a small bracket with a plastic clip).
6) Un-hook the vacuum hoses from the mass-air bracket. Do not remove them from the vehicle.
7) Remove the mass-air sensor and airbox as an assembly.
8) Unclip the airbox lid and remove the air filter.
9) Remove the nuts holding the mass-air sensor to the airbox (there are metal locking tabs over the nuts that must be bent
out of the way with a straight-bladed screwdriver).
10) Remove the foreign-object-deflector screen and separate the mass-air sensor from the airbox.
**CAUTION** The honeycomb material in the mass-air sensor is very fragile. Be careful not to damage it.
11) Remove the 4 studs from the mass-air sensor. If you thread two nuts on to the stud, and tighten them together, you can
then back the stud out with the bottom nut.
fig. 2
fig. 1
2
12) Install the K&N filter adapter onto the mass-air sensor using the stock gasket and four allen bolts. Use a thread locking
compound and do not over-tighten the bolts. (see fig. 2)
13) Install the "L" bracket onto the 20mm bolt using the nylock nut provided, but do not completely tighten at this time. (see fig. 3)
fig. 3
fig. 4
14) Remove the bolt holding the air conditioning lines to the fenderwell. If the vehicle is not equipped with A/C, the hole will be
empty. (see fig. 4)
15) Install the mass-air / adapter assembly into the intake hose, but do not tighten the hose clamp at this time.
16) Use the original bolts to secure the mass-air bracket and the "L" bracket, to the fenderwell. If the vehicle is not equipped
with A/C, use a supplied allen bolt to secure the "L" bracket.
17) Tighten the nut on the "L" bracket, at the adapter, and the hose clamp on the intake hose.
18) Re-connect the vacuum hoses to the mass-air bracket.
19) Plug the power cable in to the mass-air sensor and secure the wire to the sensor with the plastic clip.
20) Install the K&N Filtercharger® onto the adapter, do not over-tighten hose clamp!
21) Install the inter-cooler tubes back into the vehicle.
22) Re-connect the battery cable. Double check to make sure everything is tight and properly positioned before starting the
vehicle.
23) The C.A.R.B. exemption sticker, (attached) must be placed in a visible area under the hood, so that an emissions inspector
can see it when the vehicle is required to be tested for emissions. California requires testing every two years, other states
may vary.
24. It will be necessary for all FIPK’s to be checked periodically for realignment, clearance and tightening of all connections.
Failure to follow the above instructions or proper maintenance may void warranty.
*FREE K&N DECAL To register your warranty, please see us online at knfilters.com/register. FREE K&N DECAL*
ROAD TESTING
Start the engine with the transmission in neutral or park, and the emergency brake on. Listen for any air leaks or odd noises. If
there are air leaks, make sure the hose connections are secure. If there are any odd noises, check for the cause and repair before
proceeding. The K&N Filtercharger® Injection Performance Kit will function identically to the factory air filter with the exception of
being slightly louder than stock and much more responsive. If all preliminary checks are okay, then a road test is necessary.
Listen carefully for rattling or other odd noises and fix as necessary. If the road test is fine, you can enjoy driving as normal with
the added response and power. We suggest that the Filtercharger® element be checked periodically for dirt. This is now very
easy due to the open element configuration. If the filter material is overly dirty, service it according to the instructions that are in
the Recharger service kit, part number 99-5050 or 99-5000. If you have any questions or problems, inquire at your nearest K&N
dealer, or direct to K&N Engineering at (909) 684-9762.
PARTS LIST
A
B
C
D
E
F
G
desc
6mm -1.00 x 16mm allen bolt
6mm -1.00 x 20mm allen bolt
6mm -1.00 nylock nut
"L" bracket
die-cast filter adapter
size 104 hose clamp
Filtercharger® element
qty
4
1
1
1
1
1
1
part#
07818
07852
07553
07868
08842
08697
RC-2960
17785a
1/27/04
3