1
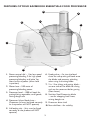
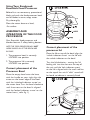
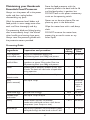
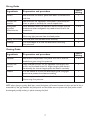
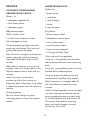
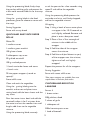
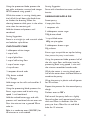
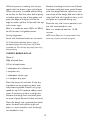
Essentials
Food Processor
UE GO
ME GO
OD NA
OD VAL
KFP80
2
Issue 1/03
Welcome to Kambrook
and your new Essentials
Food Processor.
Before attaching or detaching any parts
ensure that the power supply is turned
off and the power plug disconnected
from the power supply.
Do not use this processor for anything
other than food or beverage preparation.
Do not process boiling liquids, let cool
before placing into processing bowl.
Make sure the motor and blade have
completely stopped before disassembling.
The appliance is not intended for use by
young children or infirm persons without
supervision.
Close supervision is required at all times
when operating the appliance near children.
Young children should be supervised to
ensure that they do not play with the
appliance
Do not let the cord hang over the edge
of a table or counter, touch hot surfaces
or become knotted.
Do not place on or near a hot gas burner,
electric element, or in a heated oven.
This appliance is suitable for domestic
use only. Do not use this appliance for
anything other than its intended use.
Do not use outdoors.
The installation of a residual current
device (safety switch) is recommended
to provide additional safety protection
when using electrical appliances. It is
advisable that a safety switch with a
rated residual operating current not
exceeding 30mA be installed in the
electrical circuit supplying the
appliance. See your electrician for
professional advice.
Regularly inspect the power cord,
plug and actual appliance for any
damage. If found damaged in any
way, immediately cease use of the
appliance and return the entire
appliance to the nearest authorised
Kambrook Service Centre for
examination, replacement or repair.
At Kambrook we believe that the safe
performance of our products is the first
priority in any consumer product so that
you, our valued customer, can confidently
use and trust our products.
We ask that any electrical appliance you
use be operated in a sensible fashion with
due care and attention placed on the
following important operating instructions:
READ ALL INSTRUCTIONS
THOROUGHLY BEFORE
ACTIVATING THE APPLIANCE
AND RETAIN THEM FOR
FUTURE REFERENCE.
Ensure that the power source to be used
is the same as the voltage requirements
of the product.
Switch off then unplug from the power
outlet when not in use and before cleaning.
Do not immerse the power cord, plug or
processor body in water or any form of
liquid.
Place the appliance on a dry, level surface.
WARNING: Blades must be handled
carefully as they are sharp!
Care is needed when handling the
processing blade and the slicer/grater blade.
Ensure the food processor lid is securely
locked in place before operating.
Do not remove processing bowl from the
motor base whilst processor is in operation.
Do not place your hands or utensils in
the processing bowl while the processor
is operating.
Do not place hands in the processor bowl
unless the unit is switched off and then
disconnected from the power outlet.
Switch off the power supply and then
unplug the unit from the power outlet
before removing any parts including
blades, bowl & lid.
2
Please call 1800 800 634 for Service
Centre details.
FEATURES OF YOUR KAMBROOK ESSENTIALS FOOD PROCESSOR
6
3
4
9
5
1
8
2
10
1. Power control dial – 1 for low speed
processing/blending, 2 for high speed
processing/blending and ‘pulse’ for
short bursts of power (when held
in position)
6. Food pusher – fits into the food
chute for safe pushing of foods onto
the blades and prevents splashing
when using the mixing blade.
7. 2 in 1 fine slicing and grating blade –
use one side of the blade for slicing
and use the reverse side for grating
(Not shown).
2. Motor base – 550 watts of
processing/blending power
3. Processor bowl – 1000 ml bowl for
grating/slicing vegetables, small goods,
mixing doughs etc
8. Stainless Steel Processing blade
– use for chopping fresh meat,
mixing doughs etc
4. Processor lid and food chute –
(Processor lid must be fitted correctly
or the product will NOT operate)
9. Processor drive shaft
10. Non-skid feet – for stability
5. Lid locking tab – (this must be fitted
correctly or the product will NOT
operate)
3
Using Your Kambrook
Essentials Food Processor
Before first use remove any promotional
labels and wash the food processor bowl
and all blades in warm, soapy water.
Dry thoroughly.
Place the motor base on a level,
flat surface.
ASSEMBLY AND
OPERATION OF THE FOOD
PROCESSOR
Your Essentials, food processor and
blender features 2 safety locking devices.
Fig.1
NOTE:THE FOOD PROCESSOR WILL NOT
WORK UNLESS ALL OF THE BELOW ARE
IN PLACE:
Correct placement of the
processor lid
1. The processor bowl is correctly
LOCKED into position
Place the lid on top of the bowl, align the
‘unlock indicator arrow’ on the lid with
the unlock indicator on the bowl.
2. The processor lid is correctly
LOCKED into position
Turn the lid clockwise – moving the ‘lid
locking tab’ into the slot near the top of
the unit until the ‘lock indicator arrow’
on the lid is aligned with the small red line
on the top of the unit. A “click” sound will
be heard, to indicate is correctly fitted.
Correct placement of the
Processor Bowl
Place the empty bowl onto the base,
with the handle on your right align the
arrow on the lower edge of the bowl
with the ‘unlocked indicator arrow’ on
the motor base. Turn the bowl clockwise
until the arrow on the bowl is aligned
with the ‘locked indicator arrow’ on the
motor base. ( refer fig. 1)
Fig.2
4
Attaching the slicer/grater
blades and the processor blade
For short bursts of power, whilst
processing, use the “PULSE” setting.
Using the processor blade:
Place/insert the processor blade over the
processor drive shaft and push down.
For slicing and grating – ensure that the
food items you want to slice or grate are
of a suitable size to be fed through the
food chute.
Using the slicer/grater blades:
Place the slicing/grating blade over the
shaft adaptor.
The blade is correctly in place, when the
square opening of the slicer/grater blade
fits over the square shaft adaptor.
Place the food inside chute and push
down with the ‘food pusher’.
Never push down any foods with your
hands and do not put your hands down
the food chute at any time during
processing.
How to select the slicing or grating
side of the blade
To select the grater have the raised
grating ridges facing up towards the lid.
For using the processing blade – with the
ingredients inside the processor bowl,
start the unit on low speed (1) moving to
the higher speed (2) if necessary. Before
commencing ensure that the ‘food pusher’
is in place to avoid splashing from the
food chute. Ingredients can be added
through the food chute whilst processing.
To select the slicer have the protruding
side of the slicer blade facing up towards
the lid.
All blades must be handled carefully
as they are sharp!
If ingredients stick to the sides of the
processor bowl during processing, turn
the speed to the Off (0) position, switch
off at the power outlet, then push the
food back onto the blades using a plastic
spatula to scrape down the sides of the
bowl.Then recommence blending.
The Essentials Food Processor will not
operate unless the processing bowl, and
lid are correctly locked into position.
Ensure the speed dial is in the Off (0)
position.
Plug into a 230/240 volt power outlet.
Turn power on.
The processor is now ready to use.
NOTE: Do not over fill the processor bowl when
mixing liquids – do not fill above the bowls “MAX”
fill line.
To begin processing/slicing/grating turn
the ‘Power Control Dial’ from the Off (0)
position to either the Low (1) or High (2)
speed, depending on your requirements.
The speed can be changed at any time
during the process.
When processing is complete, turn to the
Off (0) position.Wait until blades have
stopped rotating before removing the lid,
blades or processor bowl.
5
Maintaining your Kambrook
Essentials Food Processor
Store the food processor with the
processing blade in the bowl and the lid
and the food pusher in position, but
DO NOT lock as this places unnecessary
strain on the operating switch.
Always turn the power off at the power
outlet and then unplug before
disassembling any parts.
Never use an abrasive cleaner. Do not
place any parts in the dishwasher.
Wash the processor bowl, blades and
food pusher in warm soapy water after
each use. Rinse thoroughly and dry.
Wipe the motor base with a soft, damp
cloth.
The processing blade and slicing/grating
discs are extremely sharp! Use caution
when handling and storing these parts.
Always store the processing blade with
the protective covers provided.
DO NOT immerse the motor base,
power plug or cord in water or any
other liquid.
Processing Guide
Speed
setting
Approx.
time
Roughly cut food before placing into
the processing bowl (max. 500g) and process.
1 or 2
30–60 sec
Raw meat, chicken
and fish fillets
Trim meat of any bones, gristle or fat. Cut the
ingredients to approx 25mm cubes. Place into
the processing bowl (max 500g) and process.
2
15–30 sec
Herbs
Remove stalks if necessary. Process up to 3 cups
of herbs.The bowl will need to be scraped down
during operation.
1
30 sec
Breadcrumbs or
biscuit crumbs
Break up the bread or biscuits into small pieces
1
30 sec
Nuts
(shells removed)
Place up to 2 cups
2
30 sec for
crushed,
longer to
form a
paste
Hard boiled eggs
Peel and halve the eggs.
Pulse
30–40 sec
Cooked soups
and sauces
Place up to 2 cups of liquid.
2
30 sec
Pastry
Process butter and flour to resemble
breadcrumbs, add liquids to form a ball, do not
over-process. (max 4 cups at a time)
1 or 2
30–60 sec
Bread dough
Place all dry ingredients into the processing bowl,
add liquids through the feed chute to form a ball
2
15–30 sec
Ingredients
Preparation and procedure
Fruit, vegetables
and cooked meats
6
Slicing Guide
Speed
setting
Ingredients
Preparation and procedure
Onions
Peel and halve the onions, place them down the food chute
and slice
1
Carrots and
zucchini
Peel and wash the vegetables. Place food in horizontally for
slices or place in vertically for round shaped slices
1
Small goods
eg salami,
prosciutto etc.
Small diameter salami and cabanossi will fit straight into the
food chute; other smallgoods may need to be cut to fit the
food chute.
1 or 2
Mushrooms
Place the mushrooms on their sides in the food chute.
Slice using light pressure from the food pusher
1
Celery and rhubarb Trim and pack into the food chute vertically
1
Cabbage
2
Cut into wedges to fit into the food chute, slice using
firm pressure.
Grating Guide
Speed
setting
Ingredients
Preparation and procedure
Potatoes
Peel and cut the potatoes into pieces that will fit into the
food chute, grate using firm pressure
Carrots and
zucchini
Wash and peel carrots, cut any vegetable into lengths that
will fit into the food chute. For longer lengths place food in
horizontally, for shorter lengths place the food in vertically.
1
Cheese
Cut the cheese to fit into the food chute, grate using light
pressure to prevent the cheese crumbling.
1
Chocolate
Break into pieces that will fit into the food chute.
Grate using firm pressure.
2
1 or 2
NOTE: when slicing or grating food items some food pieces will remain between the disc and the lid, this is
unavoidable. If the gap between the food pusher and the blades was not present the food pusher would
be damaged possibly resulting in plastic entering the food.
7
RECIPES
MINESTRONE SOUP
COCONUT, PUMPKIN AND
GINGER PASTA SAUCE
Makes 2 Lt
Makes 1 Lt.
1 small Leek
1 tablespoon vegetable oil
1 stick of celery
1 small brown onion
1 carrot
1 tablespoon ginger
4 ripe tomatoes
500g diced pumpkin
50 g Butter
100 ml chicken stock
2 bacon rashers sliced
1 x 410 ml can of coconut cream
2 tablespoons tomato paste
Salt and pepper to taste
1 litre chicken stock
Using the processing blade, chop the
onion into small pieces.Then with the
grating blade, grate the ginger.
1
1 brown onion
⁄4 cup Parmesan cheese
⁄4 bunch parsley chopped
1
⁄4 Clove garlic finely sliced
1
Heat the oil in a saucepan and saute the
onions, and ginger without browning
them. Add the pumpkin and stir for 2
minutes
Add sufficient water to just cover the
pumpkin, cook until the pumpkin is soft.
Add the coconut cream, stock and stir
through.
Allow the sauce to cool before
transferring half of the mixture to
processing bowl and process using speed
2, repeat the process with the remaining
mixture.
Serving Suggestion
Toss the sauce through any pasta
including gnocchi or serve with grilled
chicken.
Clean and wash the vegetables.
Using the slicing blade, slice the onion,
leek and celery. Remove from processing
bowl.
Using the grating blade, grate the carrot.
Remove from processing bowl.
Using the processing blade, puree the
tomatoes until liquefied, using speed 2.
Melt the butter in a saucepan, add half
the sliced bacon, and cook for a few
minutes.
Add the sliced vegetables to the saucepan
and saute them gently. Add the tomato
paste, pureed tomatoes and stock, bring
to the boil. Reduce heat and simmer for
30 minutes.Then add the remaining
bacon and salt and pepper to taste.
Simmer for 10 minutes.
8
Using the processing blade, finely chop
the parsley, add the garlic and process for
a few more seconds. Add this to the soup
mixture.
Using the grating blade in the food
processor, grate the cheese to serve with
the soup.
Serving Suggestion
Serve with crusty bread
QUICK AND EASY RICE PAPER
ROLLS
Makes 20
1 medium carrot
1 medium green zucchini
100 g bean shoots
crush the peanuts for a few seconds using
speed 2 and add to the vegetable
mixture.
Using the processing blade process the
coriander and mint, until finely chopped,
add to the vegetable mixture.
Wrapping
Step 1: Using a bowl of warm water place
a wrapper in for 10-15 seconds or
until slightly softened. Remove and
place it onto a damp tea towel.
Step 2: Place a 5cm x 2cm rectangle of
mixture in the middle of the
wrapper
Step 3: Fold the sides of the wrapper
across the mixture.
100 g unsalted peanuts
Step 4: Fold the end (end closest to you)
of the wrapper over the mixture,
tighten and roll until tightly
wrapped.
⁄2 bunch coriander leaves and stems
Repeat the process for all the wrappers.
⁄2 bunch mint
Serving Suggestion
20 rice paper wrappers (round or
square)*
Serve with sweet chilli sauce
2 tablespoons soy sauce
50 g dried vermicelli
1
1
Sweet chilli sauce
Clean and wash the vegetables.
Using the grating blade, grate the
zucchini and carrot and place into a
mixing bowl; add the bean shoots and the
soy sauce.
Pour hot water into a bowl and add the
vermicelli, soften it for 5 minutes, drain
the water and cut the noodles into small
lengths; add them to the vegetable
mixture.
Using the processing blade, coarsely
*Rice paper wrappers are available from most
supermarkets in the Asian food section.
CHICKEN AND BROCCOLI
LASAGNE
Serves 4
1 brown onion
500g chicken, diced
2 cloves of garlic
1 tablespoon oil
500ml tomato pasta sauce
1 head of broccoli
9
_ bunch of oregano, chopped
ZUCCHINI BAKE
150g tasty cheese
Serves 4
200g packet of fresh lasagne pasta or
precooked dried packet sheets
3 medium zucchinis
Using the slicing blade, slice the onion.
250 ml cream
Place the diced chicken and garlic into
the processor bowl and process using
speed 2 until the chicken is minced.
3 slices of stale bread (crusts removed)
Heat the oil in a frypan and cook the
onion until soft, then add the chicken
mince, stir until cooked. Add the tomato
pasta sauce and oregano and return to
the boil, reduce heat and simmer for 10
minutes.
Using the slicing blade, slice the zucchini;
layer the zucchini into an ovenproof dish.
Cut the broccoli into florets and cook
(boil or steam) for 1 minute. Drain and
run under cold water to refresh.
Using the grating blade, grate the cheese
and set aside.
Using an oven proof lasagne dish
assemble the lasagne with half of the
chicken and tomato mixture in the base
of the dish. Place 1 layer of pasta on top.
Then place the broccoli and half of the
cheese, then place another layer of pasta.
Add the remaining chicken mixture on
top, then another layer of pasta, sprinkle
top with remaining cheese.
Bake in a moderate oven (180°c) for 20
minutes
1 tablespoon grain mustard
Salt and pepper to taste
Using the processing blade, process the
stale bread using speed 2 until the
mixture resembles fine crumbs.
Whisk the cream and mustard together
and pour over the zucchini. Sprinkle the
top with breadcrumbs, salt and pepper.
Bake at 200°c for 30 minutes until golden
Serving Suggestions
Serve as an accompaniment to grilled
chicken or fish.
CAESAR SALAD DRESSING
Makes 1 Lt
4 egg yokes
10 anchovy fillets
2 tablespoons grain mustard
2 tablespoons white vinegar
700 ml peanut oil
⁄3 cup white wine
1
TIP:The lasagne can be pre-prepared and kept in
the fridge until you are ready to cook. If the
lasagne has been stored in the fridge place foil
over the lasagne and cook for 20 minutes before
removing the foil and cooking as instructed above.
100 g grated Parmesan cheese
Using the grating blade, grate the cheese
and set aside.
Serving Suggestion
Serve with a tomato salad.
10
Using the processor blade, process the
egg yolks, anchovies, mustard and vinegar
for 30 seconds using speed 1.
While the motor is running slowly pour
the half of the oil down the food chute
to thicken the dressing.When the
dressing becomes thick, pour in the white
wine, then the remaining oil.
Add the cheese and process until
combined.
Serving Suggestions
Serving Suggestion
Serve with chocolate ice cream and fresh
berries
FARMHOUSE APPLE PIE
Sweet pastry
4 cups plain flour
1 teaspoon salt
3 tablespoons castor sugar
250g butter, diced
⁄2 cup chilled water
1
Store in an airtight jar and use with salads
and coleslaw style dishes.
CHOCOLATE CAKE
1 tablespoon white vinegar
1 cup of milk
1 cup of plain flour
1 cup of self-raising flour
1 cup of castor sugar
⁄4 cup of coca
3
⁄2 teaspoon bi-carb soda
1
125g butter melted
3 x 70g eggs
Add vinegar to the milk and stand for 5
minutes.
Using the processing blade, process the
flours, sugar, cocoa and bi-carb using
speed 1 until combined.
Add the melted butter, eggs and milk,
process until combined, do not over mix.
Pour the mixture into a greased 20-cm
cake tin.
600g can pie apples
2 tablespoons brown sugar
50g sultanas
Extra sugar to sprinkle on top for baking.
Note: process the pastry in two batches.
Using the processor blade, process half of
the salt, sugar, flour and butter into the
processing bowl using speed 1, mix until
the mixture resembles breadcrumbs.
While the motor is running slowly pour
half of the water down the food chute to
combine the pastry.
Wrap the pastry in plastic and refrigerate
for 20 minutes.
Repeat the process for the second pastry
dough.
Preheat oven to 200°c
Roll one of the pastry balls on a lightly
floured surface until approximately 4mm
thick and 25cm in diameter. Use the
pastry to line a 20cm flan tin and blind
bake for 15 minutes.
Bake in a moderate oven (180-200°) for
40 minutes or until cooked.
11
While the pastry is cooking mix the pie
apples with the brown sugar and sultanas.
When the pastry is cooked add the filling
to the flan tin. Roll the other ball of pastry
as before, place on top of the apples, and
press the edge of the pastry lid to the
edge to make a perfect fit. Sprinkle the top
with castor sugar.
Remove the dough and cut into 4, flatten
the pieces and place some grated cheese
onto the dough fold the top corner into
the centre of the dough; fold each side to
meet itself and roll inwards to form a roll
and place on a greased baking tray.
Bake in a moderate oven (180°c to 200°c)
for 40 minutes until golden brown.
Bake in a moderate oven for 15–20
minutes.
Serving Suggestions
NOTE: other fillings can be incorporated in the
same way i.e. pesto, mustard, and grains.
Place the tray into a warm position until
the rolls have doubled in size.
Serve with thickened cream or ice cream.
Tip:To blind bake effectively, place a layer of
greaseproof paper over the pastry and fill with
uncooked rice.This will stop the pastry from rising
during cooking
CHEESY BREAD ROLLS
Makes 4
500g of bread flour
310 ml of tepid water
1 tablespoon of sunflower oil
1 teaspoon salt
1 tablespoon white sugar
13⁄4 teaspoon dry yeast
Place the water, oil, and then all the dry
ingredients to the processing bowl with
the processing blade. Process using high
speed for up to 25 seconds, adding more
water if necessary to form a dough ball.
Remove the dough from the bowl place
on onto a lightly floured surface to knead.
Place the dough into a greased glass bowl,
cover the bowl with plastic wrap and
place in a warm position until the dough
has doubled in size.
12
YOUR RECIPES
13
YOUR RECIPES
14
Kambrook 12 Month
Replacement Warranty
KAMBROOK warrants the purchaser
against defects in workmanship and
material, for a period of 12 months from
the date of purchase (3 months
commercial use).
Guarantee and purchase receipt for this
product are to be retained as proof of
purchase and must be presented if making
a claim under the terms of the
KAMBROOK guarantee.
KAMBROOK reserves the right to
replace or repair the appliance within
the warranty period.
Warranty does not apply to any defect,
deterioration, loss, injury or damage
occasioned by, or as a result of the misuse
or abuse, negligent handling or if the
product has not been used in accordance
with the instructions.The guarantee
excludes breakages and consumable items
such as kneading blades.
This warranty is void if there is evidence
of the product being tampered with by
unauthorised persons.
If the product includes one or a number of
accessories only the defective accessory or
product will be replaced.
In the event of KAMBROOK choosing to
replace the appliance, the guarantee will
expire at the original date, ie. 12 months
from the original purchase date.
In Australia, this KAMBROOK Guarantee
is additional to the conditions and
guarantees which are mandatory as
implied by the Trade Practices Act 1974
and State and Territory legislation.
For service, spare parts or product
information in Australia, please call
KAMBROOK on the customer Service
Line (free call) 1800 800 634.
For service, spare parts or product
information in New Zealand,
please call KAMBROOK New Zealand,
Greenmount, Auckland Phone 09 271 3980
Fax 0800 288 513. For spare parts phone
09 271 3980.
If claiming under this guarantee the product
must be returned to freight prepaid.
YOUR PURCHASE RECORD (Please complete)
Attach a copy of purchase
receipt here.
DATE OF PURCHASE______________________________________________________
MODEL NUMBER ________________________________________________________
SERIAL NUMBER (If applicable) ______________________________________________
Please don’t return purchase record
PURCHASED FROM ______________________________________________________
until you are making a claim
Kambrook 4 Kingston Town Close Oakleigh,Victoria 3166, Australia
Customer Service Line (free call) 1800 800 634 Customer Service Fax 1800 621 337
Kambrook New Zealand, Private Bag 94411, Greenmount, Auckland, New Zealand
Customer Service Line/Spare Parts 09 271 3980 Customer Service Fax 0800 288 513
UE GO
ME GO
OD NA
OD VAL
Due to continual improvement in design or otherwise, the product you purchase may differ slightly from the illustrations in this book. Issue 1/03