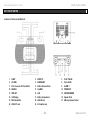
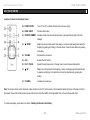
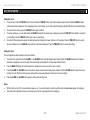
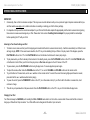
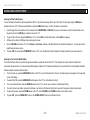
1
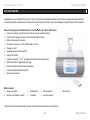
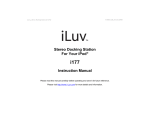
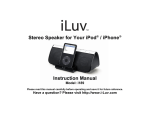
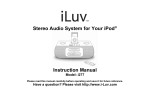
Stereo Audio System for Your iPod®
Instruction Manual
Model: i177
Please read this manual carefully before operating and save it for future reference.
Have a question? Please visit http://www.i-Luv.com
Stereo Audio System for Your iPod
V10M10_IM_EN_10192006
USER SAFETY GUIDE
INSTRUCTIONS ON ENVIRONMENT PROTECTION
Do not dispose of this product in the usual household garbage at the end of its life cycle; bring it to a collection point for the recycling of
electrical and electronic appliances. This symbol on the product means the instructions for use or the packing will inform about the methods
for disposal. The materials are recyclable as mentioned in its marking. By recycling, material recycling, or other forms of re-utilization of old
appliances, you make an important contribution to protect the environment. Please inquire at your local community administration for the
authorized disposal location.
FCC RULES
This device complies with Part 15 of the FCC Rules. Operation is subject to the condition that this device does not cause harmful interference.
Do not make changes or modify the device in any way. Changes or modifications not expressly approved by the party responsible for compliance
could void the user’s authority to operate the equipment.
IMPORTANT SAFETY WARNINGS
1. Before using the player, please ensure that your local AC voltage is suitable for this unit.
2. To prevent fire or electric shock, do not expose the unit to rain or moisture.
3. Never attempt to open the cabinet. Always refer servicing to a qualified technician.
IMPORTANT SAFETY INSTRUCTIONS
1. READ INSTRUCTIONS – All the safety and operating instructions should be read before the appliance is operated.
2. RETAIN INSTRUCTIONS – The safety and operating instructions should be retained in a secure place for future reference.
3. HEED WARNINGS – All warnings on the appliance and in the operating instructions should be observed.
4. FOLLOW INSTRUCTIONS – All operating and use instructions should be followed.
5. WATER AND MOISTURE – The appliance should not be used near water. For example: near a bathtub, kitchen sink, laundry tub, and/or swimming
pool.
6. HEAT – The appliance should be situated away from heat sources such as radiators, heat registers, stoves, or other appliances (including amplifiers)
that produce heat.
-1-
www.i-Luv.com
Stereo Audio System for Your iPod
V10M10_IM_EN_10192006
USER SAFETY GUIDE
IMPORTANT SAFETY INSTRUCTIONS – CONTINUED
7. POWER SOURCES – The appliance should be connected to a power supply only of the type described in the operating instructions or as marked on
the appliance itself.
8. CLEANING – The appliance should be cleaned with a dry cloth.
9. OBJECT AND LIQUID ENTRY – Care should be taken so that objects do not fall and liquids are not spilled into the device’s openings.
10. CARTS AND STANDS – The appliance should be used only with a cart or stand that is recommended by the manufacturer. An
appliance and cart combination should be moved with care. Quick stops, excessive force, and uneven surfaces may cause the
appliance and cart combination to overturn.
11. DAMAGE REQUIRING SERVICE – The appliance should be serviced by qualified service professional when:
a. The power supply cord or plug has been damaged.
b. Objects have fallen into, or liquid has been spilled into the appliance’s apertures.
c. The appliance has been exposed to rain.
d. The appliance has been dropped and suffered damage.
e. The appliance does not appear to operate normally or exhibits a change in performance.
12. SERVICING – The user should not attempt to service the appliance beyond what is described in the user's operating instructions. All other servicing
should be referred to qualified service professional.
13. BATTERY USAGE – To prevent battery leakage, which may result in bodily injury, property damage or damage to the unit, follow these instructions:
a. Install all batteries correctly according to the polarity (+/-) as marked on the unit.
b. Do not mix old and new batteries, carbon and alkaline, etc.
c. Remove batteries from the unit when the device will not be used for an extended period of time.
14. LEAD AND MERCURY – This product may contain lead and/or mercury. Disposal of these materials may be regulated by your local authorities due to
environmental considerations. For more detailed disposal or recycling information, please contact your local authorities or the EIA (Electronic Industries
Alliance) – http://www.eiae.org
-2-
www.i-Luv.com
Stereo Audio System for Your iPod
V10M10_IM_EN_10192006
USER SAFETY GUIDE
FCC NOTICE (USA)
This equipment has been tested and found to comply with the limits for a Class B digital device, pursuant to Part 15 of the FCC Rules. These limits are
designed to provide reasonable protection against harmful interference in a residential installation. This equipment generates, uses, and can radiate radio
frequency energy and, if not installed and used in accordance with the instructions, may cause harmful interference to radio communications. However,
there is no guarantee that interference will not occur in a particular installation. If this equipment does cause harmful interference to radio or television
reception, which can be determined by turning the equipment off and on, the user is encouraged to try to correct the interference by one or more of the
following measures:
1. Reorient or relocate the receiving antenna.
2. Increase the separation between the equipment and receiver.
3. Connect the equipment into an outlet on a circuit different from that to which the receiver is connected.
4. Consult the dealer or an experienced radio/TV technician for help.
-3-
www.i-Luv.com
Stereo Audio System for Your iPod
V10M10_IM_EN_10192006
TABLE OF CONTENTS
Getting Started
General features ……………………………………………………………………………………………………………………………………………...…
5
Installing the AC adapter…………….……………………………………………………………..………………………………………………………..…
6
Installing the backup battery for clock and alarm settings ………………..……………………….……………………………………………………….
6
Installing the remote control battery ….....………………………………………………………………………………………………………….…………
7
Installing the AM loop antenna ………………………………………………………………………………………………………………………….……..
7
Installing the dock adapter ……………………………………………………………………………………………………………………………………..
7
Location of controls on the main unit ……………………………………………………………………………………………………………….…...……
8
Location of controls on the remote control …………………………………………………………………………………………………………………...
9
Location of indications on the LCD screen …...……………………………………………………………………………………………………………..
10
Setting the clock time …….....…………….…………...……………………………………………………………………………………………………….
11
Setting the alarm time ………………………………………………………………………………………………………………………………………..…
11
Operational Instructions
Listening to your favorite songs on iPod ……………………………………………………………………………………………………………………..
12
Charging your iPod …………………………………………………………………………………………………………………………………………….
12
Listening to other audio devices ………………………………………………………………………………………………………………………………
13
Listening to your favorite radio stations ………………………………………………………………………………………………………………………
13
Using the alarm function ……………………………………………………………………………………………………………………………………….
14
Adjusting the brightness of LCD screen ………...……………………………………………………………………………………………………………
14
Setting the sleep time …………………………………………………………………………………………………………………………………………..
15
Maintenance & Troubleshooting Guide ……………………………………………………………………………………………………………..…………..
16
-4-
www.i-Luv.com
Stereo Audio System for Your iPod
V10M10_IM_EN_10192006
GETTING STARTED
Congratulations on your purchase of the new iLuv i177 for your iPod. Uniquely designed to work with your iPod, this iLuv stereo audio system with built-in
universal dock provides advanced audio and radio performance that brings out the best in your music. Remember to keep this manual for future reference.
Enhance Your Enjoyment of the Music Stored on Your iPod® with iLuvTM Stereo Audio System
•
Enhance the richness of your iPod sound with jAuraTM acoustic speaker technology
•
Powerful built-in speakers allow you to hear music with depth and clarity
•
Digital clock display with dual alarm
•
Fall asleep or wake up to your iPod, AM/FM radio, or buzzer
•
Charges your iPod
•
Integrated universal dock for your iPod
•
Supports iPod shuffle
•
Auxiliary line input for 1 and 2 generations of the iPod and other audio devices
•
AM/FM radio with PLL digital tuning technology
•
External loop antenna provides better AM reception
•
Liquid crystal display with white backlight
•
Remote control included
st
nd
What’s included?
•
Stereo audio system
•
Dock adapters
•
AM loop antenna
•
Remote control (Battery included)
•
AC adapter
•
Instruction manual
•
Warranty card
* Made for iPod with video (30GB, 60GB), iPod nano, iPod shuffle, iPod mini, iPod 4G, and iPod 3G only.
-5-
www.i-Luv.com
Stereo Audio System for Your iPod
V10M10_IM_EN_10192006
GETTING STARTED
Installing the AC Adapter
Locate the AC adapter jack on the back of the unit. Insert the AC adapter cable into this jack, and then plug the AC adapter into the wall outlet.
Installing the Backup Battery for Clock and Alarm Settings
In order to offer consistent clock settings and alarm functions, the i177 uses a backup battery system. This means that in the event of a power failure, all the
settings of i177 will remain saved. For example, after the installation of the Backup Battery, the AC cord is disconnected or a power failure occurs, the
display will NOT remain lit, but the time and date settings will be temporarily maintained. The alarm, however, will not sound when the i177 is powered only
by the Backup Battery. To install Backup Battery, follow the instructions below:
1.
Make sure the connection between the AC adapter and the unit is secure. This is important because during battery replacement it is possible for all
settings to be lost if clock and alarm have already been set.
2.
3.
Locate the battery compartment on the bottom of the unit and open.
Insert 2 “AA” batteries, following the correct polarity (+/-) drawings inside the battery compartment. For longer battery life, alkaline batteries are
suggested. Please note that new and used batteries should not be mixed. Likewise, alkaline, standard (carbon-zinc) or rechargeable (nickel-cadmium)
batteries should not be used together.
4.
Secure the battery compartment by closing the cover.
Important Notes on Batteries
To prevent battery leakage, which may result in bodily injury, property damage or damage to the unit, follow these instructions.
•
Install all batteries correctly according to the polarity (+/-) as marked on the unit.
•
Do not mix old and new batteries, carbon and alkaline, etc.
•
Remove batteries from the unit when the device will not be used for an extended period of time.
Please dispose the used batteries properly according to your local government regulations.
-6-
www.i-Luv.com
Stereo Audio System for Your iPod
V10M10_IM_EN_10192006
GETTING STARTED
Installing the Remote Control Battery
The remote control battery has been previously installed and ready for operation for immediate use. When the remote control
stops functioning, you must replace the battery with a new one. To do so, locate the battery compartment on the side of the
remote and follow the steps below:
1.
Squeeze the notch labeled “Tab A” while pulling the “battery door latch B” out towards you. This will allow the battery
holder to release and pop out. Please refer to the picture on the right side.
2.
Insert a “CR2025” 3V lithium battery. Make certain to follow the correct polarity, following the directions of the
corresponding symbols (+/-).
3.
Secure battery and push the battery holder back into the remote control until fully inserted.
Installing the AM Loop Antenna
For AM radio operation, locate the AM antenna jack on the back of the unit. Plug the AM loop antenna into the connector. To achieve the best reception
possible, a distance of 12” between the AM antenna, the unit and the iPod is recommended.
Installing the Dock Adapter
To guarantee that your iPod will fit properly into the built-in universal dock, several detachable dock adapters for old iPod players are included with this
product. Please check the bottom of dock adapters to determine compatibility with your iPod.
1.
Inserting the dock adapter
a.
2.
Choose a dock adapter that corresponds with the iPod you would like to dock. Using the correct dock adapter ensures a proper fit.
b.
Gently push the dock adapter down into the universal dock.
c.
Carefully place your iPod into the universal dock. Please note that iPod must not be in a case or “Skin”.
Removing the dock adapter
a.
Remove your iPod, grasp the dock adapter and lift upwards carefully.
-7-
www.i-Luv.com
Stereo Audio System for Your iPod
V10M10_IM_EN_10192006
GETTING STARTED
Location of Controls on the Main Unit
1.
SLEEP
2.
WAKE TO
3.
PLAY / PAUSE
4.
VOLUME
5.
BAND/RADIO
6.
iPod / shuffle
7.
9-Pin Connector for iPod shuffle
8.
Built-in Universal Dock
9.
ALARM 1
10. SEARCH
11. ALARM 2
12. POWER OFF
13. TIME SET
14. AUX
15. SNOOZE/DIMMER
16. LCD Display
17. Battery Compartment
18. Speaker Ports
19. FM Antenna Wire
20. LINE-IN Jack
21. AM Loop Antenna Socket
22. LINE-OUT Jack
23. AC Adapter Jack
-8-
www.i-Luv.com
Stereo Audio System for Your iPod
V10M10_IM_EN_10192006
GETTING STARTED
Location of Controls on the Remote Control
24. POWER ON/OFF
Turns i177 on/off or switches off alarm when alarm is sounding.
25. BAND / RADIO
Chooses radio function.
26. SNOOZE / DIMMER
Activates snooze mode when the alarm sounds. It also adjusts the strength of the LCD
backlight.
27. / DOWN
Skips to the previous track when iPod is playing, or scans currently playing track toward the
beginning by pressing and holding, In the radio mode, it tunes the radio stations by pressing
and holding.
28. VOLUME -
Decreases the volume level.
29. AUX
Enables the AUX function.
30. PLAY / PAUSE
Selects iPod and plays a track. In the play mode, it is used to pause the playback.
31. / UP
Skips to the next track when iPod is playing, or scans currently playing track toward the end
by pressing and holding, In the radio mode, it tunes the radio stations by pressing and
holding.
32. VOLUME +
Increases the volume level.
Note: The included remote control commands all basic functions on the i177. Aim the remote control toward the bottom right corner of the main unit for the
best results. Please note that the provided remote control cannot control iPod shuffle, the first generation iPod, or the second generation iPod.
To install a new battery, please refer to the section “Installing the Remote Control Battery”.
-9-
www.i-Luv.com
Stereo Audio System for Your iPod
V10M10_IM_EN_10192006
GETTING STARTED
Location of Indications on the LCD Screen
Sleep Indicator
Alarm 1 Armed
- 10 -
www.i-Luv.com
Stereo Audio System for Your iPod
V10M10_IM_EN_10192006
GETTING STARTED
Setting the Clock
1.
To set the time, locate the TIME SET button. Press and hold the TIME SET button down until the display begins to flash. Rotate the SEARCH wheel
until the desired time is displayed. Time is displayed in the 12-hour format. An icon to the right of the display indicates PM, but there is no AM indicator.
2.
To secure the time setting, press the TIME SET button again to confirm.
3.
To set the correct year, you may either rotate the SEARCH wheel until the present year is displayed or press the TIME SET button initially to accept the
current setting. Press the TIME SET button again to secure year setting.
4.
Once the first three steps are complete, the date display will be flashing in the lower right corner of the display. Press the TIME SET button to accept
the current setting or turn the SEARCH wheel until the current date is displayed. Press the TIME SET button to secure date setting.
Setting the Alarm
This unit supports two alarm settings for dual alarm feature.
1.
To set the Alarm, press and hold the ALARM 1 or the ALARM 2 button until the display begins to flash. Rotate the SEARCH wheel until the desired
alarm time is displayed, an icon to the right of the time will light up indicating PM, but there is no indicator for AM.
2.
Press the WAKE TO button and select the option for desired alarm sound source: iPod, radio or buzzer.
3.
Press the ALARM 1 or ALARM 2 button to pre-set the volume level when the Alarm(s) is(are) activated. Use the VOLUME wheel to adjust the volume
level from 10 to 40. When the Alarm(s) is(are) activated, the volume will gradually rise from low to the pre-set setting.
4.
Press the ALARM 1 or ALARM 2 button again to exit the alarm setting mode.
Notes:
•
With the Alarm set, the i177 is now activated to wake you up. To ensure this setting, check to see if the alarm and wake icons appear on the display.
•
Take notice of the adjusted volume level and make sure it is set at an appropriate level for waking up.
- 11 -
www.i-Luv.com
Stereo Audio System for Your iPod
V10M10_IM_EN_10192006
OPERATIONAL INSTRUCTIONS
IMPORTANT:
1.
Occasionally, files on iPod can become corrupted. This may cause an erratic behavior with your iLuv products. Apple Computer recommends that you
visit their website www.apple.com to obtain instructions on resetting or restoring your iPod to factory settings.
2.
It is imperative that you use the correct dock adapter for your iPod and that the dock adapter fits appropriately into the built-in universal dock. Ignoring
these rules can cause severe damage to your iPod. Please refer to the section “Installing the Dock Adapter” to properly install the dock adapter
before operating the i177 with your iPod.
Listening to Your Favorite Songs on iPod
1.
To listen to music, make sure that your iPod is playing and inserted into the built-in universal dock correctly. It will then automatically turn ON and music
will begin to play. NOTE: If the sound seems inaudible, the i177 may not be detecting that your iPod is in the play mode. If this happens, press the
PLAY/PAUSE button on the i177 or the PLAY/PAUSE button on the Remote Control twice for music play to begin.
2.
To play music when your iPod is already in the dock and in the standby mode, press the PLAY/PAUSE button on the i177 or the PLAY/PAUSE button
on the Remote Control. When your iPod is in the play mode, an iPod icon will appear on the LCD screen of the i177.
3.
To pause music, press the PLAY/PAUSE button during the play mode. To resume playback, press it again.
4.
To adjust the volume, either rotate the VOLUME wheel on the i177, or use the VOLUME+ and VOLUME- buttons on the remote control.
5.
To go to the Next or Previous track, use the or button on the remote control. To search the current track using high speed forward or rewind,
press and hold the or buttons while track is playing.
6.
To power the unit off, press the POWER OFF button on the i177 (or on the remote control). If your iPod is left in the built-in universal dock, it will
continue to charge.
7.
This unit may not operate while in the pause mode. Press the PLAY/PAUSE button on the i177 or on your iPod to initiate the play mode.
Charging Your iPod
Your iPod will always be CHARGING, until reaching the FULL CHARGE mode while it is in the built-in universal dock. Please note that this unit cannot
charge your iPod without 30-pin connector. Your iPod shuffle can be charged with the built-in 9-pin connector.
- 12 -
www.i-Luv.com
Stereo Audio System for Your iPod
V10M10_IM_EN_10192006
OPERATIONAL INSTRUCTIONS
Listening to Other Audio Devices
You can still listen to the first and second generations of iPod, or any other audio player that is not an iPod, with i177 by simply using the LINE-IN jack,
located on the rear of i177. Please ensure that before using the LINE-IN jack there is no iPod in the built-in universal dock.
1.
Insert the plug of the audio patch cord (not included) into the HEADPHONE or LINE-OUT jack on your audio device, and then insert the other end of
the patch cord into the LINE-IN jack, located on the rear of i177.
2.
To get into the AUX mode, press the AUX button on i177, or the AUX on the Remote Control, until the AUX icon appears.
3.
At this point it is safe to turn ON your device and enjoy the music.
4.
Use the VOLUME wheel on the i177, or the Volume + and Volume – buttons on the Remote Control to adjust the decibel level. You may also need to
5.
To power OFF the unit, press the POWER OFF button on i177 (or on the Remote Control). Please don’t forget to power off your audio device too.
adjust the audio device volume.
Listening to Your Favorite Radio Station
For the best FM radio clarity, fully extend the pig-tail wire antenna, located on the rear of the i177. It is important not to alter, obstruct or attach other
antennas to this wire antenna. To achieve the best AM reception, a distance of 12” between the AM antenna, the unit and iPod is recommended. Rotate the
AM loop antenna to have the better reception.
1.
To turn the radio on, press the BAND/RADIO button on the i177 (or on the Remote Control). Once on, the radio frequency will appear in the lower right
corner of the display.
2.
To select AM or FM, press the BAND/RADIO button again on the i177 (or on the Remote Control).
3.
To tune in a desired station, rotate the SEARCH wheel on the i177 (or use the or buttons on the Remote Control).
4.
To scan to the next clear station, press and hold the or buttons on the Remote Control for 4 seconds. Press again to enter the seek mode.
5.
To adjust the volume, rotate the VOLUME wheel on the i177 (or the VOLUME+ and VOLUME- buttons on the remote control).
6.
To power OFF, press the POWER OFF button (or the POWER ON/OFF button on the Remote Control).
- 13 -
www.i-Luv.com
Stereo Audio System for Your iPod
V10M10_IM_EN_10192006
OPERATIONAL INSTRUCTIONS
Using the Alarm Function
1.
To preview the alarm time, press the ALARM 1 or ALARM 2 buttons once.
2.
To activate or deactivate the alarm, press the ALARM 1 or ALARM 2 buttons once more.
3.
To snooze, press the SNOOZE / DIMMER button on the i177 (or on Remote Control), following the sounding of the alarm. The alarm will then shut off
and will sound again in approximately 9 minutes. You will have the opportunity to repeat this cycle many times during a 1 hour allotted alarm cycle.
4.
To turn the alarm off, press the POWER OFF button on the i177 (or the POWER ON/OFF button on the Remote Control). If all settings remain the
same, the alarm will turn on the following day at the same time. When the alarm is not turned off after it sounds, it will then play for approximately 60
minutes and turn off automatically. This cycle will repeat every 24 hours unless the controls are changed.
5.
To prevent the alarm from coming on daily, press the ALARM 1 or ALARM 2 buttons and set to off. Both the Alarm Icon and Wake-to icon will
disappear to signal that the alarm is deactivated.
Notes on Alarm Function:
•
Set your iPod to the repeat mode if you’ve selected Wake To iPod, and your iPod has less than one hour of songs.
•
If you have selected the Wake To iPod setting, yet no iPod is present or there is no music on the iPod at the alarm time, the i177 will automatically
switch to the buzzer mode.
•
In order to wake to your iPod, it must be appropriately placed in the built-in universal dock and powered off. If it is in the play mode no alarm will sound.
•
In the event of a power outage or if AC power is disconnected, when the i177 is powered by the Backup Battery, the alarm will NOT sound and time
and date will not be displayed. Time and date settings, however, will be temporarily saved.
Adjusting the Brightness of LCD Screen
To adjust the brightness of the LCD screen, press the SNOOZE / DIMMER button during normal operation. Each press will change the brightness level of
the LCD screen.
- 14 -
www.i-Luv.com
Stereo Audio System for Your iPod
V10M10_IM_EN_10192006
OPERATIONAL INSTRUCTIONS
Setting the Sleep Time
1.
To enter into sleep mode, press the SLEEP button while the i177 is off or while listening to your iPod or the radio. The unit will automatically turn off
after the selected time. The sleep mode also has a feature called the “Gentle Sleep”, which gradually decreases the volume.
2.
To adjust the sleep time, press the SLEEP button again and choose from 15 to 120 minutes. Pressing the SLEEP button while the sleep function is set
to 15 minutes will turn the unit off.
3.
To view the sleep time, wait until the display returns to the current time and press the SLEEP button once. It will display the sleep time remaining. Press
again to change the sleep time to the next lowest increment.
4.
To stop listening at any time, press the POWER OFF button or the POWER ON/OFF button on the Remote Control.
Note: The i177 has independent volume settings for the sleep mode which will not affect the alarm volume. The sleep volume will remain at the same level
until the setting is changed.
- 15 -
www.i-Luv.com
Stereo Audio System for Your iPod
V10M10_IM_EN_10192006
MAINTENANCE & TROUBLESHOOTING GUIDE
Maintenance
•
•
Place the unit on a level surface away from sources of direct sunlight or excessive heat.
Protect your furniture. When placing the unit on a natural wood and lacquered finish, a cloth or other protective material should be placed between it
and the furniture.
•
Clean the unit with a soft cloth moistened only with mild soap and water. Stronger cleaning agents, such as Benzine, thinner or similar materials can
damage the surface of the unit.
Troubleshooting
•
•
The stereo speaker system (i177) does not turn on.
o
The AC adapter may not be connected properly. Check the connection.
o
The wall outlet may not function. Try another outlet.
Your iPod does not fit into the built-in universal dock.
o
o
The installed dock adapter is not the correct one. Check whether a correct dock adapter is installed.
There might be some obstructions on the dock. Check whether there are any obstructions on the connector and on the dock. If everything is
secured, place your iPod back into the dock.
•
It does not recognize your iPod when docked.
o
Your iPod may not be properly docked. Take your iPod out of the dock, and remove any obstructions on the connector from the dock and on
your iPod. Place your iPod back into the dock.
o
Your iPod is frozen or locked up. Check whether your iPod operates correctly before placing it back into the dock. Please refer to the owner’s
instruction manual of your iPod.
o
The software of your iPod is outdated. Upgrade the software on your iPod. For the details on how to upgrade the software on your iPod,
please visit Apple Computer’s website: http://www.apple.com.
o
You are using the first or second generation iPod. The i177 does not recognize first or second generation iPod. Use the line-in jack for the
first or second generation of iPod.
- 16 -
www.i-Luv.com
Stereo Audio System for Your iPod
V10M10_IM_EN_10192006
MAINTENANCE & TROUBLESHOOTING GUIDE
Troubleshooting – Continued
•
Your iPod is not charged even though it is in the dock.
o
Your iPod might not be properly docked. Take your iPod out of the dock, and remove any obstructions on the connector from the dock and on
your iPod. Place your iPod back into the dock.
o
Your iPod is frozen or locked up. Check whether your iPod operates correctly before placing it back into the dock. Please refer to the owner’s
instruction manual of your iPod.
o
You are using the first, second, or third generation of iPod. First, second, and third generation of iPod is only charged with the FireWire
connection. The FireWire connection is not supported by the i177.
•
There is no sound on the external speakers when connected by the audio patch cable.
o
The connected speakers lack a power source. Check if the external speakers are powered properly.
o
You are using passive speakers, which have no built-in amplifier. The signal from LINE IN/OUT jacks needs to be amplified. Use the active
speakers, which have a built-in amplifier.
•
•
It does not find any AM radio stations, or there is a lot of static on a radio station.
o
The AM loop antenna is not connected to the i177. Connect the AM loop antenna to the jack on the back of the i177.
o
The i177 is installed where the reception is bad. Move the AM loop antenna around keeping it away from the main unit for the best reception.
When playing music, the sound gets distorted.
o
The volume level on the connected device or the i177 is set too high. Decrease the volume until the distortion has disappeared.
o
The source sound is distorted. If the original sound source (MP3) on your iPod is poor quality, the distortion and noises are easily noticed with
high-power speakers. Try a different audio source like a music CD to test.
•
The remote control does not operate properly.
o
The installed battery is weak. Replace with a new battery.
o
It is not aimed to the i177 or too far away from it. Move within 10 feet of the unit and point the remote control toward the i177.
- 17 -
www.i-Luv.com
TEL: 516-626-7188
FAX: 516-626-7105
website: www.i-Luv.com
e-mail: [email protected]
iLuv is a trademark of jWIN Electronics Corp. iPod is a trademark of Apple Computer Inc. All logos and brands are property of their respective owners. iPod
is not included in this package. Features and specifications are subject to change without prior notification.
© 2006 jWIN Electronics Corp. All rights reserved. No portion of this printing material or product enclosed herewith including design, shape and graphics,
may be not reproduced or transmitted in any form without the expressed written consent of jWIN Electronics Corp. by any means, electronics or mechanical,
including photocopy, recording or information storage and retrieval system. Any unauthorized distribution or reproduction of this printing material or product,
or any portion there of, will be prosecuted to the fullest possible extent of the law. iPod is not included with this product.