1
KD-S37
GET0699-002A
Installation/Connection Manual
Manual de instalación/conexión
0710DTSMDTJEIN
EN, SP
© 2010 Victor Company of Japan, Limited
[J]
ENGLISH
ESPAÑOL
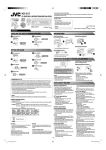
PREPARATIONS / PREPARATIVOS
You need the installation kits which corresponds to your car. / Utilice los kits de instalación que correspondan a su vehículo.
• Mark all the check boxes ( ) to make sure you have follow the instructions and the listed parts. / Marque todas las casillas (
las piezas mencionadas.
) para cerciorarse de que se han seguido las instrucciones, y de tener
Prepare this before installation / Prepare esto antes de la instalación
Check the battery system in your car / Verifique el sistema de batería de su vehículo
12 V DC, NEGATIVE ground / 12 V CC, NEGATIVO a masa
Parts list for installation and connection / Lista de piezas para instalación y conexión
A
Control panel
Panel de control
B
Sleeve / Cubierta
E
Handles / Manijas
F
Remote controller / Battery
Control remoto / Pila
C
Trim plate / Placa
de guarnición
D
Power cord / Cordón
de alimentación
INSTALLATION / INSTALACION
The following illustration shows a typical installation. If you have any questions or require information regarding installation kits, consult your JVC car audio dealer or a company supplying
kits. / La siguiente ilustración muestra una instalación típica. Si tiene alguna pregunta o necesita información acerca de las herramientas para instalación, consulte con su concesionario de JVC
de equipos de audio para automóviles o a una compañía que suministra tales herramientas.
In-dash mounting / Montaje en el tablero de instrumentos
See “ELECTRICAL CONNCECTIONS” on page 2.
/ Véase “CONEXIONES ELÉCTRICAS” en la
página 2.
When installing the unit without using the sleeve / Instalación de la unidad sin utilizar la
cubierta
In a Toyota car for example, first remove the car radio and install the unit in its place.
En un automóvil Toyota, por ejemplo, en primer lugar desmonte el autorradio e instale la unidad
en su lugar.
Removing the unit / Extracción de la unidad
Release the rear section first... / Primero libere la
sección trasera...
PRECAUTIONS on power supply and speaker connections / PRECAUCIONES
sobre las conexiones de la fuente de alimentación y de los altavoces
8 mm (3/8" / 3/8 pulgada)
Flat head screws / Tornillos tipo plano—
M5 × 8 mm (3/8" / 3/8 pulgada) *2
Pocket /
Compartimiento
Bracket / Ménsula *2
*1 Al poner la unidad vertical, tenga cuidado de no dañar el fusible provisto en la parte posterior.
*2 No suministrado con esta unidad.
*1 When you stand the unit, be careful not to damage the fuse on the rear.
*2 Not supplied for this unit.
TROUBLESHOOTING / LOCALIZACIÓN DE AVERIAS
• The fuse blows. ] Are the red and black leads connected correctly?
• Power cannot be turned on. ] Is the yellow lead connected?
• No sound from the speakers. ] Is the speaker output lead short-circuited?
• “PROTECT” appears on the display and no operation can be done. ] Is the speaker
output lead short-circuited or touches the chassis of the car/head unit? ; Have you reset your
unit?
• Sound is distorted. ] Is the speaker output lead grounded? ; Are the “–” terminals of L and R
speakers grounded in common?
• Noise interfere with sounds. ] Is the rear ground terminal connected to the car’s chassis
using shorter and thicker cords?
• This unit becomes hot. ] Is the speaker output lead grounded? ; Are the “–” terminals of L
and R speakers grounded in common?
• This unit does not work at all. ] Have you reset your unit?
Install_KD-S37[J]_f.indd 1
1
• El fusible se quema. ] ¿Están los conductores rojo y negro correctamente conectados?
• No es posible conectar la alimentación. ] ¿Está el cable amarillo conectado?
• No sale sonido de los altavoces. ] ¿Está el cable de salida del altavoz cortocircuitado?
• Aparece “PROTECT” en la pantalla y no se puede realizar ninguna operación. ] ¿El
conductor de salida de altavoz está en cortocircuito o en contacto con el chasis del automóvil/
auriculares? ; ¿Reinicializó la unidad?
• El sonido presenta distorsión. ] ¿Está el cable de salida del altavoz conectado a masa? / ¿Están
los terminales “–” de los altavoces L y R conectados a una masa común?
• Perturbación de ruido. ] ¿El terminal de tierra trasero está conectado al chasis del automóvil
utilizando los cordones más corto y más grueso?
• La unidad se calienta. ] ¿Está el cable de salida del altavoz conectado a masa? / ¿Están los
terminales “–” de los altavoces L y R conectados a una masa común?
• Este receptor no funciona en absoluto. ] ¿Reinicializó el receptor?
7/8/10 3:55:30 PM
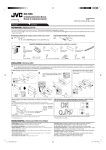
ELECTRICAL CONNECTIONS / CONEXIONES ELECTRICAS
Make sure to disconnect the battery’s negative terminal. / Asegúrese de desconectar el terminal negativo de la batería.
• Be sure to ground this unit to the car’s chassis again after installation. / Asegúrese de volver a conectar a masa esta unidad al chasis
del automóvil después de la instalación.
High / Alta
Note / Nota:
Heat sink / Sumidero térmico
It is recommended to connect to the speakers with maximum power of more than 50 W (both at the rear and at the front, with an impedance of 4 Ω to 8 Ω).
If the maximum power is less than 50 W, change <AMP GAIN> setting to prevent the speakers from being damaged (see page 28 of the INSTRUCTIONS). /
Se recomienda conectar los altavoces con una potencia máxima de más de 50 W (tanto atrás como adelante, con una impedancia de 4 Ω a 8 Ω). Si la potencia
máxima es de menos de 50 W, cambie <AMP GAIN> para evitar daños en los altavoces (consulte la página 28 del MANUAL DE INSTRUCCIONES).
Connecting the external amplifiers or subwoofer / Conexión de los amplificadores o subwoofer externos
Y-connector / Conector en Y *4
To the blue (white stripe) lead of
the unit / Al conductor azul (rayas
blancas) de la unidad
Remote lead / Cable remoto
Signal cord /
Cable de señal *4
Reset the unit. / Reinicialice el
receptor.
Rear speakers or subwoofer (Make the <L/O MODE> setting accordingly,
see page 27 of the INSTRUCTIONS.) / Altavoces traseros o subwoofer
(Realice el ajuste <L/O MODE> de conformidad, consulte la página 27
del MANUAL DE INSTRUCCIONES).
JVC Amplifier /
Amplificador de JVC
Y-connector / Conector en Y *4
To the blue (white stripe) lead of
the unit / Al conductor azul (rayas
blancas) de la unidad
Remote lead / Cable remoto
Signal cord /
Cable de señal *4
JVC Amplifier /
Amplificador de JVC
Front speakers / Altavoces
delanteros
Rear ground terminal / Terminal de tierra posterior
Antenna input /
Entrada de antena
15 A fuse /
Fusible de 15 A
White / Blanco
Front speaker (left) /
Altavoz delantero
(izquierdo)
Expansion port /
Puerto de expansión
IMPORTANT: A custom wiring harness (separately purchased) which is suitable for your car
is recommended for connection between the unit and your car.
• Consult your JVC car audio dealer or a company supplying kits for details.
IMPORTANTE: Para la conexión entre la unidad y su vehículo, se recomienda utilizar un
mazo de cables personalizado (vendido separadamente) que sea adecuado para su vehículo.
• Si desea información más detallada, consulte con su distribuidor de equipos de Car audio
JVC o con una compañía proveedora de kits.
Black / Negro
To the metallic body or chassis of the car /
A un cuerpo metálico o chasis del automóvil
Yellow / Amarillo *5
To a live terminal (constant 12 V) /
A un terminal activo (12 V constantes)
Red / Rojo
To an accessory terminal / A un terminal
para accesorios
White (black stripe) / Blanco (rayas negras)
Gray / Gris
Front speaker (right) /
Altavoz delantero
(derecho)
Gray (black stripe) / Gris (rayas negras)
Green / Verde
Rear speaker (left) /
Altavoz trasero
(izquierdo)
Green (black stripe) / Verde (rayas negras)
Purple / Púrpura
Rear speaker (right) /
Altavoz trasero
(derecho)
Purple (black stripe) / Púrpura (rayas negras)
Blue (white stripe) / Azul (rayas
blancas)
Ignition switch /
Interruptor de encendido
Fuse block /
Bloque de fusibles
To the remote lead of other equipment or automatic antenna if any
(200 mA max.) / Al conductor remoto de otro equipo o de la antena
automática, si hubiere (máx. 200 mA)
Orange (white stripe) / Naranja
(rayas blancas)
To car light control switch / Al interruptor de control de las luces del
automóvil
Connecting the external components in series / Conexión de componentes externos en serie
When connecting the external components, refer also to the manuals supplied for the components and adapter. / Cuando conecte componentes externos, consulte, también, los manuales
suministrados con los componentes y el adaptador.
Not recommended... / No recomendado...
Expansion port of the unit
/ Puerto de expansión de la
unidad
To disconnect the
connector / Para
desconectar el cable
KD-S37
Two components / Dos componentes:
A KT-HD300 *6 / KS-SRA100 *6 *7 / KS-BTA200 / XMDJVC100 / CNP2000UC *6 *8
B *9 KS-U57 / KS-U58
Three components / Tres componentes:
A KT-HD300 *6 / KS-SRA100 *6 *7 / XMDJVC100 / CNP2000UC *6 *8
B KS-BTA200
C *9 KS-U57 / KS-U58
Caution / Precaucion:
Before connecting the external components, make sure that the unit
is turned off. / Antes de conectar los componentes externos, asegúrese
de que la unidad esté apagada.
You can connect the HD Radio ™ tuner box (KT-HD300) or the following components through the various JVC adapters or system to the expansion port. / Puede conectar el sintonizador HD Radio™
(KT-HD300) o los siguientes componentes al puerto de expansión, a través de los diversos adaptadores o sistema JVC.
• Connection cords may need to be purchased separately. / Puede ser necesario comprar los cables de conexión por separado.
Component / Componente
Adapter/System / Adaptador/Sistema
Model name / Nombre del modelo
Bluetooth device / Dispositivo Bluetooth
Bluetooth adapter / Adaptador Bluetooth
KS-BTA200
XMDirect ™ Tuner Box / XMDirect ™ Tuner Box
Smart Digital Adapter / Adaptador digital inteligente
XMDJVC100
XMDirect2 Tuner System / Sistema de sintonizador XMDirect2
XM satellite radio System / Sistema de radio XM Satellite
SIRIUS satellite radio System / Sistema de radio satelital SIRIUS
SIRIUS satellite radio / Radio por satélite SIRIUS
CNP2000UC, CNPJVC1
SC-C1, KS-SRA100
PnP, SC-VDOC1, KS-SRA100
Portable audio player with line output jacks / Reproductor de audio portátil con jacks de salida de línea Line input adapter / Adaptador de entrada por línea
KS-U57
Portable audio player with 3.5 mm (3/16") stereo mini jack / Reproductor de audio portátil con
jack mini estéreo de 3,5 mm (3/16 pulgada)
KS-U58
AUX input adapter / Adaptador de entrada AUX
XM Radio and SIRIUS satellite radio cannot be used together. / No puede utilizar juntas la radio XM y la radio satelital SIRIUS.
• HD Radio ™ is a proprietary trademark of iBiquity Digital Corp. / HD Radio ™ es una marca comercial de iBiquity Digital Corp.
*3 Firmly attach the ground wire to the metallic body or to the chassis of the car—to the place uncoated with
paint.
*4 Not supplied for this unit.
*5 Before checking the operation of this unit prior to installation, this lead must be connected; otherwise,
the power cannot be turned on.
*6 You need to connect the power cord supplied for the component separately.
*7 This model is a component of SIRIUS satellite radio System.
*8 This model is a component of XM satellite radio System.
*9 To use these components, set the external input setting correctly ( see page 28 of the INSTRUCTIONS ).
Install_KD-S37[J]_f.indd 2
2
*3 Fije firmemente el cable de tierra a la carrocería metálica o al chasis—a un lugar no cubierto con pintura.
*4 No suministrado con esta unidad.
*5 Antes de comprobar el funcionamiento de esta unidad previa a de la instalación, es necesario conectar este
cable, de lo contrario no se podrá conectar la alimentación.
*6 Es necesario conectar, aparte, el cable de alimentación suministrado con el componente.
*7 Este modelo es un componente del sistema de radio satelital SIRIUS.
*8 Este modelo es un componente del sistema de radio XM Satellite.
*9 Para utilizar estos componentes, configure el ajuste de entrada externa correctamente (consulte la página
28 del MANUAL DE INSTRUCCIONES).
7/8/10 3:55:31 PM