1
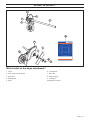
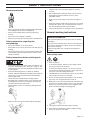
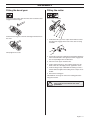
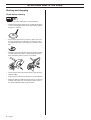
GB Operator´s manual
EDGER
FR Manuel d'utilisation
ACCESSOIRE
ES Manual de instrucciones
SUPLEMENTO
Please read these instructions carefully
and make sure you understand them
before using the machine.
ATTACHMENT
EA 850
TRANCHE-BORDURE
CORTABORDES
Lire attentivement et bien assimiler le
manuel d’utilisation avant d'utiliser la
machine.
EA 850
EA 850
Lea detenidamente el manual de
instrucciones y asegúrese de entender
su contenido antes de utilizar la máquina.
GB FR ES
CONTENTS
Contents
CONTENTS
Contents ......................................................................
Note the following before starting: ................................
WHAT IS WHAT?
What is what on the edger attachment? ......................
SAFETY INSTRUCTIONS
Machine′s safety equipment ........................................
General safety precautions ..........................................
General working instructions .......................................
Basic working techniques ............................................
ASSEMBLY
Fitting the bevel gear ...................................................
Fitting the cutter ...........................................................
STARTING AND STOPPING
Star ting and stopping ...................................................
MAINTENANCE
Bevel gear ....................................................................
Lubricating the flexible drive shaft ................................
Adjusting the edger’s cutting depth ..............................
Maintenance schedule .................................................
TECHNICAL DATA
Technical data ..............................................................
Note the following before starting:
2
2
3
4
4
5
6
7
7
Please read the operator’s manual carefully and make sure
you understand the instructions before using the machine.
These instructions supplement the instructions that were
included with the machine. For other procedures, please refer
to the operating instructions for the machine.
Husqvarna AB has a policy of continuous product
development and therefore reserves the right to modify the
design and appearance of products without prior notice.
Long-term exposure to noise can result in permanent hearing
impairment. So always use approved hearing protection.
!
8
9
9
9
9
9
!
WARNING! Under no circumstances may the
design of the machine be modified without
the permission of the manufacturer. Always
use genuine accessories. Non-authorized
modifications and/or accessories can result
in serious personal injury or the death of the
operator or others.
WARNING! This accessory may only be used
together with the intended clearing saw/
trimmer, see under heading ”Approved
accessories” in chapter Technical data in the
machine’s Operator’s Manual.
The machine is only designed for edging lawns.
2 – English
WHAT IS WHAT?
2
4
3
5
1
10
4
1
6
7
8
9
What is what on the edger attachment?
1
Cutter
6
Locking knob
2
Grease filler cap, bevel gear
7
Drive disc
3
Bevel gear
8
Support flange
4
Blade guard
9
Locking nut
5
Shaft
10 Operator′s manual
English
–3
SAFETY INSTRUCTIONS
Machine′s safety equipment
Cutting equipment
This section describes the machine′s safety equipment, its
purpose, and how checks and maintenance should be carried
out to ensure that it operates correctly. See the ”What is
what?” section to locate where this equipment is positioned
on your machine.
The cutter is designed and manufactured to withstand the
loads that edging of a lawn involves.
The life span of the machine can be reduced and the risk of
accidents can increase if machine maintenance is not carried
out correctly and if service and/or repairs are not carried out
professionally. If you need further information please contact
your nearest service workshop.
!
!
WARNING! Never use a machine with faulty
safety equipment. The machine’s safety
equipment must be checked and maintained
as described in this section. If your machine
fails any of these checks contact your
service agent to get it repaired.
WARNING! Always stop the engine before
you work on any part of the cutting
equipment. This continues to move even
after the throttle is released. Check that the
cutting equipment has stopped completely
and remove the HT lead from the spark plug
before you start any work on it.
Check the cutting attachment for damage or cracks. A
damaged cutting attachment should always be replaced.
Locking nut
The locking nut secures the cutting attachment on the output
shaft.
Protect your hand from injury when assembling, use the blade
guard as protection when tightening with a socket spanner.
Cutting attachment guard
This guard is intended to prevent loose objects from being
thrown towards the operator. The guard also protects the
operator from accidental contact with the cutting attachment.
When fitting, tighten the nut in the opposite direction to the
direction of rotation of the cutting attachment. To remove it,
undo the nut in the same direction as the cutting attachment
rotates. (CAUTION! The nut has a left-hand thread.)
CAUTION! The nylon lining inside the locking nut must not be
so worn that you can turn it by hand. The lining should offer a
resistance of at least 1.5 Nm. The nut should be replaced
after it has been put on approx. 10 times.
General safety precautions
•
•
Check that the guard is undamaged and not cracked.
Replace the guard if it has been exposed to impact or is
cracked.
Only use cutting attachments with the guards we
recommend! See the chapter on Technical data.
!
!
WARNING! The machine can cause serious
personal injury. Read the safety instructions
carefully. Learn how to use the machine.
WARNING! A faulty cutting attachment may
increase the risk of accidents.
CAUTION! Please read the operator’s manual carefully and
make sure you understand the instructions before using the
machine.
4 – English
SAFETY INSTRUCTIONS
Personal protection
•
Check that the cutter and cutter guard are correctly
secured.
•
When adjusting the carburettor make sure the cutter is
held against the ground and that no-one is in the
immediate vicinity.
•
Make sure the cutter always stops when the engine is
idling.
•
Make sure that the handle and safety features are in good
working order. Never use a machine that lacks a part or
has been modified outside its specifications.
Only use the machine for the purpose it was intended for.
•
Always wear boots and other equipment described under
the heading Personal protective equipment.
•
•
Always wear working clothes and heavy-duty long
trousers.
General working instructions
•
Never wear loose clothing or jewellery.
•
Make sure your hair does not hang below shoulder level.
IMPORTANT INFORMATION
This section describes the basic safety rules for working
with edgers.
Safety instructions regarding the
surroundings
•
Never allow children to use the machine.
•
Ensure that no-one comes closer than 15 m while you are
working.
•
Never allow anyone else to use the machine without first
ensuring that they have understood the contents of the
operator’s manual.
If you encounter a situation where you are uncertain how to
proceed you should ask an expert. Contact your dealer or
your service workshop.
Avoid all usage which you consider to be beyond your
capability.
Basic safety rules
Safety instructions before starting work
•
•
•
Inspect the working area. Remove all loose objects, such
as stones, broken glass, nails, steel wire, string, etc. that
could be thrown out or become wrapped around the cutter
or cutter guard.
Keep unauthorised persons at a distance. Children,
animals, onlookers and helpers should be kept outside the
safety zone of 15 m. Stop the machine immediately if
anyone approaches.
Check the entire machine before starting. Replace
damaged parts. Check that there are no fuel leaks and
that all guards and covers are complete and fastened
securely. Check all nuts and screws.
•
Check that the cutter is not cracked or damaged in any
other way.
•
Make sure the cutter guard is fitted and not damaged.
1
Look around you:
•
To ensure that people, animals or other things cannot
affect your control of the machine.
•
To ensure that people, animals, etc., do not come into
contact with the cutting attachment or loose objects that
are thrown out by the cutting attachment.
•
CAUTION! Do not use the machine unless you are able to
call for help in the event of an accident.
2
Do not use the machine in bad weather, such as dense
fog, heavy rain, strong wind, intense cold, etc.
3
Make sure you can move and stand safely. Check the area
around you for possible obstacles (roots, rocks, branches,
ditches, etc.) in case you have to move suddenly. Take
great care when working on sloping ground.
4
The engine must be switched off before moving.
5
Never put the machine down with the engine running
unless you have it in clear sight.
English
–5
SAFETY INSTRUCTIONS
Basic working techniques
!
Safety instructions while working
•
Always ensure you have a safe and stable working
position.
•
Always use both hands to hold the machine. Hold the
machine at the side of your body.
!
WARNING! Sometimes grass or stones can
get trapped in the cutter guard and cutter.
Always stop the engine before cleaning.
WARNING! Watch out for thrown objects.
Always wear approved eye protection. Never
lean over the cutting attachment guard.
Stones, rubbish, etc. can be thrown up into
the eyes causing blindness or serious injury.
Safety instructions after completing work
•
Use your right hand to control the throttle setting.
•
Make sure that your hands and feet do not come near the
cutting attachment when the engine is running.
•
When the engine is switched off, keep your hands and feet
away from the cutting attachment until it has stopped
completely.
•
Always carry out edging at full throttle.
•
Always keep the cutter close to the ground.
•
Always slow the engine to idle speed after each working
operation. Long periods at full throttle without any load on
the engine (i.e. without the resistance that the cutting
attachment exerts on the engine when you are using the
machine) can lead to serious engine damage.
•
Be especially careful when pulling the edger towards you
during work.
•
If any foreign object is hit or if vibrations occur stop the
machine immediately. Disconnect the HT lead from the
spark plug. Check that the machine is not damaged.
Repair any damage.
6 – English
•
Make sure the cutting attachment has stopped before
cleaning, carrying out repairs or an inspection.
Disconnect the HT lead from the spark plug.
•
Always wear heavy-duty gloves when repairing the cutting
attachment. This is extremely sharp and can easily cause
cuts.
•
Store the machine out of reach of children.
•
Use only original spare parts for repairs.
ASSEMBLY
Fitting the bevel gear
Fitting the cutter
Fit the bevel gear on the shaft. Turn the cutter so that the shaft
engages in the bevel gear.
Fit the cutter as follows:
Position the bevel gear so that the slot aligns with the line on
the shaft.
1
Fit the drive disc (A) on the output shaft. Make sure that
the edge that engages in the hole in the cutter is facing
outwards.
2
Prevent the cutter from rotating by inserting the locking pin
in the hole behind the cutter guard, so that it engages it in
the corresponding hole in the drive disc.
3
Place the cutter (B) on the drive disc.
4
Fit the support flange (C). The support flange must be
fitted so that its outer edge presses against the cutter.
5
Fit the locking nut (D). CAUTION! The locking nut has a
left-hand thread. Tighten the locking nut to a torque of 3550 Nm.
6
Remove the locking pin.
Firmly tighten the screw.
CAUTION! Do not forget to remove the locking pin before
using the machine.
!
WARNING! Under no circumstances may the
edger cutter be used without the cutter
guard fitted.
English
–7
STARTING AND STOPPING
Starting and stopping
Check before starting
•
For safety reasons follow these recommendations!
•
Check that the support flange is not cracked due to fatigue
or due to being tightened too much. Discard the support
flange if it is cracked.
•
Ensure the locking nut has not lost its captive force. The
nut lock should have a locking force of at least 1.5 Nm.
The tightening torque of the locking nut should be 35-50
Nm.
•
Check that the cutter and cutter guard are not damaged or
cracked. Replace the cutter or cutter guard if they have
been exposed to impact or if they are cracked.
•
Check that the cutting attachment always stops when the
engine is idling.
•
Only use the machine for the purpose it was intended for.
•
Make sure that the handle and safety features are in good
working order. Never use a machine that lacks a part or
has been modified outside its specifications.
8 – English
MAINTENANCE
Bevel gear
Maintenance schedule
Below you will find some general maintenance instructions. If
you need further information please contact your service
workshop.
The bevel gear is filled with the right quantity of grease at the
factory. However, before using the machine you should check
that the bevel gear is filled three-quarters full with grease. Use
HUSQVARNA special grease.
The grease in the bevel gear does not normally need to be
changed except if repairs are carried out.
Lubricating the flexible drive shaft
Inside the hollow drive shaft of the edger is a flexible drive
shaft. This flexible drive shaft should be regularly lubricated
every 25 hours in operation. Loosen the two screws on the
bevel gear and remove it. The flexible drive shaft is easily
removed from the hollow shaft by taking a firm grip on the shaft
end. Lubricate the entire length of the flexible drive shaft and
reinsert it in the hollow drive shaft. Turn the shaft while
inserting it so that it correctly engages in the clutch. Refit the
bevel gear on the hollow drive shaft and tighten the two screws.
Daily maintenance
1
Check that the cutter does not rotate when the engine is
idling.
2
Check that the guard is undamaged and not cracked.
Replace the guard if it has been exposed to impact or is
cracked.
3
Check that the cutter is undamaged and not cracked.
Replace the cutter if necessary.
4
Check that the locking nut is tight.
Weekly maintenance
1
Check that the bevel gear is filled three-quarters full with
lubricant. Fill if necessary using special grease.
2
The flexible drive shaft must be lubricated every 25
working hours or more frequently.
Technical data
Technical data
Adjusting the edger’s cutting depth
Weight, Lbs/kg
1,6
Blade length, mm
195
Centre hole, blade, inch/mm
1 / 25,4
Speed, blade, rpm
7140
The cutting depth must be adjusted before starting work.
• Loosen the locking knob (A) and rotate the guard by
moving the locking knob forwards or backwards. If the
locking knob is moved forwards (away from the machine)
the cutting depth is increased. If the locking handle is
moved backwards (towards the machine) the cutting
depth is reduced.
A
•
•
Set the desired cutting depth.
Lock the locking knob.
English
–9
1150309-20
´®z+R>|¶0z¨
´®z+R>|¶0z¨
2006-10-03